
Mapeheat
™
Thermo Connect
Operating Manual
Technology from


1
Table of Contents
Introduction ..................................................................................................................................... 2
System Tests .....................................................................................................................................3
Setup Wizard ....................................................................................................................................3
GFCI .........................................................................................................................................................3
Section 1: Home Screen ........................................................................................ 4
1.1 Temporary bypass and hold options ............................................ 5
1.2 Energy use ......................................................................................................... 5
1.3 Settings ................................................................................................................ 6
Section 2: Setup/Preferences .............................................................................7
2.1 Language ........................................................................................................... 7
2.2 Date ........................................................................................................................ 7
2.3 Time ........................................................................................................................ 7
2.4 Unit ..........................................................................................................................8
2.5 Operating mode ........................................................................................... 8
2.6 Temperature control ..................................................................................9
2.7 Temperature display ..................................................................................9
2.8 Floor type ......................................................................................................... 10
2.9 “Early Start” ..................................................................................................... 10
2.10 Floor limit ...........................................................................................................11
2.11 Screen brightness ........................................................................................11
2.12 Screensaver ......................................................................................................11
Section 3: Program/Schedule ........................................................................... 12
Section 4: Wi-Fi Settings .................................................................................... 13
Section 5: Weather Settings ..............................................................................14
Section 6: Thermostat Information ...............................................................14
Section 7: Factory Reset ...................................................................................... 15
Section 8: Wi-Fi Troubleshooting ...................................................................16
Section 9:
Connect to Google Assistant, Amazon Alexa or IFTTT
............... 17

2
Introduction
Thank you for choosing Mapeheat Thermo Connect thermostat.
You have chosen the most advanced thermostat to control your
Mapeheat Floor-Heating System. This manual will cover each of the
features of the Mapeheat Thermo Connect thermostat.

3
System Tests
Setup Wizard
GFCI
The Mapeheat Thermo Connect thermostat features a series of
diagnostic tests to conrm that the thermostat is installed and
functioning properly.
The System Tests option is available the rst time that the
thermostat is connected to power or after a factory reset is initiated.
The Mapeheat Thermo Connect thermostat features a Setup Wizard to guide you through the
basic setup process.
The Setup Wizard is available the rst time the thermostat is connected to power or after a
factory reset is initiated. Refer to Section 6 on Page 15.
The Mapeheat Thermo Connect thermostat has a built-in GFCI (ground-fault circuit interrupter).
The GFCI protects against risks of electrocution caused by a current leakage. If the current leakage
exceeds 5 mA, the GFCI will automatically be triggered, thus cutting power to the oor heating
system. To indicate the fault, a message will appear on the screen informing you of the fault. To
reset the GFCI, press the button on the right side of the thermostat. If problem persists, contact
MAPEI’s Technical Services Department at 1-800-992-6273 (USA) or 1-800-361-9309 (Canada).

4
Section 1: Home Screen
1. Change date and time
2. Access Wi-Fi settings
3. Access weather forecast (Wi-Fi connection required)
4. Current temperature
5. Target temperature or setpoint
6. Operating mode: The Auto* mode means that the thermostat is following a program/
schedule. The Manual mode means that the thermostat is not following a program/
schedule and is being controlled manually. Refer to Section 2.5 on Page 8.
7. Increase the temperature
8. Decrease the temperature
9. Heating indicator: When visible, system is heating
10. Access “Energy Use” data
11. Access “Settings” menu
* When the thermostat is in Auto mode:
• “Resume Programmed Schedule”: This phrase only appears if the temperature is
manually increased/decreased.
• “Hold Options”: This phrase only appears if the temperature is manually increased/
decreased. Refer to Section 1.1 on Page 5.
1
2
3
5
6
7
4
8
9
10 11

5
Section 1: Home Screen
Section 1.1: Temporary bypass and hold
options
If the thermostat is following the program/schedule (in Auto mode),
you can temporarily bypass the programmed temperature by
pressing the
↑
or
↓
button until the desired “Set To” temperature
is displayed. The thermostat will maintain this temperature until the
start of the next period.
1. Press “Resume Program” to cancel the temporary bypass.
2. Press “Hold Options” to access more options.
Hold Options
The Mapeheat Thermo Connect thermostat allows you to set the
duration you want for the temporary bypass temperature.
1. Change the duration of the hold time by pressing the
↑
or
↓
arrows.
2. Alternatively, press “Permanent Hold” to hold the temporary
bypass temperature indenitely.
3. Press “Cancel” to ignore the change or press “Save” to conrm.
4. On the home screen, press “Resume Program” to cancel the
temporary bypass.
Section 1.2: Energy use
The Mapeheat Thermo Connect thermostat tracks the amount of
time that your oor-heating system has been heating.
1. Press “Day/Week/Year” to view the different time ranges.
2. Press “Back” to return to the home screen.
Note that the thermostat cycles the heating on and off in order to
maintain the desired setpoint temperature. Actual heating time is
normally a percentage of the scheduled “On” time.
For example, let’s say that the thermostat is programmed to turn on
at 5:00 p.m. and turn off at 8:00 p.m. The total “On” time is 3 hours,
but the number of hours that the system is actually heating may be
a percentage of the total “On” time.

6
Section 1: Home Screen
Section 1.3: Settings
The following options are available under the “Settings” menu:
• “Setup/Preferences”
• “Program/Schedule”
• “Wi-Fi Settings”
• “Weather Settings”
• “Thermostat Info”
• “Factory Reset”

7
Section 2: Setup/Preferences
From the home screen, access the “Setup/Preferences” menu by
pressing “Settings > Setup/Preferences”. Press the
< or > arrows at
the top to view both pages of “Setup/Preferences”.
Section 2.1: Language
1. Choose between “English / Français / Español”.
2. Press “Cancel” to ignore the change or press “Save” to conrm.
Section 2.2: Date
1. Set the current month/date/year.
2. Select whether to enable/disable daylight savings time based
on your region.
3. Press “Cancel” to ignore changes or press “Save” to conrm.
Section 2.3: Time
1. Set the current time.
2. Select whether you would like the time to sync with the network
time once the thermostat is connected to your Wi-Fi network.
3. Press “Cancel” to ignore changes or press “Save” to conrm.
8
Section 2: Setup/Preferences
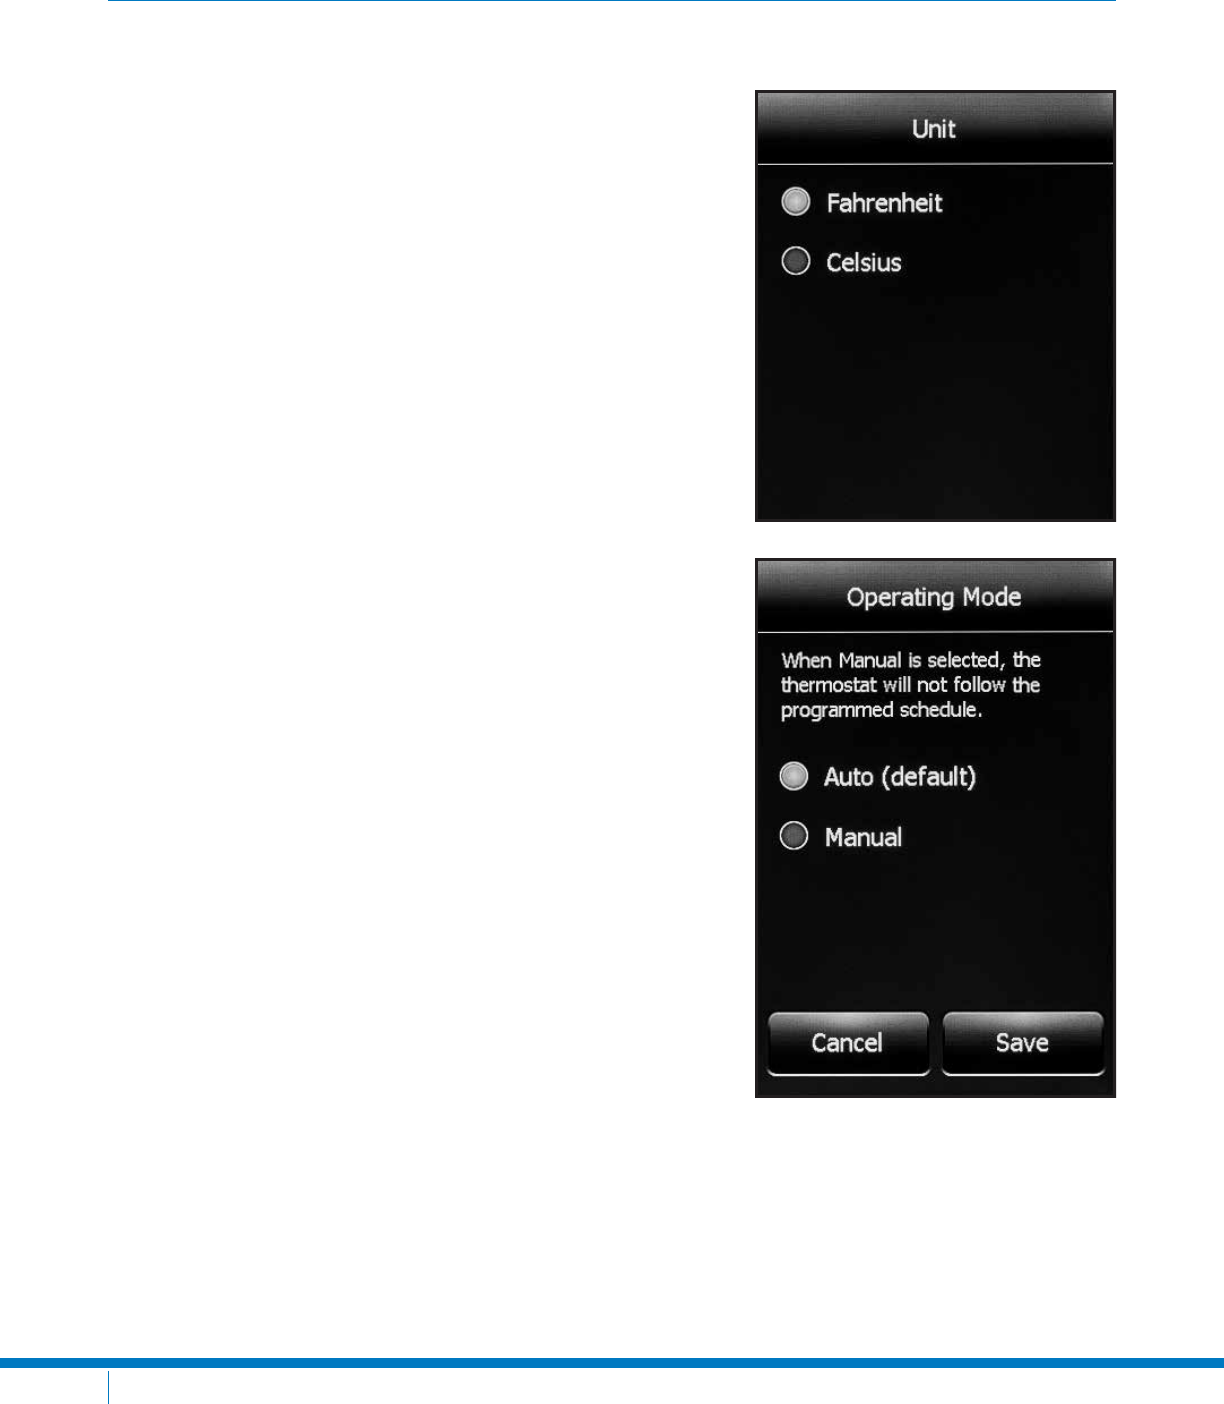
Section 2.4: Unit
1. Choose between Fahrenheit or Celsius.
2. Press “Cancel” to ignore the change or press “Save” to conrm.
Section 2.5: Operating mode
The thermostat has two operating modes:
1. Auto: “Auto” is the default mode, allowing you to program a
heating schedule for your thermostat. Refer to Section 3 on
Page 12.
2. Manual: Select the “Manual” mode if you always want to set the
temperature manually, with no programmed schedule. The
thermostat will maintain the set temperature until it is manually
changed or until you switch to another operating mode.
3. Press “Cancel” to ignore the change or press “Save” to conrm.

9
Section 2: Setup/Preferences
Section 2.6: Temperature control
The thermostat can be congured to control the oor temperature,
air/room temperature, or a combination of oor and air/room
temperature.
Temperature Control Setting Description
Floor temp. (default)
The thermostat controls the
oor temperature.
Air/room temp.
The thermostat controls the air/
room temperature. This setting
disables the oor sensor and
is useful if the oor sensor is
damaged or not installed.
Combined (advanced)
For advanced users only – This
setting allows control of the
oor-heating system based on
air/room temperature but will
not turn on the oor-heating
system if the oor temperature
is above the oor limit.
1. Select the desired temperature control.
2. Press “Cancel” to ignore the change or press “Save” to conrm.
Section 2.7: Temperature display
1. Select one of the following temperatures on the home screen
and screensaver:
• Floor temp. (default)
• Air/room temp.
2. Press “Cancel” to ignore the change or press “Save” to conrm.
10
Section 2: Setup/Preferences
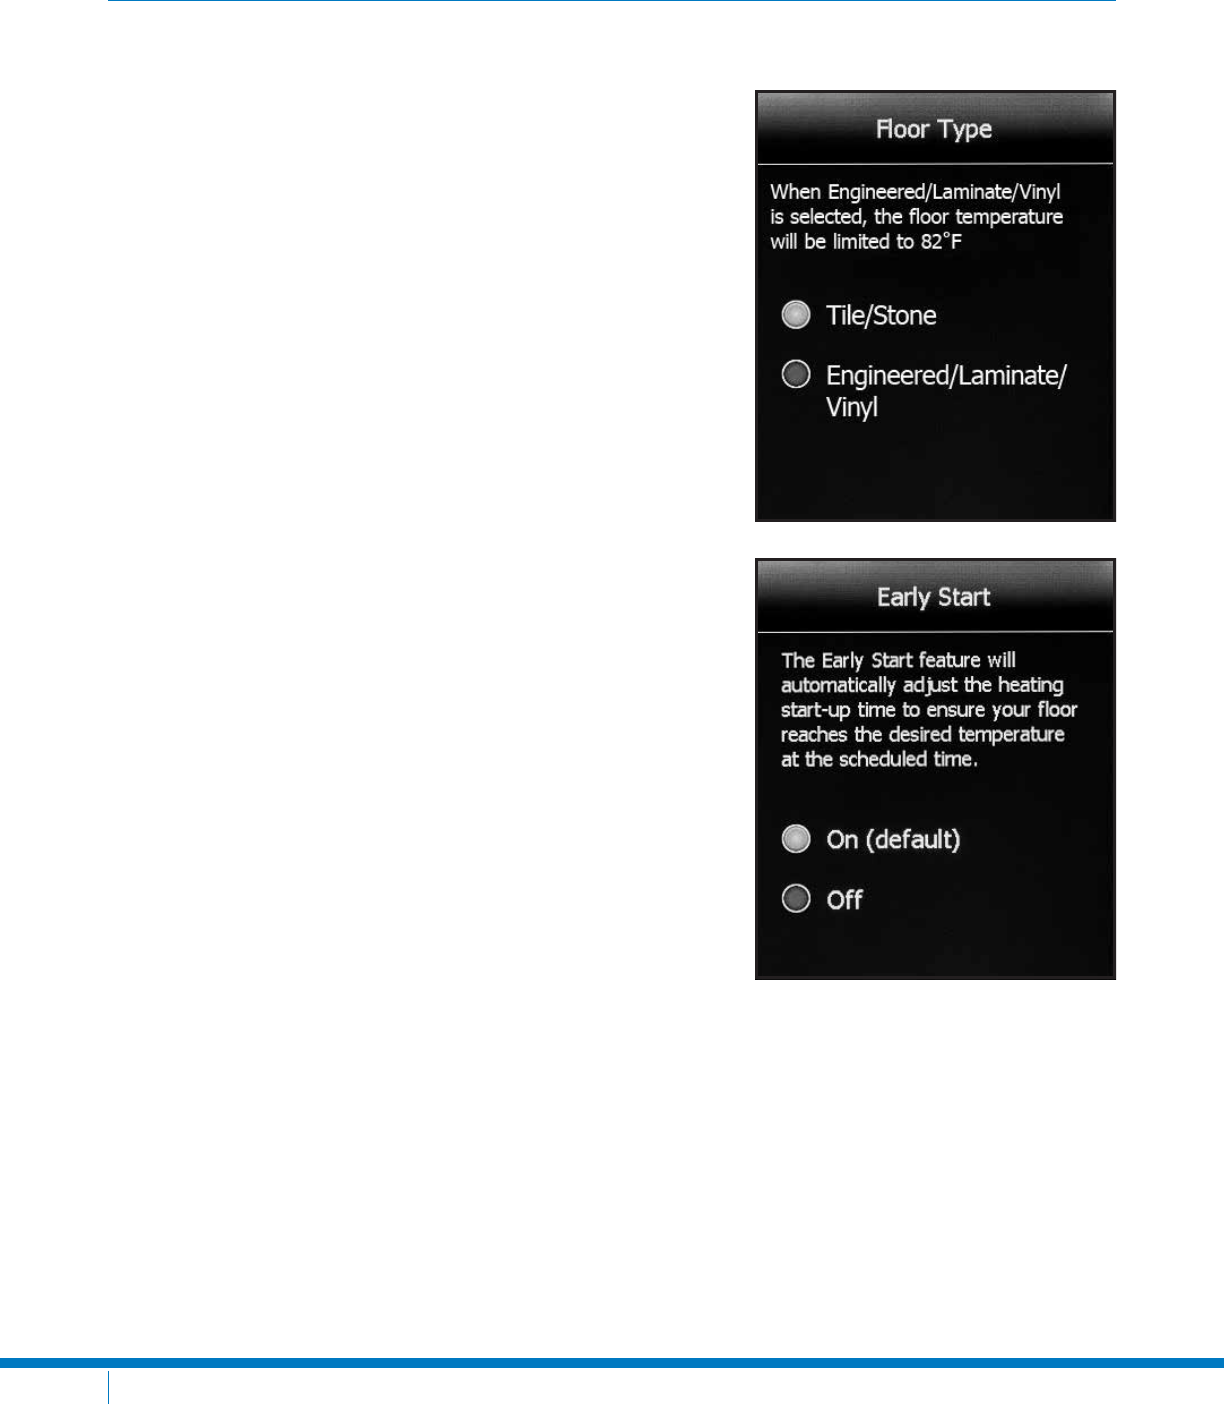
Section 2.8: Floor type
1. Set according to your ooring type.
2. When “Engineered/Laminate/Vinyl” is selected, the oor
temperature will be limited to 82°F (28°C).
Note that this setting is not available if “Temperature Control” is
set to “Air/room temp.” Refer to Section 2.6 on Page 9.
3. Press “Cancel” to ignore the change or press “Save” to conrm.
Section 2.9: “Early Start”
Early Start calculates the optimal time to start heating in order
to ensure that your oor reaches the desired temperature at the
scheduled time in your program/schedule.
Note that it only applies if your thermostat is following a
programmed schedule (that is, when the thermostat is in Auto
mode).
1. Select “On” if desired.
2. Press “Cancel” to ignore the change or press “Save” to conrm.
11
Section 2: Setup/Preferences
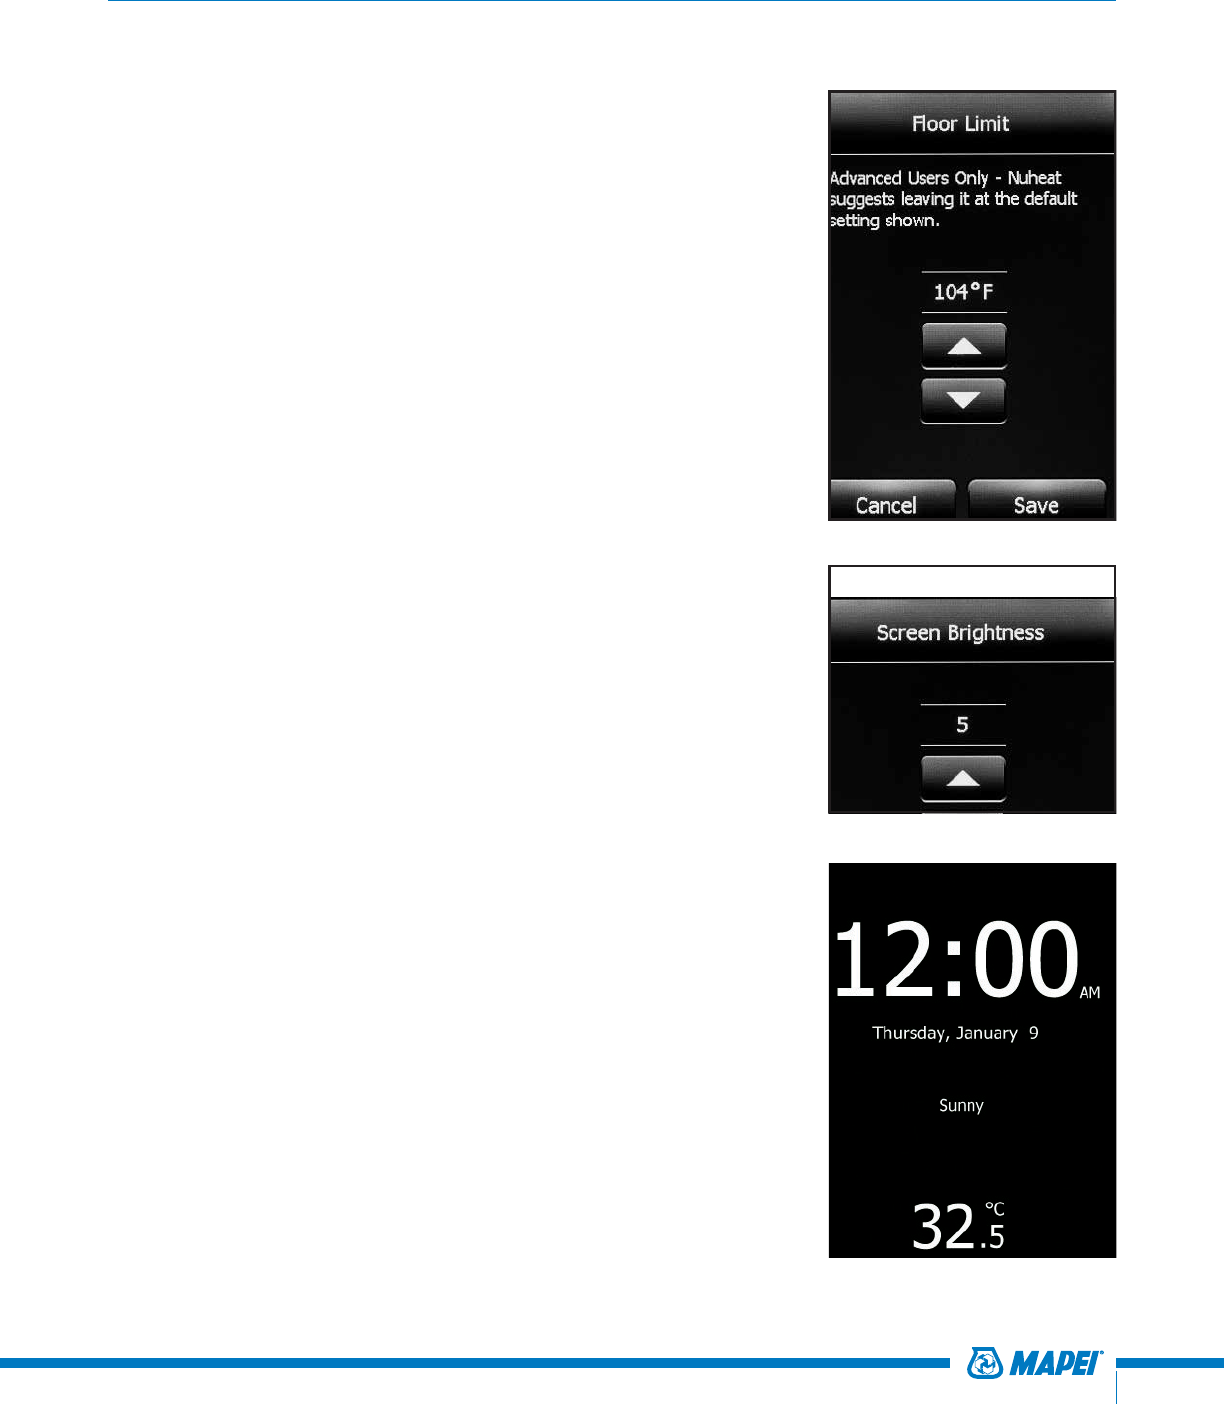
Section 2.10: Floor limit
1. Set the maximum temperature that you want the oor to reach.
The oor heating will not turn on if the oor temperature is
above the set oor limit. If the oor limit is set too low, your oor-
heating system will not turn on. MAPEI suggests leaving the
oor limit at the default factory temperature setting.
Note that this setting is not available if “Temperature Control” is
set to “Air/room temp”. Refer to Section 2.6 on Page 9.
2. Press “Cancel” to ignore the change or press “Save” to conrm.
Section 2.11 Screen brightness
1. Set the desired screen brightness.
2. Press “Cancel” to ignore the change or press “Save” to conrm.
Section 2.12: Screensaver
1. The thermostat will display a screensaver after two minutes of
inactivity. You can choose what information to display on the
screensaver.
Note that weather information for the screensaver is only
available if the thermostat is connected to your Wi-Fi network.
2. Press “Cancel” to ignore the change or press “Save” to conrm.
12
Section 3: Program/Schedule
From the home screen, access the “Program/Schedule” menu by pressing “Settings >
Program/Schedule”.
Below is the default schedule of the Mapeheat Thermo Connect thermostat:
WEEKDAYS
To adjust the setpoint(s):
1. Use the
< or > arrows to toggle between weekdays and weekend days.
2. Select the period that you want to adjust.
3. Using the
↑
or
↓
arrows, adjust the time and temperature of the setpoint.
4. Press “Cancel” to ignore the change or press “Save” to conrm.
To set a new program/schedule, press “New Program” at the bottom of the screen:
1. Select the days that share the same schedule.
2. Press “Next”.
3. Select the period that you want to adjust.
4. Using the
↑
or
↓
arrows, adjust the time and temperature of the setpoint.
5. Press “Cancel” to ignore the change or press “Save” to conrm.
6. Press “Next”.
7. Repeat Steps 1 to 6 until all days of the week have been programmed.
8. Press “Done” to save the program/schedule.
WEEKENDS
Period Start Time
Floor Temperature
Tile Wood
Wake 6:00 a.m. 88°F (31°C) 82°F (28°C)
Leave 9:00 a.m. 74°F (23°C) 74°F (23°C)
Return 5:00 p.m. 88°F (31°C) 82°F (28°C)
Sleep 11:00 p.m. 74°F (23°C) 74°F (23°C)
Period Start Time
Floor Temperature
Tile Wood
Wake 8:00 a.m. 88°F (31°C) 82°F (28°C)
Sleep 11:00 p.m. 74°F (23°C) 74°F (23°C)

13
Section 4: Wi-Fi Settings
From the home screen, access the “Wi-Fi Settings” menu by pressing “Settings > Wi-Fi Settings”.
To connect your Mapeheat Thermo Connect thermostat to your Wi-Fi network:
1. Select your Wi-Fi network from the list of available networks detected by the Mapeheat Thermo Connect
thermostat. If the network name does not appear, refer to Section 8 on Page 16 for Wi-Fi troubleshooting.
2. Enter the password for your Wi-Fi network. Note the uppercase/lowercase letters, special characters and numbers
in your password. Numbers and special characters can be accessed by pressing the button.
3. Press “Join.”
4. The thermostat will now attempt to connect to your Wi-Fi network. If this fails, check your Wi-Fi router and repeat
Steps 1 to 3. If problems persist, refer to Section 8 on Page 16 for Wi-Fi troubleshooting.
5. Press “Next” once the screen says “Connected”.
6. Enter a name for your thermostat (such as “master bathroom”).
7. Press “Next”.
8. Review the Privacy Policy available at www.mapei.com and press “Next”.
9. Enter an email address where an activation email may be sent. Note the uppercase/lowercase letters, special
characters and numbers in your email address. Numbers and special characters can be accessed by pressing the
button.
10. An activation email/link will be sent to the email address provided. Press “OK”.
11. Press “Back” to return to the home screen.
After 1 to 2 minutes, you will notice the Wi-Fi icon turn on at the top of the home screen. This means that your
Mapeheat Thermo Connect thermostat is now connected to your Wi-Fi network. If you cannot connect to your Wi-Fi
network, refer to Section 8 on Page 16 for Wi-Fi troubleshooting.
If you have a Mapeheat Thermo Connect thermostat: In order to access all the wireless features of the Mapeheat
Thermo Connect thermostat, you must rst connect the Mapeheat Thermo Connect thermostat to your Wi-Fi
network. Go into “Settings > Wi-Fi Settings” and complete the Wi-Fi setup. Once the thermostat is connected to your
WiFi network, you will be asked for an email address to begin your MyMapeheat.com account setup. An email with an
activation link and instructions will be sent to that email address. After your MyMapeheat.com account is set up, you
can control your Mapeheat Thermo Connect thermostat via MyMapeheat.com or download the Mapeheat Thermo
Connect app from the App Store or Google Play.
If you have a nVent Nuheat Signature thermostat: In order to access all the wireless features of the nVent Nuheat
Signature thermostat, you must rst connect the nVent Nuheat Signature thermostat to your Wi-Fi network. Go into
“Settings > Wi-Fi Settings” and complete the Wi-Fi setup. Once the thermostat is connected to your Wi-Fi network, you
will be asked for an email address to begin your MyNuheat.com account setup. An email with an activation link and
instructions will be sent to that email address. After your MyNuheat.com account is set up, you can control your nVent
Nuheat Signature thermostat via MyNuheat.com or download the nVent Nuheat Signature app from the App Store or
Google Play.
14
Section 6: Thermostat Information
1. From the home screen, access the “Thermostat Info” items by
pressing “Settings > Thermostat Info”.
2. Press the
< or > arrows at the top to view both pages of thermostat
information:
• “Thermostat name” – The name that was entered during the “Wi-Fi
Settings” setup. Refer to Section 4 on Page 13.
• “Thermostat ID” – The unique serial number assigned to the
thermostat during manufacturing.
• “Wi-Fi network” – The name of the Wi-Fi network to which the
thermostat is connected.
• “Account” – The email address that was entered during the “Wi-Fi
Settings” setup. Refer to Section 4 on Page 13. This is the email
address where the activation/verication email was sent.
• “Account status” – This indicates whether the thermostat has
been conrmed or not. Your MyMapeheat.com or MyNuheat.com
account must be setup in order for the thermostat to be conrmed
to your account.
• “Server status” – The status of the “MyMapeheat” or “MyNuheat”
server.
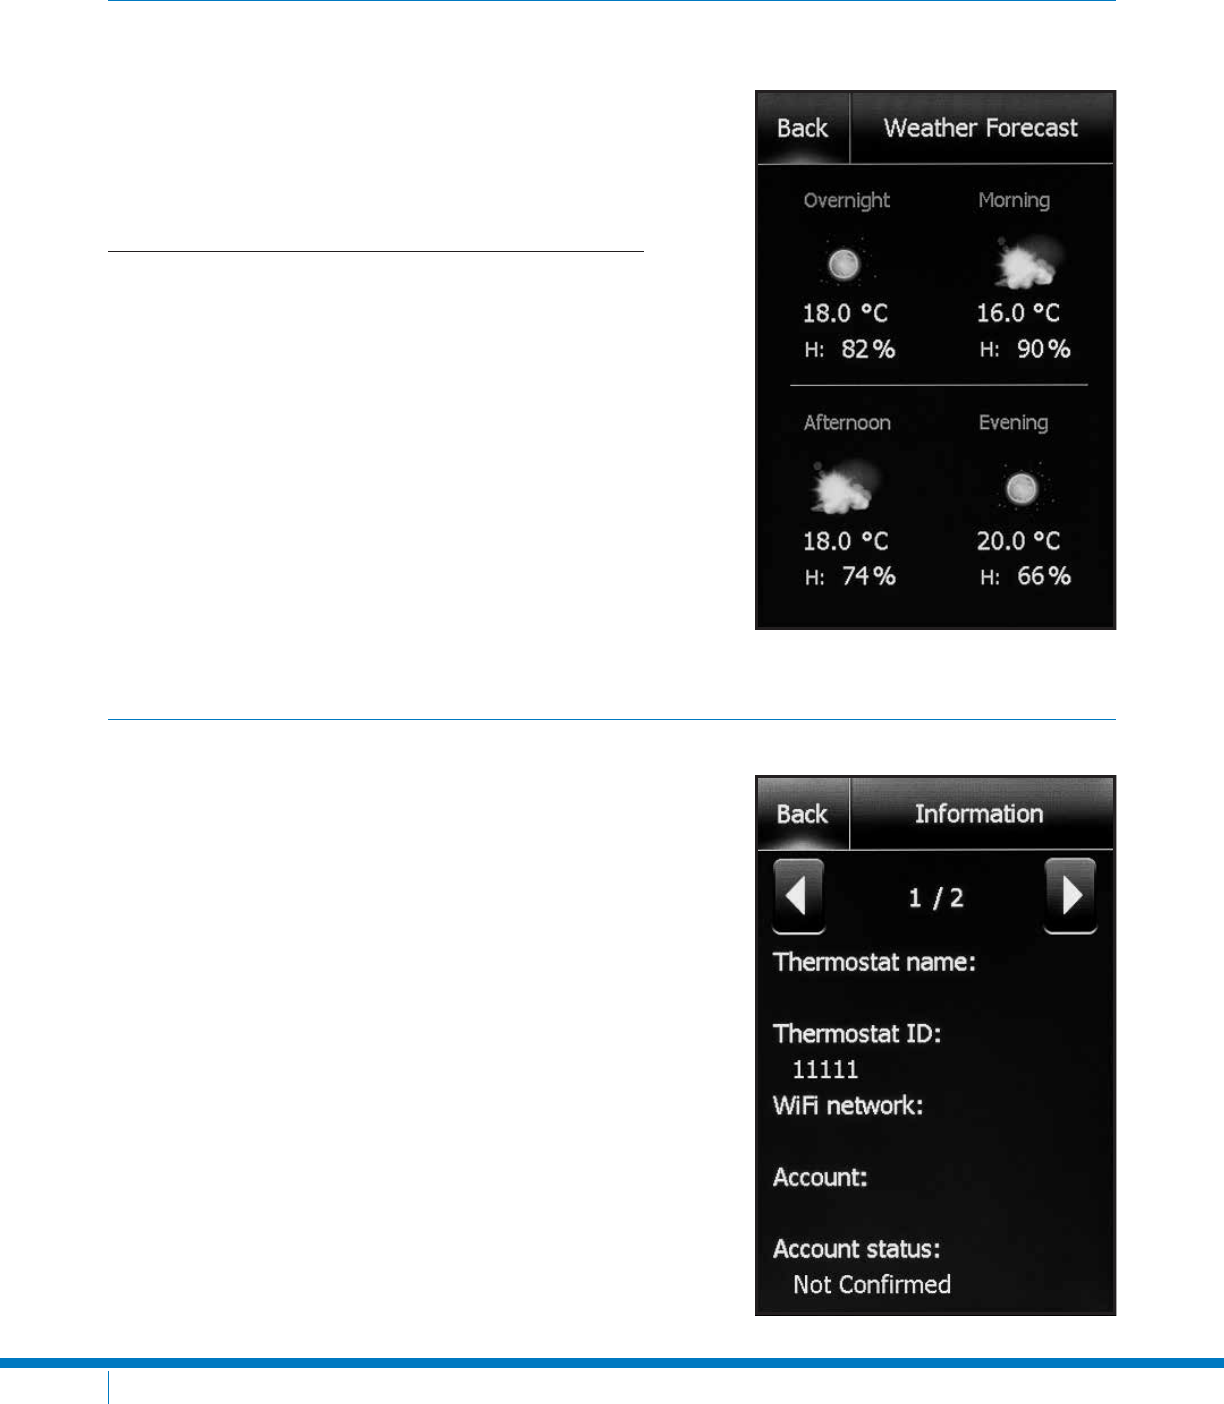
Section 5: Weather Settings
1. From the home screen, access the “Weather Settings” menu by
pressing “Settings > Weather Settings”.
Note that you must complete Wi-Fi setup in order to display
weather information on your Mapeheat Thermo Connect
thermostat. Refer to Section 4 on Page 13.
To set up weather information for display on the thermostat:
1. After you have completed the Wi-Fi setup. Refer to Section 4 on
Page 13. Press “Change” on the “Weather Location” screen.
2. Enter the “ZIP/Postal Code” for your area.
3. Press “Search”.
4. After a few seconds, your city name should appear on the screen.
5. Press “Next”.
6. Press “OK”.
7. Press “Back” to return to the home screen.
After 1 to 2 minutes, you will notice the weather information appear
on the top right corner of the home screen. Press the weather icon to
access the weather forecast.

15
Section 7: Factory Reset
Section 6: Thermostat Information
From the home screen, access “Factory Reset” by pressing “Settings
> Factory Reset”.
Factory Reset allows you to reset the thermostat back to factory
default settings. This can be used to reset the thermostat for a new
owner or for troubleshooting purposes.
WARNING: Factory Reset will delete all information stored on the
thermostat, including energy usage data.
• “Floor sensor” – The status of the oor sensor.
• “Air/room sensor” – The status of the built-in air/room temperature sensor.
• “GFCI” – The status of the GFCI. If a “?” appears, it means the GFCI has not been tested.
Refer to the GFCI Section on Page 3.
• “GFCI tested” – The date when the GFCI was last tested.
“Appl. Version” – The rmware version number (for internal use during manufacturing).
• “Wi-Fi version” – The Wi-Fi version number (for internal use during manufacturing).

16
Section 8: Wi-Fi Troubleshooting
Cause Solution
Wrong password Try entering your password again. Be careful to enter uppercase/lowercase letters,
numbers and symbols as needed. The thermostat can switch between three
different keyboards to enter these characters.
Your network name is hidden If you have another device connected to your Wi-Fi network (such as your mobile
phone), stand next to your thermostat and go into that device’s Wi-Fi settings to
see if the network name is appearing. If you do not see the network, it could mean
that your network name is hidden. If your wireless network is hidden, it means
you’ve chosen to not have the network name broadcasted to devices. In the “Wi-Fi
Settings” on the thermostat, select “Other” at the bottom and type in the name
of your network (also known as SSID). Then enter your password when you are
prompted.
Thermostat is too far from
Wi-Fi router
Try connecting another device such as your mobile phone to your Wi-Fi network.
Standing next to your thermostat, go into your device’s Wi-Fi settings. If the Wi-Fi
signal cannot be detected or is very weak on your device, it means other devices
may have trouble connecting to the network from that area of the home. This
means you may be too far away from your Wi-Fi router or there may be a problem
with it. If your Wi-Fi router is too far, you can purchase a Wi-Fi signal repeater,
which will improve the range of the Wi-Fi signal in your home for all devices.
Insufcient security settings
on your Wi-Fi router
With so many home devices now connected to the Internet, we want to make
sure our thermostats are connected to secure networks so that hackers cannot
gain control of devices in the home. There are two main types of encryption or
protection available through wireless routers: WEP and WPA. WEP is the original
form of wireless security and offers very minimal security. Hackers can easily
break into your wireless network if your router is set up with WEP encryption. It
was replaced with WPA encryption in 1999 and WPA2 in 2006. WPA is a security
protocol that makes it much more difcult to break into the networks. The
Mapeheat Thermo Connect and Nuheat Signature thermostats currently support
WPA and WPA2 encryption only.
MAPEI is releasing a version of Mapeheat Thermo Connect in the coming months
that will support WEP. If your router was manufactured after 2003, you should be
able to change the setting from WEP to WPA (see www.tech-faq.com/how-to-
change-wep-to-wpa.html). Without a Wi-Fi connection, your thermostat can still
control your oor-heating system. MAPEI recommends upgrading your security
settings to properly protect your network from hackers. If that is not an option,
please contact MAPEI’s Technical Services Department at 1-800-992-6273 (USA) or
1-800-361-9309 (Canada).
Too many wireless devices
connected to your network
Some Wi-Fi routers have a limit on the number of wireless devices that can
connect to the Internet. To test if this is your issue, shut down one of the Wi-Fi
enabled devices in your home. Once that device is completely shut down, try again
to connect to the network with the thermostat. If the thermostat successfully
connects, consult the documentation for your access point or contact your
Internet service provider (ISP) to nd out if you can increase the number of
simultaneous connections to your Wi-Fi network.
I can’t connect to my Wi-Fi network.

17
Section 8: Wi-Fi Troubleshooting
Section 9: Connect to Google Assistant,
Amazon Alexa or IFTTT
Cause Solution
Wi-Fi router requires a restart/
reboot
The problem might be with your router (even if your other wireless devices are still
connected). A simple restart of the router will usually resolve these types of issues.
While most routers just need to be unplugged and plugged back into their power
source to restart them, you should refer to your router’s documentation for specic
instructions.
Wi-Fi router rmware needs to
be updated
Contact your ISP or the router manufacturer for instructions on how to update the
rmware.
Presence of wireless
interference
Try turning off other wireless technologies (Bluetooth, Wi-Fi, wireless phones/
cameras) that may cause interference. Then test the thermostat’s network
connection.
Thermostat needs a factory
reset
Restart your thermostat. To restart it, go to “Settings > Factory Reset” and select
“Reset”. Once your thermostat has restarted, go to “Settings > Wi-Fi Settings” to try
connecting again.
I can’t connect to my Wi-Fi network.
The Mapeheat Thermo Connect thermostat works with popular home assistants and home automation products and
services such as Google Assistant, Amazon Alexa and IFTTT.
Amazon Alexa
The Mapeheat Thermo Connect thermostat can be controlled using any Alexa
device, including Amazon Echo, Amazon Echo Dot and Amazon Echo Plus.

18
Section 9: Connect to Google Assistant,
Amazon Alexa or IFTTT
Google Assistant
Control the Mapeheat Thermo Connect thermostat with any Google
Assistant-enabled device such as Google Home and Google Home Mini.
For setup information, please visit our interactive Website resource at www.mapei.com/us/en-us/mapeheat.
IFTTT
The Mapeheat Thermo Connect thermostat is part of this popular
free service that enables you to automatically trigger actions for your
oor-heating system based on other apps, Web services and devices.
Automatically turn off the oor-heating system every time you lock your
front door or get a text message whenever your oor drops below a certain
temperature. All this is possible via IFTTT.
Look for Mapeheat applets in the IFTTT app or Website.

MAPEI Headquarters of North America
1144 East Newport Center Drive
Deereld Beach, Florida 33442
1-888-US-MAPEI (1-888-876-2734) /
(954) 246-8888
Technical Services
1-800-992-6273 (U.S. and Puerto Rico)
1-800-361-9309 (Canada)
Customer Service
1-800-42-MAPEI (1-800-426-2734)
Services in Mexico
0-1-800-MX-MAPEI (0-1-800-696-2734)
Copyright ©2020 by MAPEI Corporation (“MAPEI”) and all
rights are reserved. All intellectual property rights and other
information contained in this document are the exclusive
property of MAPEI (or its parent or related companies),
unless otherwise noted. No part of this document may be
reproduced or transmitted in any form without the prior
written consent of MAPEI.
MKT: 19-2461 04/20
MAPEI USA
MAPEI Canada
