
MySchoolBucks
Parent User Guide
Table of Contents
MySchoolBucks Parent User Guide ...............................................................................
4
Browser Compatibility ......................................................................................................... 4
Creating a Parent Account in MySchoolBucks .............................................................
5
Username and Password Recovery .................................................................................... 7
Adding a Student
............................................................................................................... 9 Parent
Resources ............................................................................................................ 15
Notifications ..................................................................................................................... 15
User Profile ...................................................................................................................... 16
My Students ..................................................................................................................... 19
Notification Preferences .................................................................................................... 23
My Billing Accounts .......................................................................................................... 25
E-mail History................................................................................................................... 28
User Log .......................................................................................................................... 29
Downloads ....................................................................................................................... 29
Meal Accounts .................................................................................................................
30
Make a One-Time Payment .............................................................................................. 31
Make a Payment by Text Message ................................................................................... 35
Recent Payments ............................................................................................................. 37
Set up Automatic Payments .............................................................................................. 40
Update Automatic Payments ............................................................................................. 42
Cafeteria Meal History ...................................................................................................... 45
School Store ....................................................................................................................
46
Browse All Items .............................................................................................................. 46
Filtering Items .................................................................................................................. 47
Finding Featured Items ..................................................................................................... 49
Making a Purchase ..........................................................................................................
50
Adding Products to the Basket .......................................................................................... 50
View Cart/Checkout .......................................................................................................... 52
Managing Payments........................................................................................................
55
School Invoices ................................................................................................................ 55
My Order History .............................................................................................................. 60
Scheduled Payments........................................................................................................ 64

MySchoolBucks Parent User Guide
3
of
70
FAQ and Contacting Support
........................................................................................ 67 Support
............................................................................................................................. 68

MySchoolBucks Parent User Guide
4
of
70
MySchoolBucks Parent User Guide
MySchoolBucks is an award-winning service offered by Heartland Payment Systems, Inc.
Heartland Payment Systems is known for fair, fully disclosed pricing and empowering our
customers to take control of their payment processing costs.
Since being introduced a number of years ago, MySchoolBucks has become the product of
choice for thousands of schools throughout the United States. Whether paying for chemistry lab
fees, purchasing books, buying athletic tickets, or simply paying for school lunch,
MySchoolBucks gives parents the peace of mind when it comes to their children's school
purchases.
With MySchoolBucks, parents are able to register for an account and view information for free.
Parents are also able to view account balances or recent purchases in the school cafeteria, add
money to their student's account, and set up low balance alerts through this award-winning,
parent friendly system.
Browser Compatibility
Before using MySchoolBucks, make sure that your browser version is compatible. The following
browser versions are supported:
• Microsoft Internet Explorer (11 or higher)
• Google Chrome (22 or higher)
• Mozilla Firefox (27 or higher)
• Apple Safari (7 or higher)
Using browser versions older than those listed may result in reduced functionality.
Creating a Parent Account in MySchoolBucks
All new parent users must click Sign up today and follow the on-screen instructions to establish
their account.

MySchoolBucks Parent User Guide
5
of
70
The registration process will require you to select the state, followed by the district, in which
your students attend, your first and last name, e-mail address, and password. Your e-mail
address will be your username when logging in.

MySchoolBucks Parent User Guide
6
of
70
You are also required to select two security questions and fill out the answers. Once all
information is entered, click CREATE ACCOUNT. A welcome e-mail will be sent to the e-mail
address confirming that your profile was created.
Make sure to validate your email address after creating your account. Validating your email
should prevent login problems and ensure that you receive important emails from
MySchoolBucks.
Username and Password Recovery
If you have already created an account but have forgotten your login credentials, you can
recover your profile either by entering the e-mail address associated with your account or the
MySchoolBucks Parent User Guide
7
of
70
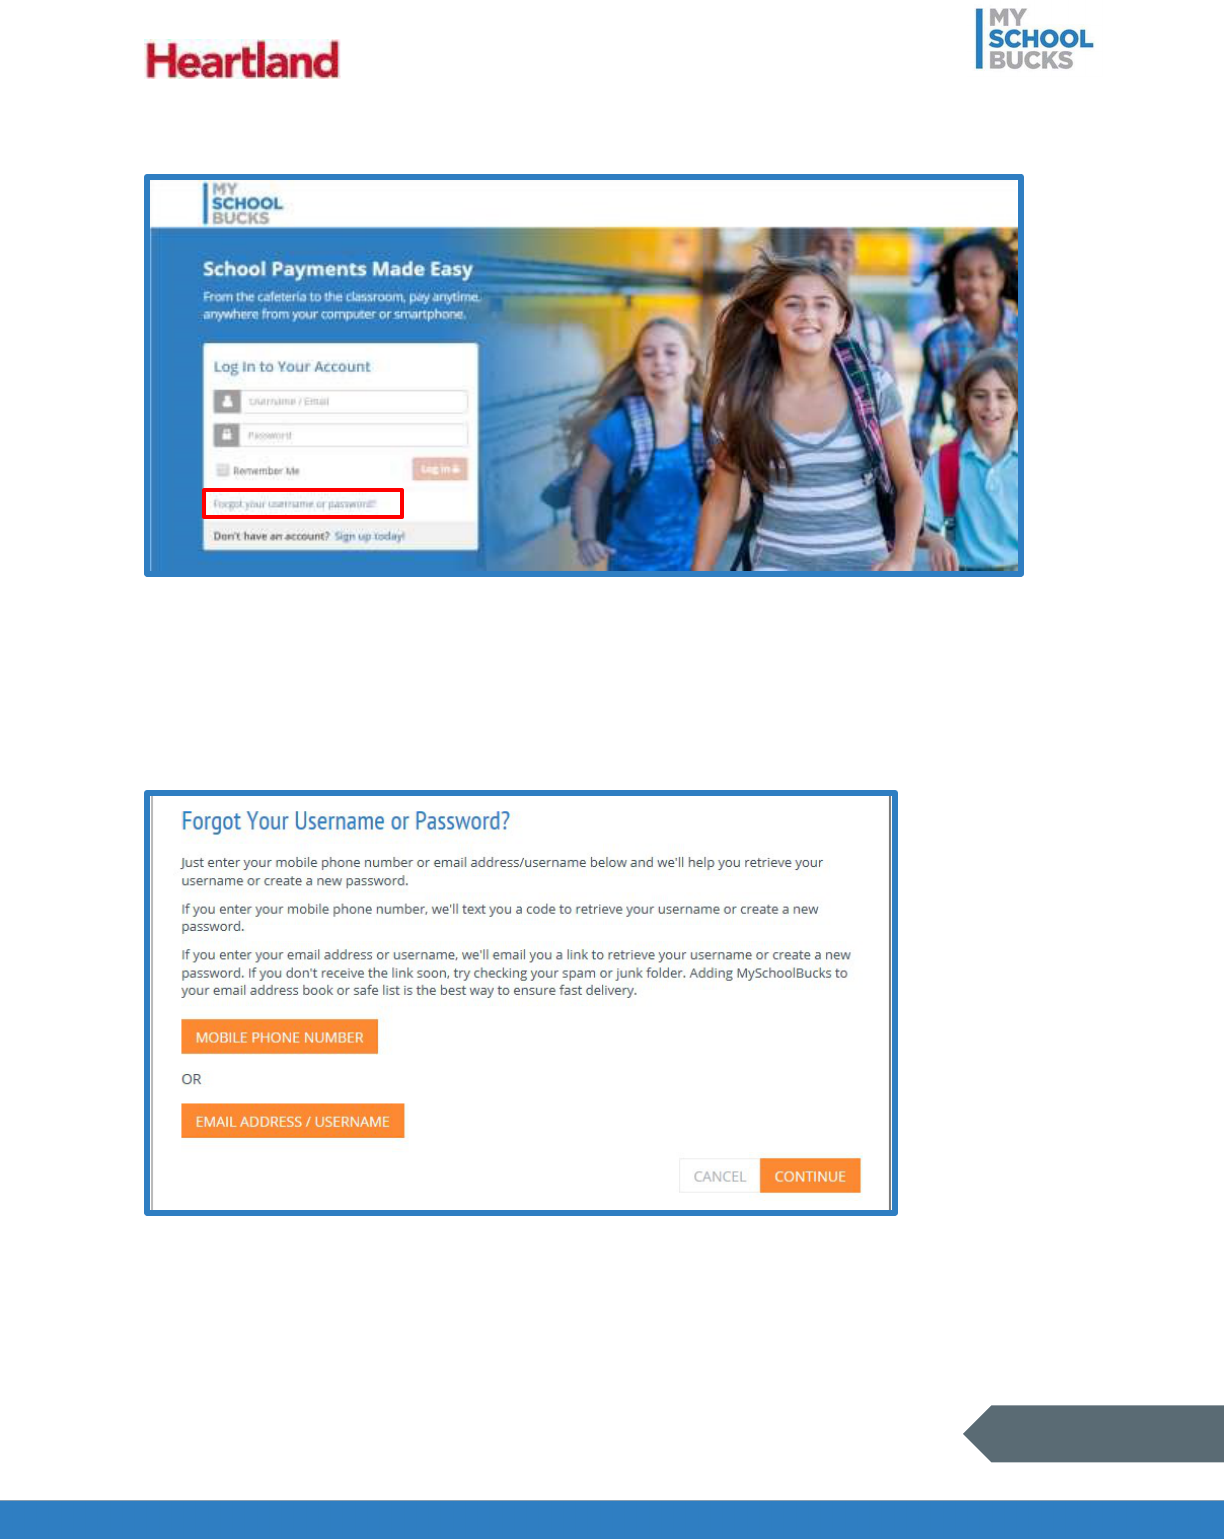
mobile phone number associated with the account. To recover your profile, first click Forgot
your username or password?
If you would like your information sent to you via text message, click Mobile Phone #, enter the
phone number associated with the account, and click Continue. If you would like your information
sent to you via e-mail, click E-mail Address/Username, enter the e-mail address or username
associated with the account, and click Continue.
NOTE: You must validate your mobile number before it may be used for password recovery.
A text message or e-mail will be sent to you. Click Finish to return to the login screen.

MySchoolBucks Parent User Guide
8
of
70
The e-mail will contain a link. Click the link to begin recovering your profile. You may be
presented with one of the security questions set up during your account creation. Enter the
answer to the question and click Recover Profile.
After correctly answering the security question, you will be provided with your username. If you
remember your password, click Login and enter your password. If you do not remember your
password, click Reset Password.
To reset your password, enter a new password in the top field and re-enter it in the field below.
Then, click Update. Note that the password must be at least 6 characters

MySchoolBucks Parent User Guide
9
of
70
After creating your account, you will then have an opportunity to add a student. You can choose
to skip this step until a later time.
If you want to add a student after the initial account setup, or if you would like to add an
additional student, you can do so from the My Students link.
Adding a Student

MySchoolBucks Parent User Guide
10
of
70
The student’s district will automatically be populated. If a new District needs to be added, click
School District at the top of the screen, and then click Add another school district.
To add a student, enter the student’s first name, last name, and student number and click FIND
STUDENT.
If the student is not able to be found, you will see the below message.

MySchoolBucks Parent User Guide
11
of
70
If you received this message, it likely means that some information was entered incorrectly. If
there are no errors in the student information and the student is still not found, you will need to
contact the school to verify your student is in their records.
If you do not know the student number, click Don’t have your child’s student ID.

MySchoolBucks Parent User Guide
12
of
70
The Student ID Request page will open. Enter your e-mail, the student’s first and last name, the
student’s birthday, and any comments you may have. Then, click Send. You will receive an
email with your child’s student number, which will allow you to add the child to your account.
NOTE: Your student ID request will have to be processed, so it may take a few days for you to
receive an e-mail with your child’s student ID.
Once the student is found, you will have the option to request a “low balance” e-mail be sent to
your e-mail once the student’s balance falls below a dollar amount that you choose. If you do
not want a low balance e-mail, simply un-check the box.
MySchoolBucks Parent User Guide
13
of
70
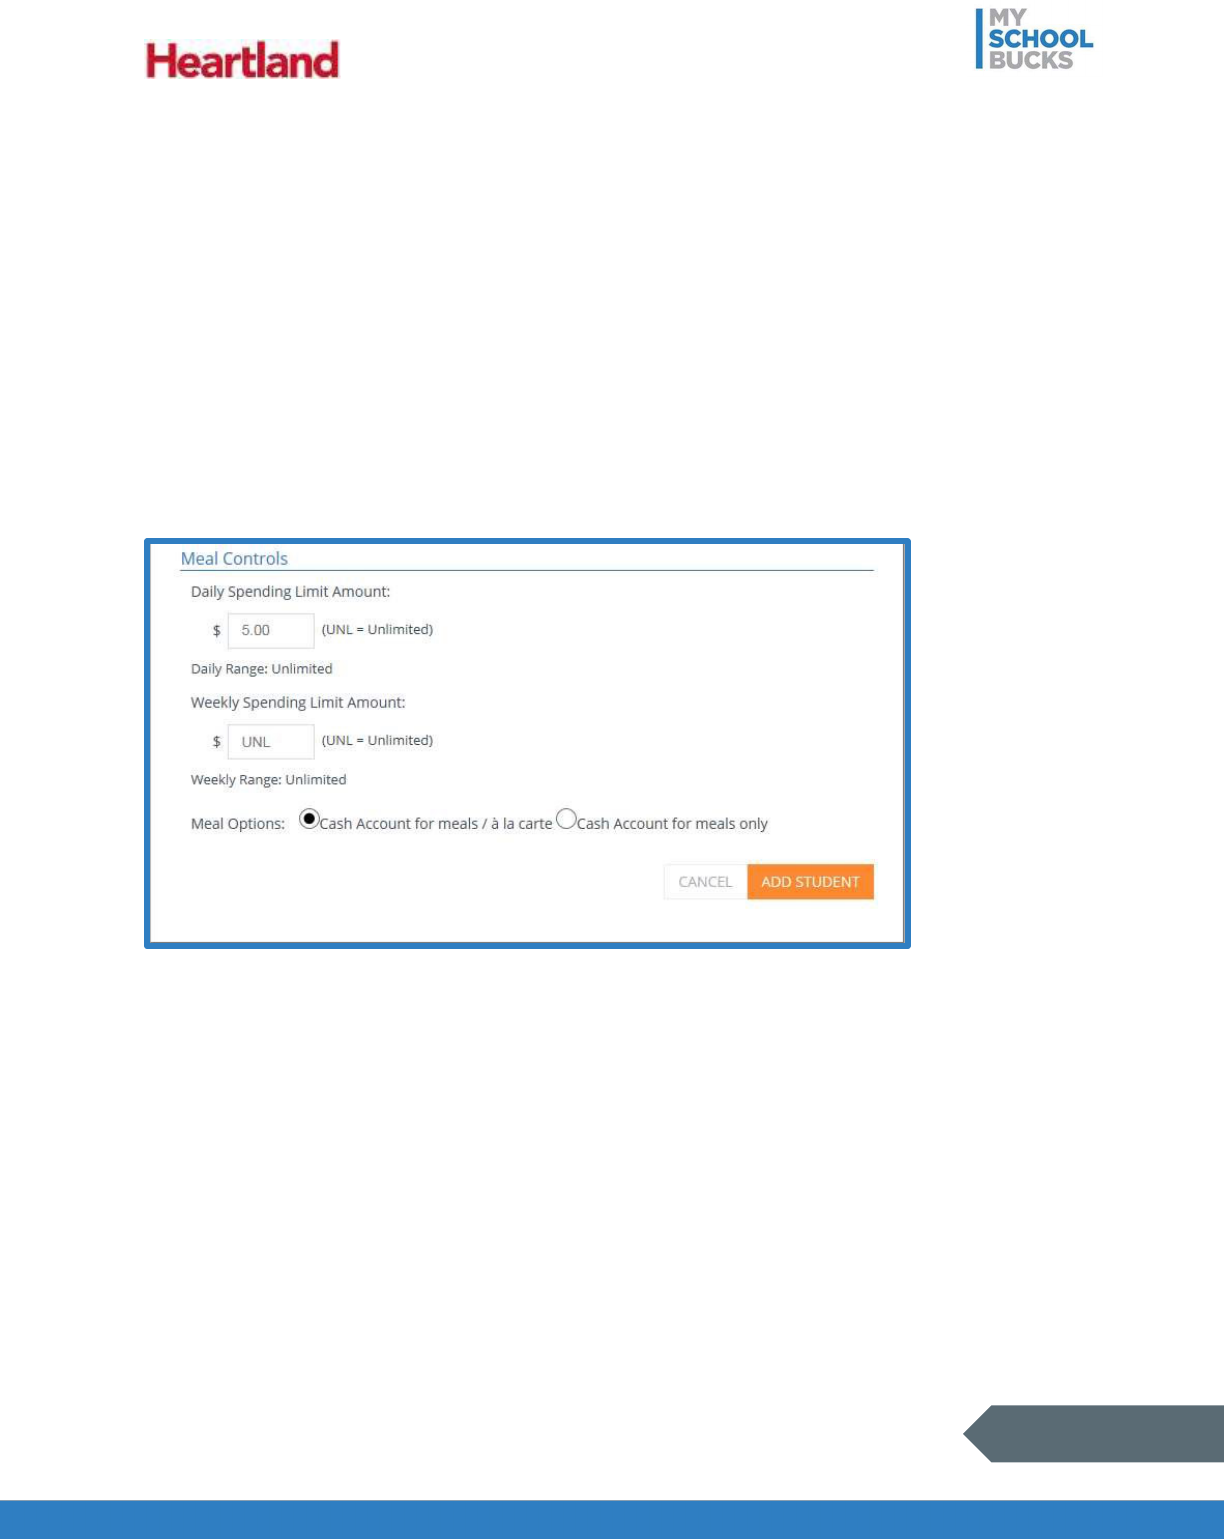
If your district has enabled them for editing, Meal Controls are available for you to set spending
limits for the student being added. Note that Meal Controls settings are on a per student basis,
so you need to set controls for each individual student.
Under Daily Spending Limit Amount, enter the amount of money you want to allow your student
to spend each day. Under Weekly Spending Limit Amount, enter the total amount of money you
want to allow your student to spend each week. Make sure that the amounts in these fields are
within the range shown under Daily Range and Weekly Range.
The Meal Options let you determine if your student is allowed to use cash from their account on
a la carte items. If you select Cash Account for meals/a la carte, your student will be allowed
to spend account money on a la carte items in addition to meals. If you select Cash Account
for meals only, your student will only be allowed to spend account money on meals.
When finished, click Add Student.

MySchoolBucks Parent User Guide
14
of
70
Once the student is added, you will see the below confirmation. You can click ADD ANOTHER
STUDENT to add another student or FINISH to complete the process.
NOTE: If you have a Membership payment plan, such as for OnePay Student Membership, you
will be prompted when adding new students to confirm or update Membership information.

MySchoolBucks Parent User Guide
15
of
70
Parent Resources
Notifications
To help keep you up to date with any news for your account or school, MySchoolBucks
organizes notifications for your account at the top of the page. When you have notifications, you
will see a red number next to the Notifications symbol.
After clicking Notifications, the page displays a list of alerts and news for your account or school.
User Profile
To review or change account information such as contact information or membership settings,
from the Welcome drop-down menu, click My User Profile. Some other options available from
this menu are Email History, User Log, and Log Out.

MySchoolBucks Parent User Guide
16
of
70
To edit information on this page, click EDIT next to the information you would like to update. For
example, if you would like to change your password, click EDIT in the Password row under My
Login. To edit the security questions used in case you forget your password, click EDIT next to
Security Question #1 or Security Question #2.
To associate an account with a name, cell phone, and an e-mail address, click EDIT next to
Name, Mobile Phone Number, and E-mail Address, respectively. In addition to having the option
to send low balance e-mails, parents may also receive e-mails associated with their student
store orders, such as receipts and refund confirmations, and promotional e-mails with updates
and news about MySchoolBucks. Parents may also opt to send text messages to their phones
to be updated with similar information.
NOTE: Any changes to email information will need to be confirmed by a validation email.

MySchoolBucks Parent User Guide
17
of
70
Under My Membership, your current membership is displayed. A membership allows you to
make purchases without having to pay the Program Fee each time. Click Update Membership
to join or decline a membership. If you have a Membership payment plan, you will be prompted
when adding new students to confirm or update Membership information.
Under My School Districts, the school districts associated with your students’ accounts are
displayed. Your primary school district is indicated by whichever district has a yellow star under
Primary. The students under your account associated with the district are listed under Students.
Click Add School District if you need to add another school district. Even if all students
associated with your account go to the same district, you may need to add a district in order to
access another district’s student store, for example.

MySchoolBucks Parent User Guide
18
of
70
My Students
The My Students page lists all of the students associated with your account. To access the My
Students screen, click the My Students link near the top of the page after clicking your name.
On the My Students screen, you can add, edit, and remove students. Click Add Student to
begin adding a student. For more details on how to add a student, see the Adding a Student
section. Click Remove to remove a student from your account.
IMPORTANT: Removing a student on this page does not refund the money on their account.
For refund information, contact your child’s school district.

MySchoolBucks Parent User Guide
19
of
70
Edit Student
Click Edit next to a student’s entry to edit the student’s notification and meal control settings.
You have the option to request to have a “low balance” e-mail or text sent to you once the
student’s balance falls below a dollar amount that you choose. If you do not want low balance
notifications, leave both boxes unchecked.

MySchoolBucks Parent User Guide
20
of
70
If your district has enabled them for editing, Meal Controls are available for you to set spending
limits for the student being added. The types of meal controls and options available may differ
from district to district, so not all of the following options may be available.
IMPORTANT: Meal Controls settings are on a per student basis, so you need to set controls for
each individual student.
Under Daily Spending Limit Amount, enter the amount of money you want to allow your student
to spend each day. Under Weekly Spending Limit Amount, enter the total amount of money you
want to allow your student to spend each week. Make sure that the amounts in these fields are
within the range shown under Daily Range and Weekly Range. If allowed by the district, you
may also set up spending limits specific to meal sessions, such as a limit that only applies to
breakfast.

MySchoolBucks Parent User Guide
21
of
70
The Meal Options let you determine if your student is allowed to use cash from their account on
a la carte items. If you select Cash Account for meals/a la carte, your student will be allowed
to spend account money on a la carte items in addition to meals. If you select Cash Account
for meals only, your student will only be allowed to spend account money on meals.
If you would like to allow your child to spend account funds on a la carte items from vending
machines, check the option Allow A La Carte Vending. Items bought a la carte this way are
still subject to spending limits. If you would like to allow your child to purchase reimbursable
meals through vended items, check the option Allow Reimbursable Meal Vending.
When you have finished setting a low balance amount and meal controls, click Update.

MySchoolBucks Parent User Guide
22
of
70
Notification Preferences
You can sign up for e-mail notifications to inform them when your student’s balance falls below a
designated amount or after an order is placed. To sign up for low balance e-mails, click EDIT
under My Students next to a student account, enter a low balance amount, and select Send
email. Click SUBMIT to confirm the changes.
You can also sign up for text messages if you have a phone registered to your account. To sign
up for low balance texts, click EDIT under My Students next to a student account, enter a low
balance amount, and select Send SMS/text message to my mobile phone. Click SUBMIT to
confirm the changes.
NOTE: You will also see meal controls on this screen. If your district has enabled meal control
editing, you may edit them from this screen. See the My Students section for more details. If
your district has disabled meal control editing, you may only view the district’s meal controls.

MySchoolBucks Parent User Guide
23
of
70
To sign up for notifications for when a payment has been made, click EDIT under My Contact
Info. Under E-mail Address, you can set what kinds of e-mails you will receive regarding your
MySchoolBucks account. To receive payment confirmation e-mails, click Yes next to Send
confirmation of payment. To receive promotional e-mails, click Yes next to Send feature
updates, news and promotional e-mails.

MySchoolBucks Parent User Guide
24
of
70
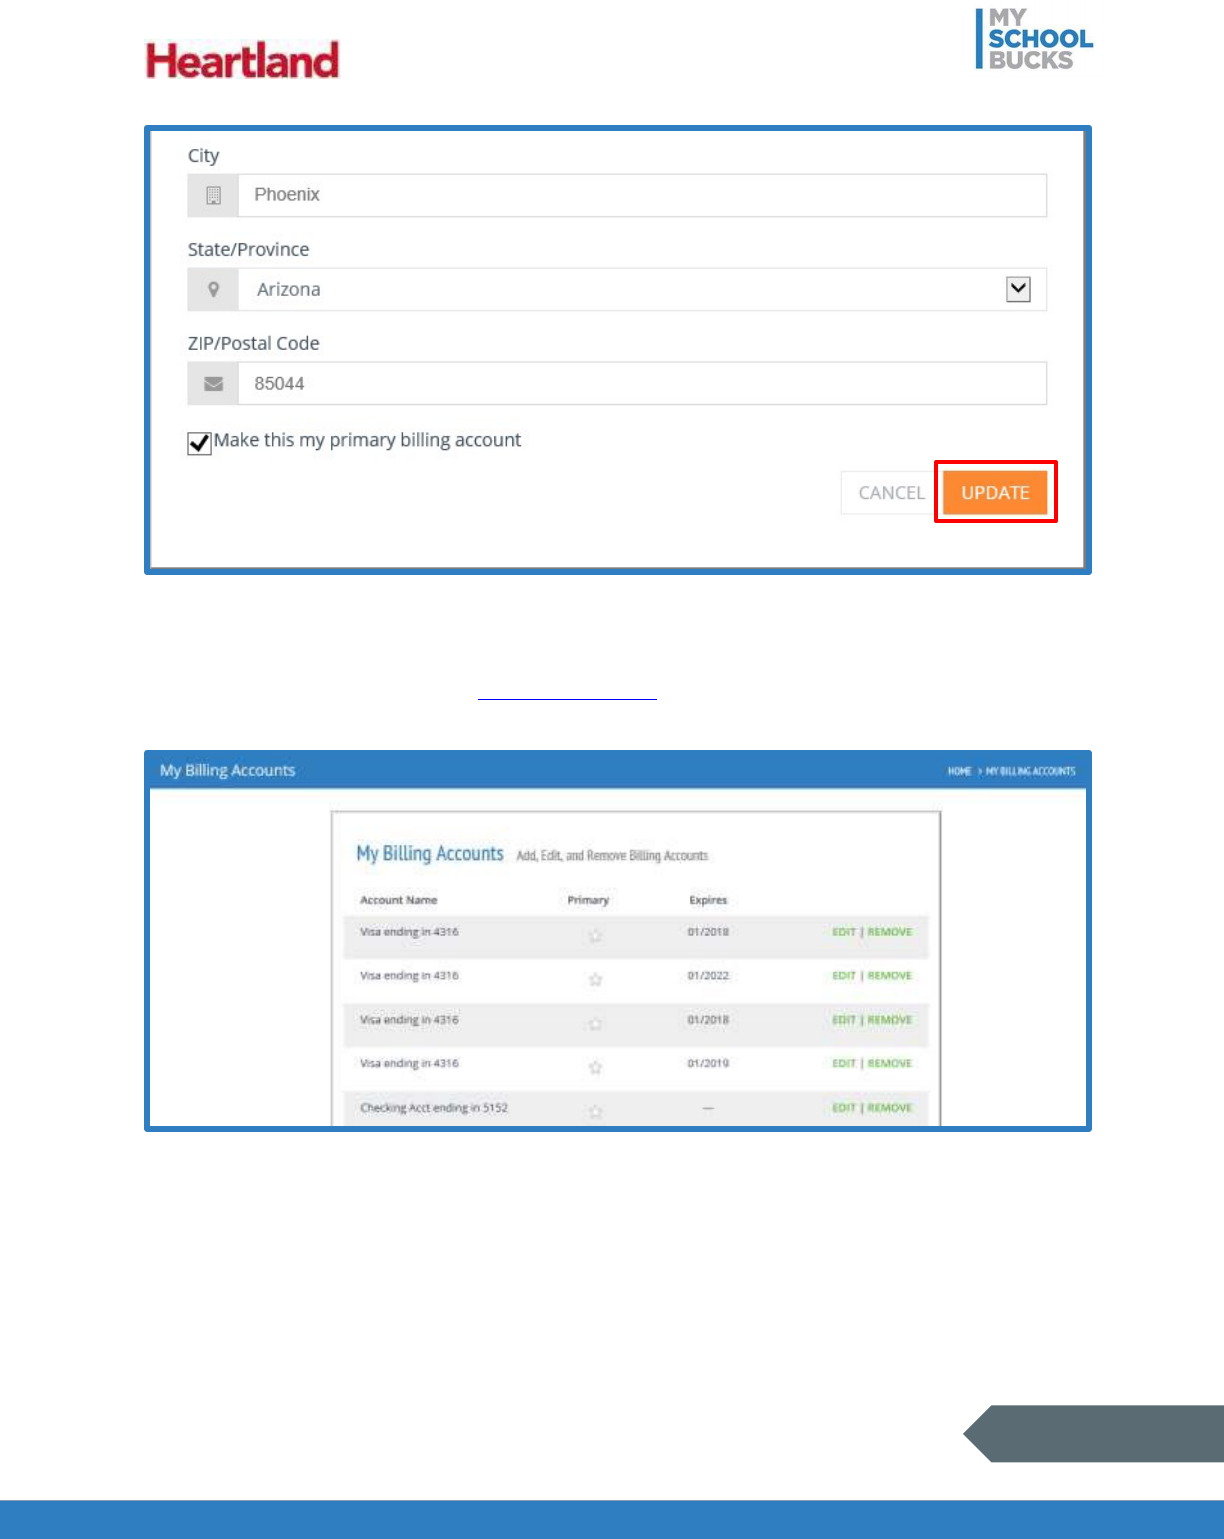
My Billing Accounts
The My Billing Accounts page lists all of the payment methods associated with your account. To
access the My Billing Accounts page, click the My Billing Accounts link near the top of the
page after clicking your name.
C
lick
Update
to confirm the changes.

MySchoolBucks Parent User Guide
25
of
70
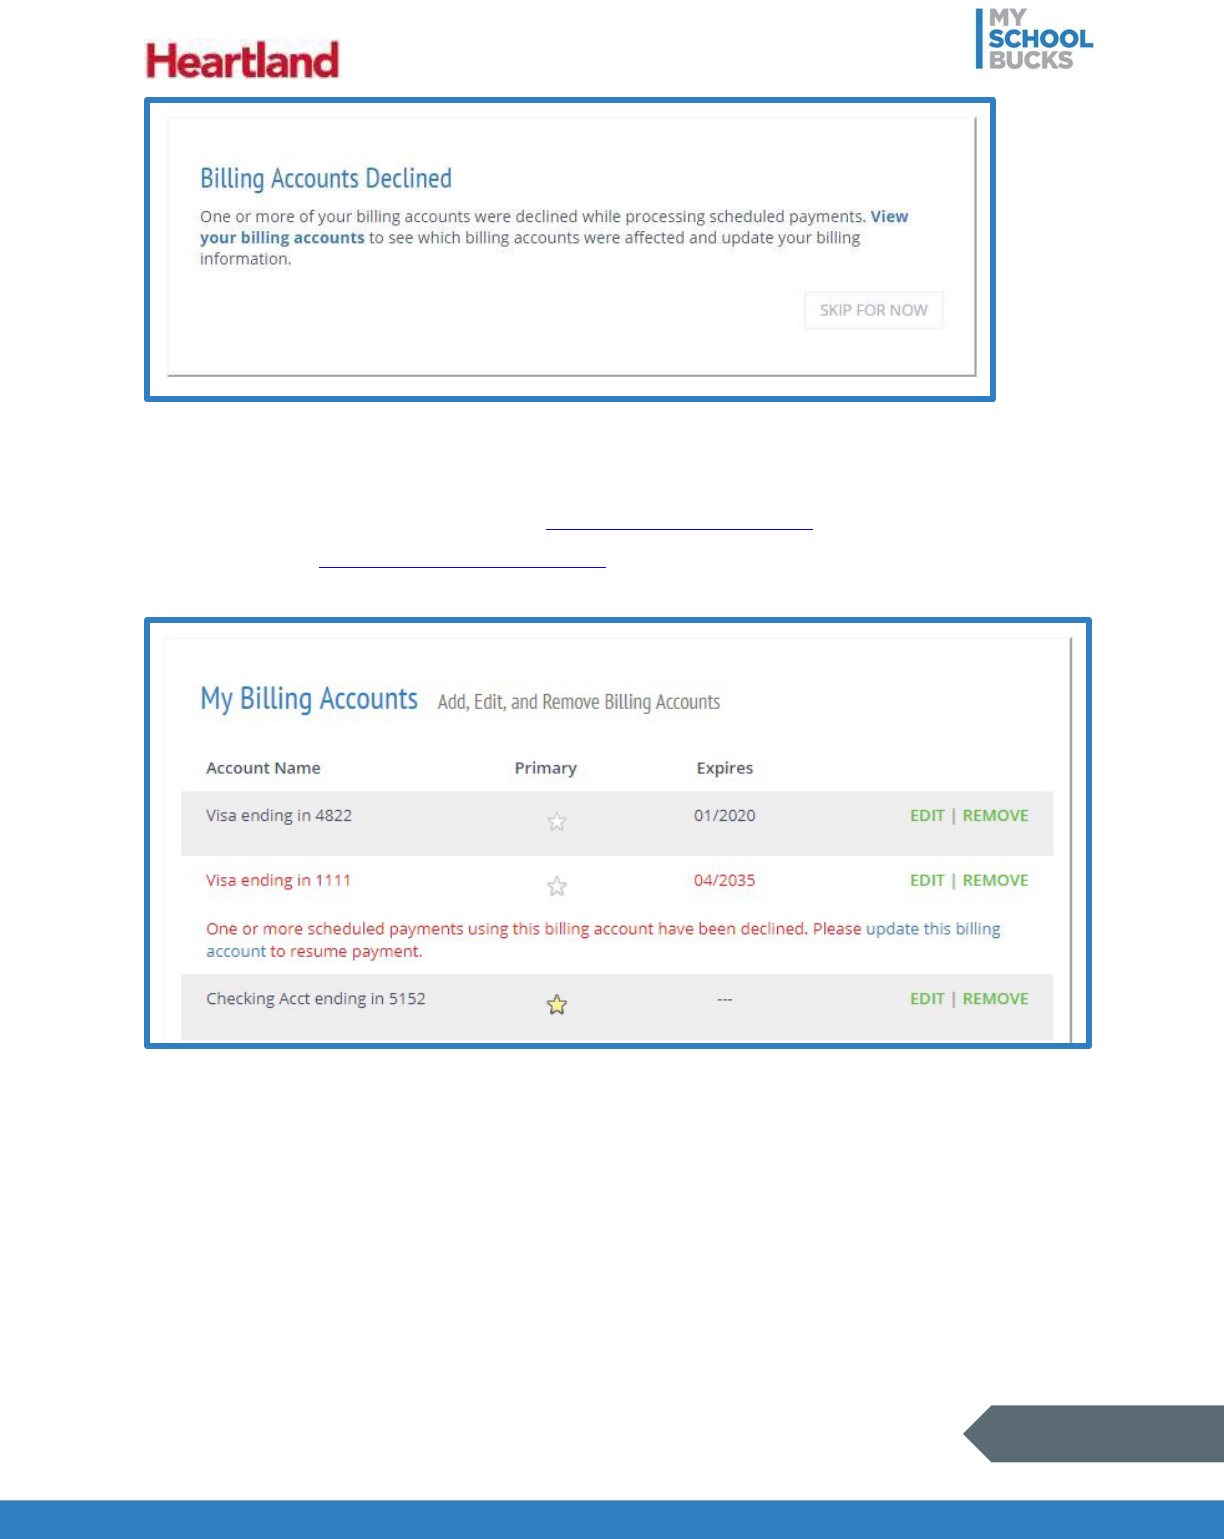
If one of your payment methods has been declined, such as when a credit card expires, click
Update Billing Accounts to go to the My Billing Accounts page.
1. Click Add Account.
2. If you have a checking account, leave the screen defaulted to e-Check and enter your
banking information.
Adding an Account

MySchoolBucks Parent User Guide
26
of
70
If you have a credit card, click the Credit Card option and enter your credit card
information.
3. Enter the address information associated with your payment method.
4. Check the Make this my primary billing account option if you plan on using this
payment method for the majority of your purchases.
MySchoolBucks Parent User Guide
27
of
70
5. Click Update.
Editing an Account
To edit an existing billing account, click Edit next to the account you need to update. The
process for editing is the same as adding an account.
To delete a billing account, click Remove next to the payment method you need to delete.
Billing accounts that have been declined are highlighted in red. You will need to edit the
payment method that has been highlighted if you want to finish the payment.

MySchoolBucks Parent User Guide
28
of
70
MySchoolBucks lets parents see a list of past e-mails sent to them, ordered chronologically. To
access your e-mail history, from the drop-down menu after clicking your name, click E-mail
History. You can view any individual e-mail by clicking the View button next the e-mail’s entry.
User Log
MySchoolBucks allows parent users to view a log of all MSB activities made within the last 90
days. This allows you to keep track of account activity (such as payments and AutoPay
changes), any changes made using your account, and potentially catch any erroneous or
unauthorized activity that may require a password change or an account lock. To access your
user log, from the drop-down menu after clicking your name, click User Log.
E
-
mail
History

MySchoolBucks Parent User Guide
29
of
70
You can access MySchoolBucks digital applications by scrolling to the bottom of the page.
Currently, mobile applications for iOS and Google Play are available to download. These
resources provide you with fast and easy access to your account.
Meal Accounts
The Meal Accounts page allows you to view student balances, active scheduled payments, and
recent payments.
All students that have been added to your account will be displayed here. Some students will
have an icon next to their name. A rounded arrow icon indicates that the student is set up on an
automatic payment plan. A trophy icon indicates the student is part of a membership program.
The amount next to a student will be highlighted yellow if their balance is below their low balance
threshold.
Downloads

MySchoolBucks Parent User Guide
30
of
70
Also displayed is the district announcement. District administrators can enter custom
announcements or notes for parents in their district to view after logging in to their accounts.
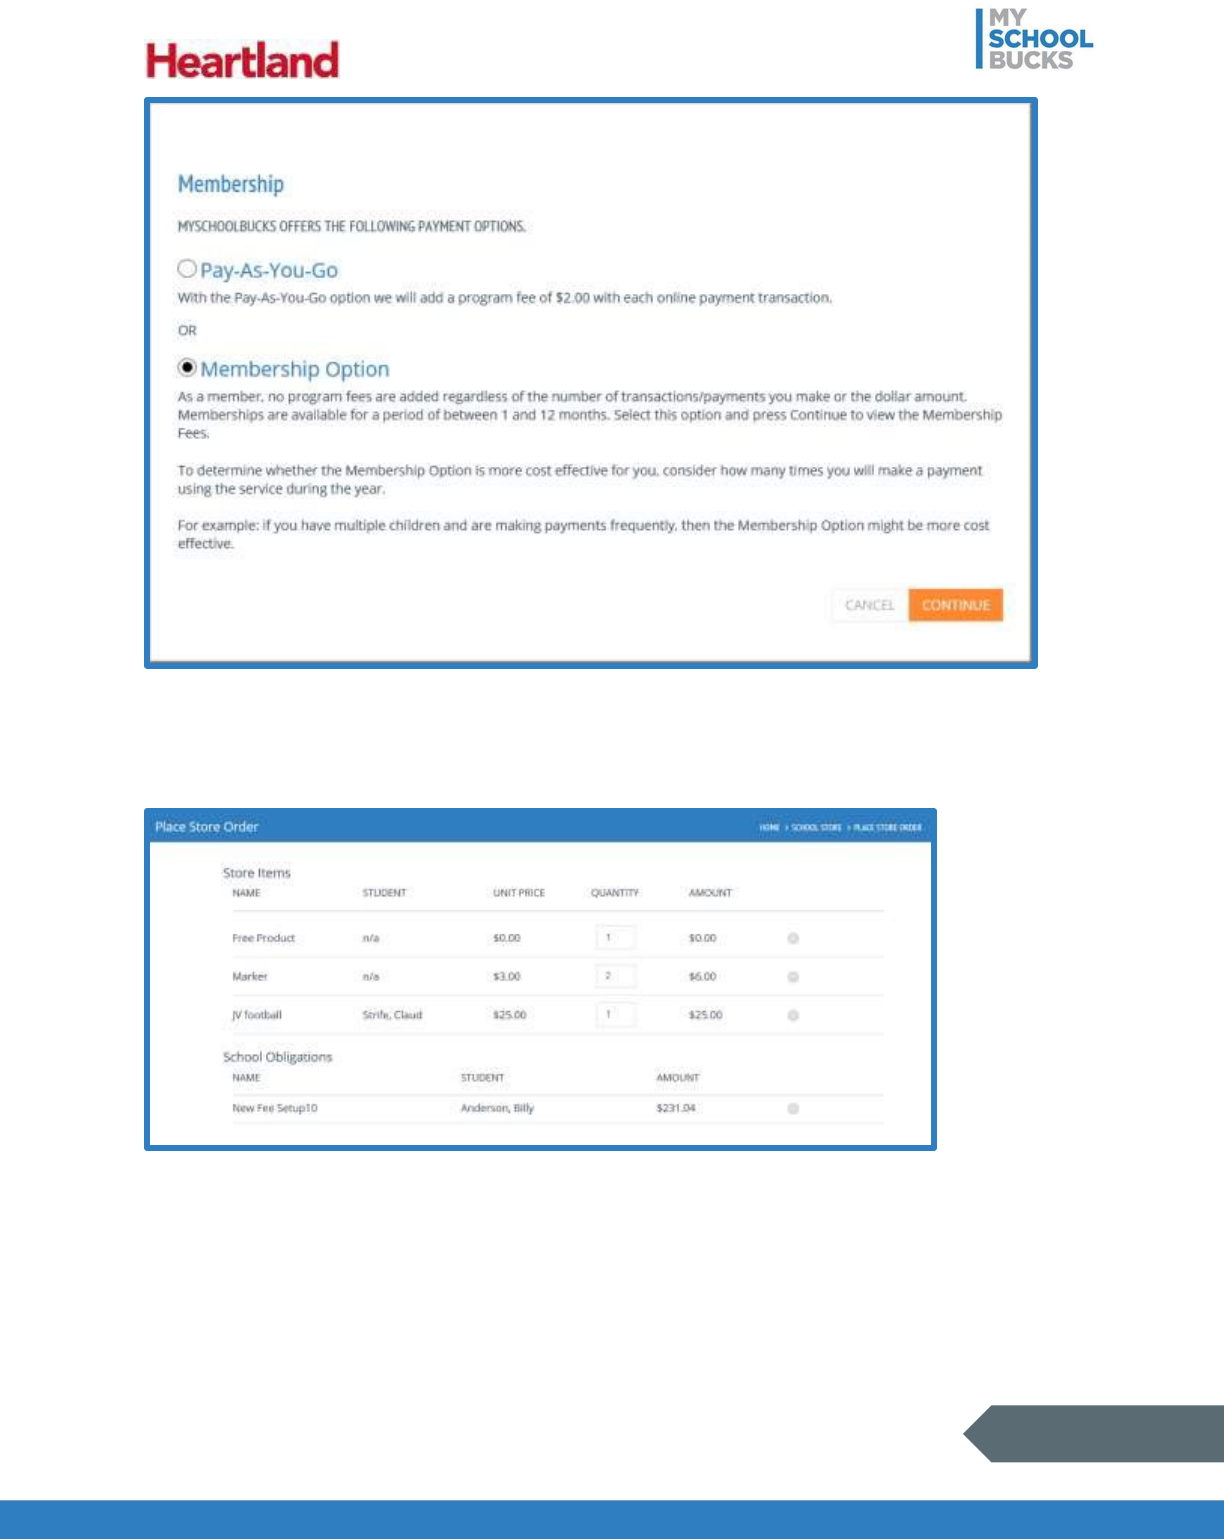
Note: When you first make a payment or set up automatic payments, you will be prompted to
select a Membership option. To begin enrolling in a membership, select Membership Option
and click Continue to see what memberships are available to you. To opt out of a membership
option and pay program fees, select Pay-As-You-Go and click Continue.

MySchoolBucks Parent User Guide
31
of
70
To process a prepayment, click Make a Payment in the Meal Accounts drop-down menu. This
will navigate you to the Place Order page.
You will be able to select a store such as Cafeteria Meal Payments or School Supplies. This will
depend on the stores that have been set up for the school district that the student attends. If there
are only cafeteria payments available, you will automatically be directed to the cafeteria payment
options.
Make a One
-
Time Payment

MySchoolBucks Parent User Guide
32
of
70
To make a payment, you will need to first select an amount to pay within the individual school
districts’ maximum payment limits. This is typically a range of $1 to $120. However, this limit
may vary depending on the district’s agreement with MySchoolBucks.
NOTE: On this screen, amounts highlighted in yellow have fallen below their “low balance”
amount. Once the balance is funded, the yellow highlight will disappear.

MySchoolBucks Parent User Guide
33
of
70
Next, select a payment method, either eCheck or Credit Card. When writing an eCheck, select
the checking account from the drop-down menu. When using a credit card, select a credit card
from the drop-down menu. If the preferred payment method does not appear in the menu, click
Enter a new checking account to enter a new eCheck account or Enter a new credit card to
enter a new credit card.
NOTE: The eCheck option is unavailable for districts not accepting eCheck payments.
Below the payment information, you will see the running totals for the payment or payments you
are making. When you have finished entering your payment information, click Place Meal Order
to submit the payments.
At this point, the order will be placed. If you selected the option to receive an e-mail notification
when an order is placed, the notification will be sent at this time.

MySchoolBucks Parent User Guide
34
of
70
Make a Payment by Text Message
In addition to using the website, you can make payments to accounts using your mobile phone.
To do this, first make sure that there is a valid phone number associated with your account. You
will also need to enable text message notifications for your account.
For more information, see Notification Preferences.

MySchoolBucks Parent User Guide
35
of
70
After entering a phone number, you will receive a text message confirmation. Text Yes to allow
for paying balances over text messages.

MySchoolBucks Parent User Guide
36
of
70
From here, you have a few options when using the pay-by-text service.
• Bal, Balance, or Balances: Texting one of these words lets you get account balances
for students on your account. Texting just the word (e.g. “Bal”) will show balances for all
students. Texting the word followed by a name (e.g. “Bal Steve”) will show a balance for
the specified student.
• Pay, Payment, or Payments: Texting one of these words lets you make a payment for
students on your account. Texting just the word (e.g. “Pay”) will make a one-time
payment to ALL students in your household. Texting the word followed by a name (e.g.
“Pay Joan”) will make a payment only for the specified student.
You should also specify a payment amount in US dollars (e.g. “Pay Hayley 25”). Leaving
out a payment amount will default the payment amount to $20.
IMPORTANT: If no student is specified and a payment amount is, the payment amount
is fully applied to each student. For example, if there are 3 students on your account and
you text “Pay 25”, $25 dollars is paid to each student’s account, totaling to $75. Help:
Texting this will request assistance from MSB.
• Stop: Texting this will opt out of the pay-by-text service.

MySchoolBucks Parent User Guide
37
of
70
Recent Payments
To view all payments processed from your account through MySchoolBucks, select Recent
Payments from the Meal Accounts drop-down menu.
The Recent Payments page will display the most recent payments made to the school.
Successful payments display in black text, and declined or returned payments are displayed in
red text. To view all available payment records for a student’s account, click View All under
their account name.
NOTE: Payments made directly to the school or through any other service will not display here.
To collapse the payment list back to only recent payments, click View Less.

MySchoolBucks Parent User Guide
38
of
70
The Download button is available in the upper right corner of the Recent Payments page. You
can use this button to export a list of your payments to an Excel spreadsheet. To do this, first
click Download.
After clicking download, you have a few options for what you will export. The Period drop-down
menu lets you select how old the payments in the list will be. If you select Custom, you must
also specify the Start Date and End Date for the payments in the list. If you want to include
payments that are specific to payments for meals, check Include Meal Payments. Once you
have selected a date range, click Export. An excel spreadsheet will be downloaded to your
computer that contains all payments within the specified date period.

MySchoolBucks Parent User Guide
39
of
70

MySchoolBucks Parent User Guide
40
of
70
Set up Automatic Payments
To set up recurring automatic payments, click AutoPay Settings in the Meal Accounts
dropdown menu.
If you do not already have automatic payments set up, you will be prompted to set up AutoPay.
You can set payments either at specific intervals or when a student’s balance falls below a
specific amount. To set automatic payments that occur at specific times, select On a recurring
basis, set a frequency (Daily, Every Week, etc.), and select a start date. To set payments that
occur automatically when an account balance is low, select When balance falls below and
select the amount that will trigger the automatic payment.
After setting a payment schedule, select the amount that will be funded to the students’
accounts when an automatic payment occurs. You can set different amounts for each student.
If the End AutoPay on checkbox is left unchecked, the automatic payments will have no set
end date. If you would like to set an end date for automatic payments, check End AutoPay on
and select an end date.

MySchoolBucks Parent User Guide
41
of
70
Next, select a method of payment. Select either e-Check or Credit Card, and then select the
payment method from the drop-down menu.
If you do not already have a payment method set up, or if you click Enter a new checking
account or Enter a new credit card, you may set one up on this page. Your bank account
information is required to set up e-check payments, while a Visa, MasterCard, or Discover card
is required for credit card payments.
Once you have entered your payment information, click Complete Setup to save your
automatic payment settings.

MySchoolBucks Parent User Guide
42
of
70
Update Automatic Payments
To update your automatic payment settings, click AutoPay Settings in the Meal Accounts
dropdown menu.
A summary of your current AutoPay settings is displayed on this page. To disable automatic
payments completely, click Disable AutoPay. If you need to make a change to your current
automatic payment settings, click Change AutoPay Settings.

MySchoolBucks Parent User Guide
43
of
70
Editing your AutoPay Settings is similar to the steps done when setting up AutoPay.
After you have made your changes, click Save Changes.

MySchoolBucks Parent User Guide
44
of
70
Updating Expired Payment Accounts
After setting up automatic payments, if the account being used for the payment has been
declined, MySchoolBucks will notify you and, upon logging in, offer to redirect you to the My
Billing Accounts page.
MySchoolBucks Parent User Guide
45
of
70
On the My Billing Accounts page, any accounts that have been declined will be highlighted with
red text. You must update the account to resume the automatic payments. For information on
how to updating billing accounts, see the My Billing Accounts section. If you would like to use a
different account, update your AutoPay settings so that a different account is selected as the
payment method.
Cafeteria Meal History
The Cafeteria Meal History page displays a list of purchases and account activity for students.
Some districts utilize software that is compatible with the running balances feature in
MySchoolBucks. However, many district cafeteria purchases will only display activity such as
purchases and deposits.

MySchoolBucks Parent User Guide
46
of
70
In addition to cafeteria purchases, this page also has tabs that display recent payments and
scheduled payments. Click the Recent Payments tab to view payments made recently to your
students’ accounts. Click Scheduled Payments to view payments that are pending.
Prepayments should display in cafeteria purchases and increase the student’s balance within 2
business days after the date of the prepayment.
School Store
MySchoolBucks offers parent account holders the ability to make school purchases online using
the School Store function. The School Store allows you to purchase products such as spirit
wear, and it also allows you to pay for school expenses, such as library fees and field trips,
quickly and conveniently. To access the School Store, click School Store from any page.

MySchoolBucks Parent User Guide
47
of
70
Browse All Items
There are two ways to access your school store’s online catalog. From the School Store Home
page, click Browse All Items to access the catalog for browsing.
Even if you are not on the Home page, you can access the school store catalog from any page
on the site by hovering your mouse cursor over School Store and clicking Browse All Items.
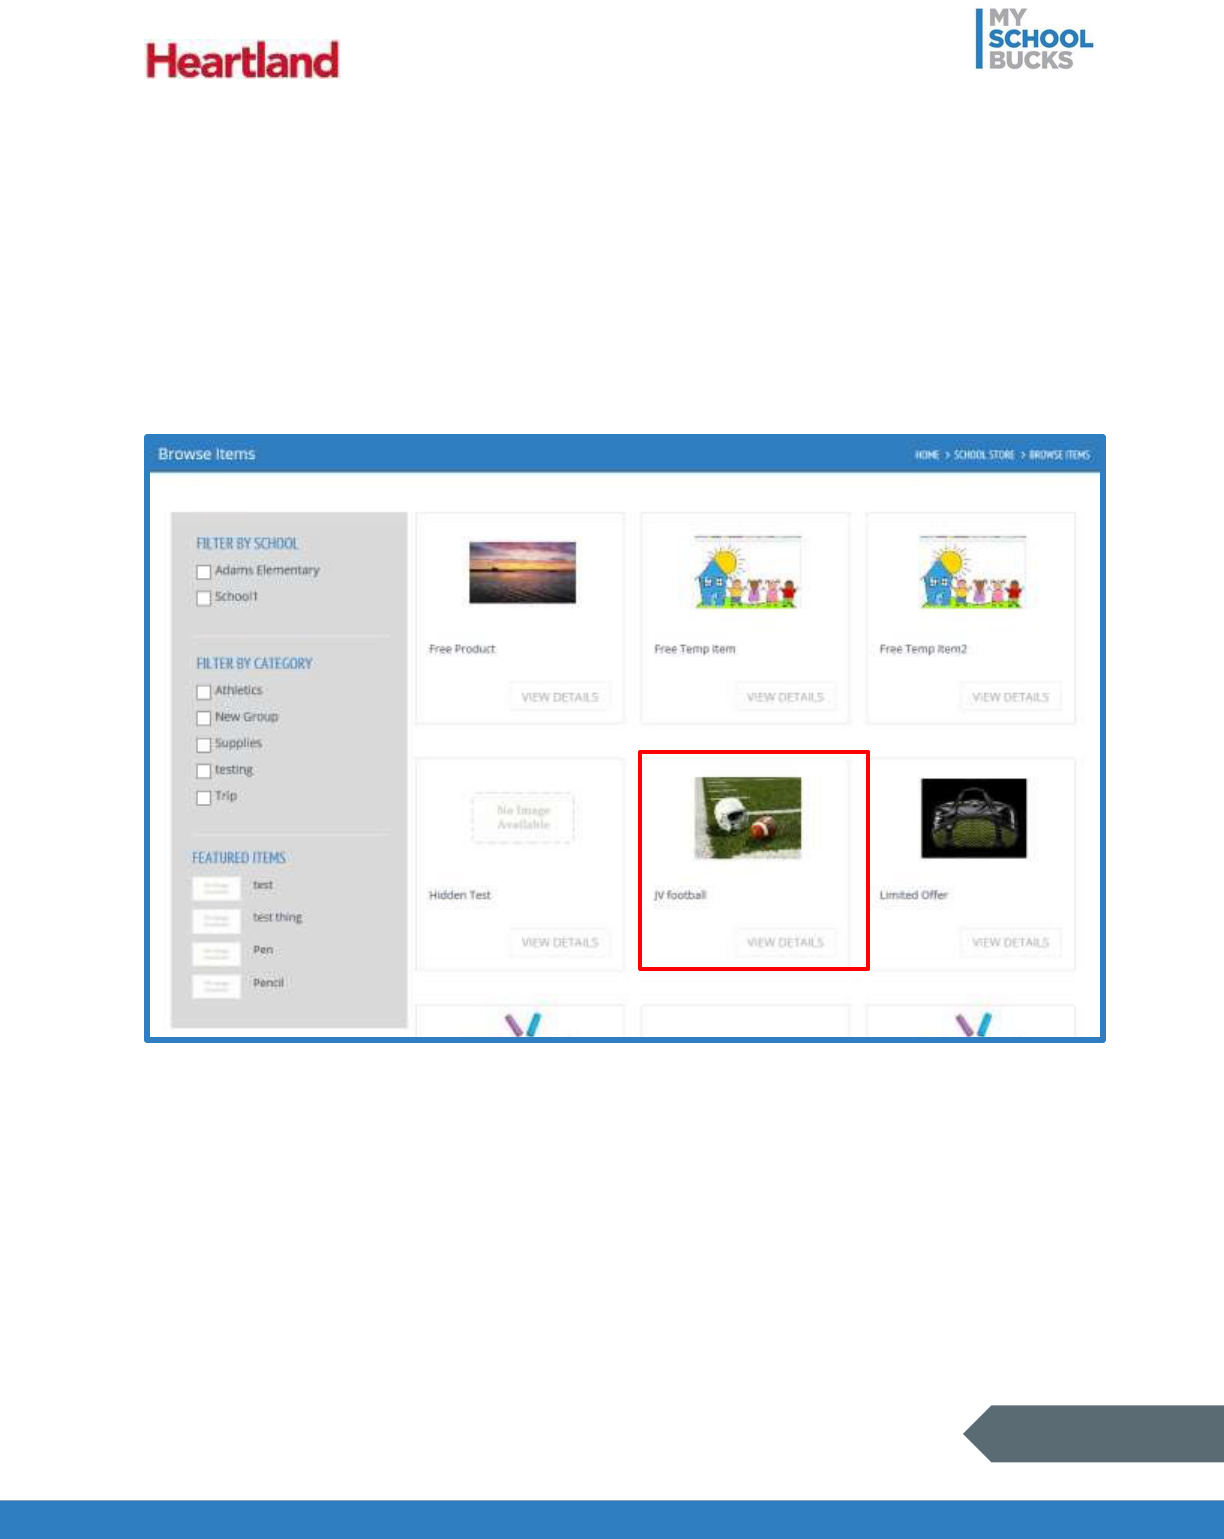
While browsing the items available in the School Store, you can make it easier to find what you
are looking for by using the Filter By options.
Filtering Items

MySchoolBucks Parent User Guide
48
of
70
Filter By School
By default, the catalog shows items from all schools within your district. To show only items
offered at a specific school, select the school under Filter By School.
NOTE: You can select multiple schools to filter for more than one school at a time.
Filter By Category
By default, the catalog shows all of the different items available within your district. To show only
the types of items you are looking for, for example a class registration fee, select the desired
option under Filter By Category.

MySchoolBucks Parent User Guide
49
of
70
In addition to filtering on the Browse Items page, you can also access the store filters from any
page by hovering your mouse cursor over School Store, hovering over Categories, and
selecting the desired category from the list.
Finding Featured Items
To see items featured specially by your school, look at the bottom of the School Store Home
page. You can also view all items in the catalog from the Featured Items by clicking View All.

MySchoolBucks Parent User Guide
50
of
70
In addition to on the School Store page, Featured Items are also available from the Browse
Items page under the Filter By options.
MySchoolBucks Parent User Guide
51
of
70
Making a Purchase
The MySchoolBucks School Store allows parents to buy products as well as pay various types
of school fees. Each type of item has a slightly different process when adding to the basket, but
checking out is the same for all products.
Adding Products to the Basket
To add a school product, such as spirit wear or supplies, to the basket for purchase, perform the
following steps.
1. Click either the picture of the product or the View Details button under the product.
The price of the item is displayed as Our Price.
2. Select the student associated with the purchase from the Student drop-down menu. If
your student does not show up in the list of students, you can add that student by
clicking Add a Student.

MySchoolBucks Parent User Guide
52
of
70
3. Enter the number of items you want to purchase in the Quantity field. This field defaults
to 1.
NOTE: The Availability field notes whether the item is in stock.
4. Click Add To Basket to place the item in your basket to be purchased.
NOTE: If you have previously purchased a selected item, previous purchase information will
appear above the product’s name on the Product Detail page.
View Cart/Checkout
After you have added at least one item to the basket for purchase, you can hover your mouse
cursor over the shopping cart icon to view a list of items in the basket. From here, you can
proceed to checkout to place your order and purchase your items by clicking

MySchoolBucks Parent User Guide
53
of
70
View Cart/Checkout or you can remove an item from the cart by clicking the X next to the
item’s price.
NOTE: The basket will only contain items being purchased during the current session. If you log
out without placing your order, the basket will be cleared and the items will not be purchased.
Another way you can proceed to the checkout page is by hovering your mouse cursor over
School Store and clicking View Cart/Checkout.
NOTE: When you first view your cart to complete your purchase, you will be prompted to select
a Membership option. To begin enrolling in a membership, select Membership Option and click
Continue to see what memberships are available to you. To opt out of a membership option
and pay program fees, select Pay-As-You-Go and click Continue.
MySchoolBucks Parent User Guide
54
of
70
On the Place Store Order page, you can change the quantity of items being purchased by
entering an amount in the Quantity column (for applicable items) and you can remove items by
clicking the X next to their price.
Select a payment method, either e-Check or Credit Card. If you have not entered a payment
method before, you will be prompted to enter one now. When using a previously created
payment method, select the payment method from the drop-down menu. If the preferred

MySchoolBucks Parent User Guide
55
of
70
payment method does not appear in the menu, click Enter a new checking account to enter a
new eCheck account or Enter a new credit card to enter a new credit card.
When you have finished reviewing your order, click Place Order to place the order and
purchase the items.
Once the order has been placed, you will receive a confirmation screen, as well as a reference
code for the order and an email sent to the email associated with your account, if applicable.
Click Print Order to print a copy of the order and click Finish to finish the purchase.
MySchoolBucks Parent User Guide
56
of
70
Managing Payments
School Invoices
When a school charges you a fee, such as for special classes or overdue library books, the fees
will show up on the School Invoices screen. You can use the School Invoices screen to pay off
fees immediately, make partial payments, or create payment plans to pay off fees over a period
of time.
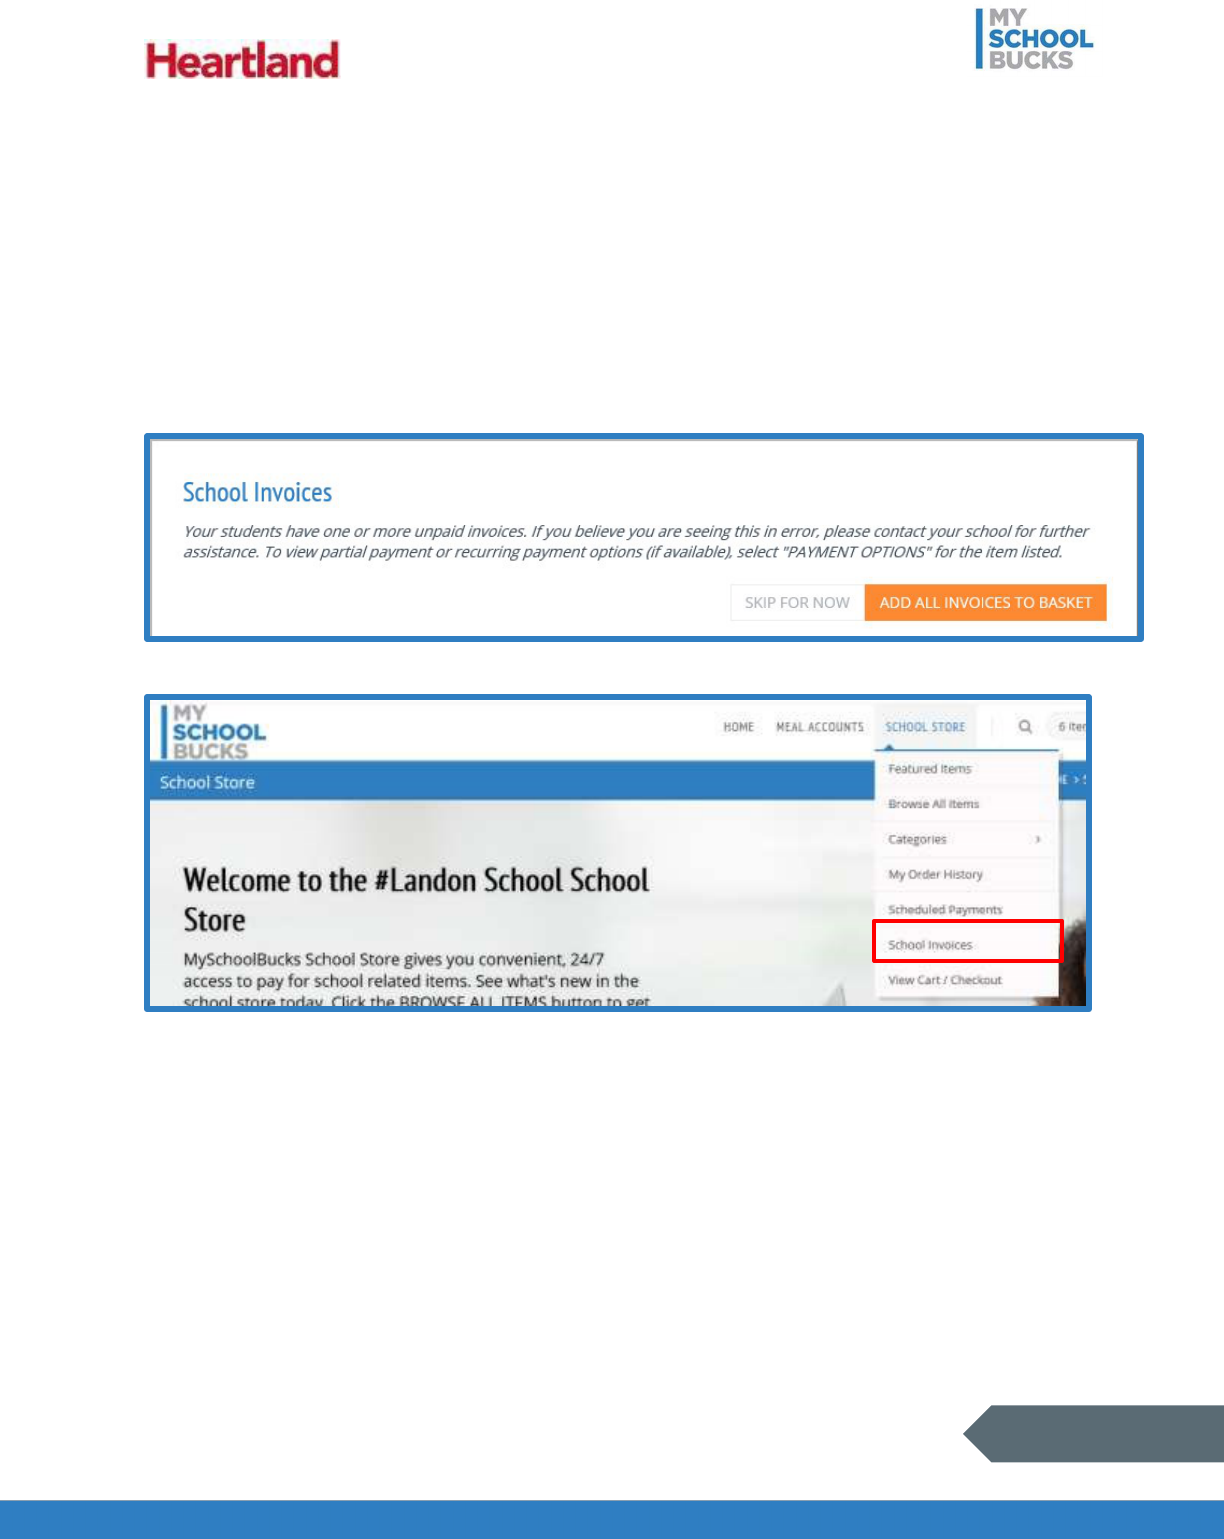
The School Invoices screen appears after you log in if you have any outstanding fees related to
your student accounts. If you would like to pay the fees at a different time, click Skip for Now.
You can check your student’s fees by clicking School Invoices under School Store.
When paying fees on the School Invoices screen, you can add fees individually or all at once. If
you plan on paying off all of the fees immediately, click Add All Invoices to Basket. If you are
only paying certain fees, click Add To Basket next to the fees you would like to pay.

MySchoolBucks Parent User Guide
57
of
70
After clicking Add To Basket, the fee will display a green checkmark if added successfully.
IMPORTANT: Adding fees to the basket does not count as paying them. You will need to view
your basket and check out before the fees will be paid.

MySchoolBucks Parent User Guide
58
of
70
When adding fees to the basket individually, you have the option to select how you will pay. To
view and select your specific payment options for a fee, click Payment Options next to the fee
you are paying.
If you are paying in full, leave the option selected at Pay in full and click Add To Basket.
If you are paying part of the fee, click Make a partial payment and enter the amount you are
paying. Then, click Add To Basket.

MySchoolBucks Parent User Guide
59
of
70
If you want to set up a series of smaller payments, select Set up installment payments. Then,
select a payment option from the drop-down menu on the right. Once you have selected a
payment installment option, click Add to Basket.
If you are adding all of your fees to the cart at once, click Add All Invoices To Basket. The
payments on the page should all show a green checkmark to indicate that they were added to
the cart successfully.

MySchoolBucks Parent User Guide
60
of
70
After adding all of the fees you will be paying to the basket, click View Cart/Checkout.
On the Place Store Order page, you can remove items by clicking the X next to their price. Any
fees removed in this way will be viewable again on the School Invoices page.

MySchoolBucks Parent User Guide
61
of
70
Select a payment method, either e-Check or Credit Card. If you have not entered a payment
method before, you will be prompted to enter one now. When using a previously created
payment method, select the payment method from the drop-down menu. If the preferred
payment method does not appear in the menu, click Enter a new checking account to enter a
new eCheck account or Enter a new credit card to enter a new credit card.
When you have finished reviewing your order, click Place Order to place the order and
purchase the items.

MySchoolBucks Parent User Guide
62
of
70
My Order History contains all orders placed through MySchoolBucks. To open the My Order
History page, click My Order History under the School Store drop-down menu.
My Order History includes both one-time prepayments and scheduled prepayments. From this
location, you can view the details of past payments such as the date that the order was placed,
the frequency of the order, and the billing account that the order is being billed to. Check the
order details by clicking View Order or View/Edit Order. You can also print orders by clicking
the printer icon.
My Order History

MySchoolBucks Parent User Guide
63
of
70
If you have a scheduled payment that is being made as a result of a student’s account falling
below their low balance threshold, you can modify the low balance threshold associated with the
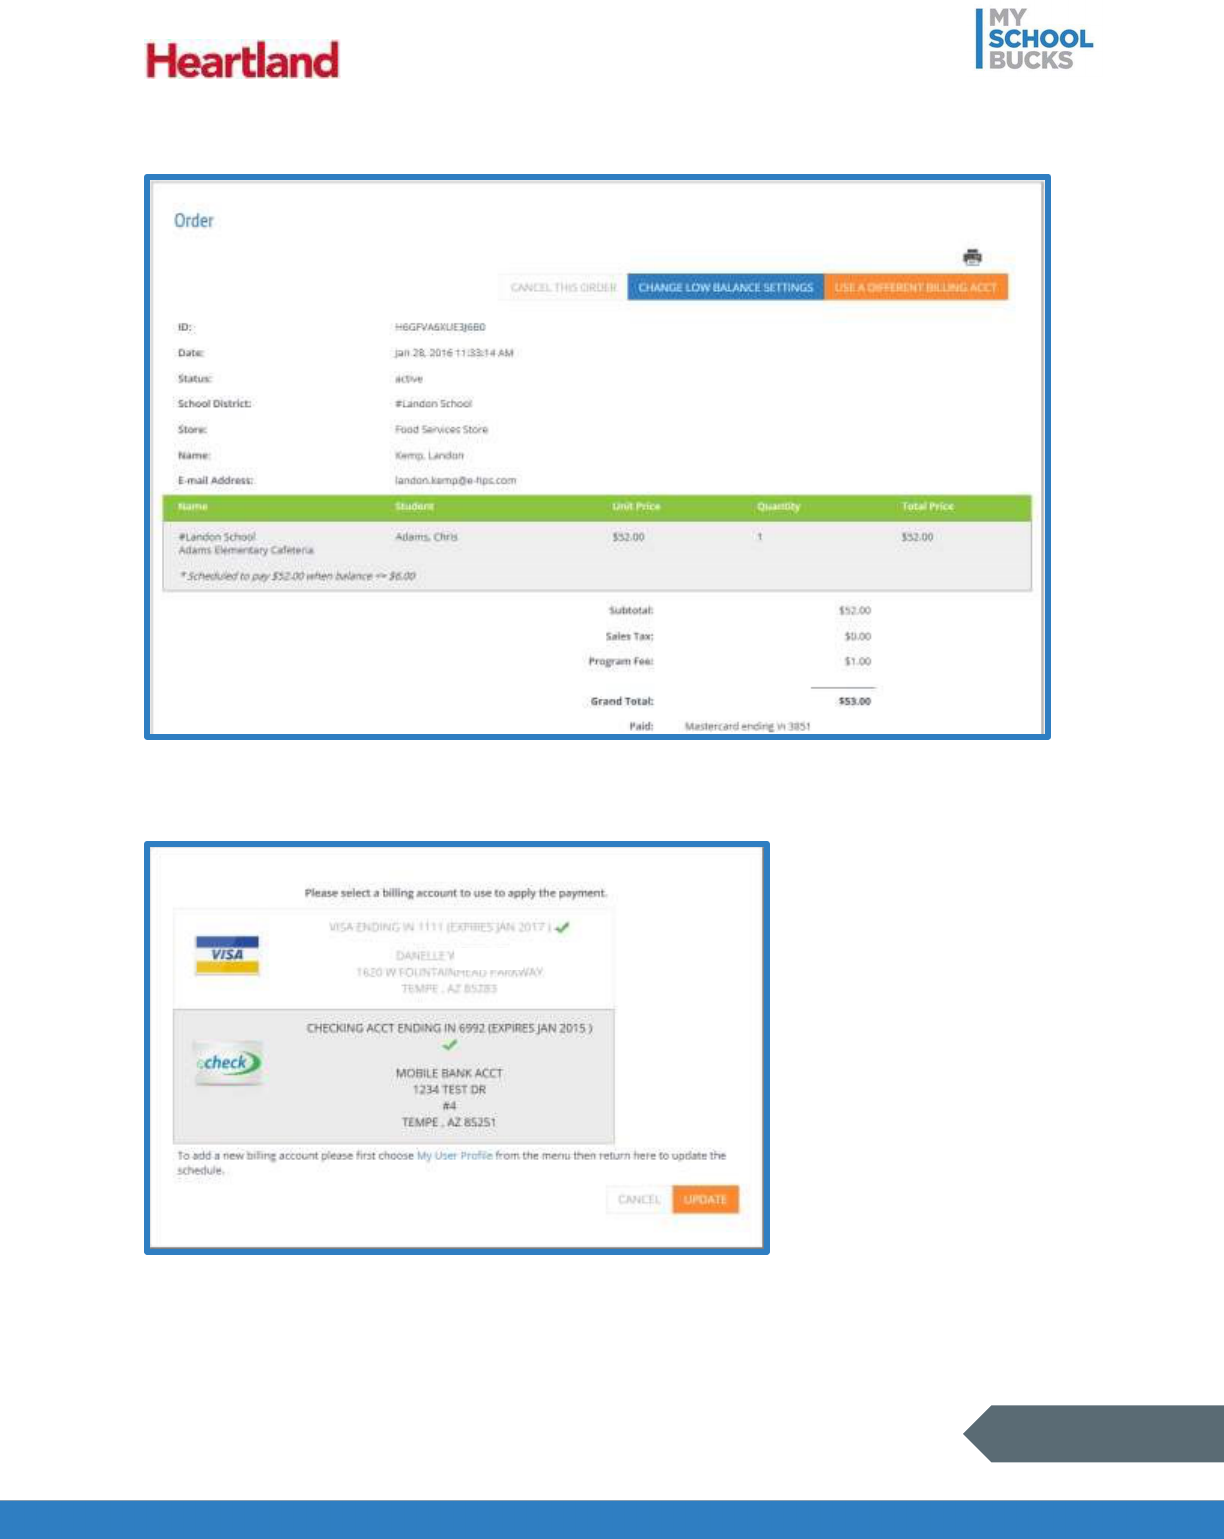
payment by clicking View/Edit Order.
To cancel the order, click Cancel This Order. To change the payment method used to complete
the scheduled payment, click Use a Different Billing Acct.
If the payment is the result of reaching a low balance threshold, you can edit the associated low
balance threshold and the payment amount by clicking Change Low Balance Settings.

MySchoolBucks Parent User Guide
64
of
70
To change the payment method, choose the new payment method you would like to use for the
payment and click Update. Note that new payment methods cannot be added from this screen.
To change the low balance threshold associated with the payment, edit the number in the Low
Balance Amount field. To change the amount being paid in response to the low balance, edit
the Payment Amount field. To save your changes, click Update.

MySchoolBucks Parent User Guide
65
of
70
If for some reason your scheduled prepayment cannot process and is canceled, likely due to a
product being no longer available, an e-mail will be sent to your account’s e-mail address.
One-time prepayments with the status of “Closed” cannot be cancelled or voided. If you are
requesting a refund and the order has already been closed, you will need to obtain the refund
directly from the school.
Scheduled Payments
The Scheduled Payments page lists the payments that are scheduled to process in the near
future. These payments are organized by student on the account. To view scheduled payments,
select Scheduled Payments from the School Store drop-down menu.

MySchoolBucks Parent User Guide
66
of
70
From this page, you can view scheduled payments on your account. In addition, you can also
cancel a payment or change the billing information associated with the payment. To cancel an
order, change the billing information on a payment, or modify the low balance threshold
associated with a payment, first click View/Edit next to the payment you would like to modify.
To cancel the order, click Cancel This Order. To change the payment method used to complete
the scheduled payment, click Use a Different Billing Acct.
MySchoolBucks Parent User Guide
67
of
70
If the payment is the result of reaching a low balance threshold, you can edit the associated low
balance threshold and the payment amount by clicking Change Low Balance Settings.
To change the payment method, choose the new payment method you would like to use for the
payment and click Update. Note that new payment methods cannot be added from this screen.

MySchoolBucks Parent User Guide
68
of
70
To change the low balance threshold associated with the payment, edit the number in the Low
Balance Amount field. To change the amount being paid in response to the low balance, edit
the Payment Amount field. To save your changes, click Update.
If for some reason your scheduled prepayment cannot process and is canceled, likely due to a
product being no longer available, an e-mail will be sent to your account’s e-mail address.
One-time prepayments with the status of “Closed” cannot be cancelled or voided. If you are
requesting a refund and the order has already been closed, you will need to obtain the refund
directly from the school.

MySchoolBucks Parent User Guide
69
of
70
FAQ and Contacting Support
Users have access to the Frequently Asked Questions as well as the parent support phone
number at the bottom of every page in MySchoolBucks by clicking Help.
You may also send Support Requests and submit User Feedback through the Contact Us
option in the top right corner or at the bottom of the page.
Support
For additional support, please contact Technical Support between the hours of 8 AM EST and 5 PM EST at
1-800-803-6755.
You may also contact customer technical support by using our support request form.

MySchoolBucks Parent User Guide
70
of
70
This confidential document is issued pursuant to non-disclosure agreements in place and subject to the terms and conditions
contained therein. Reproduction or use, without the express permission from Heartland School Solutions of any portion of this
manual is prohibited. Copyright 2017, Heartland School Solutions.
