
D15358.01 APRIL 2016
Collaboration Endpoint software
version 8.1
© 2016 Cisco Systems, Inc.
All rights reserved.
1
D15358.01 APRIL 2016
Collaboration Endpoint software
version 8.1
© 2016 Cisco Systems, Inc.
All rights reserved.
In-Room Control
on Touch10
User Interface Extensions
Cisco TelePresence
MX200 G2, MX300 G2, MX700, MX800,
SX10, SX20, SX80
CE8.1
APRIL 2016
Table of contents
Introduction
Create a user interface
API for in-room control
Widgets
Command reference
Troublesho oting
Tips and tricks
Examples
Table of contents
Introduction
Create a user interface
API for in-room control
Widgets
Command reference
Troublesho oting
Tips and tricks
Examples

D15358.01 APRIL 2016
Collaboration Endpoint software
version 8.1
© 2016 Cisco Systems, Inc.
All rights reserved.
2
Table of contents
Introduction .....................................................................................................4
Definition of terms .........................................................................................4
In-room controls ...........................................................................................5
Create a user interface for the Touch 10 .........................................................7
Launch the in-room control editor .................................................................8
Create the in-room control panel ..................................................................9
API for programming in-room controls ..........................................................14
Connect to the video system ......................................................................14
Communicate over the API .........................................................................15
Widgets .........................................................................................................20
The widget identifier ...................................................................................20
Toggle button .............................................................................................. 21
Slider ..........................................................................................................22
Spinner .......................................................................................................23
Button with custom text ..............................................................................24
Button with symbol .....................................................................................25
Group button ...............................................................................................26
Text box ......................................................................................................27
Command reference .....................................................................................29
Events ........................................................................................................ 30
Commands .................................................................................................32
Statuses ..................................................................................................... 33
Troubleshooting ............................................................................................ 35
Development tools on the web interface .................................................... 35
Tips and tricks .............................................................................................. 38
Examples .......................................................................................................41
How to use this guide
The left menu bar and the entries in the table of contents are all
hyperlinks. You can click on them to go to the topic.
Product documentation
User guides and compliance and safety information
for Cisco TelePresence systems are available at
http://www.cisco.com/go/telepresence/docs
We recommend that you visit the Cisco web site regularly for
updated versions of this guide.
Table of contents
Introduction
Create a user interface
API for in-room control
Widgets
Command reference
Troubleshooting
Tips and tricks
Examples
Table of contents

D15358.01 APRIL 2016
Collaboration Endpoint software
version 8.1
© 2016 Cisco Systems, Inc.
All rights reserved.
3
Introduction
Table of contents
Introduction
Create a user interface
API for in-room control
Widgets
Command reference
Troubleshooting
Tips and tricks
Examples
IntroductionIntroduction

D15358.01 APRIL 2016
Collaboration Endpoint software
version 8.1
© 2016 Cisco Systems, Inc.
All rights reserved.
4
Introduction
With In-Room Control you can add custom elements to our Touch10 user
interface. Such user interface extensions may be controls for lights or blinds, or
other peripherals controlled by external control systems.
Since both the Cisco video system and the other peripherals are controlled from
the Touch 10 user interface, you get a consistent user experience throughout
the meeting room.
The in-room control feature is available for the SX Series and MX Series video
systems running Collaboration Endpoint Software, version CE8.1 or later.
Definition of terms
Video system - Video system or codec in the Cisco TelePresence MXSeries
or SXSeries that runs Collaboration Endpoint Software, version CE8.1 or later.
Sometimes referred to as video device.
Control system - Third-party control system with hardware drivers for
peripherals, for example Crestron, AMX, Apple HomeKit, or Android.
Touch10 - Out touch-based control device for the MXSeries and SXSeries
video systems. Full product name: Cisco TelePresence Touch10. Also known as
Touch10 controller, or Touch10 user interface.
In-room control panel - Panel with controls for third-party peripherals in the
room. The panel opens when you tap the in-room control icon in the status bar
on Touch10. Refer to the Create a user interface chapter.
In-room control editor - Our easy to use drag-and-drop editor for making in-
room control panels.
xAPI - The bi-directional API of the video system. The xAPI allows third-party
applications to interface with and interact with the video system, and vice versa.
Widget - User interface element, for example buttons, sliders, and text fields,
that you can use to build an in-room control panel for Touch 10.
Table of contents
Introduction
Create a user interface
API for in-room control
Widgets
Command reference
Troubleshooting
Tips and tricks
Examples
Introduction

D15358.01 APRIL 2016
Collaboration Endpoint software
version 8.1
© 2016 Cisco Systems, Inc.
All rights reserved.
5
In-room controls
Example of an in-room control panel on Touch 10
In-room control panel
In-room control icon
(entry icon)
You can customize our Touch10 user interface to allow control of peripherals in
a meeting room, for example lights and blinds.
You need a Cisco video system with a Touch10 user interface, and a third-
party control system, for example Crestron, AMX, Apple HomeKit, or Android.
The video system's API, referred to as the xAPI, is the link between the video
system and the control system. Use the events and commands exposed by the
xAPI when you program the control system.
The simple drag-and-drop in-room control editor offers a library of user
interface elements, referred to as widgets. You can use these widgets to create
your own in-room control panel for the Touch10 user interface.
Together, all of this allows for the powerful combination of the control system's
functionality and the user-friendly Touch10 user interface.
In-room control schematics
Video system
Blinds
Climate
Lights
Other...
Touch10
In-room
control
editor
xAPI
Control system
Table of contents
Introduction
Create a user interface
API for in-room control
Widgets
Command reference
Troubleshooting
Tips and tricks
Examples
Introduction

D15358.01 APRIL 2016
Collaboration Endpoint software
version 8.1
© 2016 Cisco Systems, Inc.
All rights reserved.
6
Create a user interface
Use the in-room control editor to create the user interface
and to apply it to the video system
Table of contents
Introduction
Create a user interface
API for in-room control
Widgets
Command reference
Troubleshooting
Tips and tricks
Examples
Create a user interfaceCreate a user interface

D15358.01 APRIL 2016
Collaboration Endpoint software
version 8.1
© 2016 Cisco Systems, Inc.
All rights reserved.
7
Create a user interface for the Touch 10
Offline
There are two places from which you can download the offline editor:
• Download from http://www.cisco.com/go/in-room-control-docs
• Or, sign in to a video system's web interface with administrator credentials,
navigate to Integration > In-Room Control, and click Download Editor.
Extract the files from the downloaded zip-file. Keep the folder structure as is.
With the offline editor you have to work with files, rather than communicating
directly with the video system and Touch10. Apart from this, the offline editor
has full functionality.
The editor that you launch from the video system's web interface and the offline
editor share the same file format, so files created in one version can be opened
and modified in the other.
Offline in-room control editor
Export new
in-room control
panel to file
Import an
in-room control
panel from file
Offline
in-room
control
editor
Use our in-room control editor to create customized panels for peripheral
controls on the video system’s Touch10 user interface.
Connected to video system
If you have access to the video system, you can launch the editor from the
video system's web interface. Then you have immediate access to the video
system and its Touch10 user interface.
If there is already an in-room control panel on the Touch10, it will automatically
load into the editor, and you can use it as a starting point for your design.
When you push a new panel to the video system, you will immediately see the
result on the Touch10.
In-room control editor launched from the video system's web interface
Video system
Touch10
Push new in-room control
panel to video system
Import existing in-room control
panel from video system
In-room
control
editor
Export new
in-room control
panel to file
Import an
in-room control
panel from file
Table of contents
Introduction
Create a user interface
API for in-room control
Widgets
Command reference
Troubleshooting
Tips and tricks
Examples
Create a user interface

D15358.01 APRIL 2016
Collaboration Endpoint software
version 8.1
© 2016 Cisco Systems, Inc.
All rights reserved.
8
Launch the in-room control editor
Sign in to the video system's web interface with administrator credentials,
navigate to Integration > In-Room Control, and click Launch Editor.
If there is an in-room control panel on the video system already, it will
automatically load into the editor.
Offline version
If you are using the offline version of the editor, open the index.html file that you
find in the rceditor folder.
Create a new panel
Import the current panel from the
video system (codec), or import a
panel that has been exported to a
file on an earlier occasion
Export your panel to the video
system (codec), or export it to a
file that can be imported back into
the editor at a later stage
Choose an in-room control icon;
delete the panel from the video
system (codec)
Tutorial on how to use the editor
Link to online guides
Widget library
The in-room control editor
Table of contents
Introduction
Create a user interface
API for in-room control
Widgets
Command reference
Troubleshooting
Tips and tricks
Examples
Create a user interface

D15358.01 APRIL 2016
Collaboration Endpoint software
version 8.1
© 2016 Cisco Systems, Inc.
All rights reserved.
9
Create the in-room control panel
Start the design of the in-room control panel
If an in-room control panel was not automatically loaded when you launced the
editor, choose one of these alternatives:
• New creates a blank in-room control panel in the editor.
• Import> From file loads an in-room control panel, which has been exported
to a local file on an earlier occasion, into the editor.
• Import> From codec loads the current in-room control panel from the video
system into the editor. Not available in the offline editor.
All alternatives erase any unsaved data in the editor, but the existing in-room
control panel on the video system is neither overwritten nor deleted until a new
panel is exported to the video system.
Start or continue the design of an in-room control panel
Table of contents
Introduction
Create a user interface
API for in-room control
Widgets
Command reference
Troubleshooting
Tips and tricks
Examples
Create a user interface

D15358.01 APRIL 2016
Collaboration Endpoint software
version 8.1
© 2016 Cisco Systems, Inc.
All rights reserved.
10
Design the in-room control panel
What you see in the editor's design panel is similar to how the in-room control
panel will appear on the Touch10.
An in-room control panel is arranged in pages, which will appear as separate
tabs in the in-room control panel on Touch 10. Each page consists of one
or more rows, which you can populate with text and user interface elements
known as widgets.
Widgets are arranged in a four-column grid. The widgets are placed into the
grid according to the following rules:
• A widget fills between one and four columns depending on its size.
• A row is populated from right to left.
• If you add more widgets than fits in one line, widgets wrap to a new line
within the same row.
How you use the user interface elements for your meeting room is up to you.
You can, for example, create panels with preset buttons for lights and blinds, or
support for more complex scenarios such as controls for many microphones
in a large meeting room. You can find some examples for inspiration in the
Examples chapter.
Refer to the next page on how to create the panel.
The in-room control editor. Widgets from the widget library are placed in a four-column grid.
Design panel
Widget library
Four-column grid
Buttons with familiar
symbols like home,
power, arrows, camera
and loudspeaker controls,
media player controls
Buttons with custom text,
group buttons, toggle
button, sliders, spinners,
and other elements
Table of contents
Introduction
Create a user interface
API for in-room control
Widgets
Command reference
Troubleshooting
Tips and tricks
Examples
Create a user interface

D15358.01 APRIL 2016
Collaboration Endpoint software
version 8.1
© 2016 Cisco Systems, Inc.
All rights reserved.
11
1
Give the page a name
Click the page text, and enter a name.
2
Give the row a name
Click the row text, and enter a name.
3
Add widgets from the library
Drag and drop as many widgets as you need
from the widget library onto a row.
4
Enter custom text on widgets
Click the dummy-text on a button, group
button, or text field, and enter the appropriate
text.
5
Define unique identifiers
Click the widget, and type unique identifiers in
the input fields that pops up below the design
panel. You can either use the pre-assigned
identifiers or define your own.
All widgets have a unique WidgetID. Only
Group buttons have GroupIDs.
Read more about the identifiers in the Widgets
chapter.
6
Add more rows
Click
+
to add a new row.
Repeat steps 2-5 for each row.
7
Add more pages
Click
+
to add a new page.
Repeat steps 1-6 for each page.
8
Choose an in-room control icon
Click Settings in the menu, and choose an in-
room control icon (entry icon).
The in-room control icon appears in the status
bar on Touch10. When you tap the icon, the
in-room control panel opens.
Re-arrange elements
Drag a page, row, or widget, and drop it in its new
position. Drop it outside the design panel to delete it.
8
1
2
3
6
74
5
Table of contents
Introduction
Create a user interface
API for in-room control
Widgets
Command reference
Troubleshooting
Tips and tricks
Examples
Create a user interface
D15358.01 APRIL 2016
Collaboration Endpoint software
version 8.1
© 2016 Cisco Systems, Inc.
All rights reserved.
12
Apply the in-room control panel to the video system
(Not available when using the offline editor. Instead, you should export the in-
room control panel to a file in order to save your work for later.)
Apply the in-room control panel to the video system. You will see the results
immediately on the Touch10.
• Choose Export > To codec
Check the result on Touch10
(Not available when using the offline editor.)
Tap the in-room control icon (light bulb or generic utility icon) in the Touch10
status bar to open the in-room control panel.
In-room control icon
Which in-room control icon to display is defined under Settings in the editor. If
you change to the other icon, you have to export the in-room control panel to
the video system again.
Export the in-room control panel to file
Export the in-room control panel to a file, which can be imported back into the
editor at a later stage.
• Choose Export > To file
If you are using the offline editor, this is the only way you can save your work for
later.
Exporting to file may also be useful as a way of creating a design template if you
are going to push the same in-room control panel to multiple video systems.
Files exported while connected to a video system are in the same format as
files exported from an offline editor. This means that any of these files can be
imported into an editor launched from a video system's web interface, and then
pushed to the video system's Touch10.
Table of contents
Introduction
Create a user interface
API for in-room control
Widgets
Command reference
Troubleshooting
Tips and tricks
Examples
Create a user interface

D15358.01 APRIL 2016
Collaboration Endpoint software
version 8.1
© 2016 Cisco Systems, Inc.
All rights reserved.
13
API for in-room control
Table of contents
Introduction
Create a user interface
API for in-room control
Widgets
Command reference
Troubleshooting
Tips and tricks
Examples
API for in-room controlAPI for in-room control

D15358.01 APRIL 2016
Collaboration Endpoint software
version 8.1
© 2016 Cisco Systems, Inc.
All rights reserved.
14
API for programming in-room controls
Connect to the video system
The video system's API (also known as the xAPI) allows bi-directional
communication with third-party control systems, such as those from AMX or
Crestron. There are multiple ways to access the xAPI:
• Telnet
• SSH
• HTTP/HTTPS
• Ethernet port
• RS-232 / serial connection
Regardless of the method you choose, the structure of the xAPI is the same.
Choose the access method that suits your application and video system the
best.
Consult the API guide for your video system for a full description of available
access methods and how to use the xAPI. Go to
http://www.cisco.com/go/sx-docs for SX Series, or
http://www.cisco.com/go/mx-docs for MX Series
Then, click Reference Guides > Command References to find the API guides.
Table of contents
Introduction
Create a user interface
API for in-room control
Widgets
Command reference
Troubleshooting
Tips and tricks
Examples
API for in-room control

D15358.01 APRIL 2016
Collaboration Endpoint software
version 8.1
© 2016 Cisco Systems, Inc.
All rights reserved.
15
Communicate over the API
The video system and the control system exchange messages through the xAPI
to make sure that the Touch10 in-room control panel truly reflects the status of
the room.
The video system sends one or more events when someone uses one of the
controls on the Touch10 in-room control panel, and the control system should
send a command to the video system when there is a change in the room.
The video system and the control system exchange messages through the xAPI.
xAPI
Commands
Events
Video system
Touch10
Control system
Examples:
• When someone taps a Lights On button on Touch10, the video system
sends the associated events. The control system should respond to these
events by switching on the lights in the room and send the corresponding
command back to the video system.
• When someone switch on the lights in the room, the control system should
send a command to the video system, so that the video system can update
the Touch10 in-room control panel to reflect that the light is on.
Consult the Command reference chapter for an overview of all relevant events,
commands and statuses for in-room control.
Table of contents
Introduction
Create a user interface
API for in-room control
Widgets
Command reference
Troubleshooting
Tips and tricks
Examples
API for in-room control

D15358.01 APRIL 2016
Collaboration Endpoint software
version 8.1
© 2016 Cisco Systems, Inc.
All rights reserved.
16
Events for widget actions
The video system sends one or more of the following events when someone
uses the controls on the Touch10 in-room control panel:
• Pressed - sent when a widget is first pressed
• Changed - sent when changing a widget's value
(applies only to toggle buttons and sliders)
• Released - sent when a widget is released
(also when moving out of the widget before releasing)
• Clicked - sent when a widget is clicked
(pressed and released without moving out of the widget)
These events are sent in two versions.
• UserInterface Extensions Event - suited for terminal output mode
• UserInterface Extensions Widget - suited for XML output mode
Refer to the table below to find out which version is best suited for your control
system to register to.
When, and by which widgets (user interface elements), these events are
triggered, are described in the Widgets chapter.
UserInterface Extensions Event (suited for terminal output mode) UserInterface Extensions Widget (suited for XML output mode)
One single string contains information about the type of action, which widget
triggered the event (identified by the WidgetID), and the widget value.
The type of action, which widget triggered the event (identified by the
WidgetID), and the widget value are included as separate elements in the
XML tree.
How to register:
xfeedback register event/UserInterface/Extensions/Event
How to register:
xfeedback register event/UserInterface/Extensions/Widget
Example:
*e UserInterface Extensions Event Pressed Signal: "WidgetId:Value"
** end
*e UserInterface Extensions Event Changed Signal: "
WidgetId:Val ue"
** end
*e UserInterface Extensions Event Released Signal: "
WidgetId:Val ue"
** end
*e UserInterface Extensions Event Clicked Signal: "
WidgetId:Val ue"
** end
Example:
<Event>
<UserInterface item="1">
<Extensions item="1">
<Widget item="1">
<Action item="1">
<WidgetId item="1">
WidgetId</WidgetId>
<Value item="1">
Value</Value>
<Type item="1">
Type</Type>
</Action>
</Widget>
</Extensions>
</UserInterface>
</Event>
Two event versions that a control system can register to: one suited for terminal output mode, the other for XML output mode
Type of action
Type of action
Table of contents
Introduction
Create a user interface
API for in-room control
Widgets
Command reference
Troubleshooting
Tips and tricks
Examples
API for in-room control

D15358.01 APRIL 2016
Collaboration Endpoint software
version 8.1
© 2016 Cisco Systems, Inc.
All rights reserved.
17
Event for panel update
The video system sends the following event when a new in-room control
panel is applied:
• LayoutUpdated - sent when a new in-room control panel for
Touch10 is exported to the video system
As a response to this event, the control system should send commands
to initialize all widgets so that they reflect the true status of the room.
How to register:
xfeedback register event/UserInterface/Extensions/Widget/
LayoutUpdated
Example:
Terminal output mode:
*e UserInterface Extensions Widget LayoutUpdated
** end
XML output mode:
<Event>
<UserInterface item="1">
<Extensions item="1">
<Widget item="1">
<LayoutUpdated item="1"/>
</Widget>
</Extensions>
</UserInterface>
</Event>
Table of contents
Introduction
Create a user interface
API for in-room control
Widgets
Command reference
Troubleshooting
Tips and tricks
Examples
API for in-room control

D15358.01 APRIL 2016
Collaboration Endpoint software
version 8.1
© 2016 Cisco Systems, Inc.
All rights reserved.
18
Commands and statuses
The
SetValue
command, which sets the value of a widget, is essential when
working with in-room controls:
xCommand UserInterface Extensions Widget SetValue Value: Value
WidgetId:
WidgetId
When the video system receives a
SetValue
command, the video system's
status and the Touch10 in-room control panel are updated accordingly.
It is important that the control system sends
SetValue
commands in the
following situations, so that the Touch10 in-room control panel truly reflects the
status of the room:
• When the control system initially connects to the video system.
• When the video system restarts.
• When the control system restarts.
• When a new in-room control panel is exported to the video system from the
in-room control editor (as response to the LayoutUpdated event).
• When someone physically changes something in the room, for example turns
on the lights using a wall control.
• As a response to an event, for example when someone has tapped the
Lights On button on the Touch10 in-room control panel.
The control system must also do all that is necessary in the room to reflect
the action on the Touch10 in-room control panel, for example switch on the
light.
Consult the Widgets chapter for more details about which commands apply to
the different widgets (user interface elements).
Examples
User
Control
system Lights
Video system
with Touch 10
Tap Lights On
Pressed and
Released events for
Lights On widget
Turn lights on
Set the value of the
Lights On widget to
active
The appearance of
the light widget has
changed to match
what the user can
see in the room
Message flow - turn on the lights using the controls on Touch 10
User
Control
system Lights
Video system
with Touch 10
Set the value of
the Lights On
widget to active
The appearance
of the light
widget has
changed to
match what the
user can see in
the room
User
Turn lights on
with wall control
Signal that lights
are on
Message flow - turn on the lights using the wall control
Table of contents
Introduction
Create a user interface
API for in-room control
Widgets
Command reference
Troubleshooting
Tips and tricks
Examples
API for in-room control

D15358.01 APRIL 2016
Collaboration Endpoint software
version 8.1
© 2016 Cisco Systems, Inc.
All rights reserved.
19
Widgets
Description of the user interface elements and
their associated events and commands
Table of contents
Introduction
Create a user interface
API for in-room control
Widgets
Command reference
Troubleshooting
Tips and tricks
Examples
WidgetsWidgets

D15358.01 APRIL 2016
Collaboration Endpoint software
version 8.1
© 2016 Cisco Systems, Inc.
All rights reserved.
20
The widget identifier
All widgets on a Touch10 in-room control panel need a unique identifier,
a WidgetID. The WidgetID may either be defined by you, or assigned
automatically. The WidgetID can be any name or number; we recommend
using a descriptive name without special characters. The maximum number of
characters is 40.
The WidgetID is the programming link between Touch10, the video system,
and the control system. The WidgetID will be included in all events that are
associated with a widget, and you must use the same identifier when you send
commands to that widget via the code that you write for your control system.
Group identifiers
One of the widgets, the Group button, has two types of identifiers: The
WidgetID refers to the complete group of buttons, while GroupIDs are unique
identifiers for the individual buttons within the group.
Option 1 Option 2 Option 3
Widget_ID_groupbutton
Group_ID_one Group_ID_two Group_ID_three
A GroupID is assigned automatically, but can be defined by you instead. A
GroupID can be any name or number; we recommend using a descriptive
name without special characters. The maximum number of characters is 255.
Widgets
The Touch10 in-room control panel is composed of user interface elements
called widgets. You can find the complete widget library in the right pane of the
in-room control editor.
• General tab: Buttons with custom text, group buttons, toggle button, sliders,
text fields and more.
• Icons tab: Buttons with familiar symbols for Home, Power, Arrow up/down/
left/right, Camera controls, Loudspeaker controls, Microphone control, Media
player controls, and more.
The content of the next few pages describes each widget type, with emphasis
on:
• Commands that change the value of the widget
• Events that are sent (pressed, changed, released, clicked) and which actions
trigger these events
• Examples of commands and events, both in terminal output mode and XML
output mode
Syntax and semantics for all events, commands and statuses that are
related to in-room controls (user interface extensions) are included in the
Commandreference chapter.
Table of contents
Introduction
Create a user interface
API for in-room control
Widgets
Command reference
Troubleshooting
Tips and tricks
Examples
Widgets

D15358.01 APRIL 2016
Collaboration Endpoint software
version 8.1
© 2016 Cisco Systems, Inc.
All rights reserved.
21
Events
Changed Triggered when the button is released.
Value: <on/off>
Toggle button
on
off
A two-state switch which indicates either on or off.
Example: Press "on" on the toggle button with WidgetId = "togglebutton".
Terminal mode
*e UserInterface Extensions Event Changed Signal: "togglebutton:on"
** end
XML mode
<Event>
<UserInterface item="1">
<Extensions item="1">
<Widget item="1">
<Action item="1">
<WidgetId item="1">togglebutton</WidgetId>
<Value item="1">on</Value>
<Type item="1">changed</Type>
</Action>
</Widget>
</Extensions>
</UserInterface>
</Event>
Example: Set the button with WidgetId = "togglebutton" to "on".
xCommand UserInterface Extensions Widget SetValue
WidgetId: "togglebutton" Value: "on"
Commands
The visual appearence of the button changes immediately when you tap it.
However, the control system must always send a
SetValue
command to the
video system when the button toggles between on and off. This ensures that
the status is updated accordingly.
Example of use: Anything that can be turned on or off, for example lights, fan,
and projector. You can use a toggle button together with a slider for lights that
can be dimmed.
Table of contents
Introduction
Create a user interface
API for in-room control
Widgets
Command reference
Troubleshooting
Tips and tricks
Examples
Widgets

D15358.01 APRIL 2016
Collaboration Endpoint software
version 8.1
© 2016 Cisco Systems, Inc.
All rights reserved.
22
Events
Pressed Triggered when the slider is pressed
Value: N/A
Changed Triggered when the slider is moved while holding down, and when
the slider is released
Value: 0-255
Released Triggered when the slider is released
Value: 0-255
Slider
Example of use: Dimmable lights, volume control.
Example: Press the slider with WidgetId = "slider", and move it into a new
position ("68"), and release.
Terminal mode
*e UserInterface Extensions Event Pressed Signal: "slider"
** end
*e UserInterface Extensions Event Changed Signal: "slider:32"
** end
*e UserInterface Extensions Event Changed Signal: "slider:68"
** end
*e UserInterface Extensions Event Released Signal: "slider:68"
** end
XML mode
.
.
.
<Event>
<UserInterface item="1">
<Extensions item="1">
<Widget item="1">
<Action item="1">
<WidgetId item="1">slider</WidgetId>
<Value item="1">68</Value>
<Type item="1">released</Type>
</Action>
</Widget>
</Extensions>
</UserInterface>
</Event>
Example: Set the slider with WidgetId = "slider" to position "98".
xCommand UserInterface Extensions Widget SetValue WidgetId: "slider"
Value: "98"
Commands
The visual appearence of the slider changes immediately when you tap or slide
it. However, the control system must always send a
SetValue
command to the
video system to tell the new position of the slider. This ensures that the status is
updated accordingly.
A slider selects values within a set range. The minimum value is represented
by 0, and the maximum value is represented by 255. When the slider is being
pressed and moved, events are sent maximum 5 times a second.
When you tap the bar, the slider is immediately moved to that new position.
Table of contents
Introduction
Create a user interface
API for in-room control
Widgets
Command reference
Troubleshooting
Tips and tricks
Examples
Widgets

D15358.01 APRIL 2016
Collaboration Endpoint software
version 8.1
© 2016 Cisco Systems, Inc.
All rights reserved.
23
Events
Pressed Triggered when one of the spinner buttons is pressed
Value: <increment/decrement>
Released Triggered when one of the spinner buttons is released
Value: <increment/decrement>
Clicked Triggered when one of the spinner buttons is released
Value: <increment/decrement>
Spinner
Aa...
Example of use: Set the desired temperature in the room.
Example: Press and release the decrement button of the spinner with
WidgetId = "spinner".
Terminal mode
*e UserInterface Extensions Event Pressed Signal: "spinner:decrement"
** end
*e UserInterface Extensions Event Released Signal: "spinner:decrement"
** end
*e UserInterface Extensions Event Clicked Signal: "spinner:decrement"
** end
XML mode
.
.
.
<Event>
<UserInterface item="1">
<Extensions item="1">
<Widget item="1">
<Action item="1">
<WidgetId item="1">spinner</WidgetId>
<Value item="1">decrement</Value>
<Type item="1">clicked</Type>
</Action>
</Widget>
</Extensions>
</UserInterface>
</Event>
Example: For the spinner with WidgetId = "spinner", add the text "22" between
the spinner's increment and decrement buttons.
xCommand UserInterface Extensions Widget SetValue WidgetId: "spinner"
Value: "22"
Commands
Use the
SetValue
command to add or update the text between the two
buttons.
A spinner is used to step through a list of values. You may use the two buttons
to increment or decrement a number, or to step through a list of options.
Use the
SetValue
command to add text between the buttons.
Table of contents
Introduction
Create a user interface
API for in-room control
Widgets
Command reference
Troubleshooting
Tips and tricks
Examples
Widgets

D15358.01 APRIL 2016
Collaboration Endpoint software
version 8.1
© 2016 Cisco Systems, Inc.
All rights reserved.
24
Events
Pressed Triggered when the button is pressed
Value: N/A
Released Triggered when the button is released
Value: N/A
Clicked Triggered when the button is released
Value: N/A
Button with custom text
Text
inactive
Text
active
Example of use: Room presets for lighting, for example three buttons that show
Dark, Cool, Bright.
If you want to have the buttons linked so that only one can be selected at a time
(radio buttons), consider to use Group buttons.
Example: Press and release the button with WidgetId = "button".
Terminal mode
*e UserInterface Extensions Event Pressed Signal: "button"
** end
*e UserInterface Extensions Event Released Signal: "button"
** end
*e UserInterface Extensions Event Clicked Signal: "button"
** end
XML mode
.
.
.
<Event>
<UserInterface item="1">
<Extensions item="1">
<Widget item="1">
<Action item="1">
<WidgetId item="1">button</WidgetId>
<Value item="1"></Value>
<Type item="1">clicked</Type>
</Action>
</Widget>
</Extensions>
</UserInterface>
</Event>
Example: Highlight the button with WidgetId = "button" (set it in active state).
xCommand UserInterface Extensions Widget SetValue WidgetId: "button"
Value: "active"
Commands
Use the
SetValue
command to highlight or not the button in the user interface.
A value of
"active"
will highlight the button, and a value of
"inactive"
will
release it.
Buttons with custom text come in different sizes. The size determines the
maximum number of characters you can add. Text does not wrap to a new line.
You cannot use the
SetValue
command to change the text dynamically.
A button has two states: active and inactive. You do not have to set the button in
active state when someone taps it; the button can be used to just send a signal
without changing the button's visual state.
Table of contents
Introduction
Create a user interface
API for in-room control
Widgets
Command reference
Troubleshooting
Tips and tricks
Examples
Widgets
D15358.01 APRIL 2016
Collaboration Endpoint software
version 8.1
© 2016 Cisco Systems, Inc.
All rights reserved.
25
Events
Pressed Triggered when the button is pressed
Value: N/A
Released Triggered when the button is released
Value: N/A
Clicked Triggered when the button is released
Value: N/A
Button with symbol
inactive
active
Example of use: Controls for a media player, or other devices that can start,
stop, pause.
Example: Press and release the button with WidgetId = "symbol".
Terminal mode
*e UserInterface Extensions Event Pressed Signal: "symbol"
** end
*e UserInterface Extensions Event Released Signal: "symbol"
** end
*e UserInterface Extensions Event Clicked Signal: "symbol"
** end
XML mode
.
.
.
<Event>
<UserInterface item="1">
<Extensions item="1">
<Widget item="1">
<Action item="1">
<WidgetId item="1">symbol</WidgetId>
<Value item="1"></Value>
<Type item="1">clicked</Type>
</Action>
</Widget>
</Extensions>
</UserInterface>
</Event>
Example: Highlight the button with WidgetId = "symbol" (set it in active state)
xCommand UserInterface Extensions Widget SetValue WidgetId: "symbol"
Value: "active"
Commands
Use the
SetValue
command to highlight or not the button in the user interface.
A value of
"active"
will highlight the button, and a value of
"inactive"
will
release it.
There are buttons with different symbols under the Icons tab in the library. Such
a button has similar behavior as a button with custom text.
A button has two states: active and inactive. You do not have to set the button in
active state when someone taps it; the button can be used to just send a signal
without changing its visual state.
Table of contents
Introduction
Create a user interface
API for in-room control
Widgets
Command reference
Troubleshooting
Tips and tricks
Examples
Widgets

D15358.01 APRIL 2016
Collaboration Endpoint software
version 8.1
© 2016 Cisco Systems, Inc.
All rights reserved.
26
Events
Pressed Triggered when one of the buttons is pressed
Value: The GroupID of the button (within the group) that was
pressed
Released Triggered when one of the buttons is released
Value: The GroupID of the button (within the group) that was
released
Group button
Text Text Text
No button selected
Text Text Text
One button selected
Example of use: Room presets that are mutually exclusive, like room presets
where you can choose between Dark, Cool, and Bright. Remember to unselect
(release) the preset, if the preset is no longer valid (for instance when changing
the lights with a wall control, or a slider on the Touch10).
Example: There are four buttons in the group with WidgetId = "groupbutton".
Press the button with GroupID = "two".
Terminal mode
*e UserInterface Extensions Event Pressed Signal: "groupbutton:two"
** end
*e UserInterface Extensions Event Released Signal: "groupbutton:two"
** end
XML mode
.
.
.
<Event>
<UserInterface item="1">
<Extensions item="1">
<Widget item="1">
<Action item="1">
<WidgetId item="1">groupbutton</WidgetId>
<Value item="1">two</Value>
<Type item="1">released</Type>
</Action>
</Widget>
</Extensions>
</UserInterface>
</Event>
Example: Select (highlight) the button with GroupID = "one" in the group with
WidgetId = "groupbutton". Then, release all buttons (no buttons are highlighted).
xCommand UserInterface Extensions Widget SetValue
WidgetId: "groupbutton" Value: "one"
xCommand UserInterface Extensions Widget UnsetValue
WidgetId: "groupbutton"
Commands
The visual appearence of the button changes immediately when you tap it.
However, the control system must always send a
SetValue
command to the
video system when one of the buttons are tapped. This ensures that the status
is updated accordingly.
Use the
UnSetValue
command to release all buttons in the group so that no
button is highlighted.
We provide groups of either two, three or four buttons with custom text. The
buttons within a group are linked so that only one can be selected at a time
(also known as radio buttons).
The size of the button determines the maximum number of characters you can
add. Text does not wrap to a new line. You cannot use the
SetValue
command
to change the text dynamically.
Table of contents
Introduction
Create a user interface
API for in-room control
Widgets
Command reference
Troubleshooting
Tips and tricks
Examples
Widgets

D15358.01 APRIL 2016
Collaboration Endpoint software
version 8.1
© 2016 Cisco Systems, Inc.
All rights reserved.
27
Events
None
Text box
Aa
21°C
Aa
Example of use: Help text, instructions, explanation of what different presets
mean, or informative text from the control system, such as “The projector is
warming up”.
The text box with larger font size is primarily meant for status values, such as
the current temperature in the room.
Example: Set the following text in the text box with WidgetId = "textbox": "The
projector is warming up.".
xCommand UserInterface Extensions Widget SetValue
WidgetId: "textbox" Value: "The projector is warming up."
Commands
Use the
SetValue
command to set the text in the text box.
Text boxes come in different sizes. They have up to two lines of text and the
text automatically wraps to the new line.
A small text box with larger font size and no line wrap is also available.
You can define the initial text for the text box in the editor, and later on use the
SetValue
command to enter text dynamically.
Table of contents
Introduction
Create a user interface
API for in-room control
Widgets
Command reference
Troubleshooting
Tips and tricks
Examples
Widgets

D15358.01 APRIL 2016
Collaboration Endpoint software
version 8.1
© 2016 Cisco Systems, Inc.
All rights reserved.
28
Command reference
Syntax and semantics for events, commands, and statuses,
that are used with the user interface extensions
Table of contents
Introduction
Create a user interface
API for in-room control
Widgets
Command reference
Troubleshooting
Tips and tricks
Examples
Command referenceCommand reference

D15358.01 APRIL 2016
Collaboration Endpoint software
version 8.1
© 2016 Cisco Systems, Inc.
All rights reserved.
29
Command reference
This chapter includes syntax and semantics for events, commands, and
statuses, that are used with the user interface extensions.
Refer to the API guide to find descriptions of all configurations, commands, and
statuses. Go to
http://www.cisco.com/go/sx-docs for SX Series,
http://www.cisco.com/go/mx-docs for MX Series
Then, click Reference Guides > Command References to find the API guides.
Overview of events, commands and status
Events .......................................................................................................... 30
UserInterface Extensions Event Pressed .................................................... 30
UserInterface Extensions Event Changed ................................................... 30
UserInterface Extensions Event Released .................................................. 30
UserInterface Extensions Event Clicked ..................................................... 30
UserInterface Extensions Widget Action .....................................................31
UserInterface Extensions Widget LayoutUpdated ........................................31
Commands .................................................................................................... 32
UserInterface Extensions Widget SetValue .................................................32
UserInterface Extensions Widget UnsetValue ..............................................32
UserInterface Extensions Clear ...................................................................32
UserInterface Extensions List ......................................................................32
Statuses ........................................................................................................33
UserInterface Extensions Widget [n] WidgetId ............................................ 33
UserInterface Extensions Widget [n] Value ................................................. 33
Table of contents
Introduction
Create a user interface
API for in-room control
Widgets
Command reference
Troubleshooting
Tips and tricks
Examples
Command reference

D15358.01 APRIL 2016
Collaboration Endpoint software
version 8.1
© 2016 Cisco Systems, Inc.
All rights reserved.
30
UserInterface Extensions Event Released
Sent by the video system when a widget is released (even if moving the finger
out of the widget before releasing it).
Equivalent to the UserInterface Extensions Widget Action event with Type
"Released".
*e UserInterface Extensions Event Released Signal: Signal
where
Signal
: String (0, 255)
The format of the string is “<WidgetId>:<Value>”, where <WidgetId> is
the unique identifier of the widget that triggers the event, and <Value>
is the value of the widget. The range of allowed values depends on the
widget type.
UserInterface Extensions Event Clicked
Sent by the video system when a widget is clicked (pressed and released
without moving the finger out of the widget).
Equivalent to the UserInterface Extensions Widget Action event with Type
"Clicked".
*e UserInterface Extensions Event Clicked Signal: S ignal
where
Signal
: String (0, 255)
The format of the string is “<WidgetId>:<Value>”, where <WidgetId> is
the unique identifier of the widget that triggers the event, and <Value>
is the value of the widget. The range of allowed values depends on the
widget type.
Events
UserInterface Extensions Event Pressed
Sent by the video system when a widget is first pressed.
Equivalent to the UserInterface Extensions Widget Action event with Type
"P r e s s e d ".
*e UserInterface Extensions Event Pressed Signal: Signal
where
Signal
: String (0, 255)
The format of the string is “<WidgetId>:<Value>”, where <WidgetId> is
the unique identifier of the widget that triggers the event, and <Value>
is the value of the widget. The range of allowed values depends on the
widget type.
UserInterface Extensions Event Changed
Sent by the video system when changing a widget's value (applies only to
toggle buttons and sliders).
Equivalent to the UserInterface Extensions Widget Action event with Type
"Changed".
*e UserInterface Extensions Event Changed Signal: Signal
where
Signal
: String (0, 255)
The format of the string is "<WidgetId>:<Value>", where <WidgetId> is
the unique identifier of the widget that triggers the event, and <Value>
is the value of the widget. The range of allowed values depends on the
widget type.
Table of contents
Introduction
Create a user interface
API for in-room control
Widgets
Command reference
Troubleshooting
Tips and tricks
Examples
Command reference
D15358.01 APRIL 2016
Collaboration Endpoint software
version 8.1
© 2016 Cisco Systems, Inc.
All rights reserved.
31
UserInterface Extensions Widget Action
Sent by the video system when someone uses one of the controls on the user
interface (in-room control panel).
Equivalent to the UserInterface Extensions Event
Type
event.
Depending on the action type, this event it equivalent to the UserInterface
Extensions Event Pressed, UserInterface Extensions Event Changed,
UserInterface Extensions Event Released, or UserInterface Extensions Event
Clicked events.
<Event>
<UserInterface item="1">
<Extensions item="1">
<Widget item="1">
<Action item="1">
<WidgetId item="1">
WidgetId</WidgetId>
<Value item="1">
Value</Value>
<Type item="1">
Type</Type>
</Action>
</Widget>
</Extensions>
</UserInterface>
</Event>
where
WidgetId
: String (0, 40)
The unique identifier for the widget that triggered the event.
Value
: String (0, 255)
The value of the widget. The range of allowed values depends on the
widget type.
Type
: <Pressed/Changed/Released/Clicked>
Pressed: Sent when a widget is first pressed.
Changed: Sent when changing a widget's value (only for toggle buttons
and sliders).
Released: Sent when a widget is released (even if moving the finger
out of the widget before releasing it).
Clicked: Sent when a widget is clicked (pressed and released without
moving the finger out of the widget).
UserInterface Extensions Widget LayoutUpdated
Sent by the video system when the configuration file for the user interface
extensions has been updated, i.e. when exporting a new configuration from the
in-room control editor to the video system.
*e UserInterface Extensions Widget LayoutUpdated
or
<Event>
<UserInterface item="1">
<Extensions item="1">
<Widget item="1">
<LayoutUpdated item="1"/>
</Widget>
</Extensions>
</UserInterface>
</Event>
Table of contents
Introduction
Create a user interface
API for in-room control
Widgets
Command reference
Troubleshooting
Tips and tricks
Examples
Command reference

D15358.01 APRIL 2016
Collaboration Endpoint software
version 8.1
© 2016 Cisco Systems, Inc.
All rights reserved.
32
Commands
UserInterface Extensions Widget SetValue
This command sets the value of the given widget, and the UserInterface
Extensions statuses are updated accordingly. If the value is out of range, the
command returns an error.
USAGE:
xCommand UserInterface Extensions Widget SetValue Value: Value
WidgetId:
WidgetId
where
Value
: String (0, 255)
The value of the widget. The range of values depends on the widget
type.
WidgetId
: String (0, 40)
The unique identifier for the widget.
UserInterface Extensions Widget UnsetValue
This command empties the value of the given widget, and the UserInterface
Extensions statuses are updated accordingly. The user interface is notified that
the widget is no longer selected.
USAGE:
xCommand UserInterface Extensions Widget UnsetValue WidgetId:
WidgetId
where
WidgetId
: String (0, 40)
The unique identifier for the widget.
UserInterface Extensions Clear
This command deletes all user interface extensions (widgets) from the video
system.
USAGE:
xCommand UserInterface Extensions Clear
UserInterface Extensions List
Use this command to list all user interface extensions (widgets) that exist on the
video system.
USAGE:
xCommand UserInterface Extensions List
Table of contents
Introduction
Create a user interface
API for in-room control
Widgets
Command reference
Troubleshooting
Tips and tricks
Examples
Command reference

D15358.01 APRIL 2016
Collaboration Endpoint software
version 8.1
© 2016 Cisco Systems, Inc.
All rights reserved.
33
Statuses
UserInterface Extensions Widget [n] WidgetId
UserInterface Extensions Widget [n] Value
This status returns the identifier (WidgetId) and the current value of the widgets.
The value is an empty string until a value is set by using the UserInterface
Extensions Widget SetValue command.
USAGE:
xStatus UserInterface Extensions
Value space of the result returned:
Value: The value of the widget. Depends on widget type. String (0, 255)
WidgetId: The unique widget identifier. String (0, 40).
Example:
xstatus UserInterface Extensions
*s UserInterface Extensions Widget 1 Value: "on"
*s UserInterface Extensions Widget 1 WidgetId: "togglebutton"
*s UserInterface Extensions Widget 2 Value: "255"
*s UserInterface Extensions Widget 2 WidgetId: "slider"
*s UserInterface Extensions Widget 3 Value: "Blinds"
*s UserInterface Extensions Widget 3 WidgetId: "spinner"
*s UserInterface Extensions Widget 4 Value: "inactive"
*s UserInterface Extensions Widget 4 WidgetId: "button"
*s UserInterface Extensions Widget 5 Value: "2"
*s UserInterface Extensions Widget 5 WidgetId: "groupbutton"
*s UserInterface Extensions Widget 6 Value: "Projector is ready"
*s UserInterface Extensions Widget 6 WidgetId: "textfield"
** end
Table of contents
Introduction
Create a user interface
API for in-room control
Widgets
Command reference
Troubleshooting
Tips and tricks
Examples
Command reference

D15358.01 APRIL 2016
Collaboration Endpoint software
version 8.1
© 2016 Cisco Systems, Inc.
All rights reserved.
34
Troubleshooting
Help to identify the source of an error
Table of contents
Introduction
Create a user interface
API for in-room control
Widgets
Command reference
Troubleshooting
Tips and tricks
Examples
TroubleshootingTroubleshooting

D15358.01 APRIL 2016
Collaboration Endpoint software
version 8.1
© 2016 Cisco Systems, Inc.
All rights reserved.
35
Troubleshooting
Development tools on the web interface
Sign in to the video system's web interface with administrator credentials,
navigate to Integration > In-Room Control. Click the arrow to show the
Development Tools.
Overview of all widgets and their status
The Widget State Overview window lists all widgets, and their status. The status
is shown in the Current Value column.
If the Current Value column is empty, the widget has not been initialized and has
no value. We recommend that the control system initializes all widgets when it
initially connects to the video system.
Send value updates to the video system
A control system sends
SetValue
commands to the video system, telling it to
update a widget. For test puposes, you can use the Update Value column in the
Widget State Overview window to simulate a control system.
Enter a value in one of the input fields to immediately send the corresponding
SetValue
command to the video system. The CurrentValue column (status) will
be updated, and the Touch10 in-room control panel changes accordingly.
Click Unset to clear the value of the widget (send an
UnsetValue
command).
If a control system is connected to the video system, the Current Value and
Update Value columns may come out-of-sync. The Current Value column
always shows the current status, regardless of whether the
SetValue
command
is sent from a real control system, or from the Update Value column.
Widget status
Send command
to update widget
Table of contents
Introduction
Create a user interface
API for in-room control
Widgets
Command reference
Troubleshooting
Tips and tricks
Examples
Troubleshooting
D15358.01 APRIL 2016
Collaboration Endpoint software
version 8.1
© 2016 Cisco Systems, Inc.
All rights reserved.
36
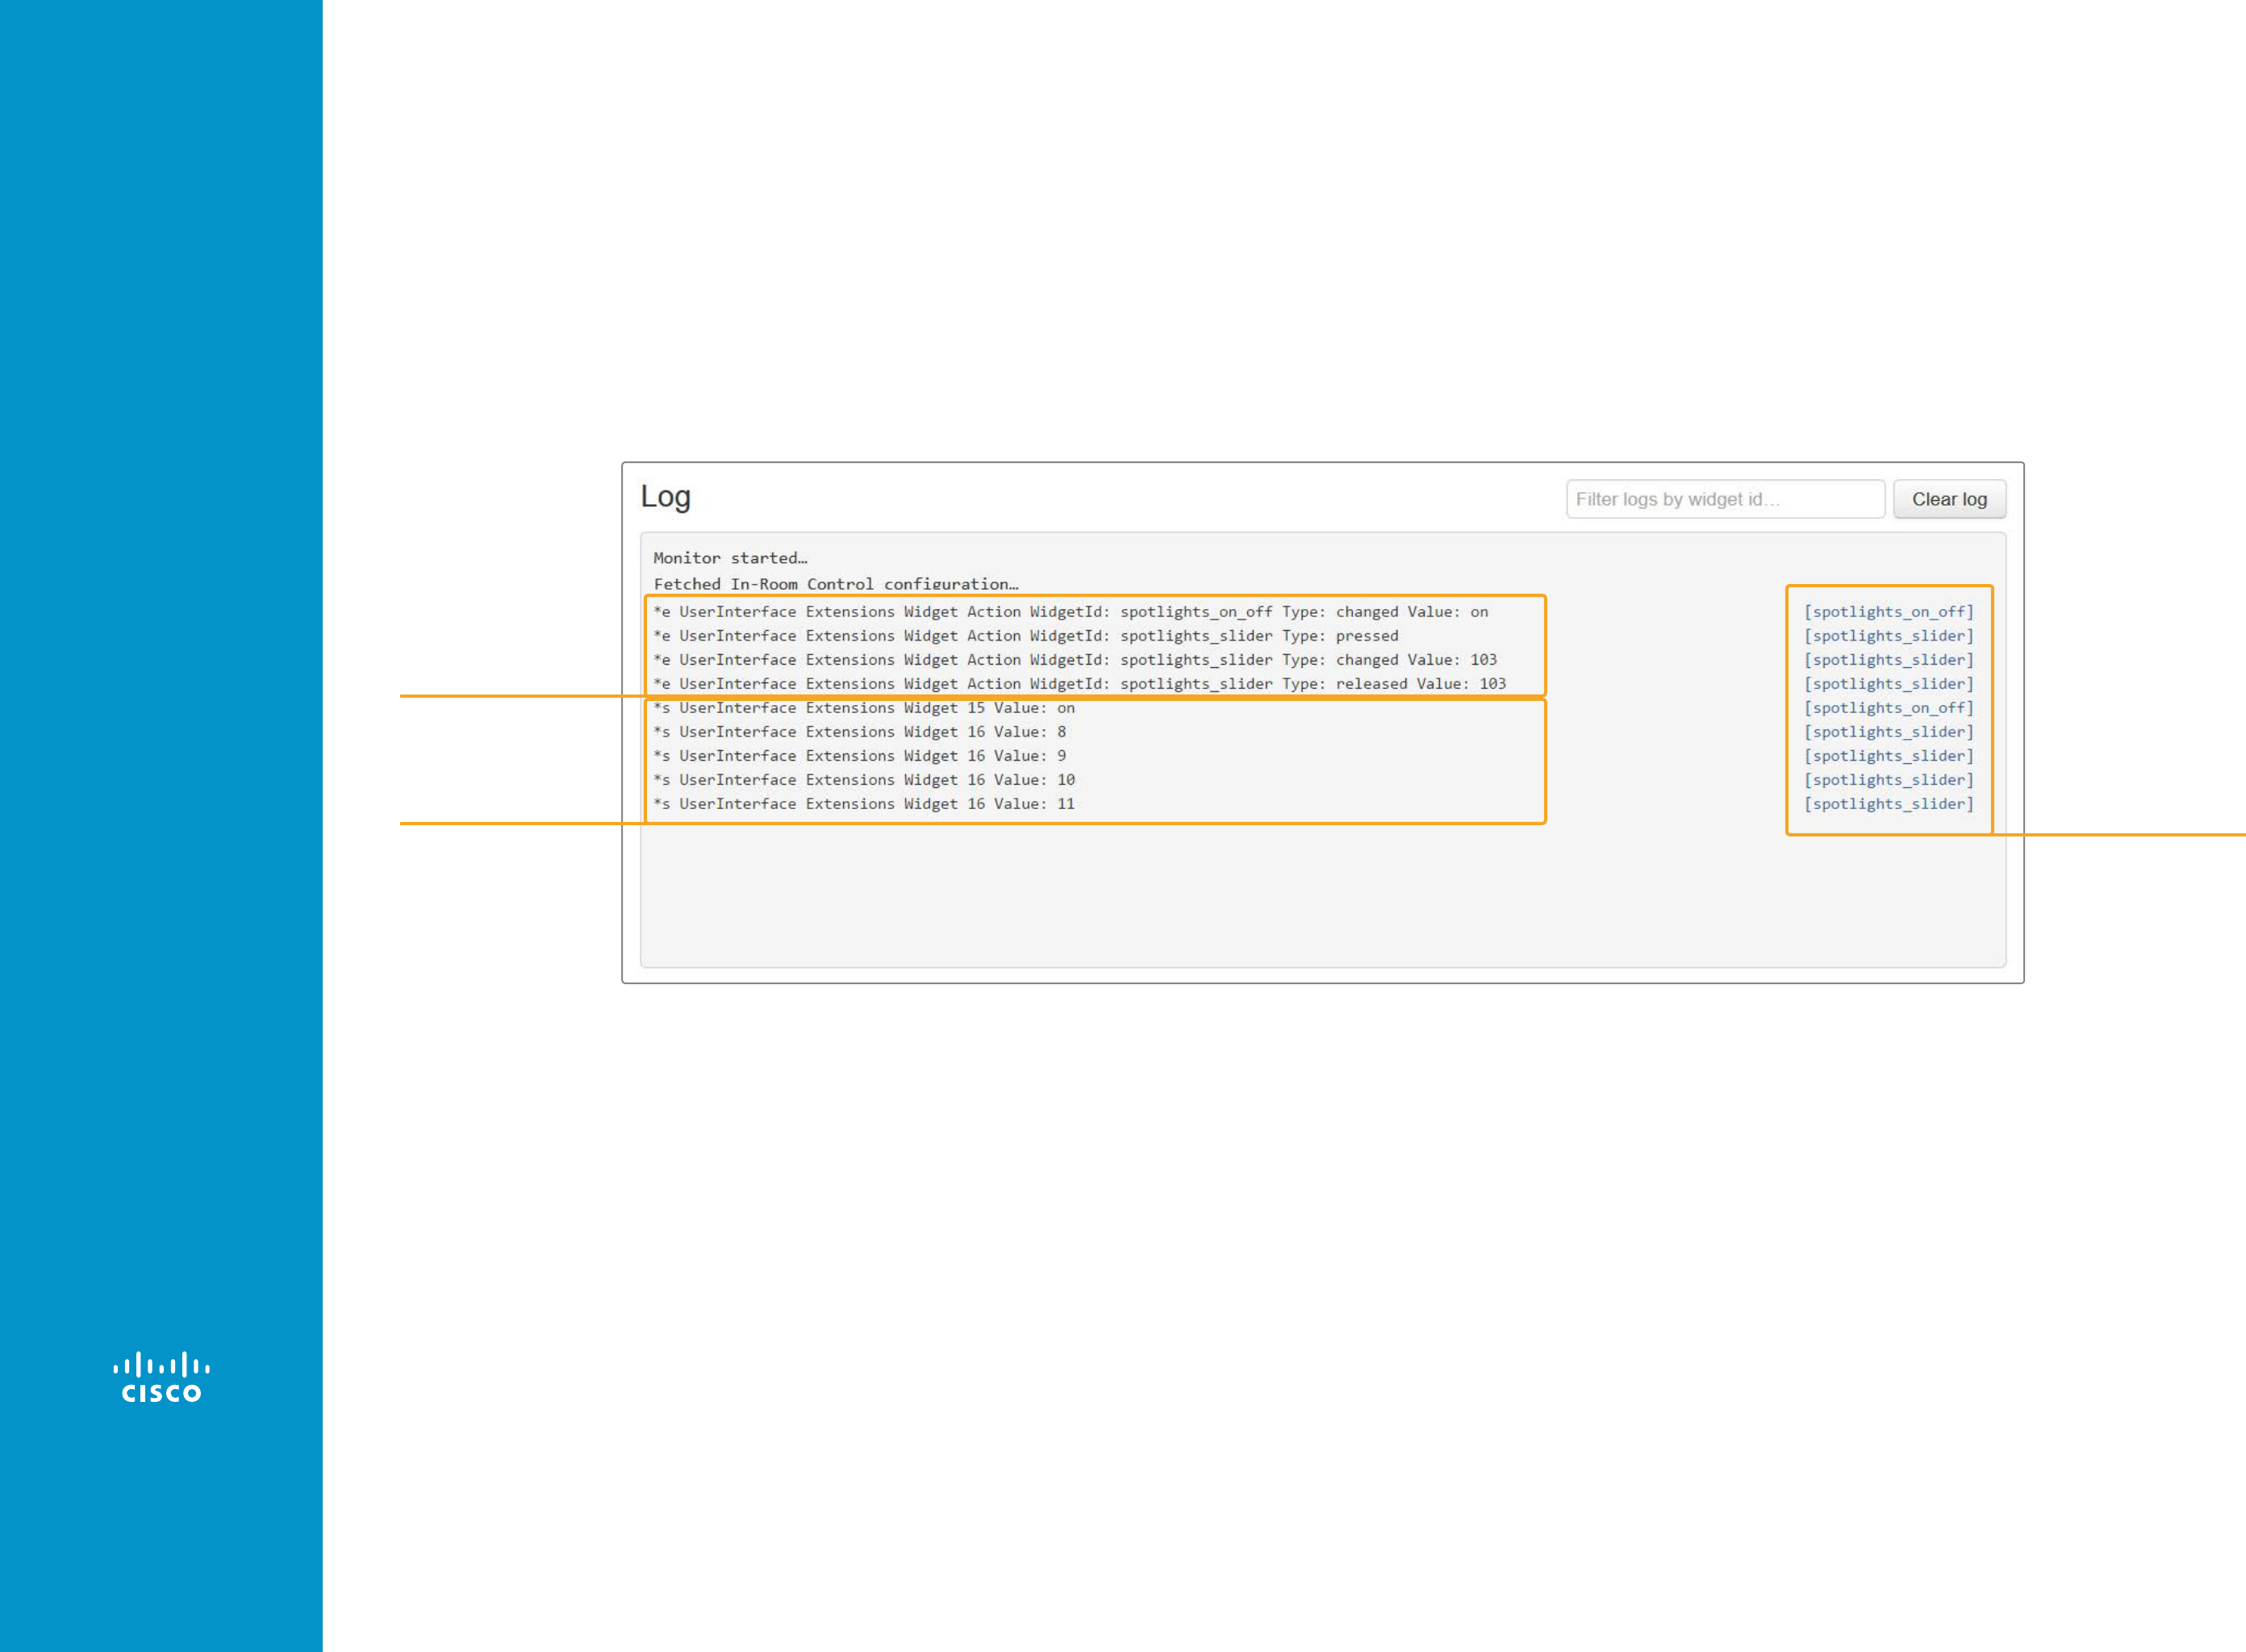
Check for events and status updates
All events and status updates related to widgets appear immediately in the Log
window. Events are prefixed with *e, and statuses are prefixed with *s.
Events appear when you use the controls on the Touch10 user interface, and
the status is updated when a command, which changes the video system's
status, is sent to the video system.
Widget ID
Events
Status
Table of contents
Introduction
Create a user interface
API for in-room control
Widgets
Command reference
Troubleshooting
Tips and tricks
Examples
Troubleshooting

D15358.01 APRIL 2016
Collaboration Endpoint software
version 8.1
© 2016 Cisco Systems, Inc.
All rights reserved.
37
Tips and tricks
Table of contents
Introduction
Create a user interface
API for in-room control
Widgets
Command reference
Troubleshooting
Tips and tricks
Examples
Tips and tricksTips and tricks

D15358.01 APRIL 2016
Collaboration Endpoint software
version 8.1
© 2016 Cisco Systems, Inc.
All rights reserved.
38
Tips and tricks
Re-register to feedback from the video system when either
the video system or the control system restarts
When either the video system or the control system restarts, the control system
must re-register to the events that the video system sends when someone uses
the Touch10 in-room controls or pushes a new in-room control panel to the
Touch10.
For terminal output mode:
xfeedback register event/UserInterface/Extensions/Widget
For XML output mode:
xfeedback register event/UserInterface/Extensions/Event
xfeedback register event/UserInterface/Extensions/Widget/
LayoutUpdated
Consult the API for in-room control chapter for more details.
Initialize all widgets
It is important that the control system initializes all the widgets on the Touch10
in-room control panel in the following situations:
• When the control system connects to the video system for the first time.
• When the video system restarts.
• When the control system restarts.
• When a new in-room control panel is exported to the video system (as
response to a LayoutUpdated event).
If this is not done, then the Touch10 may show incorrect values and not truly
reflect the status of the room.
Use the
SetValue
command to set the initial values.
Always send values back to the video system when
something changes
To avoid unexpected behavior and ambiguities, the control system must always
send
SetValue
commands to the video system when something changes. This
applies also when the change is triggered by someone using the controls on
the Touch10.
For example, it makes no difference if you use a slider on the Touch10 in-
control panel to dim the light, or a physical dimmer in the room, or another
touch panel. The control system must always send the dimmer value back to
the video system using the
SetValue
command.
Table of contents
Introduction
Create a user interface
API for in-room control
Widgets
Command reference
Troubleshooting
Tips and tricks
Examples
Tips and tricks

D15358.01 APRIL 2016
Collaboration Endpoint software
version 8.1
© 2016 Cisco Systems, Inc.
All rights reserved.
39
Update the in-room control panel
When you export a new in-room control panel to the video system, the old
panel is overwritten and replaced by the new one.
a. Launch the in-room control editor from the video system's web interface.
b. Create the in-room control panel you want, or import a previously saved
panel from file (Import > From file).
c. Click Export > To codec.
Remove the in-room control panel and icon
If there is an in-room control panel on the video system then there is also an
in-room control icon in the Touch10 status bar. Even if the panel is empty and
contains no widgets, both the icon and the panel will be visible.
Perform the following steps to remove the in-room control panel and icon from
Touch10:
a. Launch the in-room control editor from the video system's web interface.
b. Click Settings.
c. Click the Delete icon in the Remove configuration section.
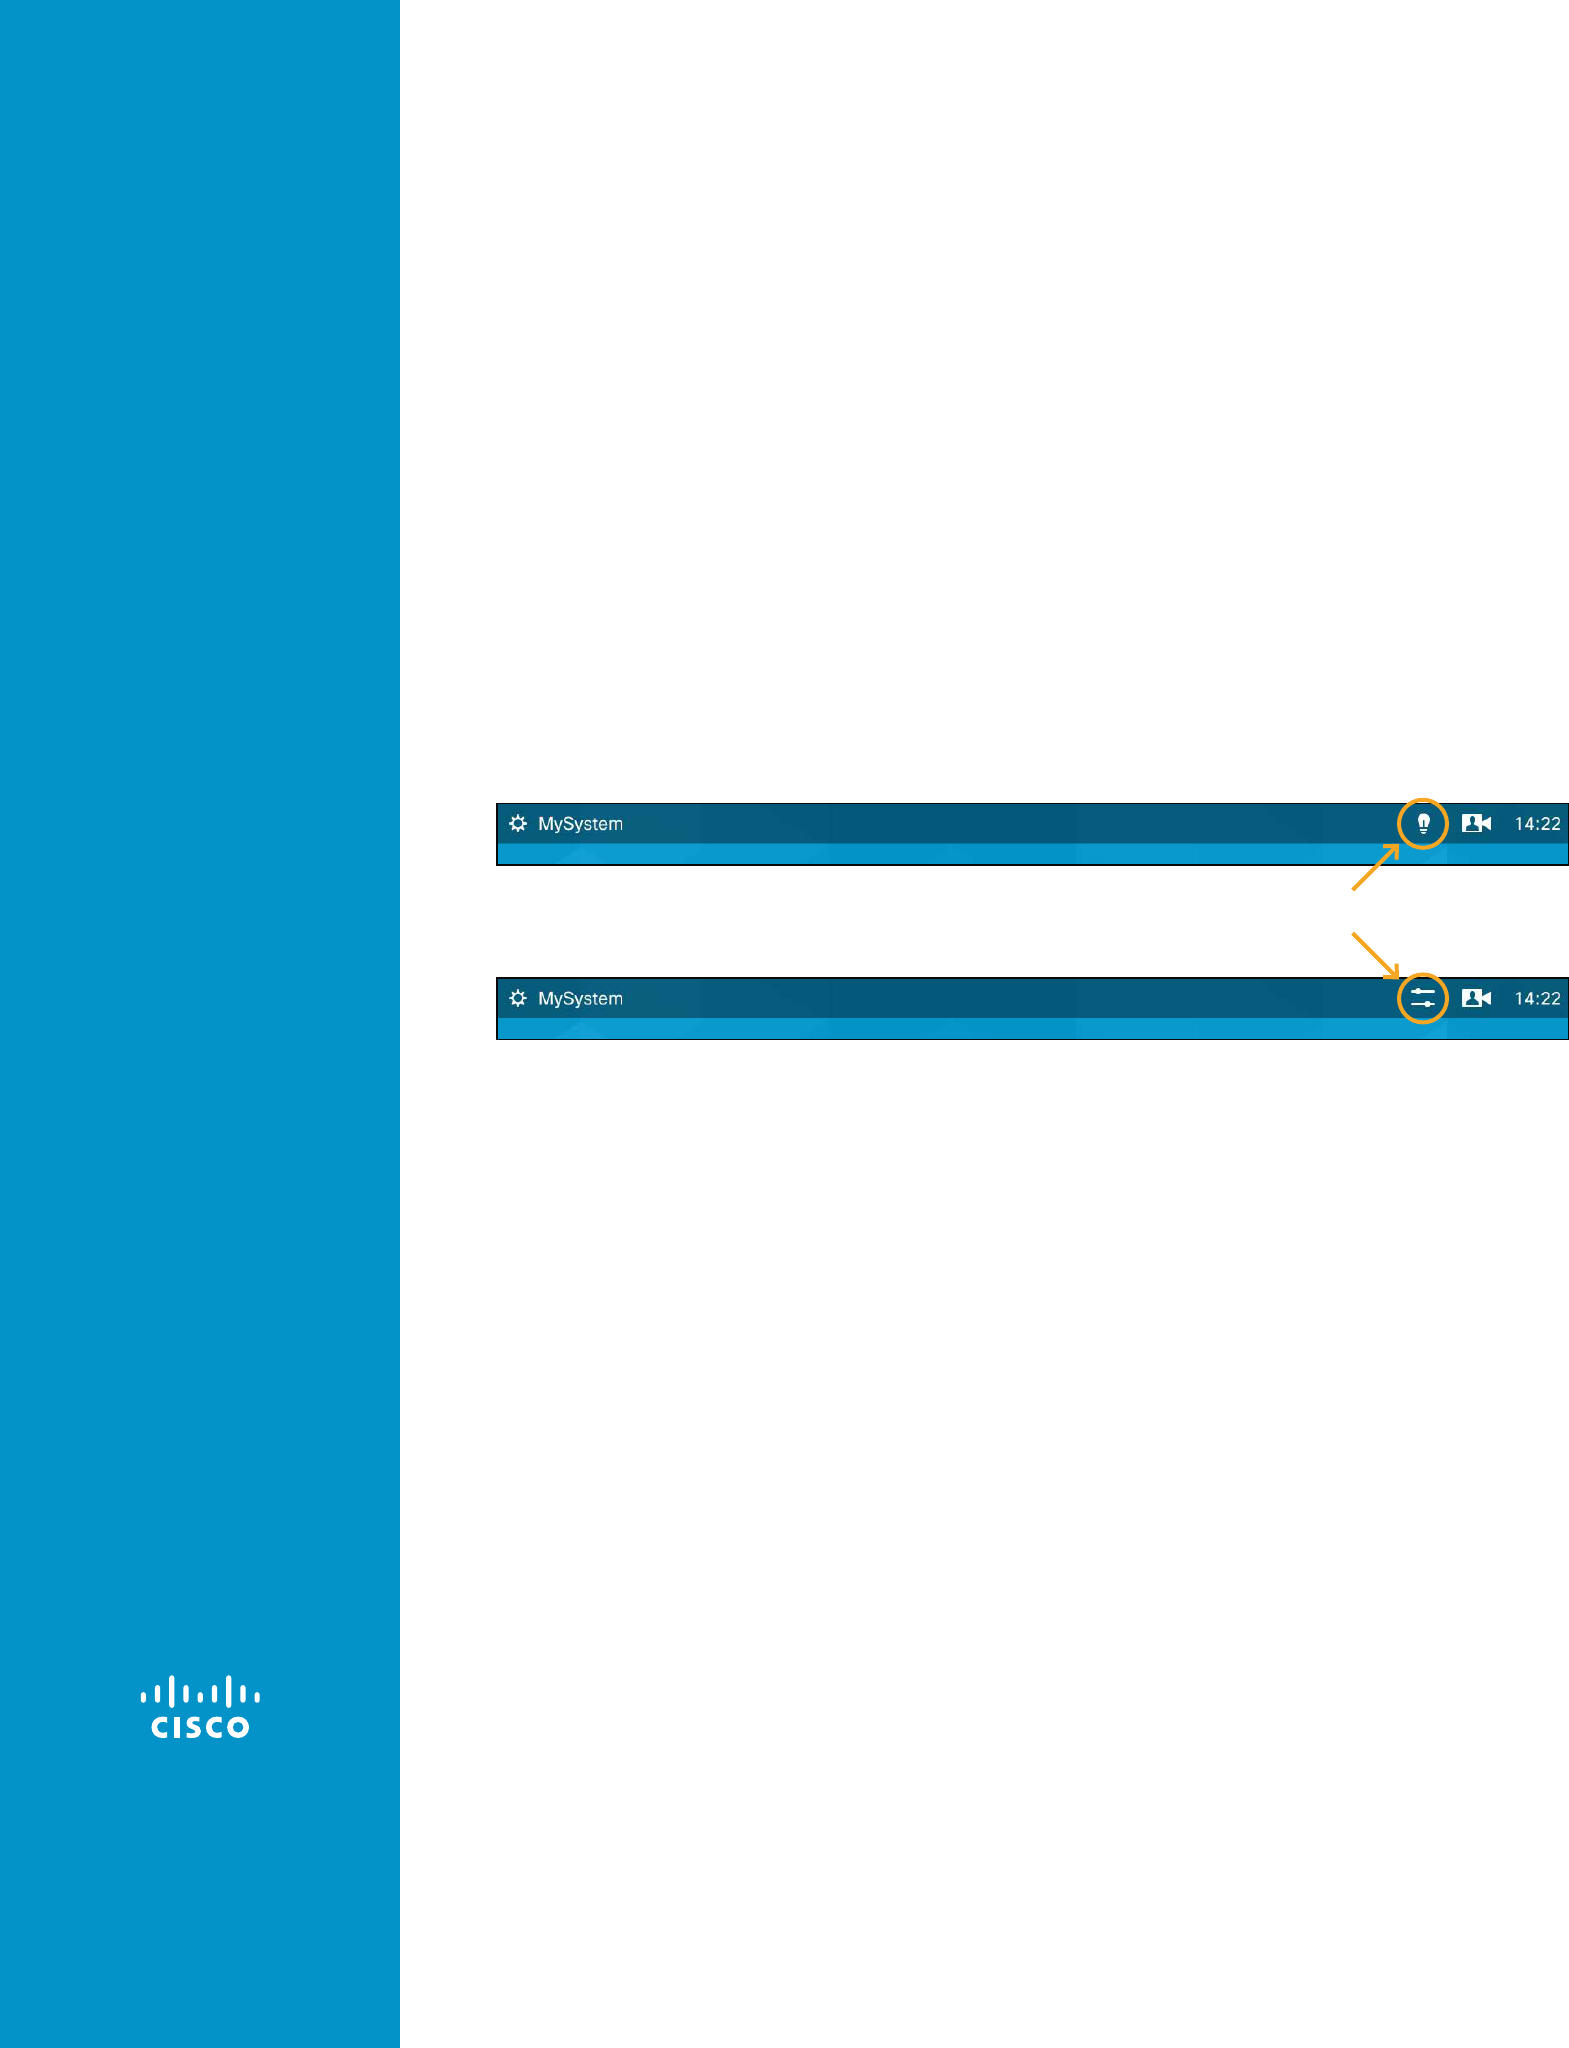
Choose an in-room control icon
The icon to tap to open the in-room control panel appears in the status bar on
Touch10. This icon is also known as the entry icon.
In-room control icon
You can choose between two icons: a light bulb (default), or a generic utility
icon. We recommend that you use the light bulb for environmental controls like
lights and blinds, and the generic utility icon for other things.
a. Launch the in-room control editor from the video system's web interface.
b. Click Settings.
c. Click the entry icon that suits your needs.
d. Click Export > To codec to apply the change.
Table of contents
Introduction
Create a user interface
API for in-room control
Widgets
Command reference
Troubleshooting
Tips and tricks
Examples
Tips and tricks

D15358.01 APRIL 2016
Collaboration Endpoint software
version 8.1
© 2016 Cisco Systems, Inc.
All rights reserved.
40
Examples
For inspiration and guidance on best practices
Table of contents
Introduction
Create a user interface
API for in-room control
Widgets
Command reference
Troubleshooting
Tips and tricks
ExamplesExamplesExamples

D15358.01 APRIL 2016
Collaboration Endpoint software
version 8.1
© 2016 Cisco Systems, Inc.
All rights reserved.
41
Examples
The following examples are meant for inspiration and to give some guidance
on best practices. It is not mandatory to design and implement controls as
illustrated in these examples.
Group controls that belong together
Consider grouping controls that belong together on the same page. The pages
you create in the in-room control editor appear as separate tabs on the control
panel.
Tabs
Table of contents
Introduction
Create a user interface
API for in-room control
Widgets
Command reference
Troubleshooting
Tips and tricks
ExamplesExamples

D15358.01 APRIL 2016
Collaboration Endpoint software
version 8.1
© 2016 Cisco Systems, Inc.
All rights reserved.
42
Control of lights
The combination of a slider and a toggle button could be used to control lights.
The toggle button switches the lights on or off; the slider serves as a dimmer.
Combination of slider and toggle button
Group button with three mutually exclusive options
Consider the following strategy:
• Set the slider to minimum when the user turns the lights off.
• Set the toggle button to off when the user moves the slider to its minimum.
• Remember the value of the slider when the lights are turned off, so that you
can return to this value when the lights are turned back on again.
If the light is at 40 %, when the user switches it off, he or she would expect it
to go back to 40 % (not maximum) when switching the lights on again.
• When the user selects one of the options in the group button (a light preset),
set the sliders and toggle buttons accordingly.
• If the lights are changed away from a preset, for instance by changing a
slider or toggle button, unselect all options in the group button.
Control of temperature
The combination of a spinner and a large font text box (value) may be used to
control temperature. Use the spinner to set the desired temperature, and the
large font text box to show the current temperature.
Large font text box
A spinner with text between the up and down arrows
For the best user experience remember the following:
• Update the large font text box as the temperature in the room changes.
• Update the text field of the spinner when someone tap the up and down
arrows.
Consult the Widgets chapter for details about how to update the spinner's text
field and the large font text box.
Table of contents
Introduction
Create a user interface
API for in-room control
Widgets
Command reference
Troubleshooting
Tips and tricks
ExamplesExamples

D15358.01 APRIL 2016
Collaboration Endpoint software
version 8.1
© 2016 Cisco Systems, Inc.
All rights reserved.
43
Control of blinds
You can either use a spinner, or up and down arrows from the Icons tab in the
widget library.
Consider the following strategy:
• Tilt the slides as response to a short press on a direction arrow. If tilted all
the way, move the blinds up or down incrementally.
• As response to a long press on a direction arrow, start moving the blinds in
that direction. They do not stop until all the way up or down.
• Short press any button in order to stop the movement after a long press.
Then no separate stop button is necessary.
Use a button only to send a signal
A button can be used just to send a signal, without changing the button's state
or visual appearance.
As an example, use the All lights on button to switch on all lights. Do not change
the button's color from gray to blue, but update the other light controls to reflect
the true status of the room.
A button that does not change color
(from gray to blue) when used
Table of contents
Introduction
Create a user interface
API for in-room control
Widgets
Command reference
Troubleshooting
Tips and tricks
ExamplesExamples

D15358.01 APRIL 2016
Collaboration Endpoint software
version 8.1
© 2016 Cisco Systems, Inc.
All rights reserved.
44
Group buttons
Group buttons are ideal when you want buttons to be linked, so that only one
can be selected at a time. For example room presets.
When the individual buttons in a group are too small to contain the text that
describes their function, consider to use text boxes for the description.
Table of contents
Introduction
Create a user interface
API for in-room control
Widgets
Command reference
Troubleshooting
Tips and tricks
ExamplesExamples

D15358.01 APRIL 2016
Collaboration Endpoint software
version 8.1
© 2016 Cisco Systems, Inc.
All rights reserved.
45
Intellectual property rights
THE SPECIFICATIONS AND INFORMATION
REGARDING THE PRODUCTS IN THIS MANUAL
ARE SUBJECT TO CHANGE WITHOUT
NOTICE. ALL STATEMENTS, INFORMATION,
AND RECOMMENDATIONS IN THIS MANUAL
ARE BELIEVED TO BE ACCURATE BUT ARE
PRESENTED WITHOUT WARRANTY OF ANY KIND,
EXPRESS OR IMPLIED. USERS MUST TAKE FULL
RESPONSIBILITY FOR THEIR APPLICATION OF
ANY PRODUCTS.
THE SOFTWARE LICENSE AND LIMITED
WARRANTY FOR THE ACCOMPANYING PRODUCT
ARE SET FORTH IN THE INFORMATION PACKET
THAT SHIPPED WITH THE PRODUCT AND ARE
INCORPORATED HEREIN BY THIS REFERENCE. IF
YOU ARE UNABLE TO LOCATE THE SOFTWARE
LICENSE OR LIMITED WARRANTY, CONTACT
YOUR CISCO REPRESENTATIVE FOR A COPY.
The Cisco implementation of TCP header
compression is an adaptation of a program
developed by the University of California, Berkeley
(UCB) as part of UCB’s public domain version of
the UNIX operating system. All rights reserved.
Copyright © 1981, Regents of the University of
California.
NOTWITHSTANDING ANY OTHER WARRANTY
HEREIN, ALL DOCUMENT FILES AND SOFTWARE
OF THESE SUPPLIERS ARE PROVIDED “AS IS”
WITH ALL FAULTS. CISCO AND THE ABOVE-
NAMED SUPPLIERS DISCLAIM ALL WARRANTIES,
EXPRESSED OR IMPLIED, INCLUDING, WITHOUT
LIMITATION, THOSE OF MERCHANTABILITY,
FITNESS FOR A PARTICULAR PURPOSE AND
NONINFRINGEMENT OR ARISING FROM A COURSE
OF DEALING, USAGE, OR TRADE PRACTICE.
IN NO EVENT SHALL CISCO OR ITS SUPPLIERS
BE LIABLE FOR ANY INDIRECT, SPECIAL,
CONSEQUENTIAL, OR INCIDENTAL DAMAGES,
INCLUDING, WITHOUT LIMITATION, LOST
PROFITS OR LOSS OR DAMAGE TO DATA ARISING
OUT OF THE USE OR INABILITY TO USE THIS
MANUAL, EVEN IF CISCO OR ITS SUPPLIERS
HAVE BEEN ADVISED OF THE POSSIBILITY OF
SUCH DAMAGES.
Any Internet Protocol (IP) addresses and phone
numbers used in this document are not intended
to be actual addresses and phone numbers. Any
examples, command display output, network
topology diagrams, and other figures included in
the document are shown for illustrative purposes
only. Any use of actual IP addresses or phone
numbers in illustrative content is unintentional and
coincidental.
All printed copies and duplicate soft copies are
considered un-Controlled copies and the original
on-line version should be referred to for latest
version.
Cisco has more than 200 offices worldwide.
Addresses, phone numbers, and fax numbers are
listed on the Cisco website at www.cisco.com/go/
offices.
Cisco and the Cisco logo are trademarks or
registered trademarks of Cisco and/or its affiliates
in the U.S. and other countries. To view a list of
Cisco trademarks, go to this URL: www.cisco.com/
go/trademarks. Third-party trademarks mentioned
are the property of their respective owners.
The use of the word partner does not imply a
partnership relationship between Cisco and any
other company. (1110R)
Cisco contacts
On our web site you will find an overview of the worldwide Cisco contacts.
Go to: http://www.cisco.com/go/offices
Corporate Headquarters
Cisco Systems, Inc.
170 West Tasman Dr.
San Jose, CA 95134 USA
Table of contents
Introduction
Create a user interface
API for in-room control
Widgets
Command reference
Troubleshooting
Tips and tricks
Examples
