
2
Welcome to the BT-300
These smart glasses allow you to enjoy viewing images and use apps anywhere and anytime you like.
The see-through lenses allow you to create your own world using AR (Augmented Reality) which overlays images on your
actual surroundings.
3
INTERNET
USB
cable
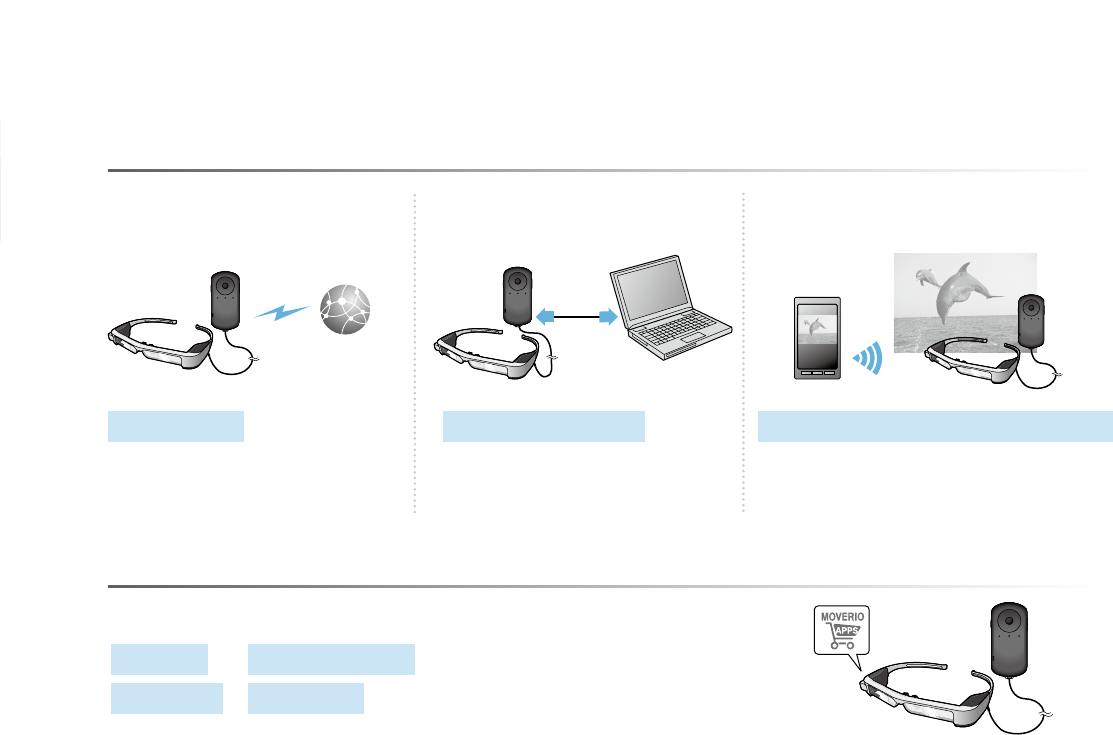
Enjoy viewing images
Having Fun with Apps
You can download apps and use them with your product.
Games Entertainment
Business Life Style
"Downloading Apps" on page 44 (this guide)
Download the apps you want
View saved images
Save easily by USB
"Viewing Movies Copied from a
Computer (Gallery)" on page 38 (this
guide)
View images on the Web
Movie sites
"Viewing Movies on a Website
(Browser)" on page 37 (this guide)
View images playing
on other devices
Sync with images on a smartphone
"Viewing Images on Other Devices (Miracast)"
on page 40 (this guide)

4
Contents
Safety Instructions ...............................6
Notes on Usage .................................11
Getting Ready ..................................12
Part Names and Functions ...............................12
Charging ................................................14
Wearing the Headset ....................................16
Turning On and O .....................................20
Using the Controller .....................................22
Using the Home Screen .................................26
Setting the language, date and time .....................30
Setting up network ......................................32
Bluetooth settings ......................................34
Adjusting the Screen ....................................35
Viewing Images .................................37
Viewing Movies on a Website (Browser) ..................37
Viewing Movies Copied from a Computer (Gallery) ......38
Viewing Images on Other Devices (Miracast) ............40
Using Apps .....................................42
Shooting a Movie (Camera) ..............................42
Downloading Apps .....................................44
Troubleshooting ................................48
System Update ..........................................51
Specications ...................................53
Intellectual Property Rights. . . . . . . . . . . . . . . . . . . . . .55
General Notes ..................................60
Contact List .....................................64

5
User's Guide Organization
User's Guide (this guide)
This guide provides information on safely using this product, basic operating methods, and troubleshoot-
ing. Make sure you read this guide before using the product.
Start Guide
This guide provides information on using this product for the rst time.
Symbols Used in this Guide
Safety symbols
Warning
This symbol indicates information that, if ignored,
could possibly result in serious personal injury or even
death due to incorrect handling.
Caution
This symbol indicates information that, if
ignored, could possibly result in personal
injury or physical damage due to incorrect
handling.
General information symbols
Indicates procedures which may result in damage or
injury if sucient care is not taken.
Indicates additional information and points
which may be useful to know regarding a
topic.
[ ]
Indicates icons, menu items, and controller key names
displayed on the screen.
Indicates a reference to related topics.

6
01_Chapter title
01_Head A
02__lead
6
For your safety, unplug the product when it is not being used. The
insulation may deteriorate, which may result in electric shock, re, or
malfunction.
Do not touch the plug during a thunderstorm. Doing so could result
in re or electric shock.
Do not leave this product in locations subject to temperatures be-
yond the specied operating range, such as cars with the windows
closed, in direct sunlight, or in front of air-conditioning or heater out-
lets. Also, avoid locations subject to sudden changes in temperature.
Doing so may result in re, breakdown, malfunction, or failure.
Do not use the product in locations where it may get wet or is sub-
ject to high levels of humidity such as in a bath or shower. Doing so
could result in re or electric shock.
Do not place this product in locations subject to smoke, steam, high
humidity, or dust such as kitchen counters or near humidiers. Doing
so may result in re, electric shock, or deterioration in image quality.
Do not cover this product with a cloth or similar material during use.
Doing so may change the shape of the case through heat, or re.
Do not expose the camera lens to direct sunlight for a long time.
Doing so may result in re or explosion due to condensed beams of
light from the lens.
For your safety, read the attached documents carefully to use the product
correctly. After you have read the documents, keep them in a safe place
so that you can refer to them quickly at a later date.
Warning
Usage environment and condition
precautions
Only use this product at the stated power-supply voltage.
Only use the supplied USB cable and AC adapter. Using other power
supply devices could result in heat, fire, explosion, malfunction, or
liquid leakage.
Take the following precautions when handling the plug. Failure to
comply with these precautions could result in re or electric shock.
• Do not plug the AC adapter into an outlet being used by many
other devices.
• Do not insert the plug into a dusty outlet.
• Insert the plug rmly into the outlet.
• Do not hold the plug with wet hands.
• Do not pull the power cable when disconnecting the plug.
Do not use the power cable (USB cable supplied) if it is damaged.
Doing so could result in re or electric shock.
• Do not modify the supplied power cable.
• Do not place heavy objects on top of the supplied power cable.
• Do not bend, twist, or pull the power cable with excessive force.
• Keep the power cable away from hot electrical appliances.
Safety Instructions

7
01_Chapter title
01_Head A
02__lead
Safety Instructions
7
Do not throw the product into a re and do not heat the product. Do
not place objects with naked ames, such as candles, on this product.
Doing so may result in heat, re, or explosion.
Warning
Viewing image precautions
Do not wear this product while driving a car, riding a motor bike or
bicycle, or performing any other dangerous tasks. Doing so may result
in accident or injury.
Do not use this product in unstable locations such as stairs or at alti-
tude. Also, do not use the product while walking in dangerous loca-
tions such as near machinery or equipment that might get caught on
the cables, where there is a lot of trac, or where it is dark. Doing so
may result in accident or injury.
When walking while viewing images on the product, be aware of
your surroundings. If you are too focused on the image, it could result
in accidents, falling down, and colliding with other people.
When viewing in dark locations, it is dicult to see your surroundings
due to the brightness of the image. Be aware of your surroundings.
When using this product in small locations, be aware of your sur-
roundings.
When wearing this product, do not look directly at the sun or other
light sources even if you are using the shade. This could cause serious
injury to your eyes or loss of eyesight.
Warning
Product usage precautions
Do not start using this product at a high volume. Doing so
may result in hearing impairment. Lower the volume before
turning o the product, and gradually increase the volume
after turning on the product. To prevent possible hearing
damage, do not listen at high volume for prolonged periods
of time.
Do not allow any conductive foreign objects to touch the charg-
ing connector, external device connector, or earphone microphone
socket, and do not put any conductive foreign objects into the con-
nection ports. Doing so may cause a short circuit and result in re or
electric shock.
Do not allow solvents such as alcohol, benzene, or thinner to touch
the product. Also, do not clean this product with a wet cloth or sol-
vents. Doing so may warp or crack the product housing and may
result in electric shock, malfunction, or re.
The product housing should only be opened by qualified service
personnel unless you are explicitly instructed to do so in the User’s
Guide. Also, do not disassemble or remodel the product (including
consumable items). Many of the parts inside the product carry a high
voltage and could cause re, electric shock, accident, or poisoning.
Do not subject the lens of the product to strong shocks or knock
it against hard objects. If the lens is damaged, it could splinter and
cause serious injuries to the eyes and face.

8
01_Chapter title
01_Head A
02__lead
Safety Instructions
8
function, disable it before turning o the product. The electromag-
netic waves may cause electromagnetic interference with medical
equipment or cause the equipment to malfunction.
Note the following points when using the Bluetooth or wireless LAN
function in medical institutions.
• Do not bring this product into operating rooms, Intensive Care
Units (ICUs), or Cardiac Care Units (CCUs).
• When in wards, turn o this product or stop the electromagnetic
waves.
• Even when not in wards, turn o this product or stop the electro-
magnetic waves if there is any electronic medical equipment in the
area.
• Follow any rules stipulated by medical institutions that prohibit the
use of devices emitting electromagnetic waves, or that prohibit en-
try to certain areas with such devices.
• If the product has an auto power on function, disable it before turn-
ing o the product.
If you have an implanted pacemaker or implanted defibrillator,
make sure you keep a distance of at least 8.7 inches (22 cm)
between this product and the implanted device when using the
Bluetooth or the wireless LAN function. The electromagnetic waves
may influence the operation of implanted pacemakers or
implanted defibrillators. Turn off this product or stop the
electromagnetic waves if you are in a location where someone near
you may have a pacemaker, such as a crowded train.
Make sure the cable does not catch on anything in the surrounding
area while wearing the product. Also, make sure the cable does not
wind around your neck. Doing so may result in accident or injury.
Make sure the cable does not get damaged. Otherwise, it may result
in re or electric shock.
• Do not damage the cable.
• Do not place heavy objects on top of the cable.
• Do not bend, twist, or pull the cable with excessive force.
• Keep the power cable away from hot electrical appliances.
Warning
Product abnormality precautions
In the following situations, turn o this product immediately, unplug
the power plug, and contact your local dealer or the Epson service
call center. Continuing to use under these conditions may result in
re or electric shock. Do not try to repair this product yourself.
• If you see smoke, or notice any strange odors or noises.
• If any water, beverages, or foreign objects get into the product.
• If the product was dropped or the case was damaged.
Warning
Wireless function precautions
When taking this product into areas in which the use of electromag-
netic waves is prohibited, such as in an aircraft or in hospitals, follow
the instructions in the area and turn o this product or disable the
Bluetooth or wireless LAN function. Do not use the Bluetooth or
wireless LAN function near automatically controlled devices such as
automatic doors or re alarms. If the product has an auto power on
9
01_Chapter title
01_Head A
02__lead
Safety Instructions
9
sult in itching or a rash.
Hold the controller securely or place it on a stable surface and make
sure the cables are not pulled with undue force. Dropping the head-
set due to the weight of the controller may result in injury or mal-
function.
Dispose of this product in accordance with your local laws and regu-
lations.
Caution
Viewing image precautions
Always take periodic breaks when viewing images using this product.
Long periods of viewing images may result in eye fatigue. If you feel
fatigued or uncomfortable even after taking a break, stop viewing im-
mediately.
Do not drop this product or treat it with unnecessary force. Also, if the
product breaks due to an impact such as a fall, stop using the prod-
uct. Continuing to use this product may result in injury due to glass
fragments.
When wearing this product, be aware of the edges of the frame. Also,
do not place your nger between the moving parts of this product,
such as the hinges. Doing so may result in injury.
Make sure you are wearing this product correctly. Incorrect usage
could make you feel nauseous.
This product should only be used for the purposes stated in the
manuals. Using it for anything else may result in injury.
Caution
Usage environment and condition
precautions
Do not place the product in locations subjected to vibrations or
shocks.
While using the product to view images, play games, or listen to mu-
sic, make sure you confirm the safety of your surroundings and do
not leave any fragile items in your immediate vicinity. The images you
are viewing may cause you to move your body involuntarily, resulting
in damage to nearby items or personal injury.
Do not place this product near high-voltage lines or magnetized
items. Doing so may result in breakdown, malfunction, or failure.
When performing maintenance, make sure you turn o the product,
unplug the power plug and the power connector and disconnect all
wires. Otherwise, it may result in electric shock.
Stop charging the battery if the charging does not end in the stated
period of time. Continuing the charge may result in liquid leakage,
heat, explosion, or re.
Caution
Product usage precautions
Stop using this product if the skin that touches the product (face and
so on) feels itchy when wearing the product, or any unusual rashes
occur, and consult your local dermatologist.
If you sweat while using the product, wipe the sweat from your face
and the product. Continuing to use under these conditions may re-

10
01_Chapter title
01_Head A
02__lead
Safety Instructions
10
If a problem or malfunction occurs, stop using this product imme-
diately. Continuing to use this product may result in injury or could
make you feel nauseous.
Stop using this product if your skin feels unusual when wearing this
product and consult your local dermatologist. Sometimes allergies
may occur due to the coating or material of the product.
How a 3D image is perceived varies depending on the individual.
Stop using the 3D function if you feel strange or cannot see in 3D.
Continuing to view the 3D images could make you feel nauseous.
This product must not be used b
y children under the age of
thirteen.
Do not use this product if you are sensitive to light, or feel nauseous.
Doing so may aggravate your pre-existing conditions.
Do not use this product if you have prior eye conditions. Doing so
may aggravate the symptoms such as strabismus, amblyopia, or an-
isometropia.
Caution
Product abnormality precautions
Contact an authorized Epson dealer when replacing batteries.
Data such as video, images, or music stored on the product may be
lost or damaged when the product malfunctions, is repaired, or un-
dergoes other services. Epson shall not be responsible for the loss of
any data, damage to data, or loss of prots that occurs at such a time.
You can recycle used lithium-ion batteries. When the prod-
uct's internal battery reaches the end of its service life, con-
tact a service center for information on recycling.

11
01_Chapter title
01_Head A
02__lead
11
Notes on Usage
This product uses an Si-OLED display panel. Due to the char-
acteristics of the Si-OLED, you may notice burn-in or de-
creasing luminance on the panel. This is not a malfunction.
To reduce the burn-in, do the following.
• Do not display the same image for a long time.
• Hide markers or text that always appear in the same position.
• Decrease the display brightness.
• Turn o the display using the tap to mute function or sleep func-
tion, or turn o the product when you are not viewing images for a
long time.
Charge the battery at least once a year even if you do not use the
product. If you do not use the product for a long period of time,
the battery performance may deteriorate or you may not be able to
charge the battery.
List of Safety Symbols (corresponding to IEC60950-1 A2)
The following table lists the meaning of the safety symbols labeled
on the equipment.
Approved standards: IEC60417 No.5031
Meaning: Direct current
To indicate on the rating plate
that the equipment is suitable
for direct current only; to identify
relevant terminals.

1212
Getting Ready
Part Names and Functions
Controller
Power button
Turns the power on or o.
"Turning On and O" on page 20 (this guide)
HOME key (touch sensor)
Displays the Home screen.
History key (touch sensor)
Displays recently used apps.
Trackpad
Touch with your nger to operate the prod-
uct.
"Using the Controller" on page 22 (this
guide)
Headset connector
Connects the controller connector.
"Charging" on page 14 (this guide)
Switch key
Changes the adjustment items to bright-
ness or 2D/3D mode. (Use the cross-key to
adjust settings.) Hold down to turn key lock
on and o.
Enter key
Selects or conrms items.
Cross-key (touch sensor)
Selects items and scrolls the screen.
LED indicator
Indicates the status of the product.
"LED indicator status" on page 15 (this
guide)
microSD card slot
Insert a commercially
available microSD
card.
micro-USB connector
Connects the supplied USB cable.
BACK key (touch sensor)
Displays the previous screen.
Volume keys
Adjusts the volume.

13
01_Chapter title
01_Head A
02__lead
Getting Ready
13
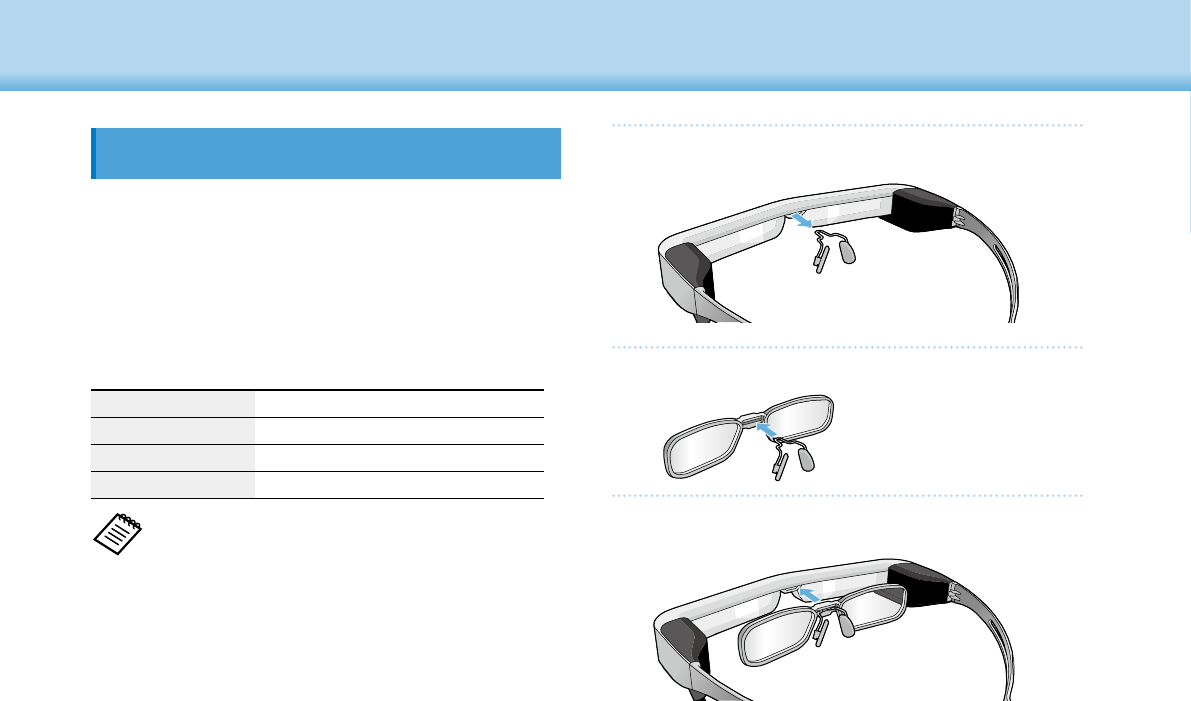
Headset
Nose pads
When wearing the product over
glasses, replace with the supplied
nose pad for glasses.
Temples
Open the temples to wear.
"Wearing the Headset" on page 16
(this guide)
Earphone microphone socket
Connects the socket for earphone
microphones. You can also connect
commercially available earphone
microphones.
"Wearing the Headset" on page 16
(this guide)
Camera/Indicator
Captures images and movies. The indi-
cators ash while the camera is starting.
"Preinstalled applications" on page 28
(this guide)
Tap to mute
This function allows you to tap twice to
temporarily hide the image and mute
the audio.
Controller connector
Connects the controller.
"Charging" on page 14 (this guide)
Shade
Shades the product from too much
exterior light.
"Attaching and Removing the
Shade" on page 19 (this guide)
Ambient light sensor
Senses the brightness of your sur-
roundings and automatically adjusts
the brightness of the screen.
"Adjusting the Brightness of the
Screen" on page 36 (this guide)

14
01_Chapter title
01_Head A
02__lead
Getting Ready
14
Charging
The product is not fully charged at the time of purchase.
Charge before use.
This section explains how to charge using the AC adapter.
Initial charging takes approximately 5 hours.
A
Connect the headset and the controller.
Insert the controller connector into the controller's head-
set connection port until it clicks.
Do not connect the controller connector to any
other devices except for the product.
B
Connect the controller and AC adapter.
Connect the controller and the AC adapter with the USB
cable.
C
Plug in the AC adapter.
The LED indicator ashes light blue.
If the battery is dead, the LED indicator does not
turn on for a while when charging starts. Charge
for at least 30 minutes, and then re-connect the
USB cable.

15
01_Chapter title
01_Head A
02__lead
Getting Ready
15
When the battery is charged 90% or higher, the LED indicator
stops ashing and remains on. The LED indicator turns o when
the battery is fully charged. (The LED indicator provides a rough
indication of the amount of remaining battery.)
Disconnect the AC adapter and the USB cable.
Battery life is approximately six hours. Battery life may vary de-
pending on application and environmental usage conditions.
LED indicator status
You can check the status of the product from the colors and the
lit status of the LED.
Green
Starting up or Shutting down
Light blue
Charging/Operating
Blue
Sleep mode
Orange
Battery running low
Pink
Error

16
01_Chapter title
01_Head A
02__lead
Getting Ready
16
B
Connect the earphone microphone to the earphone
microphone socket.
Attach the earphones before playing back any content.
Noise may be heard if the earphone microphone is dis-
connected or connected while content is being played.
You can clip the earphone microphone to your
clothes.
C
Wear the earphones.
Wearing the Headset
A
Use both hands to open the temples, and then put on
the headset.
Do not use too much force when opening the
temples of the headset.
If the headset does not feel secure when wearing
it, attach the temple grip supplied.

17
01_Chapter title
01_Head A
02__lead
Getting Ready
17
The nose pad for glasses ts over your glasses.
Wearing over Glasses
By replacing with the supplied nose pad for glasses, the headset can
be worn over glasses. (The headset can only be worn over glasses
that are approximately 5.8 inches [147 mm] wide.)
Make sure that you do not damage the glasses and
the lens of the headset when wearing.
You may not be able to wear the headset over the
glasses depending on the shape of your glasses.
A
Pull the nose pad forward to remove it.
B
Attach the nose pad for glasses.
18
01_Chapter title
01_Head A
02__lead
Getting Ready
18
A
Pull the nose pad forward to remove it.
B
Attach the nose pad to the lens holder.
C
Attach the lens holder to the headset.
Attaching the lens holder and wearing the
headset
If you wear glasses, the lens holder allows you to wear the head-
set without wearing your glasses.
Visit your local opticians and have them install lenses in the lens
holder and attach them to the headset. (The customer is respon-
sible for the cost of the lenses. Depending on the opticians, they
may not be able to perform this procedure.)
Lens holder supported lenses
Lens (W x H)
2 x 0.9 inches (50 x 24 mm)
Nose pads
0.8 inch (20 mm)
Frame PD
2.8 inches (70 mm)
Curve 4
You may not be able to view images when using
special lenses such as colored lenses, mirrored lenses,
and polarized lenses.

19
01_Chapter title
01_Head A
02__lead
Getting Ready
19
Removing the Shade
Raise the bottom edge of the shade and pull carefully
down while pressing the center of the shade to remove.
If the shade is pushed or pulled with too much force,
the shade and the lens could be damaged. Do not use
too much force on the shade.
Attaching and Removing the Shade
If it is too bright to view the screen when wearing the headset, attach
the shade.
Attaching the Shade
Tilt the shade, and then push the protruding section into
the headset until it clicks into place.
20
01_Chapter title
01_Head A
02__lead
Getting Ready
20
• See the following for information on using the
controller.
"Using the Controller" on page 22 (this guide)
• Turning off the screen while the product is on
(Sleep mode)
When you press the Power button briefly, the
product enters Sleep mode and the LED indicator
turns blue. Press the Power button briey again to
wake the product from Sleep mode.
• Disabling controller operations (Key lock)
When you hold down the Switch key, the key lock
turns on. When you hold down the Switch key
again, the key lock turns o.
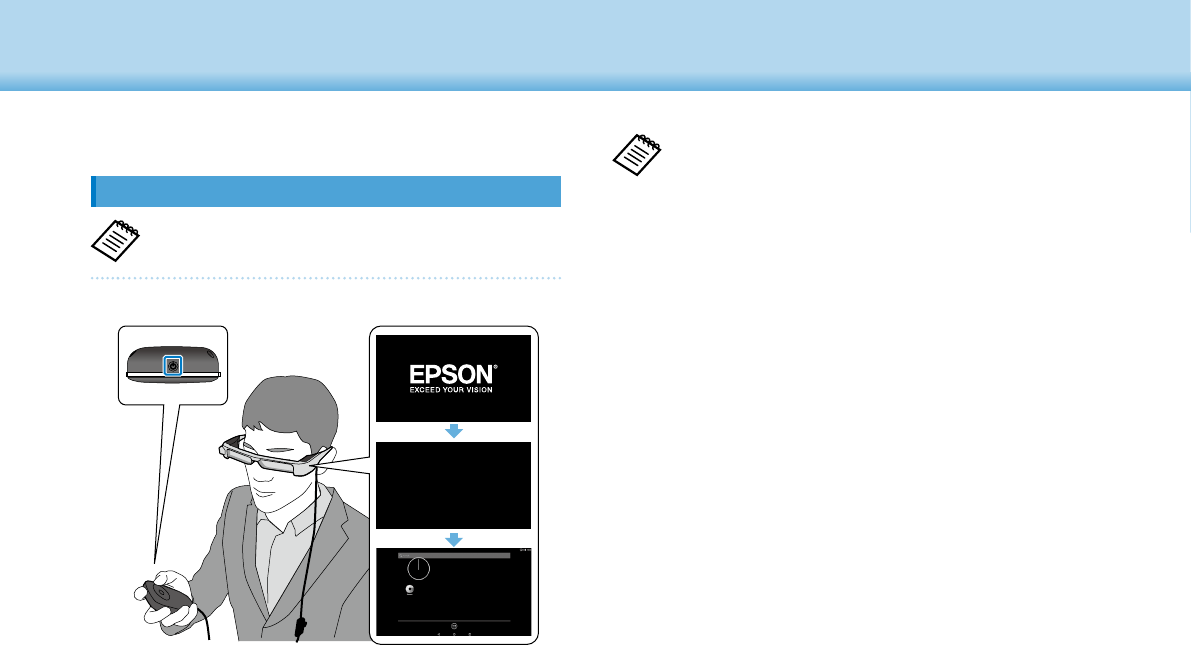
Turning On and O
Turning on
Before turning on the product, check the charge level.
"Charging" on page 14 (this guide)
Press the Power button for one second.
MOVERIO
When the startup begins, the start screen is displayed in the
headset. When startup is complete, the Home screen is dis-
played.
When you cannot view the images, adjust the vertical posi-
tion of the headset so that the lens is in line with your eyes.

21
01_Chapter title
01_Head A
02__lead
Getting Ready
21
Turning o
A
Hold down the Power button for at least one second.
The [Power o] screen is displayed.
B
Select [Power o].
The power turns o.
If operations are unstable, you can force the product to
shutdown by holding down the Power button for at
least 10 seconds.
Do not force the product to shutdown unless
operations are unstable.
Stored data and settings may be lost.

22
01_Chapter title
01_Head A
02__lead
Getting Ready
22
Using the Cross-key/Enter key
Cross-key
The Cross-key is an electrostatic touch sensor, and will
react to the lightest of touches.
The selection moves when you select icons or displayed
items. When you hold down one direction, the selection
moves continuously in that direction.
When you have not selected icons or displayed items, you
can scroll the screen.
Using the Controller
You can operate the product using one of the following
methods.
Cross-key/Enter key
"Using the Cross-key/Enter
key" on page 22 (this guide)
Trackpad
"Using the Trackpad" on
page 24 (this guide)
The controller may vibrate depending on the
operation being performed.

23
01_Chapter title
01_Head A
02__lead
Getting Ready
23
Enter key
Selects or conrms items or launches the app.
24
01_Chapter title
01_Head A
02__lead
Getting Ready
24
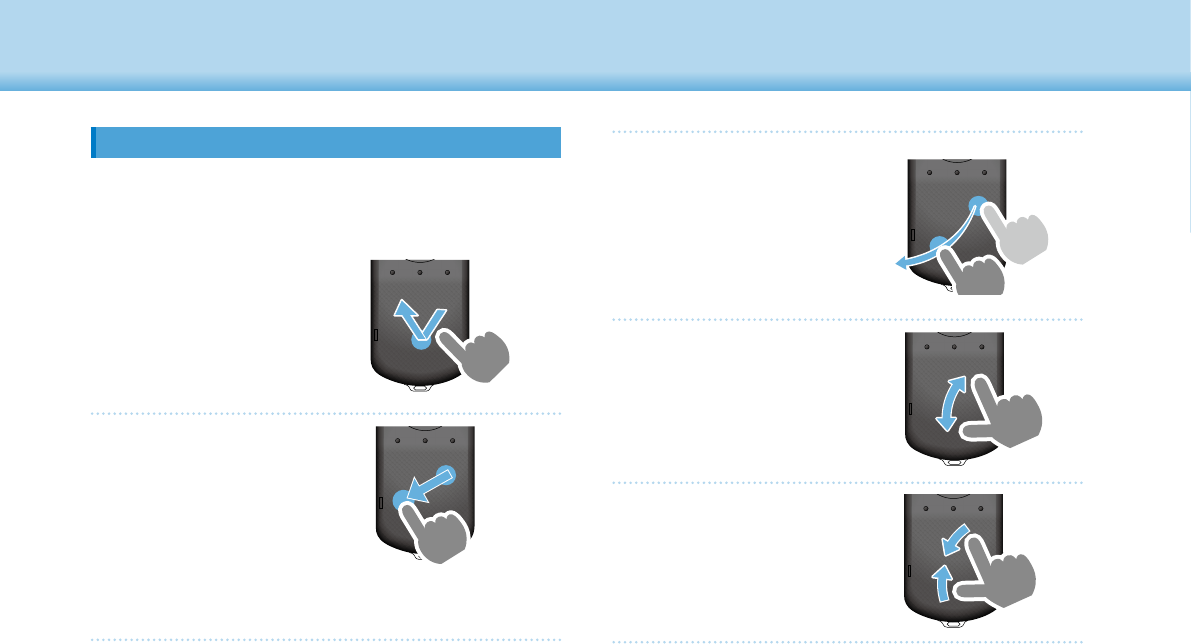
Using the Trackpad
When you touch the trackpad with your nger, a pointer is
displayed on the screen. Move the pointer to operate the
product.
Tap
Move the pointer to an
icon or displayed item, and
then tap the trackpad. Tap
performs actions such as
launching apps and selecting
items.
Drag
Touch the track pad for about
one second to select the
icon or displayed item, and
then drag your nger while
holding down the trackpad.
Drag performs actions such
as moving icons, scrolling, or
changing the screen.
Flick
Swipe your nger with a
dragging motion, or swipe
the trackpad with two
ngers.
Use two ngers to scroll the
screen smoothly.
Pinch out
Enlarges the size of the
screen by moving two
ngers apart.
Pinch in
Reduces the size of the
screen by moving two
ngers closer together.

25
01_Chapter title
01_Head A
02__lead
Getting Ready
25
Entering text
When you select a location where text entry is possible,
the software keyboard is displayed. Enter text using the
keyboard.
Changing the text entry mode
Press the [?123] key or the [ABC] key to switch between
characters on the keyboard, and press the [
↑
] key to
switch between upper and lower case letters.
26
01_Chapter title
01_Head A
02__lead
Getting Ready
26
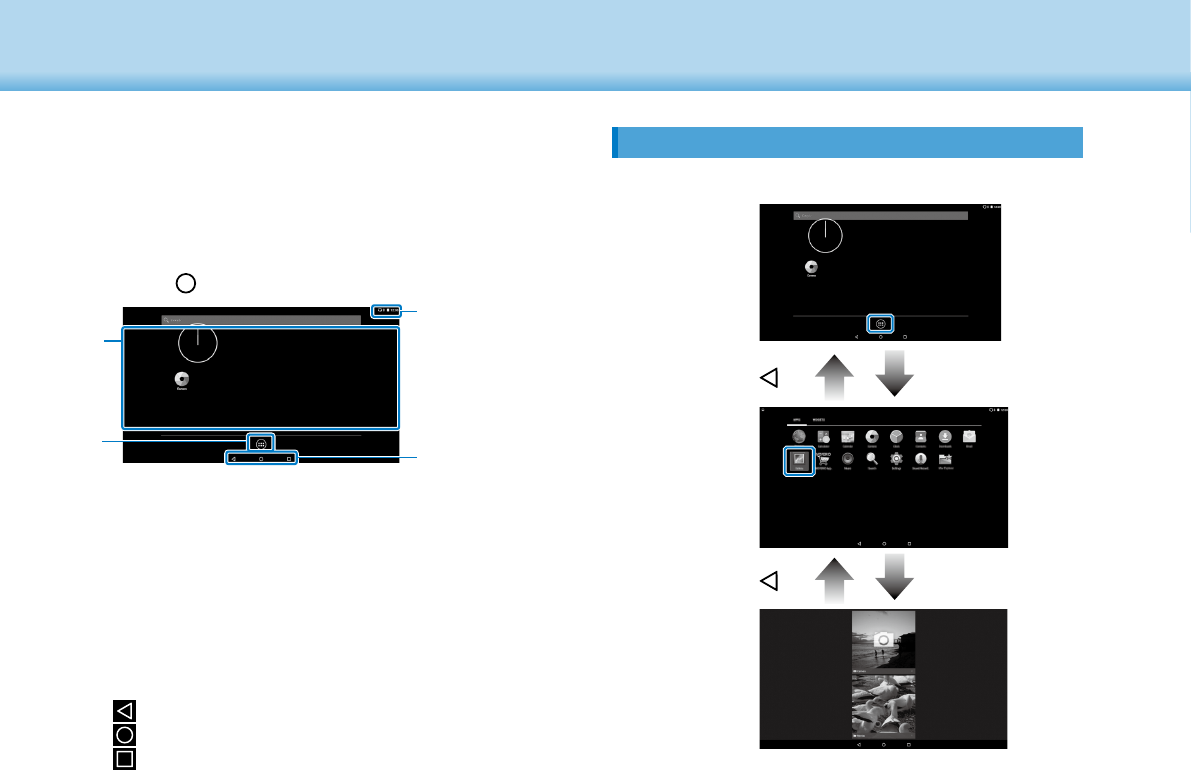
Launching an application
Launch an app from the APPS list screen.
Home screen
key Select
APPS list screen
key Select
App screen
Using the Home Screen
You can launch applications and perform various settings
from the Home screen.
The following screen is the initial screen you see when us-
ing this product.
Press the [
] key to display the Home screen.
B
C
D
A
A
App/Widget area
This area allows you to layout shortcuts and widgets for ap-
plications displayed on the Home screen.
B
APPS/WIDGETS list
Displays the APPS/WIDGETS list screen.
C
Status bar
Indicates the status of this product.
D
Virtual buttons
: Returns you to the previous screen.
: Displays the Home screen.
: Displays recently used apps.

27
01_Chapter title
01_Head A
02__lead
Getting Ready
27
Arranging apps and widgets on the Home screen
Select apps and widgets you want to display on the Home
screen from the APPS/WIDGETS list screen, and then ar-
range them.
A
On the APPS/WIDGETS list screen, move the pointer
to the app/widget, and then hold your nger down on
the app/widget.
The screen that allows you to select the location to place
the icon on the Home screen is displayed.
B
Drag to the location you want to place the icon, and
then release your nger.
Deleting apps and widgets from the Home screen
Delete apps and widgets that have been placed on the
Home screen.
A
On the Home screen, hold down your nger on the
app/widget you want to delete.
[
] is displayed at the top of the screen.
B
Drag the app/widget you want to delete over the
[
], and then release your nger.

28
01_Chapter title
01_Head A
02__lead
Getting Ready
28
Preinstalled applications
Gallery
Page 38 (this guide)
Music
Browser
Page 37 (this guide)
Calendar
Search
Sound Recorder
Calculator
Email
Camera
Page 42 (this guide)
Clock
Downloads
Settings
Status bar icons
Playing music
Connecting/using wireless LAN
Connecting to Bluetooth
Scanning microSD card
Battery charge status
Charging
Download complete
Screen dims due to high internal temperature

29
01_Chapter title
01_Head A
02__lead
Getting Ready
29
Available widgets
Widgets are small applications that display information on
the Home screen. The following widgets are available for
this product.
Analog clock
Bookmark
Calendar
Contacts
Email
Music
Music playlist
Search
Digital clock
Photo Gallery
MOVERIO Apps Market
Contacts
Mov Filer
30
01_Chapter title
01_Head A
02__lead
Getting Ready
30
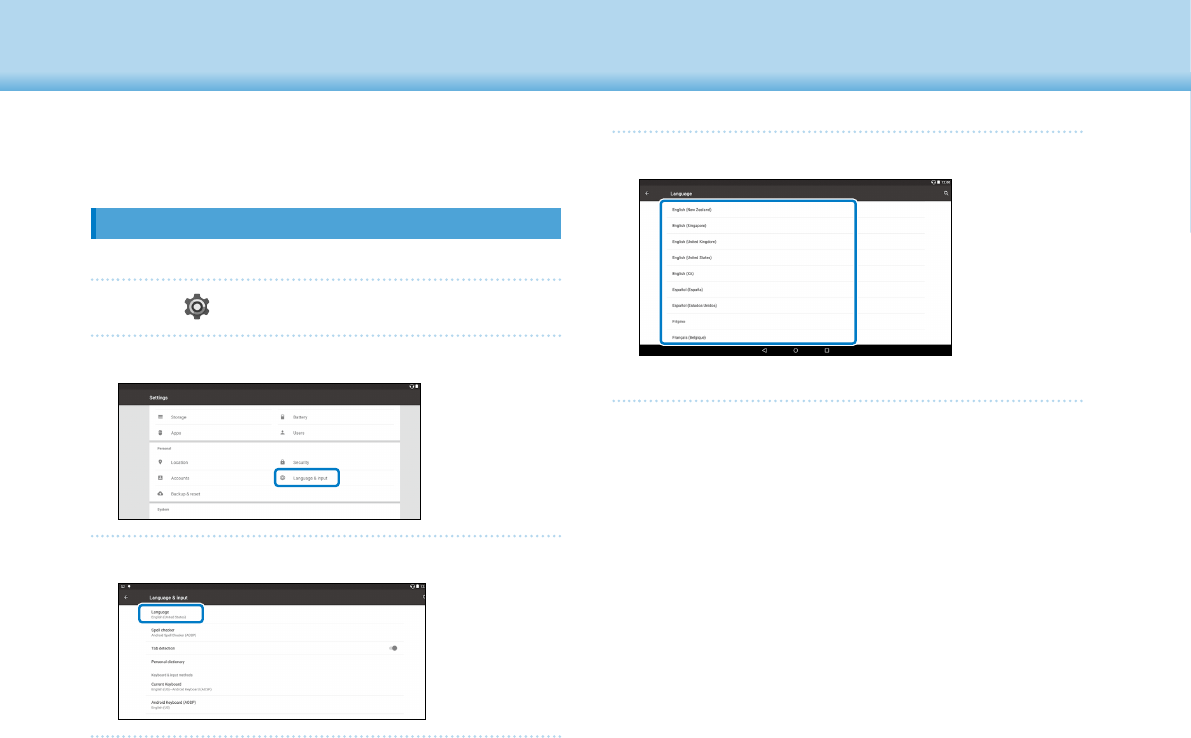
Setting the language, date and
time
Setting the language
You can set the display language.
A
Select [ ] on the APPS list screen.
B
Select [Personal] - [Language & input].
C
Select [Language].
D
Select the language you want to use.
The display language changes.

31
01_Chapter title
01_Head A
02__lead
Getting Ready
31
Setting the date and time
Set the date and time.
A
Select [ ] on the APPS list screen.
B
Select [System] - [Date & time].
C
Enable [Automatic date & time].
The date and time are set automatically.
• If the product is not connected to the Internet, the
date and time are not set automatically.
• When you disable [Automatic date & time], you can
set the date and time manually.
• You can also set the time zone and display format in
the [Date & time] setting.
32
01_Chapter title
01_Head A
02__lead
Getting Ready
32
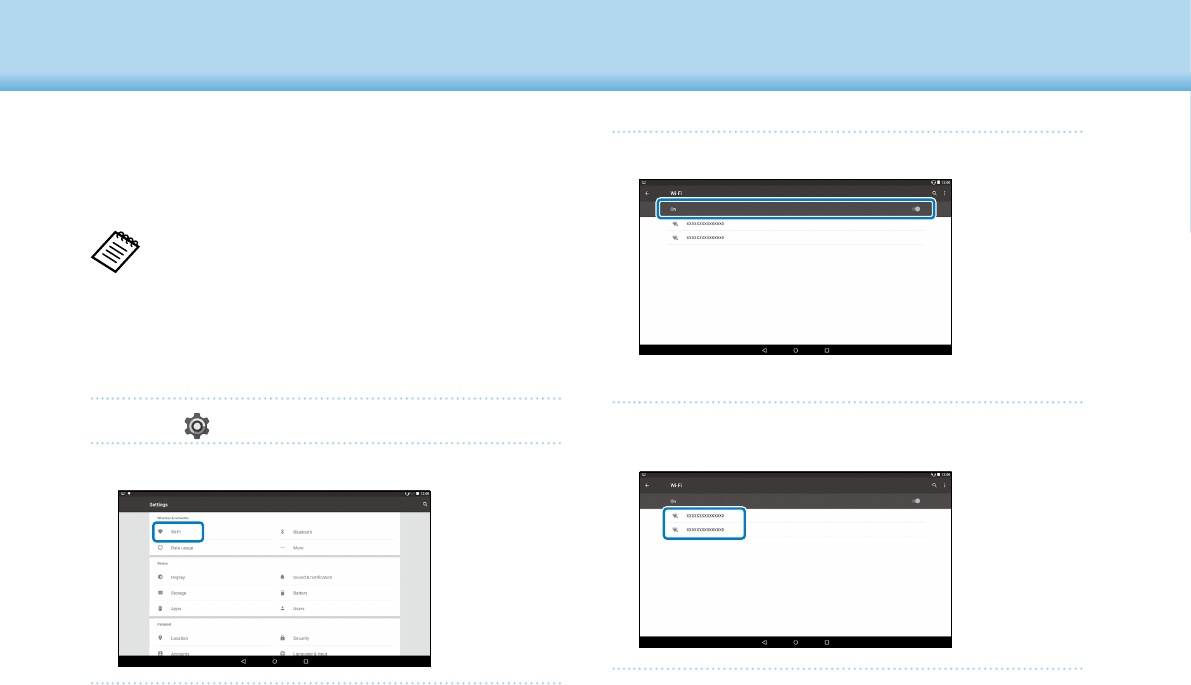
C
If [O] is selected, set it to [On].
Available SSIDs (network names) are displayed.
D
Select the SSID (network name) you want to connect
to.
Setting up network
Setup Wi-Fi so that the product can connect to the Internet over a
wireless LAN environment.
Check the following before setting up.
• The SSID (network name) for the wireless LAN access
point or public wireless LAN service you want to
connect to.
• The password and security system to connect to the
network if security has been enabled.
A
Select [ ] on the APPS list screen.
B
Select [Wireless & networks] - [Wi-Fi].

33
01_Chapter title
01_Head A
02__lead
Getting Ready
33
E
Enter the password, and then select [CONNECT].
When [ ] is displayed on the status bar, setup is com-
plete.
• See the following for details on how to enter text.
"Entering text" on page 25 (this guide)
• When you cannot find the SSID you want to
connect to, select [Add network] from [
] to add
the SSID.
• This product comes with a built-in system update
function. When the latest system is available, a
message is displayed on the screen when the
product connects to the network. We recommend
selecting the notification, and then following the
on-screen instructions to update to the latest
system.
"System Update" on page 51 (this guide)

34
01_Chapter title
01_Head A
02__lead
Getting Ready
34
C
If [O] is selected, set it to [On].
Available devices are displayed.
D
Select the device you want to connect to.
When [ ] is displayed on the status bar, setup is com-
plete.
If the device you want to connect to is not displayed,
select [Refresh] from [
].
Bluetooth settings
You need to adjust Bluetooth settings to allow the product to con-
nect wirelessly to Bluetooth enabled devices.
Check the following before setting up.
• The Bluetooth device is turned on.
• The Bluetooth device supports HSP/A2DP/HID/OPP/
SPP/AVRCP/PAN proles.
A
Select [ ] on the APPS list screen.
B
Select [Wireless & networks] - [Bluetooth].
35
01_Chapter title
01_Head A
02__lead
Getting Ready
35
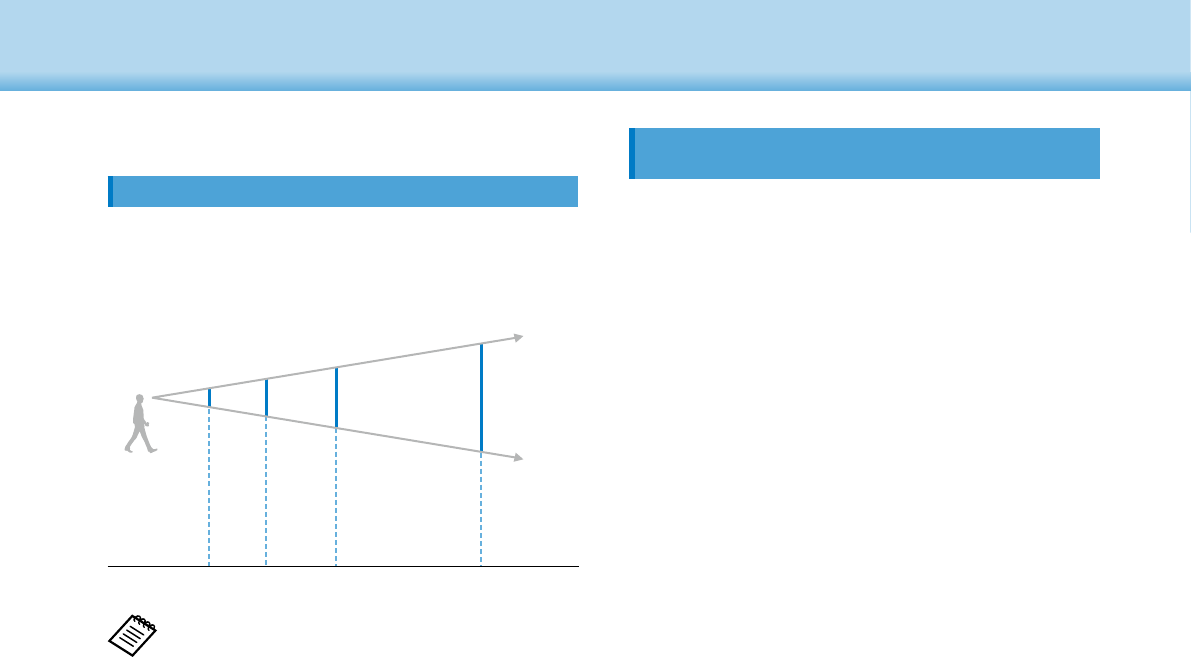
Adjusting the Screen
About the screen size
You can change the size of the screen depending on the distance
from your point of view. If your point of view is in the distance, you
will feel as if the screen size is in the distance and larger. If your point
of view is in close, you will feel as if the screen size is close and smaller.
The sense of size for the screen varies depending on the individual.
40
”
2.5m 5m 10m 20m
80
”
160
”
320
”
• How an image is perceived varies depending on the
individual.
• If there is a dierence between the strength of your
eyesight in your left and right eyes, you may not be
able to view 3D images correctly.
• How an image is perceived may vary depending on
the brightness of your surroundings.
Distance
Adjusting Brightness of the Lens (Using the
Shade)
If it is too bright to view the screen when wearing the headset, attach
the shade.
"Attaching and Removing the Shade" on page 19
(this guide)

36
01_Chapter title
01_Head A
02__lead
Getting Ready
36
Adjusting the Brightness of the Screen
The product comes with a built-in ambient light sensor that auto-
matically adjusts the brightness of the image to the brightness of the
surroundings.
To manually adjust the brightness of the images, follow the steps
below to turn o the auto adjustment feature.
A
Select [ ] on the APPS list screen.
B
Select [Device] - [Display].
C
Disable [Adaptive brightness].
The brightness auto adjust feature turns o.

37
01_Chapter title
01_Head A
02__lead
37
Viewing Images
If the URL eld is hidden, select the tab to show it again.
B
A
A
Tab
B
URL eld
Using the Browser's menu
B
A
A
Return to the previous page [
], go to the next
page [
], refresh the page [ ]
B
Menu list [
]
You can add new tabs, or browse text on a page.
Viewing Movies on a Website
(Browser)
This section explains how to connect to the Internet and
view movies on a website.
Connect to the internet using Browser.
Check the following points in advance.
• A wireless LAN environment is available.
• The Wi-Fi setting is on.
"Setting up network" on page 32 (this guide)
A
Select [ ] on the APPS list screen.
The Browser screen is displayed.
B
Select the URL eld and then enter a search keyword
or a URL.
"Entering text" on page 25 (this guide)

38
01_Chapter title
01_Head A
02__lead
Viewing Images
38
A
Select [ ] on the APPS list screen.
The Gallery's main screen is displayed.
B
Select the data you want to view.
Select [ ] to start playing the data.
Viewing Movies Copied from a
Computer (Gallery)
This section explains how to view images saved on your
computer. Copy movie data from your computer to this
product's internal storage or to a commercially available
microSD card.
You can view the copied data using this Gallery.
Check the following points in advance.
• When copying movie data from a computer,
connect the computer to this product with a USB
cable. The computer recognizes it as a portable
device, and you can copy data to the internal
storage or microSD card. See the Start Guide for
more details.
"Viewing Movies Copied from a Computer"
(Start Guide)
• The capacity for this product's internal storage is 16
GB.
• A microSD card is not included with this product.
This product supports commercially available
microSD cards (up to 2 GB) and microSDHC cards (up
to 32 GB). Insert into the controller's microSD card
slot, and then copy data.

39
01_Chapter title
01_Head A
02__lead
Viewing Images
39
Operations while playing movies
A
B
A
Pause
The pause button is displayed when you select the screen.
Select [
] to pause play back.
B
Movie positioning
Drag [ ] to the right or left to change the position
where you want to start playing.
40
01_Chapter title
01_Head A
02__lead
Viewing Images
40
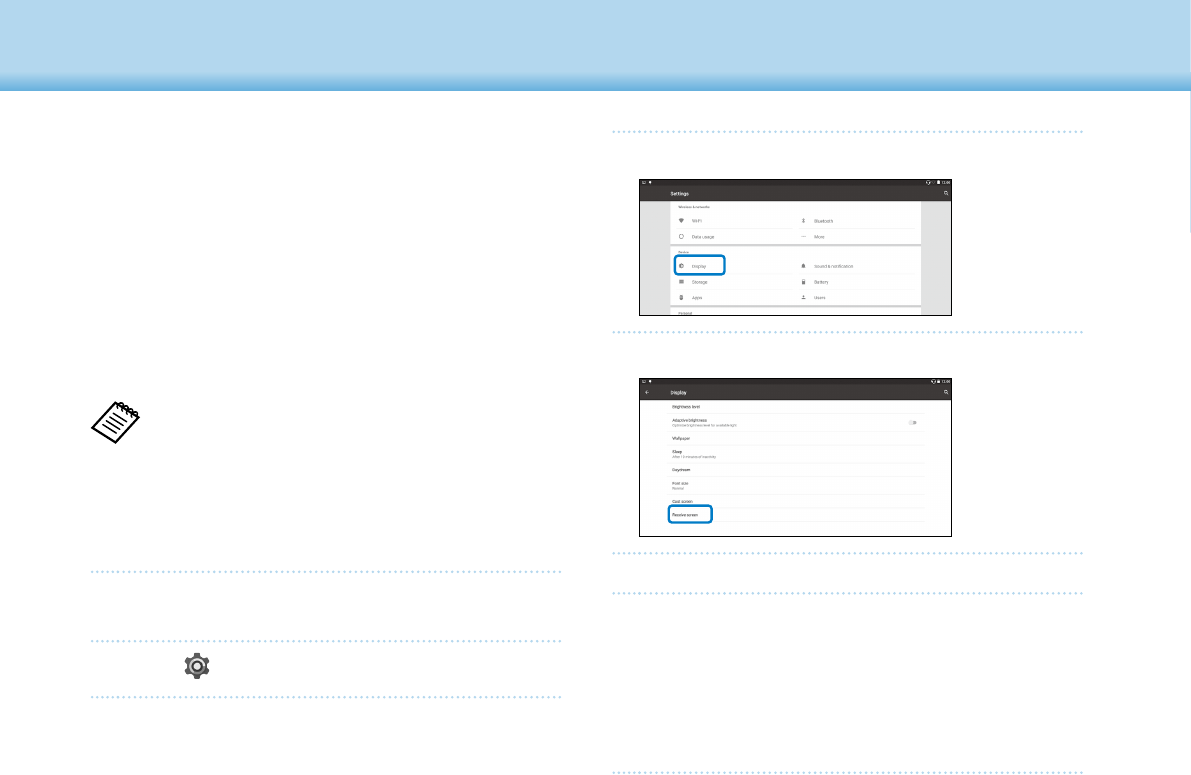
C
Select [Device] - [Display].
D
Select [Receive screen].
The device is ready to accept images from other devices.
E
Select the ID for the product of the device that is cast-
ing the image.
Follow the on-screen instructions on the device you
want to connect to. When the connection is established,
the image being cast appears on the screen of the de-
vice.
Viewing Images on Other Devices
(Miracast)
This section explains how to connect this product with
computers, smartphones, and televisions that support
Miracast, and then view content playing on a television
or smartphone on this product, and how to view content
playing on this product on a television.
Miracast is a technology that wirelessly connects support-
ed devices directly with each other and streams movies
and music between the devices.
Check the following points in advance.
• The device being used supports Miracast.
• Connections are not guaranteed for all devices.
• You cannot connect to your access point using Wi-Fi
while using the Miracast feature.
Receiving Images Being Cast
A
Set up the device sending the image so that it is ready
to accept the image being cast.
B
Select [ ] on the APPS list screen.

41
01_Chapter title
01_Head A
02__lead
Viewing Images
41
Casting Images
A
Set up the device receiving the image so that it is
ready to accept the image being cast.
B
Select [ ] on the APPS list screen.
C
Select [Device] - [Display].
D
Select [Cast screen].
E
Select [Enable wireless display] from [ ].
F
Select the ID for the product receiving the image.
Follow the on-screen instructions on the device receiv-
ing the image you want to connect to.
When the connection is established, the image on the
device appears on the screen of the device receiving
the image.
Depending on the content being played and the
communication status, the image may take a while to
be displayed, and noise may enter the image.

42
01_Chapter title
01_Head A
02__lead
42
Using Apps
Shooting a Movie (Camera)
You can shoot a video using the built-in camera.
• Make sure you do not infringe on any copyrights
when shooting a video with this product or when
editing, reproducing, or sharing recorded data.
• Using, changing, or sharing another persons
likeness or name without permission is a violation of
personality rights.
• Make sure you follow the instructions in places
in which photography is prohibited, such as live
events, industrial enterprises, and exhibitions.
• If you use this device to perform acts that are
considered as anti-social behavior, you may be
subject to punishment under local laws and
regulations.
To record audio when shooting a video, use the supplied
earphone microphone.
A
Select [ ] on the APPS list screen.
The camera's image is displayed.
B
Drag the left edge of the screen to the right, and then
select [
].
Switches to video shooting mode.
C
Select [ ].
Starts shooting video.

43
01_Chapter title
01_Head A
02__lead
Using Apps
43
D
Select [ ].
Shooting ends and the video you shot is automatically
saved to the product's internal storage.
44
01_Chapter title
01_Head A
02__lead
Using Apps
44
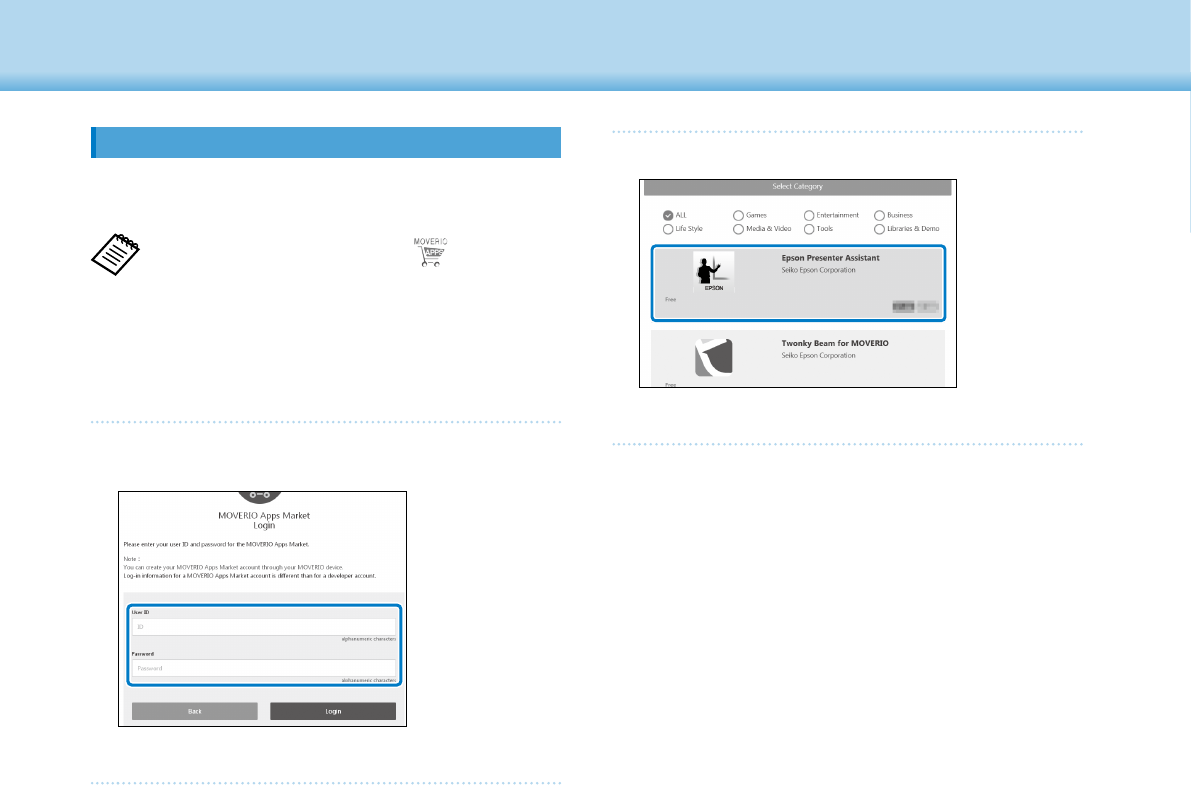
Downloading Apps
Use the MOVERIO Apps Market to download apps to the
product. When you access MOVERIO Apps Market for the
rst time, the installer starts when you select [
]. Follow
the on-screen instructions to install MOVERIO Apps Market.
Check the following points in advance.
• A wireless LAN environment is available.
• The Wi-Fi setting is on.
"Setting up network" on page 32 (this guide)
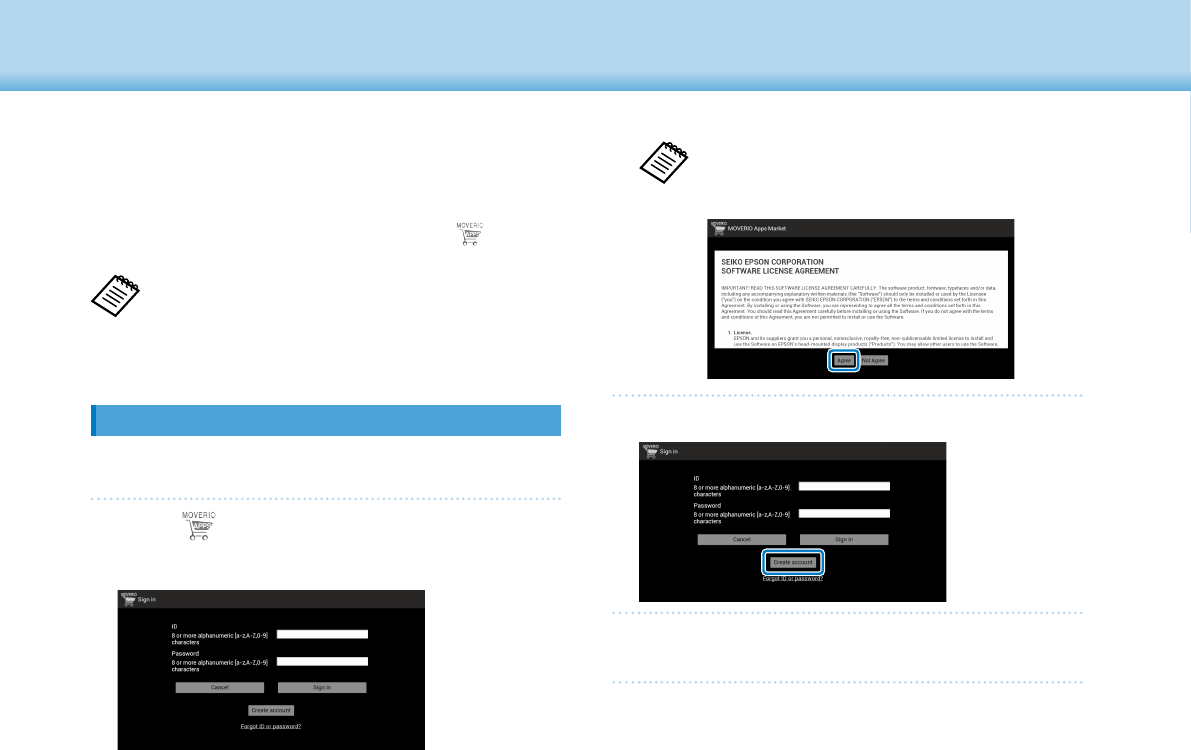
Creating a MOVERIO Apps Market account
You need to create an account when using MOVERIO Apps Market for
the rst time.
A
Select [ ] on the APPS list screen.
The MOVERIO Apps Market Sign in screen is displayed.
The license agreement screen is only displayed the rst
time you log in. Select [Agree] to display the Sign in
screen.
B
Select [Create account].
C
Follow the on-screen instructions to enter the neces-
sary information.

45
01_Chapter title
01_Head A
02__lead
Using Apps
45
D
Enter the ID, Email address, and Password you want to
use for the MOVERIO Apps Market.
E
Select [Create].
When the account is created, you are returned to the
MOVERIO Apps Market Sign in screen.
46
01_Chapter title
01_Head A
02__lead
Using Apps
46
C
Select the app you want to download.
The explanation screen for the app is displayed.
Downloading Apps
You can select the apps you want to install on this device from your
computer.
You can also select apps from the [ ].
A
Access the following website from your computer's
browser.
https://moverio.epson.com/jsp/pc/pc_login.jsp
The MOVERIO Apps Market Login screen is displayed.
B
Enter the User ID and Password, and then select
[Login].
The MOVERIO Apps Market Main screen is displayed.

47
01_Chapter title
01_Head A
02__lead
Using Apps
47
D
Select [Install].
The app is queued for installation.
When you connect the device to the Internet, queued
apps are automatically downloaded and installed.
If you do not want to install apps automatically, select
[
] - [Settings], and then clear [Auto install].
When installation is complete, the icon for the app is dis-
played on the Home screen.

48
01_Chapter title
01_Head A
02__lead
48
Troubleshooting
• If the controller gets too hot due to prolonged use or the
usage environment, battery charging stops, and the product
may turn o for safety reasons. Wait for the temperature to
fall, and then turn the product back on.
Cannot view movies or listen to audio
• The Gallery supports the following formats.
• Supported video: MP4 (MPEG-4/H.264+AAC), MPEG-2
(H.264+AAC), VP8
• Supported still images: JPEG, PNG, BMP, GIF
• Supported audio formats: WAV, MP3, AAC
• When images are not displayed while the LED indicator is
lit, the device may be muted. Tap the right-hand side of the
product twice lightly to release the mute function.
• If you accidentally activate the tap to mute function, you
can set it to O.
• Use the earphone microphone supplied to input audio.
• You may not be able to use it depending on the type
of switch earphone microphone or standard earphone
microphone.
If you think a malfunction has occurred, check the follow-
ing.
The product does not turn on
• Check that the product is fully charged.
• If the product cannot turn on due to insucient power, the
LED indicator is lit orange for ve seconds.
• If the battery is dead, the LED indicator does not turn on for
a while when charging starts. Charge for at least 30 minutes,
and then re-connect the USB cable.
"Charging" on page 14 (this guide)
• Press the Power button for one second. When the startup
begins, the start screen is displayed in the headset. When
startup is complete, the Home screen is displayed.
"Turning on" on page 20 (this guide)
• When charging cannot be performed or operations are
unresponsive, hold down the Power button for at least 10
seconds to force the product to turn o. When the power
turns o, restart the product.
"Turning o" on page 21 (this guide)
• Contact your local Service Center if you forget the password
for the screen lock. If the operating system needs to be
reinstalled, the device returns to the status at the time of
purchase.

49
01_Chapter title
01_Head A
02__lead
Troubleshooting
49
Images are fuzzy
• Switch between 2D or 3D.
• If the product gets too hot, the image brightness may be
decreased for safety reasons. When you see [
] [ ] on the
home screen, wait for the temperature to fall.
Cannot perform controller operations
• When you hold down the Switch key, the key lock turns
on, and you cannot operate the controller. Hold down the
Switch key again to release the key lock.
• When the LED indicator is blue (during Sleep mode), press
the Power button briey to release Sleep mode.
Cannot connect to the network
• Check that the wireless LAN (Wi-Fi) environment where you
are using the product can be accessed.
• Check that the device's wireless LAN setting is turned on.
Turn on your Wi-Fi.
"Setting up network" on page 32 (this guide)
When using at home
• Check that the wireless LAN router or access point is turned
on.
• Check the SSID and security password for the wireless LAN
router or access point. See the documentation provided
with the wireless LAN router or access point for more
details.
When using a public wireless LAN service
• Check that the public wireless LAN service is available.
• You may need a contract with the service supplier to use
the public wireless LAN service.
Cannot communicate with external devices
When using Miracast
• Check that the product's Miracast feature is turned on.
• Check that the external device supports Miracast.
When using Bluetooth
• Check that the product's Bluetooth feature is turned on.
• Check that the external device supports Bluetooth.
• Check that the external device supports the Bluetooth HSP/
A2DP/HID/OPP/SPP/AVRCP/PAN proles.
• Make sure the product is close to the external device and
that there are no obstacles between them. Bluetooth is
short-range wireless communication technology. It cannot
communicate over long distances.

50
01_Chapter title
01_Head A
02__lead
Troubleshooting
50
Cannot download apps
If you cannot download apps from the MOVERIO Apps Market,
check that the product can connect to the network.
"Cannot connect to the network" on page 49 (this guide)
Maintenance
If you can see marks in the image or if the image is hazy,
check that there is no dirt, dust, ngerprints, and so on, on the
lenses.
If there is dust or dirt on the lenses, wipe them carefully with a
soft cloth.

51
01_Chapter title
01_Head A
02__lead
Troubleshooting
51
System Update
This product comes with a built-in system update function.
Update the system to the latest version before using the
product.
Updating the System
Connect the AC adapter to the product, and run the update
while the product is turned on. If the amount of battery
remaining in the product drops below 50%, the system
update stops. If the update stops, turn o the product, charge
it, and then run the system update again.
A
Adjust Wi-Fi settings for the product, and then con-
nect to the Internet.
"Setting up network" on page 32 (this guide)
When a system update is available, a notification is dis-
played at the top of the screen.
You can check the update package from [Settings].
Select [
] from the APPS list, and then select
[About device] - [System Update]. When you are
using the latest system, select [Check Now] to
check if there is a newer version available.
B
Select [Download].
Follow the on-screen instructions to download the update
package.
C
Select [Start Update] on the following screen.
The product restarts and the update status is displayed
on the screen. When the update is nished, [Complete] is
displayed on the screen.

52
01_Chapter title
01_Head A
02__lead
Troubleshooting
52
D
Press the Power button on the controller to turn o
the product.
The next time you turn on the product, the updated sys-
tem starts.
Checking the System Version
A
Select [ ] on the APPS list screen.
B
Select [About device].
C
Check the build number.
The number displayed for the Build number is the current
system version.

53
01_Chapter title
01_Head A
02__lead
53
Specications
Model Number BT-300 (H756A)
Material Si-OLED
Panel size 0.43" wide panel (16:9)
Panel pixel count 921,600 HD (horizontal 1280 x vertical 720 dots) x 3
Angle of view Approximately 23 degrees (diagonally)
Virtual screen size
40" support (virtual viewing distance 8.2 ft [2.5 m])
Color reproduction 24 bit color (approximately 16,770,000 colors)
Suppor
ted movie formats MP4 (MPEG-4/H.264+AAC), MPEG-2 (H.264+AAC), VP8
Supported still image formats JPEG, PNG, BMP, GIF
Supported audio formats WAV, MP3, AAC
Supported 3D Side-by-side format
Internal memory Main memory 2 GB
User memory 16 GB
External memory microSD (2 GB maximum)
microSDHC (32 GB maximum)
Connector ports
micro-USB, controller connector, 4 pin mini jack (earphones with microphone complying with
the CTIA standard)
*1
, microSD card slot
Operating temperature
41 to 95°F (5 to 35°C); humidity 20 to 80% (no condensation)
Storage temperature
14 to 140°F (-10 to 60°C); humidity 10 to 90% (no condensation)
Power voltage Controller 5 VDC (when using USB connector)
AC adapter
Model Number PSA05F-050QAL6E-H
Manufacturer PHIHONG TECHNOLOGY CO., LTD.
Rated voltage/Current 5V/1A
*1
Restrictions in operation may occur when using an adapter plug.

54
01_Chapter title
01_Head A
02__lead
Specications
54
Power consumption
1900 mW when playing movies, 2100 mW when connected by Wi-Fi
Battery Type Lithium polymer battery 2950 mAh
Lithium content Less than 1.5 g
Amount of watt hour rating Less than 20 Wh
Frequency band IEEE 802.11a/b/g/n/ac, Miracast (Source/Sink)
Frequency range 2.4 GHz band 1 to 13 ch, 5 GHz band 36 to 144 ch
Modulation ODFM, DS-SS
Potential interference range
32.8 ft (
10 m)
Battery life Approximately 6 hours (standard life under Epson's evaluation conditions)
Exterior dimensions
(D x W x H)
Headset
7.0 x 7.5 x 1.0 inches (178 x 191 x 25 mm) (without the shade)
Controller
4.6 x 2.2 x 0.9 inches (116 x 56 x 23 mm)
(without protruding section)
Mass Headset 69 g (without shade and cables)
Controller 129 g
Camera 5 million pixels
Earphones Reception 100 dB/mW
Playback frequency band 20 to 20 kHz
Impedance 32 ohm
Earphone output
Max. voltage 150 mV or less
Voltage with broadband characteristics 75 mV or more
Sensors GPS/geomagnetic sensor/accelerometer sensor/gyroscopic sensor/ambient light sensor
Bluetooth Standard
V4.1 (Bluetooth Smart Ready Class2)
Proles HSP/A2DP/HID/OPP/SPP/AVRCP/PAN

55
01_Chapter title
01_Head A
02__lead
55
Intellectual Property Rights
Trademarks iWnnIME © OMRON SOFTWARE Co., Ltd. 2011 All Rights Reserved.
microSDHC Logo is a trademark of SD-3C, LLC.
Wi-Fi®, Wi-Fi Direct™, and Miracast™ are the trademarks or registered trademarks of the Wi-Fi Alliance.
The Bluetooth® word mark and logos are registered trademarks owned by Bluetooth SIG, Inc., and any use of such marks by the Seiko Epson Corporation is
under license.
GPStream PGPS™ is a trademark of RX Networks, Inc.
Other product names used herein are also for identication purposes only and may be trademarks of their respective owners. Epson disclaims any and all
rights in those marks.
OPEN SOURCE
SOFTWARE LI-
CENSE
As well as software owned by Epson, this product also uses open source software.
The following provides information on the open source software used in this product.
1. This product includes open source software programs according to the license terms of each program.
The open source software programs are without warranty; however, any malfunctions (including malfunctions caused by the open source
software programs) that occur in this product do not inuence the warranty conditions provided for this product.
2. We provide the source code of some open source software programs. If you desire to receive the source code above, please see the "http://
www.epson. com" and contact the customer support of your region. We provide the source code until ve (5) years after the discontinuation of
this product. You shall comply with the license terms of each open source software program.
3. The open source software programs are WITHOUT ANY WARRANTY; without even the implied warranty of MERCHANTABILITY AND FITNESS
FOR A PAR-TICULAR PURPOSE. See the license agreements of each open source software program for more details, which are described in the
product.
4. The license terms of each open source software program are described in Home screen > Settings > About device > Legal information > Open
source licenses of the product.

56
01_Chapter title
01_Head A
02__lead
Intellectual Property Rights
56
INTEL END USER SOFTWARE LICENSE AGREEMENT
IMPORTANT - READ BEFORE COPYING, INSTALLING OR USING.
Do not use or load software from this site or any associated materials until you have carefully read the following terms and conditions. By
loading or using the Software, you agree to the terms of this Agreement. If you do not wish to so agree, do not install or use the Software.
LICENSE. You have a license under Intel's copyrights to copy Intel's Software in binary form, (with the accompanying documentation, the
"Software") solely for your organization's personal internal use only in connection with Intel products for which the Software has been pro-
vided, subject to the following conditions:
(a) You may not disclose, distribute, rent, lease or transfer any part of the Software except as provided in this Agreement, and you agree to
prevent unauthorized copying of the Software.
(b) You may not reverse engineer, decompile, or disassemble the Software.
(c) You may not sublicense the Software.
(d) The Software may contain the software and other property of third party suppliers, some of which may be identied in, and licensed in
accordance with, an enclosed license.txt le or other text or le.
(e) Intel has no obligation to provide any support, technical assistance or updates for the Software.
NO IMPLIED LICENSES OR OTHER RIGHTS. The consideration under this Agreement is only for the licenses that Intel expressly grants to You
in the preceding paragraphs. Any other rights including, but not limited to, patent rights, would require an additional license and additional
consideration. Nothing in this Agreement requires or will be treated to require Intel to grant any such additional license. An essential basis of
the bargain in this Agreement is that Intel grants You no licenses or other rights including, but not limited to, patent, copyright, trademark,
trade name, service mark or other intellectual property licenses or rights, by implication, estoppel or otherwise, except for the licenses ex
-
pressly granted in the preceding paragraphs. Specically, except for the licenses expressly granted in the preceding paragraphs, Intel grants
no licenses or other rights, expressly or by implication, estoppel or otherwise, to:
(1) make, use, sell, oer for sale, or import modications of the Software;
(2) sell or oer to sell the Software;
(3) combine the Software or modied versions of the Software with other items or to use any such combination; or
(4) any claims of any patents, patent applications, or other patent rights of Intel.

57
01_Chapter title
01_Head A
02__lead
Intellectual Property Rights
57
You acknowledge that there are signicant uses of the Software in its original, unmodied and uncombined form. The consideration for the
license in this Agreement reects Intel's continuing right to assert patent claims against any modications or derivative works (including,
without limitation, error corrections and bug xes) of, or combinations with, the Software that You or third parties make that infringe any Intel
patent claim.
OWNERSHIP OF SOFTWARE AND COPYRIGHTS. Title to all copies of the Software remains with Intel or its suppliers. The Software is copyrighted
and protected by the laws of the United States and other countries, and international treaty provisions. You may not remove any copyright
notices from the Software. Except as otherwise expressly provided above, Intel grants no express or implied right under Intel patents, copy-
rights, trademarks, or other intellectual property rights. Transfer of the license terminates your right to use the Software.
DISCLAIMER OF WARRANTY. [Intel warrants that the media on which the Software is furnished will be free from defects in material and work
-
manship under normal use for a period of 90 days from the date of purchase. Intel's entire liability and your exclusive remedy will be the
replacement of the Software if the media on which the Software is furnished proves to be defective. This warranty is void if the media defect
has resulted from accident, abuse, or misapplication. [Except as provided above, the] [The] Software is provided "AS IS" without warranty of
any kind, EITHER EXPRESS OR IMPLIED, INCLUDING WITHOUT LIMITATION, WARRANTIES OF MERCHANTABILITY OR FITNESS FOR ANY PARTICU-
LAR PURPOSE.
LIMITATION OF LIABILITY. NEITHER INTEL NOR ITS SUPPLIERS WILL BE LIABLE FOR ANY DAMAGES WHATSOEVER (INCLUDING, WITHOUT LIMITA-
TION, DAMAGES FOR LOSS OF PROFITS, LOSS OF USE, INTERRUPTION OF BUSINESS, OR INDIRECT, SPECIAL, INCIDENTAL, OR CONSEQUENTIAL
DAMAGES OF ANY KIND) WHETHER UNDER THIS AGREEMENT OR OTHERWISE, EVEN IF INTEL HAS BEEN ADVISED OF THE POSSIBILITY OF SUCH
DAMAGES.
LICENSE TO USE COMMENTS AND SUGGESTIONS. This Agreement does NOT obligate You to provide Intel with comments or suggestions
regarding the Software. However, if You provide Intel with comments or suggestions for the modication, correction, improvement or en-
hancement of (a) the Software or (b) Intel products or processes that work with the Software, you grant to Intel a non-exclusive, worldwide,
perpetual, irrevocable, transferable, royalty-free license, with the right to sublicense, under Your intellectual property rights, to incorporate or
otherwise utilize those comments and suggestions.
TERMINATION OF THIS LICENSE. Intel or the sublicensor may terminate this license at any time if You are in breach of any of its terms or condi-
tions. Upon termination, You will immediately destroy the Software, and return to Intel all copies of the Software.

58
01_Chapter title
01_Head A
02__lead
Intellectual Property Rights
58
THIRD PARTY BENEFICIARY. Intel is an intended beneciary of the End User License Agreement and has the right to enforce all of its terms.
U.S. GOVERNMENT RESTRICTED RIGHTS. No Government procurement regulation or contract clauses or provision will be considered a part of
any transaction between the Parties under this Agreement unless its inclusion is required by statute, or mutually agreed upon in writing by
the Parties in connection with a specic transaction. The technical data and computer software covered by this license is a "Commercial Item,"
as that term is dened by the FAR 2.101 (48 C.F.R. 2.101) and is "commercial computer software" and "commercial computer software docu-
mentation" as specied under FAR 12.212 (48 C.F.R. 12.212) or DFARS 227.7202 (48 C.F.R. 227.7202), as applicable. This commercial computer
software and related documentation is provided to end users for use by and on behalf of the U.S. Government, with only those rights as are
granted to all other end users under the terms and conditions in this Agreement. Use for or on behalf of the U.S. Government is permitted
only if the party acquiring or using this Software is properly authorized by an appropriate U.S. Government ocial. This use by or for the U.S.
Government clause is in lieu of, and supersedes, any other FAR, DFARS, or other provision that addresses Government rights in the computer
Software or documentation covered by this license. All copyright licenses granted to the U.S. Government are coextensive with the techni
-
cal data and computer Software licenses granted in this Agreement. The U.S. Government will only have the right to reproduce, distribute,
perform, display, and prepare Derivative Works as needed to implement those rights.
EXPORT LAWS. You acknowledge that the Software and all related technical information or materials are subject to export controls under the
laws and regulations of the United States and any other applicable governments. You agree to comply with these laws and regulations gov-
erning export, re-export, import, transfer, distribution, and use of the Software, technical information and materials. In particular, but without
limitation, the Software, technical information and materials may not be exported or re-exported (a) into any U.S. embargoed countries or (b)
to any person or entity listed on a denial order published by the U.S. government or any other applicable governments. By using the Software,
technical information and materials, you represent and warrant that you are not located in any such country or on any such list. You also agree
that you will not use the Software, technical information and materials for any purposes prohibited by the U.S. government or other appli-
cable government's law, including, without limitation, the development, design, manufacture or production of nuclear, missile, chemical or
biological weapons. You conrm that the Software, technical information and materials will not be re-exported or sold to a third party who is
known or suspected to be involved in activities including, without limitation, the development, design, manufacture, or production of nuclear,
missile, chemical or biological weapons. You agree that any Software, technical information or materials subject to control under defense laws

59
01_Chapter title
01_Head A
02__lead
Intellectual Property Rights
59
and regulations (e.g., the International Trac in Arms Regulations [ITAR]) must not be transferred to non-U.S. persons, whether located in the U.S.
or abroad, without a government license. You will indemnify Intel against any loss related to Your failure to conform to these requirements.
APPLICABLE LAWS. This Agreement is governed by the laws of the state of Delaware, excluding its principles of conict of laws and the United
Nations Convention on Contracts for the Sale of Goods. You may not export the Software in violation of applicable export laws and regula-
tions.
Your specic rights may vary from country to country.

60
01_Chapter title
01_Head A
02__lead
60
General Notes
Notes Regarding Wireless
LAN
Do not use the Wireless LAN function in France unless you are indoors.
If you purchase this product outside of North America and Taiwan, please note that this product emits wireless LAN electromagnetic waves on
channels 1 to 13. Therefore, do not use the wireless LAN function in North America and Taiwan where wireless LAN channels are limited to 1 to 11
by the Wireless Telegraphy Act.
Follow local laws and regulations when using in other regions.
Wireless Telegraphy Act
Regulations
The following acts are prohibited by the Wireless Telegraphy Act.
• Modifying and disassembling (including the antenna)
• Removing the label of conformance
• Using the 5 GHz bandwidth LAN when outdoors
Restriction of Use This product is manufactured based on the specications of the country of sale. When using this product outside the country of sale, contact your
nearest support center.
When this product is used for applications requiring high reliability/safety such as transportation devices related to aviation, rail, marine, automo-
tive; disaster prevention devices; various safety devices; or functional/precision devices, you should use this product only after giving consideration
to including fail- safes and redundancies into your design to maintain safety and total system reliability.
Because this product was not intended for use in applications requiring extremely high reliability/safety such as aerospace equipment, main com-
munication equipment, nuclear power control equipment, or medical equipment related to direct medical care, please make your own judgment
on this product's suitability after a full evaluation.
Notes on Frequency This device operates in the same frequency bandwidth as industrial, scientic, and medical devices such as microwave ovens and mobile object
identication (RF-ID) systems (licensed premises radio stations, amateur, and unlicensed specied low-power radio stations (hereafter "other radio
stations")) used in factory production lines.
1. Before using this product, make sure there are no "other radio stations" being used in the vicinity.
2. If this device causes RF interference between the device and "other radio stations", promptly move to a dierent location, stop using
the device, and contact your local dealer to ask for advice on preventing interference (for example setting up partitions).
3. In addition, when harmful radio wave interference occurs between the device and "other radio stations", contact your local dealer.
Authentication information
1052D-H756A
SKSH756A
1052D-H756A
SKSH756A

61
01_Chapter title
01_Head A
02__lead
General Notes
61
Authentication information
CE
DECLARATION of CONFOR-
MITY
In France, WLAN usage is only permitted indoors.
The purpose of the WLAN function is to connect to a 2.4 GHz access point.
DECLARATION of
CONFORMITY
According to 47CFR, Part 2 and 15
Class B Personal Computers and Peripherals; and/or
CPU Boards and Power Supplies used with Class B Personal Computers
We : Epson America, Inc.
Located at : 3840 Kilroy Airport Way MS : 3-13 Long Beach, CA 90806
Tel : 562-981-3840
Declare under sole responsibility that the product identied herein, complies with 47CFR Part 2 and 15 of the FCC rules as a Class B
digital device. Each product marketed, is identical to the representative unit tested and found to be compliant with the standards.
Records maintained continue to reect the equipment being produced can be expected to be within the variation accepted, due to
quantity production and testing on a statistical basis as required by 47CFR 2.909. Operation is subject to the following two conditions
: (1) this device may not cause harmful interference, and (2) this device must accept any interference received, including interference
that may cause undesired operation.
Trade Name : EPSON
Type of Product : Smart Glasses
Model : H756A

62
01_Chapter title
01_Head A
02__lead
General Notes
62
FCC Compliance
Statement
This equipment has been tested and found to comply with the limits for a Class B digital device, pursuant to Part 15 of the FCC Rules.
These limits are designed to provide reasonable protection against harmful interference in a residential installation. This equipment
generates, uses, and can radiate radio frequency energy and, if not installed and used in accordance with the instructions, may cause
harmful interference to radio communications. However, there is no guarantee that interference will not occur in a particular instal-
lation. If this equipment does cause harmful interference to radio or television reception, which can be determined by turning the
equipment o and on, the user is encouraged to try to correct the interference by one or more of the following measures.
• Reorient or relocate the receiving antenna.
• Increase the separation between the equipment and receiver.
• Connect the equipment into an outlet on a circuit dierent from that to which the receiver is connected.
• Consult the dealer or an experienced radio/TV technician for help.
WARNING
The connection of a non-shielded equipment interface cable to this equipment will invalidate the FCC Certication or Declaration of
this device and may cause interference levels which exceed the limits established by the FCC for this equipment. It is the responsibil-
ity of the user to obtain and use a shielded equipment interface cable with this device. If this equipment has more than one interface
connector, do not leave cables connected to unused interfaces. Changes or modications not expressly approved by the manufac-
turer could void the user's authority to operate the equipment.
FCC/Industry Can-
ada (IC) Notices
FCC Notices
This device complies with Part 15 of the FCC Rules. Operation is subject to the following two conditions: (1) this device may not
cause harmful interference, and (2) this device must accept any interference received, including interference that may cause unde-
sired operation.
This equipment complies with FCC radiation exposure limits set forth for an uncontrolled environment. End-users must follow the
specic operating instructions for satisfying RF exposure compliance. This transmitter must not be co-located or operating in con-
junction with any other antenna or transmitter.
Caution:
You are cautioned that changes or modications not expressly approved by the party responsible for compliance could void your
authority to operate the equipment.
Industry Canada (IC) Notices
CAN ICES-3 (B)/NMB-3(B)
This Class B digital apparatus complies with Canadian ICES-003.
Cet appareil numèrique de la classe B est conforme à la norme NMB-003 du Canada.
This equipment complies with RF radiation exposure limits set forth for an uncontrolled environment. End-users must follow the spe-
cic operating instructions for satisfying RF exposure compliance. This transmitter must not be co-located or operating in conjunc-
tion with any other antenna or transmitter.
This device complies with Industry Canada’s licence-exempt RSSs. Operation is subject to the following two conditions:
(1) This device may not cause interference; and
(2) This device must accept any interference, including interference that may cause undesired operation of the device.

63
01_Chapter title
01_Head A
02__lead
General Notes
63
Indication of the manufacturer and the importer in accordance with requirements of directive 2011/65/EU (RoHS)
Manufacturer: SEIKO EPSON CORPORATION
Address: 3-5, Owa 3-chome, Suwa-shi, Nagano-ken 392-8502 Japan
Telephone: 81-266-52-3131
Importer: SEIKO EUROPE B.V.
Address: Azië building, Atlas ArenA, Hoogoorddreef 5, 1101 BA Amsterdam Zuidoost
The Netherlands
Telephone: 31-20-314-5000

01_Chapter title
01_Head A
02__lead
64
Contact List
This address list is current as of March 2019.
A more up-to-date contact address can be obtained from the corresponding website listed here. If you do not find what you
need on any of these pages, please visit the main Epson home page at www.epson.com.
EUROPE, MIDDLE EAST & AFRICA
ALBANIA
ITD Sh.p.k.
http://www.itd-al.com
AUSTRIA
Epson Deutschland GmbH
https://www.epson.at
BELGIUM
Epson Europe B.V.
Branch oce Belgium
https://www.epson.be
BOSNIA AND HERZEGOVI-
NA
NET d.o.o. Computer Engineering
http://www.net.com.ba
BULGARIA
Epson Service Center Bulgaria
http://www.kolbis.com
CROATIA
MR servis d.o.o.
http://www.mrservis.hr
CYPRUS
Mechatronic Ltd.
http://www.mechatronic.com.cy
CZECH REPUBLIC
Epson Europe B.V.
Branch Oce Czech Republic
https://www.epson.cz
DENMARK
Epson Denmark
https://www.epson.dk
ESTONIA
Epson Service Center Estonia
https://www.epson.ee
FINLAND
Epson Finland
https://www.epson.fi
FRANCE & DOM-TOM TER-
RITORY
Epson France S.A.
https://www.epson.fr
GERMANY
Epson Deutschland GmbH
https://www.epson.de
GREECE
Oktabit S.A.
https://www.oktabit.gr
HUNGARY
Epson Europe B.V.
Branch Oce Hungary
https://www.epson.hu
IRELAND
Epson (UK) Ltd.
https://www.epson.ie

01_Chapter title
01_Head A
02__lead
Contact List
6
5
ISRAEL
Epson Israel
https://www.epson.co.il
ITALY
Epson Italia s.p.a.
https://www.epson.it
KAZAKHSTAN
Epson Kazakhstan Rep. Oce
http://www.epson.kz
LATVIA
Epson Service Center Latvia
https://www.epson.lv
LITHUANIA
Epson Service Center Lithuania
https://www.epson.lt
LUXEMBURG
Epson Europe B.V.
Branch oce Belgium
https://www.epson.be
NORTH MACEDONIA
Digit Computer Engineering
http://digit.net.mk/
NETHERLANDS
Epson Europe B.V.
Benelux sales oce
https://www.epson.nl
NORWAY
Epson Norway
https://www.epson.no
POLAND
Epson Europe B.V.
Branch Oce Poland
https://www.epson.pl
PORTUGAL
Epson Ibérica S.A.U.
Branch Oce Portugal
https://www.epson.pt
ROMANIA
Epson Europe B.V.
Branch Oce Romania
https://www.epson.ro
RUSSIA
Epson CIS
http://www.epson.ru
UKRAINE
Epson Kiev Rep. Oce
http://www.epson.ua
SERBIA
Atom partner
http://www.atompartner.rs/wp/
EWE Comp
https://www.ewe.rs
SLOVAKIA
Epson Europe B.V.
Branch Oce Czech Republic
https://www.epson.sk
SLOVENIA
Birotehna d.o.o.
http://www.birotehna.si
SPAIN
Epson Ibérica, S.A.U.
https://www.epson.es
SWEDEN
Epson Sweden
https://www.epson.se
SWITZERLAND
Epson Deutschland GmbH
Branch oce Switzerland
https://www.epson.ch
TURKEY
Tecpro Bilgi Teknolojileri Tic. ve
San. Ltd. Sti.
http://www.tecpro.com.tr
UK
Epson (UK) Ltd.
https://www.epson.co.uk
AFRICA
https://www.epson.co.za
or
https://www.epson.fr
SOUTH AFRICA
Epson South Africa
https://www.epson.co.za

01_Chapter title
01_Head A
02__lead
Contact List
6
6
MIDDLE EAST
Epson (Middle East)
https://www.epson.ae
NORTH, CENTRAL AMERICA & CARIBBEAN ISLANDS
CANADA
Epson Canada, Ltd.
https://epson.ca
COSTA RICA
Epson Costa Rica, S.A.
https://epson.co.cr
MEXICO
Epson Mexico, S.A. de C.V.
https://epson.com.mx
ECUADOR
Epson Ecuador
https://epson.com.ec
U. S. A.
Epson America, Inc.
https://epson.com/usa
SOUTH AMERICA
ARGENTINA
Epson Argentina S.R.L.
https://epson.com.ar
BRAZIL
Epson do Brasil
https://epson.com.br
CHILE
Epson Chile S.A.
https://epson.cl
COLOMBIA
Epson Colombia Ltd.
https://epson.com.co
PERU
Epson Peru S.A.
https://epson.com.pe
VENEZUELA
Epson Venezuela S.A.
https://epson.com.ve
ASIA & OCEANIA
AUSTRALIA
Epson Australia Pty. Ltd.
https://www.epson.com.au
CHINA
Epson (China) Co., Ltd.
https://www.epson.com.cn
HONG KONG
Epson Hong Kong Ltd.
https://www.epson.com.hk
INDIA
Epson India Pvt., Ltd.
https://www.epson.co.in

01_Chapter title
01_Head A
02__lead
Contact List
6
7
INDONESIA
PT. Epson Indonesia
https://www.epson.co.id
JAPAN
Seiko Epson Co.
Toyoshina Plant
https://www.epson.jp
KOREA
Epson Korea Co., Ltd.
http://www.epson.co.kr
MALAYSIA
Epson Malaysia Sdn. Bhd.
https://www.epson.com.my
NEW ZEALAND
Epson New Zealand
https://www.epson.co.nz
PHILIPPINES
Epson Philippines Co.
https://www.epson.com.ph
SINGAPORE
Epson Singapore Pte. Ltd.
https://www.epson.com.sg
TAIWAN
Epson Taiwan Technology & Trad-
ing Ltd.
https://www.epson.com.tw
THAILAND
Epson (Thailand) Co.,Ltd.
https://www.epson.co.th
