
Ubuntu WSL
Canonical Group Ltd
Aug 29, 2024

CONTENTS
1 In this documentation 3
2 Project and community 5
2.1 Tutorials . . . . . . . . . . . . . . . . . . . . . . . . . . . . . . . . . . . . . . . . . . . . . . . . . 5
2.2 How-to guides . . . . . . . . . . . . . . . . . . . . . . . . . . . . . . . . . . . . . . . . . . . . . . 51
2.3 Reference . . . . . . . . . . . . . . . . . . . . . . . . . . . . . . . . . . . . . . . . . . . . . . . . . 62
2.4 Explanations . . . . . . . . . . . . . . . . . . . . . . . . . . . . . . . . . . . . . . . . . . . . . . . 64
i

ii

Ubuntu WSL
Benefit from the unrivalled developer experience of Ubuntu without leaving Windows.
Windows Subsystem for Linux (WSL) lets developers run a GNU/Linux environment on Windows. The Ubuntu dis-
tribution for WSL is tightly integrated with the Windows OS, supporting remote development from popular IDEs,
cross-OS file management and seamless local testing of web applications. Ubuntu WSL provides a high-quality com-
mand line interface that is also suitable for launching Linux-native graphical applications.
Ubuntu WSL can be used to build projects in a performant Linux environment without the overhead of traditional
virtual machine or dual-boot setups. Organisations that manage a Microsoft infrastructure can empower developers
who prefer a Linux-based workflow. With Ubuntu Pro for WSL, large fleets of Ubuntu WSL machines can also be
administered with ease and security.
Ubuntu WSL is for the programmer who wants a fully-featured Linux development environment but must use a Win-
dows device, the system administrator who requires a secure way of supporting Linux on hundreds of Windows ma-
chines, and the cross-platform app developer who needs to create projects that work on Linux, Windows and the browser.
CONTENTS 1

Ubuntu WSL
2 CONTENTS

CHAPTER
ONE
IN THIS DOCUMENTATION
Tutorials Start here with hands-on tutorials for new users to learn Ubuntu WSL
How-to guides Follow step-by-step instructions for performing common tasks with Ubuntu WSL, including making
your own contributions to the project
Reference Read technical descriptions of important factual information relating to Ubuntu WSL
Explanations Read explanatory notes on important concepts
3

Ubuntu WSL
4 Chapter 1. In this documentation

CHAPTER
TWO
PROJECT AND COMMUNITY
Ubuntu WSL and Ubuntu Pro for WSL are members of the Ubuntu family. These are open-source projects that warmly
welcome community contributions, suggestions, fixes and constructive feedback. Check out our contribution page for
guidelines on how best to bring your ideas, bug reports and more.
s Important
We do not directly maintain WSL, which is a Microsoft product. If you have identified a problem or bug in WSL
then submit an Issue in Microsoft’s WSL project repository.
• Code of Conduct
• Contribute to the project
• Ask and answer questions on the forum
2.1 Tutorials
2.1.1 Working with Visual Studio Code
The easiest way to access your Ubuntu development environment in WSL is by using Visual Studio Code via the built-in
Remote extension.
What you will learn:
• How to set up Visual Studio Code for remote development on Ubuntu on WSL
• How to start a basic Node.js webserver on Ubuntu using Visual Studio Code
5

Ubuntu WSL
What you will need:
• A PC with Windows 10 or 11
• (Optional) This tutorial uses Windows Terminal Preview, which you can get from the Microsoft Store
Install Ubuntu on WSL2
This tutorial assumes that you already have WSL2 installed with the latest LTS release of Ubuntu.
If not, check out our getting started tutorials for Windows 10 and Windows 11:
• Install Ubuntu on WSL2
Once you have completed the relevant tutorial, the following steps will work on either Windows 10 or 11.
Install Visual Studio Code on Windows
One of the advantages of WSL is that it can interact with the native Windows version of Visual Studio Code using its
remote development extension.
To install Visual Studio Code visit the Microsoft Store and search for Visual Studio Code.
Then click Install.
6 Chapter 2. Project and community


Ubuntu WSL
Once the installation is complete, open Visual Studio Code.
Install the Remote Development Extension
Navigate to the Extensions menu in the sidebar and search for Remote Development.
This is an extension pack that allows you to open any folder in a container, remote machine, or in WSL. Alternatively,
you can just install Remote - WSL.
8 Chapter 2. Project and community

Ubuntu WSL
Once installed we can test it out by creating an example local web server with Node.js
Install Node.js and create a new project
Open your WSL Ubuntu terminal and ensure everything is up to date by typing:
$ sudo apt update
Then:
$ sudo apt upgrade
Entering your password and pressing Y when prompted.
Next, install Node.js and npm:
$ sudo apt-get install nodejs
$ sudo apt install npm
Press Y when prompted.
Now, create a new folder for our server.
$ mkdir serverexample/
2.1. Tutorials 9

Ubuntu WSL
Then navigate into it:
$ cd serverexample/
Now, open up your folder in Visual Studio Code, you can do this by typing:
$ code .
The first time you do this, it will trigger a download for the necessary dependencies:
Once complete, your native version of Visual Studio Code will open the folder.
Creating a basic web server
In Visual Studio Code, create a new file called package.json and add the following text (original example)
{
"name": "Demo",
"version": "1.0.0",
"description": "demo project.",
"scripts": {
"lite": "lite-server --port 10001",
"start": "npm run lite"
},
"author": "",
"license": "ISC",
"devDependencies": {
"lite-server": "^1.3.1"
}
}
Save the file and then, in the same folder, create a new one called index.html
Add the following text, then save and close:
10 Chapter 2. Project and community

Ubuntu WSL
<h1>Hello World</h1>
Now return to your Ubuntu terminal (or use the Visual Studio Code terminal window) and type the following to install
a server defined by the above specifications detailed in package.json:
$ npm install
Finally, type the following to launch the web server:
$ npm start
You can now navigate to localhost:10001 in your native Windows web browser by using CTRL+LeftClick on the
terminal links.
That’s it!
By using Ubuntu on WSL you’re able to take advantage of the latest Node.js packages available on Linux as well as the
more streamlined command line tools.
Enjoy Ubuntu on WSL!
In this tutorial, we’ve shown you how to connect the Windows version of Visual Studio Code to your Ubuntu on WSL
filesystem and launch a basic Node.js webserver.
We hope you enjoy using Ubuntu inside WSL. Don’t forget to check out our other tutorials for tips on how to optimise
your WSL setup for Data Science.
2.1. Tutorials 11

Ubuntu WSL
Further Reading
• Install Ubuntu on WSL2
• Microsoft WSL Documentation
• Setting up WSL for Data Science
• Ask Ubuntu
2.1.2 Windows and Ubuntu interoperability
Some tools used during the development process are only available or are performed best on one platform and trans-
ferring data from one system to another to visualise or share can be tedious. WSL solves this problem with a feature
called interoperability.
Interoperability is the ability to transparently execute commands and applications, share files, network and environment
variables across Windows and Ubuntu.
We’ll illustrate all these notions by generating data from your Ubuntu WSL instance using your Windows user profile
directory, perform some transformations via PowerShell scripts, and finally, visualise those on Windows. We are going
to cross the chasm between the two worlds not just once, but many times, seamlessly!
What you will learn
• How to access a service provided by a web server running on your Ubuntu WSL instance from Windows.
• Share environment variables between Windows and Ubuntu, back and forth.
• Access files across filesystems, and discover where they are located on both sides.
• Run Windows commands (command line and graphical) from your WSL instance and chain them.
What you will need
• Know how to use command line tools on Windows or Linux.
• A PC with Windows 10 or 11.
• Optional: LibreOffice or MS Excel to visualise and manipulate generated data from Ubuntu.
Install Ubuntu on WSL2
This tutorial assumes that you already have WSL2 installed with the latest LTS release of Ubuntu.
If not, check out our getting started tutorial for Windows 10 and Windows 11:
• Install Ubuntu on WSL2
For this tutorial, we will assume that you have installed the Ubuntu main WSL application.
Once you have completed the relevant tutorial, the following steps will work on either Windows 10 or 11.
Note: in this tutorial, we consider that interoperability is turned on in WSL.conf, which is the default behaviour. If
you have disabled it, you can either use the ubuntu reconfiguration tool on Ubuntu 22.04+, or, for earlier versions,
directly modify back wsl.conf yourself as described on wsl.conf documentation. The settings you are interested in
are [Interop]: enabled and appendWindowsPath both set to true (or not being present, which defaults to true).
12 Chapter 2. Project and community

Ubuntu WSL
Share ports between WSL and Windows
Install Jupyter notebook on WSL.
Let’s install Jupyter notebook, a web-based interactive computing platform where we will generate some statistics.
1. In PowerShell, start an Ubuntu WSL instance:
> ubuntu.exe
2. Now in the instance, install the python package manager pip:
$ sudo apt update
$ sudo apt install python3-pip
3. Get Jupyter notebook installed via pip:
$ pip install notebook
Executing Jupyter notebook.
Finally, let’s start Jupyter, by adding it to the user PATH first:
$ export PATH=$PATH:~/.local/bin
$ jupyter notebook --no-browser
This should generate output like the following:
[I 10:52:23.760 NotebookApp] Writing notebook server cookie secret to /home/u/.local/
˓→share/jupyter/runtime/notebook_cookie_secret
[I 10:52:24.205 NotebookApp] Serving notebooks from local directory: /home/u
[I 10:52:24.205 NotebookApp] Jupyter Notebook 6.4.10 is running at:
[I 10:52:24.205 NotebookApp] http://localhost:8888/?
˓→token=1d80ee69da6238f22bb683a4acd00025d32d15dde91cbdf4
[I 10:52:24.205 NotebookApp] or http://127.0.0.1:8888/?
˓→token=1d80ee69da6238f22bb683a4acd00025d32d15dde91cbdf4
[I 10:52:24.205 NotebookApp] Use Control-C to stop this server and shut down all kernels␣
˓→(twice to skip confirmation).
[C 10:52:24.209 NotebookApp]
To access the notebook, open this file in a browser:
file:///home/u/.local/share/jupyter/runtime/nbserver-5744-open.html
Or copy and paste one of these URLs:
http://localhost:8888/?token=1d80ee69da6238f22bb683a4acd00025d32d15dde91cbdf4
or http://127.0.0.1:8888/?token=1d80ee69da6238f22bb683a4acd00025d32d15dde91cbdf4
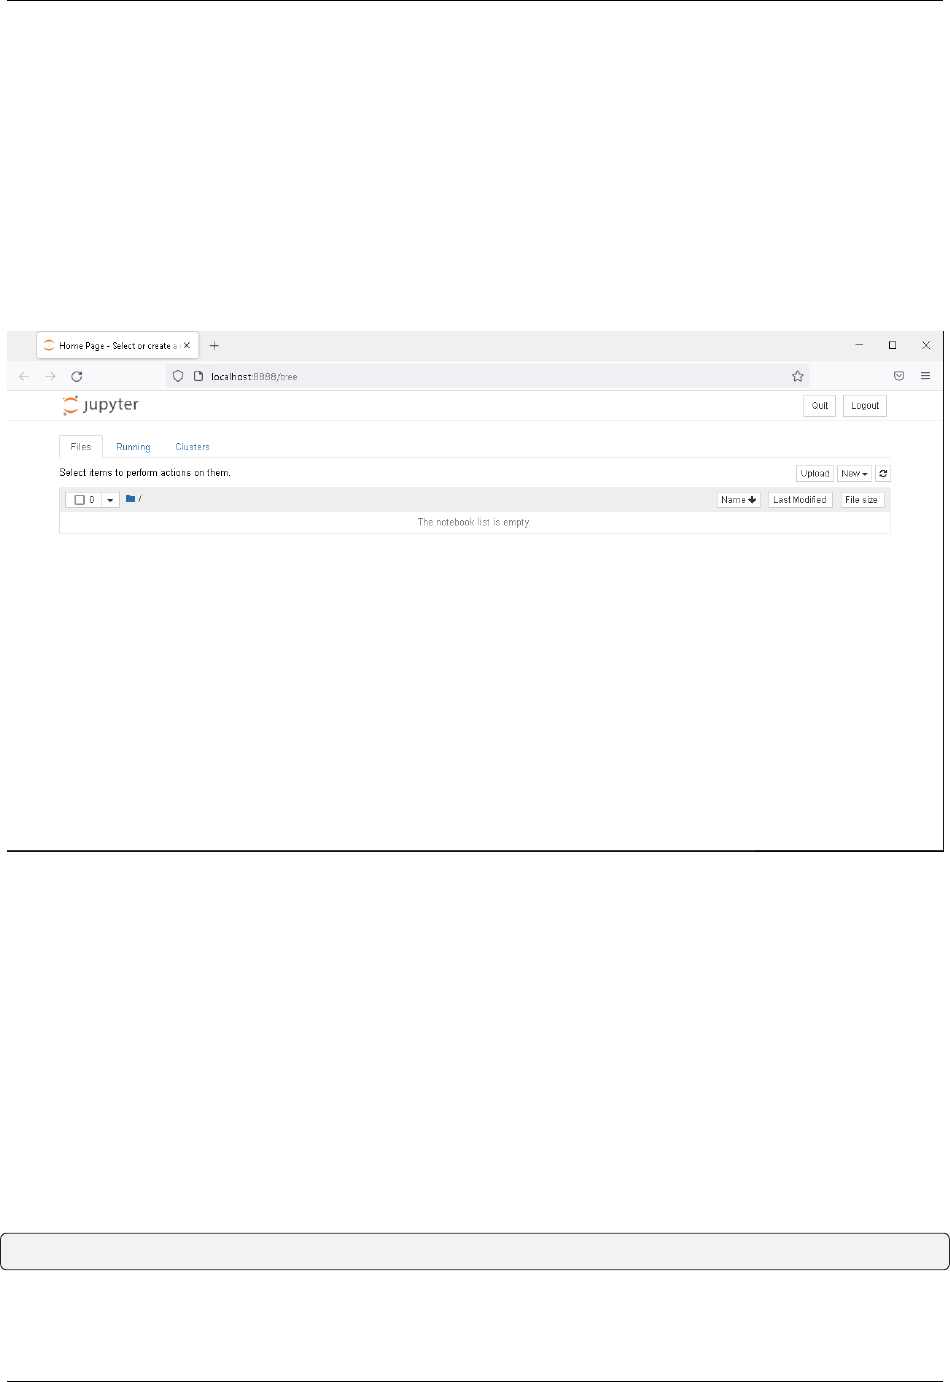
[I 10:53:03.628 NotebookApp] 302 GET / (127.0.0.1) 0.600000ms
[I 10:53:03.633 NotebookApp] 302 GET /tree? (127.0.0.1) 1.040000ms
If you look closely at the output, you will see that the Jupyter notebook is now running, and its interface is exposed via
its internal web server on localhost, port 8888.
2.1. Tutorials 13
Ubuntu WSL
Accessing port 8888
This port can be accessed directly from our Ubuntu WSL instance via curl, lynx (a command line web browser), or any
GUI web browser executed in WSL.
However, this tutorial is not about running Linux GUI applications from WSL (which you can do), or visualising data
in the command line, but interoperability! So, as you can guess, any network port exposed locally is also available from
Windows directly, if no conflict occurs.
Let’s try this right away: from Windows, launch a web browser and enter the URL
printed above with the corresponding token, for example: http://localhost:8888/?
token=1d80ee69da6238f22bb683a4acd00025d32d15dde91cbdf4.
It works! You can thus easily expose and share any services that are using network ports between your Windows
machine and WSL instances!
Note: you need to keep this command line Window opened to have your Jupyter instance running. If
you close it, the service will shut down and you won’t have access to it anymore. Other command-line
operations in the same WSL instance should be done on another terminal.
Get access to Windows environment variables on WSL
Our next step is to be able to generate some statistics on our Windows user personal directory. For Jupyter to access
those, we need to know how to get access from our Ubuntu instance to the Windows partition(s). You may already
know about it by reading documentation or blog posts, but let’s do something even cooler: let’s discover it by using
environment variables!
On another terminal, under PowerShell, let’s first check our Windows user profile directory:
PS C:\Users\myuser> echo $env:USERPROFILE
The path will be outputted:
14 Chapter 2. Project and community

Ubuntu WSL
C:\Users\myuser
Let’s share it with Ubuntu by setting WSLENV:
PS C:\Users\myuser> $env:WSLENV="USERPROFILE"
PS C:\Users\myuser> ubuntu.exe
The last command will start ubuntu where we can test that the variable has been shared:
$ echo $USERPROFILE
Running this command will again show the path:
C:\Users\myuser
Awesome! Setting WSLENV="ENVVAR1:ENVVAR2:..." allows us to share multiple environment variables from Win-
dows to our Ubuntu instance. We can then retrieve the value under Ubuntu.
However, you may notice that the environment variable value was shared as is, which is fine in most cases but not for
path-related content. Let’s check:
$ ls 'C:\Users\myuser'
This will fail to list any files and output the following message:
ls: cannot access 'C:\Users\myuser': No such file or directory
Indeed, C:\Users\myuser is not a compatible Linux-path where the Windows file system is located under WSL.
Yet we haven’t done all that for nothing! WSLENV variable declaration can be suffixed with /p, which then translates
any paths between Windows and your Linux instance.
Let’s try again. Run exit to shutdown Ubuntu, then in PowerShell set WSLENV again using the /p suffix then start
Ubuntu:
PS C:\Users\myuser> $env:WSLENV="USERPROFILE/p"
PS C:\Users\myuser> ubuntu.exe
Now in Ubuntu test the environmental variable like before:
$ echo $USERPROFILE
The output should show that the path has been translated:
/mnt/c/Users/myuser
Now let’s check the Windows files with the Linux ls command:
$ ls /mnt/c/Users/myuser
This should now list the files in the directory as expected:
AppData
'Application Data'
Contacts
Cookies
(continues on next page)
2.1. Tutorials 15

Ubuntu WSL
(continued from previous page)
Desktop
[...]
There we go! We now know where our user profile data is accessible on WSL thanks to environment variables sharing.
More generally, environment variables could be used in your scripts, or any services in your WSL instance, where
parameters are controlled from Windows.
Going further:
• There are many other flags available for environment variables sharing via WSLENV. Check out the reference
section to have a look at some handy links explaining each of them.
• The place where your Windows filesystems are mounted can vary depending on your configuration. This can be
changed with our configuration tool on Ubuntu 22.04+ or by modifying the automount section in wsl.conf.
With this, we are now ready to generate some statistics on your Windows user profile directory from our WSL instance!
Accessing Windows file from Ubuntu to run our script
After this little detour into the command line world to discover which path to use, let’s go back to our Jupyter interface
in our browser running on Windows.
We are going to create a stats-raw.csv file, containing statistics about our user profile directory.
Some preliminary warnings: accessing Windows filesystem from Ubuntu is using the 9P protocol, which might mean
slower access and indexing of files than native performance. So that this section doesn’t take too long to complete, we
are advising you to choose a subdirectory or your Windows user profile directory, with fewer files and directories to
run over. Here, we will be calling this /mnt/c/Users/mysuser/path/my/subdirectory.
From the main screen of Jupyter, create a new notebook to start developing an interactive Python solution. You can do
this by clicking on the New button, and then clicking on the Python 3 option, as we can see below.
Copy this to the first cell, taking care to edit the input directory:
import os
import mimetypes
import csv
data = {}
(continues on next page)
16 Chapter 2. Project and community

Ubuntu WSL
(continued from previous page)
for root, dirs, files in os.walk("/mnt/c/Users/mysuser/path/my/subdirectory"):
for f in files:
mime_type, encoding = mimetypes.guess_type(os.path.join(root, f))
if not mime_type:
continue
if mime_type not in data:
data[mime_type] = 0
data[mime_type] += 1
csv_cols = ["mime_type", "count"]
with open("stats-raw.csv", "w") as f:
writer = csv.writer(f)
writer.writerow(csv_cols)
for mime_type, count in data.items():
writer.writerow([mime_type, count])
print(data)
This script will enumerate all files under /mnt/c/Users/mysuser/path/my/subdirectory, get the mime types of
each entry, and count them. It will write the result in your Ubuntu user home directory as a Comma-separated Values
file named stats-raw.csv and print it as well for your viewing pleasure. :)
Let’s execute it by clicking on the “Run” button in the web interface.
2.1. Tutorials 17

Ubuntu WSL
Note that while the entry is running, you will have a In [*] with the star marker. This will be replaced by In [1]:
when completed. Once this is completed and the results have been printed, let’s ensure that the CSV file is present on
disk using an Ubuntu terminal:
$ cat stats-raw.csv
The output should look like this:
mime_type,count
text/plain,468
chemical/x-cerius,3
application/x-pkcs12,5
application/zip,27
text/x-chdr,522
text/markdown,840
text/x-c++src,235
application/json,1199
application/xml,305
application/javascript,250
text/css,49
image/png,3459
image/svg+xml,534
application/vnd.ms-pki.seccat,2
application/x-msdos-program,583
(continues on next page)
18 Chapter 2. Project and community

Ubuntu WSL
(continued from previous page)
chemical/x-pdb,20
chemical/x-cache,13
chemical/x-ncbi-asn1-binary,3
image/vnd.microsoft.icon,91
[...]
Accessing Ubuntu files from Windows
So, we now have a stat file on Ubuntu, which is the result of computation on files stored on the Windows partition. We
now want to analyse this file using Windows tools, but can we access it from Windows?
Of course, interoperability goes both ways, and we already know exactly how to discover where those are available on
Windows: introducing sharing environment variable round 2!
Start PowerShell from Ubuntu and share the HOME directory
Similarly to USERPROFILE, we want, this time, to share the user HOME variable with Windows, and let interoperability
translate it to a Windows-compatible path. In an Ubuntu terminal set the environment variable, making sure to use the
/p suffix then open a Windows command prompt:
$ export WSLENV=HOME/p
$ cmd.exe
We can check if the path has been translated with:
C:\Windows> set HOME
The following output confirms a Windows-compatible path:
HOME=\\wsl.localhost\Ubuntu\home\u
First, we are able to export the HOME variable to subprocess, telling us that we want to translate the path back to Windows
compatible paths by appending /p as we previously saw. But this is not all: we are running cmd.exe from an Ubuntu
terminal (which is itself running inside a PowerShell terminal), and get the corresponding Windows path! Even if that
sounds a little bit like the movie Inception, using this feature is just seamless: you are launching any process, Linux or
Windows, from your Ubuntu terminal. Inputs and outputs are connected and this complex machinery works flawlessly!
Accessing Linux files from Windows
Open Windows Explorer and navigate to that path to confirm they are visible there:
2.1. Tutorials 19

Ubuntu WSL
Let’s now create a PowerShell script, from Windows, on this Ubuntu filesystem and save it there:
You can open any editor, from Notepad to a full-fledged IDE. Create a file named filter-less-than-five.ps1
under \\wsl.localhost\Ubuntu\home\<youruser> (with the following content:
$csvImport = $input | ConvertFrom-CSV
# Create Array for Exporting out data
$csvArray = [System.Collections.ArrayList]@()
# Filter lines where count less than 5
Foreach ($csvImportedItem in $csvImport){
if([int]$csvImportedItem.count -ge 5){
$csvArray += $csvImportedItem
}
}
$csvArray | convertTo-CSV -NoTypeInformation
This script will take a CSV-formatted content as input, filter any item which has less than 5 occurrences and will then
export it to the standard output as another CSV-formatted content.
After saving, let’s check that it’s available on the WSL side:
$ cat filter-less-than-five.ps1
You should see the file content there.
This PowerShell script, written from Windows on your Linux instance will be quite handy to create a pipeline between
applications.
20 Chapter 2. Project and community
Ubuntu WSL
Execute and connect Linux and Windows executables.
This is all very impressive, we have been able to share network, environment variables, paths and files, as well execute
processes interchangeably between Ubuntu and Windows. Let’s go one step further by chaining all of this together in
a single, but effective line:
$ cat stats-raw.csv | powershell.exe -ExecutionPolicy Bypass -File $HOME/filter-less-
˓→than-five.ps1 | tee stats.csv
This yields the output:
"mime_type","count"
"text/plain","468"
"application/x-pkcs12","5"
"application/zip","27"
"text/x-chdr","522"
"text/markdown","840"
"text/x-c++src","235"
"application/json","1199"
"application/xml","305"
[...]
Let’s figure out what happens here:
1. We are executing a Linux application cat to display file content, hosted on Ubuntu.
2. We are then executing powershell.exe from Ubuntu which:
3. Takes as input the content piped from Ubuntu.
4. This PowerShell application uses a script, hosted on Ubuntu (that we wrote from Windows in the previous sec-
tion), converted transparently to a Windows path for PowerShell to be able to consume it.
5. Then, the script proceeds with some operations on the content and prints on stdout the filtered CSV data.
6. This is then piped back to Ubuntu, to be processed by the tee command, which writes stats.csv to the Ubuntu
filesystem, and displays the resulting output.
This simple command exercises many concepts of interoperability we saw in previous sections. However, as you can
see, this is completely transparent to us!
This deep integration for back-and-forth access between systems allows users to create awesome pipelines, taking the
best tool that is available, independent of their host operating system. To make that easy, WSL transparently converts
any paths and does the heavy lifting for you so that you don’t need to do the manual conversion!
Finally, we can even run the default associated GUI Windows application associated with those files, from Ubuntu:
$ explorer.exe stats.csv
Note: You can’t deny it’s really amazing to be able to execute explorer.exe from Ubuntu. :)
This will open LibreOffice, Microsoft Excel, or any other tool you may have associated with CSV files. From there,
you will be able to draw beautiful charts and do data analysis, but that’s another story. . .
2.1. Tutorials 21

Ubuntu WSL
Enjoy Ubuntu on WSL!
That’s all folks! In this tutorial, we’ve shown you many aspects of interoperability on WSL. To sum it up, we can:
• Run Ubuntu commands from a Windows PowerShell prompt such as cut, grep, or awk.
• Run Windows commands from an Ubuntu Terminal such as explorer.exe, notepad.exe and many others.
• Share network ports between Ubuntu and Windows systems.
• Share environment variables between Ubuntu and Windows systems.
• Open files on the Windows file system from Ubuntu.
• Browse the Ubuntu file system from Windows Explorer.
• Pipe and connect any commands or applications between Ubuntu and Windows systems.
We hope you enjoy using Ubuntu inside WSL. Don’t forget to check out our other tutorials for tips on how to optimise
your WSL experience.
Further Reading
• WSL ENV documentation
• WSL.conf documentation
• Jupyter notebook
• Install Ubuntu on WSL2
• Microsoft WSL Documentation
22 Chapter 2. Project and community

Ubuntu WSL
• Ask Ubuntu
2.1.3 Run a .NET Echo Bot as a systemd service on Ubuntu WSL
In this tutorial we will take advantage of WSL’s systemd support to run a chatbot as a systemd service for easier
deployment.
We will create the bot using .NET on Ubuntu WSL and it will be accessible from the Windows host.
.NET is an open-source development platform from Microsoft that enables developers to build multi-platform applica-
tions from a single codebase.
Requirements
• A PC running Windows 11
• The latest version of WSL from the Microsoft Store
• Ubuntu, Ubuntu 22.04 LTS or Ubuntu 24.04 LTS
• Visual Studio Code (recommended)
Systemd support is required for this tutorial and is available on WSL version 0.67.6 or higher.
In your PowerShell terminal, you can check your current WSL version by running:
> wsl --version
Inside WSL, you can check that systemd is enabled on your Ubuntu distribution with the following command:
$ cat /etc/wsl.conf
If enabled the output will be:
[boot]
systemd=true
If systemd is set to false then open the file with sudo nano /etc/wsl.conf, set it to true and save. Make sure to
restart your distribution after you have made this change.
Install .NET
To install .NET 6 on Ubuntu 24.04 LTS we first need to add the backports archive for .NET.
ò Note
If you are using Ubuntu 22.04 LTS you can skip the command for installing backports and install the .NET 6 bundle
directly.
Run this command to install backports, which includes .NET 6:
$ sudo add-apt-repository ppa:dotnet/backports
2.1. Tutorials 23

Ubuntu WSL
To install a bundle with both the SDK and runtime for .NET 6 run:
$ sudo apt install dotnet6
Run dotnet --version to confirm that the package was installed successfully.
Install and run the Bot Framework EchoBot template
Create a new directory for the project and navigate to it before proceeding:
$ mkdir ~/mybot
$ cd mybot
Once inside we can install the EchoBot C# template by running:
$ dotnet new -i Microsoft.Bot.Framework.CSharp.EchoBot
We can then verify the template has been installed correctly:
$ dotnet new --list
You should be able to find the Bot Framework Echo Bot template in the list.
Create a new Echo Bot project, with echoes as the name for our bot, using the following command:
$ dotnet new echobot -n echoes
After this has completed we can navigate into the new directory that has been created.
$ cd ~/mybot/echoes
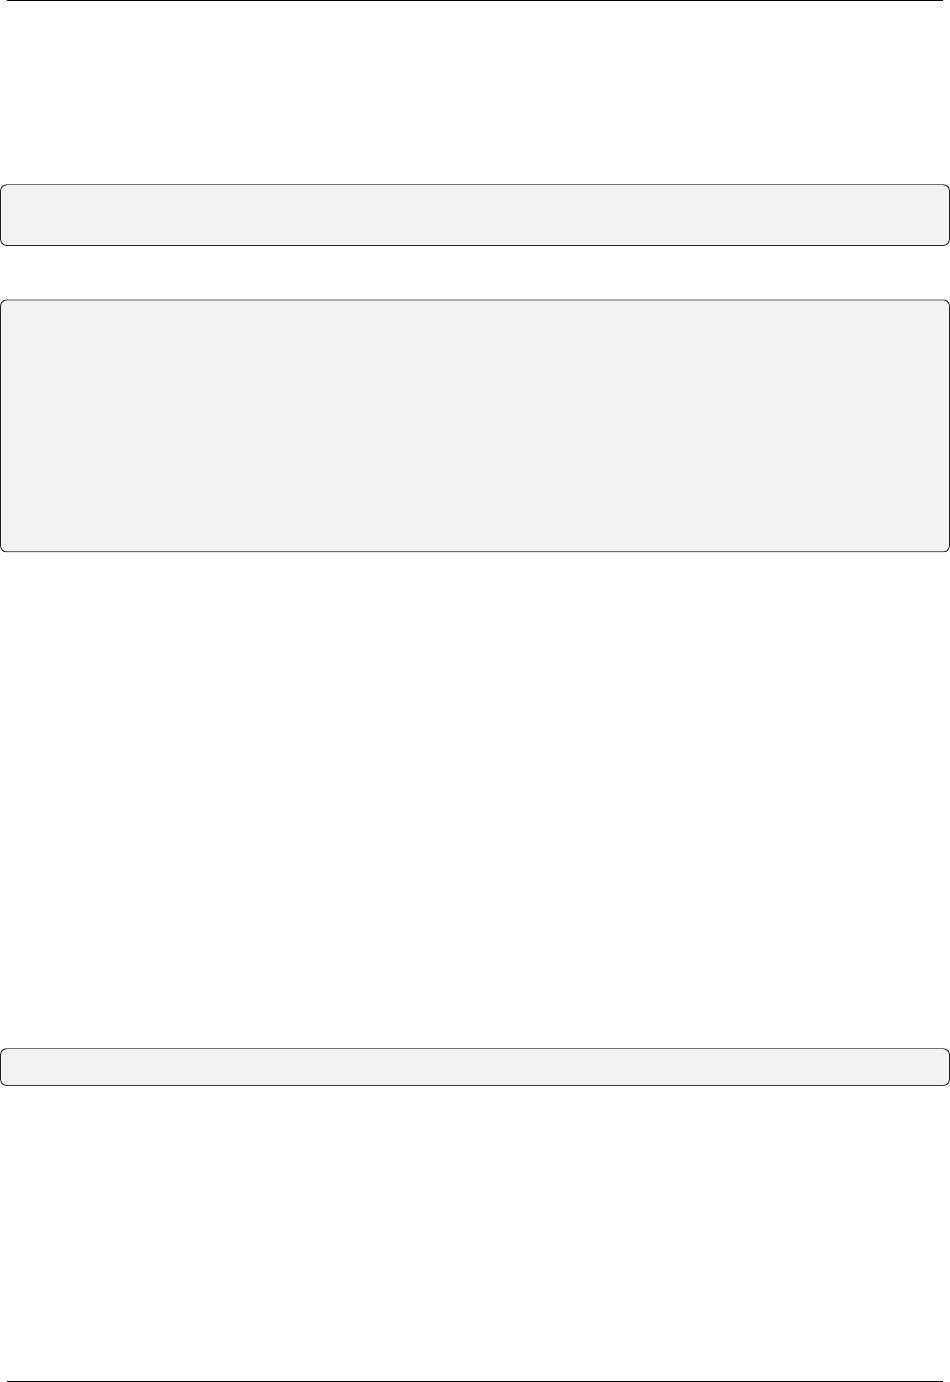
From inside this directory the project should be ready to run. Test it with:
$ sudo dotnet run
If everything was set up correctly you should see a similar output to the one below:
24 Chapter 2. Project and community
Ubuntu WSL
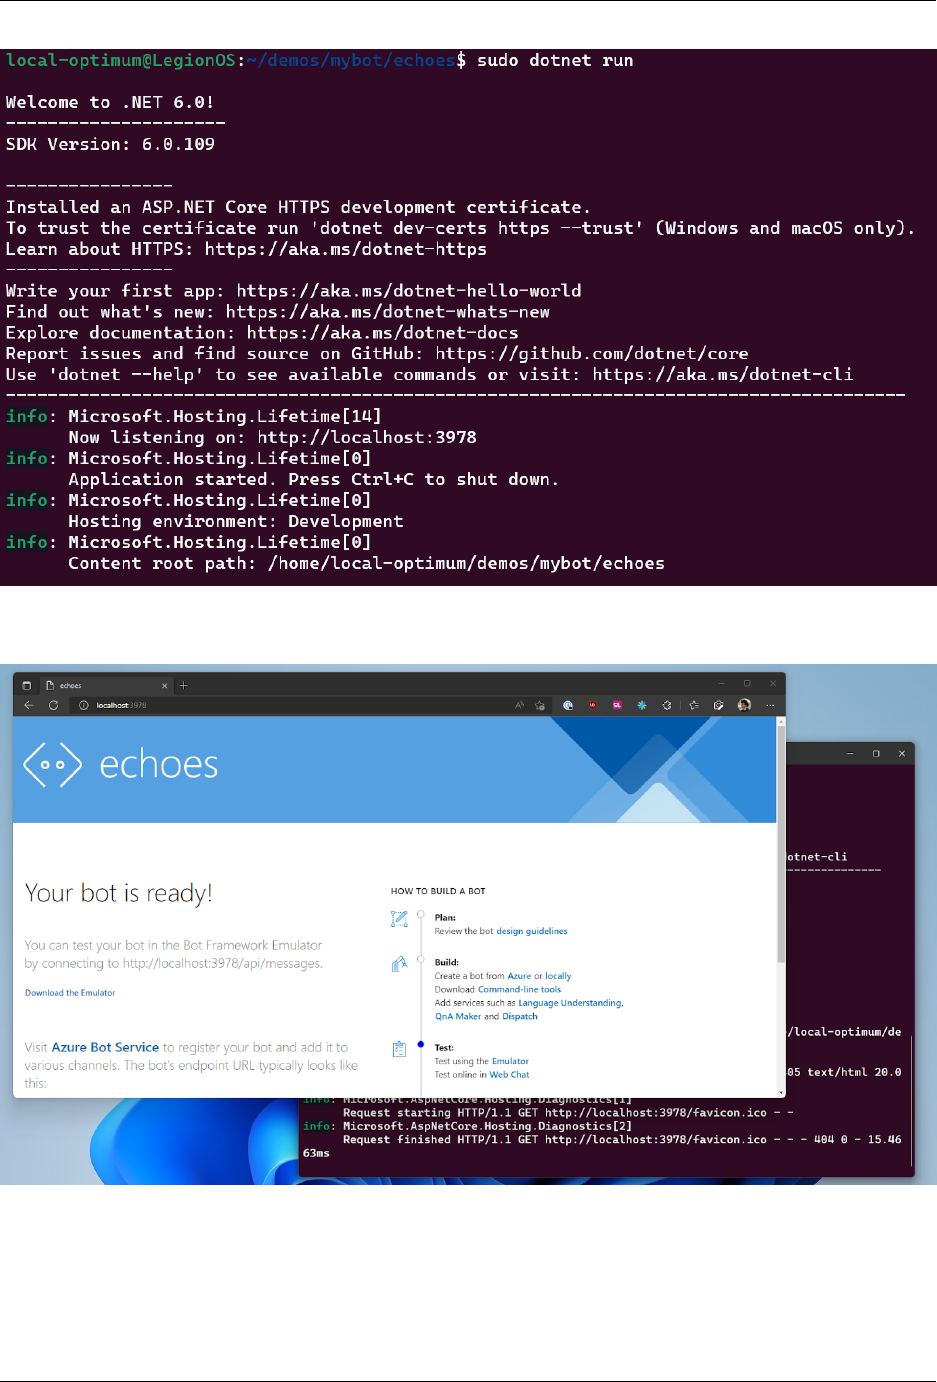
Leave the EchoBot App running in WSL for now. Open a new browser window on your Windows host and navigate to
localhost:3978 where you should see the following window:
Leave everything running as we move to the next step.
2.1. Tutorials 25

Ubuntu WSL
Install the Bot Emulator on Windows and connect to your bot
Download the Bot Emulator from the official Microsoft GitHub, taking care to select BotFramework-Emulator-4.14.1-
windows-setup.exe and install.
Running it will present you with the following screen, but before you can connect to your bot you need to change a few
settings.
First, get the IP address of your machine by running ipconfig in a PowerShell terminal.
26 Chapter 2. Project and community

Ubuntu WSL
Then select the settings icon in the bottom-left corner of the Bot Framework Emulator and enter your IP under ‘localhost
override’.
Click Save and navigate back to the Welcome tab.
2.1. Tutorials 27

Ubuntu WSL
Click Open Bot and under ‘Bot URL’ input:
http://localhost:3978/api/messages
And click Connect to connect to your Echo Bot running in WSL and start chatting!
28 Chapter 2. Project and community

Ubuntu WSL
Congratulations, your Echo Chat Bot App is running on Ubuntu WSL as an App. Now it is time to make it run as a
service.
Running your Echo Bot as a systemd service
Return to your running WSL distro and end the app with Ctrl+C.
Then install the .NET systemd extension with:
$ sudo dotnet add package Microsoft.Extensions.Hosting.Systemd
We can open our project with VS Code by running this command in the ‘echoes’ directory:
$ code .
Navigate to ‘Program.cs’ and insert .UseSystemd() as a new line in the location shown in the screenshot.
2.1. Tutorials 29

Ubuntu WSL
Save and close the project in VS Code and return to your WSL terminal.
Next we need to create a service file for your bot using your favourite editor, for example.
$ sudo nano /etc/systemd/system/echoes.service
Then paste the snippet below taking care to replace <your-username> with your username.
[Unit]
Description=The first ever WSL Ubuntu systemd .NET ChatBot Service
[Service]
WorkingDirectory=/home/<your-username>/mybot/echoes
Environment=DOTNET_CLI_HOME=/temp
ExecStart=dotnet run
SyslogIdentifier=echoes
[Install]
WantedBy=multi-user.target
Save your file and reload your services with:
$ sudo systemctl daemon-reload
To reload the services. You can check if your service is ready by running:
$ systemctl status echoes.service
You should get the following output:
30 Chapter 2. Project and community

Ubuntu WSL
Now start your service:
$ sudo systemctl start echoes.service
Then check its status again:
$ sudo systemctl status echoes.service
If everything has been configured correctly you should get an output similar to the below.
Return to your Windows host and reconnect to your Bot Emulator using the same information as before and confirm
that your bot is running, but this time as a systemd service!
2.1. Tutorials 31

Ubuntu WSL
You can stop your bot from running at any time with the command:
$ sudo systemctl stop echoes.service
Tutorial complete!
You now have a simple Echo Bot running as a systemd service on WSL that you can access from your host Windows
machine.
If you would like to expand on this example try reviewing some of the more advanced Bot Framework samples on the
Microsoft GitHub.
To read more about how Ubuntu supports .NET developers, making it easier than ever to build multi-platform services
and applications, read our previous announcement.
Further Reading
• .NET on Ubuntu
• Bot Framework samples
• Working with Visual Studio Code on Ubuntu WSL
• Enabling GPU acceleration on Ubuntu on WSL2 with the NVIDIA CUDA Platform
• Windows and Ubuntu interoperability on WSL2
• Microsoft WSL Documentation
• Ask Ubuntu
32 Chapter 2. Project and community

Ubuntu WSL
2.1.4 Enabling GPU acceleration with the NVIDIA CUDA Platform
While WSL’s default setup allows you to develop cross-platform applications without leaving Windows, enabling GPU
acceleration inside WSL provides users with direct access to the hardware. This provides support for GPU-accelerated
AI/ML training and the ability to develop and test applications built on top of technologies, such as OpenVINO,
OpenGL, and CUDA that target Ubuntu while staying on Windows.
What you will learn
• How to install a Windows graphical device driver compatible with WSL2
• How to install the NVIDIA CUDA toolkit for WSL 2 on Ubuntu
• How to compile and run a sample CUDA application on Ubuntu on WSL2
What you will need
• A Windows 10 version 21H2 or newer physical machine equipped with an NVIDIA graphics card and adminis-
trative permission to be able to install device drivers
• Ubuntu on WSL2 previously installed
• Familiarity with Linux command line utilities and interacting with Ubuntu on WSL2
Note: If you need more introductory topics, such as how to install Ubuntu on WSL, refer to previous
tutorials that can be found here.
Prerequisites
The following steps assume a specific hardware configuration. Although the concepts are essentially the same for other
architectures, different hardware configurations will require the appropriate graphics drivers and CUDA toolkit.
Make sure the following prerequisites are met before moving forward:
• A physical machine with Windows 10 version 21H2 or higher
• NVIDIA’s graphic card
• Ubuntu 20.04 or higher installed on WSL 2
• Broadband internet connection able to download a few GB of data
Install the appropriate Windows vGPU driver for WSL
Specific drivers are needed to enable use of a virtual GPU, which is how Ubuntu applications are able to
access your GPU hardware, so you’ll need to follow this step even if your system drivers are up-to-date.
Please refer to the official WSL documentation for up-to-date links matching your specific GPU vendor. You can find
these in Install support for Linux GUI apps > Prerequisites . For this example, we will download the
NVIDIA GPU Driver for WSL.
2.1. Tutorials 33

Ubuntu WSL
Note: This is the only device driver you’ll need to install. Do not install any display driver on Ubuntu.
Once downloaded, double-click on the executable file and click Yes to allow the program to make changes to your
computer.
34 Chapter 2. Project and community

Ubuntu WSL
Confirm the default directory and allow the self-extraction process to proceed.
2.1. Tutorials 35

Ubuntu WSL
A splash screen appears with the driver version number and quickly turns into the main installer window. Read and
accept the license terms to continue.
Confirm the wizard defaults by clicking Next and wait until the end of the installation. You might be prompted to
36 Chapter 2. Project and community

Ubuntu WSL
restart your computer.
2.1. Tutorials 37

Ubuntu WSL
This step ends with a screen similar to the image below.
38 Chapter 2. Project and community

Ubuntu WSL
Install NVIDIA CUDA on Ubuntu
Normally, CUDA toolkit for Linux will have the device driver for the GPU packaged with it. On WSL 2,
the CUDA driver used is part of the Windows driver installed on the system, and, therefore, care must be
taken not to install this Linux driver as previously mentioned.
The following commands will install the WSL-specific CUDA toolkit version 11.6 on Ubuntu 22.04 AMD64 architec-
ture. Be aware that older versions of CUDA (<=10) don’t support WSL 2. Also notice that attempting to install the
CUDA toolkit packages straight from the Ubuntu repository (cuda, cuda-11-0, or cuda-drivers) will attempt to
install the Linux NVIDIA graphics driver, which is not what you want on WSL 2. So, first remove the old GPG key:
$ sudo apt-key del 7fa2af80
Then setup the appropriate package for Ubuntu WSL with the following commands:
$ wget https://developer.download.nvidia.com/compute/cuda/repos/wsl-ubuntu/x86_64/cuda-
˓→wsl-ubuntu.pin
$ sudo mv cuda-wsl-ubuntu.pin /etc/apt/preferences.d/cuda-repository-pin-600
$ sudo apt-key adv --fetch-keys https://developer.download.nvidia.com/compute/cuda/repos/
˓→wsl-ubuntu/x86_64/3bf863cc.pub
$ sudo add-apt-repository 'deb https://developer.download.nvidia.com/compute/cuda/repos/
(continues on next page)
2.1. Tutorials 39

Ubuntu WSL
(continued from previous page)
˓→wsl-ubuntu/x86_64/ /'
$ sudo apt-get update
$ sudo apt-get -y install cuda
Once complete, you should see a series of outputs that end in done.:
Congratulations! You should have a working installation of CUDA by now. Let’s test it in the next step.
40 Chapter 2. Project and community

Ubuntu WSL
Compile a sample application
NVIDIA provides an open source repository on GitHub with samples for CUDA Developers to explore the features
available in the CUDA Toolkit. Building one of these is a great way to test your CUDA installation. Let’s choose the
simplest one just to validate that our installation works.
Let’s say you have a ~/Dev/ directory where you usually put your working projects. Navigate inside the directory and
git clone the cuda-samples repository:
$ cd ~/Dev
$ git clone https://github.com/nvidia/cuda-samples
To build the application, go to the cloned repository directory and run make:
$ cd ~/Dev/cuda-samples/Samples/1_Utilities/deviceQuery
$ make
A successful build will look like the screenshot below.
Once complete, run the application with:
$ ./deviceQuery
You should see a similar output to the following detailing the functionality of your CUDA setup (the exact results
depend on your hardware setup):
2.1. Tutorials 41

Ubuntu WSL
42 Chapter 2. Project and community

Ubuntu WSL
Enjoy Ubuntu on WSL!
That’s all folks! In this tutorial, we’ve shown you how to enable GPU acceleration on Ubuntu on WSL 2 and demon-
strated its functionality with the NVIDIA CUDA toolkit, from installation through to compiling and running a sample
application.
We hope you enjoy using Ubuntu inside WSL for your Data Science projects. Don’t forget to check out our blog for
the latest news on all things Ubuntu.
Further Reading
• Setting up WSL for Data Science
• Ubuntu WSL for Data Scientists Whitepaper
• NVIDIA’s CUDA Post Installation Actions
• Install Ubuntu on WSL2
• Microsoft WSL Documentation
• Ask Ubuntu
2.1.5 Use WSL for data science and engineering
WSL is an ideal platform to run your Linux workflows while using your Windows machines. Here we show an example
of how to set up GNU octave and run a toy program.
First, you’ll need to set up Ubuntu on WSL, see here.
GNU octave
GNU Octave is software featuring a high-level programming language, primarily intended for numerical
computations. Octave helps in solving linear and nonlinear problems numerically, and for performing
other numerical experiments using a language that is mostly compatible with MATLAB. [GNU / Octave ]
We will use it to calculate and draw a beautiful Julia fractal. The goal here is to use Octave to demonstrate how WSLg
works, not to go through the theory of fractals.
From an Ubuntu WSL terminal prompt run:
$ sudo apt update
$ sudo apt install -y octave
Then start the application:
$ octave --gui &
Do not forget the ampersand & at the end of the line, so the application is started in the background and we can continue
using the same terminal window.
2.1. Tutorials 43

Ubuntu WSL
In Octave, click on the New script icon to open a new editor window and copy/paste the following code:
#{
Inspired by the work of Bruno Girin ([Geek Thoughts: Fractals with Octave: Classic␣
˓→Mandelbrot and Julia](http://brunogirin.blogspot.com/2008/12/fractals-with-octave-
˓→classic-mandelbrot.html))
Calculate a Julia set
zmin: Minimum value of c
zmax: Maximum value of c
hpx: Number of horizontal pixels
niter: Number of iterations
c: A complex number
#}
function M = julia(zmin, zmax, hpx, niter, c)
%% Number of vertical pixels
vpx=round(hpx*abs(imag(zmax-zmin)/real(zmax-zmin)));
%% Prepare the complex plane
[zRe,zIm]=meshgrid(linspace(real(zmin),real(zmax),hpx),
linspace(imag(zmin),imag(zmax),vpx));
z=zRe+i*zIm;
M=zeros(vpx,hpx);
%% Generate Julia
for s=1:niter
mask=abs(z)<2;
M(mask)=M(mask)+1;
z(mask)=z(mask).^2+c;
end
M(mask)=0;
end
44 Chapter 2. Project and community

Ubuntu WSL
This code is the function that will calculate the Julia set. Save it to a file named julia.m. Since it is a function
definition, the name of the file must match the name of the function.
Open a second editor window with the New Script button and copy and paste the following code:
Jc1=julia(-1.6+1.2i, 1.6-1.2i, 640, 128, -0.75+0.2i);
imagesc(Jc1)
axis off
colormap('default');
This code calls the function defined in julia.m. You can later change the parameters if you want to explore the Julia
fractal.
Save it to a file named juliatest.m.
And finally, press the button Save File and Run.
After a few seconds, depending on your hardware and the parameters, a Julia fractal is displayed.
2.1. Tutorials 45

Ubuntu WSL
Like Octave, this window is displayed using WSLg completely transparently to the user.
Enjoy!
Further Reading
• An introduction to numerical computation applications using Ubuntu WSL
• Setting up WSL for Data Science
• Whitepaper: Ubuntu WSL for Data Scientists
• Microsoft WSL Documentation
• Ask Ubuntu
46 Chapter 2. Project and community

Ubuntu WSL
2.1.6 Automatic setup with cloud-init
Cloud-init is an industry-standard multi-distribution method for cross-platform cloud instance initialisation. Ubuntu
WSL users can now leverage it to perform an automatic setup to get a working instance with minimal touch.
See more: cloud-init official documentation.
The latest release of Ubuntu (Noble Numbat 24.04 LTS) comes with cloud-init already preinstalled, so you’ll need that
specific application to follow this tutorial. Ubuntu 24.04 LTS can be installed from this link to the Microsoft Store. A
previous version of this tutorial used Ubuntu (Preview), because that comes with the latest in-development features.
You can still use it to follow the instructions below, if you prefer.
What you will learn
• How to write cloud-config user data to a specific WSL instance.
• How to automatically set up a WSL instance with cloud-init.
• How to verify that cloud-init succeeded with the configuration supplied.
What you will need
• Windows 11 with WSL 2 already enabled
• The latest Ubuntu 24.04 LTS application from the Microsoft Store
Write the cloud-config file
Locate your Windows user home directory. It typically is C:\Users\<YOUR_USER_NAME>.
You can be sure about that path by running echo $env:USERPROFILE in PowerShell.
Inside your Windows user home directory, create a new folder named .cloud-init (notice the . à la Linux config-
uration directories), and inside the new directory, create an empty file named Ubuntu-24.04.user-data. That file
name must match the name of the distro instance that will be created in the next step.
Open that file with your text editor of choice (notepad.exe is just fine) and paste in the following contents:
#cloud-config
locale: pt_BR
users:
- name: jdoe
gecos: John Doe
groups: [adm,dialout,cdrom,floppy,sudo,audio,dip,video,plugdev,netdev]
sudo: ALL=(ALL) NOPASSWD:ALL
shell: /bin/bash
write_files:
- path: /etc/wsl.conf
append: true
content: |
[user]
default=jdoe
(continues on next page)
2.1. Tutorials 47
Ubuntu WSL
(continued from previous page)
packages: [ginac-tools, octave]
runcmd:
- sudo git clone https://github.com/Microsoft/vcpkg.git /opt/vcpkg
- sudo apt-get install zip curl -y
- /opt/vcpkg/bootstrap-vcpkg.sh
Save it and close it.
That example will create a user named jdoe and set it as default via /etc/wsl.conf, install the packages
ginac-tools and octave and install vcpkg from the git repository, since there is no deb or snap of that
application (hence the reason for being included in this tutorial - it requires an unusual setup).
See more: WSL data source reference.
Register a new Ubuntu-24.04 instance
In PowerShell, run:
> ubuntu2404.exe install --root
We skip the user creation since we expect cloud-init to do it.
If you want to be sure that there is now an Ubuntu-24.04 instance, run wsl -l -v. Notice that the ap-
plication is named Ubuntu24.04LTS but the WSL instance created is named Ubuntu-24.04. See more
about that naming convention in our reference documentation.
Check that cloud-init is running
In PowerShell again run:
> ubuntu2404.exe run cloud-init status --wait
That will wait until cloud-init completes configuring the new instance we just created. When done, you should see an
output similar to the following:
..............................................................................
..............................................................................
..............................................................................
...................
status: done
Verify that it worked
Restart the distro just to confirm that the changes in /etc/wsl.conf made by cloud-init will take effect.
Terminate the running instance:
> wsl -t Ubuntu-24.04
This should output a message confirming that the instance has stopped:
48 Chapter 2. Project and community

Ubuntu WSL
The operation completed successfully.
Now start the instance again:
> ubuntu2404.exe
You should see the standard welcome text:
To run a command as administrator (user "root"), use "sudo <command>".
See "man sudo_root" for details.
Welcome to Ubuntu Noble Numbat (GNU/Linux 5.15.137.3-microsoft-standard-WSL2 x86_64)
* Documentation: https://help.ubuntu.com
* Management: https://landscape.canonical.com
* Support: https://ubuntu.com/pro
This message is shown once a day. To disable it please create the
/home/cn/.hushlogin file.
jdoe@mib:~$
Once logged into the new distro instance’s shell, verify that:
1. The default user matches what was configured in the user data file (in our case jdoe).
jdoe@mib:~$ whoami
This should be verified with the output message:
jdoe
2. The supplied cloud-config user data was approved by cloud-init validation.
jdoe@mib:~$ sudo cloud-init schema --system
Verified with the output:
Valid schema user-data
3. The locale is set
jdoe@mib:~$ locale
Verified with:
LANG=pt_BR
LANGUAGE=
LC_CTYPE="pt_BR"
LC_NUMERIC="pt_BR"
LC_TIME="pt_BR"
LC_COLLATE="pt_BR"
LC_MONETARY="pt_BR"
LC_MESSAGES="pt_BR"
LC_PAPER="pt_BR"
(continues on next page)
2.1. Tutorials 49

Ubuntu WSL
(continued from previous page)
LC_NAME="pt_BR"
LC_ADDRESS="pt_BR"
LC_TELEPHONE="pt_BR"
LC_MEASUREMENT="pt_BR"
LC_IDENTIFICATION="pt_BR"
LC_ALL=
4. The packages were installed and the commands they provide are available.
jdoe@mib:~$ apt list --installed | egrep 'ginac|octave'
Verified:
WARNING: apt does not have a stable CLI interface. Use with caution in scripts.
ginac-tools/noble,now 1.8.7-1 amd64 [installed]
libginac11/noble,now 1.8.7-1 amd64 [installed,automatic]
octave-common/noble,now 8.4.0-1 all [installed,automatic]
octave-doc/noble,now 8.4.0-1 all [installed,automatic]
octave/noble,now 8.4.0-1 amd64 [installed]
5. Lastly, verify that the commands requested were also run. In this case we set up vcpkg from git, as recommended
by its documentation (there is no deb or snap available for that program).
jdoe@mib:~$ /opt/vcpkg/vcpkg version
This should also be verified with:
vcpkg package management program version 2024-01-11-
˓→710a3116bbd615864eef5f9010af178034cb9b44
See LICENSE.txt for license information.
Enjoy!
That’s all folks! In this tutorial, we’ve shown you how to use cloud-init to automatically set up Ubuntu on WSL 2 with
minimal touch.
This workflow will guarantee a solid foundation for your next Ubuntu WSL project.
As a side note, users installing the distro with the wsl --install online command must take a few steps to ensure
cloud-init has time to do its job. First, make sure to install with the --no-launch flag, then use the distro launcher to
install without creating a user (if you expect cloud-init to do it for you as described in this tutorial) and finally watch
cloud-init do its job. The commands are outlined below:
> wsl --install --no-launch -d Ubuntu-24.04
> ubuntu2404.exe install --root
> ubuntu2404.exe run cloud-init status --wait
We hope you enjoy using Ubuntu inside WSL!
50 Chapter 2. Project and community

Ubuntu WSL
2.2 How-to guides
2.2.1 Install Ubuntu on WSL2
What you will learn
• How to enable and install WSL on Windows 10 and Windows 11
• How to install Ubuntu 24.04 LTS using the Microsoft Store or WSL commands in the terminal
What you will need
• Windows 10 or 11 running on either a physical device or virtual machine
• All of the latest Windows updates installed
Install WSL
You can install WSL from the command line. Open a PowerShell prompt as an Administrator (we recommend using
Windows Terminal) and run:
> wsl --install
This command will enable the features necessary to run WSL and also install the default Ubuntu distribution of Linux
available in the Microsoft Store. It is recommended to reboot your machine after this initial installation to complete
the setup. You can also install WSL from the Microsoft Store.
Install Ubuntu WSL
WSL supports a variety of Linux distributions including the latest Ubuntu LTS release. Check our reference on distri-
butions to see which one you prefer.
There are multiple ways of installing distros on WSL, here we focus on two: the Microsoft Store application and WSL
commands run in the terminal. The result is the same regardless of the method.
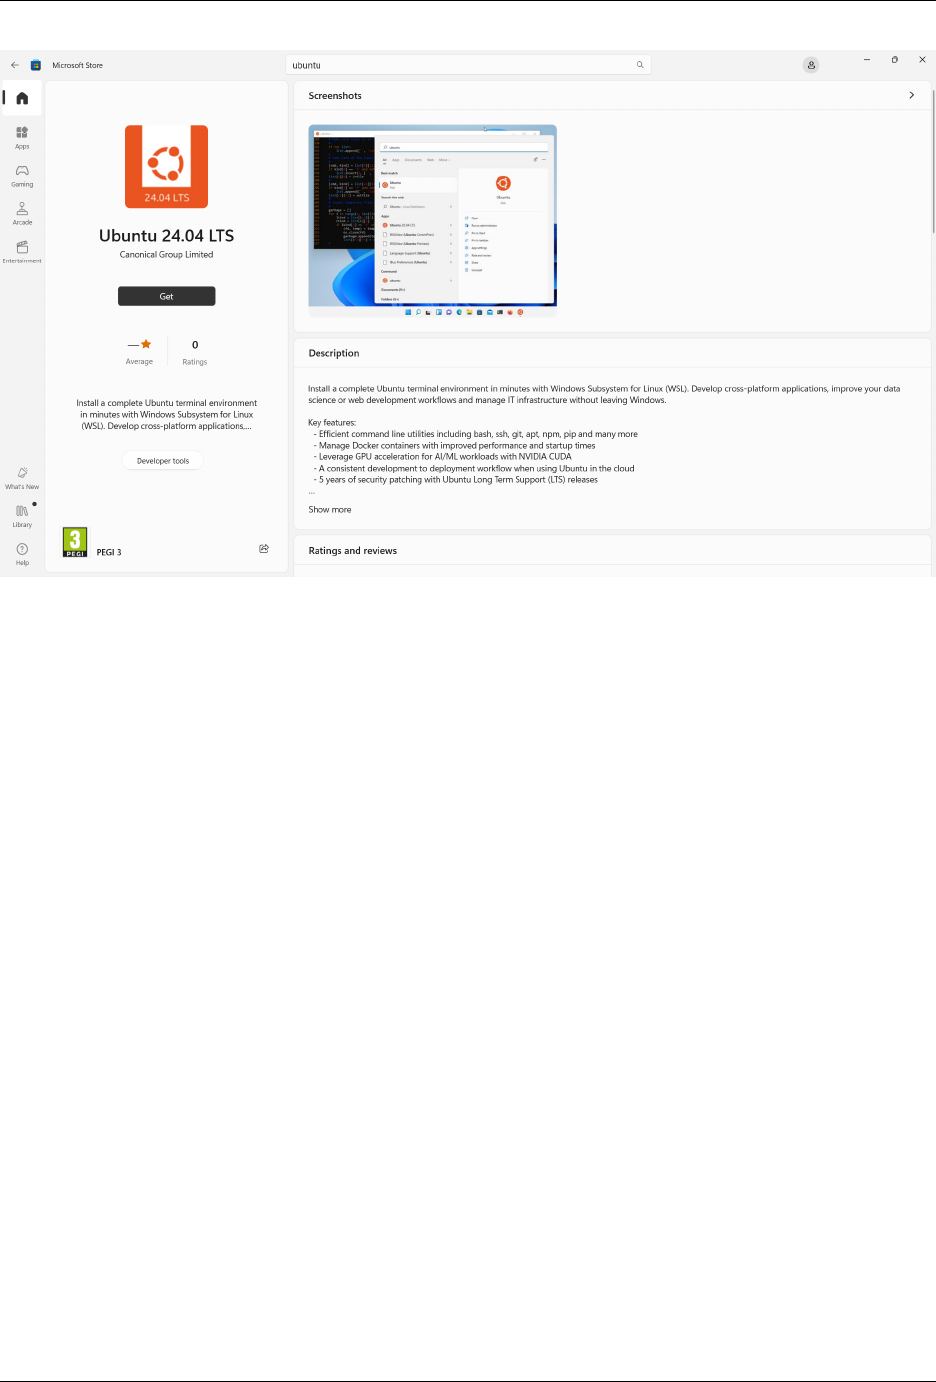
Method 1: Microsoft Store application
Find the distribution you prefer on the Microsoft Store and then click Get.
2.2. How-to guides 51
Ubuntu WSL
Ubuntu will then be installed on your machine. Once installed, you can either launch the application directly from the
Microsoft Store or search for Ubuntu in your Windows search bar.
52 Chapter 2. Project and community

Ubuntu WSL
Method 2: WSL commands in the terminal
It is possible to install the same Ubuntu versions available on the Microsoft Store directly from the command line. In
a PowerShell terminal, you can run wsl --list --online to see an output with all available distros and versions:
The following is a list of valid distributions that can be installed.
The default distribution is denoted by '*'.
Install using 'wsl --install -d <Distro>'.
NAME FRIENDLY NAME
* Ubuntu Ubuntu
Debian Debian GNU/Linux
kali-linux Kali Linux Rolling
Ubuntu-18.04 Ubuntu 18.04 LTS
Ubuntu-20.04 Ubuntu 20.04 LTS
(continues on next page)
2.2. How-to guides 53

Ubuntu WSL
(continued from previous page)
Ubuntu-22.04 Ubuntu 22.04 LTS
Ubuntu-24.04 Ubuntu 24.04 LTS
...
Your list may be different once new distributions become available.
You can install a version using a NAME from the output:
> wsl --install -d Ubuntu-24.04
You’ll see an indicator of the installation progress in the terminal:
Installing: Ubuntu 24.04 LTS
[==========================72,0%========== ]
Use wsl -l -v to see all your currently installed distros and the version of WSL they are using:
NAME STATE VERSION
Ubuntu-20.04 Stopped 2
* Ubuntu-24.04 Stopped 2
Note on installing images without the Microsoft Store
If you do not have access to the Microsoft Store or need to install a custom image it is possible to import a distribution
as a tar file:
> wsl --import <DistroName> <InstallLocation> <InstallTarFile>
Appx and MSIX packages for a given distro can also be downloaded and installed. Please refer to Microsoft’s docu-
mentation for more detailed information on these installation methods:
• Importing Linux distributions
• Installing distributions without the Microsoft Store
. Warning
You should always try to use the latest LTS release of Ubuntu, as it offers the best security, reliability and support
when using Ubuntu WSL.
Currently we do not have a recommended store for downloading tar and Appx/MSIX files for Ubuntu distros.
Run and configure Ubuntu
To open an Ubuntu 24.04 terminal run the following command in PowerShell:
> ubuntu2404.exe
Congratulations, you now have an Ubuntu terminal running on your Windows machine.
Once it has finished its initial setup, you will be prompted to create a username and password. They don’t need to match
your Windows user credentials.
54 Chapter 2. Project and community

Ubuntu WSL
Finally, it’s always good practice to install the latest updates by running the following commands within the Ubuntu
terminal, entering your password when prompted:
$ sudo apt update
$ sudo apt full-upgrade -y
Enjoy Ubuntu on WSL
In this guide, we’ve shown you how to install Ubuntu WSL on Windows 10 or 11.
We hope you enjoy working with Ubuntu in WSL. Don’t for to check out our blog for the latest news on all things
Ubuntu.
Further Reading
• Setting up WSL for Data Science
• Whitepaper: Ubuntu WSL for Data Scientists
• Microsoft WSL Documentation
• Ask Ubuntu
2.2.2 Using the Auto-installation feature
. Warning
This feature has been deprecated and is no longer supported. Stay tuned for upcoming support for Cloud-init.
ò Note
See more: Cloud init | Home
2.2.3 How to run your WSL GitHub workflow on Azure
Read more: How we improved testing Ubuntu on WSL – and how you can too!
Most of the time, what works on Ubuntu desktop works on WSL as well. However, there are some exceptions. Fur-
thermore, you may want to test software that lives both on Windows and inside WSL. In these cases, you may want to
run your automated testing on a Windows machine with WSL rather than a regular ubuntu machine.
There exist Windows GitHub runners, but they do not support the latest version of WSL. The reason is that WSL is
now a Microsoft Store application, which requires a logged-in user. GitHub runners, however, run as a service. This
means that they are not on a user session, hence they cannot run WSL (or any other store application).
Read more: What’s new in the Store version of WSL?
2.2. How-to guides 55

Ubuntu WSL
Summary
We propose you run your automated tests on a Windows virtual machine hosted on Azure. This machine will run the
GitHub actions runner not as a service, but as a command-line application.
Step-by-step
This guide will show you how to set up an Azure VM to run your WSL workflows.
1. Create a Windows 11 VM on Azure: follow Azure’s instructions, no special customisation is necessary.
Note: You can use any other hosting service. We use Azure in this guide because that is what we use
for our CI.
2. Install WSL with wsl --install.
3. Enable automatic logon: use the registry to set up your machine to log on automatically. Explanation here.
4. Add your runner to your repository: head to your repository’s page on GitHub > Settings > Actions > Runners >
New self-hosted runner. Follow the instructions. Make sure you do not enable running it as a service.
5. Set up your runner as a startup application:
1. Go to the directory you installed the GitHub runner.
2. Right-click on the run.cmd file, and click Show more options > Send to > Desktop (create shortcut).
3. Press Win+R, type shell:startup and press OK. A directory will open.
4. Find the shortcut in the desktop and drag it to the startup directory.
6. Set up your repository secrets To add a new secret, head to your repository’s page on GitHub > Settings > Secrets
> Actions > New repository secret. You’ll need the following secret:
• AZURE_VM_CREDS: See the documentation here.
7. Create your GitHub workflow. This workflow must have at least three jobs which depend each on the previous
one.
1. Start up the VM
2. Your workflow(s)
3. Stop the VM
It is also recommended to add a concurrency directive to prevent different workflows from interleaving steps
1 and 3.
8. Use our actions. We developed some actions to help you build your workflow. They are documented in the WSL
GitHub actions reference.
Example repositories
The following repositories use some variation of the workflow explained here.
• Ubuntu/WSL-example hello world example
• Ubuntu/WSL-example cloud-init testing
• Ubuntu/WSL end-to-end tests
56 Chapter 2. Project and community

Ubuntu WSL
2.2.4 Contributing
Ubuntu WSL and Ubuntu Pro for WSL
The documentation for Ubuntu WSL and Ubuntu Pro for WSL are currently in the process of being merged. These
contribution guidelines refer to both products.
Contributions to Ubuntu WSL and Ubuntu Pro for WSL are welcomed and encouraged.
Guidelines for your contributions
To ensure that making a contribution is a positive experience for both contributor and reviewer we ask that you read
and follow these community guidelines.
This communicates that you respect our time as developers. We will return that respect by addressing your issues,
assessing proposed changes and finalising your pull requests, as helpfully and efficiently as possible.
These are mostly guidelines, not rules. Use your best judgement and feel free to propose changes to this document in
a pull request.
Code of conduct
We take our community seriously and hold ourselves and other contributors to high standards of communication. By
participating and contributing, you agree to uphold the Ubuntu Community Code of Conduct.
Getting started
The source code for Ubuntu WSL and Ubuntu Pro for WSL can be found on GitHub:
• Ubuntu WSL repo
• Ubuntu Pro for WSL repo
Issues with WSL should be directed to Microsoft’s WSL project
We accept any contributions relating to Ubuntu WSL and Ubuntu Pro for WSL. However, we do not directly maintain
WSL itself, which is a Microsoft product. If you have identified a problem or bug in WSL then file an issue in Microsoft’s
WSL project repository.
If you are unsure whether your problem relates to an Ubuntu project or the Microsoft project then familiarise yourself
with their documentation.
• Ubuntu WSL docs
• Microsoft WSL docs
At this point, if you are still not sure, try to contact a maintainer of one of the projects who will advise you where best
to submit your Issue.
2.2. How-to guides 57

Ubuntu WSL
How to contribute
Contributions are made via Issues and Pull Requests (PRs). A few general guidelines that cover both:
• Use the advisories page of the repository and not a public bug report to report security vulnerabilities.
• Search for existing Issues and PRs before creating your own.
• Give a friendly ping in the comment thread to the submitter or a contributor to draw attention if your issue is
blocking — while we work hard to makes sure issues are handled in a timely manner it can take time to investigate
the root cause.
• Read this Ubuntu discourse post for resources and tips on how to get started, especially if you’ve never contributed
before
Issues
Issues should be used to report problems with the software, request a new feature or to discuss potential changes before
a PR is created. When you create a new Issue, a template will be loaded that will guide you through collecting and
providing the information that we need to investigate.
If you find an Issue that addresses the problem you’re having, please add your own reproduction information to the
existing issue rather than creating a new one. Adding a reaction can also help be indicating to our maintainers that a
particular problem is affecting more than just the reporter.
Pull requests
PRs are always welcome and can be a quick way to get your fix or improvement slated for the next release. In general,
PRs should:
• Only fix/add the functionality in question OR address wide-spread whitespace/style issues, not both.
• Add unit or integration tests for fixed or changed functionality.
• Address a single concern in the least number of changed lines as possible.
• Include documentation in the repo or on our docs site.
• Use the complete Pull Request template (loaded automatically when a PR is created).
For changes that address core functionality or would require breaking changes (e.g. a major release), it’s best to open
an Issue to discuss your proposal first. This is not required but can save time creating and reviewing changes.
In general, we follow the “fork-and-pull” Git workflow:
1. Fork the repository to your own GitHub account.
2. Clone the fork to your machine.
3. Create a branch locally with a succinct yet descriptive name.
4. Commit changes to your branch.
5. Follow any formatting and testing guidelines specific to this repo.
6. Push changes to your fork.
7. Open a PR in our repository and follow the PR template so that we can efficiently review the changes.
PRs will trigger unit and integration tests with and without race detection, linting and formatting valida-
tions, static and security checks, freshness of generated files verification. All the tests must pass before
anything is merged into the main branch.
58 Chapter 2. Project and community

Ubuntu WSL
Once merged to the main branch, po files will be automatically updated and are therefore not necessary to update in
the pull request itself, which helps minimise diff review.
Contributing to the code
About the test suite
The source code includes a comprehensive test suite made of unit and integration tests. All the tests must pass with
and without the race detector.
Each module has its own package tests and you can also find the integration tests at the appropriate end-to-end (e2e)
directory.
The test suite must pass before merging the PR to our main branch. Any new feature, change or fix must be covered by
corresponding tests.
Required dependencies for UP4W
You’ll need a Windows Machine with the following applications installed:
• Windows Subsystem for Linux
• Ubuntu-24.04
• Visual Studio Community 2019 or above
• Go
• Flutter
Building and running the binaries for UP4W
For building, you can use the following two scripts:
• Build the Windows Agent
• Build the Wsl Pro Service
Note that you’ll need to create a self-signing certificate to build the Windows Agent.
Contributor License Agreement
It is requirement that you sign the Contributor License Agreement in order to contribute. You only need to sign this
once and if you have previously signed the agreement when contributing to other Canonical projects you will not need
to sign it again.
An automated test is executed on PRs to check if it has been accepted.
Please refer to the licences for Ubuntu WSL and Ubuntu Pro for WSL below:
• Ubuntu WSL.
• Ubuntu Pro for WSL.
2.2. How-to guides 59

Ubuntu WSL
Contributing to the docs
The documentation for Ubuntu WSL and Ubuntu Pro for WSL is maintained here.
Our goal is to provide documentation that gives users the information that they need to get what they need from Ubuntu
WSL.
You can contribute to the documentation in various different ways. If you are not a developer but want to help make
the product better then helping us to improve the documentation is a way to achieve that.
At the top of each page in the documentation, you will find a feedback button. Clicking this button will open an Issue
submission page in the Ubuntu WSL GitHub repo. A template will automatically be loaded that you can modify before
submitting the Issue.
You can also find a pencil icon for editing the page on GitHub, which will open up the source file in GitHub so that
you can make changes before committing them and submitting a PR. This can be a good option if you want to make a
small change, e.g., fixing a single typo.
Lastly, at the bottom of the page you will find various links, including a link to the Discourse forum for Ubuntu WSL,
where you can ask questions and participate in discussions.
Types of contribution
Some common contributions to documentation are:
• Add or update documentation for new features or feature improvements by submitting a PR
• Add or update documentation that clarifies any doubts you had when working with the product by submitting a
PR
• Request a fix to the documentation, by opening an issue on GitHub.
• Post a question or suggestion on the forum.
Automatic documentation checks
Automatic checks will be run on any PR relating to documentation to verify the spelling, the validity of links, correct
formatting of the Markdown files and the use of inclusive language.
You should run these tests locally before submitting a PR by running the following commands:
• Check the spelling: make spelling
• Check the validity of links: make linkcheck
• Check for inclusive language: make woke
Doing these checks locally is good practice. You are less likely to run into failed CI checks after your PR is submitted
and the reviewer of your PR can more quickly focus on the contribution you have made.
60 Chapter 2. Project and community

Ubuntu WSL
Note on using code blocks
In the Ubuntu WSL docs, code blocks are used to document:
• Ubuntu terminal commands
• PowerShell terminal commands
• Terminal outputs
• Code and config files
We follow specific conventions when including code blocks so that they are readable and functional.
Include prompts when documenting terminal commands
It is common that Ubuntu and PowerShell terminal commands are included in the same page. We use prompts to ensure
that the reader can distinguish between them.
Here are some examples:
• PowerShell prompt symbol: >
• PowerShell prompt symbol with path: C:\Users\myuser>
• PowerShell prompt symbol with path and PowerShell prefix: PS C:\Users\myuser>
• Ubuntu prompt symbol: $
• Ubuntu prompt symbol with user and host: user@host:~$
Whether to include the path or user@host depends on whether it is useful in the context of the documentation being
written. For example, if demonstrating the use of multiple WSL instances, including the user and host can make it
easier to tell the instances apart.
Exclude prompts from clipboard when using copy button
The WSL docs automatically strips prompts when a user clicks the copy button on a code block. This is to prevent
errors when a reader pastes the full content of a copy block into their terminal.
We use a solution based on regular expressions, which identifies the first instance of a prompt symbol followed by
whitespace on a particular line before removing the text before that symbol.
There may be edge-cases when this creates problems; for example, you should include whitespace after a prompt but
if you don’t it may not be removed during copying.
Always test code blocks when you include them to ensure that the correct text is captured during the copy operation.
If you encounter a problem or edge-case contact the maintainers or file an issue.
2.2. How-to guides 61

Ubuntu WSL
Separate input from output and remove copy button from output blocks
Terminal commands are separated from the output that they generate. Explanatory text can be included to explain to
the reader what is being presented:
• “Run the following command. . . ”
• “This will generate the following output. . . ”
Copy buttons are not included in output blocks. This is to prevent an output being confused for an input. There are also
few reasons why someone would copy an output from documentation.
To exclude a copy button from an output block the no-copy CSS class must be included within the code block:
:class: no-copy
Note: a code-block must be labelled with the code-block directive for this to work.
Getting Help
Join us in the Ubuntu Community and post your question there with a descriptive tag.
2.3 Reference
2.3.1 Distributions
Our flagship distribution is Ubuntu. This is the one that is installed by default when you install WSL for the first time.
However, we develop several flavours. It may be the case that one or more of these flavours fits your needs better.
Each of these flavours corresponds to a different application on the Microsoft Store, and once installed, they’ll create
different distros in your WSL. These are the applications we develop and maintain:
• Ubuntu ships the latest stable LTS release of Ubuntu. When new LTS versions are released, Ubuntu can be
upgraded once the first point release is available.
• Ubuntu 18.04.6 LTS, Ubuntu 20.04.6 LTS, and Ubuntu 22.04.3 LTS are the LTS versions of Ubuntu and receive
updates for five years. Upgrades to future LTS releases will not be proposed.
• Ubuntu (Preview) is a daily build of the latest development version of Ubuntu previewing new features as they
are developed. It does not receive the same level of QA as stable releases and should not be used for production
workloads.
Naming
Due to different limitations in different contexts, these applications will have different names in different contexts. Here
is a table matching them.
1. App name is the name you’ll see in the Microsoft Store and Winget.
2. AppxPackage is the name you’ll see in Get-AppxPackage.
3. Distro name is the name you’ll see when doing wsl -l -v or wsl -l --online.
4. Executable is the program you need to run to start the distro.
62 Chapter 2. Project and community

Ubuntu WSL
App name AppxPackage name Distro name Executable
Ubuntu CanonicalGroupLimited.Ubuntu Ubuntu ubuntu.exe
Ubuntu (Preview) CanonicalGroupLimited.
UbuntuPreview
Ubuntu-Preview ubuntupreview.
exe
Ubuntu XX.YY.Z
LTS
CanonicalGroupLimited.UbuntuXX.
YYLTS
Ubuntu-XX.YY ubuntuXXYY.exe
2.3.2 GitHub actions
Download rootfs
Download the latest Rootfs tarball for a particular release of Ubuntu WSL. This can be used when you need better
granularity than what is offered by wsl-install, or you want to cache the rootfs.
Its arguments are:
• distros: a comma-separated list of distros to download. Use the names as shown in WSL. Read more: Ubuntu
WSL distributions. Defaults to Ubuntu.
• path: the path where to store the tarball. The tarball will end up as ${path}\${distro}.tar.gz. PowerShell-
style environment variables will be expanded. If there already exists a tarball at the download path, a checksum
comparison will be made to possibly skip the download.
Example usage:
- name: Download Jammy rootfs
uses: Ubuntu/WSL/.github/actions/download-rootfs@main
with:
distro: Ubuntu-22.04
path: '${env:UserProfile}\Downloads\rootfs'
WSL install
See also: download-rootfs
This action installs the Windows Subsystem for Linux application, and optionally an Ubuntu WSL application.
Its arguments are:
• distro: Optional argument
– Blank (default): don’t install any Ubuntu WSL distro
– Distro name: any of the available distros in the Microsoft store. Write its name as shown in WSL. Read
more: Ubuntu WSL distributions
Example usage:
- name: Install or update WSL
uses: Ubuntu/WSL/.github/actions/wsl-install@main
with:
distro: Ubuntu-20.04
2.3. Reference 63

Ubuntu WSL
WSL checkout
This action checks out your repository in a WSL distro. If you want to check it out on the Windows file system, use the
regular actions/checkout action instead. Example usage:
Its arguments are:
• distro: an installed WSL distro. Write its name as it would appear on WSL. Read more: Ubuntu WSL distri-
butions
• working-dir: the path where the repository should be cloned. Set to ~ by default.
• submodules:: Whether to fetch sub-modules or not. False by default.
Example usage:
- name: Check out the repository
uses: Ubuntu/WSL/.github/actions/wsl-checkout@main
with:
distro: Ubuntu-20.04
working-dir: /tmp/github/
submodules: true
WSL bash
This action runs arbitrary bash code in your distro.
Its arguments are:
• distro: an installed WSL distro. Write its name as it would appear on WSL. Read more: Ubuntu WSL distri-
butions
• exec: the script to run.
• working-dir: path to the WSL directory to run the script in. Set to ~ by default.
Example usage:
- name: Install pip
uses: Ubuntu/WSL/.github/actions/wsl-bash@main
with:
distro: Ubuntu-20.04
working-dir: /tmp/github/
exec: |
DEBIAN_FRONTEND=noninteractive sudo apt update
DEBIAN_FRONTEND=noninteractive sudo apt install python3-pip
2.4 Explanations
2.4.1 Ubuntu Pro for WSL
Ubuntu Pro for WSL is an automation tool that runs on Windows hosts to manage Ubuntu WSL instances, providing
them with compliance by attaching them to an Ubuntu Pro subscription and enrolling them into Landscape.
Documentation for UP4W can currently be found at the following link:
Ubuntu Pro for WSL Documentation
64 Chapter 2. Project and community
