
Artillery2
User Manual

2
Table of contents
What is Artillery2 5
Installation 5
WINDOWS 6
macOS 6
Uninstalling 7
Authorization 7
Artillery2 Structure 8
About Screen 8
Version 8
Dynamic Displays 8
Ignore Programchange 8
Serialnumber 9
Links 9
Global Presets 9
Effect Presets 10
Master Controls 11
MIDI 11
Bpm 11
Active 11
Deactivate all Effects 11
Keyboard 11
In- and Output Amplifier 11
Effect Page 12
Effect Settings 12
Effect menu and Preset Section 12
Mix Envelope 13

3
Effect Editor Page 14
Effect Parameters 14
Universal Modulator 15
Keyboard 16
The Effects 17
Amplitude 17
Amp 17
Compressor 17
Enveloper 18
Sync Dumper 18
Noise Gate 19
Modulation 19
Phaser 19
Flanger 20
Chorus 20
Ring Deluxe 21
Delay 21
Simple Delay 21
Diffusion Delay 22
Filter Delay 22
Tonal Delay 23
Reverb 23
Reverb HQ 24
Filter 24
Lowpass 24
Multi Filter 24
Vowel Filter 25
Equalizer 26
Granular 26
Pitch Looper 26
Timestretcher 27
Scratch Looper 27
Looper 28
Steplooper 28
Reverser 28

4
Turntable 29
Tonal Looper 29
Special 30
Overdrive 30
Pitcher 30
Retro 30
Karaoke 31
Vocoder 31
Host Integration 32
Logic 32
Live 33
Cubase 34
Studio One 34
Pro Tools 35
Sonar 36
FL Studio 37
MIDI Remote 39
MIDI Program Change 39
Questions? 40
Artillery2 makes no sound 40
Have I found a bug? 40
Impressum 40

5
What is Artillery2
Artillery2 is a super versatile multi effect.
Effects are assigned to keyboard zones and can be triggered using MIDI notes.
You can use this effect device in classical ways but also as an instrument that takes your
audio track as a sound source.
Apply a MIDI track and create stunning effect sequences on the fly.
This device will greatly improve your facilities in sound design, remixing and live playing.
The 28 effects are explained in “The Effects” Section.
Artillery2 fits perfectly on stage where you can manipulate live signals, loop them,
reverse them or just apply filters, delays or even vocode them.
Artillery2 will also be your first fx choice in the studio, it contains superb sounding effect
algorithms.
With a MIDI track you can control Artillery2 so that a delay picks up single words or
loopers and filters whisper in the background of a guitar track.
Installation
Download (requires login) the latest version here.
The standalone version and the manual will be installed into
Windows: C:\Program Files\Sugar Bytes\Artillery2
macOS: /Applications/Sugar Bytes/Artillery2
Presets will be installed into Documents\Sugar Bytes\Artillery2.
Do not move the Artillery2 presets after installation!
Back
to Table of Content

6
WINDOWS
Default installation paths:
VST2 C:\Program Files\VSTPlugins
VST3 C:\Program Files\Common Files\VST3
AAX C:\Program Files\Common Files\Avid\Audio\Plug-Ins
macOS
The Audio Unit, the VST and the AAX Plugin will be automatically installed into the correct
folders.
Default installation paths:
VST2 /Library/Audio/Plug-Ins/VST/
VST3 /Library/Audio/Plug-Ins/VST3/
AU /Library/Audio/Plug-Ins/Components/
AAX /Library/Application Support/Avid/Audio/Plug-Ins
Back
to Table of Content

7
Uninstalling
In order to uninstall Artillery2, please take the following steps:
Windows: Uninstall Artillery2 under Control Panel/AddRemove Software.
macOS: Here is the way to delete everything regarding Artillery2
/Applications/Sugar Bytes/Artillery2
/Library/Audio/Plug-Ins/VST/Artillery2.vst
/Library/Audio/Plug-Ins/VST3/Artillery2.vst3
/Library/Audio/Plug-Ins/Components/Artillery2.component
/Library/Application Support/Avid/Audio/Plug-Ins/Artillery2.aaxplugin
~/Documents/Sugar Bytes/Artillery2
~/Library/Preferences/com.sugar-bytes.Artillery2.plist
~ means: /Users/YOURLOGINNAME (your home folder)
(Please note that since OSX 10.7.x the library folder is a hidden folder.
Therefore please use the "Go To Folder" menu and then enter ~/Library.)
Authorization
The serial number is requested for installation.
If the serial number validation fails, the plugin will show that in the Artillery2 About
Screen.
Back
to Table of Content

8
Artillery2 Structure
About Screen
Click on the Artillery2 Logo to open the About Screen.
In the About Screen you have some useful information and settings as follows:
Version
Current version number.
Dynamic Displays
The Parameter displays show the parameter value after it has been modulated, so it will
change its value dynamically according to incoming modulations. That can be important
to meet certain values with your modulations.
Ignore Programchange
Programchanges will not affect Global Presets. If this option is inactive, you can call
Global Presets via programchange.
Back
to Table of Content
9
Serialnumber
Here you find your serial number which is required for downloading updates.
Links
Click these buttons to enter the Sugar Bytes website, open the manual or sign the
newsletter to be informed about Sugar Bytes releases and Artillery2 updates.
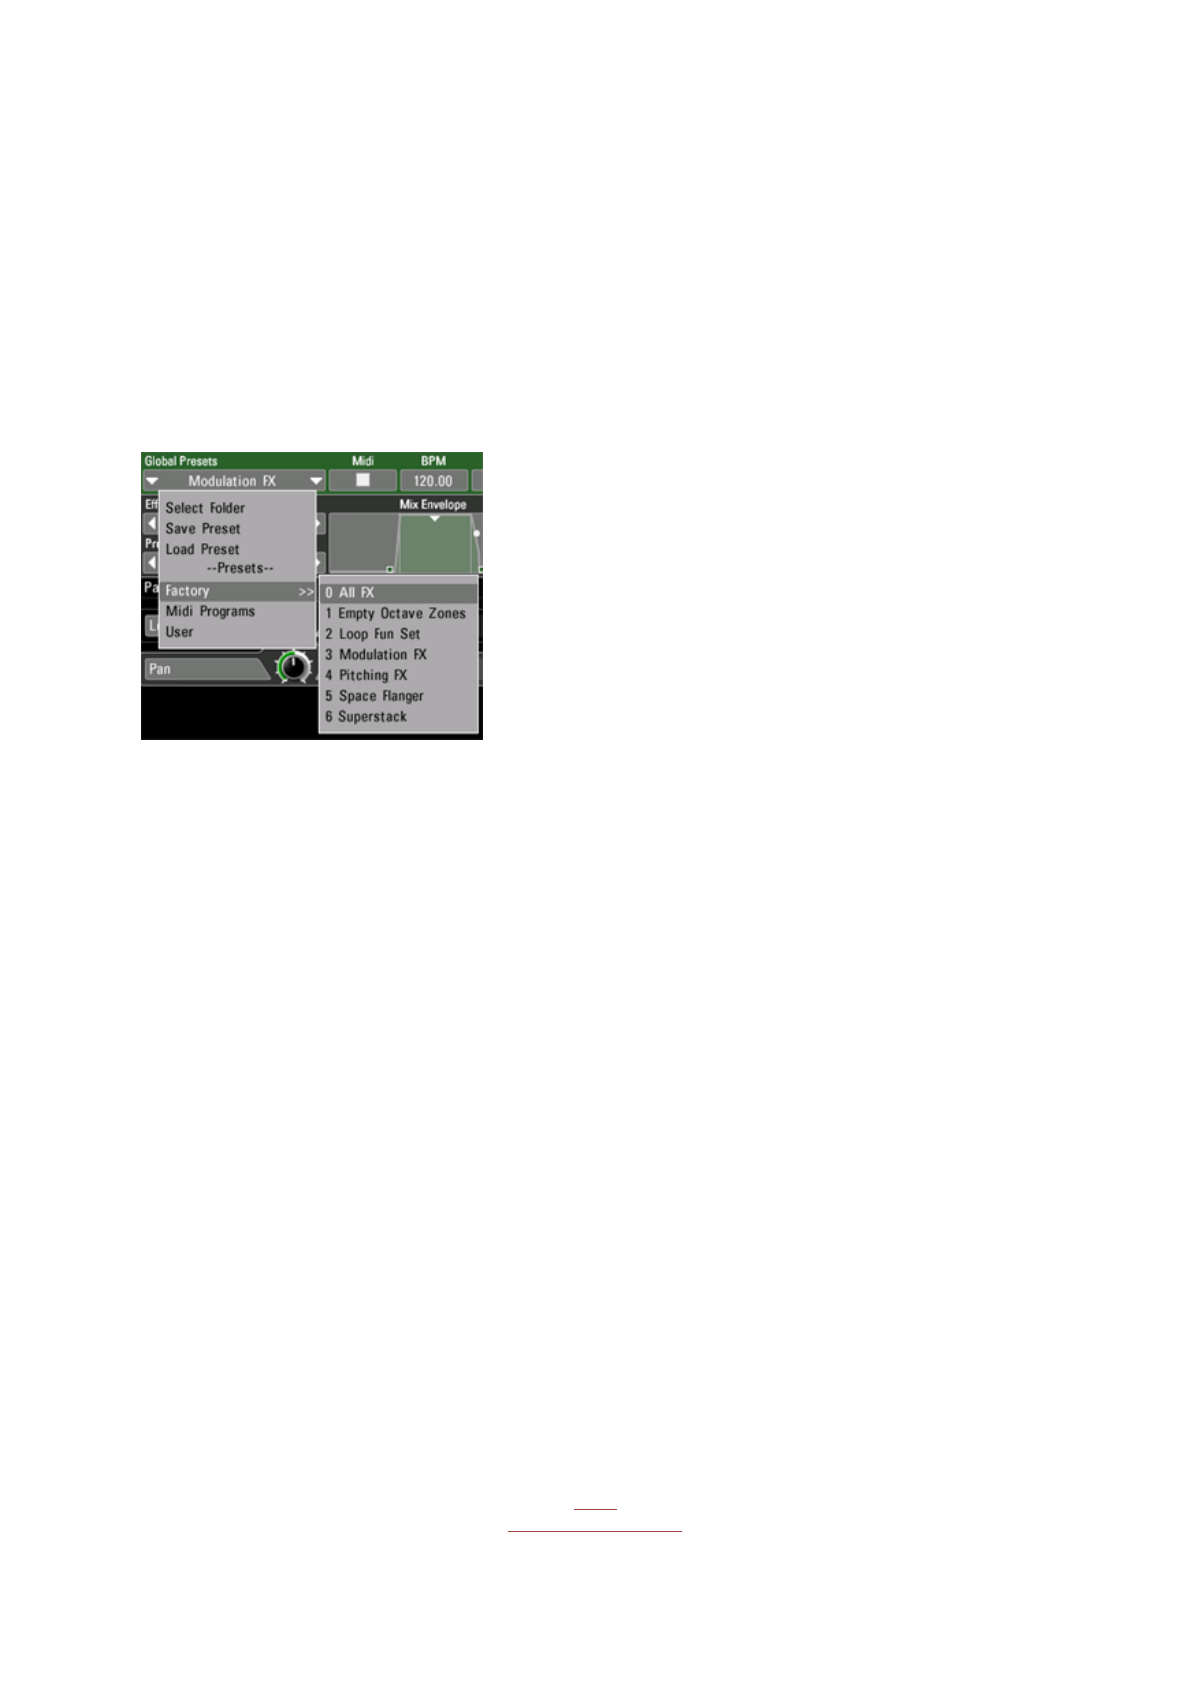
Global Presets
The Global Presets save and recall the complete plugin state.
Presets saved in the folder MIDI Programs can be recalled via programchange.
The presetnumber is the programchange number.
There is a folder called Factory which contains all Global Presets delivered with Artillery2.
We also created a User folder where your own Global Presets should be saved.
You can create more folders on this level for managing your Artillery2 Global presets.
Presets are handled in alphabetical order.
In order to save a preset, hit SAVE PRESET in the preset menu.
Back
to Table of Content

10
Effect Presets
The effect presets save and recall all settings of the current effect.
You find the Effect Presets in the upper left corner of the Effect Page, below the Effects
menu.
If you want to switch effect settings, use copy/paste in the Zone Menu to create different
keyzones for this effect.
In order to save a preset, hit SAVE PRESET in the preset menu and make sure you save
the preset in the folder for that effect.
(for example: Content/FXPresets/Looper/myloop.sbfx)
Use Load Preset to load a preset from any directory.
Each effect loads the Default.sbfx when its´s called. In order to make an effect come up
with settings you prefer, overwrite this preset with your own settings.
Back
to Table of Content

11
Master Controls
The Mastercontrols are placed on green background.
Here you set in/out level, watch MIDI activity and resize the keyboard.
Right beside the Global presets you find the following:
MIDI
A white square shows incoming MIDI notes.
Bpm
Here the current tempo is displayed.
Active
You can see the number of active effect zones in relation to the number of existing effect
zones.
Deactivate all Effects
Hit the "!" Icon to deactivate all effects.
Keyboard
Switch between two keyboard sizes with a click.
In- and Output Amplifier
Left and right beside the keyboard you find the In- and Output Amplifier.
According to the signalflow the Input Amp is left to the keyboard and the Output amp is
placed right to the keyboard.
Back
to Table of Content

12
Effect Page
With a click on a keyzone you call the Effect Page.
The effect page is the central workspace of Artillery2.
In the headline you define global settings like effects choice, presets, Mix envelope and
triggerstyle.
In the editing area you find the effect parameters and the modulation engines.
Effect Settings
Effect menu and Preset Section
In the settings area in the headline of the effect page you can select the effect and
choose a preset.
Back
to Table of Content

13
Mix Envelope
Right beside the effect menu and preset section you find the Mix Envelope.
It starts when you hit a key, plays the Attack curve, keeps the Wet level as long as you
hold the key and plays the Release curve after you released the key.
With no Attack and Release time the Mix Envelope is used like a normal Dry/Wet control,
but with longer fading times it makes effects come in and fade out, for example for
creating a delay line which fades out slowly or a looper which fades in slowly.
The Mix Envelope curve can be edited with the mouse, you can also use the diplays for
selecting the desired values directly.
Mix
Relation between input signal and affected signal.
Attack
Time for fading in the effect signal. Always in sync.
Retrigger
How the envelope works if triggered while it runs.
Legato Means that the envelope is not retriggered while it runs.
Always Retriggers the envelope with each incoming trigger.
Release
Fade out time after keys has been released.
In the right corner you find the following:
Key Mode
Decides if a trigger switches the effect on and off permanently (Toggle) or just as long as
the key is held (Trigger).
Key Quantize
Quantizes incoming triggers to the tempo grind.
That way effects are applied perfectly in sync when you play them live.
Back
to Table of Content
14
Effect Level
Level adjustment for each effect.
ON/OFF
Activate/Bypass the effect without using the keyboard.
Effect Editor Page
The Effect Editor consists of effect parameters and modulators.
Here the actual sounds are created.
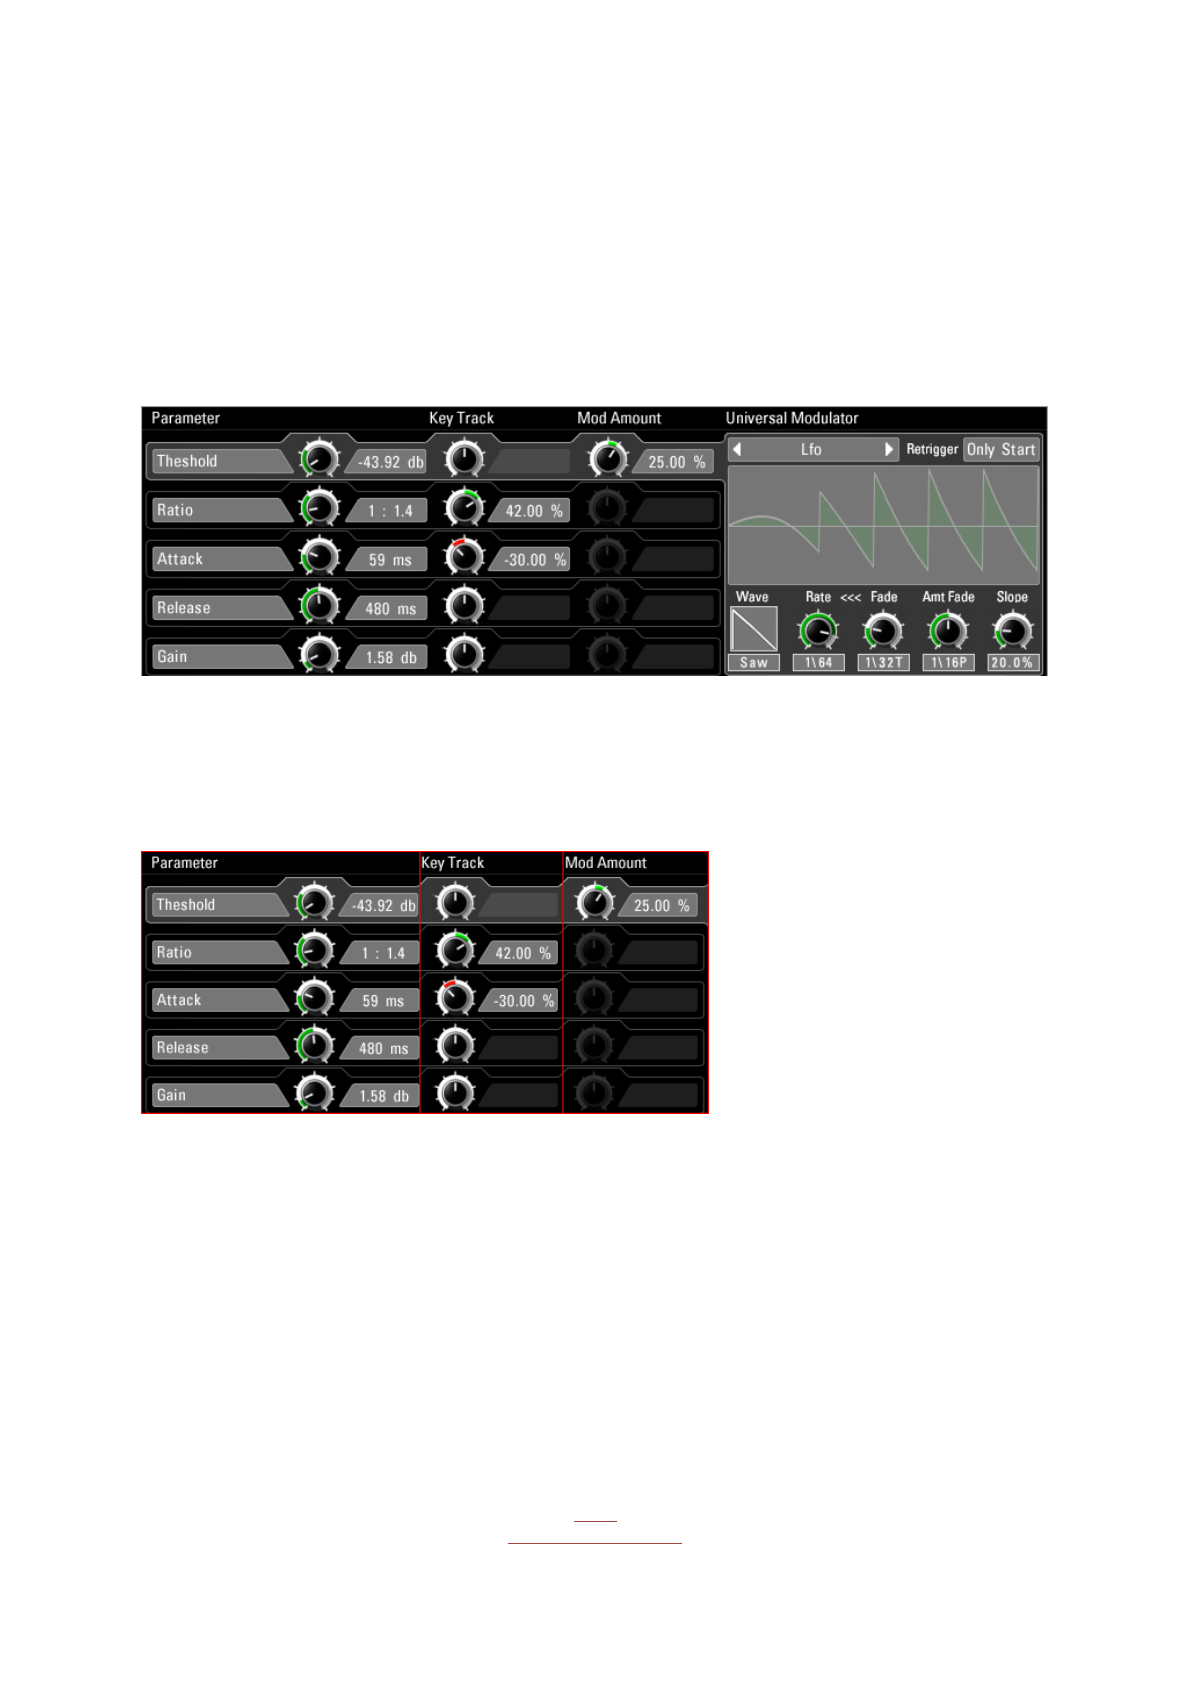
Effect Parameters
The effect parameters are organized in Stripes.
A Stripe is selected with a click anywhere in the stripe area and contains these controls:
Parameter
Usual Effect controls like filter cutoff or delay time. If the Parameter controls sync times,
you can click on its display to select the sync time from a menu.
The Parameter has a dynamic outline which shows modulations.
In the About Screen you can set the option "Dynamic Displays"
so the Parameter displays will always show the final values. That can be important to
meet certain values with your modulations.
Back
to Table of Content

15
Keytrack
The parameter can be modulated with the note position within its keyzone. That way you
can play tonal effects with real notes or spread delaytimes or loopsizes over the
keyboard. the keytracking is displayed in the zone as long as you touch the parameter or
keytrack control.
Mod Amount
Set the intensity of modulation coming from the Universal Modulator. It is greyed out
when no Modulator is active.
A Stripe is selected with a click and then connects with the Universal Modulator. That way
you can easily select and identify modulators assigned to parameters.
Universal Modulator
The Universal Modulator is available for each parameter individually and contains four
engines:
LFO
5 waveforms (Sine, Saw, Tri, Pulse, Random). Rate and Intensity can be blended (Fade),
the blending curve can be shaped logarithmical and exponential(Slope).
Envelope
An AHDSR Envelope, which is started when you hit a key.
Envelope Follower
An envelope is created out of the input signal.
Step Sequencer
Up to 32 steps and an intelligent Smooth algorithm.
The modulators have two trigger modes which restart the modulation curve.
Always: The modulator is restarted when a MIDI note is received. Does not retrigger when
MIDI notes are played legato. Only Start: The modulator is restarted when a MIDI note is
received. Each Parameter has a Mod Amount knob to fit the strength of modulation. If no
modulator is selected, the Mod Amount control is greyed out.
Back
to Table of Content

16
Keyboard
The keyboard is the central control unit of Artillery 2.
Create an effect zone and apply an effect to it.
Hit a key inside of the zone to apply the effect to the audio signal.
The keyzones show the name of the assigned effect.
You can handle keyzones with their assigned effects easily with the following functions:
Leftclick Edges: Resize Zone
Leftclick Zone: Move Zone
Leftclick Zone background: Create Zone
Shift + Leftclick Edges: Resize Zones magnetically
With a rightclick (Ctrl+Click) the Zone Menu opens and gives you the following options:
Copy/Cut/Paste: Copy or cut the Zone and paste it anywhere with another rightclick.
Delete: Delete the selected Zone.
Delete All: Delete all existing Zones.
You can resize the Zones magnetically when you hold the Shift key while resizing.
You can move a zone with the Strg/Ctrl key pressed.
Hit the arrow buttons left and right beside the keyboard, to transpose keyboard and
zones visually.
In the Artillery2 Master Controls you can switch between two keyboard sizes.
Back
to Table of Content

17
The Effects
Amplitude
Amp
A simple Amplifier with Level and Pan.
Level: Audio loudness, up to 4 times louder
than the original.
Pan: Stereo position of the audio signal.
With the Universal Modulator you can easily
create cool effects like Gater (Stepseq
modulates Level), Autopan (LFO modulates
Pan) or Compressor (Envelope Follower or
Envelope modulates Level).
Compressor
Smooth and analog sounding Compressor.
Reduces the audio level according to its
loudness. With all Artillery-Compressors, you
can do really fine NY-Compression stuff with
the Mix-Envelope.
Threshold: Defines at which level the
compressor starts to reduce the level.
Ratio: Intensity of compression.
Attack/Release: Fading times of the
compression curve.
Gain: Final loudness control.
Back
to Table of Content

18
Enveloper
The audio level is controlled with an
envelope which is started when transients
cross the Threshold level.
Threshold: The envelope starts when the
audio level rises above the threshold level.
The envelope is not restarted as long as it
runs.
Hold Trigger: The envelope is not restarted
within the given time.
Use higher settings to have less triggers
and smaller settings which result in more
triggers, up to really fast amplitude
modulations.
Attack/Release: Fading times of the
compression curve. Longer times create
longer and deeper compressions.
Amount: Intensity of compression.
Sync Dumper
The audio level is controlled with an
envelope that starts on sync times. With
the Sync Dumper the compression can be
put 4-to-the-floor for the ultimate dance-
pump.
Amount: Intensity of compression.
Attack/Release: Fading time of the
compression curve.
Time: Bpm-synced repeating time of the
compression trigger.
Gain: Final level control, +/- 6 db.
Back
to Table of Content
19
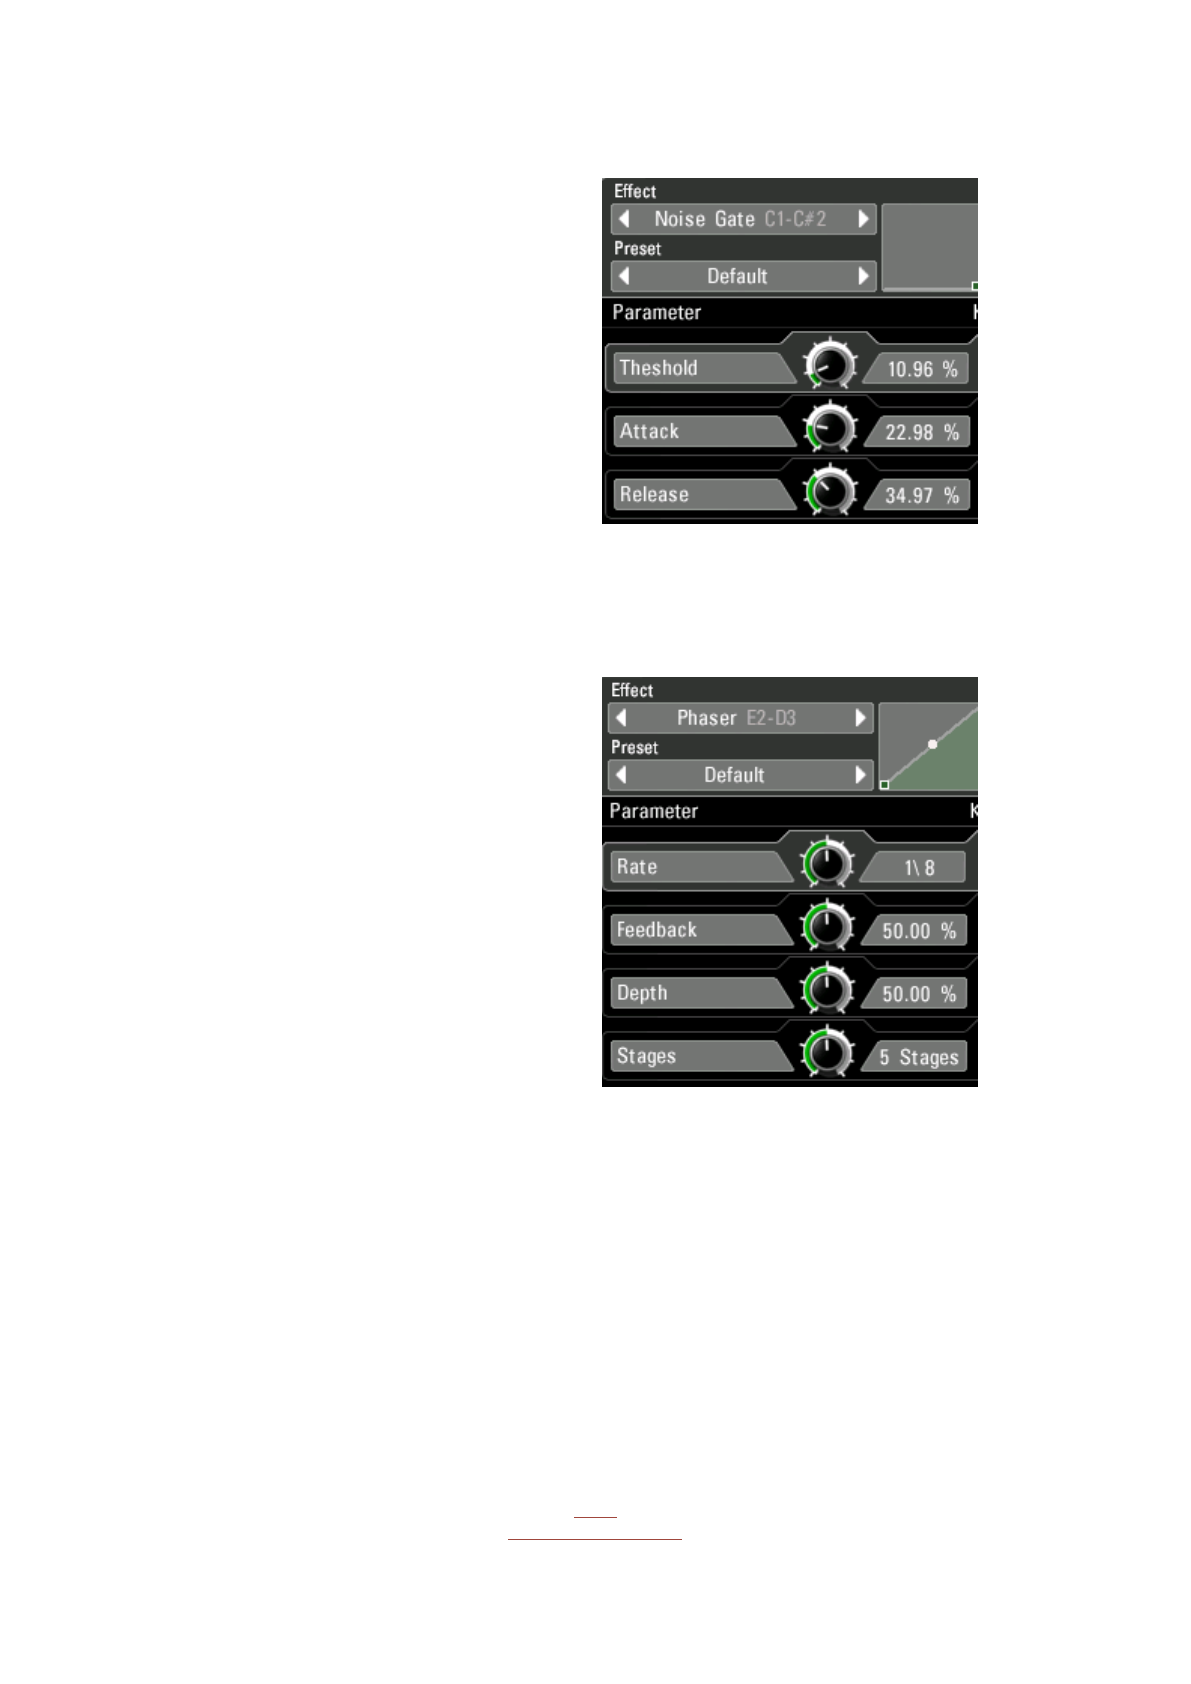
Noise Gate
A Noise Gate will let the Audio Signal pass
through only if its louder than the
Threshold Parameter. The Level cancelling
process is faded for a smooth
performance.
Threshold: The normalizing effect starts at
this level.
Attack/Release: Speed of the internal
loudness curve.
Modulation
Phaser
A warm and wide Phaser with up to 8
phasing stages.
Adds 70´s charme immediately.
Rate: Phasing speed.
Feedback: Internal feedback level. Adds
sharpness.
Depth: Phasing intensity.
Stages: Number of stacked phasing stages.
Back
to Table of Content

20
Flanger
Really nice Flanger, capable of all the well
known sounds.
Rate: Flanging speed.
Feedback: Internal feedback level. Adds
sharpness.
Depth: Flanging intensity.
Offset: Flanging timebase.
Width: Stereo widening.
Chorus
Warm and wide, with a feedback circuit for
sharp sounds.
Rate: Effect speed.
Feedback: Internal feedback level. Adds
sharpness.
Depth: Chorus intensity.
Width: Stereo widening.
Back
to Table of Content
21
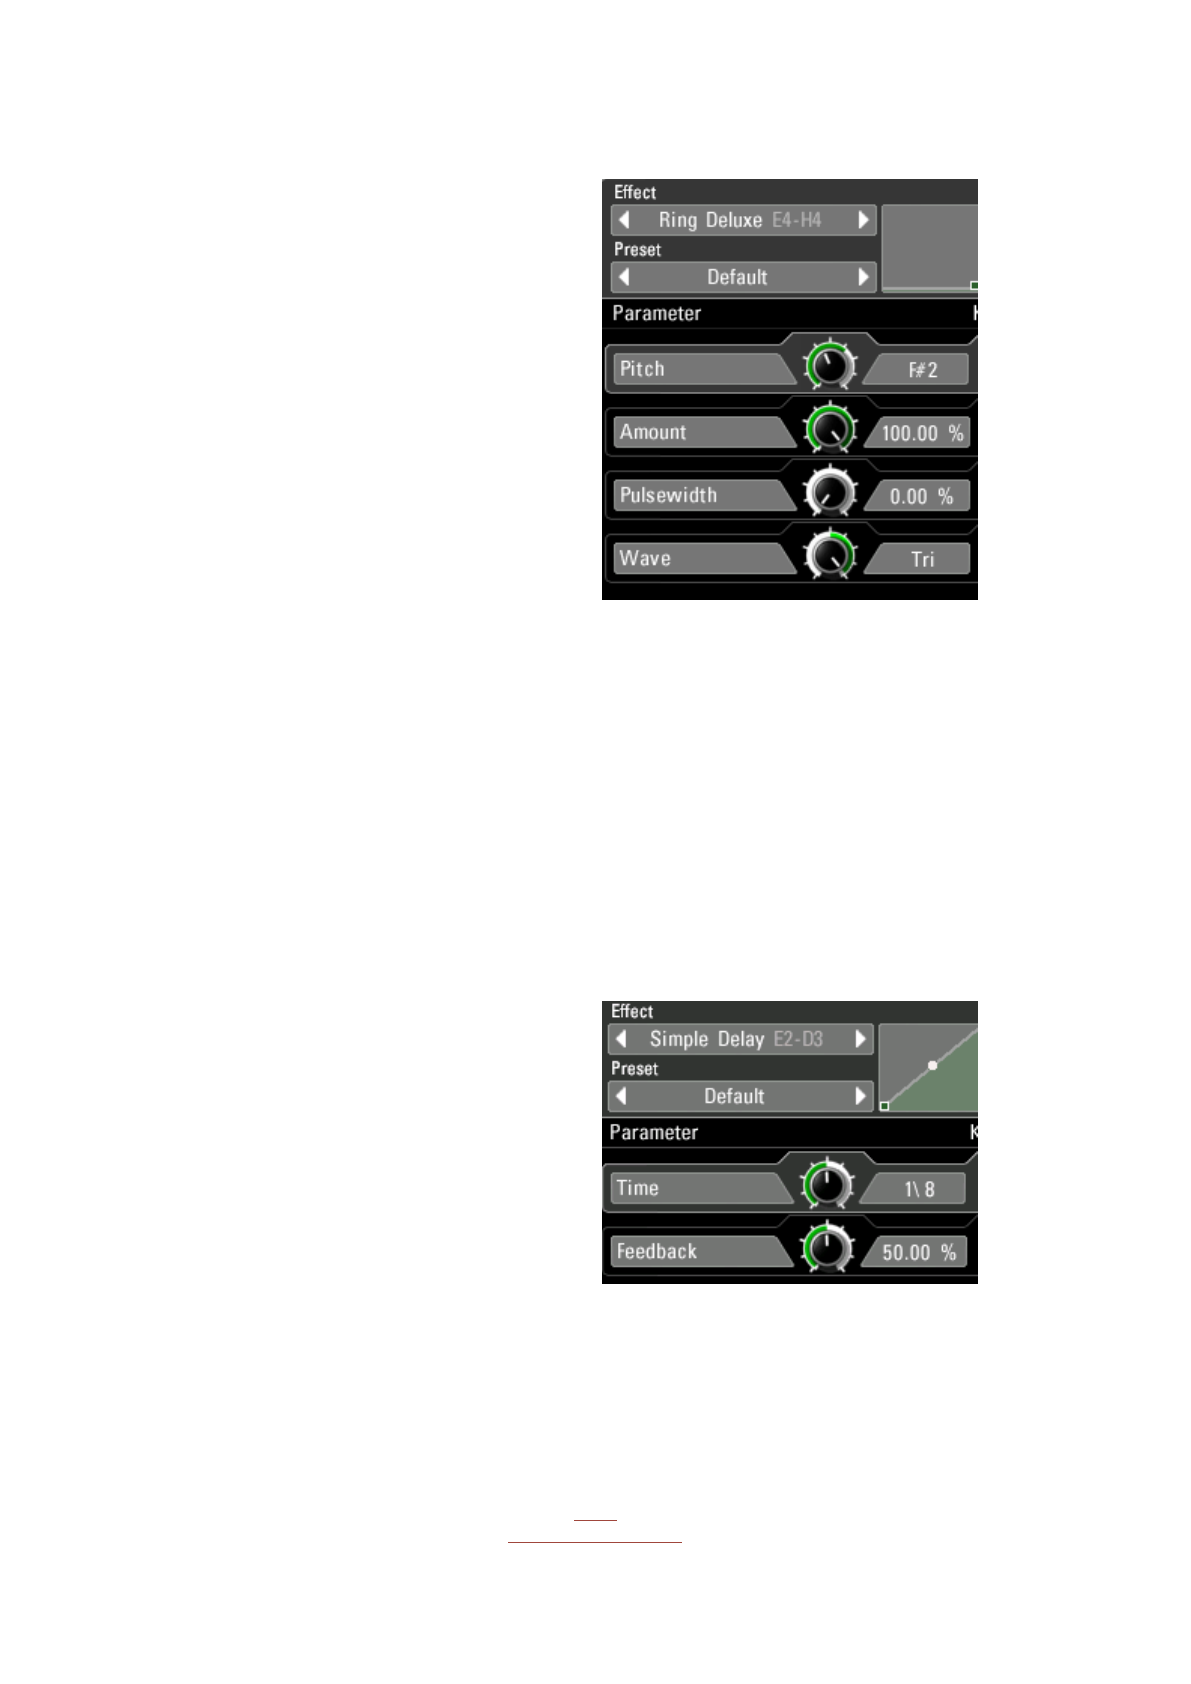
Ring Deluxe
The deluxe version of a ring modulator. A
free running oscillator controls the
amplitude of the incoming audio signal. The
possible sounds go from yummy tremolos to
wild FM-bleeps. Using the KeyTrack feature,
the oscillators pitch can be played on the
keybord, so the Ringmodulator can be
played like a synthesizer. Also the Universal
Modulator opens up new special FX worlds,
for example control the Pitch parameter
with an envelope follower to add interesting
special fx-sounds.
Pitch: Oscillator pitch in semitones.
Amount: Modulation intensity.
Pulsewidth: Pulsewidth of the oscillator
waveform. Use higher settings for a sharper
tone.
Wave: Oscillator Waveform, fades between
sine and triangle.
Delay
Simple Delay
A delay effect with synced delay times.
Time: Delaytime, in Sync to your song
tempo.
Feedback: Intensity of the internal feedback
circuit.
Back
to Table of Content

22
Diffusion Delay
A delay effect with individual delay times for
the left and right audio channels of a stereo
signal. The feedback circuits can be mixed
into each other.
TimeL/R: Delaytime in Sync to your song
tempo.
Feedback: Intensity of the internal feedback
circuit.
Feedback: Intensität der internen
Rückkopplung.
Diffusion: Amount of mixing the left and
right feedback channels into each other.
Filter Delay
A delay with a multimode filter. Modulate
the tone control with a LFO or the envelope
follower for deep space delay effects.
Time: Delaytime in Sync to your song tempo.
Feedback: Intensity of the internal feedback
circuit.
Tone: Filter cutoff.
Resonance: The signal level at the filters
cutoff frequency.
Back
to Table of Content
23
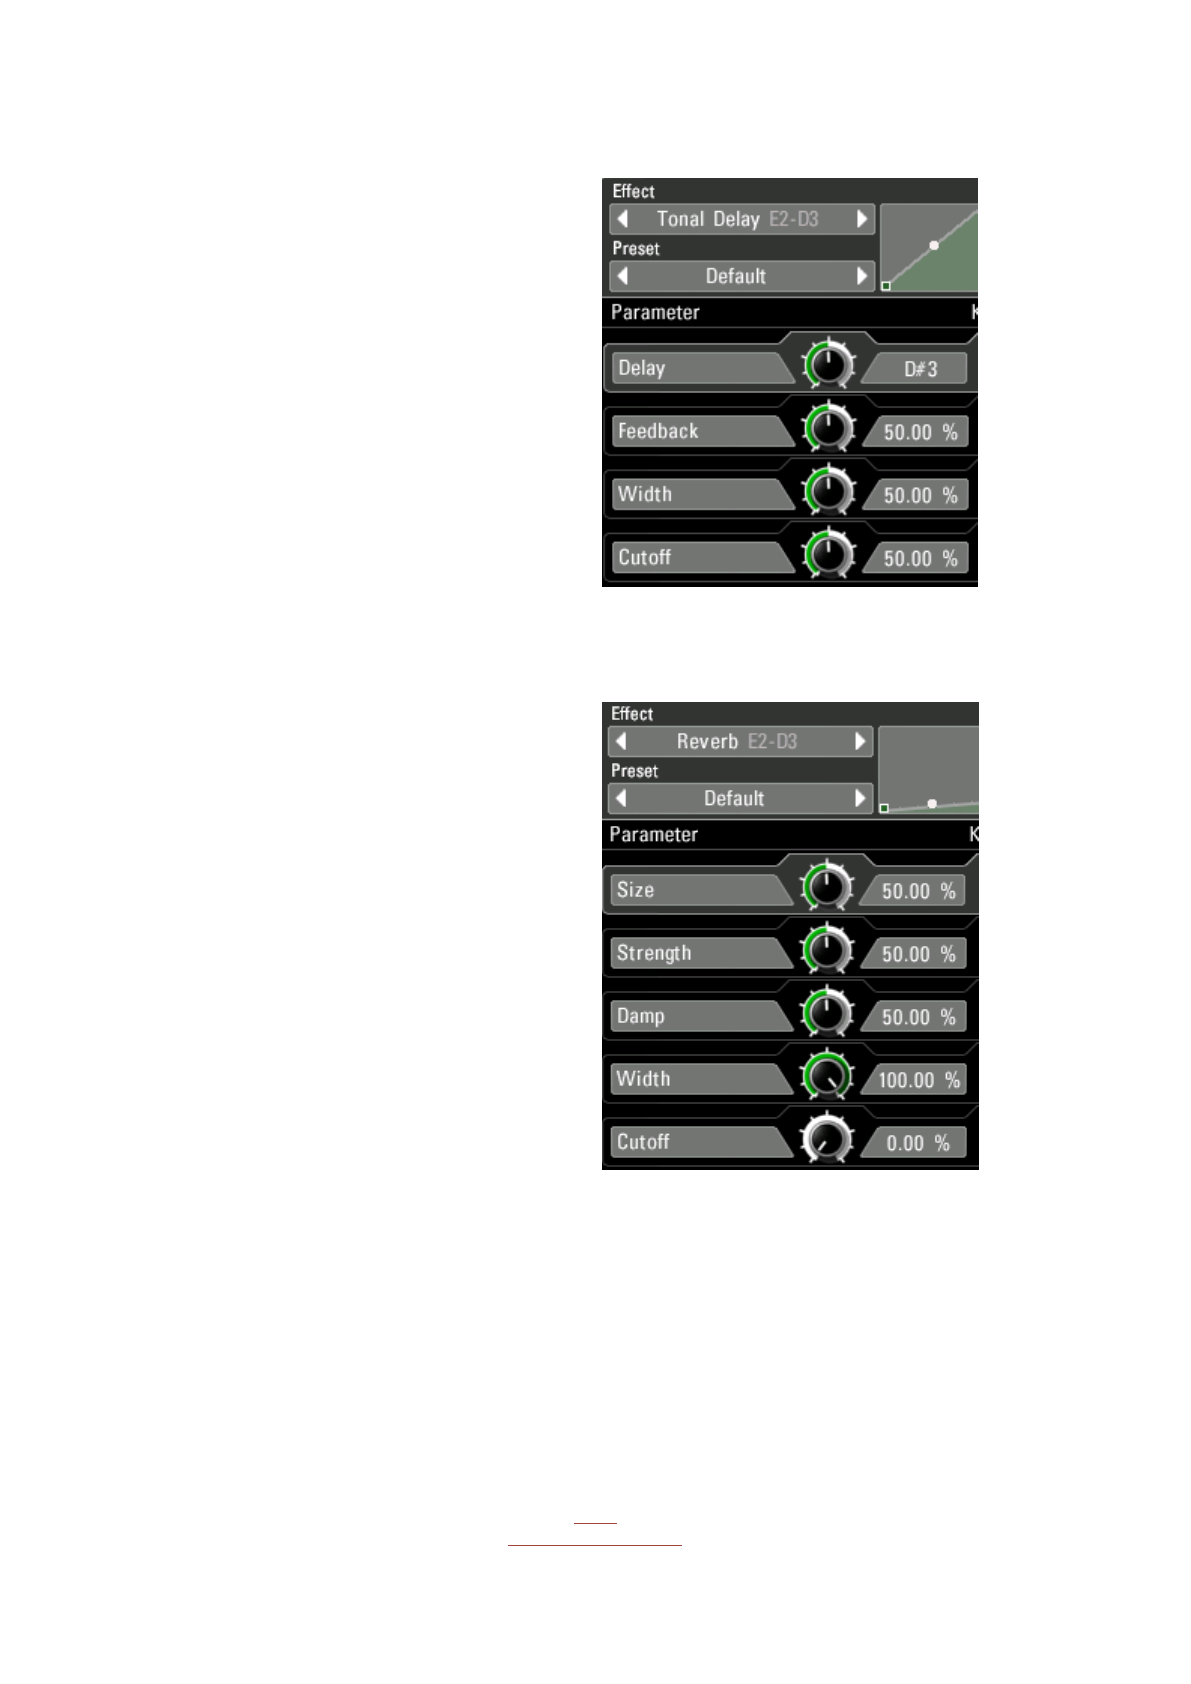
Tonal Delay
The delay times of this delay are converted
to pitch frequencies. Playing the pitch on the
keyboard using the KeyTrack feature, makes
a synthesizer out of any audio signal.
Pitch: Pitch frequency of the delay
algorithm.
Feedback: Internal feedback level. Use high
values for a clear tone.
Width: Stereo widening.
Cutoff: Highpass filter frequency.
Reverb
This special reverb features a main
reverberation room and different secondary
reverberation rooms in one unit. The
Universal Modulator opens up interesting
possibilities when used on strength or damp.
Size: Size of the main reverberation room.
Strength: Size and number of surrounded
reverberation rooms.
Damp: Damping effect introduced by
different wall materials.
Width: Stereo widening.
Cutoff: Cutoff frequency of the internal
highpass filter.
Back
to Table of Content

24
Reverb HQ
A new high quality reverb algorithm with a
rich and smooth sound that requires just a
few controls.
Room Size: Size of the reverberation room.
Reverb Time: Decay time of the reverb
signal.
Reflectivity: Determines the reflectivity of
the room walls.
Filter
Lowpass
Four cascaded Vintage Lowpass Filters, with
Overdrive.
The maximum intensity is 48db.
Cutoff: The filters cutoff frequency.
Resonance: Filter sharpness.
Strength: Strength of cascading. Goes from
12db-48db. High resonances and maximum
cascading introduce the overdrive.
Multi Filter
A warm sounding Vintage Filter with 5
algorithms, known from our Unique
Synthesizer.
Cutoff: The filters cutoff frequency.
Resonance: Filter sharpness.
Filter Type: Choose from 5 filter types here:
Highpass 2 Pole: only frequencies above the
cutoff frequency are heard.
Bandpass 2/4 Pole
: only the cutoff
frequency is heard.
Back
to Table of Content

25
Lowpass 4 Pole: only frequencies below the
cutoff are heard.
Comb Filter: is based on a feedback
algorithm with delaytimes that correspond
to filter frequencies.
Vowel Filter
The Multi Filter, equipped with Vowel
Frequencies, as used in our Unique
Synthesizer. Two vowel frequencies can be
chosen and you can mix between them.
Vowel A/B: The Vowel frequencies. Choose
one for A and one for B.
Vowel Mix: Crossfade between Freq A and
Freq B. Modulate this one with the Universal
Modulator.
Resonance: Filter sharpness.
Filter Type: Choose from 5 filter types here:
Highpass 2 Pole: only frequencies above the
cutoff frequency are heard.
Bandpass 2/4 Pole: only the cutoff frequency
is heard.
Lowpass 4 Pole: only frequencies below the
cutoff are heard.
Comb Filter: is based on a feedback
algorithm with delaytimes that correspond
to filter frequencies.
Back
to Table of Content
26
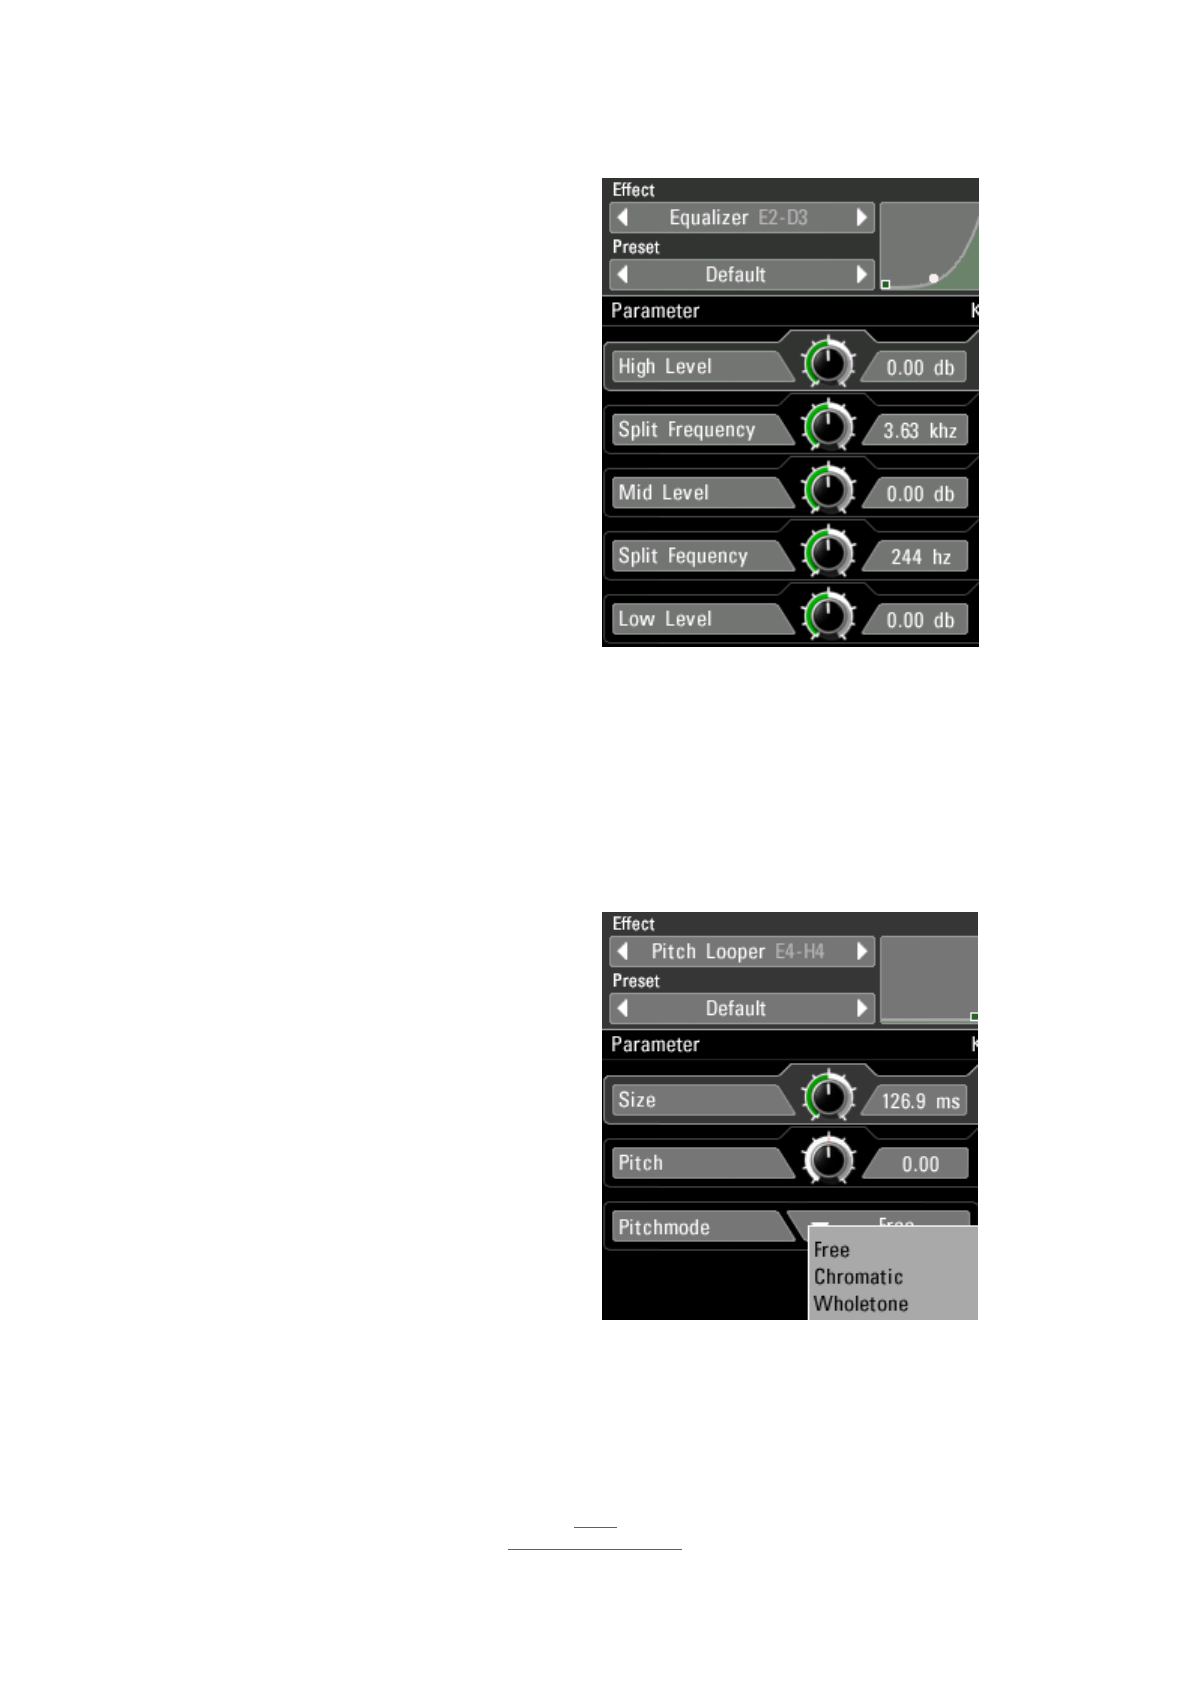
Equalizer
A parametric 3band EQ. The signal is splitted
into three frequency bands. The split
frequency can be controlled and the level of
each band can be controlled individually.
Using the Envelope Follower from the
Universal Modulator, you can create very
cool multiband compressors.
High Level: Level of the high frequency
band.
High Split: Split frequency between high and
mid band.
Mid Level: Level of the mid frequency band.
Low Split: Split frequency between mid and
low band.
Low Level: Level of the low frequency band.
Granular
Pitch Looper
This effect records the audio signal and
loops the recording as long as you hold the
key.
Additionally, the loop can be pitched +-24
semitones.
Size: Loop length.
Pitch: Pitch of the looped signal.
Pitch Mode: Different working modes of the
Pitch knob.
Free: means continuous pitch changes
without stepping.
Chromatic: gives you a stepping in
semitones.
Wholetone: gives you a stepping in whole
tones.
Back
to Table of Content

27
Timestretcher
A loop becomes sampled and is then played
back timestretched by the given factor
without affecting the pitch of the audio
signal.
Amount: Playback speed factor. 100% is full
speed, 50% means half speed, 0% is full
stop.
Grainsize: Grain resolution. Much stretching
requires a bigger grainsize while lees
stretching requires a smaller grainsize.
XFade: Fading time and amount for the
crossfade between loop start and loop end.
Scratch Looper
It plays the loop forward and backward like
scratching a vinyl record. You can have
different speeds for fwd and bwd spin and
individual slopes for the spinning change
between fwd and bwd and vice versa. This a
very complex effect where all parameters
interact with each other, opening new
worlds of scratching your audio signals.
Size: defines the size of the looping buffer. It
works in tempo values, so you can easily
decide how long the loop will be.
Fwd Spin: Determines the FWD playback
speed.
Fwd Slope: Controls the FWD playback
acceleration curve. Actually this setting
emulates the different acceleration styles of
the scratching hand.
Bwd Spin: Determines the BWD playback
speed.
Bwd Slope: Controls the BWD playback
acceleration curve. Actually this setting
emulates the different acceleration styles of
the scratching hand.
Back
to Table of Content

28
Looper
This effect records the audio signal and
loops the recording as long as you hold the
key.
For live looping sessions we recommend to
use Key Quantize, which will fit your playing
to select the sync grid. the Key Quantize
feature can be found in the Effect Head
Size: Loop length.
Direction: Speed and Direction of the looped
signal.
XFade: Fading time and amount for the
crossfade between loop start and loop end.
Steplooper
This effect records the audio signal
constantly and loops each part of it for a
number of times. So as long as you hold the
key, this looper is stepping along with your
track.
Size: Length of a single loop.
Count: Number of times one loop is played
until the next loop starts.
XFade: Fading time and amount for the
crossfade between loop start and loop end.
Reverser
This effect records the signal, cuts it into
snippets and plays these backwards
constantly.
Size: Defines the recording and playback
time of one reversing snippet.
XFade: Fading time and amount for the
crossfade between loop start and loop end.
Back
to Table of Content

29
Turntable
The audiosignal is stopped or started with a
certain acceleration when you activate this
effect.
Time: Time needed for the complete stop or
the complete speeding up.
Player Mode: Choose between two
turntable modes:
Stop: The audio signal is breaking down until
it stops. As long as the effect is active, the
signal remains stopped.
Start: Starting from silence, the audio signal
is accelerated until it reaches the current
speed. The audio signal jumps to its original
playing position when the effect becomes
inactive.
Tonal Looper
A looping effect with very short looping
times which represent pitch frequencies.
Pitch: Tonal frequency of the loopsize,
makes an oscillator out of any audio signal.
Direction: Playback and direction speed of
the looped signal.
XFade: Fading time and amount for the
crossfade between loop start and loop end.
Back
to Table of Content

30
Special
Overdrive
A warm and crunchy overdrive. Will take
your audio to the front of the mix. Use
several stages together with some filters
for unlimited signal smashing!
Drive: Overdrive intensity, enters distortion
at higher settings.
Harmonics: Odd harmonics are added at
lower settings, even harmonics are
introduced at higher settings.
Pitcher
A pitching effect that goes from -12 bis +12
semitones.
Pitch: Transposing factor in semitones.
Retro
Bit Depth: Bitcrushing-intensity.
Sample Rate: Amount of samplerate
reduction.
Back
to Table of Content

31
Karaoke
M/S mixing effect. The levels of the stereo
center and the stereo sides can be
controlled individually here. If you take the
stereo center down, the main voice of a
recording disappears, which makes the
karaoke effect.
Center Level: Loudness of the absolute
stereo center.
Edge Level: Loudness of left and right side-
signals of a stereo signal.
Vocoder
Ultra analog sounding 32-band vocoder. A
synthesizer is already integrated, so the
vocoding effect can be used rightaway.
The vocoding effect is played on the
keyboard, so the keyzone for this effect
must be large enough.
Focus: The resolution of the spectral band
separation can be increased at a certain
frequency to have more attention on
important frequency ranges.
Shift: The frequencies of Carrier and
Modulator can be offsetted with each other
which introduce formant shifting effects.
Response: Intensity of bandsplitting and
transient translation. Lower settings are
recommended for mellow pads and
percussions, higher settings fit best for
vocals.
Synth Wave: Waveform used by the internal
synthesizer.
Synth Octave: Base Octave of the Vocoder
key zone.
Back
to Table of Content

32
Host Integration
Logic
Use Artillery2 as MIDI Controlled FX. Pick it up on an Instrument Track and choose it from
the MIDI Controlled FX list in the Plugins menu in the I/O slot.
Then, in the sidechain menu in the upper right corner, select the Audio track or Bus that
you want to use with Artillery2.
Then, in the Logic mixer, turn down the level of the audio track that you selected in the
Artillery2 sidechain menu.
Back
to Table of Content

33
Live
In Live it's highly recommended to use the VST version. The installer will ask you for the
VST2/VST3 plugins folder. Make sure you set the VST Plugins folder that Live is using. Please
have a look in your VST folder and check whether the Artillery2.dll/ Artillery2.vst3 (Win) or
Artillery2.vst/ Artillery2.vst3 (macOS) file is present beside your other VST's.
At least in Live it can happen that a plugin gets marked as unloadable and will not be
rescanned automatically. You have to force a rescan by unchecking and checking the 'Use
custom VST Folder' checkbox in Preferences/File Folder/Plug-In Sources.
Use Artillery2 as Insert Effect on an Audio Track.
Now create a MIDI track and send the MIDI signal to the audio track with Artillery2 loaded.
You can now play Artillery2 live, sending MIDI to the MIDI track, or using MIDI clips.
Back
to Table of Content

34
Cubase
Go to the Cubase plugin manager and make a full rescan there. Ensure that the Artillery2.dll/
Artillery2.vst3 (Win) or Artillery2.vst/ Artillery2.vst3 (macOS) file is in Cubase's assigned VST
Plugins folder. Use Artillery2 as insert or send effect. Pick it up from the VST Effects list.
Now create a MIDI track and choose Artillery2 as MIDI out target for the MIDI track.
Now you can play Artillery2 with your MIDI keyboard and record/draw nice effect
sequences in the MIDI track.
Studio One
Go to the Studio One menu and choose Options, click on Locations, then VST Plug-Ins.
Click the Add button and select your VST
Plugin folder. Press OK then close and re-
open Studio One. If you still don’t see your
plugin, go back into that screen and click
the “reset blacklist” button, then close and
open Studio One again.
Back
to Table of Content

35
Pick it up from the VST Effects list.
Create an instrument track and choose Artillery2 as MIDI out target for that track.
Pro Tools
Use Artillery2 as Insert Effect on an Audio Track.
Now create a MIDI track and send the MIDI signal to the audio track with Artillery2 loaded.
You can now play Artillery2 live, sending MIDI to the MIDI track, or using MIDI clips.
Back
to Table of Content

37
Then you will have a MIDI track assigned to it and from now on you can route a MIDI track
to Artillery2 so that Artillery2 can receive MIDI via this track.
(If you should try to trigger a note which is out of the keys or haven't drawn a MIDI note in
the Key Editor there might be no sound.)
FL Studio
Plugin Artillery2 in the mixer section of your audio track (here it is insert1)
Back
to Table of Content
39
MIDI Remote
All relevant Artillery2 parameters can be controlled via Host Automation.
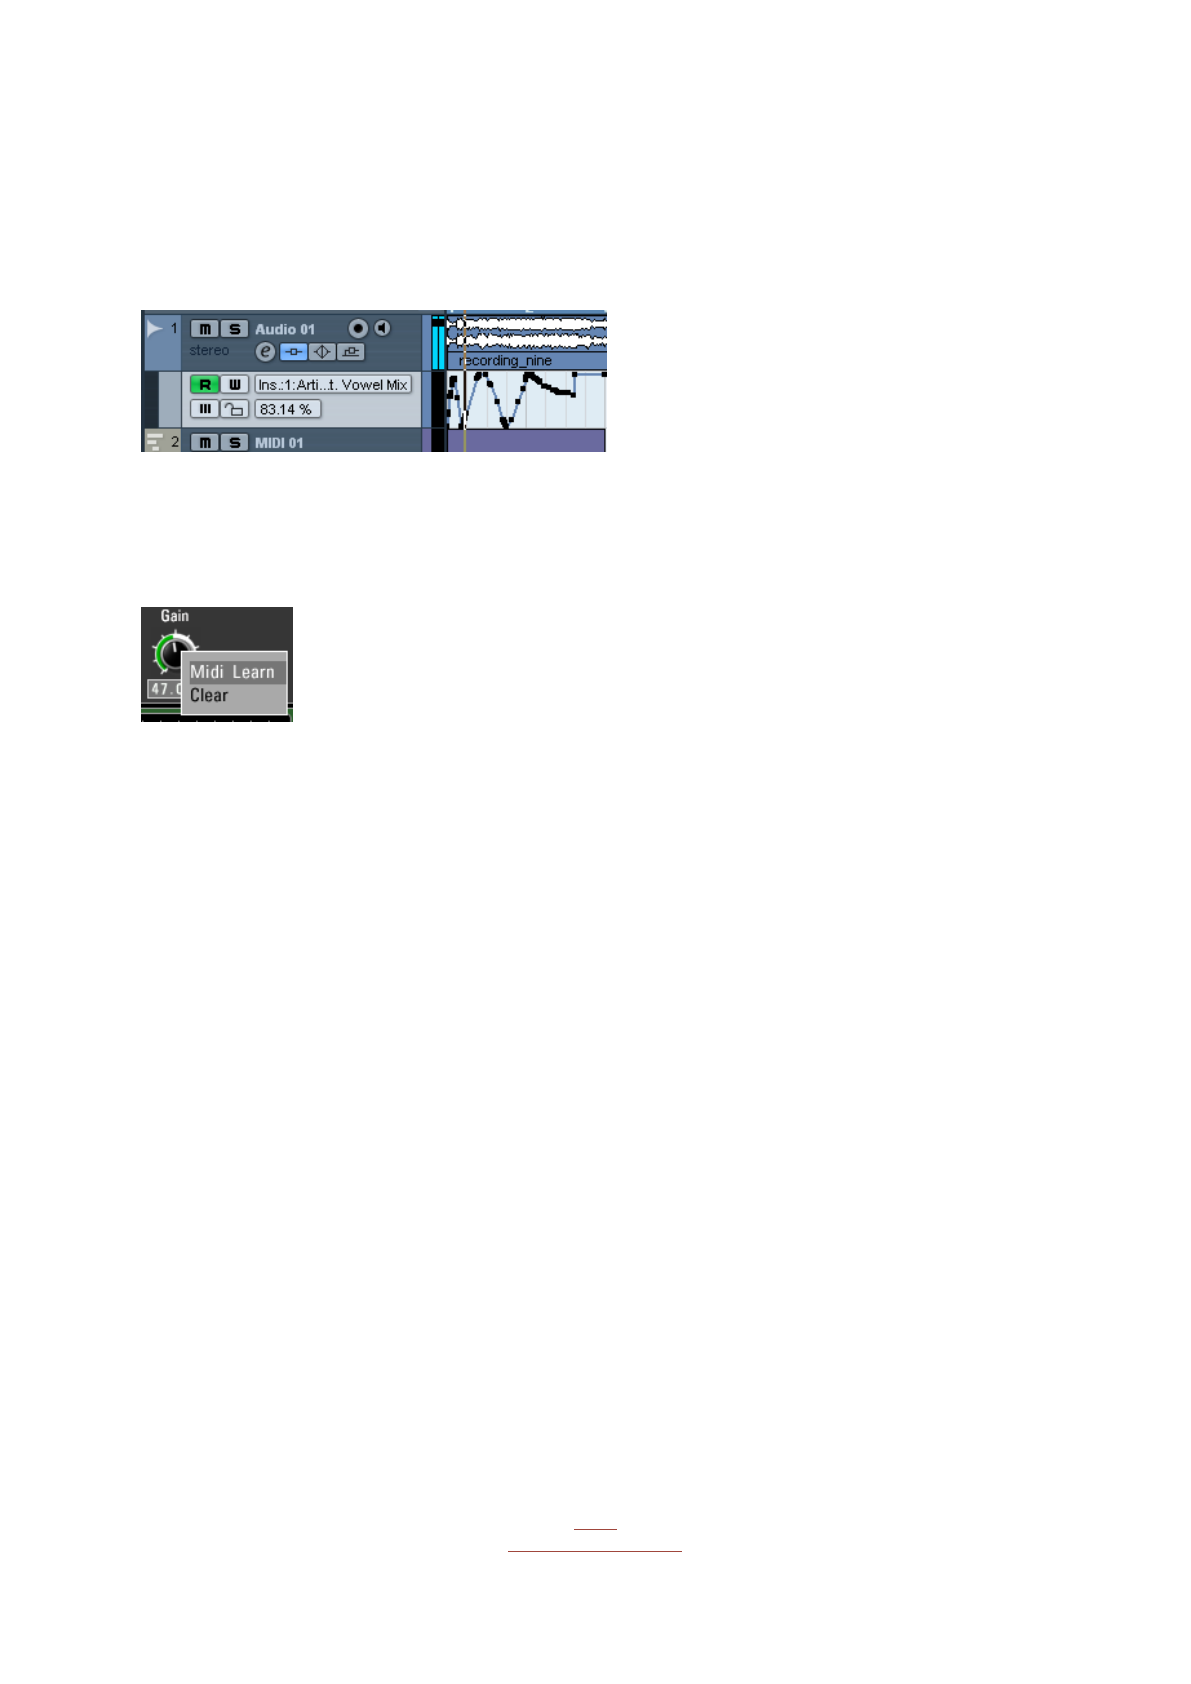
All relevant Artillery2 controls can be remoted via MIDI controllers.
You find the MIDI Learn function when you right click a control.
MIDI Program Change
Create a Folder called 'Midi Programs' beside the Factory Preset folder.
Path should be like this:
Documents/Sugar Bytes/Artillery2/Presets/Midi Programs/
Put the preset you want to call in that folder.
You have to restart Artillery2 after copying files into that folder in order to reflect the
changes.
Deactivate the "Ignore Programchange " option in the Artillery2 About
Screen.
All presets in the Midi Programs Folder can be called with MIDI Program Change
messages now.
They should load via program change according to their alphabetical order.
Back
to Table of Content

40
Questions?
Artillery2 makes no sound
The Demo could be timed out or the serial number could be wrong. Both issues will be
displayed in the interface, left beside the Artillery About Screen.
Have I found a bug?
Please write to [email protected]
Impressum
Sugar Bytes GmbH | Made of passion
Robert Fehse, Rico Baade | Greifswalder Str. 29 | 10405 Berlin, Germany
Tel. +493060920395 | Str.-Nr. 37/207/21266 | HR-Nr. HRB 124199 B
Back
to Table of Content


