
Salesforce DX Developer Guide
Version 61.0, Summer ’24
Last updated: August 2, 2024
©
Copyright 2000–2024 Salesforce, Inc. All rights reserved. Salesforce is a registered trademark of Salesforce, Inc., as are other
names and marks. Other marks appearing herein may be trademarks of their respective owners.

CONTENTS
Chapter 1: How Salesforce Developer Experience (DX) Tooling Changes the Way You
Work . . . . . . . . . . . . . . . . . . . . . . . . . . . . . . . . . . . . . . . . . . . . . . . . . . . . . . . . . . . . . . 1
Use a Sample Repo to Get Started . . . . . . . . . . . . . . . . . . . . . . . . . . . . . . . . . . . . . . . . . . 3
Create an Application . . . . . . . . . . . . . . . . . . . . . . . . . . . . . . . . . . . . . . . . . . . . . . . . . . . 4
Migrate or Import Existing Source . . . . . . . . . . . . . . . . . . . . . . . . . . . . . . . . . . . . . . . . . . . 5
Release Notes . . . . . . . . . . . . . . . . . . . . . . . . . . . . . . . . . . . . . . . . . . . . . . . . . . . . . . . . 5
Chapter 2: Provide Developers Access to Salesforce DX Tools . . . . . . . . . . . . . . . . . . . 6
Select and Enable a Dev Hub Org . . . . . . . . . . . . . . . . . . . . . . . . . . . . . . . . . . . . . . . . . . . 7
Enable Unlocked Packaging . . . . . . . . . . . . . . . . . . . . . . . . . . . . . . . . . . . . . . . . . . . 8
Enable Source Tracking in Sandboxes . . . . . . . . . . . . . . . . . . . . . . . . . . . . . . . . . . . . 8
Enable Einstein Chatbot Features in Scratch Orgs . . . . . . . . . . . . . . . . . . . . . . . . . . . . . 8
Enable Language Extension Packages (Beta) . . . . . . . . . . . . . . . . . . . . . . . . . . . . . . . . 9
Add Salesforce DX Users . . . . . . . . . . . . . . . . . . . . . . . . . . . . . . . . . . . . . . . . . . . . . . . . 9
Determine Which License to Assign to Dev Hub Users . . . . . . . . . . . . . . . . . . . . . . . . . 10
Add a System Administrator or Standard User to Your Dev Hub Org . . . . . . . . . . . . . . . . 11
Add a Developer User to Your Dev Hub Org . . . . . . . . . . . . . . . . . . . . . . . . . . . . . . . . 11
Add a Limited Access User to Your Dev Hub Org . . . . . . . . . . . . . . . . . . . . . . . . . . . . 12
Create and Assign a Permission Set to Developer Users . . . . . . . . . . . . . . . . . . . . . . . 12
Chapter 3: Project Setup . . . . . . . . . . . . . . . . . . . . . . . . . . . . . . . . . . . . . . . . . . . . . . 14
Sample Repository on GitHub . . . . . . . . . . . . . . . . . . . . . . . . . . . . . . . . . . . . . . . . . . . . . 15
Create a Salesforce DX Project . . . . . . . . . . . . . . . . . . . . . . . . . . . . . . . . . . . . . . . . . . . . 15
Salesforce DX Project Structure and Source Format . . . . . . . . . . . . . . . . . . . . . . . . . . . . . . . 16
How to Exclude Source When Syncing . . . . . . . . . . . . . . . . . . . . . . . . . . . . . . . . . . . . . . . 21
Create a Salesforce DX Project from Existing Source . . . . . . . . . . . . . . . . . . . . . . . . . . . . . . 25
Convert Files in Metadata Format to Source Format . . . . . . . . . . . . . . . . . . . . . . . . . . . . . . 27
Salesforce DX Usernames and Orgs . . . . . . . . . . . . . . . . . . . . . . . . . . . . . . . . . . . . . . . . 28
Link a Namespace to a Dev Hub Org . . . . . . . . . . . . . . . . . . . . . . . . . . . . . . . . . . . . . . . 30
Salesforce DX Project Configuration . . . . . . . . . . . . . . . . . . . . . . . . . . . . . . . . . . . . . . . . . 31
Multiple Package Directories . . . . . . . . . . . . . . . . . . . . . . . . . . . . . . . . . . . . . . . . . . . . . 34
Replace Strings in Code Before Deploying or Packaging . . . . . . . . . . . . . . . . . . . . . . . . . . . 37
Test String Replacements . . . . . . . . . . . . . . . . . . . . . . . . . . . . . . . . . . . . . . . . . . . . 41
Chapter 4: Authorization . . . . . . . . . . . . . . . . . . . . . . . . . . . . . . . . . . . . . . . . . . . . . . 42
Authorize an Org Using a Browser . . . . . . . . . . . . . . . . . . . . . . . . . . . . . . . . . . . . . . . . . 43
Authorize an Org Using the JWT Flow . . . . . . . . . . . . . . . . . . . . . . . . . . . . . . . . . . . . . . . 44
Authorize a Scratch Org Using the JWT Flow . . . . . . . . . . . . . . . . . . . . . . . . . . . . . . . 45
Authorize an Org Using Its SFDX Authorization URL . . . . . . . . . . . . . . . . . . . . . . . . . . . . . . 46
Create a Private Key and Self-Signed Digital Certificate . . . . . . . . . . . . . . . . . . . . . . . . . . . . 46
Create a Connected App in Your Org . . . . . . . . . . . . . . . . . . . . . . . . . . . . . . . . . . . . . . . . 47
Use the Default Connected App Securely . . . . . . . . . . . . . . . . . . . . . . . . . . . . . . . . . . . . . 49
Use an Existing Access Token . . . . . . . . . . . . . . . . . . . . . . . . . . . . . . . . . . . . . . . . . . . . 49
Authorization Information for an Org . . . . . . . . . . . . . . . . . . . . . . . . . . . . . . . . . . . . . . . . 50
Log Out of an Org . . . . . . . . . . . . . . . . . . . . . . . . . . . . . . . . . . . . . . . . . . . . . . . . . . . . 52
Chapter 5: Metadata Coverage . . . . . . . . . . . . . . . . . . . . . . . . . . . . . . . . . . . . . . . . 53
Chapter 6: Scratch Orgs . . . . . . . . . . . . . . . . . . . . . . . . . . . . . . . . . . . . . . . . . . . . . . 54
Supported Scratch Org Editions and Allocations . . . . . . . . . . . . . . . . . . . . . . . . . . . . . . . . 57
Build Your Own Scratch Org Definition File . . . . . . . . . . . . . . . . . . . . . . . . . . . . . . . . . . . . 58
Scratch Org Features . . . . . . . . . . . . . . . . . . . . . . . . . . . . . . . . . . . . . . . . . . . . . . . 62
Scratch Org Settings . . . . . . . . . . . . . . . . . . . . . . . . . . . . . . . . . . . . . . . . . . . . . . . 133
Create a Scratch Org Based on an Org Shape . . . . . . . . . . . . . . . . . . . . . . . . . . . . . . . . . 134
Enable Org Shape for Scratch Orgs . . . . . . . . . . . . . . . . . . . . . . . . . . . . . . . . . . . . . 135
Org Shape Permissions . . . . . . . . . . . . . . . . . . . . . . . . . . . . . . . . . . . . . . . . . . . . 136
Create and Manage Org Shapes . . . . . . . . . . . . . . . . . . . . . . . . . . . . . . . . . . . . . . 137
Scratch Org Definition for Org Shape . . . . . . . . . . . . . . . . . . . . . . . . . . . . . . . . . . . . 137
Troubleshoot Org Shape . . . . . . . . . . . . . . . . . . . . . . . . . . . . . . . . . . . . . . . . . . . . 139
Create Scratch Orgs . . . . . . . . . . . . . . . . . . . . . . . . . . . . . . . . . . . . . . . . . . . . . . . . . . . 141
Scratch Org Snapshots . . . . . . . . . . . . . . . . . . . . . . . . . . . . . . . . . . . . . . . . . . . . . . . . 144
Get Started with Scratch Org Snapshots . . . . . . . . . . . . . . . . . . . . . . . . . . . . . . . . . . 145
Salesforce CLI Snapshot Commands . . . . . . . . . . . . . . . . . . . . . . . . . . . . . . . . . . . . 146
Create a Scratch Org Snapshot . . . . . . . . . . . . . . . . . . . . . . . . . . . . . . . . . . . . . . . 147
Create a Snapshot for Use with Namespaced Scratch Orgs . . . . . . . . . . . . . . . . . . . . 148
Create a Scratch Org Based on a Snapshot . . . . . . . . . . . . . . . . . . . . . . . . . . . . . . . 148
Manage and Maintain Your Snapshots . . . . . . . . . . . . . . . . . . . . . . . . . . . . . . . . . . 150
Select the Salesforce Release for a Scratch Org . . . . . . . . . . . . . . . . . . . . . . . . . . . . . . . . . 151
Deploy Source From Your Project to the Scratch Org . . . . . . . . . . . . . . . . . . . . . . . . . . . . . 153
Retrieve Source from the Scratch Org to Your Project . . . . . . . . . . . . . . . . . . . . . . . . . . . . . 155
Scratch Org Users . . . . . . . . . . . . . . . . . . . . . . . . . . . . . . . . . . . . . . . . . . . . . . . . . . . . 157
Create a Scratch Org User . . . . . . . . . . . . . . . . . . . . . . . . . . . . . . . . . . . . . . . . . . . 158
User Definition File for Customizing a Scratch Org User . . . . . . . . . . . . . . . . . . . . . . . 160
Generate or Change a Password for a Scratch Org User . . . . . . . . . . . . . . . . . . . . . . 161
Manage Scratch Orgs from the Dev Hub Org . . . . . . . . . . . . . . . . . . . . . . . . . . . . . . . . . 162
Scratch Org Error Codes . . . . . . . . . . . . . . . . . . . . . . . . . . . . . . . . . . . . . . . . . . . . . . . . 163
Chapter 7: Sandboxes . . . . . . . . . . . . . . . . . . . . . . . . . . . . . . . . . . . . . . . . . . . . . . . 165
Authorize Your Production Org . . . . . . . . . . . . . . . . . . . . . . . . . . . . . . . . . . . . . . . . . . . 166
Create a Sandbox Definition File . . . . . . . . . . . . . . . . . . . . . . . . . . . . . . . . . . . . . . . . . . 166
Create, Clone, or Refresh a Sandbox . . . . . . . . . . . . . . . . . . . . . . . . . . . . . . . . . . . . . . . 168
Chapter 8: Track Changes Between Your Project and Org . . . . . . . . . . . . . . . . . . . . 172
Manage Source Tracking for Your org . . . . . . . . . . . . . . . . . . . . . . . . . . . . . . . . . . . . . . 173
Contents
Preview Changes Identified by Source Tracking . . . . . . . . . . . . . . . . . . . . . . . . . . . . . . . . 174
Deploy and Retrieve Changes Identified by Source Tracking . . . . . . . . . . . . . . . . . . . . . . . . 175
Retrieve Changes to Profiles with Source Tracking . . . . . . . . . . . . . . . . . . . . . . . . . . . 178
Resolve Conflicts Between Your Local Project and Org . . . . . . . . . . . . . . . . . . . . . . . . . . . . 179
Best Practices . . . . . . . . . . . . . . . . . . . . . . . . . . . . . . . . . . . . . . . . . . . . . . . . . . . . . . . 180
Performance Considerations of Source Tracking . . . . . . . . . . . . . . . . . . . . . . . . . . . . . . . . 181
Chapter 9: Development . . . . . . . . . . . . . . . . . . . . . . . . . . . . . . . . . . . . . . . . . . . . . 182
Develop Against Any Org . . . . . . . . . . . . . . . . . . . . . . . . . . . . . . . . . . . . . . . . . . . . . . . 184
Assign a Permission Set . . . . . . . . . . . . . . . . . . . . . . . . . . . . . . . . . . . . . . . . . . . . . . . . 187
Ways to Add Data to Your Org . . . . . . . . . . . . . . . . . . . . . . . . . . . . . . . . . . . . . . . . . . . 188
Example: Export and Import Data Between Orgs . . . . . . . . . . . . . . . . . . . . . . . . . . . . 189
Create Lightning Apps and Aura Components . . . . . . . . . . . . . . . . . . . . . . . . . . . . . . . . . 190
Create Lightning Web Components . . . . . . . . . . . . . . . . . . . . . . . . . . . . . . . . . . . . . . . . 191
Create an Apex Class . . . . . . . . . . . . . . . . . . . . . . . . . . . . . . . . . . . . . . . . . . . . . . . . . 191
Create an Apex Trigger . . . . . . . . . . . . . . . . . . . . . . . . . . . . . . . . . . . . . . . . . . . . . . . . 192
Create a Custom Object . . . . . . . . . . . . . . . . . . . . . . . . . . . . . . . . . . . . . . . . . . . . . . . . 193
Execute Anonymous Apex . . . . . . . . . . . . . . . . . . . . . . . . . . . . . . . . . . . . . . . . . . . . . . 194
Run Apex Tests . . . . . . . . . . . . . . . . . . . . . . . . . . . . . . . . . . . . . . . . . . . . . . . . . . . . . . 195
Debug Apex . . . . . . . . . . . . . . . . . . . . . . . . . . . . . . . . . . . . . . . . . . . . . . . . . . . . 197
Generate and View Apex Debug Logs . . . . . . . . . . . . . . . . . . . . . . . . . . . . . . . . . . 198
Chapter 10: Build and Release Your App . . . . . . . . . . . . . . . . . . . . . . . . . . . . . . . . . 200
Build and Release Your App with Metadata API . . . . . . . . . . . . . . . . . . . . . . . . . . . . . . . 202
Develop and Test Changes Locally . . . . . . . . . . . . . . . . . . . . . . . . . . . . . . . . . . . . . 204
Build and Test the Release Artifact . . . . . . . . . . . . . . . . . . . . . . . . . . . . . . . . . . . . . 205
Test the Release Artifact in a Staging Environment . . . . . . . . . . . . . . . . . . . . . . . . . . 205
Release Your App to Production . . . . . . . . . . . . . . . . . . . . . . . . . . . . . . . . . . . . . . 206
Cancel a Metadata Deployment . . . . . . . . . . . . . . . . . . . . . . . . . . . . . . . . . . . . . . 206
Chapter 11: Unlocked Packages . . . . . . . . . . . . . . . . . . . . . . . . . . . . . . . . . . . . . . . 207
What’s an Unlocked Package? . . . . . . . . . . . . . . . . . . . . . . . . . . . . . . . . . . . . . . . . . . . 208
Package-Based Development Model . . . . . . . . . . . . . . . . . . . . . . . . . . . . . . . . . . . . . . 208
Before You Create Unlocked Packages . . . . . . . . . . . . . . . . . . . . . . . . . . . . . . . . . . . . . 209
Know Your Orgs . . . . . . . . . . . . . . . . . . . . . . . . . . . . . . . . . . . . . . . . . . . . . . . . . . . . 209
Create Org-Dependent Unlocked Packages . . . . . . . . . . . . . . . . . . . . . . . . . . . . . . . . . . 210
Workflow for Unlocked Packages . . . . . . . . . . . . . . . . . . . . . . . . . . . . . . . . . . . . . . . . . . 211
Configure Unlocked Packages . . . . . . . . . . . . . . . . . . . . . . . . . . . . . . . . . . . . . . . . . . . 212
Project Configuration File for Unlocked Packages . . . . . . . . . . . . . . . . . . . . . . . . . . . 213
Unlocked Packaging Keywords . . . . . . . . . . . . . . . . . . . . . . . . . . . . . . . . . . . . . . . 218
Package Installation Key . . . . . . . . . . . . . . . . . . . . . . . . . . . . . . . . . . . . . . . . . . . . 219
Extract Dependency Information from Unlocked Packages . . . . . . . . . . . . . . . . . . . . . 220
Understanding Namespaces . . . . . . . . . . . . . . . . . . . . . . . . . . . . . . . . . . . . . . . . 221
Share Release Notes and Post-Install Instructions . . . . . . . . . . . . . . . . . . . . . . . . . . . 225
Contents
Specify Unpackaged Metadata or Apex Access for Apex Tests (Unlocked Packages) . . . 226
Best Practices for Unlocked Packages . . . . . . . . . . . . . . . . . . . . . . . . . . . . . . . . . . 227
Package IDs and Aliases for Unlocked Packages . . . . . . . . . . . . . . . . . . . . . . . . . . . 227
Frequently Used Unlocked Packaging Operations . . . . . . . . . . . . . . . . . . . . . . . . . . 228
How We Handle Profile Settings in Unlocked Packages . . . . . . . . . . . . . . . . . . . . . . . . . . 228
Develop Unlocked Packages . . . . . . . . . . . . . . . . . . . . . . . . . . . . . . . . . . . . . . . . . . . . 230
Create and Update an Unlocked Package . . . . . . . . . . . . . . . . . . . . . . . . . . . . . . . . 231
Create New Versions of an Unlocked Package . . . . . . . . . . . . . . . . . . . . . . . . . . . . . 231
Code Coverage for Unlocked Packages . . . . . . . . . . . . . . . . . . . . . . . . . . . . . . . . . 236
Considerations for Promoting Packages with Dependencies . . . . . . . . . . . . . . . . . . . 237
Release an Unlocked Package . . . . . . . . . . . . . . . . . . . . . . . . . . . . . . . . . . . . . . . 238
Update an Unlocked Package Version . . . . . . . . . . . . . . . . . . . . . . . . . . . . . . . . . . 239
Hard-Deleted Components in Unlocked Packages . . . . . . . . . . . . . . . . . . . . . . . . . . 239
Delete an Unlocked Package or Package Version . . . . . . . . . . . . . . . . . . . . . . . . . . 244
View Package Details . . . . . . . . . . . . . . . . . . . . . . . . . . . . . . . . . . . . . . . . . . . . . 245
Push a Package Upgrade for Unlocked Packages . . . . . . . . . . . . . . . . . . . . . . . . . . . . . . 245
Install an Unlocked Package . . . . . . . . . . . . . . . . . . . . . . . . . . . . . . . . . . . . . . . . . . . . 246
Install Packages with the CLI . . . . . . . . . . . . . . . . . . . . . . . . . . . . . . . . . . . . . . . . . 246
Install Unlocked Packages from a URL . . . . . . . . . . . . . . . . . . . . . . . . . . . . . . . . . . 248
Upgrade a Version of an Unlocked Package . . . . . . . . . . . . . . . . . . . . . . . . . . . . . . 248
Sample Script for Installing Unlocked Packages with Dependencies . . . . . . . . . . . . . . 249
Migrate Deprecated Metadata from Unlocked Packages . . . . . . . . . . . . . . . . . . . . . . . . . 251
Uninstall an Unlocked Package . . . . . . . . . . . . . . . . . . . . . . . . . . . . . . . . . . . . . . . . . . 252
Transfer an Unlocked Package to a Different Dev Hub . . . . . . . . . . . . . . . . . . . . . . . . . . . 252
Take Ownership of an Unlocked Package Transferred from a Different Dev Hub . . . . . . 255
Chapter 12: Continuous Integration . . . . . . . . . . . . . . . . . . . . . . . . . . . . . . . . . . . . . 257
Continuous Integration Using CircleCI . . . . . . . . . . . . . . . . . . . . . . . . . . . . . . . . . . . . . . 258
Configure Your Environment for CircleCI . . . . . . . . . . . . . . . . . . . . . . . . . . . . . . . . . 258
Connect CircleCI to Your DevHub . . . . . . . . . . . . . . . . . . . . . . . . . . . . . . . . . . . . . . 259
Continuous Integration Using Jenkins . . . . . . . . . . . . . . . . . . . . . . . . . . . . . . . . . . . . . . 260
Configure Your Environment for Jenkins . . . . . . . . . . . . . . . . . . . . . . . . . . . . . . . . . . 261
Jenkinsfile Walkthrough . . . . . . . . . . . . . . . . . . . . . . . . . . . . . . . . . . . . . . . . . . . . 262
Sample Jenkinsfile . . . . . . . . . . . . . . . . . . . . . . . . . . . . . . . . . . . . . . . . . . . . . . . 268
Continuous Integration with Travis CI . . . . . . . . . . . . . . . . . . . . . . . . . . . . . . . . . . . . . . . 273
Sample CI Repos for Org Development Model . . . . . . . . . . . . . . . . . . . . . . . . . . . . . . . . 273
Sample CI Repos for Package Development Model . . . . . . . . . . . . . . . . . . . . . . . . . . . . . 273
Chapter 13: Troubleshoot Salesforce DX . . . . . . . . . . . . . . . . . . . . . . . . . . . . . . . . . 275
CLI Version Information . . . . . . . . . . . . . . . . . . . . . . . . . . . . . . . . . . . . . . . . . . . . . . . . 276
Error: No default dev hub found . . . . . . . . . . . . . . . . . . . . . . . . . . . . . . . . . . . . . . . . . . 276
Unable to Work After Failed Org Authorization . . . . . . . . . . . . . . . . . . . . . . . . . . . . . . . . 276
Error: The consumer key is already taken . . . . . . . . . . . . . . . . . . . . . . . . . . . . . . . . . . . . 277
Chapter 14: Limitations for Salesforce DX . . . . . . . . . . . . . . . . . . . . . . . . . . . . . . . . . 279
Contents

CHAPTER 1 How Salesforce Developer Experience (DX) Tooling
Changes the Way You Work
Salesforce DX tooling provides modern experience to manage and develop apps on the platform across
their entire lifecycle. It brings together source-driven development, team collaboration with governance,
and new levels of agility for custom app development on Salesforce based on modern best practices.
In this chapter ...
• Use a Sample Repo
to Get Started
Highlights include:
• Create an
Application
•
Your tools, your way. You use the developer tools you already know.
•
The ability to apply best practices to software development. Source code and metadata exist outside
of the org and provide more agility to develop Salesforce apps in a team environment. Instead of
the org, your version control system is the source of truth.
• Migrate or Import
Existing Source
• Salesforce DX
Release Notes
•
A powerful command-line interface (CLI) removes the complexity of working with your Salesforce
org for development, continuous integration, and delivery.
•
Flexible and configurable scratch orgs that you build for development and automated environments.
This new type of org makes it easier to build your apps and packages.
•
You can use any IDE or text editor you want with the CLI and externalized source.
Note: Salesforce DX tooling requires the API Enabled system permission, which provides
programmatic access to your org's information.
Are You Ready to Begin?
Here’s the basic order for doing your work using Salesforce DX. These workflows include the most
common CLI commands. For all commands, see the Salesforce CLI Command Reference.
•
Install Salesforce CLI
•
Enable Dev Hub
•
Use a Sample Repo to Get Started
•
Create an Application
•
Migrate or Import Existing Source
Optionally, install:
•
Salesforce Extensions for VS Code
•
Code Builder
1

Use a Sample Repo to Get Started
The quickest way to get going with Salesforce DX tooling is to clone the dreamhouse-lwc GitHub repo. Use its configuration files
and Salesforce application to try some commonly used Salesforce CLI commands. In addition to source code for the application, the
repo includes sample data and Apex tests.
1. Open a terminal or command prompt window, and clone the dreamhouse-lwc GitHub sample repo using HTTPS or SSH.
HTTPS:
git clone https://github.com/trailheadapps/dreamhouse-lwc.git
SSH:
git clone [email protected]:trailheadapps/dreamhouse-lwc.git
2. Change to the dreamhouse-lwc project directory.
cd dreamhouse-lwc
3. Authorize your Dev Hub org by logging into it, set it as your default, and assign it an alias.
sf org login web --set-default-dev-hub --alias DevHub
Enter your Dev Hub org credentials in the browser that opens. After you log in successfully, you can close the browser.
4. Create a scratch org using the config/project-scratch-def.json file, set the org as your default, and assign it an alias.
sf org create scratch --definition-file config/project-scratch-def.json --set-default
--alias my-scratch-org
The command uses the default Dev Hub you set with the sf org login web command in a previous step.
5. View the orgs that you've either created or logged into.
sf org list
The table displays the Dev Hub you logged into and the scratch org you created. The right-most column indicates the default scratch
org and Dev Hub org; in the real-life output you see cute emojis, but in the output below we use (S) and (D), respectively. The
Alias column displays the aliases you assigned each org. Here’s some sample output.
Type Alias Username Org ID
Status Expires
── ─────── ────────────── ────────────────────────────────────── ──────────────────
───────────────────── ──────────
Connected
Connected
(S) Scratch my-scratch-org [email protected] 00D7xOjgTEASXXXXXX
Active 2024-05-16
Legend: (D)=DevHub, (S)=Default Org Use --all to see expired and deleted scratch
orgs
6. Deploy the Dreamforce app, whose source is in the force-app directory, to the scratch org.
sf project deploy start --source-dir force-app
3
Use a Sample Repo to Get StartedHow Salesforce Developer Experience (DX) Tooling Changes
the Way You Work

7. Assign the dreamhouse permission set to the default scratch org user ([email protected]).
sf org assign permset --name dreamhouse
8. Import sample data from three objects (Contact, Property, and Broker) into the scratch org using the specified plan definition file.
sf data import tree --plan data/sample-data-plan.json
9. Run Apex tests.
sf apex run test --result-format human --wait 1
Apex tests run asynchronously by default. If the tests finish before the --wait value, the results are displayed. Otherwise, use the
displayed command to get the results using a job ID.
10. Open the scratch org and view the deployed metadata under Most Recently Used.
sf org open
11. In App Launcher, find and open the Dreamhouse application.
Congrats! You just deployed an application to a new scratch org.
SEE ALSO:
Sample Repository on GitHub
Authorization
Create Scratch Orgs
Deploy Source From Your Project to the Scratch Org
Run Apex Tests
Create an Application
Follow the basic workflow when you are starting from scratch to create and develop an app that runs on the Lightning Platform.
1. Set up your project.
2. Authorize the Developer Hub org for the project.
3. Configure your local project.
4. Create a scratch org.
5. Push the source from your project to the scratch org.
6. Develop the app.
7. Pull the source to keep your project and scratch org in sync.
8. Run tests.
9. Add, commit, and push changes. Create a pull request.
Deploy your app using one of the following methods:
•
Build and release your app with managed packages
•
Build and release your app using the Metadata API
4
Create an ApplicationHow Salesforce Developer Experience (DX) Tooling Changes
the Way You Work

Migrate or Import Existing Source
Use the Metadata API to retrieve the code, and then convert your source for use in a Salesforce DX project.
Tip: If your current repo follows the directory structure that is created from a Metadata API retrieve, you can skip the retrieve step
and go directly to converting the source.
1. Set up your project.
2. Retrieve your metadata.
3. Convert the metadata formatted source you just retrieved to source format.
4. Authorize the Developer Hub org for the project.
5. Configure your local project.
6. Create a scratch org.
7. Push the source from your project to the scratch org.
8. Develop the app.
9. Pull the source to sync your project and scratch org.
10. Run tests.
11. Add, commit, and push changes. Create a pull request.
Deploy your app using one of the following methods:
•
Build and release your app with managed packages.
•
Build and release your app using the Metadata API.
Salesforce DX Release Notes
Use the Salesforce Release Notes to learn about the most recent updates and changes to development environments, packaging, platform
development tools, and Salesforce APIs.
For the latest changes, visit:
•
Salesforce Extensions for Visual Studio Code Release Notes
•
Salesforce CLI Release Notes
•
Development Environments Release Notes (Includes Developer Edition orgs, sandboxes, and scratch orgs)
•
Packaging Release Notes
•
New and Changed Items for Developers (Includes Apex, standard objects, Metadata API, and more)
5
Migrate or Import Existing SourceHow Salesforce Developer Experience (DX) Tooling Changes
the Way You Work

CHAPTER 2 Provide Developers Access to Salesforce DX Tools
Prepare your development team with the license, user access, and user permissions they need. Determine
which org to use as your Dev Hub org, and enable the Dev Hub setting in that org.
In this chapter ...
• Select and Enable a
Dev Hub Org
• Add Salesforce DX
Users
6

Select and Enable a Dev Hub Org
EDITIONS
Available in: Salesforce
Classic and Lightning
Experience
Dev Hub available in:
Developer, Enterprise,
Performance, and
Unlimited Editions
Scratch orgs available in:
Developer, Enterprise,
Group, and Professional
Editions
The Dev Hub lets you create scratch orgs, unlocked packages, and second-generation managed
packages. Your Dev Hub is also the designated place to manage all your scratch orgs, packages,
and namespaces.
Determine which org to use as your Dev Hub org, then enable the Dev Hub setting in that org. Dev
Hub comprises objects with permissions that allow admins to control the level of access available
to a user and an org. If you’re developing an unlocked package that you intend to deploy to other
orgs, enable the Dev Hub setting in one of your active production orgs. This ensures that your
package is owned by an active org.
All Salesforce ISV and OEM partners should designate their Partner Business Org (PBO) as their Dev
Hub org, see Enable Dev Hub and Second-Generation Managed Packaging for more details.
To enable Dev Hub in an org:
1. Log in as System Administrator to your production, Developer Edition, or trial org.
2. From Setup, enter Dev Hub in the Quick Find box and select Dev Hub.
If you don't see Dev Hub in the Setup menu, make sure that your org is one of the supported
editions.
3. To enable Dev Hub, click Enable.
After you enable Dev Hub, you can’t disable it.
Note: You can’t enable Dev Hub in a sandbox.
The Dev Hub org instance determines where scratch orgs are created.
•
Scratch orgs created from a Dev Hub org in Government Cloud are created on a Government Cloud instance.
•
Scratch orgs created from a Dev Hub org in Hyperforce are created on a Hyperforce instance.
Consider these factors if you select a trial or Developer Edition org as your Dev Hub.
•
You can create up to six scratch orgs and package versions per day, with a maximum of three active scratch orgs.
•
Trial orgs expire on their expiration date.
•
Developer Edition orgs can expire due to inactivity.
•
Package versions are associated with your Dev Hub org. When a trial or Developer Edition org expires, you lose access to the package
versions.
Enable Unlocked Packaging
Enable packaging in your org so you can develop unlocked packages. You can work with the packages in scratch orgs and sandboxes.
Enable Source Tracking in Sandboxes
Turn on source tracking in the source (production) org so Developer and Developer Pro sandboxes automatically track changes
between sandboxes created from it and Salesforce DX projects. Existing sandboxes don’t have source tracking enabled until you
refresh them.
Enable Einstein Chatbot Features in Scratch Orgs
Turn on Einstein Features in your Dev Hub to eliminate the manual steps for enabling the Chatbot feature in scratch orgs. When you
accept the Terms of Service for Einstein, a separate acceptance is not required in each scratch org created from this Dev Hub org. If
you previously accepted the Terms of Service for Einstein to turn on an Einstein-related feature, this setting is already enabled.
7
Select and Enable a Dev Hub OrgProvide Developers Access to Salesforce DX Tools

Enable Language Extension Packages (Beta)
Enable Language Extension Packages in Dev Hub to create language extension packages that contain translations of components
in other packages. This feature is available in unlocked and first- and second-generation managed packages.
Enable Unlocked Packaging
Enable packaging in your org so you can develop unlocked packages. You can work with the packages in scratch orgs and sandboxes.
Before you begin, enable Dev Hub in your org.
1. Log in to the org where you’ve enabled Dev Hub.
2. From Setup, enter Dev Hub in the Quick Find box and select Dev Hub.
3. Select Enable Unlocked Packages and Second-Generation Managed Packages.
After you enable this setting, you can’t disable it.
To get started with creating unlocked packages, see Unlocked Packages. For information on second-generation managed packages, see
the Second-Generation Managed Packages Developer Guide.
Enable Source Tracking in Sandboxes
EDITIONS
Available in: Enterprise,
Performance, and Unlimited
Editions
Turn on source tracking in the source (production) org so Developer and Developer Pro sandboxes
automatically track changes between sandboxes created from it and Salesforce DX projects. Existing
sandboxes don’t have source tracking enabled until you refresh them.
Note: You can’t enable source tracking in Developer Edition orgs.
To enable Source Tracking in Sandboxes for Developer and Developer Pro sandboxes:
1. Log in to the source (production) org.
2. From Setup, in the Quick Find Box, enter Dev Hub and select Dev Hub.
If you don't see Dev Hub in the Setup menu, make sure that the source org is one of the supported editions.
3. Select Enable Source Tracking in Developer and Developer Pro Sandboxes.
4. Refresh any existing Developer or Developer Pro sandboxes to enable this feature.
Source tracking is automatically enabled for any newly created Developer or Developer Pro sandboxes.
Enable Einstein Chatbot Features in Scratch Orgs
Turn on Einstein Features in your Dev Hub to eliminate the manual steps for enabling the Chatbot feature in scratch orgs. When you
accept the Terms of Service for Einstein, a separate acceptance is not required in each scratch org created from this Dev Hub org. If you
previously accepted the Terms of Service for Einstein to turn on an Einstein-related feature, this setting is already enabled.
Complete this task before attempting to create a scratch org with the Chatbot feature.
1. Log in to your Dev Hub org.
2. From Setup, enter Dev Hub in the Quick Find box and select Dev Hub.
3. On the Dev Hub Setup page, turn on Enable Einstein Features.
8
Enable Unlocked PackagingProvide Developers Access to Salesforce DX Tools

Enable Language Extension Packages (Beta)
Enable Language Extension Packages in Dev Hub to create language extension packages that contain translations of components in
other packages. This feature is available in unlocked and first- and second-generation managed packages.
Note: This feature is a Beta Service. Customer may opt to try such Beta Service in its sole discretion. Any use of the Beta Service
is subject to the applicable Beta Services Terms provided at Agreements and Terms.
Language extension packages can only contain Translations and CustomObjectTranslations. If a base package includes components
that can’t be translated, those components aren’t included when you create a language extension package.
1. In Dev Hub, from Setup, in the Quick Find box, enter Dev Hub, and then select Dev Hub.
2. On the Dev Hub Setup page, turn on Enable Language Extension Packages.
Add Salesforce DX Users
System administrators can access the Dev Hub org by default. You can enable more users to access the Dev Hub org so that they can
create scratch orgs and use other developer-specific features.
Your developer users can use Salesforce DX with the Salesforce, and Salesforce Platform standard user license, or you can assign them
the Developer license, or the Salesforce Limited Access - Free license instead.
If your org has Developer licenses, you can add users with the Developer profile and assign them the provided Developer permission
set. Alternatively, you can add users with the Standard User or System Administrator profiles. For a standard user, you must create a
permission set with the required Dev Hub permissions. We recommend that you avoid adding users as system administrators unless
their work requires that level of authority and not just Dev Hub org access.
Determine Which License to Assign to Dev Hub Users
Which license type you assign to developer users depends on how much access they require in the Dev Hub org. If they require full
administrative access, you can assign the Salesforce or Salesforce Platform standard user license. If you want to limit access to only
specific features, Salesforce provides two developer license options
Add a System Administrator or Standard User to Your Dev Hub Org
Add system administrator users only if their work requires that level of authority. Otherwise, add standard users and create a permission
set with the required Salesforce DX permissions.
Add a Developer User to Your Dev Hub Org
Using a Developer license, add a user with the Developer profile and assign them the Developer permission set.
Add a Limited Access User to Your Dev Hub Org
If your users only require access to the Dev Hub, the Salesforce Limited Access - Free license is a good approach. The Salesforce
Limited Access - Free license is available by request. After this license is provisioned add a user with this license and the Limited
Access user profile, and then create and assign them a permission set to the required Dev Hub objects.
Create and Assign a Permission Set to Developer Users
To give full access to the Dev Hub org, create and assign a custom permission set that grants access to required Dev Hub objects.
Or if you have the Developer license, assign the Developer permission set.
SEE ALSO:
Org Shape Permissions
9
Enable Language Extension Packages (Beta)Provide Developers Access to Salesforce DX Tools
Determine Which License to Assign to Dev Hub Users
Which license type you assign to developer users depends on how much access they require in the Dev Hub org. If they require full
administrative access, you can assign the Salesforce or Salesforce Platform standard user license. If you want to limit access to only
specific features, Salesforce provides two developer license options
Salesforce or Salesforce Platform License
The Salesforce license is for users who require full access to standard CRM and AppExchange apps. Users with this user license are entitled
to access any standard or custom app.
The Salesforce Platform license is designed for users who need access to custom apps but not to standard CRM functionality. Users with
this user license are entitled to use custom apps developed in your organization or installed from AppExchange.
Developer License
The Developer license is designed for users whose role is to build customizations or applications. This license provides access to
development tools and environments. It comes with one Developer sandbox, one scratch org, and access to the Dev Hub. In the
production org, this license restricts access to standard and custom objects. For example, users can’t access the Account object within
the Sales app. And because of the restriction to custom objects, users can’t be assigned access to custom apps or AppExchange apps.
The development environments provide access to Salesforce features. With a Developer sandbox, you can use all the features that exist
in the production org. The org administrator can create the Developer sandbox that was provisioned with the Developer license. A
scratch org, which can be configured to your specifications using a scratch org definition file, gives you access to features on a trial basis.
For example, you can use a scratch org to work with Financial Services Cloud or to play with Sales Cloud Einstein features. The Developer
license provides access to the Dev Hub, enabling users to create scratch orgs on a self-service basis.
Free Limited Access License
The Salesforce Limited Access - Free license provides accounts to non-admin users in your production org, when these users require
access to only a specific app, feature, or setting. Standard Salesforce objects such as Accounts, Contacts, and Opportunities aren’t
accessible with this license. The Salesforce Limited Access - Free license isn’t available in Developer Edition orgs.
The edition of the Dev Hub org determines the maximum number of the Limited Access licenses you can request.
•
Enterprise Edition orgs can request up to 20 licenses.
•
Unlimited Edition orgs can request up to 50 licenses.
To request this license, contact your Salesforce account executive. A Salesforce admin can upgrade a Salesforce Limited Access - Free
license to a standard Salesforce license at any time.
The Salesforce Limited Access - Free license doesn’t support certain features.
•
To provide the ability to create and manage org shapes, assign the Salesforce user license. The Salesforce Limited Access - Free
license isn’t supported at this time.
•
Users with the Salesforce Limited Access - Free license and View All permissions can create scratch orgs using an existing org shape.
•
Users with the Salesforce Limited Access - Free license and View All permissions can view scratch org snapshots created by users
other than themselves.
•
The Salesforce Limited Access - Free license doesn’t provide access to some Salesforce CLI commands, such as sf limits api
display.
10
Determine Which License to Assign to Dev Hub UsersProvide Developers Access to Salesforce DX Tools
•
Contact your Salesforce admin for API limits information.
SEE ALSO:
Add Salesforce DX Users
Permission Set for Salesforce DX Users
Add a System Administrator or Standard User to Your Dev Hub Org
Add system administrator users only if their work requires that level of authority. Otherwise, add standard users and create a permission
set with the required Salesforce DX permissions.
1. Create a user in your Dev Hub org, if necessary.
a. In Setup, enter Users in the Quick Find box, then select Users.
b. Click New User.
c. Fill out the form, and assign the System Administrator or Standard User profile.
d. Click Save.
If you’re adding a System Administrator user, you can stop here.
2. If you’re adding a Standard User, create a permission set for Salesforce DX users if you don’t have one.
a. From Setup, enter Permission Sets in the Quick Find box, then select Permission Sets.
b. Click New.
c. Enter a label, API name, and description. The API name is a unique name used by the API and managed packages.
d. Select a user license option. If you plan to assign this permission set to multiple users with different licenses, select None.
e. Click Save. The permission set overview page appears. From here, you can navigate to the permissions you want to add or
change for Salesforce DX. For the required permissions, see Create and Assign a Permission Set to Developer Users.
3. Apply the Salesforce DX permission set to the Standard User.
a. From Setup, enter Permission Sets in the Quick Find box, then select Permission Sets.
b. Select the Salesforce DX permission set.
c. In the permission set toolbar, click Manage Assignments.
d. Click Add Assignments.
e. Select the user to assign the permission set to.
f. Click Assign.
g. Click Done.
You can limit a user’s access by modifying the permissions.
Add a Developer User to Your Dev Hub Org
Using a Developer license, add a user with the Developer profile and assign them the Developer permission set.
The Developer license is a paid license that is designed for users whose role is to build customizations or applications. This license provides
access to development tools and environments. It comes with one Developer sandbox, one scratch org, and access to the Dev Hub. In
the production org, this license restricts access to standard and custom objects.
11
Add a System Administrator or Standard User to Your Dev
Hub Org
Provide Developers Access to Salesforce DX Tools
1. Create a user in your Dev Hub org.
a. In Setup, enter Users in the Quick Find box, then select Users.
b. Click New User.
c. Fill out the form.
d. Select Developer for User License, and then Developer for Profile.
e. After filling out the remaining information, click Save.
2. Assign the built-in Developer permission set to the user.
a. On the user's detail page, in the Permission Set Assignments related list, click Edit Assignments.
b. In the Available Permission Sets, add the Developer permission set and click Save.
The Developer permission set grants access to Dev Hub features and second-generation packages. For details, see Create and Assign a
Permission Set to Developer Users.
Add a Limited Access User to Your Dev Hub Org
If your users only require access to the Dev Hub, the Salesforce Limited Access - Free license is a good approach. The Salesforce Limited
Access - Free license is available by request. After this license is provisioned add a user with this license and the Limited Access user
profile, and then create and assign them a permission set to the required Dev Hub objects.
The Salesforce Limited Access - Free is designed for users whose role is to build customizations or applications. This license provides
access to the Dev Hub, development tools, and environments. In the production org, this license restricts access to standard and custom
objects.
1. Create a user in your Dev Hub org.
a. In Setup, enter Users in the Quick Find box, then select Users.
b. Click New User.
c. Fill out the form.
d. Select Salesforce Limited Access - Free for User License, and then Limited Access User for Profile.
e. After filling out the remaining information, click Save.
2. Create a permission set that provides your developer users with access to the required Dev Hub objects. For details, see Create and
Assign a Permission Set for Developer Users or Assign Second-Generation Managed Packaging User Permissions.
Create and Assign a Permission Set to Developer Users
To give full access to the Dev Hub org, create and assign a custom permission set that grants access to required Dev Hub objects. Or if
you have the Developer license, assign the Developer permission set.
Standard Developer Permission Set
If you're providing access to the Dev Hub org using the standard Developer license, it also includes a built-in Developer permission set.
This permission set provides the required permissions for scratch orgs, and unlocked and second-generation managed packaging. You
can use the provided Developer permission set or create your own.
12
Add a Limited Access User to Your Dev Hub OrgProvide Developers Access to Salesforce DX Tools

Create a Permission Set
Follow the steps to create a permission set, then add the required scratch org and packaging permissions.
Required Permissions for Scratch Orgs
•
Object Settings > Scratch Org Infos > Read, Create, Edit, and Delete
•
Object Settings > Active Scratch Orgs > Read, Edit, and Delete
Required Permissions for Unlocked Packaging and Second-Generation Managed
Packaging
To work with unlocked or second-generation managed packages in the Dev Hub org, the permission set must contain the scratch org
permissions and:
•
Object Settings > Namespace Registries > Read
•
System Permissions > Create and Update Second-Generation Packages
The system permission provides access to:
Tooling API Object (Create and Edit)Salesforce CLI Command
Package2package create
Package2VersionCreateRequestpackage version create
Package2Versionpackage version update
Assign Permission Set to Users
To assign one or more users to a permission set, or to remove a user from a permission set, see Manage Permission Set Assignments in
Salesforce Help.
13
Create and Assign a Permission Set to Developer UsersProvide Developers Access to Salesforce DX Tools

CHAPTER 3 Project Setup
A Salesforce DX project provides a project structure for your org’s metadata (code and configuration),
org templates, sample data, and all your team’s tests. To bring consistency to your team’s development
processes, store these items in a source control system (SCS). Retrieve the contents of your team’s
repository when you’re ready to develop a new feature.
In this chapter ...
• Sample Repository
on GitHub
• Create a Salesforce
DX Project
What makes a project a Salesforce DX project? It includes an sfdx-project.json file, which
defines the project’s configuration. This .json file includes connected app information for Salesforce
• Salesforce DX Project
Structure and Source
Format
CLI, in which directories project files are located, packaging directory structure for 2GP packages, and
which API version you want to use, if not the latest.
You have different options to create a Salesforce DX project depending on how you want to begin. You
can use your preferred SCS. Most of our examples use Git.
• How to Exclude
Source When Syncing
• Create a Salesforce
DX Project from
Existing Source
Explore the features of Salesforce DX using one of
our sample repos and your own SCS and toolset.
Use the Sample Repository on GitHub
Start with an existing Salesforce app to create a
Salesforce DX project.
Create a Salesforce DX Project from Existing Source
• Convert Files in
Metadata Format to
Source Format
Create an app on the Salesforce Platform using a
Salesforce DX project.
Create a Salesforce DX Project
• Salesforce DX
Usernames and Orgs
• Link a Namespace to
a Dev Hub Org
• Salesforce DX Project
Configuration
• Multiple Package
Directories
• Replace Strings in
Code Before
Deploying or
Packaging
14
Sample Repository on GitHub
To get started quickly, see the dreamhouse-lwc GitHub repo. This standalone application contains an example DX project with
multiple Apex classes, Aura components, custom objects, sample data, and Apex tests.
Cloning this repo creates the directory dreamhouse-lwc. See the repo’s Readme for more information.
Assuming that you’ve already set up Git, use the git clone command to clone the main branch of the repo from the command
line.
To use HTTPS:
git clone https://github.com/trailheadapps/dreamhouse-lwc
To use SSH:
git clone [email protected]:trailheadapps/dreamhouse-lwc.git
If you don’t want to use Git, download a .zip file of the repository’s source using Clone, or download on the GitHub website. Unpack the
source anywhere on your local file system.
See Use a Sample Repo to Get Started for the next steps.
Tip: Check out more complex examples in the Sample Gallery.
The Sample Gallery contains sample apps that show what you can build on the Salesforce platform. They’re continuously updated
to incorporate the latest features and best practices.
Create a Salesforce DX Project
A Salesforce DX project has a specific structure and a configuration file that identifies the directory as a Salesforce DX project.
1. Change to the directory where you want the DX project located.
2. Create the DX project.
sf project generate --name MyProject
If you don’t specify an output directory with the --output-dir flag, the project directory is created in the current location. You
can also use the --default-package-dir flag to specify the default package directory to target when syncing source to
and from the org. If you don’t indicate a default package directory, this command creates a default package directory, force-app.
Use the --template flag to specify what your project initially looks like. Each template provides a complete directory structure
that takes the guesswork out of where to put your source. If you choose --template empty, your project contains these
sample configuration files to get you started.
•
.forceignore
•
config/project-scratch-def.json
•
sfdx-project.json
•
package.json
If you choose --template standard, your project also contains these files that are especially helpful when using Salesforce
Extensions for VS Code. If you don’t specify the --template flag, the project generate command uses the standard
template.
•
.gitignore: Makes it easier to start using Git for version control.
15
Sample Repository on GitHubProject Setup

•
.prettierrc and .prettierignore: Make it easier to start using Prettier to format your Aura components.
•
.vscode/extensions.json: Causes Visual Studio Code, when launched, to prompt you to install the recommended
extensions for your project.
•
.vscode/launch.json: Configures Replay Debugger, making it more discoverable and easier to use.
•
.vscode/settings.json: By default, this file has one setting for excluding certain files and folders in searches and quick
open. You can change this value or add other settings.
If you choose --template analytics, you get all the helpful basic and VS Code files. But the default package directory
contains fewer directories, such as for storing Analytics template bundles. /force-app/main/default/waveTemplates)
and a few other metadata types, such as Apex classes and LWC components.
Example:
sf project generate --name mywork --template standard
sf project generate --name mywork --default-package-dir myapp-source
Next steps:
•
(Optional) Register the namespace with the Dev Hub org.
•
Configure the project (sfdx-project.json). If you use a namespace, update this file to include it.
•
Create a scratch org definition that produces scratch orgs with the features you need for your project. The config directory of
your new project contains a sample scratch org definition file (project-scratch-def.json).
SEE ALSO:
Create a Salesforce DX Project from Existing Source
Salesforce DX Project Configuration
Link a Namespace to a Dev Hub Org
Build Your Own Scratch Org Definition File
How to Exclude Source When Syncing
VS Code Command: SFDX: Create Project, SFDX: Create Project with Manifest
Salesforce DX Project Structure and Source Format
A Salesforce DX project has a specific project structure and source format. Source format uses a different set of files and file extensions
from what the Metadata API uses. When you retrieve metadata from the org with the project retrieve start command,
Salesforce CLI stores it in source format in your project. When you deploy metadata, Salesforce CLI converts it into the format that the
Metadata API requires.
Source Transformation
It’s not uncommon for metadata formatted source to be very large, making it difficult to find what you want. If you work on a team with
other developers who update the same metadata at the same time, you have to deal with merging multiple updates to the file. If you’re
thinking that there has to be a better way, you’re right.
Before, all custom objects and object translations were stored in one large metadata file.
16
Salesforce DX Project Structure and Source FormatProject Setup

We solve this problem by providing a new source shape that breaks down these large source files to make them more digestible and
easier to manage with a version control system. It’s called source format.
A Salesforce DX project stores custom objects and custom object translations in intuitive subdirectories. Source format makes it much
easier to find what you want to change or update. And you can say goodbye to messy merges.
Static Resources
Static resources must reside in the /main/default/staticresources directory. The project deploy and project
retrieve commands support auto-expanding or compressing archive MIME types within your project. These behaviors support
both the .zip and .jar MIME types. This way, the source files are more easily integrated in your Salesforce DX project and version
control system.
For example, if you upload a static resource archive through the scratch org’s Setup UI, the project retrieve start command
expands it into its directory structure within the project. To mimic this process from the file system, add the directory structure to compress
directly into the static resources directory root, then create the associated .resource-meta.xml file. If an archive exists as a single
file in your project, it’s always treated as a single file and not expanded.
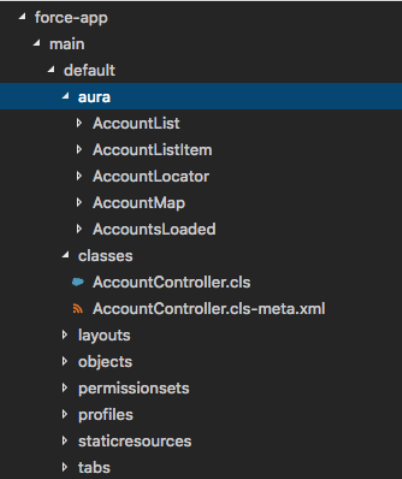
This example illustrates how different types of static resources are stored in your local project. You can see an expanded .zip archive
called expandedzippedresource and its related .resource-meta.xml file. You also see a couple .jpg files being stored
with their MIME type, and a single file being stored with the legacy .resource extension
17
Salesforce DX Project Structure and Source FormatProject Setup

See Salefsorce Help: Static Resources for more information.
File Extensions
When you convert existing metadata format to source format, we create an XML file for each bit. All files that contain XML markup now
have an .xml extension so that your XML editor recognizes them as XML files and you can look at them. To sync your local projects
and scratch orgs, Salesforce DX projects use a particular directory structure for custom objects, custom object translations, Lightning
web components, Aura components, and documents.
For example, if you had an object called Case, source format provides an XML version called Case.object-meta.xml. If you have
an app called DreamHouse, we create a file called DreamHouse.app-meta.xml. You get the idea.
Traditionally, static resources are stored on the file system as binary objects with a .resource extension. Source format handles static
resources differently by supporting content MIME types. For example, .gif files are stored as a .gif instead of .resource. By
storing files with their MIME extensions, you can manage and edit your files using the associated editor on your system.
You can have a combination of existing static resources with their .resource extension, and newly created static resources with
their MIME content extensions. Existing static resources with .resource extensions keep that extension, but any new static resources
show up in your project with their MIME type extensions. We allow .resource files to support the transition for existing customers.
Although you get this additional flexibility, we recommend storing your files with their MIME extensions.
Custom Objects
When you convert from metadata format to source format, your custom objects are placed in the <package
directory>/main/default/objects directory. Each object has its own subdirectory that reflects the type of custom object.
Some parts of the custom objects are extracted into in these subdirectories:
18
Salesforce DX Project Structure and Source FormatProject Setup
•
businessProcesses
•
compactLayouts
•
fields
•
fieldSets
•
listViews
•
recordTypes
•
sharingReasons
•
validationRules
•
webLinks
The parts of the custom object that aren’t extracted are placed in a <object>.object-meta.xml file.
Custom Object Translations
Custom object translations reside in the <package directory>/main/default/objectTranslations directory,
each in their own subdirectory named after the custom object translation. Custom object translations and field translations are extracted
into their own files within the custom object translation’s directory.
•
For field names, <field_name>.fieldTranslation-meta.xml
•
For object names, <object_name>.objectTranslation-meta.xml
The remaining pieces of the custom object translation that aren’t field translations are placed in a file called
<objectTranslation>.objectTranslation-meta.xml.
See Salesforce Help: Translation Workbench for more information.
Aura Components
Aura bundles and components must reside in a directory named aura under the <package directory> directory.
19
Salesforce DX Project Structure and Source FormatProject Setup

Lightning Web Components
Lightning web components must reside in a directory named lwc under the <package directory> directory.
ExperienceBundle for Lightning Communities
The ExperienceBundle metadata type must reside in a directory named experiences under the <package directory>
directory. The experiences directory contains a folder for each Lightning community in your org. See the Experience Cloud Developer
Guide for details.
Documents
Documents must be inside the directories of their parent document folder. The parent document folder must be in a directory called
documents. Each document has a corresponding metadata XML file that you can view with an XML editor.
20
Salesforce DX Project Structure and Source FormatProject Setup

Custom Labels
All custom labels are contained in a single file called CustomLabels.labels-meta.xml that resides in a directory named
labels under the <package directory> directory. Each package directory can have its own
CustomLabels.labels-meta.xml file.
How to Exclude Source When Syncing
When syncing metadata between your local file system and a target org, you often have source files you want to exclude. Similarly, you
often want to exclude certain files when converting source to Salesforce DX source format. In both cases, you can exclude individual
files or all files in a specific directory with a .forceignore file.
The .forceignore file excludes files when running most of the project commands, such as project deploy start,
project retrieve start, project convert source, and project delete source.
Structure of the .forceignore File
The .forceignore file structure mimics the .gitignore structure. Each line in .forceignore specifies a pattern that
corresponds to one or more files. The files typically represent metadata components, but can be any files you want to exclude, such as
LWC configuration JSON files or tests.
21
How to Exclude Source When SyncingProject Setup

The project commands, when parsing the .forceignore file, use the same rules and patterns as the .gitignore file. A
few common examples of these rules and patterns include:
•
Always use the forward slash (/) as a directory separator, even on operating systems that use back slashes, such as Microsoft Windows.
•
An asterisk (*) matches anything except a forward slash (/).
•
Two consecutive asterisks (**) in patterns have special meaning, depending on where they’re located in the pathname. See for
examples.
•
For readability, use blank lines as separators in the .forceignore file.
There are many more rules and patterns. See the git documentation for details.
Determine the Exact Filename for a Metadata Component
As you build your .forceignore file, you sometimes need the exact name of the metadata components that you want to exclude.
The easiest way to determine the name of a particular component is to look at the package directory that contains the source files, such
as the default force-app directory.
For example, profile metadata components live in the main/default/profiles directory. Let’s say that the directory contains
the source file NotUsedProfile.profile-meta.xml. To specify that the project commands exclude this component,
add this entry to your .forceignore:
**/NotUsedProfile.profile-meta.xml
Another way to determine the exact name of a metadata component is to look at the output of the project commands if you’re
also using source tracking. For example, if you have either local or remote changes, run the project deploy preview or
project retrieve preview command to display the full pathname of the changed components. This output displays the
filename of the Dreamhouse permission set and the Settings custom tab in the Path column of the Will Deploy section:
sf project deploy preview
Will Deploy [2] files.
Type Fullname Path
───────────── ──────────
───────────────────────────────────────────────────────────────────────
PermissionSet dreamhouse
force-app/main/default/permissionsets/dreamhouse.permissionset-meta.xml
CustomTab Settings force-app/main/default/tabs/Settings.tab-meta.xml
Other Files That the Source Commands Ignore
The source commands ignore these files even if they aren’t included in your .forceignore file:
•
Any source file or directory that begins with a “dot”, such as .DS_Store or .sf
•
Any file that ends in .dup
•
package2-descriptor.json
•
package2-manifest.json
22
How to Exclude Source When SyncingProject Setup

Exclude Remote Changes Not Yet Synced with Your Local Source
Sometimes, you make a change directly in an org but you don’t want to pull that change into your local DX project. To exclude remote
metadata changes, add an entry to .forceignore that represents the metadata source file that would be created if you did retrieve
it.
For example, if you have a permission set named Dreamhouse, add this entry to .forceignore:
**/Dreamhouse.permissionset-meta.xml
Exclude MetadataWithContent Types
Metadata components that include content, such as ApexClass or EmailTemplate, extend the MetadataWithContent type. These
components have two source files: one for the content itself, such as the Apex code or email template, and the accompanying metadata
file. For example, the source files for the HelloWorld Apex class are HelloWorld.cls and HelloWorld.cls-meta.xml.
To exclude a MetadataWithContent component, such as an ApexClass, either list both source files in the .forceignore file, or use
an asterisk. For example:
# Explicilty list the HelloWorld source files to be excluded
helloWorld/main/default/classes/HelloWorld.cls
helloWorld/main/default/classes/HelloWorld.cls-meta.xml
# Exclude the HelloWorld Apex class using an asterisk
helloWorld/main/default/classes/HelloWorld.cls*
Exclude Bundles and File Groups
Use two consecutive asterisks (**) to ignore files spread across multiple directories with just one .forceignore entry.
For example, to exclude all resource files related to a Lightning web component named myLwcComponent, add this entry to exclude
the entire component bundle:
**/lwc/myLwcComponent
To exclude all Apex classes:
**/classes
Metadata with Special Characters
If a metadata name has special characters (such as forward slashes, backslashes, or quotation marks), we encode the file name on the
local file system for all operating systems. For example, if you retrieve a custom profile called Custom: Marketing Profile, the colon is
encoded in the resulting file name.
Custom%3A Marketing Profile.profile-meta.xml
If you reference a file name with special characters in .forceignore, use the encoded file name.
Where to Put .forceignore
Be sure the paths that you specify in .forceignore are relative to the directory containing the .forceignore file. For the
.forceignore file to work its magic, you must put it in the proper location, depending on which command you’re running.
23
How to Exclude Source When SyncingProject Setup

•
Add the .forceignore file to the root of your project for the project source tracking commands.
•
Add the file to the metadata retrieve directory (with package.xml) for project convert mdapi.
Multiple .forceignore Files in a Single Project
You typically have only one .forceignore file in your Salesforce DX project, usually in the project’s root directory. However, it’s
possible to have more, so it’s important to know which .forceignore file the project commands use when deploying or
retrieving a particular source file.
When the project commands are determining whether to exclude a source file, they traverse up the directory tree from where the
source file lives, looking for a .forceignore file. When they find one, they refer to it to determine whether to exclude the source
file, and then stop. They don’t continue looking for another .forceignore file.
Let’s look at an example. Imagine you have a .forceignore file in the root directory of your project, and it doesn’t exclude any Apex
classes. In addition to the standard force-app package directory, you’ve configured a second package directory called
second-package, which has its own .forceignore file at its root. This .forceignore file excludes Apex classes that start
with Paged. The second-package package directory has an Apex class called PagedResult in its main/default/classes
subdirectory. Here’s what it looks like in VS Code.
Let’s say you run this command in the project to deploy all Apex classes in all package directories.
sf project deploy start --metadata ApexClass
Because the PagedResult Apex class lives in the second-package package directory, the deploy command refers to the
.forceignore in that directory, and excludes the source files associated with the Apex class. The command doesn’t refer to the
project .forceignore file.
Let’s now assume that the force-app directory contains a PagedNewResult Apex class. The deploy command refers to the
project .forceignore file and thus doesn’t exclude the associated source files. Or in other words, the command deploys the files
associated with the PagedNewResult Apex class.
24
How to Exclude Source When SyncingProject Setup

Sample Syntax
Here are some options for indicating which source to exclude. In this example, all paths are relative to the project root directory.
# Specify a relative path to a directory from the project root
helloWorld/main/default/classes
# Specify a wildcard directory - any directory named “classes” is excluded
**classes
# Specify file extensions
**.cls*
**.pdf
# Specify a specific file
helloWorld/main/default/HelloWorld.cls*
List the Files and Directories Currently Being Ignored
Use the project list ignored command to list the files and directories in your project that the project commands are
currently ignoring. The project list ignored command refers to the .forceignore file to determine the list of ignored
files.
To list all the files in all package directories that are ignored, run the command without any flags. Use the --source-dir flag to
limit the check to a specific file or directory. If you specify a directory, the command checks all subdirectories recursively.
This example checks if a particular file is ignored.
sf project list ignored --source-dir package.xml
This example gets a list of all ignored files in a specific directory.
sf project list ignored --source-dir force-app/main/default
Sample output if the command finds ignored files:
Found the following ignored files:
force-app/main/default/aura/.eslintrc.json
force-app/main/default/lwc/.eslintrc.json
force-app/main/default/lwc/jsconfig.json
Sample output if the file isn’t ignored:
No ignored files found in paths:
README.md
SEE ALSO:
Retrieve Changes to Profiles with Source Tracking
Create a Salesforce DX Project from Existing Source
If you’re a Salesforce developer, partner, or ISV, you likely have existing source in a managed package in your packaging org or application
source in your sandbox or production org. Before you begin using Salesforce DX, retrieve the existing source into a Salesforce DX project.
25
Create a Salesforce DX Project from Existing SourceProject Setup

1. Create a Salesforce DX project.
sf project generate --name MyProject
2. Change to the project directory.
cd MyProject
3. Retrieve your source by running the project retrieve start command. The location and format of your current source
determine the command flags you must use.
Command To Retrieve Your SourceFormat and Location of Current Source
sf project retrieve start --package-name
<package-name> --target-org
<sourceOrg-username-or-alias>
You’re a partner who has your source already defined as a
managed package in your packaging org.
The --target-org flag specifies the username or alias for
the source org (such as a packaging org) from which you’re
retrieving the source. The --package-name flag specifies
the package name; if the name contains a space, enclose it in
double quotes.
By default, the command creates a package directory, with the
same name as your package, in the DX project directory. The
command then retrieves the source from your package and
organizes it in the new directory using the standard DX source
format structure. Use the --output-dir to specify a different
directory; the command creates the directory if it doesn’t exist.
sf project retrieve start --manifest
<manifest-file> --target-org
<sourceOrg-username-or-alias>
You have a manifest file, typically called package.xml, that
defines your unpackaged source in a sandbox or production org.
The --target-org flag specifies the username or alias for
the org (such as a sandbox or production) from which you’re
retrieving the source. The --manifest flag indicates the path
to the manifest file, typically called package.xml.
By default, the command retrieves the source into the existing
force-app package directory of your DX project Use the
--output-dir to specify a different directory; the command
creates the directory if it doesn’t exist.
Tip: If you already have a repo that follows the directory structure created from a Metadata API retrieve, then your source files
in the repo are in metadata format. You can convert these files into source format and include them in your Salesforce DX
project. See Convert Files in Metadata Format to Source Format for details.
4. If the retrieve created a package directory in your project, add it to your sfdx-project.json file.
26
Create a Salesforce DX Project from Existing SourceProject Setup

Do you have source in a sandbox or production org, but you don’t have a manifest file (package.xml) for retrieving it to your project?
Use the project generate manifest CLI command to create one. For example, this command generates a manifest from
the metadata components in the org with the alias prod-org.
sf project generate manifest --from-org prod-org
See the command help for more examples and information.
sf project generate manifest --help
You can also refer to Sample package.xml Manifest Files in the Metadata API Developer Guide.
SEE ALSO:
Create a Salesforce DX Project
Salesforce DX Project Structure and Source Format
Salesforce DX Project Configuration
Convert Files in Metadata Format to Source Format
VS Code Command: SFDX: Create Project, SFDX: Create Project with Manifest
Convert Files in Metadata Format to Source Format
If you already have a repo in which you’ve retrieved metadata from an org using the Metadata API directly, the files are in metadata
format. You can convert these files into source format and add them to your Salesforce DX project. You can then deploy and retrieve
them to and from your org using CLI commands and use source tracking to track changes.
The convert command ignores all files that start with a “dot,” such as .DS_Store. To exclude more files from the convert process,
add a .forceignore file.
1. Change to your Salesforce DX project directory.
2. Convert the files from metadata format to source format with the project convert mdapi command. Let’s say your
metadata-format files are in a directory called /Users/testing/mdapi_project.
sf project convert mdapi --root-dir /Users/testing/mdapi_project
The --root-dir flag is the name of the directory that contains the metadata format files.
The converted source is stored in the default package directory indicated in the sfdx-project.json file, typically named
force-app. Use the --output-dir flag to put the converted files in a different package directory; the command creates the
directory if it doesn’t exist.
3. If the convert created a package directory in your project, add it to your sfdx-project.json file.
SEE ALSO:
Salesforce DX Project Configuration
27
Convert Files in Metadata Format to Source FormatProject Setup

Salesforce DX Usernames and Orgs
Many Salesforce CLI commands connect to an org to complete their task. For example, the org create scratch command,
which creates a scratch org, connects to a Dev Hub org. The project deploy start and project retrieve start
commands synchronize source code between your project and an org. In each case, the CLI command requires a username to determine
which org to connect to. Usernames are unique within the entire Salesforce ecosystem and are associated with just one org.
When you create a scratch org, the CLI generates a username. The username looks like an email address, such as
[email protected]. You don’t need a password to connect to or open a scratch org, although you can generate one
later with the org generate password command.
Salesforce recommends that you set the org that you connect to the most during development as your default org. The easiest way to
set it is when you log in to a Dev Hub org or create a scratch org; you can also use the config commands. Specify the
--set-default-dev-hub or --set-default flag, respectively. You can also create an alias to make the org’s usernames
more readable and intuitive. You can use usernames or their aliases interchangeably for all CLI commands that connect to an org.
These examples set the default org and aliases when you log in and authorize an org, in this case a Dev Hub org, and then when you
create a scratch org.
sf org login web --set-default-dev-hub --alias my-hub-org
sf org create scratch --definition-file config/project-scratch-def.json --set-default
--alias my-scratch-org
To verify whether a CLI command requires an org connection, look at its flag list with the -h flag. Commands that have the
--target-dev-hub flag connect to the Dev Hub org. Similarly, commands that have --target-org connect to scratch orgs,
sandboxes, and so on. This example displays the flag list and help information about org create scratch.
sf org create scratch -h
When you run a CLI command that requires an org connection and you don’t specify a username, the command uses the default. To
display all the orgs that you've authorized or created, run org list. The default Dev Hub and scratch orgs are marked with an emoji
on the left; see the legend at the end of the display for details.
Let's run through a few examples. This example deploys source code to the org that you've set as the default.
sf project deploy start
To specify an org other than the default, use --target-org. For example, let’s say you created a scratch org with the alias
my-other-scratch-org. It’s not the default but you still want to deploy source to it.
sf project deploy start --target-org my-other-scratch-org
This example shows how to use the --target-dev-hub flag to specify a non-default Dev Hub org when creating a scratch org.
--alias yet-another-scratch-org
More About Setting Default Orgs
If you’ve already created a scratch org, you can set it, or any other org, as your default by running the config set command from
your project directory.
sf config set target-org [email protected]
28
Salesforce DX Usernames and OrgsProject Setup

The command sets the value locally, so it works only for the current project. To use the default org for all projects on your computer,
specify the --global flag. You can run this command from any directory. Local project defaults override global defaults.
sf config set target-org [email protected] --global
The process is similar to set a default Dev Hub org, except you use the target-dev-hub config variable.
sf config set target-dev-hub [email protected]
To unset a config variable, run the config unset command. Use the --global flag to unset it for all your Salesforce DX projects.
sf config unset target-org --global
To view all the configuration variables you’ve set, run config list; if you run it from a project directory it also lists the local ones.
sf config list
More About Aliasing
Use the alias set command to set an alias for a scratch org you’ve already created, or any org after you’ve authorized it. You can
create an alias for any org: Dev Hub, scratch org, production, sandbox, and so on. So when you issue a command that requires the org’s
username, using an easily-remembered alias speeds things up.
sf alias set my-scratch-org [email protected]
An alias also makes it easy to set a default org. The previous example of using config set to set target-org now becomes
much more digestible when you use an alias rather than the actual username.
sf config set target-org my-scratch-org
Set multiple aliases with a single command by separating the name-value pairs with a space; in this case you must use the equal sign.
sf alias set org1=<username> org2=<username>
You can associate an alias with only one username at a time. If you set it multiple times, the alias points to the most recent username.
For example, if you run the following two commands, the alias my-org is set to [email protected].
sf alias set my-org [email protected]
sf alias set my-org [email protected]
To view all aliases that you’ve set, use one of the following commands.
sf alias list
sf org list
To remove an alias, use the alias unset command.
sf alias unset my-org
List All Your Orgs
Use the org list command to display the usernames and aliases for the orgs that you’ve authorized and the active scratch orgs
that you’ve created.
sf org list
Type Alias Username Org ID
29
Salesforce DX Usernames and OrgsProject Setup

Status Expires
── ─────── ────────────── ───────────────────────────────────────────── ──────────────────
───────────────────── ──────────
Connected
Connected
Active 2023-08-21
Legend: D=Default DevHub, O=Default Org Use --all to see expired and deleted scratch
orgs
The output lists the orgs that you’ve authorized or created, including Dev Hub orgs, production orgs, scratch orgs, and sandboxes. The
table displays the usernames that you specified when you authorized the orgs, their aliases, their IDs, and whether the CLI can connect
to it. An emoji on the left points to the default org or Dev Hub; refer to the legend at the bottom for details. Scratch orgs also display
their expiration dates.
To view more information, such as the scratch org creation date and associated DevHub org, and instance URL for all orgs, use the
--verbose flag.
sf org list --verbose
Use the --clean flag to remove non-active scratch orgs from the list. The command prompts you before it does anything.
sf org list --clean
SEE ALSO:
Authorization
Build Your Own Scratch Org Definition File
Create Scratch Orgs
Generate or Change a Password for a Scratch Org User
Deploy Source From Your Project to the Scratch Org
Link a Namespace to a Dev Hub Org
To use a namespace with a scratch org, you must link the Developer Edition org where the namespace is registered to a Dev Hub org.
Complete these tasks before you link a namespace.
•
If you don’t have an org with a registered namespace, create a Developer Edition org that is separate from the Dev Hub or scratch
orgs. If you already have an org with a registered namespace, you’re good to go.
•
In the Developer Edition org, create and register the namespace.
Important: Choose namespaces carefully. If you’re trying out this feature or need a namespace for testing purposes, choose
a disposable namespace. Don’t choose a namespace that you want to use in the future for a production org or some other
real use case. After you associate a namespace with an org, you can't change it or reuse it.
1. Log in to your Dev Hub org as the System Administrator or as a user with the Salesforce DX Namespace Registry permissions.
Tip: Make sure your browser allows pop-ups from your Dev Hub org.
30
Link a Namespace to a Dev Hub OrgProject Setup

a. From the App Launcher menu, select Namespace Registries.
b. Click Link Namespace.
2. In the window that pops up, log in to the Developer Edition org in which your namespace is registered using the org's System
Administrator's credentials.
You can’t link orgs without a namespace: sandboxes, scratch orgs, patch orgs, and branch orgs require a namespace to be linked to
the Namespace Registry.
To view all the namespaces linked to the Namespace Registry, select the All Namespace Registries list view.
SEE ALSO:
Get a Trial Development Environment for Free
Lightning Aura Components Developer Guide: Create a Namespace in Your Org
Add Salesforce DX Users
Salesforce Help: My Domain
Salesforce DX Project Configuration
The project configuration file sfdx-project.json indicates that the directory is a Salesforce DX project. The configuration file
contains project information and facilitates the authorization of orgs and the creation of second-generation packages. It also tells
Salesforce CLI where to put files when syncing between the project and org.
We provide sample sfdx-project.json files in the sample repos for creating a project using Salesforce CLI or Salesforce Extensions
for VS Code.
Note: Are you planning to create second-generation packages? When you’re ready, add packaging-specific configuration options
to support package creation. See Project Configuration File for a Second-Generation Managed Package.
We recommend that you check in this file with your source.
{
"packageDirectories" : [
{ "path": "force-app", "default": true},
{ "path" : "unpackaged" },
{ "path" : "utils" }
],
"namespace": "",
"sfdcLoginUrl" : "https://login.salesforce.com",
"sourceApiVersion": "58.0"
}
You can manually edit these parameters.
name (required for Salesforce Functions)
Salesforce DX or Salesforce Functions project name.
namespace (optional)
The global namespace that is used with a package. The namespace must be registered with an org that is associated with your Dev
Hub org. This namespace is assigned to scratch orgs created with the org create scratch command. If you’re creating an
unlocked package, you have the option to create a package with no namespace.
31
Salesforce DX Project ConfigurationProject Setup

Important: Register the namespace with Salesforce and then connect the org with the registered namespace to the Dev
Hub org.
oauthLocalPort (optional)
By default, the OAuth port is 1717. Change this port if 1717 is already in use and you plan to create a connected app in your Dev
Hub org to support JWT-based authorization. Be sure you also follow the steps in Create a Connected App in Your Org to change
the callback URL.
packageAliases (optional)
Aliases for package IDs, which can often be cryptic. See Project Configuration File for a Second-Generation Managed Package for
details.
packageDirectories (required)
Package directories indicate which directories to target when syncing source to and from the org. These directories can contain
source files from your managed or unmanaged package. They can also contain unpackaged source files produced by, for example,
an ant tool or change set. For information on all packageDirectories options, see Project Configuration File for a
Second-Generation Managed Package.
Keep these things in mind when working with package directories.
•
The location of the package directory is relative to the project. Don’t specify an absolute path. The following two examples are
equivalent.
"path": "helloWorld"
"path" : "./helloWorld"
•
You can have only one default path (package directory). If you have only one path, we assume it’s the default, so you don’t have
to explicitly set the default parameter. If you have multiple paths, you must indicate which one is the default.
•
Salesforce CLI uses the default package directory as the target directory when retrieving changes from the org to the local project.
This default path is also used when creating second-generation packages.
•
If you don’t specify an output directory, the default package directory is also where files are stored during source conversions.
Source conversions are both from metadata format to source format, and from source format to metadata format.
plugins (optional)
To use the custom plugins you’ve created with your Salesforce DX project, add a plugins section to the sfdx-project.json
file. In this section, add configuration values and settings to change your plugins’ behavior.
"plugins": {
"yourPluginName": {
"timeOutValue": "2"
},
"yourOtherPluginName": {
"yourCustomProperty": true
}
}
Store configuration variables for only those values that you want to check in to source control for the project. These configuration
values affect your whole development team.
pushPackageDirectoriesSequentially (optional) (Deprecated)
Note: This property is deprecated and applies only to the deprecated force:source:push command. It doesn't affect
the behavior of the project deploy start command. To deploy packages sequentially, and in a specific order, use
separate project deploy start commands in the desired order.
32
Salesforce DX Project ConfigurationProject Setup

Set to true to push multiple package directories in the order they're listed in packageDirectories when using
force:source:push. The directories are pushed in separate transactions. The default value of this property is false, which
means that multiple package directories are deployed in a single transaction without regard to order. Example:
"packageDirectories": [
{
"path": "es-base-custom",
"default": true
},
{
"path": "es-base-ext"
}
],
"pushPackageDirectoriesSequentially": true,
replacements (optional)
Automatically replace strings in your metadata source files with specific values right before you deploy the files to an org.
See Replace Strings in Code Before Deploying for details.
sfdcLoginUrl (optional)
The login URL that the org login commands use. If not specified, the default is https://login.salesforce.com.
Override the default value if you want users to authorize to a specific Salesforce instance. For example, if you want to authorize into
a sandbox org, set this parameter to https://test.salesforce.com.
If you don’t specify a default login URL here, or if you run org login outside the project, specify the instance URL when authorizing
the org with the --instance-url flag.
sourceApiVersion (optional)
The API version that the source is compatible with. The default is the same version as the Salesforce CLI.
The sourceApiVersion value determines the fields retrieved for each metadata type during project deploy, project
retrieve, or project convert. This field is important if you’re using a metadata type that has changed in a recent release.
You’d want to specify the version of your metadata source. For example, let's say a new field was added to the CustomTab for API
version 58.0. If you retrieve components for version 57.0 or earlier, you see errors when running the project commands because
the components don't include that field.
Don’t confuse this project configuration parameter with the org-api-version CLI configuration variable, which has a similar name.
See How API Version and Source API Version Work in Salesforce CLI for more information.
sourceBehaviorOptions (optional) (Beta)
Configure certain aspects about how Salesforce CLI manages the source code in your Salesforce DX project.
You can use this option to specify which metadata types in your Salesforce DX project are decomposed. Custom objects and custom
object translations are always decomposed by default.
Decomposing means breaking up the single, and often large, metadata format XML file that corresponds to a metadata component
into smaller XML files and directories based on its subtypes.
Possible values:
•
decomposePermissionSetBeta—Decompose the PermissionSet metadata type.
•
decomposeCustomLabelsBeta—Decompose the CustomLabels metadata type.
•
decomposeWorkflowBeta—Decompose the WorkFlow metadata type.
•
decomposeSharingRulesBeta—Decompose the SharingRules metadata type
33
Salesforce DX Project ConfigurationProject Setup

Example:
"sourceBehaviorOptions": ["decomposePermissionSetBeta", "decomposeCustomLabelsBeta"]
SEE ALSO:
Link a Namespace to a Dev Hub Org
Authorization
How to Exclude Source When Syncing
Retrieve Source from the Scratch Org to Your Project
Deploy Source From Your Project to the Scratch Org
Multiple Package Directories
When you create your Salesforce DX project, we recommend that you organize your metadata into logical groupings by creating multiple
package directories locally. You then define these directories in your sfdx-project.json file. You can group similar code and
source files for an application or customization to better organize your team’s repository. Later, if you decide to use second-generation
packages (2GP), these directories correspond to the actual 2GP packages.
Note: For clarity, a package directory refers to the local (client-side) directory that contains decomposed metadata files, that is,
metadata in source format. This directory doesn’t always result in a 2GP package. Package refers to a 2GP package.
In your sfdx-project.json file, list each package directory separately in the packageDirectories section. Each local
package directory adheres to the standard Salesforce DX project structure.
The multiple package directory structure is client-side (local) only. When you deploy the source to the org with project deploy
start, there’s no association between its local package directory location and the package in the org. You specify that metadata
belongs to a specific 2GP package in an org by explicitly installing the 2GP package.
All of the project commands that deploy, retrieve, and convert metadata support multiple package directories.
How Do I Set It Up?
Setting up multiple package directories is easy. How you organize your local source code among these directories takes more thought
and planning, and depends on your development environment. Plan how to organize your code before you get started. Keep your
source code well organized as your project grows to make it easier and more efficient for your developers to work.
Let’s say you put the decomposed metadata files for a custom object MyObject in the default package directory. You can then put files
for a new field MyField on MyObject in a different “extension” package directory without having to also include the MyObject files.
Although this example is simple, you can organize your code in any number of different ways. These blog posts provide some ideas.
Here’s how you set up multiple package directories. Let’s first look at a sample sfdx-project.json snippet:
"packageDirectories": [
{
"path": "es-base-custom",
"default": true
},
{
"path": "es-base-ext"
},
{
34
Multiple Package DirectoriesProject Setup

"path": "es-base-styles"
}
],
The sample sfdx-project.json snippet defines three package directories: es-base-custom (the default), es-base-ext,
and es-base-styles. Let’s say your top-level local project directory is called easy-spaces-lwc. The directory hierarchy
underneath it looks something like this:
Each es-base-* directory adheres to the standard Salesforce DX project structure. For example, the es-base-ext directory
looks something like this:
Now add the decomposed metadata source to these multiple package directories in the way that best suits your development environment.
How Does It Work?
Let's go through a few examples to see how project deploy start and project retrieve start work with multiple
package directories.
For new orgs, the default project deploy start command deploys all the metadata in all multiple package directories
listed in your sfdx-project.json file. After that, the command deploys only metadata that's new, changed, or marked for delete.
By default, the command deploys the metadata in a single transaction, as if you had just one package directory.
sf project deploy start --target-org my-org
You can also target the metadata you want to deploy. You can deploy specific package directories, specific metadata components,
components listed in a manifest file, and more. This example deploys the metadata in the es-base-custom package directory:
sf project deploy start --source-dir es-base-custom --target-org my-org
35
Multiple Package DirectoriesProject Setup

To deploy more than one package directory, specify the --source-dir flag multiple times. This example deploys all the package
directories configured in the sample sfdx-project.json file shown in the previous section.
sf project deploy start --source-dir es-base-custom --source-dir es-base-ext --source-dir
es-base-styles --target-org my-org
This example deploys all Apex classes found in all your multiple package directories:
sf project deploy start --metadata ApexClass --target-org my-org
When you run project retrieve start, the command retrieves all remote changes from the org into your local project. For
each retrieved component, the command looks in all package directories for a local match. If it finds a match, the command updates it.
If it doesn't find a match, the command copies the local component into the default package directory, which in our example is
es-base-custom.
sf project retrieve start --target-org my-org
You can then move the retrieved files into the package directory that makes sense for your project. After you deploy the moved files
back to the org with project deploy start, Salesforce CLI tracks their new location.
You can also use project retrieve start to retrieve targeted metadata from your org. Existing metadata is retrieved into its
correct local package directory and new metadata into the default package directory. This example retrieves only the metadata components
contained in the local es-base-custom package directory:
sf project retrieve start --source-dir es-base-custom --target-org my-org
This example retrieves all Apex classes from your org; new classes go into the default package directory and classes that exist locally go
into their corresponding package directory.
sf project retrieve start --metadata ApexClass --target-org my-org
Push Source Sequentially
By default, project deploy start deploys metadata to your org in a single transaction, regardless of the order that you list
your multiple package directories in sfdx-project.json. But sometimes you must specify the exact order that the package
directories are pushed. Reasons include:
•
The number of recomposed metadata component files in your local project exceeds the Salesforce metadata limit of 10,000 files
per retrieve or deploy. One workaround is to split up your metadata into multiple package directories that each contain less than
this limit and push each directory sequentially, and thus separately.
•
You have dependencies between multiple package directories, which requires that they be pushed in a specific order.
•
More than one package directory contains the same metadata component, and you want to specify which one is deployed last so
it's not overwritten.
If you need multiple deployments in a specific order, run project deploy start several times with the --source-dir or
--metadata flags in the desired order.
SEE ALSO:
Developer Guide: Second-Generation Managed Packages
Developer Guide: Install and Uninstall Second-Generation Managed Packages
Salesforce DX Project Structure and Source Format
Salesforce Developers Blog: Working with Modular Development and Unlocked Packages
36
Multiple Package DirectoriesProject Setup

Replace Strings in Code Before Deploying or Packaging
Automatically replace strings in your metadata source files with specific values right before you deploy the files to an org or create a
package version.
These sample use cases describe scenarios for using string replacement:
•
A NamedCredential contains an endpoint that you use for testing. But when you deploy the source to your production org, you
want to specify a different endpoint.
•
An ExternalDataSource contains a password that you don’t want to store in your repository, but you’re required to deploy the
password along with your metadata.
•
You deploy near-identical code to multiple orgs. You want to conditionally swap out some values depending on which org you’re
deploying to.
For the project deploy start command, string replacement occurs when source-formatted files are converted to metadata
API format, and then a ZIP file is created and deployed to the org. It also occurs when you run the package version create
command, which converts source files as part of the package creation process. The changes that result from string replacement are
never written to your project source; they apply only to the deployed or packaged files.
Note: For simplicity, the rest of this topic assumes that you’re using string replacement before deploying to your org, but the
same ideas also apply to creating a package version.
Configure String Replacement
Configure string replacement by adding a replacements property to your sfdx-project.json file. The property accepts
multiple entries that consist of keys that define the:
•
Source file or files that contain the string to be replaced.
•
The string to be replaced.
•
The replacement value.
To see how string replacements work, let’s look at an example; see more examples later in this topic.
This sample sfdx-project.json specifies that when the file force-app/main/default/classes/myClass.cls
is deployed, all occurrences of the string replaceMe are replaced with the value of the THE_REPLACEMENT environment variable:
{
"packageDirectories": [
{
"path": "force-app",
"default": true
}
],
"name": "myproj",
"replacements": [
{
"filename": "force-app/main/default/classes/myClass.cls",
"stringToReplace": "replaceMe",
"replaceWithEnv": "THE_REPLACEMENT"
}
]
}
You can specify these keys in the replacements property.
37
Replace Strings in Code Before Deploying or PackagingProject Setup

Location of Files
One of the following properties is required:
•
filename: Single file that contains the string to be replaced.
•
glob: Collection of files that contain the string to be replaced. Example: **/classes/*.cls.
String to be Replaced
One of the following properties is required:
•
stringToReplace: The string to be replaced.
•
regexToReplace: A regular expression (regex) that specifies a string pattern to be replaced.
Replacement Value
One of the following properties is required:
•
replaceWithEnv: Specifies that the string is replaced with the value of the specified environment variable.
•
replaceWithFile: Specifies that the string is replaced with the contents of the specified file.
Conditional Processing
These properties are optional:
•
replaceWhenEnv: Specifies that a string replacement occur only when a specific environment variable is set to a specific
value. Use the property env to specify the environment variable and the property value to specify the value that triggers
the string replacement.
•
allowUnsetEnvVariable: Boolean property used with the replaceWithEnv property. When set to true, specifies
that if the replaceWithEnv environment variable isn’t set, then remove the replacement string from the file before deploying.
In other words, replace it with nothing. When set to false (the default value), you get an error when the replaceWithEnv
environment variable isn’t set.
Follow these syntax rules:
•
Always use forward slashes for directories (/), even on Windows.
•
Both JSON and regular expressions use the backslash (\) as an escape character. As a result, when you use a regular expression to
match a dot, which requires escaping, you must use two backslashes for the regexToReplace value:
"regexToReplace" : "\\."
Similarly, to match a single backslash, you must specify three of them.
"regexToReplace" : "\\\"
Examples
This example is similar to the previous example but shows how to configure string replacement for two files:
"replacements": [
{
"filename": "force-app/main/default/classes/FirstApexClass.cls",
"stringToReplace": "replaceMe",
"replaceWithEnv": "THE_REPLACEMENT"
},
{
"filename": "force-app/main/default/classes/SecondApexClass.cls",
"stringToReplace": "replaceMe",
"replaceWithEnv": "THE_REPLACEMENT"
38
Replace Strings in Code Before Deploying or PackagingProject Setup

}
]
This example shows how to specify that the string replacement occur only if an environment variable called DEPLOY_DESTINATION
exists and it has a value of PROD.
"replacements": [
{
"filename": "force-app/main/default/classes/myClass.cls",
"stringToReplace": "replaceMe",
"replaceWithEnv": "THE_REPLACEMENT",
"replaceWhenEnv": [{
"env": "DEPLOY_DESTINATION",
"value": "PROD"
}]
}
]
In this example, if the environment variable SOME_ENV_THAT_CAN_BE_BLANK isn’t set, the string myNS__ in the myClass.cls
file is removed when the file is deployed. If the environment variable is set to a value, then that value replaces the myNS__ string.
"replacements": [
{
"filename": "/force-app/main/default/classes/myClass.cls",
"stringToReplace": "myNS__",
"replaceWithEnv": "SOME_ENV_THAT_CAN_BE_BLANK",
"allowUnsetEnvVariable": true
}
]
This example specifies that when the Apex class files in the force-app/main/default directory are deployed, all occurrences
of the string replaceMe are replaced with the contents of the file replacementFiles/copyright.txt.
"replacements": [
{
"glob": "force-app/main/default/classes/*.cls",
"stringToReplace": "replaceMe",
"replaceWithFile": "replacementFiles/copyright.txt"
}
]
Use a regular expression to specify a search pattern for text rather than the literal text. For example, Apex class XML files always contain
an <apiVersion> element that specifies the Salesforce API version, as shown in this snippet.
<?xml version="1.0" encoding="UTF-8" ?>
<ApexClass xmlns="http://soap.sforce.com/2006/04/metadata">
<apiVersion>55.0</apiVersion>
<status>Active</status>
</ApexClass>
Let’s say you want to test your Apex classes on a more recent API version before you actually update all your classes. This example shows
how to use a regular expression to search for the <apiVersion> element. At deploy, the element is replaced with a specific string,
39
Replace Strings in Code Before Deploying or PackagingProject Setup

such as <apiVersion>58.0</apiVersion>, which is contained in the
replacementFiles/latest-api-version.txt file.
"replacements": [
{
"glob": "force-app/main/default/classes/*.xml",
"regexToReplace": "<apiVersion>\\d+\\.0</apiVersion>",
"replaceWithFile": "replacementFiles/latest-api-version.txt"
}
]
Tips and Tricks
•
(macOS or Linux only) When using the replaceWithEnv or replaceWhenEnv properties, you can specify that the environment
variables apply to a single command by prepending the variables before the command execution. For example:
THE_REPLACEMENT="some text" DEPLOY_DESTINATION=PROD sf project deploy start
Warning: Be careful when setting passwords or secrets this way, because they show up in your terminal history.
•
If you’ve configured many string replacements, and are finding it difficult to manage, check out open-source tools that load the
contents of one or more files to your environment, such as dotenv-cli. In this example, environment variables configured in two local
.env files are loaded before the project deploy start command execution:
dotenv -e .env1 -e .env2 sf project deploy start
Warning: Don’t commit passwords or secrets in .env files.
•
If you specify --json for project deploy start, the JSON output includes a replacements property that lists the
affected files and the string that was replaced. If you specify --json and --concise, the JSON output doesn’t include the
replacements property.
To view string replacement information in the project deploy start human-readable output, specify --verbose.
Considerations and Limitations
•
If you configure multiple string replacements in multiple files, the performance of the deployment can degrade. Consider using the
filename key when possible, to ensure that you open only one file. If you must use glob, try to limit the number of files that
are opened by specifying a single directory or metadata type.
For example, "glob": "force-app/main/default/classes/*.cls" targets Apex class files in a specific directory,
which is better than "glob": "**/classes/**”, which searches for all Apex metadata files in all package directories.
•
Be careful using string replacement in static resources. When not doing string replacement, Salesforce CLI simply zips up all static
resources when it first encounters their directory and deploys them as-is. If you configure string replacement for a large static resource
directory, the CLI must inspect a lot more files than usual, which can degrade performance.
•
You can’t use string replacements when deploying in metadata format, such as with the command project deploy start
--metadata-dir.
•
If your deployment times out, or you specify the --async flag of project deploy start, and then run project
deploy resume or project deploy report to see what happened, the deployed files contain string replacements
as usual. However, the output of project deploy resume and project deploy report don’t display the same
string replacement information as project deploy start --verbose would have.
40
Replace Strings in Code Before Deploying or PackagingProject Setup

Test String Replacements
To test string replacement without actually deploying files to the org or creating a package version, follow these steps.
Test String Replacements
To test string replacement without actually deploying files to the org or creating a package version, follow these steps.
1. Set the SF_APPLY_REPLACEMENTS_ON_CONVERT environment variable to true.
2. Run the project convert source command, which converts the source files into metadata API format. For example:
sf project convert source --output-dir mdapiOut --source-dir force-app
3. Inspect the files in the output directory (mdapiOut in our example) for the string replacements and what exactly will be deployed
to the org or packaged.
Warning: Be careful when writing passwords or secrets to the file system while testing. Also, be sure to reset any environment
variables you set during testing so they aren’t accidentally applied later.
41
Test String ReplacementsProject Setup

CHAPTER 4 Authorization
EDITIONS
Available in: Salesforce
Classic and Lightning
Experience
Dev Hub available in:
Developer,Enterprise,
Performance, and
Unlimited Editions
Scratch orgs are available
in: Developer, Enterprise,
Group, and Professional
Editions
Authorization refers to logging into an org so you can run
commands that require access to the org. Creating an org with a
CLI command also automatically authorizes it. For example, you
authorize a Dev Hub org to allow you to create, delete, and manage
your Salesforce scratch orgs. After you set up your project on your
local machine, you authorize the Dev Hub org before you can create
a scratch org. When you run the command to create the scratch
org, Salesforce CLI automatically authorizes it.
You can also authorize other existing orgs, such as sandboxes or
packaging orgs, to provide more flexibility when using CLI
commands.
You authorize an org only one time. To switch between orgs during
development, specify the username that you used to log into the
org with either the --target-org or --target-dev-hub
flag. You can also set a default org or use an alias.
In this chapter ...
• Authorize an Org
Using a Browser
• Authorize an Org
Using the JWT Flow
• Authorize an Org
Using Its SFDX
Authorization URL
• Create a Private Key
and Self-Signed
Digital Certificate
• Create a Connected
App in Your Org
• Use the Default
Connected App
Securely
You have some options when authorizing an org, depending on what you’re trying to accomplish.
•
The easiest option is to run org login web, which opens a browser in which you enter your
Salesforce credentials. This option is officially called the OAuth 2.0 web server flow.
• Use an Existing
Access Token
• Authorization
Information for an
Org
•
For continuous integration (CI) or automated environments, use the org login jwt command.
This option is officially called the OAuth 2.0 JSON Web Tokens (JWT) bearer flow. This flow is ideal
for scenarios where you can’t interactively log in to a browser, such as from a CI script.
You can also use the org login sfdx-url command in automated environments; this
method uses the org’s SFDX authorization URL.
• Log Out of an Org
Important: If your org is configured with high assurance (stepped up) authentication,
Salesforce prompts the user to verify their identity. This verification process means that you
can’t use the JWT flow or SFDX authorization URL with Salesforce CLI for headless authentication.
SEE ALSO:
Authorize an Org Using a Browser
Authorize an Org Using the JWT Flow
Salesforce Help: OAuth 2.0 Web Server Flow for Web App Integration
Salesforce Help: OAuth 2.0 JWT Bearer Flow for Server-to-Server Integration
42

Authorize an Org Using a Browser
Authorize an org with a browser by running a CLI command and entering your credentials in the browser that automatically opens.
That’s it!
Use this authorization method when multi-factor authentication (MFA) is enabled on your org, either directly with a username and
password or via single sign-on (SSO).
1. Open a terminal (macOS and Linux) or command prompt (Windows).
2. Run the org login web CLI command. We recommend using the --alias flag to make it easy to refer to the org later.
sf org login web --alias my-org
Use the --set-default flag if you want the org to be the default for commands that accept the --target-org flag. If
you’re authorizing a Dev Hub org, use the --set-default-dev-hub flag instead. See the org login web command
for examples.
3. In the browser window that opens, sign in to your org with your Salesforce login credentials. Click Allow, which allows Salesforce
CLI to access to your org.
4. Close the browser window. Your org is now authorized!
If the URL that you use to log in to your org isn’t the default (login.salesforce.com), update your project configuration file
(sfdx-project.json). Set the sfdcLoginUrl option to your My Domain login URL. For example:
"sfdcLoginUrl" : "https://MyDomainName.my.salesforce.com"
This example is for a sandbox.
"sfdcLoginUrl" : "https://MyDomainName--SandboxName.sandbox.my.salesforce.com"
Alternatively, you can use the --instance-url flag of org login web to specify the URL. This value overrides the login URL
you specified in the sfdx-project.json file. For example:
sf org login web --alias my-hub-org --instance-url https://exciting.sandbox.my.salesforce.com
Note: We recommend that you use your enhanced My Domain login URL, as it isn’t affected by org migrations that change your
org’s Salesforce instance. Be sure you use the version that ends in my.salesforce.com instead of the URL you see in Lightning
Experience (.lightning.force.com). To verify the valid My Domain URL, from Setup, enter My Domain in the Quick
Find box, then select My Domain.
Also, the orgs you authorize for Salesforce CLI are required to have a connected app. We provide a default connected app called
Salesforce CLI. If you need more security or control, such as setting the refresh token timeout or specifying IP ranges, create
your own connected app. You can also configure the default connected app to be more secure.
SEE ALSO:
Salesforce CLI Command Reference: org login web
Create a Connected App in Your Org
Use the Default Connected App Securely
Salesforce DX Project Configuration
Salesforce Help: Enhanced Domains
VS Code Command: SFDX: Authorize an Org, SFDX: Authorize a Dev Hub
43
Authorize an Org Using a BrowserAuthorization

Authorize an Org Using the JWT Flow
Use the JWT flow to authorize an org in continuous integration (CI) environments, which are fully automated and don’t support the
human interactivity of logging into a browser.
Note: This option to authorize an org is officially called the OAuth 2.0 JSON Web Tokens (JWT) bearer flow.
The JWT flow requires a digital certificate, also called a digital signature, to sign the JWT request. You can use your own certificate or
create a self-signed certificate using OpenSSL.
Important: If your org is configured with high assurance (stepped up) authentication, Salesforce prompts the user to verify their
identity. This verification process means that you can’t use the JWT flow and Salesforce CLI for headless authentication.
1. If you don’t have your own private key and digital certificate, you can use OpenSSL to create the key and a self-signed certificate.
It’s assumed in this task that your private key file is named server.key and your digital certificate is named server.crt.
2. Create a connected app, and configure it for Salesforce DX.
This task includes uploading the server.crt digital certificate file. Make note of the consumer key when you save the connected
app because you need it later.
3. Open a terminal (macOS and Linux) or command prompt (Windows).
4. Run the org login jwt CLI command. We recommend using the --alias flag to make it easy to refer to the org later.
Specify the consumer key from your connected app with the --client-id flag, the path to the private JWT key file
(server.key), and the username for your org. For example:
sf org login jwt --client-id 04580y4051234051 --jwt-key-file /Users/jdoe/JWT/server.key
--username [email protected] --alias my-hub-org
Use the --set-default flag if you want the org to be the default for commands that accept the --target-org flag. If
you’re authorizing a Dev Hub org, use the --set-default-dev-hub flag instead. See the org login jwt command
for examples.
You can authorize a scratch org using the same consumer key and private key file that you used to authorize its associated Dev Hub org.
See Authorize a Scratch Org Using the JWT Flow
If the URL that you use to log in to your org isn’t the default (login.salesforce.com), update your project configuration file
(sfdx-project.json). Set the sfdcLoginUrl option to your enhanced My Domain login URL. For example:
"sfdcLoginUrl" : "https://MyDomainName.my.salesforce.com"
This example is for a sandbox.
"sfdcLoginUrl" : "https://MyDomainName--SandboxName.sandbox.my.salesforce.com"
Alternatively, you can use the --instance-url flag of the org login jwt command to specify the URL. This value overrides
the login URL you specified in the sfdx-project.json file. For example:
sf org login jwt --client-id 04580y4051234051 --jwt-key-file /Users/jdoe/JWT/server.key
--username [email protected] --alias my-hub-org --instance-url
https://mydomain--mysandbox.sandbox.my.salesforce.com
Note: We recommend that you use your My Domain login URL, because it isn’t affected by org migrations that change your org’s
Salesforce instance. Be sure you use the version that ends in my.salesforce.com instead of the URL you see in Lightning
Experience (.lightning.force.com). To verify the valid My Domain URL, from Setup, enter My Domain in the Quick
Find box, then select My Domain.
44
Authorize an Org Using the JWT FlowAuthorization

Authorize a Scratch Org Using the JWT Flow
If you authorized your Dev Hub org using the org login jwt command, you can use the same digital certificate and private
key to authorize an associated scratch org. This method is useful for continuous integration (CI) systems that must authorize scratch
orgs after creating them, but don’t have access to the scratch org’s access token.
SEE ALSO:
Salesforce CLI Command Reference: org login jwt
Create a Private Key and Self-Signed Digital Certificate
Create a Connected App in Your Org
Salesforce DX Project Configuration
Salesforce Help: Enhanced Domains
Salesforce Help: Set Up Multi-Factor Authentication
Authorize a Scratch Org Using the JWT Flow
If you authorized your Dev Hub org using the org login jwt command, you can use the same digital certificate and private key
to authorize an associated scratch org. This method is useful for continuous integration (CI) systems that must authorize scratch orgs
after creating them, but don’t have access to the scratch org’s access token.
Before you begin, we assume that:
•
You previously authorized your Dev Hub org with the org login jwt command.
•
The private key file you used when authorizing your Dev Hub org is accessible and in /Users/jdoe/JWT/server.key.
•
You’ve created a scratch org and have its administration user’s username, such as [email protected].
•
You know the scratch org’s instance URL. If you don’t know it, you can query your Dev Hub org. For example:
sf data query --target-org my-dev-hub --query "SELECT SignupUsername,LoginUrl FROM
ScratchOrgInfo WHERE SignupUsername='[email protected]'"
1. Copy the consumer key from the connected app that you created in your Dev Hub org.
a. Log in to your Dev Hub org.
b. From Setup, enter App Manager in the Quick Find box to get to the Lightning Experience App Manager.
c.
Locate the connected app in the apps list, then click the dropdown menu on the right side, and select View.
d. In the API (Enable OAuth Settings) section, click Manage Consumer Details
If prompted, verify your identity by entering the verification code that was automatically sent to your email address.
e. Copy the Consumer Key to your clipboard. The consumer key is a long string of numbers, letters, and characters, such as
3MVG9szVa2Rx_sqBb444p50Yj (example shortened for clarity.)
2. Open a terminal (macOS and Linux) or command prompt (Windows).
3. Run the org login jwt CLI command. The --client-id and --jwt-key-file flag values are the same as when
you ran the command to authorize a Dev Hub org. Set --username to the scratch org’s admin username and set
45
Authorize a Scratch Org Using the JWT FlowAuthorization

--instance-url to the scratch org’s instance URL, such as
https://energy-enterprise-2539-dev-ed.scratch.my.salesforce.com. For example:
sf org login jwt --client-id 3MVG9szVa2Rx_sqBb444p50Yj \
--jwt-key-file /Users/jdoe/JWT/server.key --username [email protected] \
--instance-url https://energy-enterprise-2539-dev-ed.scratch.my.salesforce.com
If you get an error that the user isn’t approved, it means that the scratch org information hasn’t yet been replicated. Wait a short
time and try again.
Note: If your scratch org is running on Hyperforce and the --username value of org login jwt is a non-admin scratch
org user, you can’t use your Dev Hub’s digital certificate and private key. To authorize the scratch org in this scenario, follow the
standard JWT flow steps.
SEE ALSO:
Authorize an Org Using the JWT Flow
Salesforce Help: Connected Apps
Create Scratch Orgs
Authorize an Org Using Its SFDX Authorization URL
Use an org's Salesforce DX (SFDX) authorization URL to authorize an org in continuous integration (CI) environments, which are fully
automated and don’t support the human interactivity of logging into a browser.
1. Open a terminal (macOS and Linux) or command prompt (Windows) on the computer where you’ve already authorized the org
using a Web browser.
2. Get your org’s SFDX authorization URL and store it in a file by running this command.
sf org display --target-org my-org --verbose --json > authFile.json
The JSON output includes a key called sfdxAuthUrl, whose value is the org’s SFDX authorization URL.
3. In your CI environment, authorize the org by referencing the authFile.json file with this command.
sf org login sfdx-url --sfdx-url-file authFile.json
For more information and examples, see the reference about the org login sfdx-url command in the Salesforce CLI Command
Reference.
Create a Private Key and Self-Signed Digital Certificate
Authorizing an org with the org login jwt command requires a digital certificate and the private key used to sign the certificate.
You can use your own private key and certificate issued by a certification authority. Alternatively, you can use OpenSSL to create a key
and a self-signed digital certificate. Using a private key and certificate is optional when you authorize an org by logging into a browser.
This process produces two files:
•
server.key—The private key. You specify this file when you authorize an org with the org login jwt command.
•
server.crt—The digital certificate. You upload this file when you create the required connected app.
1. Open a terminal (macOS and Linux) or command prompt (Windows).
46
Authorize an Org Using Its SFDX Authorization URLAuthorization

2. If necessary, install OpenSSL on your computer.
To check whether OpenSSL is installed on your computer, run the which command on macOS or Linux or the where command
on Windows.
which openssl
3. Create a directory for storing the generated files, and change to the directory.
mkdir /Users/jdoe/JWT
cd /Users/jdoe/JWT
4. Generate a private key, and store it in a file called server.key.
openssl genpkey -des3 -algorithm RSA -pass pass:SomePassword -out server.pass.key -pkeyopt
rsa_keygen_bits:2048
openssl rsa -passin pass:SomePassword -in server.pass.key -out server.key
You can delete the server.pass.key file because you no longer need it.
5. Generate a certificate signing request using the server.key file. Store the certificate signing request in a file called server.csr.
Enter information about your company when prompted.
openssl req -new -key server.key -out server.csr
6. Generate a self-signed digital certificate from the server.key and server.csr files. Store the certificate in a file called
server.crt.
openssl x509 -req -sha256 -days 365 -in server.csr -signkey server.key -out server.crt
Now create a custom connected app and upload the digital certificate to it.
SEE ALSO:
OpenSSL: Cryptography and SSL/TLS Tools
Create a Connected App in Your Org
Authorize an Org Using the JWT Flow
Create a Connected App in Your Org
Salesforce CLI requires a connected app in the org that you're authorizing. A connected app is a framework that enables an external
application, in this case Salesforce CLI, to integrate with Salesforce using APIs and standard protocols, such as OAuth. We provide a
default connected app when you authorize an org with the org login web command. For extra security, you can create your own
connected app in your org using Setup and configure it with the settings of your choice. You're required to create a connected app
when authorizing the org with the org login jwt command.
Note: The steps marked Required for JWT are required only if you’re creating a connected app to use with the org login
jwt command. In this case you also need a file that contains a digital certificate, such as server.crt. The steps are optional
if you’re creating a connected app to use with org login web.
1. Log in to your org.
2. From Setup, enter App Manager in the Quick Find box, then select App Manager.
47
Create a Connected App in Your OrgAuthorization

3. In the top-right corner, click New Connected App.
4. Update the basic information as needed, such as the connected app name and your email address.
5. Select Enable OAuth Settings.
6. For the callback URL, enter http://localhost:1717/OauthRedirect.
If port 1717 (the default) is already in use on your local machine, specify an available one instead. Then update your
sfdx-project.json file by setting the oauthLocalPort property to the new port. For example, if you set the callback
URL to http://localhost:1919/OauthRedirect:
"oauthLocalPort" : "1919"
7. (Required for JWT) Select Use digital signatures.
8. (Required for JWT) Click Choose File and upload file that contains your digital certificate, such as server.crt.
9. Add these OAuth scopes:
•
Manage user data via APIs (api)
•
Manage user data via Web browsers (web)
•
Perform requests at any time (refresh_token, offline_access)
10. Click Save, then Continue.
11. Click Manage Consumer Details.
If prompted, verify your identity by entering the verification code that was automatically sent to your email address.
12. Click Copy next to Consumer Key because you need it later when you run an org login command.
13. Click Back to Manage Connected Apps.
14. Click Manage.
15. Click Edit Policies.
16. In the OAuth Policies section, for the Refresh Token Policy field, click Expire refresh token after: and enter 90 days or less.
Setting a maximum of 90 days for the refresh token expiration is a security best practice. To continue running CLI commands against
an org whose refresh tokens have expired, reauthorize it with the org login web or org login jwt command.
17. In the Session Policies section, set Timeout Value to 15 minutes.
Setting a timeout for access tokens is a security best practice. Salesforce CLI automatically handles an expired access token by referring
to the refresh token.
18. (Required for JWT) In the OAuth Policies section, select Admin approved users are pre-authorized for permitted users, and click
OK.
19. Click Save.
20. (Required for JWT) Click Manage Profiles, select the profiles that are pre-authorized to use this connected app, and click Save.
Similarly, click Manage Permission Sets to select the permission sets. Create permission sets if necessary.
To specify the consumer key, use the --client-id flag of the org login commands. For example, if your consumer key is
04580y4051234051 and you’re authorizing a Dev Hub org by logging into it from a browser, run this command in a terminal (macOS
and Linux) or command prompt (Windows):
sf org login web --client-id 04580y4051234051 --set-default-dev-hub --alias my-hub-org
48
Create a Connected App in Your OrgAuthorization

See the reference for org login web and org login jwt for more examples.
SEE ALSO:
Create a Private Key and Self-Signed Digital Certificate
Salesforce Help: Connected Apps
Authorization
Salesforce Help: Set Up Multi-Factor Authentication
Use the Default Connected App Securely
If you authorize an org with the org login web command, but don't specify the --client-id flag, Salesforce CLI creates a
default connected app in the org called Salesforce CLI. However, its refresh tokens are set to never expire. As a security best
practice, Salesforce recommends that refresh tokens in your org expire after 90 days or fewer. Another security best practice is to set an
expiration for the access token to 15 minutes. Similar to refresh tokens, the access token in the default connected app is set to never
expire. To continue using this default connected app in a secure way, configure its policies.
1. Log in to your org.
2. From Setup, enter OAuth in the Quick Find box, then select Connected Apps OAuth Usage.
3. Select the Salesforce CLI app and click Install. Confirm by clicking Install again.
4. Click Edit Policies.
5. In the OAuth Policies section, for the Refresh Token Policy field, click Expire refresh token after: and enter 90 Days or less.
6. In the Session Policies section, set Timeout Value to 15 minutes.
7. Click Save.
If you run a CLI command against an org whose refresh token has expired, you get an error. For example:
ERROR running org open: Error authenticating with the refresh token due to: expired
access/refresh token
The org list command also displays expired refresh token information in the CONNECTED STATUS column. To continue using the
org, reauthorize it with the org login web or org login jwt command.
Salesforce CLI automatically handles an expired access token by referring to the refresh token.
SEE ALSO:
Salesforce Help: Connected Apps
Authorize an Org Using a Browser
Authorize an Org Using the JWT Flow
Use an Existing Access Token
When you authorize an org using the org login commands, Salesforce CLI takes care of generating and refreshing all tokens, such
as the access token. But sometimes you want to run a few CLI commands against an existing org without going through the entire
authorization process. In this case, you provide the access token and URL of the Salesforce instance that hosts the org to which you want
to connect.
49
Use the Default Connected App SecurelyAuthorization
Almost all CLI commands that have the --target-org | -o flag accept an access token. The only exception is org display
user.
1. Open a terminal (macOS and Linux) or command prompt (Windows).
2. To get the instance URL and access token for the org to connect to, run the org display command. See the values for the
Access Token and Instance Url keys.
sf org display --target-org myorg
=== Org Description
KEY VALUE
─────────────── ───────────────────────────────────────────────
Access Token 00D8H0000007wprAQkAQAlOT5H (truncated for security)
...
Instance Url https://creative-impala-20hx3-dev-ed.my.salesforce.com
...
3. Use config set to set the org-instance-url configuration variable. To set it locally, run the command from a Salesforce
DX project; to set it globally, use the --global flag.
sf config set org-instance-url=https://creative-impala-20hx3-dev-ed.my.salesforce.com
--global
4. When you run the CLI command, use the org’s access token as the value for the --target-org flag rather than the org’s
username. For example:
sf project deploy start --source-dir <source-dir> --target-org 00D8H0000007wprAQkAQAlOT5H
Tip: If your access token contains a ! character, you must sometimes escape it with a backslash (\). For example, if your
access token is 00007wpr!AQkAQA, specify it this way: --target-org 00007wpr\!AQkAQA
Salesforce CLI doesn’t store the access token in its internal files. It uses it only for this CLI command run.
SEE ALSO:
Authorization Information for an Org
Salesforce CLI Command Reference: config set
Salesforce CLI Command Reference: project deploy start
Authorization Information for an Org
You can view information for all orgs that you’ve authorized and the scratch orgs that you’ve created.
To view authorization information about an org, run this command from a terminal (macOS and Linux) or command prompt (Windows).
sf org display --target-org <username-or-alias>
If you have set a default org, you don’t have to specify the --target-org flag. To display the usernames for all the active orgs that
you’ve authorized or created, run org list.
If you’ve set an alias for an org, you can specify it with the --target-org flag. This example uses the my-scratch-org alias.
sf org display --target-org my-scratch-org
50
Authorization Information for an OrgAuthorization

Warning: This command will expose sensitive information that allows for subsequent activity
using your current authenticated session.
Sharing this information is equivalent to logging someone in under the current credential,
resulting in unintended access and escalation of privilege.
For additional information, please review the authorization section of the
https://developer.salesforce.com/docs/atlas.en-us.sfdx_dev.meta/sfdx_dev/sfdx_dev_auth_web_flow.htm
=== Org Description
KEY VALUE
───────────────
────────────────────────────────────────────────────────────────────────────────────────────────────────────────
Access Token <long-string>
Alias my-scratch-org
Api Version 58.0
Client Id PlatformCLI
Created By [email protected]
Created Date 2023-06-09T17:59:18.000+0000
Dev Hub Id [email protected]
Edition Developer
Expiration Date 2023-06-16
Id 00D8H0000007wprU
Instance Url https://java-connect-41-dev-ed.scratch.my.salesforce.com
Org Name Your Company
Signup Username [email protected]
Status Active
Username [email protected]
To get more information, such as the Salesforce DX authentication URL, include the --verbose flag. This flag displays the Sfdx
Auth Url value only if you authorized the org using org login web and not org login jwt.
Note: To help prevent security breaches, the org display output doesn’t include the org’s client secret or refresh token.
SEE ALSO:
OAuth 2.0 Web Server Authentication Flow
Salesforce DX Usernames and Orgs
51
Authorization Information for an OrgAuthorization

Log Out of an Org
For security purposes, you can use the Salesforce CLI to log out of any org you’ve previously authorized. This practice prevents other
users from accessing your orgs if you don’t want them to.
Important: The only way to access an org after you log out of it is with a password. By default, new scratch orgs contain one
administrator with no password. Therefore, to avoid losing access to a scratch org, set a password for at least one user of a scratch
org if you want to access it again after logging out. If you don’t want to access the scratch org again, delete it with org delete
scratch rather than log out of it.
To log out of an org, run org logout from a terminal (macOS and Linux) or command prompt (Windows). This example uses the
alias my-hub-org to log out.
sf org logout --target-org my-hub-org
To log out of all your orgs, including scratch orgs, use the --all flag.
sf org logout --all
To access an org again, other than a scratch org, reauthorize it.
When you log out of an org, it no longer shows up in the org list output. If you log out of a Dev Hub org, the associated scratch
orgs show up only if you specify the --all flag.
SEE ALSO:
Salesforce CLI Command Reference: org logout
VS Code Command: SFDX: Log Out from All Authorized Orgs, SFDX: Log Out from Default Org
52
Log Out of an OrgAuthorization

CHAPTER 5 Metadata Coverage
Launch the Metadata Coverage report to determine supported metadata for scratch org source tracking
purposes. The Metadata Coverage report is the ultimate source of truth for metadata coverage across
several channels. These channels include Metadata API, scratch org source tracking, unlocked packages,
second-generation managed packages, classic managed packages, and more.
View the Metadata Coverage report.
For more information, see Metadata Types in the Metadata API Developer Guide.
We've moved the information on Hard-Deleted Components in Unlocked Packages.
SEE ALSO:
Components Available in Managed Packages
53

CHAPTER 6 Scratch Orgs
The scratch org is a source-driven and disposable deployment of Salesforce code and metadata. A scratch
org is fully configurable, allowing developers to emulate different Salesforce editions with different
features and settings. You can share the scratch org configuration file with other team members, so you
all have the same basic org in which to do your development. In addition to code and metadata,
developers can install packages and deploy synthetic or dummy data for testing. Don’t add personal
data to scratch orgs.
In this chapter ...
• Supported Scratch
Org Editions and
Allocations
• Build Your Own
Scratch Org Definition
File
Scratch orgs drive developer productivity and collaboration during the development process, and
facilitate automated testing and continuous integration. You can use Salesforce CLI or an IDE to open
your scratch org in a browser without logging in. Spin up a new scratch org when you want to:
• Create a Scratch Org
Based on an Org
Shape
•
Start a new project.
•
Start a new feature branch.
• Create Scratch Orgs
•
Test a new feature.
• Scratch Org
Snapshots
•
Start automated testing.
• Select the Salesforce
Release for a Scratch
Org
•
Perform development tasks directly in an org.
•
Start from “scratch” with a fresh new org.
Alternatives to scratch orgs are sandboxes and Developer Edition orgs, which are used as development
environments for many Salesforce development use cases. If you’re wondering whether to use a sandbox,
• Deploy Source From
Your Project to the
Scratch Org
scratch org, or Developer Edition org as your development environment, you’re not alone. To help you
better understand which to choose, see the Salesforce Developers Blog: Choose the Right Salesforce
Org for the Right Job.
• Retrieve Source from
the Scratch Org to
Your Project
Source Tracking
Source tracking refers to tracking the changes you make to your local source files and the metadata in
your org, and keeping both in sync.
• Scratch Org Users
• Manage Scratch
Orgs from the Dev
Hub Org
• Scratch Org Error
Codes
Scratch orgs have source tracking enabled by default. You can opt out of source tracking when you
create the scratch org by specifying the --no-track-source flag of the org create
scratch command. This flag affects only your local configuration, not the scratch org itself. Salesforce
CLI sets a local configuration option trackSource: false as part of your authorization information
to the org. If you log out of the scratch org and then log back in again, source tracking is enabled again
by default.
If you’re actively in development mode, we suggest keeping source tracking enabled in your scratch
org so you can easily sync the changes between your org and your local project. But source tracking can
slow down deployments and retrievals, so it’s sometimes better to disable it if it’s not needed. Here are
some use cases.
54

•
Your continuous integration (CI) script simply creates a scratch org, deploys source, runs Apex and
browser tests, and then deletes the scratch org.
•
You want to spin up a scratch org for a demo, user acceptance testing, or debugging.
•
Your test data has changed and you want to ensure it’s correct by importing it into a scratch org.
But you haven’t changed any metadata or source code.
•
You want to install and verify a package your CI built.
•
You want to test a pull request by deploying code to a scratch org, but you don’t plan to change
the code.
Scratch Org Creation Methods
By default, scratch orgs are empty. They don’t contain much of the sample metadata that you get when
you sign up for an org, such as a Developer Edition org, the traditional way. Some of the things not
included in a scratch org are:
•
Custom objects, fields, indexes, tabs, and entity definitions
•
Sample data
•
Sample Chatter feeds
•
Dashboards and reports
•
Workflows
•
Picklists
•
Profiles and permission sets
•
Apex classes, triggers, and pages
Before creating a scratch org, you must configure it so it has the features, settings, licenses, and limits
that mirror a source org, often your production org. The combination of features, settings, edition, licenses,
and limits are what we refer to as the org’s shape.
We offer these methods for configuring scratch orgs:
•
Build Your Own Scratch Org Definition File
•
Create a Scratch Org Based on an Org Shape
On Which Salesforce Instances Are Scratch Orgs
Created?
Scratch orgs are created on sandbox instances. The sandbox instance depends on the country information
used when creating the Dev Hub org.
Scratch orgs for Government Cloud and Hyperforce are created in the region where the Dev Hub org is
physically located.
•
Scratch orgs created from a Dev Hub org in Government Cloud are created in a Government Cloud
instance.
•
Scratch orgs created from a Dev Hub org in Hyperforce are created on a Hyperforce instance.
If you notice that your scratch orgs aren’t located in the expected region, create a Salesforce Support
case.
55
Scratch Orgs

Scratch Org Expiration Policy
A scratch org is temporary and is deleted along with the associated ActiveScratchOrgs records from the
Dev Hub after their expiration. This expiration process ensures that teams frequently sync their changes
with their version control system and are working with the most recent version of their project.
Scratch orgs have a maximum 30 days lifespan. You can select a duration from 1 through 30 days at the
time of creation, with the default set at 7 days. After the scratch org has expired, you can’t restore it.
Note: Deleting a scratch org doesn’t terminate your scratch org subscription. If your subscription
is still active, you can create a new scratch org. Creating a new scratch org counts against your
daily and active scratch org limits.
SEE ALSO:
Salesforce Admins Blog: Sandboxes vs. Scratch Orgs and How to Use Them
56
Scratch Orgs

Supported Scratch Org Editions and Allocations
Your Dev Hub org is often your production org, and you can enable Dev Hub in these editions: Developer, Enterprise, Unlimited, or
Performance. Your Dev Hub edition determines how many scratch orgs you can create. You choose one of the supported scratch org
editions each time you create a scratch org.
Supported Scratch Org Editions
Possible values for the Salesforce edition of the scratch org are:
•
Developer
•
Enterprise
•
Group
•
Professional
Note: Partners can create partner edition scratch orgs: Partner Developer, Partner Enterprise, Partner Group, and Partner Professional.
This feature is available only if creating scratch orgs from a Dev Hub in a partner business org. See Supported Scratch Org Editions
for Partners in the First-Generation Managed Packaging Developer Guide for details.
Scratch orgs have these storage limits:
•
200 MB for data
•
50 MB for files
Entities defined as metadata types aren’t counted as part of storage allocations in scratch orgs. For more information about entities that
are counted against storage allocations, see Salesforce Help: Data and File Storage Allocations.
Supported Dev Hub Editions and Associated Scratch Org Allocations
To ensure optimal performance, your Dev Hub org edition determines your scratch org allocations. These allocations determine how
many scratch orgs you can create daily, and how many can be active at a given point.
To try out scratch orgs, sign up for a Developer Edition org on Salesforce Developers, then enable Dev Hub.
Note: If you’re a partner or ISV, your scratch org allocations are likely different. See the First-Generation Managed Packaging
Developer Guide for details.
The active scratch org allocation is the maximum number of scratch orgs you can have at any given time based on the edition type. The
allocation becomes available if you delete a scratch org or if a scratch org expires. The daily scratch org allocation is the maximum number
of successful scratch org creations you can initiate in a rolling (sliding) 24-hour window. Allocations are determined based on the number
of scratch orgs created in the preceding 24 hours.
Daily Scratch Org AllocationActive Scratch Org AllocationEdition
63Developer Edition or trial
8040Enterprise Edition
200100Unlimited Edition
200100Performance Edition
57
Supported Scratch Org Editions and AllocationsScratch Orgs

List Active and Daily Scratch Orgs
Note: If your Salesforce admin provided access to the Dev Hub org using the Free Limited Access license and you can’t run this
command, contact your admin for assistance.
To view your scratch org allocations and how many are remaining, run this command in a terminal or command window against your
Dev Hub org. Only relevant limits (ActiveScratchOrgs and DailyScratchOrgs) are shown.
sf limits api display --target-org <Dev Hub username or alias>
Look for these two limits in the output:
Name Remaining Max
─────────────────────────────────────────── ───────── ─────────
ActiveScratchOrgs 198 200
DailyScratchOrgs 400 400
View Limits for a Scratch Org
To view limits information for a scratch org:
sf limits api display --target-org <scratch org username or alias>
Build Your Own Scratch Org Definition File
The scratch org definition file is a blueprint for a scratch org. It mimics the shape of an org that you use in the development lifecycle,
such as sandbox, packaging, or production.
The settings and configuration options associated with a scratch org determine its shape, including:
•
Edition—The Salesforce edition of the scratch org, such as Developer, Enterprise, Group, or Professional.
•
Add-on features—Functionality that isn’t included by default in an edition.
•
Settings—Org and feature settings used to configure Salesforce products, such as Field Service and Communities.
Setting up different scratch org definition files allows you to easily create scratch orgs with different shapes for testing. For example, you
can turn Field Service on or off in a scratch org by setting the FieldService org preference in the definition file. If you want a scratch org
with sample data and metadata like you’re used to, add this option: hasSampleData.
We recommend that you keep this file in your project and check it in to your version control system. For example, create a team version
that you check in for all team members to use. Individual developers could also create their own local version that includes the scratch
org definition parameters. Examples of these parameters include email and last name, which identify who is creating the scratch org.
Scratch Org Definition File Name
You indicate the path to the scratch org configuration file when you create a scratch org with the org create scratch CLI
command.
•
If you’re using Salesforce CLI on the command line, you can name this file whatever you like and locate it anywhere the CLI can
access.
•
If you’re using Salesforce Extensions for VS Code, make sure that the scratch org definition file is located in the config folder of
your Salesforce DX project. Its name must also end in scratch-def.json.
58
Build Your Own Scratch Org Definition FileScratch Orgs

If you’re using a sample repo or creating a Salesforce DX project, the sample scratch org definition files are located in the config
directory. You can create different configuration files for different org shapes or testing scenarios. For easy identification, name the file
something descriptive, such as devEdition-scratch-def.json or packaging-org-scratch-def.json.
Scratch Org Definition File Options
Here are the options you can specify in the scratch org definition file:
Default If Not SpecifiedRequired?Name
CompanyNoorgName
Dev Hub's country. If you want to override this value, enter the
two-character, upper-case ISO-3166 country code (Alpha-2 code).
Nocountry
You can find a full list of these codes at several sites, such as:
https://www.iso.org/obp/ui/#search. This value sets the locale of
the scratch org.
test-unique_identifier@example.comNousername
Email address of the Dev Hub user making the scratch org creation
request
NoadminEmail
None. Valid entries are Developer, Enterprise, Group, or ProfessionalYesedition
None. 2000-character free-form text field.
The description is a good way to document the scratch org’s
purpose. You can view or edit the description in the Dev Hub. From
Nodescription
App Launcher, select Scratch Org Info or Active Scratch Orgs,
then click the scratch org number.
Valid values are true and false. False is the default, which
creates an org without sample data.
NohasSampleData
Default language for the country. To override the language set by
the Dev Hub locale, see Supported Languages for the codes to use
in this field.
Nolanguage
None. See Scratch Org Features.Nofeatures
Same Salesforce release as the Dev Hub org. Options are
preview or previous. You can use this option only during
Salesforce release transition periods.
Norelease
None. See Scratch Org Settings for more information.Nosettings
None. Use objectSettings to specify object-level sharing settings
and default record types. To successfully install in a scratch org,
NoobjectSettings
some packages require that you define object-level sharing settings
and default record types. The objectSettings option is a map. Each
key is the lowercase name of an object, such as opportunity or
account. The definition for each key is also a map with two possible
values:
59
Build Your Own Scratch Org Definition FileScratch Orgs

Default If Not SpecifiedRequired?Name
•
sharingModel—Sets a sharing model. Different objects
support different sharing models. Possible values of sharing
models are:
–
private
–
read
–
readWrite
–
readWriteTransfer
–
fullAccess
–
controlledByParent
–
controlledByCampaign
–
controlledByLeadOrContent
•
defaultRecordType—Creates a record type. This setting
is required before installing a package that creates record types.
Specify an alphanumeric string that starts with a lowercase
letter.
None. Useful for Dev Ops use cases where you want to track extra
information on the ScratchOrgInfo object. First, create the custom
No<custom field API name>
field, and then reference it in the scratch org definition by its API
name.
None. 15-character source org ID. Use only if you’re using Org
Shape for Scratch Orgs to create your scratch org. See Create a
Scratch Org Based on an Org Shape.
NosourceOrg
Sample Scratch Org Definition File
Here’s what the scratch org definition JSON file looks like. For more information on features and settings, see Scratch Org Features.
{
"orgName": "Acme",
"edition": "Enterprise",
"features": ["Communities", "ServiceCloud", "Chatbot"],
"settings": {
"communitiesSettings": {
"enableNetworksEnabled": true
},
"mobileSettings": {
"enableS1EncryptedStoragePref2": true
},
"omniChannelSettings": {
"enableOmniChannel": true
},
"caseSettings": {
"systemUserEmail": "[email protected]"
}
60
Build Your Own Scratch Org Definition FileScratch Orgs

}
}
Some features, such as Communities, can require a combination of a feature and a setting to work correctly for scratch orgs. This code
snippet sets both the feature and associated setting.
"features": ["Communities"],
"settings": {
"communitiesSettings": {
"enableNetworksEnabled": true
},
...
Create a Custom Field for ScratchOrgInfo
You can add more options to the scratch org definition to manage your Dev Ops process. To do so, create a custom field on the
ScratchOrgInfo object. (ScratchOrgInfo tracks scratch org creation and deletion.)
Important: If you’re making these changes directly in your production org, proceed with the appropriate level of caution. The
ScratchOrgInfo object isn’t available in sandboxes or scratch orgs.
In the Dev Hub org, create the custom field.
•
From Setup, enter Object Manager in the Quick Find box, then select Object Manager.
•
Click Scratch Org Info.
•
In Fields & Relationships, click New.
•
Define the custom field, then click Save.
After you create the custom field, you can pass it a value in the scratch org definition file by referencing it with its API name. Let’s say
you create two custom fields called workitem and release. Add the custom fields and associated values to the scratch org
definition, then create the scratch org:
{
"orgName": "MyCompany",
"edition": "Developer",
"workitem__c": "W-12345678",
"release__c": "June 2024 pilot",
"settings": {
"omniChannelSettings": {
"enableOmniChannel": true
}
}
}
Set Object-Level Sharing Settings and Default Record Types
To install successfully, some packages require that you define object-level sharing settings and default record types before installation.
Set the sharing settings and default record types with objectSettings. In this sample scratch org definition file, we set a sharing
model and a default record type for opportunity, and a default record type for account.
{
"orgName": "MyCompany",
61
Build Your Own Scratch Org Definition FileScratch Orgs

"edition": "Developer",
"features": ["Communities", "ServiceCloud", "Chatbot"],
"settings": {
"communitiesSettings": {
"enableNetworksEnabled": true
}
}
"objectSettings": {
"opportunity": {
"sharingModel": "private",
"defaultRecordType": "default"
},
"account": {
"defaultRecordType": "default"
}
}
}
Scratch Org Features
The scratch org definition file contains the configuration values that determine the shape of the scratch org. You can enable these
supported add-on features in a scratch org.
Scratch Org Settings
Scratch org settings are the format for defining org preferences in the scratch org definition. Because you can use all Metadata API
settings, they’re the most comprehensive way to configure a scratch org. If a setting is supported in Metadata API, it’s supported in
scratch orgs. Settings provide you with fine-grained control because you can define values for all fields for a setting, rather than just
enabling or disabling it.
Scratch Org Features
The scratch org definition file contains the configuration values that determine the shape of the scratch org. You can enable these
supported add-on features in a scratch org.
Note: Some scratch org features require a license or permissions in the Dev Hub org. If you can’t create the scratch org by just
specifying the feature name in the scratch org definition file, see your Salesforce admin for assistance.
Supported Features
Features aren’t case-sensitive. You can indicate them as all-caps, or as we define them here for readability. If a feature is followed by
<value>, you must specify a value as an incremental allocation or limit.
You can specify multiple feature values in a comma-delimited list in the scratch org definition file.
"features": ["ServiceCloud", "API", "AuthorApex"],
AccountInspection
Enables the Account Intelligence view. The Account Intelligence view is a consolidated dashboard showing account metrics, activities,
and related opportunities and cases.
AccountingSubledgerGrowthEdition
Provides three permission sets that enable access to Accounting Subledger Growth features.
62
Scratch Org FeaturesScratch Orgs
AccountingSubledgerStarterEdition
Provides three permission sets that enable access to Accounting Subledger Starter features.
AccountingSubledgerUser
Enables organization-wide access to Accounting Subledger Growth features when the package is installed.
AddCustomApps:<value>
Increases the maximum number of custom apps allowed in an org. Indicate a value from 1–30.
AddCustomObjects:<value>
Increases the maximum number of custom objects allowed in the org. Indicate a value from 1–30.
AddCustomRelationships:<value>
Increases the maximum number of custom relationships allowed on an object. Indicate a value from 1–10.
AddCustomTabs:<value>
Increases the maximum number of custom tabs allowed in an org. Indicate a value from 1–30.
AddDataComCRMRecordCredit:<value>
Increases record import credits assigned to a user in your scratch org. Indicate a value from 1–30.
AddInsightsQueryLimit:<value>
Increases the size of your CRM Analytics query results. Indicate a value from 1–30 (multiplier is 10). Setting the quantity to 6 increases
the query results to 60.
AdditionalFieldHistory:<value>
Increases the number of fields you can track history for beyond the default, which is 20 fields. Indicate a value between 1–40.
AdmissionsConnectUser
Enables the Admissions Connect components. Without this scratch org feature parameter, the custom Admissions Connect
components render as blank.
AdvisorLinkFeature
Enables the Student Success Hub components. Without this scratch org feature parameter, the custom Student Success Hub
components render as blank.
AdvisorLinkPathwaysFeature
Enables the Pathways components. Without this scratch org feature parameter, the custom Pathways components render as blank.
AIAttribution
Provides access to Einstein Attribution for Marketing Cloud Account Engagement. Einstein Attribution uses AI modeling to dynamically
assign attribution percentages to multiple campaign touchpoints.
AllUserIdServiceAccess
Enables all users to access all users’ information via the user ID service.
AnalyticsAdminPerms
Enables all permissions required to administer the CRM Analytics platform, including permissions to enable creating CRM Analytics
templated apps and CRM Analytics Apps.
AnalyticsAppEmbedded
Provides one CRM Analytics Embedded App license for the CRM Analytics platform.
API
Even in the editions (Professional, Group) that don’t provide API access, REST API is enabled by default. Use this scratch org feature
to access additional APIs (SOAP, Streaming, Bulk, Bulk 2.0).
63
Scratch Org FeaturesScratch Orgs
ArcGraphCommunity
Lets you add Actionable Relationship Center (ARC) components to Experience Cloud pages so your users can view ARC Relationship
Graphs.
Assessments
Enables dynamic Assessments features, which enables both Assessment Questions and Assessment Question Sets.
AssetScheduling:<value>
Enables Asset Scheduling license. Asset Scheduling makes it easier to book rooms and equipments. Indicate a value between 1–10.
AssociationEngine
Enables the Association Engine, which automatically associates new accounts with the user’s current branch by creating branch unit
customer records.
AuthorApex
Enables you to access and modify Apex code in a scratch org. Enabled by default in Enterprise and Developer Editions.
B2BCommerce
Provides the B2B License. B2BCommerce enables business-to-business (B2B) commerce in your org. Create and update B2B stores.
Create and manage buyer accounts. Sell products to other businesses.
B2BLoyaltyManagement
Enables the B2B Loyalty Management license. Create loyalty programs and set up loyalty program-specific processes that allow you
to recognize, rewards, and retain customers.
B2CCommerceGMV
Provides the B2B2C Commerce License. B2B2C Commerce allows you to quickly stand up an ecommerce site to promote brands
and sell products into multiple digital channels. You can create and update retail storefronts in your org, and create and manage
person accounts.
B2CLoyaltyManagement
Enables the Loyalty Management - Growth license. Create loyalty programs and set up loyalty program-specific processes that allow
you to recognize, rewards, and retain customers.
B2CLoyaltyManagementPlus
Enables the Loyalty Management - Advanced license. Create loyalty programs and set up loyalty program-specific processes that
allow you to recognize, rewards, and retain customers.
BatchManagement
Enables the Batch Management license. Batch Management allows you to process a high volume of records in manageable batches.
BigObjectsBulkAPI
Enables the scratch org to use BigObjects in the Bulk API.
Briefcase
Enables the use of Briefcase Builder in a scratch org, which allows you to create offline briefcases that make selected records available
for viewing offline.
BudgetManagement
Gives users access to budget management features and objects. To enable budget management, add this feature to your scratch
org definition file.
BusinessRulesEngine
Enables Business Rules Engine, which enables both expression sets and lookup tables.
64
Scratch Org FeaturesScratch Orgs
CacheOnlyKeys
Enables the cache-only keys service. This feature allows you to store your key material outside of Salesforce, and have the Cache-Only
Key Service fetch your key on demand from a key service that you control.
CalloutSizeMB:<value>
Increases the maximum size of an Apex callout. Indicate a value between 3–12.
CampaignInfluence2
Provides access to Customizable Campaign Influence for Sales Cloud and Marketing Cloud Account Engagement. Customizable
Campaign Influence can auto-associate or allow manual creation of relationships among campaigns and opportunities to track
attribution.
CascadeDelete
Provides lookup relationships with the same cascading delete functionality previously only available to master-detail relationships.
To prevent records from being accidentally deleted, cascade-delete is disabled by default.
CaseClassification
Enables Einstein Case Classification. Case Classification offers recommendations to your agents so they can select the best value.
You can also automatically save the best recommendation and route the case to the right agent.
CaseWrapUp
Enables Einstein Case Wrap-Up. To help agents complete cases quickly, Einstein Case Wrap-Up recommends case field values based
on past chat transcripts.
CGAnalytics
Enables the Consumer Goods Analytics org perm in scratch orgs.
ChangeDataCapture
Enables Change Data Capture, if the scratch org edition doesn't automatically enable it.
Chatbot
Enables deployment of Bot metadata into a scratch org, and allows you to create and edit bots.
ChatterEmailFooterLogo
ChatterEmailFooterLogo allows you to use the Document ID of a logo image, which you can use to customize chatter emails.
ChatterEmailFooterText
ChatterEmailFooterText allows you to use footer text in customized Chatter emails.
ChatterEmailSenderName
ChatterEmailSenderName allows you to customize the name that appears as the sender’s name in the email notification. For example,
your company’s name.
CloneApplication
CloneApplication allows you to clone an existing custom Lightning app and make required customizations to the new app. This
way, you don’t have to start from scratch, especially when you want to create apps with simple variations.
CMSMaxContType
Limits the number of distinct content types you can create within Salesforce CMS to 21.
CMSMaxNodesPerContType
Limits the maximum number of child nodes (fields) you can create for a particular content type to 15.
CMSUnlimitedUse
Enables unlimited content records, content types, and bandwidth usage in Salesforce CMS.
65
Scratch Org FeaturesScratch Orgs
Communities
Allows the org to create a customer community. To use Communities, you must also include communitiesSettings >
enableNetworksEnabled in the settings section of your scratch org definition file.
ConAppPluginExecuteAsUser
Enables the pluginExecutionUser field in the ConnectedApp Metadata API object.
ConcStreamingClients:<value>
Increases the maximum number of concurrent clients (subscribers) across all channels and for all event types for API version 36.0
and earlier. Indicate a value between 20–4,000.
ConnectedAppCustomNotifSubscription
Enables connected apps to subscribe to custom notification types, which are used to send custom desktop and mobile notifications.
ConnectedAppToolingAPI
Enables the use of connected apps with the Tooling API.
ConsentEventStream
Enables the Consent Event Stream permission for the org.
ConsolePersistenceInterval:<value>
Increases how often console data is saved, in minutes. Indicate a value between 0–500. To disable auto save, set the value to 0.
ContactsToMultipleAccounts
Enables the contacts to multiple accounts feature. This feature lets you relate a contact to two or more accounts.
ContractApprovals
Enables contract approvals, which allow you to track contracts through an approval process.
ContractManagement
Enables the Contract Lifecycle (CLM) Management features in the org.
ContractMgmtInd
Enables the Contract Lifecycle Management (CLM) features for Industries.
CoreCpq
Enables read-write access to Revenue Lifecycle Management features and objects. To use Revenue Lifecycle Management, you must
also include revenueManagementSettings > enableCoreCPQ in the settings section of your scratch org definition file.
CPQ
Enables the licensed features required to install the Salesforce CPQ managed package but doesn't install the package automatically.
CustomerExperienceAnalytics
Enables the Customer Lifecycle Analytics org perm in scratch orgs.
CustomFieldDataTranslation
Enables translation of custom field data for Work Type Group, Service Territory, and Service Resource objects. You can enable data
translation for custom fields with Text, Text Area, Text Area (Long), Text Area (Rich), and URL types.
CustomNotificationType
Allows the org to create custom notification types, which are used to send custom desktop and mobile notifications.
DataComDnbAccounts
Provides a license to Data.com account features.
DataComFullClean
Provides a license to Data.com cleaning features, and allows users to turn on auto fill clean settings for jobs.
66
Scratch Org FeaturesScratch Orgs
DataMaskUser
Provides 30 Data Mask permission set licenses. This permission set enables access to an installed Salesforce Data Mask package.
DataProcessingEngine
Enables the Data Processing Engine license. Data Processing Engine helps transform data that's available in your Salesforce org and
write back the transformation results as new or updated records.
DebugApex
Enables Apex Interactive Debugger. You can use it to debug Apex code by setting breakpoints and checkpoints, and inspecting your
code to find bugs.
DecisionTable
Enables Decision Table license. Decision tables read business rules and decide the outcome for records in your Salesforce org or for
the values that you specify.
DefaultWorkflowUser
Sets the scratch org admin as the default workflow user.
DeferSharingCalc
Allows admins to suspend group membership and sharing rule calculations and to resume them later.
DevelopmentWave
Enables CRM Analytics development in a scratch org. It assigns five platform licenses and five CRM Analytics platform licenses to the
org, along with assigning the permission set license to the admin user. It also enables the CRM Analytics Templates and Einstein
Discovery features.
DeviceTrackingEnabled
Enables Device Tracking.
DevOpsCenter
Enables DevOps Center in scratch orgs so that partners can create second-generation managed packages that extend or enhance
the functionality in the DevOps Center application (base) package.
DisableManageIdConfAPI
Limits access to the LoginIP and ClientBrowser API objects to allow view or delete only.
DisclosureFramework
Provides the permission set licenses and permission sets required to configure Disclosure and Compliance Hub.
Division
Turns on the Manage Divisions feature under Company Settings. Divisions let you segment your organization's data into logical
sections, making searches, reports, and list views more meaningful to users. Divisions are useful for organizations with extremely
large amounts of data.
DocGen
Enables the Document Generation Feature in the Org.
DocGenDesigner
Enables the designers to create and configure document templates.
DocGenInd
Enables the Industry Document Generation features in the org.
DocumentChecklist
Enables Document Tracking and Approval features, and adds the Document Checklist permission set. Document tracking features
let you define documents to upload and approve, which supports processes like loan applications or action plans.
67
Scratch Org FeaturesScratch Orgs
DocumentReaderPageLimit
Limits the number of pages sent for data extraction to 5.
DSARPortability
Enables an org to access the DSARPortability feature in Privacy Center. Also, provides one seat each of the PrivacyCenter and
PrivacyCenterAddOn licenses.
DurableClassicStreamingAPI
Enables Durable PushTopic Streaming API for API version 37.0 and later.
DurableGenericStreamingAPI
Enables Durable Generic Streaming API for API version 37.0 and later.
DynamicClientCreationLimit
Allows the org to register up to 100 OAuth 2.0 connected apps through the dynamic client registration endpoint.
EAndUDigitalSales
Enables the Energy and Utilities Digital Sales feature in the org.
EAndUSelfServicePortal
Enables the Self Service Portal features for Digital Experience users in the org.
EAOutputConnectors
Enable CRM Analytics Output Connectors.
EASyncOut
Enable CRM Analytics SyncOut.
EdPredictionM3Threshold
Sets the number of records in the payload to 10, after which the Einstein Discovery prediction service uses M3.
EdPredictionTimeout
Sets the maximum duration of a single Einstein Discovery prediction to 100 milliseconds.
EdPredictionTimeoutBulk
Sets the maximum duration of a single Einstein Discovery prediction when it runs in bulk to 10 milliseconds.
EdPredictionTimeoutByomBulk
Sets the maximum duration of a single Bring Your Own Model (BYOM) Einstein Discovery prediction to 100 milliseconds.
EducationCloud: <value>
Enables use of Education Cloud.
EinsteinAnalyticsPlus
Provides one CRM Analytics Plus license for the CRM Analytics platform.
EinsteinArticleRecommendations
Provides licenses for Einstein Article Recommendations. Einstein Article Recommendations uses data from past cases to identify
Knowledge articles that are most likely to help your customer service agents address customer inquiries.
EinsteinBuilderFree
Provides a license that allows admins to create one enabled prediction with Einstein Prediction Builder. Einstein Prediction Builder
is custom AI for admins
EinsteinDocReader
Provides the license required to enable and use Intelligent Form Reader in a scratch org. Intelligent Form Reader uses optical character
recognition to automatically extract data with Amazon Textract.
68
Scratch Org FeaturesScratch Orgs
EinsteinRecommendationBuilder
Provides a license to create recommendations with Einstein Recommendation Builder. Einstein Recommendation Builder lets you
build custom AI recommendations.
EinsteinSearch
Provides the license required to use and enable Einstein Search features in a scratch org.
EinsteinVisits
Enables Consumer Goods Cloud. With Consumer Goods cloud, transform the way you collaborate with your retail channel partners.
Empower your sales managers to plan visits and analyze your business’s health across stores. Also, allow your field reps to track
inventory, take orders, and capture visit details using the Retail Execution mobile app.
EinsteinVisitsED
Enables Einstein Discovery, which can be used to get store visit recommendations. With Einstein Visits ED, you can create a visit
frequency strategy that allows Einstein to provide optimal store visit recommendations.
EmbeddedLoginForIE
Provides JavaScript files that support Embedded Login in IE11.
EmpPublishRateLimit:<value>
Increases the maximum number of standard-volume platform event notifications published per hour. Indicate a value between
1,000–10,000.
EnablePRM
Enables the partner relationship management permissions for the org.
EnableManageIdConfUI
Enables access to the LoginIP and ClientBrowser API objects to verify a user's identity in the UI.
EnableSetPasswordInApi
Enables you to use sf org generate password to change a password without providing the old password.
EncryptionStatisticsInterval:<value>
Defines the interval (in seconds) between encryption statistics gathering processes. The maximum value is 604,800 seconds (7 days).
The default is once per 86,400 seconds (24 hours).
EncryptionSyncInterval:<value>
Defines how frequently (in seconds) the org can synchronize data with the active key material. The default and maximum value is
604,800 seconds (7 days). To synchronize data more frequently, indicate a value, in seconds, equal to or larger than 0.
EnergyAndUtilitiesCloud
Enables the Energy and Utilities Cloud features in the org.
Entitlements
Enables entitlements. Entitlements are units of customer support in Salesforce, such as phone support or web support that represent
terms in service agreements.
ERMAnalytics
Enables the ERM Analytics org perm in your scratch org.
EventLogFile
Enables API access to your org's event log files. The event log files contain information about your org’s operational events that you
can use to analyze usage trends and user behavior.
EntityTranslation
Enables translation of field data for Work Type Group, Service Territory, and Service Resource objects.
69
Scratch Org FeaturesScratch Orgs
ExcludeSAMLSessionIndex
Excludes Session Index in SAML sign-on (SSO) and single logout (SLO) flows.
ExpressionSetMaxExecPerHour
Enables an org to run a maximum of 500,000 expression sets per hour by using Connect REST API.
ExternalIdentityLogin
Allows the scratch org to use Salesforce Customer Identity features associated with your External Identity license.
FieldAuditTrail
Enables Field Audit Trail for the org and allows a total 60 tracked fields. By default, 20 fields are tracked for all orgs, and 40 more are
tracked with Field Audit Trail.
FieldService:<value>
Provides the Field Service license. Indicate a value between 1–25.
FieldServiceAppointmentAssistantUser:<value>
Adds the Field Service Appointment Assistant permission set license. Indicate a value between 1–25.
FieldServiceDispatcherUser:<value>
Adds the Field Service Dispatcher permission set license. Indicate a value between 1–25.
FieldServiceLastMileUser:<value>
Adds the Field Service Last Mile permission set license. Indicate a value between 1–25.
FieldServiceMobileExtension
Adds the Field Service Mobile Extension permission set license.
FieldServiceMobileUser:<value>
Adds the Field Service Mobile permission set license. Indicate a value between 1–25.
FieldServiceSchedulingUser:<value>
Adds the Field Service Scheduling permission set license. Indicate a value between 1–25.
FinanceLogging
Adds Finance Logging objects to a scratch org. This feature is required for Finance Logging.
FinancialServicesCommunityUser:<value>
Adds the Financial Services Insurance Community permission set license, and enables access to Financial Services insurance community
components and objects. Indicate a value between 1–10.
FinancialServicesInsuranceUser
Adds the Financial Services Insurance permission set license, and enables access to Financial Services insurance components and
objects.
FinancialServicesUser:<value>
Adds the Financial Services Cloud Standard permission set license. This permission set enables access to Lightning components and
the standard version of Financial Services Cloud. Also provides access to the standard Salesforce objects and custom Financial Services
Cloud objects. Indicate a value between 1–10.
FlowSites
Enables the use of flows in Salesforce Sites and customer portals.
ForceComPlatform
Adds one Salesforce Platform user license.
ForecastEnableCustomField
Enables custom currency and customer number fields for use as measures in forecasts based on opportunities.
70
Scratch Org FeaturesScratch Orgs
FSCAlertFramework
Makes Financial Services Cloud Record Alert entities accessible in the scratch org.
FSCServiceProcess
Enables the Service Process Studio feature of Financial Service Cloud. Provides 10 seats each of the IndustriesServiceExcellenceAddOn
and FinancialServicesCloudStardardAddOn licenses. To enable the feature, you must also turn on the StandardServiceProcess setting
in Setup and grant users the AccessToServiceProcess permission.
Fundraising
Gives users access to Nonprofit Cloud for Fundraising features and objects in Salesforce.
GenericStreaming
Enables Generic Streaming API for API version 36.0 and earlier.
GenStreamingEventsPerDay:<value>
Increases the maximum number of delivered event notifications within a 24-hour period, shared by all CometD clients, with generic
streaming for API version 36.0 and earlier. Indicate a value between 10,000–50,000.
Grantmaking
Gives users access to Grantmaking features and objects in Salesforce and Experience Cloud.
GuidanceHubAllowed
Enables the Guidance Center panel in Lightning Experience. The Guidance Center shows suggested and assigned content in the
user’s flow of work. Suggested content is related to the app or page where the user is working. Assigned content includes guidance
sets for Salesforce admins, links or Trailhead modules assigned to users with Learning Paths, and Enablement programs for sales
reps.
HealthCloudAddOn
Enables use of Health Cloud.
HealthCloudEOLOverride
Salesforce retired the Health Cloud CandidatePatient object in Spring ‘22 to focus on the more robust Lead object. This scratch org
feature allows you to override that retirement and access the object.
HealthCloudForCmty
Enables use of Health Cloud for Experience Cloud Sites.
HealthCloudMedicationReconciliation
Allows Medication Management to support Medication Reconciliation.
HealthCloudPNMAddOn
Enables use of Provider Network Management.
HealthCloudUser
This enables the scratch org to use the Health Cloud objects and features equivalent to the Health Cloud permission set license for
one user.
HighVelocitySales
Provides Sales Engagement licenses and enables Salesforce Inbox. Sales Engagement optimizes the inside sales process with a
high-productivity workspace. Sales managers can create custom sales processes that guide reps through handling different types
of prospects. And sales reps can rapidly handle prospects with a prioritized list and other productivity-boosting features. The Sales
Engagement feature can be deployed in scratch orgs, but the settings for the feature can’t be updated through the scratch org
definition file. Instead, configure settings directly in the Sales Engagement app.
71
Scratch Org FeaturesScratch Orgs
HighVolumePlatformEventAddOn
Increases the daily delivery allocation of high-volume platform events or change data capture events by 100,000 events. This scratch
org feature simulates the purchase of an add-on. If the org has the HighVolumePlatformEventAddOn, the daily allocation
is flexible and isn’t enforced strictly to allow for usage peaks.
HLSAnalytics
Enables the HLS Analytics org perm in scratch orgs.
HoursBetweenCoverageJob:<value>
The frequency in hours when the sharing inheritance coverage report can be run for an object. Indicate a value between 1–24.
IdentityProvisioningFeatures
Enables use of Salesforce Identity User Provisioning.
IgnoreQueryParamWhitelist
Ignores allowlisting rules for query parameter filter rules. If enabled, you can add any query parameter to the URL.
IndustriesActionPlan
Provides a license for Action Plans. Action Plans allow you to define the tasks or document checklist items for completing a business
process.
IndustriesBranchManagement
Branch Management lets branch managers and administrators track the work output of branches, employees, and customer segments
in Financial Services Cloud.
IndustriesCompliantDataSharing
Grants users access to participant management and advanced configuration for data sharing to improve compliance with regulations
and company policies.
IndustriesMfgTargets
Enables Sales Agreements. With Sales Agreements, you can negotiate purchase and sale of products over a continued period. You
can also get insights into products, prices, discounts, and quantities. And you can track your planned and actual quantities and
revenues with real-time updates from orders and contracts.
IndustriesManufacturingCmty
Provides the Manufacturing Sales Agreement for the Community permission set license, which is intended for the usage of partner
community users. It also provides access to the Manufacturing community template for admins users to create communities.
IndustriesMfgAccountForecast
Enables Account Forecast. With Account Forecast, you can generate forecasts for your accounts based on orders, opportunities, and
sales agreements. You can also create formulas to calculate your forecasts per the requirements of your company.
InsightsPlatform
Enables the CRM Analytics Plus license for CRM Analytics.
InsuranceCalculationUser
Enables the calculation feature of Insurance. Provides 10 seats each of the BRERuntimeAddOn and OmniStudioRuntime licenses.
Also, provides one seat each of the OmniStudio and BREPlatformAccess licenses.
InsuranceClaimMgmt
Enables claim management features. Provides one seat of the InsuranceClaimMgmtAddOn license.
InsurancePolicyAdmin
Enables policy administration features. Provides one seat of the InsurancePolicyAdministrationAddOn license.
72
Scratch Org FeaturesScratch Orgs
IntelligentDocumentReader
Provides the license required to enable and use Intelligent Document Reader in a scratch org. Intelligent Document Reader uses
optical character recognition to automatically extract data with Amazon Textract by using your AWS account.
Interaction
Enables flows. A flow is the part of Salesforce Flow that collects data and performs actions in your Salesforce org or an external
system. Salesforce Flow provides two types of flows: screen flows and autolaunched flows.
IoT
Enables IoT so the scratch org can consume platform events to perform business and service workflows using orchestrations and
contexts.
JigsawUser
Provides one license to Jigsaw features.
Knowledge
Enables Salesforce Knowledge and gives your website visitors, clients, partners, and service agents the ultimate support tool. Create
and manage a knowledge base with your company information, and securely share it when and where it's needed. Build a knowledge
base of articles that can include information on process, like how to reset your product to its defaults, or frequently asked questions.
LegacyLiveAgentRouting
Enables legacy Live Agent routing for Chat. Use Live Agent routing to chat in Salesforce Classic. Chats in Lightning Experience must
be routed using Omni-Channel.
LightningSalesConsole
Adds one Lighting Sales Console user license.
LightningScheduler
Enables Lightning Scheduler. Lightning Scheduler gives you tools to simplify appointment scheduling in Salesforce. Create a
personalized experience by scheduling customer appointments—in person, by phone, or by video—with the right person at the
right place and time.
LightningServiceConsole
Assigns the Lightning Service Console License to your scratch org so you can use the Lightning Service Console and access features
that help manage cases faster.
LiveAgent
Enables Chat for Service Cloud. Use web-based chat to quickly connect customers to agents for real-time support.
LiveMessage
Enables Messaging for Service Cloud. Use Messaging to quickly support customers using apps such as SMS text messaging and
Facebook Messenger.
LongLayoutSectionTitles
Allows page layout section titles to be up to 80 characters.
LoyaltyAnalytics
Enables Analytics for Loyalty license. The Analytics for Loyalty app gives you actionable insights into your loyalty programs.
LoyaltyEngine
Enables Loyalty Management Promotion Setup license. Promotion setup allows loyalty program managers to create loyalty program
processes. Loyalty program processes help you decide how incoming and new Accrual and Redemption-type transactions are
processed.
LoyaltyManagementStarter
Enables the Loyalty Management - Starter license. Create loyalty programs and set up loyalty program-specific processes that allow
you to recognize, rewards, and retain customers.
73
Scratch Org FeaturesScratch Orgs
LoyaltyMaximumPartners:<value>
Increases the number of loyalty program partners that can be associated with a loyalty program in an org where the Loyalty
Management - Starter license is enabled. The default and maximum value is 1.
LoyaltyMaximumPrograms:<value>
Increases the number of loyalty programs that can be created in an org where the Loyalty Management - Starter license is enabled.
The default and maximum value is 1.
LoyaltyMaxOrderLinePerHour:<value>
Increases the number of order lines that can be cumulatively processed per hour by loyalty program processes. Indicate a value
between 1–3,500,000.
LoyaltyMaxProcExecPerHour:<value>
Increases the number of transaction journals that can be processed by loyalty program processes per hour. Indicate a value between
1–500,000.
LoyaltyMaxTransactions:<value>
Increases the number of Transaction Journal records that can be processed. Indicate a value between 1–50,000,000.
LoyaltyMaxTrxnJournals:<value>
Increases the number of Transaction Journal records that can be stored in an org that has the Loyalty Management - Start license
enabled.
Macros
Enables macros in your scratch org. After enabling macros, add the macro browser to the Lightning Console so you can configure
predefined instructions for commonly used actions and apply them to multiple posts at the same time.
MarketingUser
Provides access to the Campaigns object. Without this setting, Campaigns are read-only.
MaxActiveDPEDefs:<value>
Increases the number of Data Processing Engine definitions that can be activated in the org. Indicate a value between 1–50.
MaxApexCodeSize:<value>
Limits the non-test, unmanaged Apex code size (in MB). To use a value greater than the default value of 10, contact Salesforce
Customer Support.
MaxAudTypeCriterionPerAud
Limits the number of audience type criteria available per audience. The default value is 10.
MaxCustomLabels:<value>
Limits the number of custom labels (measured in thousands). Setting the limit to 10 enables the scratch org to have 10,000 custom
labels. Indicate a value between 1–15.
MaxDatasetLinksPerDT:<value>
Increases the number of dataset links that can be associated with a decision table. Indicate a value between 1–3.
MaxDataSourcesPerDPE:<value>
Increases the number of Source Object nodes a Data Processing Engine definition can contain. Indicate a value between 1–50.
MaxDecisionTableAllowed:<value>
Increases the number of decision tables rules that can be created in the org. Indicate a value between 1–30.
MaxFavoritesAllowed:<value>
Increases the number of Favorites allowed. Favorites allow users to create a shortcut to a Salesforce Page. Users can view their
Favorites by clicking the Favorites list dropdown in the header. Indicate a value between 0–200.
74
Scratch Org FeaturesScratch Orgs
MaxFieldsPerNode:<value>
Increases the number of fields a node in a Data Processing Engine definition can contain. Indicate a value between 1–500.
MaxInputColumnsPerDT:<value>
Increases the number of input fields a decision table can contain. Indicate a value between 1–10.
MaxLoyaltyProcessRules:<value>
Increases the number of loyalty program process rules that can be created in the org. Indicate a value between 1–20.
MaxNodesPerDPE:<value>
Increases the number of nodes that a Data Processing Engine definition can contain. Indicate a value between 1–500.
MaxNoOfLexThemesAllowed:<value>
Increases the number of Themes allowed. Themes allow users to configure colors, fonts, images, sizes, and more. Access the list of
Themes in Setup, under Themes and Branding. Indicate a value between 0–300.
MaxOutputColumnsPerDT:<value>
Increases the number of output fields a decision table can contain. Indicate a value between 1–5.
MaxSourceObjectPerDSL:<value>
Increases the number of source objects that can be selected in a dataset link of a decision table. Indicate a value between 1–5.
MaxStreamingTopics:<value>
Increases the maximum number of delivered PushTopic event notifications within a 24-hour period, shared by all CometD clients.
Indicate a value between 40–100.
MaxUserNavItemsAllowed:<value>
Increases the number of navigation items a user can add to the navigation bar. Indicate a value between 0–500.
MaxUserStreamingChannels:<value>
Increases the maximum number of user-defined channels for generic streaming. Indicate a value between 20–1,000.
MaxWritebacksPerDPE:<value>
Increases the number of Writeback Object nodes a Data Processing Engine definition can contain. Indicate a value between 1–50.
MedVisDescriptorLimit:<value>
Increases the number of sharing definitions allowed per record for sharing inheritance to be applied to an object. Indicate a value
between 150–1,600.
MinKeyRotationInterval
Sets the encryption key material rotation interval at once per 60 seconds. If this feature isn't specified, the rotation interval defaults
to once per 604,800 seconds (7 days) for Search Index key material, and once per 86,400 seconds (24 hours) for all other key material.
MobileExtMaxFileSizeMB:<value>
Increases the file size (in megabytes) for Field Service Mobile extensions. Indicate a value between 1–2,000.
MobileSecurity
Enables Enhanced Mobile Security. With Enhanced Mobile Security, you can control a range of policies to create a security solution
tailored to your org’s needs. You can limit user access based on operating system versions, app versions, and device and network
security. You can also specify the severity of a violation.
MultiLevelMasterDetail
Allows the creation a special type of parent-child relationship between one object, the child, or detail, and another object, the parent,
or master.
MutualAuthentication
Requires client certificates to verify inbound requests for mutual authentication.
75
Scratch Org FeaturesScratch Orgs
MyTrailhead
Enables access to a myTrailhead enablement site in a scratch org.
NonprofitCloudCaseManagementUser
Provides the permission set license required to use and configure the Salesforce.org Nonprofit Cloud Case Management managed
package. You can then install the package in the scratch org.
NumPlatformEvents:<value>
Increases the maximum number of platform event definitions that can be created. Indicate a value between 5–20.
ObjectLinking
Create rules to quickly link channel interactions to objects such as contacts, leads, or person accounts for customers (Beta).
OmnistudioMetadata
Enables Omnistudio metadata API. Using this API, customers can deploy and retrieve Omnistudio components programmatically.
OmnistudioRuntime
Enables business users to execute OmniScripts, DataMappers, FlexCards, and so on in the employee facing applications.
OmnistudioDesigner
Enables administrator or developer to create new OmniScripts/ DataMappers / Integration Procedures instances.
OrderManagement
Provides the Salesforce Order Management license. Order Management is your central hub for handling all aspects of the order
lifecycle, including order capture, fulfillment, shipping, payment processing, and servicing.
OrderSaveLogicEnabled
Enables scratch org support for New Order Save Behavior. OrderSaveLogicEnabled supports only New Order Save Behavior. If your
scratch org needs both Old and New Order Save Behavior, use OrderSaveBehaviorBoth.
OrderSaveBehaviorBoth
Enables scratch org support for both New Order Save Behavior and Old Order Save Behavior.
OutboundMessageHTTPSession
Enables using HTTP endpoint URLs in outbound message definitions that have the Send Session ID option selected.
OutcomeManagement
Gives users access to Outcome Management features and objects in Salesforce and Experience Cloud.
PardotScFeaturesCampaignInfluence
Enables additional campaign influence models, first touch, last touch, and even distribution for Pardot users.
PersonAccounts
Enables person accounts in your scratch org.
PipelineInspection
Enables Pipeline Inspection. Pipeline Inspection is a consolidated pipeline view with metrics, opportunities, and highlights of recent
changes.
PlatformCache
Enables Platform Cache and allocates a 3 MB cache. The Lightning Platform Cache layer provides faster performance and better
reliability when caching Salesforce session and org data.
PlatformConnect:<value>
Enables Salesforce Connect and allows your users to view, search, and modify data that's stored outside your Salesforce org. Indicate
a value from 1–5.
76
Scratch Org FeaturesScratch Orgs
PlatformEncryption
Shield Platform Encryption encrypts data at rest. You can manage key material and encrypt fields, files, and other data.
PlatformEventsPerDay:<value>
Increases the maximum number of delivered standard-volume platform event notifications within a 24-hour period, shared by all
CometD clients. Indicate a value between 10,000–50,000.
ProcessBuilder
Enables Process Builder, a Salesforce Flow tool that helps you automate your business processes.
ProductsAndSchedules
Enables product schedules in your scratch org. Enabling this feature lets you create default product schedules on products. Users
can also create schedules for individual products on opportunities.
ProductCatalogManagementAddOn
Enables read-write access to Product Catalog Management features and objects.
ProductCatalogManagementViewerAddOn
Enables read access to Product Catalog Management features and objects.
ProductCatalogManagementPCAddOn
Enables read access to Product Catalog Management features and objects for Partner Community Users in scratch orgs.
ProgramManagement
Enables access to all Program Management and Case Management features and objects.
ProviderFreePlatformCache
Provides 3 MB of free Platform Cache capacity for security-reviewed managed packages. This feature is made available through a
capacity type called Provider Free capacity and is automatically enabled in Developer Edition orgs. Allocate the Provider Free capacity
to a Platform Cache partition and add it to your managed package.
PublicSectorAccess
Enables access to all Public Sector features and objects.
PublicSectorApplicationUsageCreditsAddOn
Enables additional usage of Public Sector applications based on their pricing.
PublicSectorSiteTemplate
Allows Public Sector users access to build an Experience Cloud site from the templates available.
RecordTypes
Enables Record Type functionality. Record Types let you offer different business processes, picklist values, and page layouts to different
users.
RefreshOnInvalidSession
Enables automatic refreshes of Lightning pages when the user's session is invalid. If, however, the page detects a new token, it tries
to set that token and continue without a refresh.
RevSubscriptionManagement
Enables Subscription Management. Subscription Management is an API-first, product-to-cash solution for B2B subscriptions and
one-time sales.
S1ClientComponentCacheSize
Allows the org to have up to 5 pages of caching for Lightning Components.
SalesCloudEinstein
Enables Sales Cloud Einstein features and Salesforce Inbox. Sales Cloud Einstein brings AI to every step of the sales process.
77
Scratch Org FeaturesScratch Orgs
SalesforceContentUser
Enables access to Salesforce content features.
SalesforceFeedbackManagementStarter
Provides a license to use the Salesforce Feedback Management - Starter features.
SalesforceIdentityForCommunities
Adds Salesforce Identity components, including login and self-registration, to Experience Builder. This feature is required for Aura
components.
SalesforcePricing
Enables Salesforce Pricing, which allows you to set, manage, and optimize prices across your entire product portfolio
SalesUser
Provides a license for Sales Cloud features.
SAML20SingleLogout
Enables usage of SAML 2.0 single logout.
SCIMProtocol
Enables access support for the SCIM protocol base API.
SecurityEventEnabled
Enables access to security events in Event Monitoring.
SentimentInsightsFeature
Provides the license required to enable and use Sentiment Insights in a scratch org. Use Sentiment Insights to analyze the sentiment
of your customers and get actionable insights to improve it.
ServiceCatalog
Enables Employee Service Catalog so you can create a catalog of products and services for your employees. It can also turn your
employees' requests for these products and services into approved and documented orders.
ServiceCloud
Assigns the Service Cloud license to your scratch org, so you can choose how your customers can reach you, such as by email, phone,
social media, online communities, chat, and text.
ServiceCloudVoicePartnerTelephony
Assigns the Service Cloud Voice with Partner Telephony add-on license to your scratch org, so you can set up a Service Cloud Voice
contact center that integrates with supported telephony providers. Indicate a value from 1–50.
ServiceUser
Adds one Service Cloud User license, and allows access to Service Cloud features.
SessionIdInLogEnabled
Enables Apex debug logs to include session IDs. If disabled, session IDs are replaced with "SESSION_ID_REMOVED" in debug logs.
SFDOInsightsDataIntegrityUser
Provides a license to Salesforce.org Insights Platform Data Integrity managed package. You can then install the package in the scratch
org.
SharedActivities
Allow users to relate multiple contacts to tasks and events.
Sites
Enables Salesforce Sites, which allows you to create public websites and applications that are directly integrated with your Salesforce
org. Users aren’t required to log in with a username and password.
78
Scratch Org FeaturesScratch Orgs
SocialCustomerService
Enables Social Customer Service, sets post defaults, and either activates the Starter Pack or signs into your Social Studio account.
StateAndCountryPicklist
Enables state and country/territory picklists. State and country/territory picklists let users select states and countries from predefined,
standardized lists, instead of entering state, country, and territory data into text fields.
StreamingAPI
Enables Streaming API.
StreamingEventsPerDay:<value>
Increases the maximum number of delivered PushTopic event notifications within a 24-hour period, shared by all CometD clients
(API version 36.0 and earlier). Indicate a value between 10,000–50,000.
SubPerStreamingChannel:<value>
Increases the maximum number of concurrent clients (subscribers) per generic streaming channel (API version 36.0 and earlier).
Indicate a value between 20–4,000.
SubPerStreamingTopic:<value>
Increases the maximum number of concurrent clients (subscribers) per PushTopic streaming channel (API version 36.0 and earlier).
Indicate a value between 20–4,000.
SurveyAdvancedFeatures
Enables a license for the features available with the Salesforce Feedback Management - Growth license.
SustainabilityCloud
Provides the permission set licenses and permission sets required to install and configure Sustainability Cloud. To enable or use CRM
Analytics and CRM Analytics templates, include the DevelopmentWave scratch org feature.
SustainabilityApp
Provides the permission set licenses and permission sets required to configure Net Zero Cloud. To enable or use Tableau CRM and
Tableau CRM templates, include the DevelopmentWave scratch org feature.
TCRMforSustainability
Enables all permissions required to manage the Net Zero Analytics app by enabling Tableau CRM. You can create and share the
analytics app for your users to bring your environmental accounting in line with your financial accounting.
TimelineConditionsLimit
Limits the number of timeline record display conditions per event type to 3.
TimelineEventLimit
Limits the number of event types displayed on a timeline to 5.
TimelineRecordTypeLimit
Limits the number of related object record types per event type to 3.
TimeSheetTemplateSettings
Time Sheet Templates let you configure settings to create time sheets automatically. For example, you can create a template that
sets start and end dates. Assign templates to user profiles so that time sheets are created for the right users.
TransactionFinalizers
Enables you to implement and attach Apex Finalizers to Queueable Apex jobs.
WaveMaxCurrency
Increases the maximum number of supported currencies for CRM Analytics. Indicate a value between 1–5.
WavePlatform
Enables the Wave Platform license.
79
Scratch Org FeaturesScratch Orgs
Workflow
Enables Workflow so you can automate standard internal procedures and processes.
WorkflowFlowActionFeature
Allows you to launch a flow from a workflow action.
WorkplaceCommandCenterUser
Enables access to Workplace Command Center features including access to objects such as Employee, Crisis, and
EmployeeCrisisAssessment.
WorkThanksPref
Enables the give thanks feature in Chatter.
AccountInspection
Enables the Account Intelligence view. The Account Intelligence view is a consolidated dashboard showing account metrics, activities,
and related opportunities and cases.
AccountingSubledgerGrowthEdition
Provides three permission sets that enable access to Accounting Subledger Growth features.
More Information
Requires that you also include the DataProcessingEngine scratch org feature in your scratch org definition file. Requires that you enable
Data Pipelines. Requires configuration using the Setup menu in the scratch org. See Accounting Subledger in Salesforce Help.
AccountingSubledgerStarterEdition
Provides three permission sets that enable access to Accounting Subledger Starter features.
More Information
Requires that you also include the DataProcessingEngine scratch org feature in your scratch org definition file. Requires that you enable
Data Pipelines. Requires configuration using the Setup menu in the scratch org. See Accounting Subledger in Salesforce Help.
AccountingSubledgerUser
Enables organization-wide access to Accounting Subledger Growth features when the package is installed.
More Information
Requires that you install the Accounting Subledger or Accounting Subledger for Industries managed package. If you install the Accounting
Subledger package, also set up the Opportunity object. See Accounting Subledger Legacy Documentation in Salesforce Help.
AddCustomApps:<value>
Increases the maximum number of custom apps allowed in an org. Indicate a value from 1–30.
80
Scratch Org FeaturesScratch Orgs
Supported Quantities
1–30, Multiplier: 1
AddCustomObjects:<value>
Increases the maximum number of custom objects allowed in the org. Indicate a value from 1–30.
Supported Quantities
1–30, Multiplier: 1
AddCustomRelationships:<value>
Increases the maximum number of custom relationships allowed on an object. Indicate a value from 1–10.
Supported Quantities
1–10, Multiplier: 5
AddCustomTabs:<value>
Increases the maximum number of custom tabs allowed in an org. Indicate a value from 1–30.
Supported Quantities
1–30, Multiplier: 1
AddDataComCRMRecordCredit:<value>
Increases record import credits assigned to a user in your scratch org. Indicate a value from 1–30.
Supported Quantities
1–30, Multiplier: 1
AddInsightsQueryLimit:<value>
Increases the size of your CRM Analytics query results. Indicate a value from 1–30 (multiplier is 10). Setting the quantity to 6 increases
the query results to 60.
Supported Quantities
1–30, Multiplier: 10
AdditionalFieldHistory:<value>
Increases the number of fields you can track history for beyond the default, which is 20 fields. Indicate a value between 1–40.
81
Scratch Org FeaturesScratch Orgs

Supported Quantities
1–40, Multiplier: 1
More Information
Previous name: AddHistoryFieldsPerEntity.
AdmissionsConnectUser
Enables the Admissions Connect components. Without this scratch org feature parameter, the custom Admissions Connect components
render as blank.
Scratch Org Definition File
Add these options to your scratch org definition file:
{
"orgName": "Omega - Dev Org",
"edition": "Partner Developer",
"hasSampleData": "true",
"features": [
"DevelopmentWave",
"AdmissionsConnectUser",
"Communities",
"OmniStudioDesigner",
"OmniStudioRuntime"
],
"settings": {
"lightningExperienceSettings": {
"enableS1DesktopEnabled": true
},
"chatterSettings": {
"enableChatter": true
},
"languageSettings": {
"enableTranslationWorkbench": true
},
"enhancedNotesSettings": {
"enableEnhancedNotes": true
},
"pathAssistantSettings": {
"pathAssistantEnabled": true
},
"securitySettings": {
"enableAdminLoginAsAnyUser":true
},
"userEngagementSettings": {
"enableOrchestrationInSandbox": true,
"enableOrgUserAssistEnabled": true,
"enableShowSalesforceUserAssist": false
},
"experienceBundleSettings": {
"enableExperienceBundleMetadata": true
82
Scratch Org FeaturesScratch Orgs

},
"communitiesSettings": {
"enableNetworksEnabled": true,
"enableOotbProfExtUserOpsEnable": true
},
"mobileSettings": {
"enableS1EncryptedStoragePref2": false
}
}
}
More Information
Next, install the Admissions Connect package in the scratch org. For installation instructions, see Install Admissions Connect in Salesforce
Help.
AdvisorLinkFeature
Enables the Student Success Hub components. Without this scratch org feature parameter, the custom Student Success Hub components
render as blank.
Scratch Org Definition File
Add these options to your scratch org definition file:
{
"edition": "Partner Developer",
"features": [
"Communities",
"FeatureParameterLicensing",
"AdvisorLinkFeature"
],
"orgName": "SAL - Dev Workspace",
"hasSampleData": "true",
"settings": {
"chatterSettings": {
"enableChatter": true
},
"communitiesSettings": {
"enableNetworksEnabled": true,
"enableOotbProfExtUserOpsEnable": true
},
"enhancedNotesSettings": {
"enableEnhancedNotes": true
},
"experienceBundleSettings": {
"enableExperienceBundleMetadata": true
},
"lightningExperienceSettings": {
"enableS1DesktopEnabled": true
},
"mobileSettings": {
"enableS1EncryptedStoragePref2": false
83
Scratch Org FeaturesScratch Orgs

},
"languageSettings": {
"enableTranslationWorkbench": true
},
"securitySettings": {
"enableAdminLoginAsAnyUser": true
}
}
}
More Information
Next, install the Student Success Hub package in the scratch org. For setup instructions, see Install Student Success Hub in Salesforce
Help.
AdvisorLinkPathwaysFeature
Enables the Pathways components. Without this scratch org feature parameter, the custom Pathways components render as blank.
Scratch Org Definition File
Add these options to your scratch org definition file:
{
"orgName": "Pathways - Dev Org",
"edition": "Partner Developer",
"features": [
"Communities",
"FeatureParameterLicensing",
"AdvisorLinkFeature",
"AdvisorLinkPathwaysFeature"
],
"settings": {
"chatterSettings": {
"enableChatter": true
},
"enhancedNotesSettings": {
"enableEnhancedNotes": true
},
"communitiesSettings": {
"enableNetworksEnabled": true
},
"languageSettings": {
"enableTranslationWorkbench": true
},
"lightningExperienceSettings": {
"enableS1DesktopEnabled": true
},
"mobileSettings": {
"enableS1EncryptedStoragePref2": false
}
}
}
84
Scratch Org FeaturesScratch Orgs

More Information
Next, install the Pathways package in the scratch org. For setup instructions, see Set Up Pathways in Salesforce Help.
AIAttribution
Provides access to Einstein Attribution for Marketing Cloud Account Engagement. Einstein Attribution uses AI modeling to dynamically
assign attribution percentages to multiple campaign touchpoints.
Sample Scratch Org Definition File
Before enabling Einstein Attribution, make sure that enableAIAttribution and enableCampaignInfluence2 are set
to true.
{
"orgName": "NTOutfitters",
"edition": "Enterprise",
"features": ["AIAttribution"],
"settings": {
"campaignSettings": {
"enableAIAttribution": true
"enableCampaignInfluence2": true
}
}
More Information
This feature is available in Account Engagement Advanced and Premium editions.
Optional configuration steps are accessible in Setup in the scratch org. For more information, see Salesforce Help: Einstein Attribution.
AllUserIdServiceAccess
Enables all users to access all users’ information via the user ID service.
More Information
The AllUserIdServiceAccess permission is off by default for all new and existing orgs. To turn on this feature, contact Salesforce Customer
Support.
AnalyticsAdminPerms
Enables all permissions required to administer the CRM Analytics platform, including permissions to enable creating CRM Analytics
templated apps and CRM Analytics Apps.
More Information
See Set Up the CRM Analytics Platform in Salesforce Help for more information.
85
Scratch Org FeaturesScratch Orgs

AnalyticsAppEmbedded
Provides one CRM Analytics Embedded App license for the CRM Analytics platform.
API
Even in the editions (Professional, Group) that don’t provide API access, REST API is enabled by default. Use this scratch org feature to
access additional APIs (SOAP, Streaming, Bulk, Bulk 2.0).
More Information
See Salesforce editions with API access for more information.
ArcGraphCommunity
Lets you add Actionable Relationship Center (ARC) components to Experience Cloud pages so your users can view ARC Relationship
Graphs.
More Information
Provides 1 seat of the FinancialServicesEALoginAddon add-on license.
Requires that you install Financial Services Cloud. See Customize Experience Cloud Templates using ARC Components in Financial Services
Cloud Administrator Guide.
Assessments
Enables dynamic Assessments features, which enables both Assessment Questions and Assessment Question Sets.
More Information
Add these options to your scratch org feature definition file. For "edition," you can indicate any of the supported scratch org feature
editions.
{
"orgName": "Sample Org",
"edition": "Developer",
"features": ["Assessments"],
"settings": {
"industriesSettings": {
"enableIndustriesAssessment": true,
"enableDiscoveryFrameworkMetadata": true
}
}
}
Add the Assessment to the page layout. See Page Layouts in Salesforce Help for more information.
AssetScheduling:<value>
Enables Asset Scheduling license. Asset Scheduling makes it easier to book rooms and equipments. Indicate a value between 1–10.
86
Scratch Org FeaturesScratch Orgs
Supported Quantities
1–10
More Information
See Enable Asset Scheduling in Salesforce Scheduler in Salesforce Help for more information.
AssociationEngine
Enables the Association Engine, which automatically associates new accounts with the user’s current branch by creating branch unit
customer records.
More Information
Provides 11 seats of the FSCComprehensivePsl user license and 11 seats of the FSCComprehensiveAddOn add-on license.
Requires that you install Financial Services Cloud. See AssociationEngineSettings in Metadata API Developer Guide.
AuthorApex
Enables you to access and modify Apex code in a scratch org. Enabled by default in Enterprise and Developer Editions.
More Information
For Group and Professional Edition orgs, this feature is disabled by default. Enabling the AuthorApex feature lets you edit and test your
Apex classes.
B2BCommerce
Provides the B2B License. B2BCommerce enables business-to-business (B2B) commerce in your org. Create and update B2B stores. Create
and manage buyer accounts. Sell products to other businesses.
More Information
Requires that you also include the Communities scratch org feature in your scratch org definition file to create a store using B2B Commerce.
Not available in Professional, Partner Professional, Group, or Partner Group Edition orgs.
B2BLoyaltyManagement
Enables the B2B Loyalty Management license. Create loyalty programs and set up loyalty program-specific processes that allow you to
recognize, rewards, and retain customers.
More Information
See Loyalty Management in Salesforce Help for more information.
87
Scratch Org FeaturesScratch Orgs
B2CCommerceGMV
Provides the B2B2C Commerce License. B2B2C Commerce allows you to quickly stand up an ecommerce site to promote brands and
sell products into multiple digital channels. You can create and update retail storefronts in your org, and create and manage person
accounts.
More Information
Also requires the Communities feature in your scratch org definition file.
Not available in Professional, Partner Professional, Group, or Partner Group Edition orgs.
For more information, see Salesforce Help at Salesforce B2B Commerce and B2B2C Commerce..
B2CLoyaltyManagement
Enables the Loyalty Management - Growth license. Create loyalty programs and set up loyalty program-specific processes that allow
you to recognize, rewards, and retain customers.
More Information
See Loyalty Management in Salesforce Help for more information.
B2CLoyaltyManagementPlus
Enables the Loyalty Management - Advanced license. Create loyalty programs and set up loyalty program-specific processes that allow
you to recognize, rewards, and retain customers.
More Information
See Loyalty Management in Salesforce Help for more information.
BatchManagement
Enables the Batch Management license. Batch Management allows you to process a high volume of records in manageable batches.
More Information
See Batch Management in Salesforce Help for more information.
BigObjectsBulkAPI
Enables the scratch org to use BigObjects in the Bulk API.
More Information
See Big Objects Implementation Guide for more information.
88
Scratch Org FeaturesScratch Orgs
Briefcase
Enables the use of Briefcase Builder in a scratch org, which allows you to create offline briefcases that make selected records available
for viewing offline.
BudgetManagement
Gives users access to budget management features and objects. To enable budget management, add this feature to your scratch org
definition file.
More Information
See Budget Management in Salesforce Help for more information.
BusinessRulesEngine
Enables Business Rules Engine, which enables both expression sets and lookup tables.
More Information
Provides 10 Business Rules Engine Designer and 10 Business Rules Engine Runtime licenses. For more information, see Business Rules
Engine in Salesforce Help.
CacheOnlyKeys
Enables the cache-only keys service. This feature allows you to store your key material outside of Salesforce, and have the Cache-Only
Key Service fetch your key on demand from a key service that you control.
More Information
Requires enabling PlatformEncryption and configuration using the Setup menu in the scratch org. See Which User Permissions Does
Shield Platform Encryption Require?, Generate a Tenant Secret with Salesforce, and Cache-Only Key Service in Salesforce Help.
CalloutSizeMB:<value>
Increases the maximum size of an Apex callout. Indicate a value between 3–12.
Supported Quantities
3–12, Multiplier: 1
CampaignInfluence2
Provides access to Customizable Campaign Influence for Sales Cloud and Marketing Cloud Account Engagement. Customizable Campaign
Influence can auto-associate or allow manual creation of relationships among campaigns and opportunities to track attribution.
89
Scratch Org FeaturesScratch Orgs

Sample Scratch Org Definition File
To enable Customizable Campaign Influence, set enableCampaignInfluence2 to true.
{
"orgName": "NTOutfitters",
"edition": "Enterprise",
"features": ["CampaignInfluence2"],
"settings": {
"campaignSettings": {
"enableCampaignInfluence2": true
}
}
More Information
This feature is available in Salesforce Enterprise, Performance, Unlimited, and Developer Editions.
Optional configuration steps are accessible in Setup in the scratch org. For more information, see Salesforce Help: Customizable Campaign
Influence.
CascadeDelete
Provides lookup relationships with the same cascading delete functionality previously only available to master-detail relationships. To
prevent records from being accidentally deleted, cascade-delete is disabled by default.
CaseClassification
Enables Einstein Case Classification. Case Classification offers recommendations to your agents so they can select the best value. You
can also automatically save the best recommendation and route the case to the right agent.
CaseWrapUp
Enables Einstein Case Wrap-Up. To help agents complete cases quickly, Einstein Case Wrap-Up recommends case field values based on
past chat transcripts.
More Information
Available in Enterprise Edition scratch orgs.
Requires configuration using the Setup menu in the scratch org.
See Set Up Einstein Classification Apps in Salesforce Help for more information.
CGAnalytics
Enables the Consumer Goods Analytics org perm in scratch orgs.
More Information
Provides 1 seat of the CGAnalyticsPlus add-on license.
90
Scratch Org FeaturesScratch Orgs
ChangeDataCapture
Enables Change Data Capture, if the scratch org edition doesn't automatically enable it.
Chatbot
Enables deployment of Bot metadata into a scratch org, and allows you to create and edit bots.
More Information
To use this feature, turn on Enable Einstein Features in the Dev Hub org to accept the Terms of Service.
See Einstein Bots in Salesforce Help for more information.
ChatterEmailFooterLogo
ChatterEmailFooterLogo allows you to use the Document ID of a logo image, which you can use to customize chatter emails.
More Information
See Add Your Custom Brand to Email Notifications in Salesforce Help for more information.
ChatterEmailFooterText
ChatterEmailFooterText allows you to use footer text in customized Chatter emails.
More Information
See Add Your Custom Brand to Email Notifications in Salesforce Help for more information.
ChatterEmailSenderName
ChatterEmailSenderName allows you to customize the name that appears as the sender’s name in the email notification. For example,
your company’s name.
More Information
See Chatter Email Settings and Branding in Salesforce Help for more information.
CloneApplication
CloneApplication allows you to clone an existing custom Lightning app and make required customizations to the new app. This way,
you don’t have to start from scratch, especially when you want to create apps with simple variations.
More Information
See Create Lightning Apps in Salesforce Help for more information.
91
Scratch Org FeaturesScratch Orgs
CMSMaxContType
Limits the number of distinct content types you can create within Salesforce CMS to 21.
CMSMaxNodesPerContType
Limits the maximum number of child nodes (fields) you can create for a particular content type to 15.
CMSUnlimitedUse
Enables unlimited content records, content types, and bandwidth usage in Salesforce CMS.
Communities
Allows the org to create a customer community. To use Communities, you must also include communitiesSettings >
enableNetworksEnabled in the settings section of your scratch org definition file.
More Information
Available in Enterprise and Developer Edition scratch orgs.
ConAppPluginExecuteAsUser
Enables the pluginExecutionUser field in the ConnectedApp Metadata API object.
ConcStreamingClients:<value>
Increases the maximum number of concurrent clients (subscribers) across all channels and for all event types for API version 36.0 and
earlier. Indicate a value between 20–4,000.
Supported Quantities
20–4,000, Multiplier: 1
ConnectedAppCustomNotifSubscription
Enables connected apps to subscribe to custom notification types, which are used to send custom desktop and mobile notifications.
More Information
Sending custom notifications requires both CustomNotificationType to create notification types and
ConnectedAppCustomNotifSubscription to subscribe to notification types. See Manage Your Notifications with Notification Builder in
Salesforce Help for more information on custom notifications.
ConnectedAppToolingAPI
Enables the use of connected apps with the Tooling API.
92
Scratch Org FeaturesScratch Orgs
ConsentEventStream
Enables the Consent Event Stream permission for the org.
More Information
See Use the Consent Event Stream in Salesforce Help for more information.
ConsolePersistenceInterval:<value>
Increases how often console data is saved, in minutes. Indicate a value between 0–500. To disable auto save, set the value to 0.
Supported Quantities
0–500, Multiplier: 1
ContactsToMultipleAccounts
Enables the contacts to multiple accounts feature. This feature lets you relate a contact to two or more accounts.
ContractApprovals
Enables contract approvals, which allow you to track contracts through an approval process.
ContractManagement
Enables the Contract Lifecycle (CLM) Management features in the org.
ContractMgmtInd
Enables the Contract Lifecycle Management (CLM) features for Industries.
CoreCpq
Enables read-write access to Revenue Lifecycle Management features and objects. To use Revenue Lifecycle Management, you must
also include revenueManagementSettings > enableCoreCPQ in the settings section of your scratch org definition file.
More Information
•
Available in Developer and Enterprise scratch org editions.
•
Provides 10 RevenueLifecycleManagementAddOn add-on licenses.
•
Provides permission sets for Context Service, Business Rules Engine, Product Catalog Management, Product Discovery, Salesforce
Pricing, Product Configurator, Quote and Order Capture, and Asset Lifecycle.
•
Displays the setup pages for Context Service, Product Discovery, Salesforce Pricing, and Revenue Settings (Product Configurator and
Quote and Order Capture).
•
Requires configuration using the Setup menu in the scratch org. See Revenue Lifecycle Management.
93
Scratch Org FeaturesScratch Orgs

Scratch Org Definition File
Add these options to your scratch org definition file.
{
"edition": "<Edition Name>",
"features": [
"CoreCpq",
"EnableSetPasswordInApi",
"Communities",
"OrderSaveLogicEnabled",
"OrderSaveBehaviorBoth"
],
"settings": {
"chatterSettings": {
"enableChatter": false
},
"revenueManagementSettings": {
"enableCoreCPQ": true
},
"lightningExperienceSettings": {
"enableS1DesktopEnabled": true
}
},
"orgName": “<Org Name>”,
"adminEmail": "<Admin Email Address>"
}
CPQ
Enables the licensed features required to install the Salesforce CPQ managed package but doesn't install the package automatically.
More Information
For additional information and configuration steps, see Manage Your Quotes with CPQ in Salesforce Help.
CustomerExperienceAnalytics
Enables the Customer Lifecycle Analytics org perm in scratch orgs.
More Information
Provides 1 seat of the CustomerExperienceAnalyticsPlus add-on license.
CustomFieldDataTranslation
Enables translation of custom field data for Work Type Group, Service Territory, and Service Resource objects. You can enable data
translation for custom fields with Text, Text Area, Text Area (Long), Text Area (Rich), and URL types.
94
Scratch Org FeaturesScratch Orgs
More Information
Requires that you also include the EntityTranslation scratch org feature in your scratch org definition file. Not available in Professional,
Partner Professional, Group, or Partner Group Edition orgs.
CustomNotificationType
Allows the org to create custom notification types, which are used to send custom desktop and mobile notifications.
More Information
Sending custom notifications requires both CustomNotificationType to create notification types and
ConnectedAppCustomNotifSubscription to subscribe to notification types. See Manage Your Notifications with Notification Builder in
Salesforce Help for more information on custom notifications.
DataComDnbAccounts
Provides a license to Data.com account features.
DataComFullClean
Provides a license to Data.com cleaning features, and allows users to turn on auto fill clean settings for jobs.
DataMaskUser
Provides 30 Data Mask permission set licenses. This permission set enables access to an installed Salesforce Data Mask package.
More Information
For additional installation and configuration steps, see Install the Managed Package in Salesforce Help.
DataProcessingEngine
Enables the Data Processing Engine license. Data Processing Engine helps transform data that's available in your Salesforce org and write
back the transformation results as new or updated records.
More Information
See Data Processing Engine in Salesforce Help for more information.
DebugApex
Enables Apex Interactive Debugger. You can use it to debug Apex code by setting breakpoints and checkpoints, and inspecting your
code to find bugs.
DecisionTable
Enables Decision Table license. Decision tables read business rules and decide the outcome for records in your Salesforce org or for the
values that you specify.
95
Scratch Org FeaturesScratch Orgs

More Information
See Decision Table in Salesforce Help for more information.
DefaultWorkflowUser
Sets the scratch org admin as the default workflow user.
DeferSharingCalc
Allows admins to suspend group membership and sharing rule calculations and to resume them later.
More Information
Requires configuration using the Setup menu in the scratch org. See Defer Sharing Calculations in Salesforce Help.
DevelopmentWave
Enables CRM Analytics development in a scratch org. It assigns five platform licenses and five CRM Analytics platform licenses to the org,
along with assigning the permission set license to the admin user. It also enables the CRM Analytics Templates and Einstein Discovery
features.
DeviceTrackingEnabled
Enables Device Tracking.
DevOpsCenter
Enables DevOps Center in scratch orgs so that partners can create second-generation managed packages that extend or enhance the
functionality in the DevOps Center application (base) package.
Dev Hub Org
Ask a Salesforce admin to enable DevOps Center in the Dev Hub org. From Setup, enter DevOps Center in the Quick Find box, then
select DevOps Center. You can create scratch orgs after the org preference is enabled.
Scratch Org Definition File
Add these options to your scratch org definition file:
{
"orgName": "Acme",
"edition": "Enterprise",
"features": ["DevOpsCenter"],
"settings": {
"devHubSettings": {
"enableDevOpsCenterGA": true
}
}
}
96
Scratch Org FeaturesScratch Orgs

Scratch Org Definition File For Scratch Orgs Created from an Org Shape
If you create a scratch org based on an org shape with DevOps Center enabled, we still require that you add the DevOps Center feature
and setting to the scratch org definition for legal reasons as part of the DevOps Center terms and conditions.
{
"orgName": "Acme",
"sourceOrg": "00DB1230400Ifx5",
"features": ["DevOpsCenter"],
"settings": {
"devHubSettings": {
"enableDevOpsCenterGA": true
}
}
}
More Information
Salesforce Help: Build an Extension Package for DevOps Center
DisableManageIdConfAPI
Limits access to the LoginIP and ClientBrowser API objects to allow view or delete only.
DisclosureFramework
Provides the permission set licenses and permission sets required to configure Disclosure and Compliance Hub.
Scratch Org Definition File
Add these options to your scratch org definition file:
{
"orgName": "dch org",
"edition": "Developer",
"features": ["DisclosureFramework"],
"settings": {
"industriesSettings":{
"enableGnrcDisclsFrmwrk": true,
"enableIndustriesAssessment" : true
}
}
}
More Information
For configuration steps, see Disclosure and Compliance Hub in the Set Up and Maintain Net Zero Cloud guide in Salesforce Help.
97
Scratch Org FeaturesScratch Orgs
Division
Turns on the Manage Divisions feature under Company Settings. Divisions let you segment your organization's data into logical sections,
making searches, reports, and list views more meaningful to users. Divisions are useful for organizations with extremely large amounts
of data.
DocGen
Enables the Document Generation Feature in the Org.
DocGenDesigner
Enables the designers to create and configure document templates.
DocGenInd
Enables the Industry Document Generation features in the org.
DocumentChecklist
Enables Document Tracking and Approval features, and adds the Document Checklist permission set. Document tracking features let
you define documents to upload and approve, which supports processes like loan applications or action plans.
More Information
See Enable Document Tracking and Approvals in the Financial Services Cloud Administrator Guide for more information.
DocumentReaderPageLimit
Limits the number of pages sent for data extraction to 5.
More Information
See Intelligent Form Reader in Salesforce Help for more information.
DSARPortability
Enables an org to access the DSARPortability feature in Privacy Center. Also, provides one seat each of the PrivacyCenter and
PrivacyCenterAddOn licenses.
More Information
See Portability in the Salesforce REST API Developer Guide for more information.
DurableClassicStreamingAPI
Enables Durable PushTopic Streaming API for API version 37.0 and later.
98
Scratch Org FeaturesScratch Orgs
More Information
Available in Enterprise and Developer Edition scratch orgs.
DurableGenericStreamingAPI
Enables Durable Generic Streaming API for API version 37.0 and later.
More Information
Available in Enterprise and Developer Edition scratch orgs.
DynamicClientCreationLimit
Allows the org to register up to 100 OAuth 2.0 connected apps through the dynamic client registration endpoint.
EAndUDigitalSales
Enables the Energy and Utilities Digital Sales feature in the org.
EAndUSelfServicePortal
Enables the Self Service Portal features for Digital Experience users in the org.
EAOutputConnectors
Enable CRM Analytics Output Connectors.
More Information
This scratch org requires the Dev Hub to have the EAOutputConnectors permission. See Salesforce Output Connection in Salesforce
Help for more details.
EASyncOut
Enable CRM Analytics SyncOut.
More Information
This scratch org requires the Dev Hub to have the EASyncOut permission. See Sync Out for Snowflake in Salesforce Help for more details.
EdPredictionM3Threshold
Sets the number of records in the payload to 10, after which the Einstein Discovery prediction service uses M3.
EdPredictionTimeout
Sets the maximum duration of a single Einstein Discovery prediction to 100 milliseconds.
99
Scratch Org FeaturesScratch Orgs
EdPredictionTimeoutBulk
Sets the maximum duration of a single Einstein Discovery prediction when it runs in bulk to 10 milliseconds.
EdPredictionTimeoutByomBulk
Sets the maximum duration of a single Bring Your Own Model (BYOM) Einstein Discovery prediction to 100 milliseconds.
EducationCloud: <value>
Enables use of Education Cloud.
Supported Quantities
Maximum: 10; Multiplier: 1
More Information
Standard set up steps are required after enabling this feature. See Set Up Education Cloud in Salesforce Help for more information.
EinsteinAnalyticsPlus
Provides one CRM Analytics Plus license for the CRM Analytics platform.
EinsteinArticleRecommendations
Provides licenses for Einstein Article Recommendations. Einstein Article Recommendations uses data from past cases to identify Knowledge
articles that are most likely to help your customer service agents address customer inquiries.
More Information
Available in Enterprise Edition scratch orgs.
Requires configuration using the Setup menu in the scratch org.
See Set Up Einstein Article Recommendations in Salesforce Help for more information.
EinsteinBuilderFree
Provides a license that allows admins to create one enabled prediction with Einstein Prediction Builder. Einstein Prediction Builder is
custom AI for admins
More Information
For configuration steps, see Einstein Prediction Builder in Salesforce Help.
EinsteinDocReader
Provides the license required to enable and use Intelligent Form Reader in a scratch org. Intelligent Form Reader uses optical character
recognition to automatically extract data with Amazon Textract.
100
Scratch Org FeaturesScratch Orgs
More Information
To use this scratch org feature, the Dev Hub org requires the EinsteinDocReader and SalesforceManagedIFR permissions. For information
about Intelligent Form Reader, see Intelligent Form Reader in Salesforce Help.
EinsteinRecommendationBuilder
Provides a license to create recommendations with Einstein Recommendation Builder. Einstein Recommendation Builder lets you build
custom AI recommendations.
More Information
Enabled in Developer and Enterprise Editions.
Requires configuration using the Setup menu in the scratch org. You also need the EinsteinRecommendationBuilderMetadata feature
to use Einstein Recommendation Builder in scratch org.
EinsteinSearch
Provides the license required to use and enable Einstein Search features in a scratch org.
More Information
Available in Professional and Enterprise Edition scratch orgs.
Requires configuration using the Setup menu in the scratch org.
See Manage Einstein Search Settings in Salesforce Help for more information.
EinsteinVisits
Enables Consumer Goods Cloud. With Consumer Goods cloud, transform the way you collaborate with your retail channel partners.
Empower your sales managers to plan visits and analyze your business’s health across stores. Also, allow your field reps to track inventory,
take orders, and capture visit details using the Retail Execution mobile app.
EinsteinVisitsED
Enables Einstein Discovery, which can be used to get store visit recommendations. With Einstein Visits ED, you can create a visit frequency
strategy that allows Einstein to provide optimal store visit recommendations.
More Information
See Create a Visit Frequency Next Best Action Strategy in Salesforce Help.
EmbeddedLoginForIE
Provides JavaScript files that support Embedded Login in IE11.
101
Scratch Org FeaturesScratch Orgs
EmpPublishRateLimit:<value>
Increases the maximum number of standard-volume platform event notifications published per hour. Indicate a value between
1,000–10,000.
Supported Quantities
1,000–10,000, Multiplier: 1
EnablePRM
Enables the partner relationship management permissions for the org.
EnableManageIdConfUI
Enables access to the LoginIP and ClientBrowser API objects to verify a user's identity in the UI.
EnableSetPasswordInApi
Enables you to use sf org generate password to change a password without providing the old password.
EncryptionStatisticsInterval:<value>
Defines the interval (in seconds) between encryption statistics gathering processes. The maximum value is 604,800 seconds (7 days).
The default is once per 86,400 seconds (24 hours).
Supported Quantities
0–60,4800, Multiplier: 1
More Information
Requires enabling PlatformEncryption and some configuration using the Setup menu in the scratch org. See Which User Permissions
Does Shield Platform Encryption Require?, and Generate a Tenant Secret with Salesforce in Salesforce Help.
EncryptionSyncInterval:<value>
Defines how frequently (in seconds) the org can synchronize data with the active key material. The default and maximum value is 604,800
seconds (7 days). To synchronize data more frequently, indicate a value, in seconds, equal to or larger than 0.
Supported Quantities
0–604,800, Multiplier: 1
More Information
Requires enabling PlatformEncryption and some configuration using the Setup menu in the scratch org. See Which User Permissions
Does Shield Platform Encryption Require?, and Generate a Tenant Secret with Salesforce in Salesforce Help.
102
Scratch Org FeaturesScratch Orgs
EnergyAndUtilitiesCloud
Enables the Energy and Utilities Cloud features in the org.
Entitlements
Enables entitlements. Entitlements are units of customer support in Salesforce, such as phone support or web support that represent
terms in service agreements.
ERMAnalytics
Enables the ERM Analytics org perm in your scratch org.
More Information
Provides 1 seat of the ERMAnalyticsPlus add-on license.
EventLogFile
Enables API access to your org's event log files. The event log files contain information about your org’s operational events that you can
use to analyze usage trends and user behavior.
EntityTranslation
Enables translation of field data for Work Type Group, Service Territory, and Service Resource objects.
More Information
To translate custom field data, also include the CustomFieldDataTranslation scratch org feature in your scratch org definition file. Not
available in Professional, Partner Professional, Group, or Partner Group Edition orgs.
ExcludeSAMLSessionIndex
Excludes Session Index in SAML sign-on (SSO) and single logout (SLO) flows.
More Information
The ExcludeSAMLSessionIndex permission is off by default for all new and existing orgs. Enable this permission when Salesforce is the
identity provider and you don’t want the session index to be sent during SAML SSO. Enable this permission when Salesforce is the service
provider and you don’t want the session index to be sent during SLO. To turn on this feature, contact Salesforce Customer Support.
ExpressionSetMaxExecPerHour
Enables an org to run a maximum of 500,000 expression sets per hour by using Connect REST API.
For more information, see Expression Set in Salesforce developer documentation.
ExternalIdentityLogin
Allows the scratch org to use Salesforce Customer Identity features associated with your External Identity license.
103
Scratch Org FeaturesScratch Orgs
FieldAuditTrail
Enables Field Audit Trail for the org and allows a total 60 tracked fields. By default, 20 fields are tracked for all orgs, and 40 more are
tracked with Field Audit Trail.
More Information
Previous name: RetainFieldHistory
FieldService:<value>
Provides the Field Service license. Indicate a value between 1–25.
Supported Quantities
1–25, Multiplier: 1
More Information
Available in Enterprise Edition. Enabled by default in Developer Edition. See Enable Field Service in Salesforce Help for more information.
FieldServiceAppointmentAssistantUser:<value>
Adds the Field Service Appointment Assistant permission set license. Indicate a value between 1–25.
Supported Quantities
1–25, Multiplier: 1
More Information
See Setup Field Service Appointment Assistant and Assign Field Service Permissions in Salesforce Help for more information.
FieldServiceDispatcherUser:<value>
Adds the Field Service Dispatcher permission set license. Indicate a value between 1–25.
Supported Quantities
1–25, Multiplier: 1
More Information
See Assign Field Service Permissions in Salesforce Help for more information.
FieldServiceLastMileUser:<value>
Adds the Field Service Last Mile permission set license. Indicate a value between 1–25.
104
Scratch Org FeaturesScratch Orgs
Supported Quantities
1–25, Multiplier: 1
FieldServiceMobileExtension
Adds the Field Service Mobile Extension permission set license.
FieldServiceMobileUser:<value>
Adds the Field Service Mobile permission set license. Indicate a value between 1–25.
Supported Quantities
1–25, Multiplier: 1
More Information
See Assign Field Service Permissions in Salesforce Help for more information.
FieldServiceSchedulingUser:<value>
Adds the Field Service Scheduling permission set license. Indicate a value between 1–25.
Supported Quantities
1–25, Multiplier: 1
More Information
See Assign Field Service Permissions in Salesforce Help for more information.
FinanceLogging
Adds Finance Logging objects to a scratch org. This feature is required for Finance Logging.
FinancialServicesCommunityUser:<value>
Adds the Financial Services Insurance Community permission set license, and enables access to Financial Services insurance community
components and objects. Indicate a value between 1–10.
Supported Quantities
1–10, Multiplier: 1
FinancialServicesInsuranceUser
Adds the Financial Services Insurance permission set license, and enables access to Financial Services insurance components and objects.
105
Scratch Org FeaturesScratch Orgs
More Information
See Get Started with Financial Services Cloud for Insurance in Salesforce Help.
FinancialServicesUser:<value>
Adds the Financial Services Cloud Standard permission set license. This permission set enables access to Lightning components and the
standard version of Financial Services Cloud. Also provides access to the standard Salesforce objects and custom Financial Services Cloud
objects. Indicate a value between 1–10.
Supported Quantities
1–10, Multiplier: 1
FlowSites
Enables the use of flows in Salesforce Sites and customer portals.
ForceComPlatform
Adds one Salesforce Platform user license.
ForecastEnableCustomField
Enables custom currency and customer number fields for use as measures in forecasts based on opportunities.
More Information
Available in Enterprise Edition and Unlimited Edition scratch orgs, and requires enabling Collaborative Forecasts in Setup. See Collaborative
Forecasts in Salesforce Help for more information.
FSCAlertFramework
Makes Financial Services Cloud Record Alert entities accessible in the scratch org.
More Information
Provides 11 seats of the FSCComprehensivePsl user license and 11 seats of the FSCComprehensiveAddOn add-on license.
Requires that you install Financial Services Cloud and OmniStudio. See Record Alerts in Financial Services Cloud Administrator Guide.
FSCServiceProcess
Enables the Service Process Studio feature of Financial Service Cloud. Provides 10 seats each of the IndustriesServiceExcellenceAddOn
and FinancialServicesCloudStardardAddOn licenses. To enable the feature, you must also turn on the StandardServiceProcess setting in
Setup and grant users the AccessToServiceProcess permission.
Fundraising
Gives users access to Nonprofit Cloud for Fundraising features and objects in Salesforce.
106
Scratch Org FeaturesScratch Orgs

Scratch Org Definition File
See Nonprofit Cloud for Fundraising in Salesforce Help for more information. To enable Fundraising, add these settings to your scratch
org definition file.
Note: The Fundraising licenses are assigned when the Fundraising feature is enabled in the scratch org.
{
"orgName": "Fundraising Org",
"edition": "Enterprise",
"features": [
"AccountingSubledgerGrowthEdition",
"IndustriesActionPlan",
"AnalyticsQueryService",
"PublicSectorAccess",
"Fundraising",
"IndustriesSalesExcellenceAddOn",
"IndustriesServiceExcellenceAddOn",
"MarketingUser",
"ProgramManagement",
"OmniStudioDesigner",
"OmniStudioRuntime",
"EnableSetPasswordInApi",
"PersonAccounts"
],
"settings": {
"lightningExperienceSettings": {
"enableS1DesktopEnabled": true
},
"IndustriesSettings": {
"enableFundraising": true
"enableGroupMembershipPref”: true
}
}
}
GenericStreaming
Enables Generic Streaming API for API version 36.0 and earlier.
More Information
Available in Enterprise and Developer Edition scratch orgs.
GenStreamingEventsPerDay:<value>
Increases the maximum number of delivered event notifications within a 24-hour period, shared by all CometD clients, with generic
streaming for API version 36.0 and earlier. Indicate a value between 10,000–50,000.
Supported Quantities
10,000–50,000, Multiplier: 1
107
Scratch Org FeaturesScratch Orgs

Grantmaking
Gives users access to Grantmaking features and objects in Salesforce and Experience Cloud.
More Information
See Grantmaking in Salesforce Help for more information. To enable Grantmaking, add these settings to your scratch org definition file.
{
"features": ["Grantmaking"],
"settings": {
"IndustriesSettings": {
"enableGrantmaking": true
}
}
}
GuidanceHubAllowed
Enables the Guidance Center panel in Lightning Experience. The Guidance Center shows suggested and assigned content in the user’s
flow of work. Suggested content is related to the app or page where the user is working. Assigned content includes guidance sets for
Salesforce admins, links or Trailhead modules assigned to users with Learning Paths, and Enablement programs for sales reps.
More Information
Not available in Group Edition scratch orgs.
To use this scratch org feature, the Dev Hub org requires the GuidanceHubAllowed permission. If this permission isn't enabled in the
Dev Hub, contact Salesforce Customer Support.
See Guidance Center in Salesforce Help for more information.
HealthCloudAddOn
Enables use of Health Cloud.
More Information
See Administer Health Cloud in Salesforce Help for more information.
HealthCloudEOLOverride
Salesforce retired the Health Cloud CandidatePatient object in Spring ‘22 to focus on the more robust Lead object. This scratch org
feature allows you to override that retirement and access the object.
More Information
To use this scratch org feature, the Dev Hub org requires the HealthCloudEOLOverride permission. See Candidate Patient Data Entity
Retirement in Salesforce Help for more information.
108
Scratch Org FeaturesScratch Orgs
HealthCloudForCmty
Enables use of Health Cloud for Experience Cloud Sites.
More Information
See Experience Cloud Sites in Salesforce Help for more information.
HealthCloudMedicationReconciliation
Allows Medication Management to support Medication Reconciliation.
More Information
See Enable Medication Management to Perform Medication Reconciliation in Salesforce Help for more information.
HealthCloudPNMAddOn
Enables use of Provider Network Management.
More Information
See Provider Network Management in Salesforce Help for more information.
HealthCloudUser
This enables the scratch org to use the Health Cloud objects and features equivalent to the Health Cloud permission set license for one
user.
More Information
See Assign Health Cloud Permission Sets and Permission Set Licenses in Salesforce Help for more information.
HighVelocitySales
Provides Sales Engagement licenses and enables Salesforce Inbox. Sales Engagement optimizes the inside sales process with a
high-productivity workspace. Sales managers can create custom sales processes that guide reps through handling different types of
prospects. And sales reps can rapidly handle prospects with a prioritized list and other productivity-boosting features. The Sales Engagement
feature can be deployed in scratch orgs, but the settings for the feature can’t be updated through the scratch org definition file. Instead,
configure settings directly in the Sales Engagement app.
HighVolumePlatformEventAddOn
Increases the daily delivery allocation of high-volume platform events or change data capture events by 100,000 events. This scratch
org feature simulates the purchase of an add-on. If the org has the HighVolumePlatformEventAddOn, the daily allocation is
flexible and isn’t enforced strictly to allow for usage peaks.
109
Scratch Org FeaturesScratch Orgs

More Information
See Platform Event Allocations in the Platform Events Developer Guide.
HLSAnalytics
Enables the HLS Analytics org perm in scratch orgs.
More Information
Provides 1 seat of the HealthCareAnalyticsPlus add-on license.
HoursBetweenCoverageJob:<value>
The frequency in hours when the sharing inheritance coverage report can be run for an object. Indicate a value between 1–24.
Supported Quantities
1–24, Multiplier: 1
IdentityProvisioningFeatures
Enables use of Salesforce Identity User Provisioning.
IgnoreQueryParamWhitelist
Ignores allowlisting rules for query parameter filter rules. If enabled, you can add any query parameter to the URL.
Note: Where possible, we changed noninclusive terms to align with our company value of Equality. We maintained certain terms
to avoid any effect on customer implementations.
IndustriesActionPlan
Provides a license for Action Plans. Action Plans allow you to define the tasks or document checklist items for completing a business
process.
More Information
Previous name: ActionPlan.
For more information and configuration steps, see Enable Actions Plans in Salesforce Help.
IndustriesBranchManagement
Branch Management lets branch managers and administrators track the work output of branches, employees, and customer segments
in Financial Services Cloud.
110
Scratch Org FeaturesScratch Orgs
More Information
Provides the Branch Management add-on license and user permissions, plus 11 seats of the FSCComprehensivePsl user license and 11
seats of the FSCComprehensiveAddOn add-on license.
Requires that you install Financial Services Cloud. See Branch Management in Financial Services Cloud Administrator Guide.
IndustriesCompliantDataSharing
Grants users access to participant management and advanced configuration for data sharing to improve compliance with regulations
and company policies.
More Information
Provides 1 seat of the FinancialServicesCloudStandardAddOn add-on license.
Requires that you install Financial Services Cloud. See Compliant Data Sharing in Financial Services Cloud Administrator Guide.
IndustriesMfgTargets
Enables Sales Agreements. With Sales Agreements, you can negotiate purchase and sale of products over a continued period. You can
also get insights into products, prices, discounts, and quantities. And you can track your planned and actual quantities and revenues
with real-time updates from orders and contracts.
More Information
See Track Sales Compliance with Sales Agreements in Salesforce Help for more information.
IndustriesManufacturingCmty
Provides the Manufacturing Sales Agreement for the Community permission set license, which is intended for the usage of partner
community users. It also provides access to the Manufacturing community template for admins users to create communities.
More Information
See Improve Partner Collaboration with Communities in Salesforce Help for more information.
IndustriesMfgAccountForecast
Enables Account Forecast. With Account Forecast, you can generate forecasts for your accounts based on orders, opportunities, and
sales agreements. You can also create formulas to calculate your forecasts per the requirements of your company.
More Information
See Create Account Forecasts to Enhance Your Planning in Salesforce Help for more information.
InsightsPlatform
Enables the CRM Analytics Plus license for CRM Analytics.
111
Scratch Org FeaturesScratch Orgs
InsuranceCalculationUser
Enables the calculation feature of Insurance. Provides 10 seats each of the BRERuntimeAddOn and OmniStudioRuntime licenses. Also,
provides one seat each of the OmniStudio and BREPlatformAccess licenses.
InsuranceClaimMgmt
Enables claim management features. Provides one seat of the InsuranceClaimMgmtAddOn license.
More Information
See Manage Claims in Salesforce Help for more information.
InsurancePolicyAdmin
Enables policy administration features. Provides one seat of the InsurancePolicyAdministrationAddOn license.
More Information
See Manage Insurance Policies in Salesforce Help for more information.
IntelligentDocumentReader
Provides the license required to enable and use Intelligent Document Reader in a scratch org. Intelligent Document Reader uses optical
character recognition to automatically extract data with Amazon Textract by using your AWS account.
More Information
To use this scratch org feature, the Dev Hub org requires the EinsteinDocReader and BYOAForIFR permissions. For information about
Intelligent Document Reader, see Intelligent Document Reader in Salesforce Help.
Interaction
Enables flows. A flow is the part of Salesforce Flow that collects data and performs actions in your Salesforce org or an external system.
Salesforce Flow provides two types of flows: screen flows and autolaunched flows.
More Information
Requires configuration in the Setup menu of the scratch org.
IoT
Enables IoT so the scratch org can consume platform events to perform business and service workflows using orchestrations and contexts.
More Information
Also requires Metadata API Settings in the scratch org definition file.
112
Scratch Org FeaturesScratch Orgs
JigsawUser
Provides one license to Jigsaw features.
Knowledge
Enables Salesforce Knowledge and gives your website visitors, clients, partners, and service agents the ultimate support tool. Create and
manage a knowledge base with your company information, and securely share it when and where it's needed. Build a knowledge base
of articles that can include information on process, like how to reset your product to its defaults, or frequently asked questions.
More Information
See Salesforce Knowledge in Salesforce Help for more information.
LegacyLiveAgentRouting
Enables legacy Live Agent routing for Chat. Use Live Agent routing to chat in Salesforce Classic. Chats in Lightning Experience must be
routed using Omni-Channel.
LightningSalesConsole
Adds one Lighting Sales Console user license.
LightningScheduler
Enables Lightning Scheduler. Lightning Scheduler gives you tools to simplify appointment scheduling in Salesforce. Create a personalized
experience by scheduling customer appointments—in person, by phone, or by video—with the right person at the right place and
time.
More Information
See Manage Appointments with Lightning Scheduler in Salesforce Help for more information.
LightningServiceConsole
Assigns the Lightning Service Console License to your scratch org so you can use the Lightning Service Console and access features that
help manage cases faster.
More Information
See Lightning Service Console in Salesforce Help for more information.
LiveAgent
Enables Chat for Service Cloud. Use web-based chat to quickly connect customers to agents for real-time support.
113
Scratch Org FeaturesScratch Orgs
LiveMessage
Enables Messaging for Service Cloud. Use Messaging to quickly support customers using apps such as SMS text messaging and Facebook
Messenger.
LongLayoutSectionTitles
Allows page layout section titles to be up to 80 characters.
More Information
To turn on this feature, contact Salesforce Customer Support.
LoyaltyAnalytics
Enables Analytics for Loyalty license. The Analytics for Loyalty app gives you actionable insights into your loyalty programs.
More Information
See Analytics for Loyalty in Salesforce Help for more information.
LoyaltyEngine
Enables Loyalty Management Promotion Setup license. Promotion setup allows loyalty program managers to create loyalty program
processes. Loyalty program processes help you decide how incoming and new Accrual and Redemption-type transactions are processed.
More Information
See Create Processes with Promotion Setup in Salesforce Help for more information.
LoyaltyManagementStarter
Enables the Loyalty Management - Starter license. Create loyalty programs and set up loyalty program-specific processes that allow you
to recognize, rewards, and retain customers.
More Information
See Loyalty Management in Salesforce Help for more information.
LoyaltyMaximumPartners:<value>
Increases the number of loyalty program partners that can be associated with a loyalty program in an org where the Loyalty Management
- Starter license is enabled. The default and maximum value is 1.
Supported Quantities
0–1, Multiplier: 1
114
Scratch Org FeaturesScratch Orgs
LoyaltyMaximumPrograms:<value>
Increases the number of loyalty programs that can be created in an org where the Loyalty Management - Starter license is enabled. The
default and maximum value is 1.
Supported Quantities
0–1, Multiplier: 1
LoyaltyMaxOrderLinePerHour:<value>
Increases the number of order lines that can be cumulatively processed per hour by loyalty program processes. Indicate a value between
1–3,500,000.
Supported Quantities
1–3,500,000, Multiplier: 1
LoyaltyMaxProcExecPerHour:<value>
Increases the number of transaction journals that can be processed by loyalty program processes per hour. Indicate a value between
1–500,000.
Supported Quantities
1–500,000, Multiplier: 1
LoyaltyMaxTransactions:<value>
Increases the number of Transaction Journal records that can be processed. Indicate a value between 1–50,000,000.
Supported Quantities
1–50,000,000, Multiplier: 1
LoyaltyMaxTrxnJournals:<value>
Increases the number of Transaction Journal records that can be stored in an org that has the Loyalty Management - Start license enabled.
Supported Quantities
1–25,000,000, Multiplier: 1
More Information
See Transaction Journal Limits in Salesforce Help for more information.
115
Scratch Org FeaturesScratch Orgs
Macros
Enables macros in your scratch org. After enabling macros, add the macro browser to the Lightning Console so you can configure
predefined instructions for commonly used actions and apply them to multiple posts at the same time.
More Information
See Set Up and Use Macros in Salesforce Help for more information.
MarketingUser
Provides access to the Campaigns object. Without this setting, Campaigns are read-only.
MaxActiveDPEDefs:<value>
Increases the number of Data Processing Engine definitions that can be activated in the org. Indicate a value between 1–50.
Supported Quantities
1–50, Multiplier: 1
MaxApexCodeSize:<value>
Limits the non-test, unmanaged Apex code size (in MB). To use a value greater than the default value of 10, contact Salesforce Customer
Support.
MaxAudTypeCriterionPerAud
Limits the number of audience type criteria available per audience. The default value is 10.
MaxCustomLabels:<value>
Limits the number of custom labels (measured in thousands). Setting the limit to 10 enables the scratch org to have 10,000 custom
labels. Indicate a value between 1–15.
Supported Quantities
1–15, Multiplier: 1,000
MaxDatasetLinksPerDT:<value>
Increases the number of dataset links that can be associated with a decision table. Indicate a value between 1–3.
Supported Quantities
1–3, Multiplier: 1
116
Scratch Org FeaturesScratch Orgs
MaxDataSourcesPerDPE:<value>
Increases the number of Source Object nodes a Data Processing Engine definition can contain. Indicate a value between 1–50.
Supported Quantities
1–50, Multiplier: 1
MaxDecisionTableAllowed:<value>
Increases the number of decision tables rules that can be created in the org. Indicate a value between 1–30.
Supported Quantities
1–30, Multiplier: 1
MaxFavoritesAllowed:<value>
Increases the number of Favorites allowed. Favorites allow users to create a shortcut to a Salesforce Page. Users can view their Favorites
by clicking the Favorites list dropdown in the header. Indicate a value between 0–200.
Supported Quantities
0–200, Multiplier: 1
MaxFieldsPerNode:<value>
Increases the number of fields a node in a Data Processing Engine definition can contain. Indicate a value between 1–500.
Supported Quantities
1–500, Multiplier: 1
MaxInputColumnsPerDT:<value>
Increases the number of input fields a decision table can contain. Indicate a value between 1–10.
Supported Quantities
1–10, Multiplier: 1
MaxLoyaltyProcessRules:<value>
Increases the number of loyalty program process rules that can be created in the org. Indicate a value between 1–20.
Supported Quantities
1–20, Multiplier: 1
117
Scratch Org FeaturesScratch Orgs
MaxNodesPerDPE:<value>
Increases the number of nodes that a Data Processing Engine definition can contain. Indicate a value between 1–500.
Supported Quantities
1–500, Multiplier: 1
MaxNoOfLexThemesAllowed:<value>
Increases the number of Themes allowed. Themes allow users to configure colors, fonts, images, sizes, and more. Access the list of
Themes in Setup, under Themes and Branding. Indicate a value between 0–300.
Supported Quantities
0–300, Multiplier: 1
MaxOutputColumnsPerDT:<value>
Increases the number of output fields a decision table can contain. Indicate a value between 1–5.
Supported Quantities
1–5, Multiplier: 1
MaxSourceObjectPerDSL:<value>
Increases the number of source objects that can be selected in a dataset link of a decision table. Indicate a value between 1–5.
Supported Quantities
1–5, Multiplier: 1
MaxStreamingTopics:<value>
Increases the maximum number of delivered PushTopic event notifications within a 24-hour period, shared by all CometD clients. Indicate
a value between 40–100.
Supported Quantities
40–100, Multiplier: 1
MaxUserNavItemsAllowed:<value>
Increases the number of navigation items a user can add to the navigation bar. Indicate a value between 0–500.
Supported Quantities
0–500, Multiplier: 1
118
Scratch Org FeaturesScratch Orgs
MaxUserStreamingChannels:<value>
Increases the maximum number of user-defined channels for generic streaming. Indicate a value between 20–1,000.
Supported Quantities
20–1,000, Multiplier: 1
MaxWritebacksPerDPE:<value>
Increases the number of Writeback Object nodes a Data Processing Engine definition can contain. Indicate a value between 1–50.
Supported Quantities
1–10, Multiplier: 1
MedVisDescriptorLimit:<value>
Increases the number of sharing definitions allowed per record for sharing inheritance to be applied to an object. Indicate a value between
150–1,600.
Supported Quantities
150–1,600, Multiplier: 1
MinKeyRotationInterval
Sets the encryption key material rotation interval at once per 60 seconds. If this feature isn't specified, the rotation interval defaults to
once per 604,800 seconds (7 days) for Search Index key material, and once per 86,400 seconds (24 hours) for all other key material.
More Information
Requires enabling PlatformEncryption and some configuration using the Setup menu in the scratch org. See Which User Permissions
Does Shield Platform Encryption Require? and Generate a Tenant Secret with Salesforce in Salesforce Help.
MobileExtMaxFileSizeMB:<value>
Increases the file size (in megabytes) for Field Service Mobile extensions. Indicate a value between 1–2,000.
Supported Quantities
1–2,000, Multiplier: 1
MobileSecurity
Enables Enhanced Mobile Security. With Enhanced Mobile Security, you can control a range of policies to create a security solution
tailored to your org’s needs. You can limit user access based on operating system versions, app versions, and device and network security.
You can also specify the severity of a violation.
119
Scratch Org FeaturesScratch Orgs

MultiLevelMasterDetail
Allows the creation a special type of parent-child relationship between one object, the child, or detail, and another object, the parent,
or master.
MutualAuthentication
Requires client certificates to verify inbound requests for mutual authentication.
MyTrailhead
Enables access to a myTrailhead enablement site in a scratch org.
Scratch Org Definition File
Add these options to your scratch org definition file:
{
"orgName": "Acme",
"edition": "Enterprise",
"features": ["MyTrailhead"],
"settings": {
"trailheadSettings": {
"enableMyTrailheadPref": true
}
}
}
More Information
Salesforce Help: Enablement Sites (myTrailhead)
NonprofitCloudCaseManagementUser
Provides the permission set license required to use and configure the Salesforce.org Nonprofit Cloud Case Management managed
package. You can then install the package in the scratch org.
More Information
For installation and configuration steps, see Salesforce.org Nonprofit Cloud Case Management.
NumPlatformEvents:<value>
Increases the maximum number of platform event definitions that can be created. Indicate a value between 5–20.
Supported Quantities
5–20, Multiplier: 1
120
Scratch Org FeaturesScratch Orgs

ObjectLinking
Create rules to quickly link channel interactions to objects such as contacts, leads, or person accounts for customers (Beta).
OmnistudioMetadata
Enables Omnistudio metadata API. Using this API, customers can deploy and retrieve Omnistudio components programmatically.
For more information, see Enable OmniStudio Metadata API Support.
OmnistudioRuntime
Enables business users to execute OmniScripts, DataMappers, FlexCards, and so on in the employee facing applications.
OmnistudioDesigner
Enables administrator or developer to create new OmniScripts/ DataMappers / Integration Procedures instances.
OrderManagement
Provides the Salesforce Order Management license. Order Management is your central hub for handling all aspects of the order lifecycle,
including order capture, fulfillment, shipping, payment processing, and servicing.
More Information
Available in Enterprise and Developer Edition scratch orgs.
If you want to configure Order Management to use any of these features, enable it in your scratch org:
•
MultiCurrency
•
PersonAccounts
•
ProcessBuilder
•
StateAndCountryPicklist
Requires configuration using the Setup menu in the scratch org. For installation and configuration steps, see Salesforce Help: Salesforce
Order Management.
Note: The implementation process includes turning on several Order and Order Management feature toggles in Setup. In a scratch
org, you can turn them on by including metadata settings in your scratch org definition file. For details about these settings, see
OrderSettings and OrderManagementSettings in the Metadata API Developer Guide.
OrderSaveLogicEnabled
Enables scratch org support for New Order Save Behavior. OrderSaveLogicEnabled supports only New Order Save Behavior. If your scratch
org needs both Old and New Order Save Behavior, use OrderSaveBehaviorBoth.
Scratch Org Definition File
To enable OrderSaveLogicEnabled, update your scratch org definitions file.
{
"features": ["OrderSaveLogicEnabled"],
121
Scratch Org FeaturesScratch Orgs

"settings": {
"orderSettings": {
"enableOrders": true
}
}
}
OrderSaveBehaviorBoth
Enables scratch org support for both New Order Save Behavior and Old Order Save Behavior.
Scratch Org Definition File
To enable OrderSaveLogicEnabled, update your scratch org definitions file.
{
"features": ["OrderSaveBehaviorBoth"],
"settings": {
"orderSettings": {
"enableOrders": true
}
}
}
OutboundMessageHTTPSession
Enables using HTTP endpoint URLs in outbound message definitions that have the Send Session ID option selected.
OutcomeManagement
Gives users access to Outcome Management features and objects in Salesforce and Experience Cloud.
More Information
See Outcome Management in Salesforce Help for more information. To enable Outcome Management, add these settings to your
scratch org definition file.
{
"features": ["OutcomeManagement"],
"settings": {
"IndustriesSettings": {
"enableOutcomes": true
}
}
}
PardotScFeaturesCampaignInfluence
Enables additional campaign influence models, first touch, last touch, and even distribution for Pardot users.
122
Scratch Org FeaturesScratch Orgs

PersonAccounts
Enables person accounts in your scratch org.
More Information
Available in Enterprise and Developer Edition scratch orgs.
PipelineInspection
Enables Pipeline Inspection. Pipeline Inspection is a consolidated pipeline view with metrics, opportunities, and highlights of recent
changes.
More Information
Available in Enterprise Edition scratch orgs. To enable Pipeline Inspection in your scratch org, add this setting in your scratch org definition
file.
"settings": {
...
"opportunitySettings": {
"enablePipelineInspectionFlow": true
},
...
}
PlatformCache
Enables Platform Cache and allocates a 3 MB cache. The Lightning Platform Cache layer provides faster performance and better reliability
when caching Salesforce session and org data.
More Information
See Platform Cache in the Apex Developer Guide for more information.
PlatformConnect:<value>
Enables Salesforce Connect and allows your users to view, search, and modify data that's stored outside your Salesforce org. Indicate a
value from 1–5.
Supported Quantities
1–5, Multiplier: 1
PlatformEncryption
Shield Platform Encryption encrypts data at rest. You can manage key material and encrypt fields, files, and other data.
123
Scratch Org FeaturesScratch Orgs
PlatformEventsPerDay:<value>
Increases the maximum number of delivered standard-volume platform event notifications within a 24-hour period, shared by all CometD
clients. Indicate a value between 10,000–50,000.
Supported Quantities
10,000–50,000, Multiplier: 1
ProcessBuilder
Enables Process Builder, a Salesforce Flow tool that helps you automate your business processes.
More Information
Requires configuration in the Setup menu of the scratch org.
See Process Builder in Salesforce Help for more information.
ProductsAndSchedules
Enables product schedules in your scratch org. Enabling this feature lets you create default product schedules on products. Users can
also create schedules for individual products on opportunities.
ProductCatalogManagementAddOn
Enables read-write access to Product Catalog Management features and objects.
More Information
Available in Developer and Enterprise scratch org editions. Provides 1 Product Catalog Management add-on license.
ProductCatalogManagementViewerAddOn
Enables read access to Product Catalog Management features and objects.
More Information
Available in Developer and Enterprise scratch org editions. Provides 1 Product Catalog Management Viewer add-on license.
ProductCatalogManagementPCAddOn
Enables read access to Product Catalog Management features and objects for Partner Community Users in scratch orgs.
More Information
•
Available in Developer and Enterprise scratch org editions.
•
Provides 1 Product Catalog Management add-on license.
124
Scratch Org FeaturesScratch Orgs

•
Requires a partner community user to be set up. The partner community user must be granted the Product Catalog Management
Partner Community add-on license.
ProgramManagement
Enables access to all Program Management and Case Management features and objects.
More Information
To enable ProgramManagement, add these settings to your scratch org definition file.
{
"orgName": "Sample Org" ,
"edition": "Enterprise",
"features": ["ProgramManagement"],
"settings": {
"IndustriesSettings": {
"enableBenefitManagementPreference": true,
"enableBenefitAndGoalSharingPref": true,
"enableCarePlansPreference": true
}
}
}
Alternatively, enable the settings in the org manually. See Enable Program Management in Salesforce Help.
ProviderFreePlatformCache
Provides 3 MB of free Platform Cache capacity for security-reviewed managed packages. This feature is made available through a capacity
type called Provider Free capacity and is automatically enabled in Developer Edition orgs. Allocate the Provider Free capacity to a Platform
Cache partition and add it to your managed package.
More Information
See Set Up a Platform Cache Partition with Provider Free Capacity in Salesforce Help for more information.
PublicSectorAccess
Enables access to all Public Sector features and objects.
PublicSectorApplicationUsageCreditsAddOn
Enables additional usage of Public Sector applications based on their pricing.
PublicSectorSiteTemplate
Allows Public Sector users access to build an Experience Cloud site from the templates available.
125
Scratch Org FeaturesScratch Orgs

RecordTypes
Enables Record Type functionality. Record Types let you offer different business processes, picklist values, and page layouts to different
users.
RefreshOnInvalidSession
Enables automatic refreshes of Lightning pages when the user's session is invalid. If, however, the page detects a new token, it tries to
set that token and continue without a refresh.
RevSubscriptionManagement
Enables Subscription Management. Subscription Management is an API-first, product-to-cash solution for B2B subscriptions and one-time
sales.
More Information
Available in Enterprise and Developer scratch orgs. To enable Subscription Management in your scratch org, add this setting in your
scratch org definition file.
"settings": {
...
"subscriptionManagementSettings": {
"enableSubscriptionManagement": true
},
...
}
For more information about Subscription Management, see
https://developer.salesforce.com/docs/revenue/subscription-management/overview.
S1ClientComponentCacheSize
Allows the org to have up to 5 pages of caching for Lightning Components.
SalesCloudEinstein
Enables Sales Cloud Einstein features and Salesforce Inbox. Sales Cloud Einstein brings AI to every step of the sales process.
More Information
Available in Enterprise Edition scratch orgs.
See Sales Cloud Einstein in Salesforce Help for more information.
SalesforceContentUser
Enables access to Salesforce content features.
126
Scratch Org FeaturesScratch Orgs
SalesforceFeedbackManagementStarter
Provides a license to use the Salesforce Feedback Management - Starter features.
More Information
Available in Enterprise and Developer edition scratch orgs. To use the Salesforce Feedback Management - Starter features, enable Surveys
and assign the Salesforce Advanced Features Starter user permission to the scratch org user. For additional information on how to enable
Surveys and configuration steps, see Enable Surveys and Configure Survey Settings and Assign User Permissions in Salesforce Help.
SalesforceIdentityForCommunities
Adds Salesforce Identity components, including login and self-registration, to Experience Builder. This feature is required for Aura
components.
SalesforcePricing
Enables Salesforce Pricing, which allows you to set, manage, and optimize prices across your entire product portfolio
More Information
Provides 5 Salesforce Pricing Design Time AddOn, 5 Salesforce Pricing Run Time AddOn licenses. For more information, see Salesforce
Pricing in Salesforce Help.
SalesUser
Provides a license for Sales Cloud features.
SAML20SingleLogout
Enables usage of SAML 2.0 single logout.
SCIMProtocol
Enables access support for the SCIM protocol base API.
SecurityEventEnabled
Enables access to security events in Event Monitoring.
SentimentInsightsFeature
Provides the license required to enable and use Sentiment Insights in a scratch org. Use Sentiment Insights to analyze the sentiment of
your customers and get actionable insights to improve it.
More Information
To use this scratch org feature, the Dev Hub org requires the IESentimentAnalysis, AwsSentimentAnalysis, BYOAForSentiment, and
IESentimentAnalysisEnabled permissions. For information about Sentiment Insights, see Sentiment Insights in Salesforce Help.
127
Scratch Org FeaturesScratch Orgs
ServiceCatalog
Enables Employee Service Catalog so you can create a catalog of products and services for your employees. It can also turn your employees'
requests for these products and services into approved and documented orders.
More Information
To use this scratch org feature, the Dev Hub org requires the ServiceCatalog permission. To learn more, see Employee Service Catalog.
ServiceCloud
Assigns the Service Cloud license to your scratch org, so you can choose how your customers can reach you, such as by email, phone,
social media, online communities, chat, and text.
ServiceCloudVoicePartnerTelephony
Assigns the Service Cloud Voice with Partner Telephony add-on license to your scratch org, so you can set up a Service Cloud Voice
contact center that integrates with supported telephony providers. Indicate a value from 1–50.
Supported Quantities
1–50, Multiplier: 1
More Information
For setup and configuration steps, see Service Cloud Voice with Partner Telephony in Salesforce Help.
ServiceUser
Adds one Service Cloud User license, and allows access to Service Cloud features.
SessionIdInLogEnabled
Enables Apex debug logs to include session IDs. If disabled, session IDs are replaced with "SESSION_ID_REMOVED" in debug logs.
SFDOInsightsDataIntegrityUser
Provides a license to Salesforce.org Insights Platform Data Integrity managed package. You can then install the package in the scratch
org.
More Information
For installation and configuration steps, see the Salesforce.org Insights Platform Data Integrity help.
SharedActivities
Allow users to relate multiple contacts to tasks and events.
128
Scratch Org FeaturesScratch Orgs
More Information
For additional installation and configuration steps, see Considerations for Enabling Shared Activities in Salesforce Help.
Sites
Enables Salesforce Sites, which allows you to create public websites and applications that are directly integrated with your Salesforce
org. Users aren’t required to log in with a username and password.
More Information
You can create sites and communities in a scratch org, but custom domains, such as www.example.com, aren't supported.
SocialCustomerService
Enables Social Customer Service, sets post defaults, and either activates the Starter Pack or signs into your Social Studio account.
StateAndCountryPicklist
Enables state and country/territory picklists. State and country/territory picklists let users select states and countries from predefined,
standardized lists, instead of entering state, country, and territory data into text fields.
StreamingAPI
Enables Streaming API.
More Information
Available in Enterprise and Developer Edition scratch orgs.
StreamingEventsPerDay:<value>
Increases the maximum number of delivered PushTopic event notifications within a 24-hour period, shared by all CometD clients (API
version 36.0 and earlier). Indicate a value between 10,000–50,000.
Supported Quantities
10,000–50,000, Multiplier: 1
SubPerStreamingChannel:<value>
Increases the maximum number of concurrent clients (subscribers) per generic streaming channel (API version 36.0 and earlier). Indicate
a value between 20–4,000.
Supported Quantities
20–4,000, Multiplier: 1
129
Scratch Org FeaturesScratch Orgs

SubPerStreamingTopic:<value>
Increases the maximum number of concurrent clients (subscribers) per PushTopic streaming channel (API version 36.0 and earlier).
Indicate a value between 20–4,000.
Supported Quantities
20–4,000, Multiplier: 1
SurveyAdvancedFeatures
Enables a license for the features available with the Salesforce Feedback Management - Growth license.
More Information
Available in Enterprise and Developer edition scratch orgs. To use the Salesforce Feedback Management - Growth features, enable
Surveys and assign the Salesforce Surveys Advanced Features user permission to the scratch org user. For additional information on how
to enable Surveys and configuration steps, see Enable Surveys and Configure Survey Settings and Assign User Permissions in Salesforce
Help.
SustainabilityCloud
Provides the permission set licenses and permission sets required to install and configure Sustainability Cloud. To enable or use CRM
Analytics and CRM Analytics templates, include the DevelopmentWave scratch org feature.
More Information
For installation and configuration steps, see Sustainability Cloud Legacy Documentation in the Set Up and Maintain Net Zero Cloud
guide in Salesforce Help.
SustainabilityApp
Provides the permission set licenses and permission sets required to configure Net Zero Cloud. To enable or use Tableau CRM and Tableau
CRM templates, include the DevelopmentWave scratch org feature.
Scratch Org Definition File
Add these options to your scratch org definition file:
{
"orgName": "net zero scratch org",
"edition": "Developer",
"features": ["SustainabilityApp"],
"settings": {
"industriesSettings": {
"enableSustainabilityCloud": true,
"enableSCCarbonAccounting": true
}
}
}
130
Scratch Org FeaturesScratch Orgs
More Information
For configuration steps, see Configure Net Zero Cloud in the Set Up and Maintain Net Zero Cloud guide in Salesforce Help.
TCRMforSustainability
Enables all permissions required to manage the Net Zero Analytics app by enabling Tableau CRM. You can create and share the analytics
app for your users to bring your environmental accounting in line with your financial accounting.
More Information
For more information, see Deploy Net Zero Analytics in the Set Up and Maintain Net Zero Cloud guide in Salesforce Help.
TimelineConditionsLimit
Limits the number of timeline record display conditions per event type to 3.
More Information
See Provide Holistic Patient Care with Enhanced Timeline in Salesforce Help for more information.
TimelineEventLimit
Limits the number of event types displayed on a timeline to 5.
More Information
See Provide Holistic Patient Care with Enhanced Timeline in Salesforce Help for more information.
TimelineRecordTypeLimit
Limits the number of related object record types per event type to 3.
More Information
See Provide Holistic Patient Care with Enhanced Timeline in Salesforce Help for more information.
TimeSheetTemplateSettings
Time Sheet Templates let you configure settings to create time sheets automatically. For example, you can create a template that sets
start and end dates. Assign templates to user profiles so that time sheets are created for the right users.
More Information
For configuration steps, see Create Time Sheet Templates in Salesforce Help.
TransactionFinalizers
Enables you to implement and attach Apex Finalizers to Queueable Apex jobs.
131
Scratch Org FeaturesScratch Orgs

More Information
Note: This functionality is currently in open pilot and subject to restrictions.
See the Transaction Finalizers (Pilot) in Apex Developer Guide for more information.
WaveMaxCurrency
Increases the maximum number of supported currencies for CRM Analytics. Indicate a value between 1–5.
WavePlatform
Enables the Wave Platform license.
Workflow
Enables Workflow so you can automate standard internal procedures and processes.
More Information
Requires configuration in the Setup menu of the scratch org.
WorkflowFlowActionFeature
Allows you to launch a flow from a workflow action.
More Information
This setting is supported only if you enabled the pilot program in your org for flow trigger workflow actions. If you enabled the pilot,
you can continue to create and edit flow trigger workflow actions.
If you didn't enable the pilot, use the Flows action in the ProcessBuilder scratch org feature instead.
WorkplaceCommandCenterUser
Enables access to Workplace Command Center features including access to objects such as Employee, Crisis, and EmployeeCrisisAssessment.
More Information
For additional installation and configuration steps, see Set Up Your Work.com Development Org in the Workplace Command Center for
Work.com Developer Guide.
WorkThanksPref
Enables the give thanks feature in Chatter.
132
Scratch Org FeaturesScratch Orgs

Scratch Org Settings
Scratch org settings are the format for defining org preferences in the scratch org definition. Because you can use all Metadata API
settings, they’re the most comprehensive way to configure a scratch org. If a setting is supported in Metadata API, it’s supported in
scratch orgs. Settings provide you with fine-grained control because you can define values for all fields for a setting, rather than just
enabling or disabling it.
For information on Metadata API settings and their supported fields, see Settings in Metadata API Developer Guide.
Important: Although the Settings are upper camel case in the Metadata API Developer Guide, be sure to indicate them as lower
camel case in the scratch org definition.
{
"orgName": "Acme",
"edition": "Enterprise",
"features": ["Communities", "ServiceCloud", "Chatbot"],
"settings": {
"communitiesSettings": {
"enableNetworksEnabled": true
},
"lightningExperienceSettings": {
"enableS1DesktopEnabled": true
},
"mobileSettings": {
"enableS1EncryptedStoragePref2": true
},
"omniChannelSettings": {
"enableOmniChannel": true
},
"caseSettings": {
"systemUserEmail": "[email protected]"
}
}
}
Here’s an example of how to configure SecuritySettings in your scratch org. In this case, to define session timeout, you nest the field
values.
{
"orgName": "Acme",
"edition": "Enterprise",
"features": [],
"settings": {
"mobileSettings": {
"enableS1EncryptedStoragePref2": true
},
"securitySettings": {
"sessionSettings":{
"sessionTimeout": "TwelveHours"
}
}
}
}
133
Scratch Org SettingsScratch Orgs

This example shows how to use NameSettings to enable middle names and suffixes in your org for these person objects: Contact, Lead,
Person Account, and User.
{
"orgName": "Acme",
"edition": "Enterprise",
"settings": {
"mobileSettings": {
"enableS1EncryptedStoragePref2": true
},
"nameSettings": {
"enableMiddleName": true,
"enableNameSuffix": true
}
}
}
Create a Scratch Org Based on an Org Shape
We know it’s not easy to build a scratch org definition that mirrors the features and settings in your production org. With Org Shape for
Scratch Orgs, you can leave building the scratch org definition to us. After you capture the org’s shape, you can spin up scratch orgs
based on it.
Available in: Developer, Group, Professional, Unlimited, and Enterprise editions. The scratch org created from the org shape is the same
edition as the source org.
Not available in: Scratch orgs and sandboxes
What’s Included in Org Shape?
Features, Metadata API settings, edition, limits, and licenses determine what we refer to as an org’s shape. For further clarification, org
shape includes:
•
Metadata API settings with boolean fields.
•
Licenses associated with installed packages, but not the packages themselves. To use the associated package, install it in the scratch
org created from the org shape.
Note: Some features aren’t captured when the org shape is created. However, you can add the features manually to the scratch
org definition file. See Troubleshoot Org Shape for details.
What’s Not Included in Org Shape?
•
Metadata API settings with integer or string fields. However, you can manually add non-Boolean settings or other settings
not included in the source org to your scratch org definition. See Scratch Org Definition for Org Shape for examples.
•
Metadata types
•
Data
134
Create a Scratch Org Based on an Org ShapeScratch Orgs
Org Shapes Are Specific to a Release
Scratch org shapes are associated with a specific Salesforce release. Be sure to recreate the org shape after the source org is upgraded
to the new Salesforce release. During a Salesforce major release transition, your Dev Hub org and source org can be on different release
versions. See Scratch Org Definition for Org Shape for options during the transition period.
Can I See the Org Shape File?
Org shapes are internal system files and aren’t viewable.
Enable Org Shape for Scratch Orgs
Enable Org Shape for Scratch Orgs in the org whose shape you want to capture (source org).
Org Shape Permissions
A Salesforce admin for the Dev Hub org must assign permissions to users who plan to create org shapes, or create scratch orgs based
on an org shape. If you already have a permission set for Salesforce DX users, you can update it to include access.
Create and Manage Org Shapes
Create an org shape to mimic the baseline setup (features, limits, edition, and Metadata API settings) of a source org without the
extraneous data and metadata. If the features, settings, or licenses of that org change, you can capture those updates by recreating
the org shape. You can have only one active org shape at a time. Org shapes are internal system files and aren’t viewable.
Scratch Org Definition for Org Shape
During org shape creation, we capture the features, settings, edition, licenses, and limits of the specified source org. This way, you
don’t have to manually include these items in the scratch org definition file. You can create a scratch org based solely on the source
org shape. Or you can add more features and settings in the scratch org definition file to include functionality not present in the
source org.
Troubleshoot Org Shape
Here are some issues you can encounter when using Org Shape for Scratch Orgs.
SEE ALSO:
Metadata API Developer Guide: Settings
Enable Org Shape for Scratch Orgs
Enable Org Shape for Scratch Orgs in the org whose shape you want to capture (source org).
Available in: Developer, Group, Professional, Unlimited, and Enterprise editions
Not available in: Scratch orgs and sandboxes
Be sure to:
•
Enable Org Shape for Scratch Orgs in both the source org and the Dev Hub org, if you want to capture the shape of an org that isn’t
also your Dev Hub org.
•
When entering the org ID, use only the first 15 characters rather than the full 18-character org ID.
You can find the org ID in Setup > Company Information.
1. Enable Org Shape for Scratch Orgs in the Dev Hub org that you use to create scratch orgs. Contact a Salesforce admin if you require
assistance.
a. From Setup, enter Scratch Orgs in the Quick Find box, then select Scratch Orgs.
135
Enable Org Shape for Scratch OrgsScratch Orgs

b. Click the toggle for Enable Org Shape for Scratch Orgs.
c. In the text box, enter the 15-character org ID for the Dev Hub, then click Save.
2. (Optional) If the source org is different from the Dev Hub org, enable Org Shape for Scratch Orgs in the source org.
a. Log in to the source org.
b. From Setup, enter Scratch Orgs in the Quick Find box, then select Scratch Orgs.
c. Click the toggle for Enable Org Shape for Scratch Orgs.
d. Enter the 15-character Dev Hub org ID that you’re using to create scratch orgs.
You can specify up to 50 Dev Hub org IDs to address these common use cases:
•
You have multiple production orgs but your development team has access to only one. For the customization they're building, they
require the shape of another production org.
•
Your developers use their own Dev Hub orgs and don't have access to the production org. However, they want to create scratch
orgs based on the shape of the production org.
•
You're an ISV who uses your production org to create scratch orgs. You want to capture the shape of your first-generation packaging
org so you can build second-generation packages.
Org Shape Permissions
A Salesforce admin for the Dev Hub org must assign permissions to users who plan to create org shapes, or create scratch orgs based
on an org shape. If you already have a permission set for Salesforce DX users, you can update it to include access.
PermissionsAccess
Object Settings > Shape Representation > Create, EditCreate an org shape
Object Settings > Shape Representation > DeleteDelete an org shape
No additional permissions are required besides the ones for creating
scratch orgs.
Use an org shape to create a scratch org
You don’t require the “Modify All” permission to delete shapes created by others because there can be only one active shape in the org
at a time.
Supported Licenses
In addition to providing users with appropriate permissions, be sure to assign the Salesforce license to Org Shape users. Other user
licenses aren’t supported at this time.
SEE ALSO:
Add Salesforce DX Users
SOAP API Developer Guide: ShapeRepresentation
136
Org Shape PermissionsScratch Orgs

Create and Manage Org Shapes
Create an org shape to mimic the baseline setup (features, limits, edition, and Metadata API settings) of a source org without the
extraneous data and metadata. If the features, settings, or licenses of that org change, you can capture those updates by recreating the
org shape. You can have only one active org shape at a time. Org shapes are internal system files and aren’t viewable.
An org shape captures Metadata API settings, not all metadata types. For example, customizations that appear in the org, such as
Lightning Experience Themes, aren’t included as part of org shape. See Settings in the Metadata API Guide for the complete list.
An org shape includes org preference and permissions. It doesn’t include data entries such as AddressSettings.
Important: Scratch org shapes are associated with a specific Salesforce release. Be sure to recreate the org shape after the source
org is upgraded to the new Salesforce release.
1. Authorize both your Dev Hub org and the source org. Run this command for each org.
sf auth web login --alias
2. Create the org shape for the source org. This command kicks off an asynchronous process to create the org shape.
sf org create shape --target-org <source org username/alias>
Successfully created org shape for 3SRB0000000TXbnOCG.
3. Check the status of the shape:create command.
sf org shape list
=== Org Shapes
ALIAS USERNAME ORG ID SHAPE STATUS CREATED BY CREATED DATE
────── ──────── ────────────────── ──────────── ────────── ─────────────
You can use the org shape after the status is Active:
=== Org Shapes
ALIAS USERNAME ORG ID SHAPE STATUS CREATED BY CREATED DATE
────── ───────── ────────────────── ──────────── ──────────── ────────────
If you run the sf org create shape command again for this org, the previous shape is marked inactive and replaced by a new
active shape.
If you don’t want to create scratch orgs based on this shape, you can delete the org shape. To delete an org shape:
sf org delete shape --target-org <username/alias>
Scratch Org Definition for Org Shape
During org shape creation, we capture the features, settings, edition, licenses, and limits of the specified source org. This way, you don’t
have to manually include these items in the scratch org definition file. You can create a scratch org based solely on the source org shape.
Or you can add more features and settings in the scratch org definition file to include functionality not present in the source org.
Important: In the scratch org definition, indicate the 15-character sourceOrg instead of edition. The sourceOrg is the
org ID for the org whose shape you created. Use only the first 15 characters rather than the full 18-character org ID.
137
Create and Manage Org ShapesScratch Orgs

Simple Scratch Org Definition File
If your Dev Hub org, source org, and org shape are all on the same Salesforce version, you can use the simple scratch org definition.
{
"orgName": "Acme",
"sourceOrg": "00DB1230400Ifx5"
}
Scratch Org Definition File during Salesforce Release Transitions
During the Salesforce major release transition, your Dev Hub org and source org can be on different versions. If your Dev Hub org is on
a different version than your source org, add the release option to your scratch org definition file to create scratch orgs using the
org shape.
{
"orgName": "Acme",
"sourceOrg": "00DB1230400Ifx5",
"release": "previous"
}
Release Option to Use in
Scratch Org Definition File
Supported Scratch Org
Version
Dev Hub VersionSource Org/Org Shape
Version
"release": "previous"Current version onlyPreviewCurrent
"release": "preview"Preview version onlyCurrentPreview
Scratch Org Definition File for DevOps Center
If you create a scratch org based on an org shape with DevOps Center enabled, we still require that you add the DevOps Center feature
and setting to the scratch org definition. We require that customers explicitly enable it for legal reasons as part of the DevOps Center
terms and conditions.
{
"orgName": "Acme",
"sourceOrg": "00DB1230400Ifx5",
"features": ["DevOpsCenter"],
"settings": {
"devHubSettings": {
"enableDevOpsCenterGA": true
}
}
}
Scratch Org Definition File with Other Features and Settings
To add features not captured by org shape, or to test features that your source org doesn't have, you can add more scratch org features
and Metadata API settings. Settings refer to the Settings metadata type, not all metadata types.
{
"orgName": "Acme",
138
Scratch Org Definition for Org ShapeScratch Orgs

"sourceOrg": "00DB1230000Ifx5",
"features": ["Communities", "ServiceCloud", "Chatbot"],
"settings": {
"communitiesSettings": {
"enableNetworksEnabled": true
},
"mobileSettings": {
"enableS1EncryptedStoragePref2": true
},
"omniChannelSettings": {
"enableOmniChannel": true
},
"caseSettings": {
"systemUserEmail": "[email protected]"
}
}
}
Next: Create a scratch org using the org shape scratch org definition file.
SEE ALSO:
Metadata API Developer Guide: Settings
Troubleshoot Org Shape
Here are some issues you can encounter when using Org Shape for Scratch Orgs.
Some Features Not Captured by Org Shape
Description: Some features and settings aren’t enabled in the org shape, in many cases by design due to security or legal reasons.
•
Chatbot
•
DevOpsCenter
•
MultiCurrency
•
PersonAccounts
Workaround: Add them to the scratch org definition.
{
"orgName": "Acme",
"sourceOrg": "00DB1230400Ifx5",
"features": [”Chatbot”, "MultiCurrency", "DevOpsCenter"],
"settings":
{
"botSettings":
"enableBots": true
}
"currencySettings":
"enableMultiCurrency": true
}
"devHubSettings": {
"enableDevOpsCenterGA": true
139
Troubleshoot Org ShapeScratch Orgs

}
}
Some Field Service Features Aren't Enabled in Org Shape
Description: Even when the Field Service Enhanced Scheduling and Optimization, and Field Service Integration features are enabled
in the source org in which the org shape is created, these features aren’t enabled when creating a scratch org based on the org shape.
Workaround: Manually add the missing Field Service Metadata API settings to the scratch org definition depending on which features
are enabled in the source org.
Scenario 1: If the org shape included both the Field Service Enhanced Scheduling and Optimization, and Field Service Integration features,
manually add the Field Service Enhanced Scheduling and Optimization Metadata API setting, o2EngineEnabled, in the scratch
org definition file, which enables both features.
"settings":
{
"fieldServiceSettings":
{
"fieldServiceOrgPref": true,
"o2EngineEnabled": true
}
}
Scenario 2: If the org shape included only the Field Service Integration feature, manually add the Field Service Enhanced Scheduling and
Optimization Metadata API setting optimizationServiceAccess, to the scratch org definition file.
"settings":
{
"fieldServiceSettings":
{
"fieldServiceOrgPref": true,
"optimizationServiceAccess": true
}
}
DevOps Center Isn’t Enabled in a Scratch Org Based on an Org Shape
Description: Although DevOps Center is enabled in the source org, the scratch org created from the source org’s shape doesn’t have
DevOps Center enabled. The DevOps Center org preference is purposely toggled off. We require that customers explicitly enable it by
indicating the feature and setting in the scratch org definition file for legal reasons as part of the DevOps Center terms and conditions.
Workaround: Add the DevOps Center feature and setting to the scratch org definition file. See Scratch Org Definition for Org Shape for
details.
ERROR running force:org:shape:list
Description: A trial org from which you created the org shape has expired. You could see either of these errors:
ERROR running org list shape: Error authenticating with the refresh token due to: inactive
user
ERROR running org list shape: Error authenticating with the refresh token due to: expired
access/refresh token
140
Troubleshoot Org ShapeScratch Orgs

Workaround:
•
Use sf org logout to log out and remove the expired org.
•
Run sf org list shape again.
Can't create a Digital Experience Cloud Site Using Org Shape
Description: When you try to create a scratch org from an org shape that contains an Experience Cloud Site, you get an error.
Required fields are missing: [Welcome Email Template, Change Password Email Template, Lost
Password Template]
Workaround: None.
Error While Creating Scratch Org Using a Shape
Description: You see this error when creating a scratch org using a shape.
ERROR running org create scratch: A fatal signup error occurred. Please try again.
If you still see this error, contact Salesforce Support for assistance.
Workaround: Generate a new shape using the org create shape command, then try again.
Shift Status Picklists Aren’t Populated When Using a Shape With Field Service
Description: When you create a scratch org from a shape with Field Service enabled, the Status field picklist for Shifts is empty.
Workaround: Use an org shape with field service disabled, then enable field service in the scratch org definition file settings.
{
"orgName": "Acme",
"sourceOrg": "00DB1230000Ifx5",
"settings": {
"fieldServiceSettings": {
"fieldServiceOrgPref": true
}
}
}
Org Shape Feature Accepts Only 15-Character Org IDs
Description: You can use only 15-character org IDs when enabling Org Shape for Scratch Orgs and specifying the source org in the
scratch org definition file. Org IDs are usually 18 characters long, which is what the org list command displays.
Workaround: Use only the first 15 characters of a standard 18-character org ID when working with the Org Shape feature.
Create Scratch Orgs
Easily spin up a scratch org and open it directly from the command line.
Before you create a scratch org:
•
Set up your Salesforce DX project
•
Authorize the Dev Hub org
141
Create Scratch OrgsScratch Orgs

•
Create the scratch org definition file (build your own or use an org shape)
You can create scratch orgs for different functions, such as for feature development, for development of packages that contain a
namespace, or for user acceptance testing.
Tip: Delete any unneeded or malfunctioning scratch orgs in the Dev Hub org or via the command line so that they don’t count
against your active scratch org allocations.
Indicate the path to the scratch definition file relative to your current directory. For sample repos and new projects, this file is located in
the config directory.
Ways to Create Scratch Orgs
Create a scratch org for development using a scratch org definition file, give the scratch org an alias, and indicate that this scratch org
is the default. Use the --target-dev-hub flag to specify your Dev Hub org’s username or alias; if you don’t specify this flag, the
command uses your default Dev Hub.
sf org create scratch --definition-file config/project-scratch-def.json --alias MyScratchOrg
--set-default --target-dev-hub MyHub
You can override many of the options in the user definition file by specifying the corresponding flag at the command line when you run
org create scratch. This technique allows multiple users or continuous integration jobs to share a base definition file and then
customize options when they run the command. This example overrides the adminEmail and edition options.
sf org create scratch --definition-file config/project-scratch-def.json --admin-email
[email protected] --edition developer
You’re not required to specify a definition file when you create a scratch org, as long as you specify the required flag --edition.
sf org create scratch --edition developer
This example creates a scratch org from an org shape with the specified ID.
sf org create scratch --source-org 00DB1230000Ifx5
Create a scratch org for user acceptance testing or to test installations of packages. In this case, you don’t want to create a scratch org
with a namespace. You can use this command to override the namespace value in the scratch org definition file. This example also
specifies the scratch org’s duration, which indicates when the scratch org expires (in 1-30 days). The default duration is 7 days.
sf org create scratch --definition-file config/project-scratch-def.json --no-namespace
--duration-days 30
Specify the Salesforce release for the scratch org. During the Salesforce release transition, you can specify the release (preview or previous)
when creating a scratch org. See Select the Salesforce Release for a Scratch Org for details.
sf org create scratch --edition developer --release preview
Request a scratch org, but don’t wait for it complete, by specifying the --async flag.
sf org create scratch --edition developer --async
The command displays a job ID that you pass to the org resume scratch command. Use this command to also resume a scratch
org creation that times out.
sf org resume scratch --job-id 2SRB0000CSqdJOAT
142
Create Scratch OrgsScratch Orgs

Create a scratch org with source tracking disabled.
sf org create scratch --definition-file config/project-scratch-def.json --no-track-source
If Scratch Org Creation Is Successful
While executing, the org create scratch command displays running information about the background processes, such as
sending requests, deploying org settings, and so on. When the command completes, it displays two important pieces of information:
the org ID and the username.
Creating Scratch Org...
RequestId: 2SRB000000CSqdEOAT (https://cbdocorg.my.salesforce.com/2SRB000000CSqdEOAT)
OrgId: 00D8I000000PhAk
Username: [email protected]
Prepare Request
Send Request
Wait For Org
Available
Authenticate
Deploy Settings
Done
Your scratch org is ready.
You can now open the org.
sf org open --target-org [email protected]
If you used the --alias flag to set an alias, you can use that value for --target-org.
sf org open --target-org MyScratchOrg
Troubleshooting Tips
If the create command runs into an error, it’s not always clear if the scratch org was created. Issue this command on your Dev Hub org
to see if it returns the scratch org ID, which confirms the existence of a scratch org created today and owned by you:
sf data query --query "SELECT ID, Name, Status FROM ScratchOrgInfo WHERE CreatedBy.Name =
'<your name>' AND CreatedDate = TODAY" --target-org <Dev Hub org>
143
Create Scratch OrgsScratch Orgs

Use this information to determine if the creation actually worked. For example, let’s say your name is Jane Doe, and you created an alias
for your Dev Hub org called DevHub:
sf data query --query "SELECT ID, Name, Status FROM ScratchOrgInfo WHERE CreatedBy.Name =
'Jane Doe' AND CreatedDate = TODAY" --target-org DevHub
SEE ALSO:
ScratchOrgInfo sObject API Reference
Project Setup
Authorization
Build Your Own Scratch Org Definition File
Deploy Source From Your Project to the Scratch Org
VS Code Command: SFDX: Create a Default Scratch Org
Scratch Org Snapshots
Capture the state of a scratch org’s configuration so that you can use it to create scratch org replicas. A snapshot is a point-in-time copy
of a scratch org that includes installed packages, features, limits, licenses, metadata, and data.
Configuring a scratch org with a project’s dependencies can be a manual and time-consuming process. It can require deploying dependent
metadata to it, seeding it with sample data, installing one or more packages, and then performing manual tasks directly in the scratch
org. And then, poof, the scratch org expires, and you have to start all over again. With scratch org snapshots, you can quickly replicate
scratch orgs with the required project dependencies.
How Snapshots Fit in the Development Lifecycle
Because a snapshot is a point-in-time copy of your scratch org, it’s static. To update your snapshot, delete it and create another snapshot.
You can create a snapshot from only a scratch org and, conversely, you can create only scratch orgs from a snapshot. Snapshots have
the same 200-MB data storage limit as scratch orgs. A snapshot isn’t meant to replace source-driven development or a version control
system. You continue to follow best development practices by externalizing and modularizing your project source.
Snapshots and scratch orgs don’t replace sandboxes for user acceptance testing. A snapshot is intended to contain the static dependencies
of a project, and not the entire happy soup of your production org.
Snapshot Allocations and Limits
Snapshots are associated with a Dev Hub org. Therefore, you must use the same Dev Hub org when you create the scratch org from the
snapshot.
•
The number of snapshots you can create is the same as the active scratch org allocation based on edition type.
•
Snapshots expire after 90 days. When a snapshot expires or is deleted, its status is updated automatically and its license becomes
immediately available.
•
Snapshot data is retained for 100 days. When a snapshot expires, it’s associated data is deleted 10 days later. If a snapshot is deleted,
its associated data is deleted 100 days after its creation date.
Snapshot Allocations (Active and Daily)Edition
3Developer Edition
144
Scratch Org SnapshotsScratch Orgs

Snapshot Allocations (Active and Daily)Edition
40Enterprise Edition
100Unlimited Edition
100Performance Edition
To view your snapshot usage with Salesforce CLI, run:
sf org list limits -o <Dev Hub username or alias>
Look for these values in the output:
Name Remaining Max
───────────────────── ───────── ─────────
ActiveOrgSnapshots 38 40
DailyOrgSnapshots 35 40
Get Started with Scratch Org Snapshots
Install the required Salesforce DX tools, then enable Dev Hub and Scratch Org Snapshots in an org, usually your production org.
Salesforce CLI Snapshot Commands
You must use Salesforce CLI commands to create and manage your scratch org snapshots.
Create a Scratch Org Snapshot
You can create a snapshot if the source scratch org wasn’t created using a snapshot or with a namespace.
Create a Snapshot for Use with Namespaced Scratch Orgs
You can use a namespace when creating a scratch org from a snapshot. That way, you can deploy namespaced metadata to the
scratch org. However, you can’t use a namespaced scratch org to create a snapshot. Snapshots are intended to include only dependent
packages, metadata, and test data.
Create a Scratch Org Based on a Snapshot
The snapshot must belong to the Dev Hub that you’re using to create the scratch org. Create a scratch org definition file that references
the snapshot. We recommend creating a definition file specifically for this purpose. Changing or deleting a scratch org has no effect
on a snapshot.
Manage and Maintain Your Snapshots
You can check the status of snapshot creation, list all snapshots, and delete a snapshot.
Get Started with Scratch Org Snapshots
Install the required Salesforce DX tools, then enable Dev Hub and Scratch Org Snapshots in an org, usually your production org.
•
Install Salesforce CLI.
•
Enable Dev Hub in your production org.
•
Authorize your Dev Hub org. The Dev Hub org is the org you use to create and manage scratch orgs.
•
Enable Scratch Org Snapshots in the Dev Hub org.
•
Provide users with permissions to create snapshots.
145
Get Started with Scratch Org SnapshotsScratch Orgs

Enable Scratch Org Snapshots in the Dev Hub Org
A snapshot must belong to the Dev Hub org that you’re using to create the scratch orgs.
Assign a License and Permissions to Snapshot Users
Provide all non-admin Scratch Org Snapshots users with a supported license and access to the required scratch org and snapshot
objects. Dev Hub (production org) admins can create and manage snapshots by default.
Enable Scratch Org Snapshots in the Dev Hub Org
EDITIONS
Available in: Developer,
Enterprise, Group,
Professional, and Unlimited
editions
Not available in: Scratch
orgs and sandboxes
A snapshot must belong to the Dev Hub org that you’re using to create the scratch orgs.
1. Log into your Dev Hub org as the admin user.
2. From Setup, enter Scratch Orgs in the Quick Find box, then select Scratch Orgs.
3. Click to enable Enable Scratch Org Snapshots.
Assign a License and Permissions to Snapshot Users
Provide all non-admin Scratch Org Snapshots users with a supported license and access to the
required scratch org and snapshot objects. Dev Hub (production org) admins can create and manage
snapshots by default.
1. Log in to your Dev Hub org as the admin user.
2. Assign to each snapshot user a Salesforce, Salesforce Platform, or Salesforce Limited Access license.
3. In Setup, create a permission set or select an existing one.
4. From the permission set’s Object Settings, select Org Snapshots, then click Edit.
a. Under Object Permissions, select Read, Create, and Delete.
b. (Optional) Add these object permissions to the permission set.
•
To allow users to see snapshots that other users create, select View All.
•
To allow users to delete snapshots that other users create, select Modify All (Salesforce license only).
5. If snapshot users don’t already have access to the required scratch org objects (Scratch Org Info and Active Scratch Orgs) through
another permission set, include access to them in this permission set.
See Required Permissions for Scratch Orgs in Create and Assign a Permission Set to Developer Users for details.
6. Save your changes.
7. Click Manage Assignments, then Add Assignment.
8. Select the users, click Next, and optionally set an expiration date.
9. Click Assign, then Done.
Salesforce CLI Snapshot Commands
You must use Salesforce CLI commands to create and manage your scratch org snapshots.
org create snapshot
Create a snapshot of a scratch org.
org delete snapshot
Delete a scratch org snapshot.
146
Salesforce CLI Snapshot CommandsScratch Orgs

org get snapshot
Get details about a scratch org snapshot.
org list snapshot
List scratch org snapshots that belong to the specified Dev Hub org.
Get Help in the Terminal for Command Syntax
The --help and -h flags enable you to get varying levels of help (comprehensive or abbreviated) right in the command window:
Example:
sf org create snapshot --help
Create a Scratch Org Snapshot
You can create a snapshot if the source scratch org wasn’t created using a snapshot or with a namespace.
Before you begin:
•
Enable Dev Hub in your production org, or another org you use to create scratch orgs.
•
Enable Scratch Org Snapshots in the Dev Hub org.
•
Be sure that non-admin users have the proper permissions to use scratch orgs and snapshots. See Assign a License and Permissions
to Snapshot Users for details.
A snapshot captures the state of a scratch org at a point in time. To update your snapshot, delete it and create another snapshot. Unlike
an org shape, a snapshot includes installed packages, metadata, and data. The time to create a snapshot depends on the size of the
source scratch org. To speed up snapshot creation time, include only what’s necessary for your project.
Command syntax:
sf org create snapshot --name <name> --source-org <ID or alias of scratch org> \
--target-dev-hub <username or alias of Dev Hub org> --description <text>
A snapshot name can have a maximum length of 15 characters. It can contain only alphanumeric characters (no special characters or
spaces, even if the name is surrounded by quotation marks during creation).
Tip: To view the aliases, usernames, and IDs of your authenticated orgs and scratch orgs, run the org list command.
Example:
sf org create snapshot --name dhsnapshot --source-org dreamhouse-scratch \
--target-dev-hub my-dev-hub --description "Dreamhouse app"
Your request is initially InProgress:
Name Value
────────────────── ────────────────────
Id 0Oo1Q0000004C93SXX
Snapshot Name dhsnapshot
Description Dreamhouse app
Status InProgress
Source Org 00D050000004ipAEXX
Created Date 09/22/2023, 02:07 PM
Last Modified Date 09/22/2023, 02:07 PM
Expiration Date 2023-12-21
147
Create a Scratch Org SnapshotScratch Orgs

To check the status of the request, see Manage and Maintain Your Snapshots.
Create a Snapshot for Use with Namespaced Scratch Orgs
You can use a namespace when creating a scratch org from a snapshot. That way, you can deploy namespaced metadata to the scratch
org. However, you can’t use a namespaced scratch org to create a snapshot. Snapshots are intended to include only dependent packages,
metadata, and test data.
1. Create and register the namespace in the Dev Hub org and add it to the sfdx-project.json file.
2. When you create the scratch org that you plan to use as the source of the snapshot, be sure to indicate the --no-namespace
flag.
3. Create the scratch org snapshot.
4. Create a scratch org based on the snapshot.
SEE ALSO:
Link a Namespace to a Dev Hub Org
Create a Scratch Org Based on a Snapshot
The snapshot must belong to the Dev Hub that you’re using to create the scratch org. Create a scratch org definition file that references
the snapshot. We recommend creating a definition file specifically for this purpose. Changing or deleting a scratch org has no effect on
a snapshot.
Create the Scratch Org Definition File
The scratch org definition file is the blueprint for your scratch org. It’s likely that your snapshot includes all the required features and
settings to configure the scratch orgs created from it.
Using our Dreamhouse scratch org as an example, let’s create a scratch org definition file called dhsnapshot-scratch-def.json
that contains only two entries: orgName and snapshot, which is the name you gave the snapshot when you created it.
Important: Be sure you use the snapshot option instead of edition in the scratch org definition file.
{
"orgName": "Salesforce",
"snapshot": "dhsnapshot"
}
When creating the scratch org definition file, don’t include these options:
•
edition
•
features
•
hasSampleData
•
release
•
sourceOrg
148
Create a Snapshot for Use with Namespaced Scratch OrgsScratch Orgs

Add Settings to the Scratch Org Definition File to Override Default Snapshot Settings
Some scratch org settings aren’t inherited from the org snapshot. In these cases, you can add these settings in the scratch org definition
file to achieve the desired scratch org configuration when creating a scratch org from a snapshot.
This example scratch org definition file illustrates adding some scratch org settings, in the event that these settings weren’t inherited
from the scratch org snapshot.
{
"orgName": "Salesforce",
"snapshot": "dhsnapshot",
"settings": {
"activitiesSettings": {
"enableCalendarHomeLWC": false
},
"omniChannelSettings": {
"enableOmniSkillRouting": true
"enableOmniChannel": true
},
"experienceBundleSettings": {
"enableExperienceBundleMetadata": true
},
"oauthOidcSettings": {
"blockOAuthUnPwFlow": true
},
"mobileSettings": {
"enableS1EncryptedStoragePref2": false
},
"securitySettings": {
"lockerServiceNext": false
}
}
}
Create the Scratch Org Based On Your Snapshot
It can take Salesforce longer to create a scratch org from a snapshot, so we suggest you increase the --wait value so the command
doesn’t time out. Remember to set the --target-dev-hub flag to the same Dev Hub org associated with the snapshot.
For example:
sf org create scratch --definition-file config/dhsnapshot-scratch-def.json \
--alias dh-scratch-ci --wait 10 --target-dev-hub my-dev-hub
Success! Development and testing with scratch orgs just got a whole lot easier.
Determine the Release Version for the Resulting Scratch Org
Normally, a scratch org is created on the same release version as the Dev Hub org regardless of how the scratch org was created: using
the standard method, an org shape, or a snapshot. However, during Salesforce Preview, a scratch org can be created on a different release
version from the Dev Hub org, if the snapshot release version differs from the Dev Hub’s release version.
During the Salesforce release transition, release version differences can occur for these scenarios:
•
The Dev Hub org is on the current generally available Salesforce release, but the snapshot is created on the preview release version.
149
Create a Scratch Org Based on a SnapshotScratch Orgs

•
The Dev Hub has upgraded to the preview release, but the snapshot was created on the current release version.
In cases where the Dev Hub org and snapshot release versions differ, the resulting scratch org is created on the same release version as
the snapshot, as illustrated in this table.
Resulting Scratch Org Release
Version
Snapshot Release VersionDev Hub Release Version
CurrentCurrentCurrent
PreviewPreviewCurrent
CurrentCurrentPreview
PreviewPreviewPreview
Snapshot Error Codes
See Scratch Org Error Codes for details.
Manage and Maintain Your Snapshots
You can check the status of snapshot creation, list all snapshots, and delete a snapshot.
Check the Status of a Snapshot Creation
Creating a snapshot can take a while. Use the snapshot name or ID to check its creation status.
sf org get snapshot --snapshot <name or ID> --target-dev-hub <username or alias>
For example:
sf org get snapshot --snapshot dhsnapshot --target-dev-hub my-dev-hub
After the status changes to Active, you can use the snapshot to create scratch orgs.
Name Value
────────────────── ────────────────────
Id 0Oo1Q0000004C93SXX
Snapshot Name dhsnapshot
Description Dreamhouse app
Status Active
Source Org 00D050000004ipAEXX
Created Date 09/22/2023, 02:07 PM
Last Modified Date 09/22/2023, 02:14 PM
Expiration Date 2024-09-21
Last Cloned Date
Last Cloned By Id
150
Manage and Maintain Your SnapshotsScratch Orgs

List All Scratch Org Snapshots
You can view all the snapshots in a Dev Hub org that you have access to. If you’re an admin, you can see all snapshots associated with
the Dev Hub org. If you’re a user, you can see only your snapshots, unless a Dev Hub admin gives you View All permissions.
sf org list snapshot --target-dev-hub <username or alias>
Delete a Scratch Org Snapshot
If you don’t need a snapshot anymore or run out of active snapshots, you can delete a snapshot. Dev Hub admins can delete any snapshot,
while users can delete only their snapshots unless a Dev Hub admin gives the user Modify All permissions. Deleting a snapshot frees up
a license to create an additional snapshot, but the associated data is retained for 100 days after the snapshot was created.
sf org delete snapshot --snapshot dhsnapshot --target-dev-hub <username or alias>
Select the Salesforce Release for a Scratch Org
During the Salesforce release transition, you can specify the release (preview or previous) when creating a scratch org.
What Is Salesforce Preview?
During every major Salesforce release, you can get early access to the upcoming release in your scratch orgs and sandboxes to test new
customizations and features before your production org is upgraded. This window is called the Salesforce Preview, and scratch orgs
created on the upcoming release are called preview scratch orgs.
Normally, you create scratch orgs that are the same version as the Dev Hub. However, during the major Salesforce release transition that
happens three times a year, you can select the Salesforce release version Preview or Previous, based on the version of your Dev
Hub.
To try out new features in an upcoming release, you no longer have to create a trial Dev Hub on the upcoming version to create preview
scratch orgs. You can use your existing Dev Hub that includes your existing scratch org active and daily limits.
For example, you can select a version over the next three releases during these release transition dates. Preview start date is when
sandbox instances are upgraded. Preview end date is when all instances are on the GA release.
Preview End DatePreview Start DateRelease Version
June 15, 2024May 12, 2024Summer ’24
October 12, 2024September 8, 2024Winter ’25
February 15, 2025January 5, 2025Spring ’25
Because previous and preview are relative terms, your Dev Hub org version during the release transition determines their relative
significance. Here’s what happens when you try to create a scratch org with one of the release values.
PreviousPreviewDev Hub Version
Prior Dev Hub versionError (Dev Hub is already on the latest
version)
Dev Hub has upgraded to the latest version
151
Select the Salesforce Release for a Scratch OrgScratch Orgs

PreviousPreviewDev Hub Version
Error (Dev Hub is on the GA version;
previous version unavailable)
Version following the Dev Hub version
(newly released Salesforce version)
Dev Hub is still on the GA version
Note: If you don’t specify a release value, the scratch org version is the same version as the Dev Hub org.
Create a Scratch Org for a Specific Release
You can specify the release version in the scratch org definition file or directly on the command line. Any value you set on the command
line overrides what you have defined in your scratch definition file.
•
Find out which instance your Dev Hub org is on: https://status.salesforce.com.
•
Add the release option (lowercase) to your scratch org definition file.
{
"orgName": "Dreamhouse",
"edition": "Developer",
"release": "preview",
"settings": {
"mobileSettings": {
"enableS1EncryptedStoragePref2": true
}
}
}
Alternatively, you can specify the release value directly on the command line with the --release flag. Any value you specify on
the command line overrides the value in the scratch org definition.
•
Create the scratch org by executing the org create scratch command in a terminal (macOS and Linux) or command
prompt (Windows).
In this example, we’re creating a scratch org on the preview release.
sf org create scratch --definition-file config/project-scratch-def.json --alias PreviewOrg
--target-dev-hub DevHub --release preview
Be sure to set the apiVersion to match the scratch org version.
To set it globally for all DX projects:
sf config set org-api-version 59.0 --global
To set it on the command line:
SF_ORG_API_VERSION=59.0 sf org create scratch --definition-file
config/project-scratch-def.json --alias PreviewOrg --target-dev-hub DevHub --release preview
Note: Regardless of the release version of your Dev Hub, you can use scratch org features that are available in the release (preview
or previous) of the scratch org you create.
152
Select the Salesforce Release for a Scratch OrgScratch Orgs

What If I Want to Create a Pre-Release Scratch Org?
Pre-release is a very early build of the latest version of Salesforce that’s available before Salesforce Preview. It's not built to handle scale
and doesn't come with any Salesforce Support service-level agreements (SLAs). For this reason, the only way to create a pre-release
scratch org is to sign up for a pre-release trial Dev Hub org (subject to availability).
SEE ALSO:
VS Code Command: SFDX: Create a Default Scratch Org
Deploy Source From Your Project to the Scratch Org
After changing the source, you can sync the changes to your scratch org by deploying the changed source to it with the project
deploy start command.
Note: Scratch orgs have source tracking enabled by default. But sometimes you don’t want source tracking, such as in a continuous
integration environment when you want to speed up deployments. You can opt out of source tracking when you create the scratch
org by specifying the --no-track-source flag.
sf org create scratch --definition-file config/project-scratch-def.json --no-track-source
See Create Scratch Orgs for more reasons to disable source tracking.
The first time you deploy source to the org, all source in the package directories in the sfdx-project.json file is deployed to the
scratch org to complete the initial setup. At this point, Salesforce CLI starts source-tracking locally on the file system and remotely in the
scratch org to determine which metadata has changed. Let’s say you deployed an Apex class to a scratch org and then decide to modify
the class in the scratch org instead of your local file system. Salesforce CLI tracks in which local package directory the class was created,
so when you retrieve it back to your project, it knows where it belongs.
To run the deploy commands described in the remainder of this topic, first open a terminal (macOS and Linux) or command window
(Windows) and then change to your Salesforce DX project directory.
Preview a Deployment
Before you deploy source to an org, you can preview the components that will be deployed, the potential conflicts, and the ignored
files by executing project deploy preview. For example, this command displays a preview of deploying all the source in your
project to a scratch org with alias MyGroovyScratchOrg.
sf project deploy preview --target-org MyGroovyScratchOrg
Use flags to target the source you want to preview, such as only the source listed in a manifest. In this example, --target-org
points to the scratch org’s username.
Tip: You can create an alias for an org using alias set. To display the usernames and aliases of all the scratch orgs you’ve
created, run org list.
153
Deploy Source From Your Project to the Scratch OrgScratch Orgs

Deploy Source to a Scratch Org
To deploy changed local source to your default scratch org, run this command.
sf project deploy start
The command displays what it deployed. This sample output shows a deployment of the PropertyController Apex class.
Deploying v58.0 metadata to [email protected] using the v59.0 SOAP API.
Deploy ID: 0Af7e00001WsuoSCAR
Status: Succeeded | ████████████████████████████████████████ | 1/1 Components (Errors:0)
| 0/0 Tests (Errors:0)
Deployed Source
=====================================================================================================
| State Name Type Path
| ─────── ────────────────── ─────────
──────────────────────────────────────────────────────────────
| Changed PropertyController ApexClass force-app/main/default/classes/PropertyController.cls
| Changed PropertyController ApexClass
force-app/main/default/classes/PropertyController.cls-meta.xml
Use flags to target the source you want to deploy, rather than everything that’s changed.
•
Use the --metadata flag to deploy specific metadata components, such as Apex classes.
•
Use the --manifest flag to deploy components in a manifest file.
•
Use --source-dir to deploy source in a package directory.
See the reference information about project deploy start for examples and other flags you can specify.
Select Files to Ignore During Deploys
It’s likely that you have some files that you don’t want to sync between the project and scratch org. Add these files to the .forceignore
file so they’re ignored by the deploy command.
If the Deploy Detects Warnings
If you run project deploy start, and warnings occur, Salesforce CLI doesn’t deploy the source. Warnings can occur, for example,
if your project source is using an outdated version. If you want to ignore these warnings and deploy the source to the scratch org, run:
sf project deploy start --ignore-warnings
Tip: Although you can successfully deploy using this option, we recommend addressing the issues in the source files. For example,
if you see a warning because a Visualforce page is using an outdated version, consider updating your page to the current version
of Visualforce. This way, you can take advantage of new features and performance improvements.
If the Deploy Detects File Conflicts
During development, you change files locally in your file system and change the scratch org directly using the builders and editors that
Salesforce supplies. Usually, these changes don’t cause a conflict and involve unique files. Also, the project deploy start
command doesn’t handle merges. Projects and scratch orgs are meant to be used by one developer.
154
Deploy Source From Your Project to the Scratch OrgScratch Orgs

However, if you run project deploy start, and conflicts are detected, Salesforce CLI terminates the operation and doesn’t
deploy the source. Instead, it displays conflict information, such as this sample output. The PropertyController Apex class has been
changed both locally and in the org, but the changes are in conflict.
sf project deploy start
STATE FULL NAME TYPE FILE PATH
──────── ────────────────── ─────────
─────────────────────────────────────────────────────────────────────────────────────────────────────────
Conflict PropertyController ApexClass
<dir>/force-app/main/default/classes/PropertyController.cls-meta.xml
Conflict PropertyController ApexClass
<dir>/force-app/main/default/classes/PropertyController.cls
Error (1): There are changes in the org that conflict with the local changes you're trying
to deploy.
First decide which change you want to keep. To keep the local change, rerun the deploy and specify the --ignore-conflicts
flag.
sf project deploy start --ignore-conflicts
To keep the change that’s in the org, run the project retrieve start command to retrieve the change to your local project,
and specify the --ignore-conflicts flag.
sf project retrieve start --ignore-conflicts
SEE ALSO:
How to Exclude Source When Syncing
Retrieve Source from the Scratch Org to Your Project
Track Changes Between Your Project and Org
VS Code Command: SFDX: Deploy Source to Org
Retrieve Source from the Scratch Org to Your Project
After you do an initial deploy, your changes are tracked between your local file system and your scratch org. If you change metadata in
your scratch org, retrieve those changes to your local project to keep both in sync.
Note: Scratch orgs have source tracking enabled by default. But sometimes you don’t want source tracking, such as in a continuous
integration environment when you want to speed up deployments. You can opt out of source tracking when you create the scratch
org by specifying the --no-track-source flag.
sf org create scratch --definition-file config/project-scratch-def.json --no-track-source
See Create Scratch Orgs for more reasons to disable source tracking.
To run the retrieve commands described in the remainder of this topic, first open a terminal (macOS and Linux) or command window
(Windows) and then change to your Salesforce DX project directory.
155
Retrieve Source from the Scratch Org to Your ProjectScratch Orgs

Preview a Retrieve
Before you retrieve metadata from an org, you can preview the components that will be retrieved, the potential conflicts, and the ignored
files by executing project retrieve preview. For example, this command displays a preview of retrieving changed metadata
from a scratch org with the alias MyGroovyScratchOrg to your local project.
sf project retrieve preview --target-org MyGroovyScratchOrg
Tip: You can create an alias for an org using alias set. To display the usernames and aliases of all the scratch orgs you’ve
created, run org list.
Retrieve Metadata from Your Scratch Org
To retrieve changed source from your default scratch org to your project, run this command
sf project retrieve start
The command displays what it retrieved and where in your local Salesforce DX project it puts it. This sample output shows a retrieve of
the DiscountSpecial Apex class and DiscountPermSet permission set into the force-app/main/default directory.
Preparing retrieve request...
Preparing retrieve request... Succeeded
Retrieved Source
====================================================================================================================
| State Name Type Path
| ─────── ─────────────── ─────────────
────────────────────────────────────────────────────────────────────────────
| Created DiscountSpecial ApexClass force-app/main/default/classes/DiscountSpecial.cls
| Created DiscountSpecial ApexClass
force-app/main/default/classes/DiscountSpecial.cls-meta.xml
| Created DiscountPermSet PermissionSet
force-app/main/default/permissionsets/DiscountPermSet.permissionset-meta.xml
Use flags to target the source you want to retrieve, rather than everything that’s changed.
•
Use the --metadata flag to retrieve specific metadata components, such as Apex classes.
•
Use the --manifest flag to retrieve components in a manifest file.
•
Use --source-dir to retrieve source in a package directory.
See the reference information about project retrieve start for examples and other flags you can specify.
Select Files to Ignore During Retrieves
It’s likely that you have some files that you don’t want to sync between the project and scratch org. Add these files to the .forceignore
file so they’re ignored by the retrieve command.
156
Retrieve Source from the Scratch Org to Your ProjectScratch Orgs

If the Retrieve Detects File Conflicts
During development, you change files locally in your file system and change the scratch org using builders and editors. Usually, these
changes don’t cause a conflict and involve unique files. Also, the project retrieve start command doesn’t handle merges.
Projects and scratch orgs are meant to be used by one developer.
However, if you run project retrieve start, and conflicts are detected, Salesforce CLI terminates the operation and doesn’t
retrieve the source. Instead, it displays conflict information, such as this sample output. The PropertyController Apex class has been
changed both locally and in the org, but the changes are in conflict.
sf project retrieve start
Preparing retrieve request... Sending request to org
STATE FULL NAME TYPE FILE PATH
──────── ────────────────── ─────────
───────────────────────────────────────────────────────────────────
Conflict PropertyController ApexClass
<dir>force-app/main/default/classes/PropertyController.cls-meta.xml
Preparing retrieve request... Error
Error (1): There are changes in your local files that conflict with the org changes you're
trying to retrieve.
First decide which change you want to keep. To keep the change that’s in the org, rerun the retrieve and specify the
--ignore-conflicts flag.
sf project retrieve start --ignore-conflicts
To keep the local change, run the project deploy start command to deploy the change to your org, and specify the
--ignore-conflicts flag.
sf project deploy start --ignore-conflicts
SEE ALSO:
Retrieve Source from the Scratch Org to Your Project
How to Exclude Source When Syncing
Track Changes Between Your Project and Org
VS Code Command: SFDX: Retrieve Source to Org
Scratch Org Users
A scratch org includes one administrator user by default. The admin user is typically adequate for all your testing needs. But sometimes
you need other users to test with different profiles and permission sets.
You can create a user by opening the scratch org in your browser and navigating to the Users page in Setup. You can also use the org
create user CLI command to easily integrate the task into a continuous integration job.
Scratch Org User Limits, Defaults, and Considerations
•
You can run the org create user command only for scratch orgs. If you try to create a user for a non-scratch org, the command
fails.
157
Scratch Org UsersScratch Orgs
•
Your scratch org edition determines the number of available user licenses. The number of licenses determines the number of users
you can create. For example, a Developer Edition org includes a maximum of two Salesforce user licenses. Therefore, in addition to
the default administrator user, you can create one standard user.
•
The new user’s username must be unique across all Salesforce orgs and in the form of an email address. The org create user
command provides the --set-unique-username flag to ensure uniqueness. The username is active only within the bounds
of the associated scratch org.
•
You can’t delete a user using Salesforce CLI, just like you can’t delete a Salesforce user using Setup. The user is deactivated when
you delete the scratch org with which the user is associated. Deactivating a user frees up the user license. But you can’t reuse
usernames, even if the associated user has been deactivated.
•
The simplest way to create a user is to let the org create user command assign default or generated characteristics to the
new user. If you want to customize your new user, create a definition file and specify it with the --definition-file (-f)
flag. In the file, you can include all the User sObject fields and a set of Salesforce DX-specific options, described in User Definition
File for Customizing a Scratch Org User. You can also specify these options on the command line.
•
If you don’t customize your new user, the org create user command creates a user with the following default characteristics.
–
The username is the existing administrator’s username prepended with a timestamp. For example, if the administrator username
is [email protected], the new username is something like [email protected].
–
The user’s profile is Standard User.
–
The values of the required fields of the User sObject are the corresponding values of the administrator user. For example, if the
administrator’s locale (specifically the LocaleSidKey field of User sObject) is en_US, the new user’s locale is also en_US.
•
After the new user has been created, Salesforce CLI automatically authenticates it to the scratch org so the new user can immediately
start using the scratch org. Salesforce CLI uses the same authentication method that was used on the associated Dev Hub org. Due
to Hyperforce limitations, if the Dev Hub authentication used the JWT flow and the scratch org is on Hyperforce, then the scratch
org user creation fails. For this reason, if you plan to create scratch org users, authenticate to the Dev Hub org with either the org
login web or org login sfdx-url command, and not org login jwt.
Create a Scratch Org User
Although scratch orgs were designed to be used by one developer, sometimes you need other users to test with different profiles
and permission sets.
User Definition File for Customizing a Scratch Org User
To customize a new scratch org user, rather than use the default and generated values, create a definition file.
Generate or Change a Password for a Scratch Org User
By default, new scratch orgs contain one administrator user with no password. Use the org generate password CLI command
to generate or change a password for this admin user. After it's set, you can’t unset a password, you can only change it.
SEE ALSO:
User sObject API Reference
Create a Scratch Org User
Although scratch orgs were designed to be used by one developer, sometimes you need other users to test with different profiles and
permission sets.
158
Create a Scratch Org UserScratch Orgs

Use the org create user command to create a user. Specify the --set-alias flag to assign a simple name to the user that
you can reference in later CLI commands. When the command completes, it outputs the new username and user ID.
sf org create user --set-alias qa-user --target-org my-scratch
for org 00D80000PhAkUAK.
See more details about this user by running "sf org user display -o
Users are associated with a specific scratch org. Specify the scratch org username or alias at the command line with the --target-org
flag if it isn’t already set as the default. If you try to create a user for a non-scratch org, the org create user command fails.
You can customize the new user by creating a definition file and specifying it with the --definition-file flag.
sf org create user --set-alias qa-user --definition-file config/user-def.json
View the list of users associated with a scratch org with the org list users command. The (A) on the left identifies the administrator
user that was created when the scratch org was created.
sf org list users --target-org my-scratch
=== Users in org 00D80000PhAkUAK
Default Alias Username Profile Name User
Id
─────── ────────── ─────────────────────────────────────────── ────────────────────
───────────────
0058I002inzvQAA
0058I002inzvQAA
Display details about a user with the org display user command.
sf org display user --target-org qa-user
Warning: This command exposes sensitive information <truncated for readability>
=== User Description
key label
────────────
────────────────────────────────────────────────────────────────────────────────────────────────────────────────
Username [email protected]
Profile Name Standard User
Id 0058I002inzvQAA
Org Id 00D80000PhAkUAK
Access Token 00D8I<truncated>
Instance Url https://connect-enterprise-1121-dev-ed.scratch.my.salesforce.com
Login Url https://connect-enterprise-1121-dev-ed.scratch.my.salesforce.com
159
Create a Scratch Org UserScratch Orgs

Alias qa-user
User Definition File for Customizing a Scratch Org User
To customize a new scratch org user, rather than use the default and generated values, create a definition file.
The user definition file uses JSON format and can include any Salesforce User sObject field and these Salesforce DX-specific options.
Default If Not SpecifiedDescriptionSalesforce DX Option
NoneAn array of permission sets assigned to the
user. Separate multiple values with commas,
and enclose in square brackets.
You must have previously deployed the
permission sets to the scratch org with
project deploy start.
permsets
FalseBoolean. Specifies whether to generate a
random password for the user.
If set to true, org create user
displays the generated password after it
generatePassword
completes. You can also view the password
using org display user.
Standard UserName of a profile to associate with the user.
Similar to the ProfileId field of the User
profileName
sObject except that you specify the name
of the profile and not its ID. Convenient
when you know only the name of the
profile.
The user definition file options are case-insensitive. However, we recommend that you use lower camel case for the Salesforce DX-specific
options and upper camel case for the User sObject fields. This format is consistent with other Salesforce DX definition files.
This user definition file includes some User sObject fields and three Salesforce DX options (profileName, permsets, and
generatePassword).
{
"Username": "[email protected]",
"LastName": "Hobbs",
"Email": "[email protected]",
"Alias": "tester1",
"TimeZoneSidKey": "America/Denver",
"LocaleSidKey": "en_US",
"EmailEncodingKey": "UTF-8",
"LanguageLocaleKey": "en_US",
"profileName": "Standard Platform User",
"permsets": ["Dreamhouse", "Cloudhouse"],
160
User Definition File for Customizing a Scratch Org UserScratch Orgs

"generatePassword": true
}
In the example, the username [email protected] must be unique across the entire Salesforce ecosystem; otherwise, the org create
user command fails. We recommend that you use the --set-unique-username flag, which overrides the value in the
configuration file and ensures a unique username. The alias in the Alias option is different from the alias you specify with the
--set-alias flag of org create user. Use the Alias option only with the Salesforce UI. The --set-alias flag is local to
the computer from which you run the CLI, and you can use it with other CLI commands.
Indicate the path to the user definition file with the --definition-file flag. You can name this file whatever you like and store
it anywhere the CLI can access.
sf org create user --set-alias qa-user --definition-file config/user-def.json --target-org
my-scratch
You can override an option in the user definition file by specifying it as a name-value pair at the command line. This technique allows
multiple users or continuous integration jobs to share a base definition file and then customize options when they run the command.
This example overrides the username, list of permission sets, and whether to generate a password.
sf org create user --set-alias qa-user --definition-file config/user-def.json
permsets="Dreamy,Cloudy" [email protected] generatePassword=false --target-org
my-scratch
You can also add options at the command line that aren’t in the user definition file. This example adds the City option.
sf org create user --set-alias qa-user --definition-file config/user-def.json City=Oakland
--target-org my-scratch
SEE ALSO:
User sObject API Reference
Generate or Change a Password for a Scratch Org User
By default, new scratch orgs contain one administrator user with no password. Use the org generate password CLI command
to generate or change a password for this admin user. After it's set, you can’t unset a password, you can only change it.
You can also use the --on-behalf-of flag to generate a password for a scratch org user that you've created locally with the org
create user command. You can’t use the org generate password command for users that you created in the scratch
org with Setup.
1. Generate a password for a scratch org user with this command:
sf org generate password --target-org <username-or-alias>
You can run this command for scratch org users only. The command outputs the generated password.
The target org must be the username or alias for the scratch org admin user. Use the --on-behalf-of flag to assign passwords
to multiple users at once, including admin users, or to users who don’t have permissions to do it themselves. Specify multiple locally
created users by specifying multiple --on-behalf-of flags. For example, let’s say the my-scratch alias corresponds to the
scratch org’s admin user, and you want to generate a password for users with aliases ci-user and qa-user:
sf org generate password --target-org my-scratch --on-behalf-of ci-user --on-behalf-of
qa-user
161
Generate or Change a Password for a Scratch Org UserScratch Orgs

By default, the command generates a password that's 13 characters in length; the possible characters include all lower and upper
case letters, numbers, and symbols. To change the password strength, use the --length and --complexity flags. The
--complexity flag is a number from 0 through 5; the higher the value, the more possible characters are used, which strengthens
the password. The default value is 5. See the command-line help for a description of each value. This example shows how to generate
a password that's 20 characters long:
sf org generate password --target-org my-scratch --length 20
2. View the generated password and other user details:
sf org display user --target-org qa-user
Warning: This command exposes sensitive information <truncated for readability>
=== User Description
key label
────────────
────────────────────────────────────────────────────────────────────────────────────────────────────────────────
Username [email protected]
Profile Name Standard User
Id 0058I002inzvQAA
Org Id 00D80000PhAkUAK
Access Token 00D8I<truncated>
Instance Url https://connect-enterprise-1121-dev-ed.scratch.my.salesforce.com
Login Url https://connect-enterprise-1121-dev-ed.scratch.my.salesforce.com
Alias qa-user
Password ogihymg%lXa
3. Log in to the scratch org with the new password:
a. From the org display user output, copy the value of the Instance URL and paste it into your browser. In our example,
the instance URL is https://connect-enterprise-1121-dev-ed.scratch.my.salesforce.com.
b. If you’ve already opened the scratch org with the org open command, you’re automatically logged in again. To try out the
new password, log out and enter the username and password listed in the output of the org display user command.
c. Click Log In to Sandbox.
Note: If you change a scratch org user’s password using the Salesforce UI, the new password doesn’t show up in the org
display user output.
Manage Scratch Orgs from the Dev Hub Org
You can view and delete your scratch orgs and their associated requests from the Dev Hub org.
162
Manage Scratch Orgs from the Dev Hub OrgScratch Orgs

In the Dev Hub org, the ActiveScratchOrg standard object represents the scratch orgs that are currently in use. The ScratchOrgInfo
standard object represents the requests that were used to create scratch orgs and provides historical context.
1. Log in to the Dev Hub org as the System Administrator or as a user with the Salesforce DX permissions.
2. From the App Launcher, select Active Scratch Orgs to see a list of all active scratch orgs.
To view more details about a scratch org, click the link in the Number column.
3. To delete an active scratch org from the Active Scratch Orgs list view, choose Delete from the dropdown.
Deleting an active scratch org doesn’t delete the request (ScratchOrgInfo) that created it, but it does free up a scratch org so that it
doesn’t count against your allocations.
4. To view the requests that created the scratch orgs, select Scratch Org Infos from the App Launcher.
To view more details about a request, click the link in the Number column. The details of a scratch org request include whether it's
active, expired, or deleted.
5. To delete the request that was used to create a scratch org, choose Delete from the dropdown.
Deleting the request (ScratchOrgInfo) also deletes the active scratch org.
SEE ALSO:
Add Salesforce DX Users
Scratch Org Error Codes
If scratch org creation fails, the system generates an error code that can help you identify the cause. Some of these errors are generated
by the SignupRequest API and apply to all org signups.
Note: These error codes are specific to scratch org signups. Additional error codes for other org signup scenarios are included in
the Object Reference for the Salesforce Platform: SignupRequest.
DescriptionError Code
Duplicate username.C-1007
Error while establishing the new org’s My Domain (subdomain) settings. Contact Salesforce Support for
assistance.
C-1015
Error while configuring the OAuth connected app for Proxy Signup. Verify that your connected app has a
valid consumer key, callback URL, and unexpired certificate (if applicable).
C-1016
Invalid subdomain value provided during sign-up.C-1018
Subdomain in use. Choose a new subdomain value.C-1019
Template not found. Either the template doesn’t exist or it was deleted.C-1020
Template is the wrong version.C-1033
Can’t create the org. Contact Salesforce Customer Support for assistance.C-1034
Not a valid scratch org. Contact Salesforce Customer Support for assistance.C-9998
Generic fatal error. Contact Salesforce Customer Support for assistance.C-9999
163
Scratch Org Error CodesScratch Orgs

DescriptionError Code
Namespace isn’t registered. To use a namespace with a scratch org, you must link the Developer Edition
org where the namespace is registered to a Dev Hub org. See Salesforce Help: Link a Namespace to a Dev
Hub Org.
S-1017
Invalid country.S-2006
Can't create scratch org from org shape. Contact the source org admin to add your Dev Hub org ID. From
Setup, in the Quick Find box, enter Org Shape, and then select Org Shape.
SH-0001
Can't create scratch org. No org shape exists for the specified sourceOrg. Create an org shape and try
again.
SH-0002
Can't create scratch org from the org shape because it was created on a previous Salesforce release version
and is outdated. Recreate the org shape and try again.
SH-0003
The snapshot has expired. Create another snapshot, then try again.SN-0001
The snapshot doesn’t belong to the specified Dev Hub org. Run the command with the appropriate
--target-dev-hub.
SN-0002
Can’t validate org shape due to fatal error. Contact Salesforce Customer Support for assistance.SH-9999
Can’t create the scratch org. Try again later.VR-0001
Can’t create the scratch org. Check that the release value is valid. If no release value was specified, contact
Salesforce Customer Support.
VR-0002
Can’t create the scratch org. Check that the release value is valid. If no release value was specified, contact
Salesforce Customer Support.
VR-0003
164
Scratch Org Error CodesScratch Orgs

CHAPTER 7 Sandboxes
USER PERMISSIONS
To view a sandbox:
• View Setup and
Configuration
To create, refresh, activate,
and delete a sandbox:
• Manage Dev Sandboxes
(Developer or Developer
Pro only) or Manage
Sandboxes (all sandbox
types)
Sandboxes are copies of your Salesforce org that you can use for
development, testing, and training, without compromising the
data and applications in your production org.
Salesforce offers sandboxes and a set of deployment tools, so you
can:
In this chapter ...
• Authorize Your
Production Org
• Create a Sandbox
Definition File
•
Isolate customization and development work from your
production environment until you’re ready to deploy changes.
• Create, Clone, or
Refresh a Sandbox
•
Test changes against copies of your production data and users.
•
Provide a training environment.
•
Coordinate individual changes into one deployment to
production.
Traditionally, you or your admin has created and managed your
sandboxes through the Setup UI. But we realize that many developers want the ability to create and
manage their developer and testing environments programmatically, and to automate their CI processes.
Salesforce CLI enables you to do both.
Alternatives to sandboxes are scratch orgs and Developer Edition orgs, which are used as development
environments for many Salesforce development use cases. If you’re wondering whether to use a sandbox,
scratch org, or Developer Edition org as your development environment, you’re not alone. To help you
better understand which to choose, see the Salesforce Developers Blog: Choose the Right Salesforce
Org for the Right Job.
165

Authorize Your Production Org
JWT and Web-based flows require a production org with sandbox licenses instead of a Dev Hub. However, it’s OK if your production org
is also a Dev Hub org.
The examples in Authorize an Org Using the JWT-Based Flow and Authorize an Org Using the Web-Based Flow are geared toward scratch
orgs. Follow these tips to successfully authorize your production org.
•
Be sure to use https://login.salesforce.com for sfdcLoginUrl in sfdx-project.json file. Alternatively,
you can use org login jwt --instance-url to specify the URL directly on the command line. This value overrides the
login URL you specified in the sfdx-project.json file.
•
Specify the username for your production org when running the org login jwt command. No need to specify a Dev Hub or
indicate a default Dev Hub.
•
The JWT authorization flow requires that you create a connected app. When you create the connected app, log in to your production
org, not a Dev Hub org.
Create a Sandbox Definition File
Before you can create a sandbox using Salesforce CLI, define the configuration for it in a sandbox definition file. The sandbox definition
file is a blueprint for the sandbox. You can create different definition files for each sandbox type that you use in the development process.
Sandbox Configuration Values
DescriptionRequired?Option
A reference to the ID of an Apex class that runs after
each copy of the sandbox. Allows you to perform
business logic on the sandbox to prepare it for use.
NoapexClassId
If true, you can activate a sandbox refresh
immediately.
NoautoActivate
Full sandboxes only. This field is visible if your
organization has purchased an option to copy
NocopyArchivedActivities
archived activities for sandbox. To obtain this option,
contact Salesforce Customer Support.
If true, archived Chatter data is copied to the
sandbox.
NocopyChatter
A description of the sandbox (1000 or fewer
characters), which helps you distinguish it from other
sandboxes.
Nodescription
Full sandboxes only. Represents the number of days
of object history to be copied in the sandbox.
Valid values:
NohistoryDays
•
-1, which means all available days
•
0 (default)
166
Authorize Your Production OrgSandboxes

DescriptionRequired?Option
•
10
•
20
•
30
•
60
•
90
•
120
•
150
•
180
Valid values are Developer, Developer_Pro,
Partial, and Full.
Yes (for sandbox creation)licenseType
A unique alphanumeric string (10 or fewer characters)
to identify the sandbox. You can’t reuse a name while
a sandbox is in the process of being deleted.
YessandboxName
Name of the sandbox being cloned.Yes (for sandbox cloning)sourceSandboxName
Optional for Full sandboxes. Not available for
Developer and Developer Pro sandboxes.
A reference to the sandbox template as identified by
the 15-character ID beginning with 1ps in the URL
Yes (for Partial sandboxes)templateId
when viewing a sandbox template in a browser. A
sandbox template lets you select which objects to
copy in a sandbox.
Note: You can indicate either licenseType or sourceSandboxName in your definition file, but not both.
Sample Sandbox Definition File
Although you can place the sandbox definition file anywhere, we recommend keeping it in your Salesforce DX project in the config
directory. When naming the file, we suggest providing a descriptive name that ends in sandbox-def.json, for example,
developer-sandbox-def.json.
Here's a sample definition file for creating a sandbox:
{
"sandboxName": "dev1",
"licenseType": "Developer"
}
Here's a sample definition file for cloning a sandbox:
{
"sandboxName": "dev1clone",
167
Create a Sandbox Definition FileSandboxes

"sourceSandboxName": "dev1"
}
SEE ALSO:
Tooling API: SandboxInfo
Create, Clone, or Refresh a Sandbox
Create a sandbox to use for development, testing, or training. Clone a sandbox to copy its data and metadata to another sandbox. Refresh
an existing sandbox to get the latest metadata, and sometimes data, from the source org.
Before you create or clone a sandbox:
•
Create a Salesforce DX project with a manifest file.
•
Authorize to a production org with available sandbox licenses.
•
Create the sandbox definition file.
Why We Recommend Using Aliases
When you create or clone a sandbox, the usernames generated in the sandbox are based on the usernames present in the production
org or sandbox. The username looks like an email address, such as [email protected]. If the resulting username
isn’t unique, we prepend some characters and digits to the username. The modified username looks something like
00x7Vq[email protected].
As you can imagine, remembering these usernames can be challenging, especially if you have several sandboxes you’re managing.
Aliasing is a powerful way to manage and track your orgs, and we consider it a best practice. So when you issue a command that requires
the username, using an alias that you can remember can speed up things.
If you didn’t set an alias when you created the sandbox, you can set one later.
sf alias set MyDevSandbox [email protected]
Create a Sandbox
Optional: Create a Sandbox Definition File
Optional: Create a Data Cloud Sandbox (Beta)
When you create a sandbox, Salesforce copies the metadata and optionally data from your production org to a sandbox org. Specify the
username or alias of your production org with the --target-org flag.
sf org create sandbox --target-org prodOrg --definition-file config/dev-sandbox-def.json
--alias MyDevSandbox --set-default --wait 30
The command asks you to confirm the sandbox configuration and then shows information as the sandbox is being created.
The --set-default flag indicates that this sandbox is your default org for all CLI commands. If you’re working with several orgs
and you don’t want this one to be the default, exclude this flag.
168
Create, Clone, or Refresh a SandboxSandboxes

To directly define the required sandbox options, or to override the values defined in the sandbox definition file, specify appropriate flags
on the command line.
sf org create sandbox --name FullSbx --license-type=Full --target-org prodOrg --alias
MyFullSandbox --wait 30
Tip: Because the sandbox is processed in a queue, the sandbox creation process can take longer than the default wait time of 6
minutes. We recommend setting a larger value for --wait, for example, 30 minutes.
How long the creation process takes depends on the size and complexity of your production org. You see status messages posted to
output:
Sandbox Create... 00:28:00 until timeout. 26%
Field Value
───────────── ────────────────────────────
Id 0GR1Q888800HORuWAO
SandboxName dev11
Status Processing
LicenseType DEVELOPER
SandboxInfoId 0GQ1Q000009999mWAO
Created Date 2023-10-17T21:42:49.000+0000
CopyProgress 26%
SandboxOrg 00DP0099993zEZj
---------------------
Sandbox Create Stages
- Pending
… - Processing
… - Activating
… - Authenticating
After the wait period is over, you can run the org resume sandbox command to check the status of the sandbox creation process.
If the sandbox is created within the wait time, Salesforce CLI automatically authenticates in to the sandbox. And the sandbox appears
in the output of the org list command. Team members can authenticate to the sandbox by running the org web login
command and providing their usernames and passwords.
sf org web login --instance-url https://test.salesforce.com
Clone a Sandbox
You can create a sandbox by cloning an existing sandbox rather than using your production org as your source. You can save time by
customizing a sandbox with a set of data and metadata and then replicating it. Use the --clone flag to specify the existing sandbox
name and the --name flag to the name of the new sandbox. Both sandboxes must be associated with the specified production org
that contains the sandbox licenses. (--target-org flag).
Sandbox cloning simplifies having multiple concurrent streams of work in your application life cycle. You can set up a sandbox for each
type of work, such as development, testing, and staging. Your colleagues can easily clone individual sandboxes instead of sharing one
sandbox and stepping on each other’s toes.
sf org create sandbox --clone FullSbx --name NewSbx --target-org prodOrg --alias MyDevSandbox
--set-default --wait 30
Tip: Because the sandbox is processed in a queue, the sandbox cloning process can take longer than the default wait time of 6
minutes. We recommend setting a larger value for --wait, for example, 30 minutes.
169
Create, Clone, or Refresh a SandboxSandboxes

After the wait period is over, you can run the org resume sandbox command to check the status of the sandbox cloning process.
If the sandbox is cloned within the wait time, the CLI automatically authenticates in to the sandbox. And the sandbox appears in the
output of the org list command. Team members can authenticate to the sandbox by running the org web login command
and providing their usernames and passwords.
sf org web login --instance-url https://test.salesforce.com
Check the Sandbox Status
Creating or cloning a sandbox can take several minutes. If the command times out, it displays a job ID that you can pass to the org
resume sandbox command to report on creation or cloning status. When the sandbox is ready, this command also authenticates
to the sandbox.
sf org resume sandbox --job-id 0GR1888880000HORuWAO --target-org prodOrg
If the org create sandbox command times out, the alias isn’t set. However, you can set it using the alias set command:
sf alias set MyDevSandbox [email protected]
Open a Sandbox
After the sandbox is ready, you can open it by specifying its username or alias. However, you don’t have to provide its password because
the CLI manages the authentication details for you.
sf org open --target-org MyDevSandbox
Refresh a Sandbox
Refreshing an existing sandbox updates its metadata from the source org. If the sandbox is a clone or if it uses a sandbox template, the
refresh process also updates the sandbox org’s data.
sf org refresh sandbox --name FullSbx --target-org prodOrg
Be sure the value of --name is the sandbox name, and not its alias. The --target-org flag can be either the username or alias
of the source org.
To change the configuration of the refreshed sandbox, specify a definition file with the --definition-file flag. Then include
the configuration options you want to change, such as licenseType, templateID, or copyArchivedActivities (full
sandbox only.) You can’t, however, change the sandbox name using the org refresh sandbox command. To change the
sandbox name, first delete it with the org delete sandbox command. Then recreate it with the org create sandbox
command and give it a new name.
Delete a Sandbox
You can delete a sandbox using Salesforce CLI, whether you created it locally with org create sandbox or logged into an existing
sandbox with a org login command. You must also have previously logged into the production org that contains the sandbox
license.
sf org delete sandbox --target-org MyDevSandbox
170
Create, Clone, or Refresh a SandboxSandboxes
Next:
•
Retrieve metadata from your sandbox to your local DX project.
•
Develop directly in your sandbox, then retrieve the changes to your local DX project.
•
Deploy local changes to a sandbox.
SEE ALSO:
Salesforce Help: Deploy Enhancements from Sandboxes
Salesforce Help: Create, Clone, or Refresh a Sandbox Using Setup UI
Authorize an Org Using the JWT Flow
Authorize an Org Using a Browser
171
Create, Clone, or Refresh a SandboxSandboxes

CHAPTER 8 Track Changes Between Your Project and Org
Use source tracking to track the changes between your local project and a scratch org or sandbox when
you create, update, or delete source code.
In this chapter ...
• Manage Source
Tracking for Your org
Source tracking has no direct effect on the org; it affects only your local environment. Specifically,
Salesforce CLI checks a local configuration file to determine whether you’ve enabled source tracking for
• Preview Changes
Identified by Source
Tracking
a particular org. If you have, then source tracking operations are executed when you work with the org,
such as using the project deploy start command.
The project deploy|retrieve start commands without flags deploy or retrieve all changed
source between your local project and the target org. For more granular control, use flags to specify
• Deploy and Retrieve
Changes Identified
by Source Tracking
specific metadata components, package directories, or manifest files to deploy or retrieve. This example
retrieves the MyFabClass Apex class:
sf project retrieve start --metadata ApexClass:MyFabClass
• Resolve Conflicts
Between Your Local
Project and Org
In addition to listing the changes you make, source tracking makes it possible to:
• Best Practices
•
Automatically track changes to metadata components, saving you from tracking them manually.
• Performance
Considerations of
Source Tracking
•
See changes deployed to a sandbox by other developers.
•
Deploy or retrieve changed source.
•
Identify and resolve conflicts between your local project and scratch org or sandbox before deploying
or retrieving source.
To see which metadata components support source tracking, check the Source Tracking column of the
Metadata Coverage Report.
172

Manage Source Tracking for Your org
Source tracking works only if your target org allows it. Don’t worry, you can still deploy or retrieve metadata to and from an org without
source tracking. But the commands don’t check for conflicts, and you must specify exactly what you want to deploy or retrieve using an
appropriate flag, such as --source-dir or --metadata.
Org Editions that Support Source Tracking
•
Developer Edition orgs, production orgs, Partial Copy sandboxes, and Full sandboxes—Source tracking isn’t supported.
•
Developer and Developer Pro sandboxes—Source tracking is supported if their associated production org has been enabled for
source tracking.
•
Scratch orgs—Source tracking is always supported.
Manage Source Tracking in New Orgs
Scratch Orgs have source tracking enabled by default. For Developer and Developer Pro sandboxes, source tracking is also enabled by
default as long as their associated production org has been enabled for source tracking.
You can opt out of source tracking when you create the scratch org or sandbox by specifying the --no-track-source flag of the
org create scratch|sandbox command. This flag affects only your local configuration, not the org itself. Salesforce CLI sets
a local configuration option trackSource: false as part of your authorization information to the org. If you log out of the org
and then log back in again, source tracking is enabled again by default.
Here’s how to create a scratch org with source tracking disabled.
sf org create scratch --target-dev-hub=MyHub --definition-file
config/project-scratch-def.json --no-track-source
Here’s a sandbox example.
sf org create sandbox --definition-file config/dev-sandbox-def.json --target-org prodOrg
--no-track-source
Manage Source Tracking in Existing Orgs
You can change whether an existing scratch org or sandbox allows source tracking with these two commands:
•
org enable tracking: Allow Salesforce CLI to track changes in your source files between your project and an org.
•
org disable tracking: Prevent Salesforce CLI from tracking changes in your source files between your project and an org.
This example shows how to enable source tracking in an org with alias mySandbox; the command returns an error if the org doesn't
support tracking, such as a Full sandbox.
sf org enable tracking --target-org mySandbox
173
Manage Source Tracking for Your orgTrack Changes Between Your Project and Org

Let’s say you have a sandbox that you use for integration tests, and you want to deploy source to it but not wait for tracking operations.
This example shows how to disable source tracking on an org with alias mySandbox:
sf org disable tracking --target-org mySandbox
SEE ALSO:
VS Code Command: SFDX: Create a Default Scratch Org
Preview Changes Identified by Source Tracking
To see changes between your local project and target org, navigate to the project directory for which you want to see changes. Then
run one of the preview commands, which display either the local changes in your project you can deploy to your org, or the org changes
that you can retrieve.
1. In a terminal or command window, navigate to the project directory. In this example, the directory is named MyProject.
cd /Users/joe/dx-projects/MyProject
2. To see what’s changed between your project and org, run either the project deploy preview or project retrieve
preview command. Include the --target-org flag to specify the username or alias of the scratch org or sandbox that you
want to compare with your local project. In this example, the command displays the local changes that can be deployed to the
sandbox with the alias DevSandbox.
sf project deploy preview --target-org DevSandbox
Similarly, this example displays the remote changes in the sandbox that can be retrieved back into the local project.
sf project retrieve preview --target-org DevSandbox
The project deploy preview command accepts the --metadata, --source-dir, and --manifest flags,
which you can use to preview more granular deployments. This example previews a deployment of only ApexClass metadata:
sf project deploy preview --metadata ApexClass --target-org DevSandbox
This project deploy preview sample output shows that there are local changes to the WidgetClass Apex class and
WidgetObject__c custom object that can be deployed to the org.
sf project deploy preview --target-org DevSandbox
No conflicts found.
No files will be deleted.
Will Deploy [2] files.
Type Fullname Path
──────────── ───────────────
──────────────────────────────────────────────────────────────────────────────
ApexClass WidgetClass force-app/main/default/classes/WidgetClass.cls-meta.xml
CustomObject WidgetObject__c
force-app/main/default/objects/WidgetObject__c/WidgetObject__c.object-meta.xml
174
Preview Changes Identified by Source TrackingTrack Changes Between Your Project and Org

No files were ignored. Update your .forceignore file if you want to ignore certain files.
This project retrieve preview sample output shows that there are remote changes to the GizmoClass Apex class and
GizmoObject__c custom object (and its layout) that can be retrieved from the org to the local project. The output also shows that there
are no conflicts between the project and org.
sf project retrieve preview --target-org DevSandbox
No conflicts found.
No files will be deleted.
Will Retrieve [3] files.
Type Fullname Path
──────────── ───────────────────────────────── ────
Layout GizmoObject__c-GizmoObject Layout
CustomObject GizmoObject__c
ApexClass GizmoClass
Ignored [2] files. These files won't retrieve because they're ignored by your .forceignore
file.
Type Fullname Path
─────── ─────────────────────────────────── ────
Profile Admin
Profile B2B Reordering Portal Buyer Profile
The preview commands use tables of change information with three columns: Type, Fullname, and Path. Each row represents one
change.
•
Type is the changed component’s metadata type. It describes what the component is, such as an Apex class or a custom object.
•
Fullname is the API name of the component.
•
Path is the location of the component in your local project. If it’s blank, the component isn’t present in your local project. When
blank, it usually means that a component is present in the org but not in your local project.
If source tracking doesn’t detect any changes, then the preview commands return a statement saying No results found.
=== Source Status
No results found
After previewing the changes in the source in your local project and the org, you’re ready to deploy or retrieve and resolve potential
conflicts.
Deploy and Retrieve Changes Identified by Source Tracking
When you create a Salesforce app, you typically use both low-code and pro-code techniques. An example of low-code is creating a
custom object directly in an org using Setup. An example of pro-code is creating an Apex class in your local project using an IDE, such
as VS Code. As you work, source tracking identifies changes so you can keep the remote metadata in the org in sync with the source in
your local project.
The process is iterative. First you preview the remote and local changes. If conflicts exist, you resolve them. You must now ensure that
these changes exist in both the org and your local project. So you retrieve the remote changes to your local project, then push them to
your source control repository, to ensure that the source control system contains all your changes and is the source of historical truth.
175
Deploy and Retrieve Changes Identified by Source TrackingTrack Changes Between Your Project and Org

You deploy your local changes, such as Apex code, to the org so you can validate and test it. And you keep iterating through this process
until you finish developing the Salesforce app.
To see source tracking in action, let’s look at some examples.
Say you run project retrieve preview and see remote changes.
sf project retrieve preview --target-org DevSandbox
No conflicts found.
No files will be deleted.
Will Retrieve [3] files.
Type Fullname Path
──────────── ───────────────────────────────── ────
Layout GizmoObject__c-GizmoObject Layout
CustomObject GizmoObject__c
ApexClass GizmoClass
Ignored [2] files. These files won't retrieve because they're ignored by your .forceignore
file.
Type Fullname Path
─────── ─────────────────────────────────── ────
Profile Admin
Profile B2B Reordering Portal Buyer Profile
Retrieve the changes in your org to your local project with the project retrieve start command. Now that the components
have been created locally, the Path column has a value and it includes the default package directory.
sf project retrieve start --target-org DevSandbox
Preparing retrieve request... Sending request to org
Preparing retrieve request... Succeeded
Retrieved Source
=========================================================================================================================================
| State Name Type Path
| ─────── ───────────────────────────────── ────────────
────────────────────────────────────────────────────────────────────────────────
| Created GizmoClass ApexClass
force-app/main/default/classes/GizmoClass.cls
| Created GizmoClass ApexClass
force-app/main/default/classes/GizmoClass.cls-meta.xml
| Created GizmoObject__c CustomObject
force-app/main/default/objects/GizmoObject__c/GizmoObject__c.object-meta.xml
| Created GizmoObject__c-GizmoObject Layout Layout
force-app/main/default/layouts/GizmoObject__c-GizmoObject Layout.layout-meta.xml
After retrieving the source, run project retrieve preview again. Now, source tracking reports that there’s nothing to retrieve.
sf project retrieve preview
No conflicts found.
No files will be deleted.
176
Deploy and Retrieve Changes Identified by Source TrackingTrack Changes Between Your Project and Org

No files will be retrieved.
Ignored [2] files. These files won't retrieve because they're ignored by your .forceignore
file.
Type Fullname Path
─────── ─────────────────────────────────── ────
Profile Admin
Profile B2B Reordering Portal Buyer Profile
Let’s now look at deploying. To preview your local changes, run project deploy preview.
sf project deploy preview --target-org DevSandbox
No conflicts found.
No files will be deleted.
Will Deploy [2] files.
Type Fullname Path
──────────── ───────────────
──────────────────────────────────────────────────────────────────────────────
ApexClass WidgetClass force-app/main/default/classes/WidgetClass.cls-meta.xml
CustomObject WidgetObject__c
force-app/main/default/objects/WidgetObject__c/WidgetObject__c.object-meta.xml
No files were ignored. Update your .forceignore file if you want to ignore certain files.
Then deploy your local changes. After deploying to a sandbox, other developers that are using the sandbox can see your changes.
sf project deploy start --target-org DevSandbox
Deploying v59.0 metadata to [email protected] using the v59.0 SOAP API.
Deploy ID: 0Af8D00000pNmKySAK
Status: Succeeded | ████████████████████████████████████████ | 2/2 Components (Errors:0)
| 0/0 Tests (Errors:0)
Deployed Source
=====================================================================================================================
| State Name Type Path
| ─────── ─────────────── ────────────
──────────────────────────────────────────────────────────────────────────────
| Created WidgetClass ApexClass force-app/main/default/classes/WidgetClass.cls
| Created WidgetClass ApexClass
force-app/main/default/classes/WidgetClass.cls-meta.xml
| Created WidgetObject__c CustomObject
force-app/main/default/objects/WidgetObject__c/WidgetObject__c.object-meta.xml
Run project deploy preview again.
sf project deploy preview
No conflicts found.
177
Deploy and Retrieve Changes Identified by Source TrackingTrack Changes Between Your Project and Org

No files will be deleted.
No files will be deployed.
No files were ignored. Update your .forceignore file if you want to ignore certain files.
The command reports there’s nothing to deploy, indicating that your local project and the org are synchronized.
Retrieve Changes to Profiles with Source Tracking
Retrieving profiles behaves a little differently with source tracking.
SEE ALSO:
VS Code Command: SFDX: Deploy|Retrieve Source to|from Org
Retrieve Changes to Profiles with Source Tracking
Retrieving profiles behaves a little differently with source tracking.
Important: In general, we recommend that you use permission sets instead of profiles. Profiles aren’t consistent across orgs, and
the source files that are retrieved and deployed depend on the org type, the tracking state, and other metadata in the operation.
If you decide to continue using profiles, we recommend that you exclude them when you deploy or retrieve by adding them to
the .forceignore file.
Without source tracking, retrieving profiles only returns some profile information. Retrieving profiles returns information about profiles
that pertains to other items specified in the package.xml file.
For example, retrieving profiles with this package.xml file returns profile permissions for the MyCustomField__c custom field on
the Account object.
<?xml version="1.0" encoding="UTF-8"?>
<Package xmlns="http://soap.sforce.com/2006/04/metadata">
<types>
<members>Account.MyCustomField__c</members>
<name>CustomField</name>
</types>
<types>
<members>*</members>
<name>Profile</name>
</types>
<version>50.0</version>
</Package>
With source tracking, retrieving profiles returns profile information pertaining to anything else specified in the package.xml file
plus any components getting tracked by source tracking. That includes any entity for which a change exists between your local project
and the org.
178
Retrieve Changes to Profiles with Source TrackingTrack Changes Between Your Project and Org

For example, say you create a custom field on the Opportunity object called OppCustomField__c in your local environment. Source
tracking detects the change and reports it. Now you retrieve profiles using the same package.xml file as you did when source
tracking was off.
<?xml version="1.0" encoding="UTF-8"?>
<Package xmlns="http://soap.sforce.com/2006/04/metadata">
<types>
<members>Account.MyCustomField__c</members>
<name>CustomField</name>
</types>
<types>
<members>*</members>
<name>Profile</name>
</types>
<version>50.0</version>
</Package>
Even though the package.xml file doesn’t reference OppCustomField__c, because source tracking is tracking the new custom field,
your retrieve returns profile permissions for both the MyCustomField__c custom field on the Account object and the OppCustomField__c
on the Opportunity object.
For more information about retrieving profiles, see the Profile metadata type in the Metadata API Developer Guide.
Note: Although source retrieves don’t include package.xml files, retrieve requests return profile information pertaining to
everything reported by source tracking.
SEE ALSO:
Salesforce Help: Permission Sets
How to Exclude Source When Syncing
Resolve Conflicts Between Your Local Project and Org
As a best practice, if conflicts exist for components in your local project or in the org, resolve them before moving forward. You can
resolve the conflict manually, or overwrite one version of a component with another. Only overwrite changes if you're certain that the
new version is the one you want to use.
Say you run project deploy preview and see conflicting changes between your local project and in the org. For example,
this command output shows that WidgetClass has conflicting changes but GizmoClass is ready to be deployed.
sf project deploy preview --target-org DevSandbox
Conflicts [1]. Run the command with the --ignore-conflicts flag to override.
Type Fullname Path
───────── ─────────── ───────────────────────────────────────────────────────
ApexClass WidgetClass force-app/main/default/classes/WidgetClass.cls-meta.xml
No files will be deleted.
Will Deploy [1] files.
Type Fullname Path
───────── ────────── ──────────────────────────────────────────────────────
ApexClass GizmoClass force-app/main/default/classes/GizmoClass.cls-meta.xml
179
Resolve Conflicts Between Your Local Project and OrgTrack Changes Between Your Project and Org

No files were ignored. Update your .forceignore file if you want to ignore certain files.
If you try to actually deploy the source, Salesforce CLI reports the conflict again and stops the operation from completing. You see similar
conflict messages when you run project retrieve preview. To successfully deploy or retrieve, first resolve the conflicts, and
then overwrite either your local project or the org with the resolved file. Let’s see how this works.
Overwrite Conflicting Changes
If you decide that the local version is correct, overwrite the conflicting change in the org by including the --ignore-conflicts
flag when you deploy. In our example, because only WidgetClass has conflicting changes, let’s first deploy just that component
to get rid of the conflicts and then deploy the non-conflicting source later.
sf project deploy start --metadata ApexClass:WidgetClass --ignore-conflicts --target-org
DevSandbox
The DevSandbox org now has the same version of WidgetClass that was in your local project. When you run project deploy
preview again you see no conflicting changes messages.
If, however, you decide that the version of WidgetClass in the org is the correct one, overwrite your local copy by retrieving the
DevSandbox org version while ignoring conflicts.
sf project retrieve start --metadata ApexClass:WidgetClass --ignore-conflicts --target-org
DevSandbox
Your local project now has the same version of WidgetClass that was in your org.
Well done, you resolved the conflict! Now run project deploy start without any special flags to finish deploying GizmoClass
and any other new local source.
sf project deploy start --target-org DevSandbox
Deploying v59.0 metadata to [email protected] using the v59.0 SOAP API.
Deploy ID: 0Af8D00000pNtEUSA0
Status: Succeeded | ████████████████████████████████████████ | 1/1 Components (Errors:0)
| 0/0 Tests (Errors:0)
Deployed Source
=====================================================================================
| State Name Type Path
| ─────── ────────── ───────── ──────────────────────────────────────────────────────
| Created GizmoClass ApexClass force-app/main/default/classes/GizmoClass.cls
| Created GizmoClass ApexClass force-app/main/default/classes/GizmoClass.cls-meta.xml
SEE ALSO:
VS Code Documentation: Detect Conflicts on Deploy
Best Practices
Get the most out of source tracking by following these best practices.
180
Best PracticesTrack Changes Between Your Project and Org

Retrieve changes and resolve conflicts before deploying your changes to
a sandbox
This practice helps other developers incorporate your changes and facilitates collaboration.
Review metadata change history with a version control system like Git
With a version control system, you can version your changes, track change history, and review metadata changes before promoting to
other environments, such as a sandbox.
Get source tracking files back into sync
If source tracking gets confused and starts reporting inaccuracies, you can use the project deploy|retrieve start
commands to get back into sync. Which command you use depends on which source you most trust: use project deploy start
if you trust your local source files and project retrieve start if you trust what’s in your org. For either command, specify
the --ignore-conflicts flag. See Resolve Conflicts Between Your Local Project and Org for details and examples.
Performance Considerations of Source Tracking
Source tracking performs extra functions to determine changes to source tracked components, such as running more queries and waiting
for the SourceMember Tooling API object to be updated after a deployment. So, some commands can take a little longer to run when
working with medium-to-large sized projects. If you’re working with small projects, you don’t notice any slowdown.
A medium-sized project has 30 or more components or 50 or more tests. A project with 25 components and 51 tests is considered
medium.
A large-sized project is 600 or more components or 150 or more tests. A project with 610 components and 140 tests is considered large.
If you experience long-running commands, break up your projects into smaller sets of components, and deploy the smaller sets.
You can also opt out of source tracking when you create a scratch org or sandbox by specifying the --no-track-source flag of
the org create scratch|sandbox command. See Source Tracking for use cases.
If creating a scratch org or sandbox for use as a development environment in DevOps Center, don’t disable source tracking.
181
Performance Considerations of Source TrackingTrack Changes Between Your Project and Org

CHAPTER 9 Development
After you import some test data, you’ve completed the process of setting up your project. Now, you’re
ready to start the development process.
In this chapter ...
• Develop Against Any
Org
Create Source Files from the CLI
To add source files from the CLI, make sure that you’re working in an appropriate directory. For example,
if your package directory is called force-app, create Apex classes in
• Assign a Permission
Set
• Ways to Add Data to
Your Org
force-app/main/default/classes. You can organize your source as you want underneath
each package directory except for documents, custom objects, and custom object translations.
• Create Lightning
Apps and Aura
Components
As of API version 45.0, you can build Lightning components using two programming models: Lightning
Web Components and Aura Components. To organize your components’ source files, your Aura
• Create Lightning Web
Components
components must be in the aura directory. Your Lightning web components must be in the lwc
directory.
• Create an Apex
Class
Execute one of these commands.
• Create an Apex
Trigger
•
apex generate class
•
apex generate trigger
• Create a Custom
Object
•
cmdt generate object
•
cmdt generate field
• Execute Anonymous
Apex
•
cmdt generate record
• Run Apex Tests
•
cmdt generate records
•
cmdt generate fromorg
•
lightning generate app
•
lightning generate component
•
lightning generate event
•
lightning generate interface
•
lightning generate test
•
schema generate sobject
•
schema generate field
•
schema generate platformevent
•
schema generate tab
•
static-resource generate
•
visualforce generate component
•
visualforce generate page
182

Many of the commands have these two helpful optional flags:
DescriptionFlag
The directory for saving the created files. If you don’t indicate
a directory, your source is added to the current folder. To add
-d, --output-dir
the source to an existing directory, indicate the absolute or
relative path. If you don’t indicate an absolute or a relative
path and the directory doesn’t exist, Salesforce CLI attempts
to create it for you.
Template used for the file creation.-t, --template
Tip: If you want to know more information about a command, run it with the --help flag. For
example, sf apex generate class --help.
Edit Source Files
Use your favorite code editor to edit Apex classes, Visualforce pages and components, Lightning web
components, and Aura components in your project. You can also make edits in the Setup UI of your org
and then use project retrieve start to retrieve those changes to your project. For Lightning
pages (FlexiPage files) that are already in your org, use the shortcut to open Lightning App Builder in a
scratch org from your default browser. Lightning Pages are stored in the flexipages directory.
To edit a FlexiPage in your default browser—for example, to edit the Property_Record_Page
source—execute this command from the flexipages directory.
sf org open --source-file Property_Record_Page.flexipage-meta.xml
If you want to generate a URL that loads the .flexipage-meta.xml file in Lightning App Builder
but doesn’t launch your browser, use the --url-only | -r flag.
sf org open --source-file Property_Record_Page.flexipage-meta.xml
--url-only
SEE ALSO:
Salesforce CLI Command Reference
183
Development

Develop Against Any Org
After developing against scratch or sandbox orgs that have source tracking enabled, you eventually test and validate your changes in a
non-source-tracked org.
You can use Salesforce CLI to retrieve and deploy metadata (in metadata format) to non-source-tracked orgs with the same ease as
retrieving and deploying source (in source format) to and from scratch orgs. If you’re new to Salesforce CLI, Salesforce DX Project Structure
and Source File Format explains the difference between source format and metadata format.
Using project retrieve start, you can retrieve the metadata you need in source format to your local file system (DX project).
When your changes are ready for testing or production, you can use project deploy start to deploy your local files directly
to a non-source-tracked org.
Not sure what metadata types are supported or which metadata types support wild cards in package.xml? See Metadata Types in
the Metadata API Developer Guide.
Before You Begin
Before you begin, don't forget to:
•
Create a Salesforce DX project that includes a manifest (package.xml). Run project generate --name mywork
MyProject --manifest.
•
Authorize your non-source-tracked org. If connecting to a sandbox, edit your sfdx-project.json file to set sfdcLoginUrl
to https://test.salesforce.com before you authorize the org. Don't forget to create aliases for your non-source-tracked
orgs.
Metadata Names That Require Encoding on the Command Line
When retrieving or deploying metadata using the --metadata option, commas in metadata names require encoding to work
properly.
Don’t: sf project deploy start --metadata "Profile:Standard User" --metadata
"Layout:Page,Console"
Do: sf project deploy start --metadata "Profile:Standard User" --metadata
"Layout:Page%2CConsole"
Retrieve Source from a Non-Source-Tracked Org
Use the project retrieve start command to retrieve source from orgs that don’t have source tracking, such as a sandbox
or your production org. If you already have the source code and metadata in a VCS, you might be able to skip this step. If you're starting
anew, you retrieve the metadata associated with the feature, project, or customization you're working on.
You can retrieve metadata in source format using one of these methods:
•
Specify a package.xml that lists the components to retrieve.
•
Specify a comma-separated list of metadata component names.
•
Specify a comma-separated list of source file paths to retrieve. You can use the source path option when source exists locally, for
example, after you've done an initial retrieve.
•
Specify a comma-separated list of package names.
If the comma-separated list you’re supplying contains spaces, enclose the entire comma-separated list in one set of double quotes.
184
Develop Against Any OrgDevelopment

Command ExampleTo Retrieve:
sf project retrieve start --manifest
path/to/package.xml
All metadata components listed in a manifest
sf project retrieve --source-dir path/to/sourceSource files in a directory
sf project retrieve --source-dir
path/to/apex/classes/MyClass.cls --source-dir
path/to/source/objects
A specific Apex class and the objects whose source
is in a directory
sf project retrieve start --metadata
"Profile:Standard User"
Metadata that contains spaces
sf project retrieve --metadata ApexClassAll Apex classes
sf project retrieve --metadata ApexClass:MyApexClassA specific Apex class
sf project retrieve --metadata "Layout:Page%2C
Console"
A layout name that contains a comma (Layout: Page,
Console)
sf project retrieve --metadata --package-name
DreamHouse
All the metadata related to a specific package or
packages
You can specify only one scoping parameter when retrieving metadata: --metadata, --source-dir, or --manifest. If you
indicate --package-name, you can include one additional scoping parameter.
sf project retrieve start --package-name DreamHouse --manifest manifest/package.xml
Deploy Source to a Non-Source-Tracked Org
Use the project deploy start command to deploy source to orgs that don’t have source tracking, such as a sandbox or
production org.
You can deploy metadata in source format using these methods:
•
Specify a package.xml that lists the components to deploy
•
Specify a comma-separated list of metadata component names
•
Specify a comma-separated list of source file paths to deploy
If the comma-separated list you’re supplying contains spaces, enclose the entire comma-separated list in one set of double quotes.
Command ExampleTo Deploy:
sf project deploy start --manifest
path/to/package.xml
All components listed in a manifest
sf project deploy start --source-dir path/to/sourceSource files in a directory
sf project deploy start --source-dir
path/to/apex/classes/MyClass.cls --source-dir
path/to/source/objects
A specific Apex class and the objects whose source
is in a directory
sf project deploy start --metadata ApexClassAll Apex classes
185
Develop Against Any OrgDevelopment

Command ExampleTo Deploy:
sf project deploy start --metadata
ApexClass:MyApexClass
A specific Apex class
sf project deploy start --metadata CustomObject
--metadata ApexClass
All custom objects and Apex classes
sf project deploy start --metadata ApexClass
--metadata "Profile:Content Experience Profile"
All Apex classes and a profile that has a space in its
name
sf project deploy quick --job-id JOBID
You can run this option after you have run tests, passed code coverage
requirements, and performed a check-only deployment using the project
deploy validate command, which returns the job ID.
A recently validated set of components without
running Apex tests (often referred to as a quick
deploy)
sf project deploy start --ignore-warningsEven if the deployment contains warnings
sf project deploy start --ignore-errorsRegardless of whether the deployment contains
errors (not recommended if deploying to a
production org)
Delete Non-Tracked Source
Use the project delete source command to delete components from orgs that don’t have source tracking, such as sandboxes.
If the source exists locally in a DX project, you can delete metadata by specifying the path to the source or by listing individual metadata
components. If the comma-separated list you’re supplying contains spaces, enclose the entire comma-separated list in one set of double
quotes.
Command ExampleTo Delete:
sf project delete source --source-dir path/to/sourceSource files in a directory
sf project delete source --metadata
FlexiPage:Broker_Record_Page
A specific component, such as a FlexiPage
sf project delete source --metadata "Profile:Content
Experience Profile"
A specific component that includes a space
Do You Want to Retain the Generated Metadata?
Normally, when you run some CLI commands, a temporary directory with all the metadata is created then deleted upon successful
completion of the command. However, retaining these files can be useful for several reasons. You can debug problems that occur during
command execution. You can use the generated package.xml when running subsequent commands, or as a starting point for
creating a manifest that includes all the metadata you care about.
To retain all the metadata in a specified directory path when you run these commands, set the SF_MDAPI_TEMP_DIR environment
variable:
•
project deploy start
•
project retrieve start
186
Develop Against Any OrgDevelopment

•
project delete source
•
project convert mdapi|source
•
org create scratch (if your scratch org definition contains scratch org settings, not org preferences)
Example:
SF_MDAPI_TEMP_DIR=/users/myName/myDXProject/metadata
SEE ALSO:
VS Code Command: SFDX: Deploy|Retrieve|Delete Source From Org
Assign a Permission Set
After creating your scratch org and deploying the source, you must sometimes give your users access to your application, especially if
your app contains custom objects.
1. If needed, create the permission set in the scratch org.
a. Open the scratch org in your browser.
sf org open --target-org <scratch org username/alias>
b. From Setup, enter Perm in the Quick Find box, then select Permission Sets.
c. Click New.
d. Enter a descriptive label for the permission set, then click Save.
e. Under Apps, click Assigned Apps > Edit.
f. Under Available Apps, select your app, then click Add to move it to Enabled Apps.
g. Click Save.
2. Retrieve the permission set from the scratch org to your project.
sf project retrieve start --target-org <scratch org username/alias>
3. Assign the permission set to one or more users of the org that contains the app:
sf org assign permset --name <permset_name> --target-org <username/alias>
The target username must have permission to assign a permission set. Use the --on-behalf-of flag to assign a permission
set to non-administrator users.
sf org assign permset --name <permset_name> --target-org <admin-user> --on-behalf-of
<non-admin-user>
You can also assign permission set licenses to users using the org assign permsetlicense command. It works similarly to
the org assign permset command.
SEE ALSO:
Salesforce Help: Permission Sets
Salesforce Help: Permission Set Licenses
187
Assign a Permission SetDevelopment

Ways to Add Data to Your Org
Orgs for development need a small set of stock data for testing.
Sometimes, the stock data in a scratch org doesn’t meet your development needs. Apex tests generally create their own data. Therefore,
if Apex tests are the only tests you’re running in a scratch org, you probably don’t need to worry about data for the time being. However,
other tests, such as UI, API, or user acceptance tests, do need baseline data. Make sure that you use consistent datasets when you run
tests of each type.
The following sections describe the Salesforce CLI commands you can use to populate your orgs. The commands you use depend on
your current stage of development.
You can also use the data query CLI command to run a SOQL query against an org. While the command doesn’t change the data
in an org, it’s useful for searching or counting the data. You can also use it with other data manipulation commands. See the SOQL and
SOSL Reference Guide for general SOQL limits that also apply when you use these commands.
Considerations for Scratch Orgs
Scratch orgs come with the same set of data as the edition on which they’re based. For example, Developer Edition orgs typically include
10–15 records for key standard objects, such as Account, Contact, and Lead. These records come in handy when you’re testing something
like a new trigger, workflow rule, Lightning web component, Aura component, or Visualforce page.
data export | import tree Commands
The SObject Tree Save API drives the data export|import tree commands for exporting and importing data. The commands
use JSON files to describe objects and relationships. The data export command requires a SOQL query to select the data in an org
that it writes to the JSON files. Rather than loading all records of each type and establishing relationships, the data import command
loads parents and children already in the hierarchy.
Note: These commands are intended for developers to test with small datasets. The query for export can return a maximum of
2000 records. The files for import can have a maximum of 200 records.
data delete | upsert bulk Commands
Bulk API 2.0 drives the data delete|upsert bulk commands for exporting a basic dataset from an org and storing that data
in source control. You can then update or augment the data directly rather than in the org from where it came. The data
delete|upsert bulk commands use CSV files to import data files into scratch orgs or to delete sets of data that you no longer
want hanging around. Use dot notation to establish child-to-parent relationships.
data create | delete | get record Commands
Everyone’s process is unique, and you don’t always need the same data as your teammates. When you want to create, modify, or delete
individual records quickly, use the data create|delete|get record commands. No data files are needed.
188
Ways to Add Data to Your OrgDevelopment

Example: Export and Import Data Between Orgs
Let’s say you’ve created the perfect set of data to test your application, and it currently resides in a scratch org. You finished coding
a new feature in a second scratch org, pushed your source code, and assigned the needed permission sets. Now you want to populate
the scratch org with your perfect set of data from the other org. How? Read on!
SEE ALSO:
SObject Tree Request Body (REST API Developer Guide)
Create Multiple Records (REST API Developer Guide)
Create Nested Records (REST API Developer Guide)
Salesforce Object Query Language (SOQL)
Sample CSV File (Bulk API 2.0 and Bulk API Developer Guide)
Salesforce CLI Command Reference
Example: Export and Import Data Between Orgs
Let’s say you’ve created the perfect set of data to test your application, and it currently resides in a scratch org. You finished coding a
new feature in a second scratch org, pushed your source code, and assigned the needed permission sets. Now you want to populate
the scratch org with your perfect set of data from the other org. How? Read on!
While this example is a bit contrived, it’s useful for getting some hands-on experience with the data commands. The example refers to
the Broker and Properties custom objects of the Salesforce DreamHouse LWC application example on GitHub. Let’s say that the scratch
org from which you want to export data has the alias org-with-data. Similarly, the scratch org into which you want to import data
has the alias org-needs-data. For the org-with-data scratch org, it’s assumed that you have already:
•
Created the Broker and Properties custom objects by deploying the DreamHouse source.
•
Assigned the permission set.
•
Populated the objects with the data.
For the org-needs-data scratch org, however, it’s assumed that you’ve created the Broker and Properties objects and assigned
the permission set but not yet populated the objects with data.
See the README in the dreamhouse-lwc GitHub repo for instructions on these prerequisite tasks.
1. Export the data from the org-with-data scratch org.
Use the data query command to fine-tune the SELECT query so that it returns the exact set of data you want to export. This
command outputs the results to your terminal or command window, but it doesn’t generate any files.
Note: Because the SOQL query is long, the sample command is broken up with backslashes for easier reading. You can still
copy and paste the command into your terminal window and run it.
sf data query --target-org org-with-data --query \
"SELECT Id, Name, Title__c, Phone__c, Mobile_Phone__c, \
Email__c, Picture__c, \
(SELECT Name, Address__c, City__c, State__c, Zip__c, \
Price__c, Beds__c, Baths__c, Picture__c, \
Thumbnail__c, Description__c \
FROM Properties__r) \
FROM Broker__c"
189
Example: Export and Import Data Between OrgsDevelopment

2. When you’re satisfied with the SELECT statement, use it to export the data into a set of JSON files with the data export tree
command.
sf data export tree --target-org org-with-data --query \
"SELECT Id, Name, Title__c, Phone__c, Mobile_Phone__c, \
Email__c, Picture__c, \
(SELECT Name, Address__c, City__c, State__c, Zip__c, \
Price__c, Beds__c, Baths__c, Picture__c, \
Thumbnail__c, Description__c \
FROM Properties__r) \
FROM Broker__c" \
--prefix export-demo --output-dir sfdx-out --plan
The data export tree command writes the JSON files to the sfdx-out directory and prefixes each file name with the
string export-demo. The files include a plan definition file, which refers to the other files that contain the data, one for each
exported object (Broker and Properties).
3. Import the data into the org-needs-data scratch org by specifying the plan definition file to the data import tree
command.
sf data import tree --target-org org-needs-data \
--plan sfdx-out/export-demo-Broker__c-Property__c-plan.json
Use the --plan parameter to specify the full path name of the plan execution file generated by the data export tree
command. Plan execution file names always end in -plan.json.
Example: Looking for a more complicated example? The easy-spaces-lwc sample app has a data plan showing how to import
Accounts, related Contacts, and a 3-level deep custom object chain.
SEE ALSO:
GitHub: Dreamhouse LWC sample repo
Salesforce CLI Command Reference
Create Lightning Apps and Aura Components
You can use Salesforce CLI to create Lightning apps and Aura components in your local Salesforce DX project. The generated files live
in an aura directory in a package directory of your project.
1. Open a terminal (macOS and Linux) or command prompt Windows and change to your Salesforce DX project directory.
2. Create the aura directory in the location you want to generate the Lightning app and Aura components. For example, if you want
to generate them in the default package directory, create the force-app/main/default/aura directory if it doesn’t exist.
3. Create a Lightning app or an Aura component; specify the app or component name with the --name flag and the aura directory
with the --output-dir flag.
sf lightning generate app --name myApp --output-dir force-app/main/default/aura
sf lightning generate component --type aura --name myAuraComponent --output-dir
force-app/main/default/aura
190
Create Lightning Apps and Aura ComponentsDevelopment

Use the project deploy start command to deploy the new Lightning app and Aura component to your org.
sf project deploy start --metadata AuraDefinitionBundle:myApp --metadata
AuraDefinitionBundle:myAuraComponent
SEE ALSO:
VS Code Command: SFDX: Create Aura App|Component|Event|Interface
Create Lightning Web Components
Create Lightning Web Components
You can use Salesforce CLI to create Lightning web components in your local Salesforce DX project. The generated files live in a lwc
directory in a package directory of your project.
1. Open a terminal (macOS and Linux) or command prompt Windows and change to your Salesforce DX project directory.
2. Create the lwc directory in the location you want to generate the Lightning app and Aura components. For example, if you want
to generate them in the default package directory, create the force-app/main/default/aura directory if it doesn’t exist.
3. Create the Lightning web component; specify the component name with the --name flag and the lwc directory with the
--output-dir flag.
sf lightning generate component --type lwc --name myLightningWebComponent --output-dir
force-app/main/default/lwc
Use the project deploy start command to deploy your new Lightning web component to your org.
sf project deploy start --metadata LightningComponentBundle:myLightningWebComponent
SEE ALSO:
Create Lightning Apps and Aura Components
Lightning Web Components Dev Guide: Introducing Lightning Web Components
VS Code Command: SFDX: Create Lightning Web Component | Test
Create an Apex Class
You can use Salesforce CLI to create Apex classes in your local Salesforce DX project. The generated class files live in a classes directory
in a package directory of your project.
1. Open a terminal (macOS and Linux) or command prompt Windows and change to your Salesforce DX project directory.
2. Create the classes directory in the location you want to generate the Apex class. For example, if you want to generate it in the
default package directory, create the force-app/main/default/classes directory if it doesn’t exist.
3. Create the Apex class; specify the class name with the --name flag and the classes directory with the --output-dir
flag.
sf apex generate class --name myClass --output-dir force-app/main/default/classes
The command generates two files:
•
myClass.cls-meta.xml—metadata file
191
Create Lightning Web ComponentsDevelopment

•
myClass.cls—Apex source file
By default, the command creates an empty Apex class. However, you can select different templates, depending on what you’re creating,
by specifying the --template flag.
More Information in Apex Developer
Guide
DescriptionTemplate
ClassesStandard Apex class.DefaultApexClass (default)
Exception Class and Built-in ExceptionsUse Apex built-in exceptions or create
custom exceptions. All exceptions have
common methods.
ApexException
isTest AnnotationUse the @isTest annotation to define
classes and methods that only contain code
used for testing your application.
ApexUnitTest
Apex Email ServiceUse email services to process the contents,
headers, and attachments of inbound email.
InboundEmailService
This example selects the ApexException template.
sf apex generate class --name myException --template ApexException --output-dir
force-app/main/default/classes
Use the project deploy start command to deploy the new Apex class to your org.
sf project deploy start --metadata ApexClass:myClass
SEE ALSO:
Apex Developer Guide
VS Code Command: SFDX: Create Apex Class
Create an Apex Trigger
Use Apex triggers to perform custom actions before or after a change to a Salesforce record, such as an insertion, update, or deletion.
You can use Salesforce CLI to create Apex triggers in your local Salesforce DX project. The generated files live in a triggers directory
in a package directory of your project.
1. Open a terminal (macOS and Linux) or command prompt Windows and change to your Salesforce DX project directory.
2. Create the triggers directory in the location you want to generate the Apex trigger. For example, if you want to generate it in
the default package directory, create the force-app/main/default/triggers directory if it doesn’t exist.
3. Generate the Apex trigger; specify the trigger name with the --name flag and the triggers directory with the --output-dir
flag.
sf apex generate trigger --name myTrigger --output-dir force-app/main/default/triggers
192
Create an Apex TriggerDevelopment

By default, the generated trigger is for before insert events on the generic sObject. Use the --event and --sobject
flags to change these default values. This example generates a trigger that fires before and after an insert into the Account object.
sf apex generate trigger --name myTrigger --event 'before insert,after insert' --sobject
Account --output-dir force-app/main/default/triggers
The command generates two files.
•
myTrigger.trigger-meta.xml—metadata file
•
myTrigger.trigger—Apex trigger source file
Use the project deploy start command to deploy the new Apex trigger to your org.
sf project deploy start --metadata ApexTrigger:myTrigger --target-org myscratch
SEE ALSO:
Apex Developer Guide: Triggers
Trailhead: Apex Triggers
VS Code Command: SFDX: Create Apex Trigger
Create a Custom Object
You can use Salesforce CLI to generate the metadata files for new custom objects in your local Salesforce DX project.
1. Open a terminal (macOS and Linux) or command prompt Windows and change to your Salesforce DX project directory.
2. Run the interactive schema generate sobject command. You must specify a label for your new custom object with the
--label flag. The command uses this label to provide intelligent suggestions for other object properties, such as its API name
and plural label.
sf schema generate sobject --label "New Object"
Answer all the questions about your new object, such as the location of the generated files in your Salesforce DX project and whether
to enable various object properties.
After you create your custom object:
•
Create a custom field on your new object with the interactive schema generate field command, which generates the
necessary metadata files in your project. You can also use the command to create a custom field on a standard object, such as
Account.
•
Create a custom tab for your new object with the schema generate tab command.
Then deploy your new custom object to your org.
sf project deploy start --metadata CustomObject:NewObject__c --target-org myscratch
193
Create a Custom ObjectDevelopment

The first time you deploy your new custom object to a source-tracking org, the org creates additional properties and sets new defaults
on it. For this reason, we recommend that you immediately retrieve the custom object so your local source files are updated with this
new information.
SEE ALSO:
Salesforce Help: Fields Required for Creating Custom Objects
Salesforce Help: Custom Field Types
Salesforce Help: Custom Field Attributes
Execute Anonymous Apex
You can execute an anonymous block of Apex code in an org with the apex run Salesforce CLI command.
1. Open a terminal (macOS and Linux) or command prompt Windows and change to your Salesforce DX project directory.
2. Run the apex run command with no flags to open an interactive shell. At the prompt, enter all your Apex code; press CTRL-D
when you're finished. Your code is then executed in a single execute anonymous request in the specified org, or the default org if
you don’t specify one.
sf apex run --target-org myscratch
This output shows an example of executing the Apex code system.debug ('Hello world!');
Start typing Apex code. Press the Enter key after each line, then press CTRL+D when
finished.
system.debug ('Hello world!');
Compiled successfully.
Executed successfully.
58.0 APEX_CODE,DEBUG;APEX_PROFILING,INFO
Execute Anonymous: system.debug ('Hello world!');
14:23:06.174
(174742273)|USER_INFO|[EXTERNAL]|0058H000005QWcE|[email protected]|(GMT-07:00)
Pacific Daylight Time (America/Los_Angeles)|GMT-07:00
14:23:06.174 (174785450)|EXECUTION_STARTED
14:23:06.174 (174792639)|CODE_UNIT_STARTED|[EXTERNAL]|execute_anonymous_apex
14:23:06.174 (175417814)|USER_DEBUG|[1]|DEBUG|Hello world!
14:23:06.175 (175529797)|CUMULATIVE_LIMIT_USAGE
14:23:06.175 (175529797)|LIMIT_USAGE_FOR_NS|(default)|
Number of SOQL queries: 0 out of 100
Number of query rows: 0 out of 50000
Number of SOSL queries: 0 out of 20
Number of DML statements: 0 out of 150
Number of Publish Immediate DML: 0 out of 150
Number of DML rows: 0 out of 10000
Maximum CPU time: 0 out of 10000
Maximum heap size: 0 out of 6000000
Number of callouts: 0 out of 100
Number of Email Invocations: 0 out of 10
Number of future calls: 0 out of 50
Number of queueable jobs added to the queue: 0 out of 50
Number of Mobile Apex push calls: 0 out of 10
194
Execute Anonymous ApexDevelopment

14:23:06.175 (175529797)|CUMULATIVE_LIMIT_USAGE_END
14:23:06.174 (175598235)|CODE_UNIT_FINISHED|execute_anonymous_apex
14:23:06.174 (175617689)|EXECUTION_FINISHED
Use the --file flag to execute Apex code in a file rather than interactively.
sf apex run --file ~/test.apex
SEE ALSO:
Apex Developer Guide: Anonymous Blocks
VS Code Command: SFDX: Execute Anonymous Apex with Currently Selected Text | Editor Contents
Run Apex Tests
When you’re ready to test changes to your source code, you can run Apex tests in an org using Salesforce CLI on the command line. You
can also run Apex tests from Salesforce Extensions for VS Code or from within third-party continuous integration tools, such as Jenkins
or CircleCI.
Minimum User Permissions and Settings Required
The user running Apex tests must have these user permissions in the org:
•
View Setup and Configuration
•
API Enabled
Also ensure that the Enable Streaming API setting is enabled in the org’s user interface. The setting is enabled by default.
See User Permissions and Configure User Interface Settings for details.
Run All Apex Tests and View Results
This command runs all Apex tests in the specified org asynchronously, which is the default behavior.
sf apex run test --target-org myscratch
The command outputs the apex get test command with a job ID that you can then run to view the full results. For example:
sf apex get test --test-run-id 7078HzRMVV --target-org myscratch
For more examples, see the help for the commands by running sf apex run test --help and sf apex get test
--help CLI commands, or read the Salesforce CLI Reference, which contains the same information as the help output.
Determine Code Coverage in Orgs With Large Volumes of Apex Code
Before deploying Apex classes and triggers to your production org, or including them in an AppExchange managed package, you must
write unit tests that cover 75% of the total Apex code in your org. You can retrieve information about your current code coverage
percentage using one of these tools:
•
Salesforce CLI: Specify the --code-coverage flag of the apex run test command. Or
•
VS Code: Check the retrieve-test-code-coverage setting.
195
Run Apex TestsDevelopment

Both methods produce a report with detailed information about the code coverage of all Apex classes in your org.
To improve the performance for large test runs, check the Store Only Aggregate Code Coverage setting in your org from Setup >
Apex Test Execution > Options.... This setting improves the performance of gathering code coverage information for large orgs with
many Apex classes by turning off per-class code coverage. When the setting is checked, the Apex Code Coverage by Class table in the
Apex test results contains all Apex classes and triggers listed in ApexCodeCoverageAggregate, including classes that aren't
covered by the tests in the current Apex test run. You can drill down and check which classes aren’t covered, and then adjust your unit
tests to reach the required code coverage.
To minimize scrolling while viewing your code coverage information when you run only a handful of Apex tests, we recommend
unchecking the Store Only Aggregate Code Coverage setting. The Apex Code Coverage by Class table then shows only the Apex
classes and triggers covered by the current Apex test run. The calculation of per-class code coverage filters the entries in this table to
include only classes that were directly touched by the test methods in the run.
Here’s an example of how you can use the Store Only Aggregate Code Coverage setting to investigate and resolve code coverage
issues. A nightly build with the setting checked shows that the Class032 has only 57% code coverage.
Uncheck the setting and run the test on Class032 to get code coverage information for just that class. Use this information to write
more unit tests for the class with low coverage. As you keep checking the new code coverage percentage of Class032, you no longer
have to scroll through the long results of all your Apex tests.
196
Run Apex TestsDevelopment

Debug Apex
If you use Salesforce Extensions for Visual Studio Code (VS Code) for your development tasks, you have a choice of Apex Debugger
extensions. Whichever debugger you chose, you set breakpoints in your Apex classes and step through their execution to inspect
your code in real time to find bugs. You can run Apex tests in VS Code or on the command line.
Generate and View Apex Debug Logs
Apex debug logs can record database operations, system processes, and errors that occur when executing a transaction or running
unit tests in any authenticated org. Enable the Debug Log in Salesforce Extensions for VS Code, then view the logs with VS Code or
Salesforce CLI.
SEE ALSO:
Apex Developer Guide : Debugging, Testing, and Deploying Apex
Salesforce CLI Command Reference : Apex Commands
Test Anything Protocol (TAP)
VS Code Command: SFDX: Run Apex Tests | Test Suite
Debug Apex
If you use Salesforce Extensions for Visual Studio Code (VS Code) for your development tasks, you have a choice of Apex Debugger
extensions. Whichever debugger you chose, you set breakpoints in your Apex classes and step through their execution to inspect your
code in real time to find bugs. You can run Apex tests in VS Code or on the command line.
197
Debug ApexDevelopment

Apex Replay Debugger
Apex Replay Debugger is available for use without any additional licenses. To configure and use it, see Apex Replay Debugger.
Apex Interactive Debugger
You must have at least one available Apex Debugger session in your Dev Hub org. To purchase more sessions for an org, contact your
System Admin to open a case.
•
Performance Edition and Unlimited Edition orgs include one Apex Debugger session.
•
Apex Debuggers sessions aren’t available in Trial and Developer Edition orgs.
•
You can purchase Apex Debugger sessions for Enterprise Edition orgs.
Enable the Apex Debugger in your scratch orgs by adding the DebugApex feature to your scratch org definition file:
"features": "DebugApex"
To configure and use it, see Apex Interactive Debugger.
ISV Customer Debugger (Salesforce Extensions for VS Code Only)
ISV Customer Debugger is part of the Apex Interactive Debugger (salesforcedx-vscode-apex-debugger) extension, so
you don’t have to install anything other than the Salesforce Extension Pack and its prerequisites. You can debug only sandbox orgs.
See ISV Customer Debugger in Salesforce Extensions for VS Code for details.
SEE ALSO:
Visual Studio Marketplace: Apex Replay Debugger extension
Visual Studio Marketplace: Apex Interactive Debugger extension
Generate and View Apex Debug Logs
Apex debug logs can record database operations, system processes, and errors that occur when executing a transaction or running unit
tests in any authenticated org. Enable the Debug Log in Salesforce Extensions for VS Code, then view the logs with VS Code or Salesforce
CLI.
1. In Salesforce Extensions for VS Code, prepare the org to generate logs and configure the debugger.
a. Log in to the org.
b. For Replay Debugger, run SFDX: Turn on Apex Debug Log for Replay Debugger.
c. Create a launch configuration file for Replay Debugger or Interactive Debugger.
2. After you run the tests, get a list of the debug logs.
sf apex list log --target-org myscratch
APPLICATION DURATION (MS) ID LOCATION SIZE (B) LOG USER OPERATION REQUEST
START TIME STATUS
─────────── ───────────── ─────── ───────── ──────── ───────── ─────────────── ───────
─────────── ───────
Unknown 1143 07L9Axx SystemLog 23900 User User ApexTestHandler Api
2017-09-05x Success
198
Generate and View Apex Debug LogsDevelopment

3. View a debug log by passing its ID to the apex get log command.
sf apex get log --log-id 07L9A000000aBYGUA2
38.0
APEX_CODE,FINEST;APEX_PROFILING,INFO;CALLOUT,INFO;DB,INFO;SYSTEM,DEBUG;VALIDATION,INFO;VISUALFORCE,INFO;WAVE,INFO;WORKFLOW,INFO
15:58:57.3
(3717091)|USER_INFO|[EXTERNAL]|0059A000000TwPM|[email protected]|Pacific
Standard Time|GMT-07:00
15:58:57.3 (3888677)|EXECUTION_STARTED
15:58:57.3
(3924515)|CODE_UNIT_STARTED|[EXTERNAL]|01p9A000000FmMN|RejectDuplicateFavoriteTest.acceptNonDuplicate()
15:58:57.3 (5372873)|HEAP_ALLOCATE|[72]|Bytes:3
...
SEE ALSO:
Apex Developer Guide: Debug Log
199
Generate and View Apex Debug LogsDevelopment

CHAPTER 10 Build and Release Your App
When you finish writing your code, the next step is to deploy it. We offer different deployment options
based on your role and needs as a customer, system integrator, or independent software vendor (ISV)
partner.
In this chapter ...
• Build and Release
Your App with
Metadata API
To learn about the benefits of the different development models, review these Trailhead modules:
•
Org Development Model
•
Package Development Model
•
Quick Start: Unlocked Packages
•
Unlocked Packages for Customers
You have several tooling options, based on how you decide to build and release yours apps.
Customers and Non-ISV Partners
•
Code Builder – A web-based integrated development environment that has all the power and
flexibility of Visual Studio Code, Salesforce Extensions for VS Code, and Salesforce CLI in your web
browser.
•
Salesforce Extensions for VS Code – A set of extensions that come with rich tools for developing on
the Salesforce platform.
•
Salesforce CLI – A command-line interface that simplifies development and build automation when
working with your Salesforce org
•
Metadata API – An API for deploying, retrieving, creating, updatinge, or deleting customizations.
•
DevOps Center – Change and release management for declarative and pro-code developers.
•
Unlocked Packages – For customers who want to organize metadata into a package and deploy the
metadata (via packages) to different orgs.
ISV Partners
•
Second-Generation Managed Packages
If you’re an ISV that develops apps and lists them on AppExchange, Salesforce recommends managed
packages.
Second-generation managed packaging (managed 2GP) ushers in a new way for AppExchange
partners to develop, distribute, and manage their apps and metadata. You can use managed 2GP
to organize your source, build small modular packages, integrate with your version control system,
and better utilize your custom Apex code. You can execute all packaging operations via Salesforce
CLI, or automate them using scripts.
200
For more information on managed 2GP packages, see the Second-Generation Managed Packaging
Developer Guide.
•
First-Generation Managed Packages
Similar to managed 2GP, managed 1GP packages are used by ISVs to distribute their business apps
to customers via AppExchange.
If you’re familiar with first-generation managed packages and want to learn more about how 1GP
differs from 2GP, see Comparison of First- and Second-Generation Managed Packages.
For more information on managed 1GP packages, see Create a First-Generation Managed Package
using Salesforce DX.
201
Build and Release Your App

Build and Release Your App with Metadata API
Develop and test your app in your sandboxes. Use Salesforce CLI or Salesforce Extensions for VS Code to retrieve and deploy your source.
This development work flow is called the org development model.
Develop and Test in a Sandbox Using the Org Development Model
Similar to change sets, the release artifact is a set of changed metadata to update in the production org. You can develop, test, and
deploy your changes using the project deploy commands. If you want to know more about this development model, see the
Org Development Model module in Trailhead.
Development and Release Environments
1. Develop and test: Each team member has their own Developer sandbox to create their assigned customization. Developer sandboxes
contain no production data.
2. Build release: Team members each migrate their customizations from their respective developer sandboxes to a shared Developer
Pro sandbox for integration. Developer Pro sandboxes don’t contain production data, but you can seed them with testing data.
3. Test release: For user-acceptance testing, the team uses a Partial sandbox to create a complete replica of production.
4. Release: After the release is in production, the team can use the Full sandbox to train users without the risk of altering production
data. A Full sandbox includes a copy of production data.
202
Build and Release Your App with Metadata APIBuild and Release Your App

What Tools Do I Need?
DescriptionTool
The Salesforce DX project contains the metadata and source files
that comprise your changes. A DX project has a specific project
structure and source format.
In addition to source files, the project contains a configuration file,
sfdx-project.json. This file contains project information
Salesforce DX project
and enables you to leverage Salesforce DX tools for many of your
development tasks.
After testing the changes, you create the deployment artifact, a
.zip file that contains changed files to deploy. Deploy the release
Deployment artifact
artifact to the full (staging) sandbox first, and then finally to
production. You can think of the deployment artifact as the
inbound change set. The changes don’t take effect until they are
deployed.
All changes are merged and stored in a source control system,
which contains the Salesforce DX project.
Source control system
You can use Salesforce CLI for every phase of the org development
life cycle. It improves productivity by providing a single interface
for all your development, testing, and automation use cases.
Salesforce CLI
Salesforce Extensions for VS Code is built on top of Salesforce CLI
and Visual Studio Code. Together, they are an integrated
Salesforce Extensions for VS Code
development environment for custom development on Lightning
Platform. You can run Salesforce CLI commands directly from the
command palette or terminal.
It’s still important to capture your changes externally using formal
change-tracking tools, such as a change list, a deployment run list,
and other project management tools.
Change management mechanisms
Considerations for Deploying Apex Code
To deploy Apex to production, unit tests of your Apex code must meet coverage requirements. Code coverage indicates how many
executable lines of code in your classes and triggers are covered by your test methods. Write test methods to test your triggers and
classes, and then run those tests to generate code coverage information.
If you don’t specify a test level when initiating a deployment, the default test execution behavior depends on the contents of your
deployment package.
•
If your deployment package contains Apex classes or triggers, when you deploy to production, all tests are executed, except tests
that originate from a managed package.
•
If your package doesn’t contain Apex code, no tests are run by default.
You can run tests for a deployment of non-Apex components. You can override the default test execution behavior by setting the test
level in your deployment options. Test levels are enforced regardless of the types of components present in your deployment package.
203
Build and Release Your App with Metadata APIBuild and Release Your App

We recommend that you run all local tests in your development environment, such as a sandbox, before deploying to production.
Running tests in your development environment reduces the number of tests required in a production deployment.
Develop and Test Changes Locally
Develop changes in source format, deploying to and retrieving from your Developer sandbox.
Build and Test the Release Artifact
After your team has finished its development tasks, transition to the build release phase to integrate your changes in a Developer
Pro sandbox. Then build the release artifact.
Test the Release Artifact in a Staging Environment
Stage the changes and run regression tests in a Full sandbox.
Release Your App to Production
Now that all your tests have passed in the Full sandbox, you’re ready to deploy to production.
Cancel a Metadata Deployment
You can cancel a metadata deployment from Salesforce CLI and specify a wait time for the command to complete.
Develop and Test Changes Locally
Develop changes in source format, deploying to and retrieving from your Developer sandbox.
These steps provide the high-level work flow.
1. Create a DX project.
A DX project has a specific structure and configuration files that Salesforce DX tooling requires. See Create a Salesforce DX Project.
2. Create a source control repository or use an existing one.
If you’re using an existing repo, be sure it has the required DX configuration files. See Salesforce DX Project Structure and Source
Format.
3. Authorize the Developer sandbox.
See Authorize an Org Using a Browser.
4. Perform development tasks in your developer sandbox.
5. Retrieve the changes from the developer sandbox.
If your sandbox is source tracked, changes are automatically identified. To retrieve just the changed metadata:
sf project retrieve start
If your sandbox isn’t source tracked, or want to retrieve metadata that hasn’t changed, or you want to retrieve many changes, you
can use a manifest (package.xml).
sf project retrieve start --manifest path/to/package.xml
Run sf project retrieve start --help for all command options with examples.
6. Commit the changes to the source control repository.
Next: Deploy all changes the team has made to the first testing environment to test those changes. See Salesforce CLI Reference: deploy
Commands.
204
Develop and Test Changes LocallyBuild and Release Your App

Build and Test the Release Artifact
After your team has finished its development tasks, transition to the build release phase to integrate your changes in a Developer Pro
sandbox. Then build the release artifact.
Here are the high-level steps in the work flow to create the release artifact.
1. Pull the changes from the repo so your local project contains all the changes your team has made.
2. Authorize the Developer Pro sandbox.
3. Run the deploy command that mimics what you’ll deploy to production, for example:
sf project source deploy --manifest manifest/package.xml --target-org dev-pro-sandbox
\
--test-level RunSpecifiedTests --tests TestMyCode
4. Open the sandbox.
5. Perform testing.
6. If the testing passes, continue to the test release phase where you deploy the release artifact to the partial sandbox. Then perform
user-acceptance testing.
After the testing passes, move to the release phase and perform regression tests in the Full sandbox.
Test the Release Artifact in a Staging Environment
Stage the changes and run regression tests in a Full sandbox.
After you have made all your changes based on the integration testing, the next step is to stage the changes in a Full sandbox. The
process of deploying changes to the Full sandbox is similar to the process you used to deploy changes to your Developer Pro sandbox.
This phase includes regression testing and mimics how you release the changes to production.
These steps provide the high-level work flow.
1. Authorize the Full sandbox.
2. (Optional) If you made any changes based on your testing in the Developer Pro sandbox, create a release artifact (.zip). If not, use
the existing release artifact.
3. To validate the deployment without saving the components in the target org, run all local (regression) tests. A validation enables
you to verify the results of tests that would be executed during a deployment, but doesn’t commit any changes.
sf project deploy validate --manifest manifest/package.xml --target-org full-sandbox
--test-level RunLocalTests
4. Test the actual production deployment steps in the staging sandbox. Set up the same quick deploy that you plan to execute against
the production org.
sf project deploy validate --manifest manifest/package.xml --target-org full-sandbox
--test-level RunSpecifiedTests
This command returns a job ID that you reference in the quick deploy.
5. Next, test the quick deploy using the job ID returned in the previous step.
sf project deploy quick --target-org full-sandbox --job-id jobID
After you validate a deployment, you have 10 days to perform the quick deployment to production.
205
Build and Test the Release ArtifactBuild and Release Your App

Release Your App to Production
Now that all your tests have passed in the Full sandbox, you’re ready to deploy to production.
1. In your deployment run list, complete any pre-deployment tasks.
2. Authorize your production org.
3. Set up the quick deploy by validating the deployment.
sf project deploy validate --source-dir force-app --target-org prod-org --test-level
RunLocalTests
This command returns a job ID that you reference in the quick deploy.
4. After the tests are run, verify that all the Apex tests have passed. Be sure that the tests cover at least 75% of the code being deployed.
5. Run the quick deploy:
sf project deploy quick --target-org prod-org --job-id jobID
6. Open the production org, then perform any post-deployment tasks listed in the deployment run list.
Cancel a Metadata Deployment
You can cancel a metadata deployment from Salesforce CLI and specify a wait time for the command to complete.
To cancel your most recent deployment, run project deploy cancel --use-most-recent. You can cancel earlier
deployments by using the --job-id <JOBID> flag to specify the deployment that you want to cancel.
sf project deploy cancel --job-id <jobid>
The default wait time for the cancel command to complete and display its results in the terminal window is 33 minutes. If the command
isn’t completed by the end of the wait period, the CLI returns control of the terminal window to you. You can adjust the wait time as
needed by specifying the number of minutes in the --wait flag, as shown in the following example:
sf project deploy cancel --wait 20 --use-most-recent
Curious about the status of a canceled deployment? Run a deployment report.
sf project deploy report --use-most-recent
206
Release Your App to ProductionBuild and Release Your App

CHAPTER 11 Unlocked Packages
Salesforce offers different types of packages, and unlocked packages are especially suited for internal
business apps. Unless you plan to distribute an app on AppExchange, an unlocked package is the right
package type for most use cases. You can use unlocked packages to organize your existing metadata,
package an app, extend an app that you’ve purchased from AppExchange, or package new metadata.
In this chapter ...
• What’s an Unlocked
Package?
• Package-Based
Development Model
Unlocked packages follow a source-driven development model. The source of truth of the metadata
contained in the package is your version control system, not what’s in an org. This model brings with it
all the benefits of modern source-driven development models.
• Before You Create
Unlocked Packages
Note: If you’re an AppExchange partner that plans to distribute your app to customers via
AppExchange, use second-generation managed packaging. See Second-Generation Managed
Packages for more information.
• Know Your Orgs
• Create
Org-Dependent
Unlocked Packages
• Workflow for
Unlocked Packages
• Configure Unlocked
Packages
• How We Handle
Profile Settings in
Unlocked Packages
• Develop Unlocked
Packages
• Push a Package
Upgrade for
Unlocked Packages
• Install an Unlocked
Package
• Migrate Deprecated
Metadata from
Unlocked Packages
• Uninstall an
Unlocked Package
• Transfer an Unlocked
Package to a
Different Dev Hub
207

What’s an Unlocked Package?
If you’re new to packaging, think of a package as a container that you fill with metadata. It contains a set of related features, customizations,
and schema. Unlocked packages help you add, edit, and remove metadata in your org in a trackable way. You can apply your metadata
to multiple orgs, and upgrade your Salesforce apps easier and faster. Unlocked packages are especially suited for internal business apps.
Unlocked packages differ from managed packages, which have manageability rules that determine the behavior of each metadata
component in the package. With an unlocked package, you have a lot of flexibility. Your admins can make changes directly in production
in response to emergency change requests because metadata in unlocked packages can be modified in a production org.
At the same time, this flexibility comes with responsibility. Ensure that you have the proper governance in place to prevent cases where
package updates overwrite changes that admins make directly in production. You can avoid this issue by ensuring that your admins
communicate with your development team whenever they edit any packaged metadata directly in the production org.
Each unlocked package has a distinct lifecycle. When you add metadata to an existing unlocked package, you create a new package
version. While the package is continually evolving, each package version is an immutable artifact that never changes.
A package version contains the specific metadata and features associated with the package version at the time it was created. As you
iterate on your package, and add, remove, or change the packaged metadata, you create many package versions.
You can install a package version in a scratch, sandbox, trial, Developer Edition, or production org. Installing a package version is similar
to deploying metadata. Each package version has a version number, and subscribers can install a new package version into their org
through a package upgrade.
Note: Because package versions are immutable, they can also be used as artifacts for Continuous Integration (CI) and Continuous
Delivery (CD) processes.
You can repeat the package development cycle any number of times. You can change metadata, create a package version, test the
package version, and finally install the package to a production org. This distinct app development lifecycle lets you control exactly what,
when and how your metadata is rolled out. In the installed org, you can inspect which metadata came from which package and the set
of all metadata associated with a specific package.
Package-Based Development Model
To demonstrate the power of unlocked packages, here’s how packaging works in the traditional development model. For most production
orgs, metadata traditionally is contained in two buckets: a set of managed packages installed from AppExchange, and unpackaged
metadata.
Customers often invest in Salesforce customizations to support business processes and extend the power of the Salesforce platform. In
the development model, your Salesforce org’s monolith of unpackaged metadata contains all the metadata that belongs to a custom
app or extension. Because that metadata isn’t isolated or organized, it can be difficult to understand, upgrade, and maintain.
In the package development model, you can organize your unpackaged metadata in your production org into well-defined packages.
And you can use Salesforce DX projects to organize your source into package directories with everything managed in a version control
system of your choice. Your end goal is to create packages using those directories that are versionable, easy to maintain, update, install,
and upgrade.
Unlocked packages allow you to declare multi-level dependencies on one or many managed and unlocked packages, which keeps your
packages small and modular. You can use the command line to execute unlocked packaging operations, or you can include
packaging-specific Salesforce CLI commands in a script and automate your package development.
208
What’s an Unlocked Package?Unlocked Packages

Before You Create Unlocked Packages
When you use unlocked packaging, to be sure that you set it up correctly, verify the following.
Did you?
•
Enable Dev Hub in Your Org
•
Enable Second-Generation Managed Packaging
•
Install Salesforce CLI
Note: Unlocked packaging is available with these licenses: Salesforce or Salesforce Limited Access - Free (partners only).
Developers who work with unlocked packages need the correct permission set in the Dev Hub org. Developers need either the System
Administrator profile or the Create and Update Second-Generation Packages permission. For more information, see Add Salesforce DX
Users.
The maximum number of unlocked package versions that you can create from a Dev Hub per day is the same as your daily scratch org
allocation. To request a limit increase, contact Salesforce Customer Support.
Scratch orgs and packages count separately, so creating an unlocked package doesn’t count against your daily scratch org limit. To view
your scratch org limits, use the CLI:
sf limits api display
For more information on scratch org limits, see Scratch Orgs.
Know Your Orgs
Some of the orgs that you use with unlocked packaging have a unique purpose.
Choose Your Dev Hub Org
Use the Dev Hub org for these purposes.
When you create an unlocked package using Salesforce CLI, you associate the package with a specific Dev Hub org. When you’re ready
to define and create a package for production use, be sure to create the package using the Dev Hub in one of your production orgs.
•
As owner of all unlocked packages
•
To link your namespaces if you want to create namespaced unlocked packages
•
To authorize and run your sf package commands
Namespace Org
If you are using a namespace, you’ll need a namespace org to acquire a package namespace. If you want to use the namespace strictly
for testing, choose a disposable namespace.
After you create a namespace org and specify the namespace in it, open the Dev Hub org and link the namespace org to the Dev Hub
org.
Other Orgs
When you work with packages, you also use these orgs:
209
Before You Create Unlocked PackagesUnlocked Packages

•
You can create scratch orgs on the fly to use while testing your packages.
•
The target or installation org is where you install the package.
Create Org-Dependent Unlocked Packages
USER PERMISSIONS
To create packages:
• Create and Update
Second-Generation
Packages
Org-dependent unlocked packages are a variation of unlocked packages that allow you to create
packages that depend on unpackaged metadata in the org where you plan to install the package
(installation org).
Untangling your production org metadata can be a daunting project. But now you have a solution
that enables you to package metadata without completely accounting for all metadata dependencies:
org-dependent unlocked packages. When you use org-dependent unlocked packages, metadata
validation occurs during package installation, instead of during package version creation.
Longstanding and large production orgs often accumulate large amounts of metadata that are difficult to modularize when adopting
a package-based Application Lifecycle Management (ALM) approach. Instead, you can package metadata that depends on unpackaged
metadata in the installation org.
Note: Org-dependent unlocked packages are a variation of unlocked packages, and not a separate package type. They follow
the same package development steps, and use the same supported metadata types as unlocked packages.
To create an org-dependent unlocked package, specify the orgdependent CLI parameter on the sf package create CLI
command.
sf package create -t Unlocked -r force-app -n MyPackage --org-dependent
Org Dependent Unlocked PackagesUnlocked PackagesScenario
No. These packages are designed for specific
production and sandbox orgs. You can install
YesBuild once, install anywhere
them only in orgs that contain the metadata that
the package depends on.
Occurs during package installationOccurs during package version creationDependency validation
NoYesCan depend on other packages
NoYesRequires dependencies to be
resolved to create the package
See the unlocked packaging channel of the
Metadata Coverage Report.
See the unlocked packaging channel of the
Metadata Coverage Report.
Supported metadata types
Use a sandbox that contains the dependent
metadata. Consider enabling Source Tracking in
Use scratch orgs to develop and test your
unlocked packages.
Recommended development
and testing environment
Sandboxes to develop your org-dependent
unlocked package. Then, test the package in a
sandbox org before installing it in your production
org.
We don’t calculate code coverage, but we
recommend that you ensure the Apex code in
your package is well tested.
Before you can promote and release an unlocked
package, the Apex code must meet a minimum
75% code coverage requirement.
Code coverage requirement
210
Create Org-Dependent Unlocked PackagesUnlocked Packages

To review which of your packages are org-dependent unlocked packages, use sf package list --verbose.
Workflow for Unlocked Packages
You can create and install an unlocked package directly from the Salesforce command line.
Review and complete the steps in Before You Create Unlocked Packages before starting this workflow.
The basic workflow includes these steps. See specific topics for details about each step.
1. Create a DX project.
sf project generate --output-dir expense-manager-workspace --name expenser-app
2. Authorize the Dev Hub org, and create a scratch org.
sf org login web --set-default-dev-hub --alias MyDevHub
When you perform this step, include the --set-default-dev-hub option. You can then omit the Dev Hub username when
running subsequent Salesforce CLI commands.
Tip: If you define an alias for each org you work with, it’s easy to switch between different orgs from the command line. You
can authorize different orgs as you iterate through the package development cycle.
3. Create a scratch org and develop the package. You can use VS Code and the Setup UI in the scratch org to build and retrieve the
pieces you want to include in your package. Navigate to the expenser-app directory, and then run this command.
sf org create scratch --definition-file config/project-scratch-def.json --alias MyTestOrg1
--duration-days 30
4. Verify that all package components are in the project directory where you want to create a package.
5. From the Salesforce DX project directory, create the package.
sf package create --name "Expense Manager" --path force-app
--package-type Unlocked
6. Review your sfdx-project.json file. The CLI automatically updates the project file to include the package directory and
creates an alias based on the package name.
{
"packageDirectories": [
{
"path": "force-app",
"default": true,
"package": "Expense Manager",
"versionName": "ver 0.1",
"versionNumber": "0.1.0.NEXT"
}
],
"namespace": "",
"sfdcLoginUrl": "https://login.salesforce.com",
"sourceApiVersion": "59.0",
"packageAliases": {
"Expense Manager": "0Hoxxx"
211
Workflow for Unlocked PackagesUnlocked Packages

}
}
Notice the placeholder values for versionName and versionNumber.
Specify the features and org settings required for the metadata in your package using an external .json file, such as the scratch org
definition file. You can specify using the --definition-file flag with the sf package version create command,
or list the definition file in your sfdx-project.json file. See: Project Configuration File for Unlocked Packages
7. Create a package version. This example assumes the package metadata is in the force-app directory.
sf package version create --package "Expense Manager" --installation-key test1234 --wait
10
8. Install and test the package version in a scratch org. Use a different scratch org from the one you used in step three.
sf package install --package "Expense [email protected]" --target-org MyTestOrg1
--installation-key test1234 --wait 10 --publish-wait 10
9. After the package is installed, open the scratch org to view the package.
sf org open --target-org MyTestOrg1
Package versions are beta until you promote them to a managed-released state. See: Release an Unlocked Package.
Configure Unlocked Packages
You include an entry in the sfdx-project.json file for each package to specify its alias, version details, dependencies, features,
and org settings. From the command line, you can also set or change options, such as specifying an installation key, update the package
name, or add a description.
Project Configuration File for Unlocked Packages
The project configuration file is a blueprint for your project. The settings in the file create an outline of your package and determine
the package attributes and package contents.
Unlocked Packaging Keywords
A keyword is a variable that you can use to specify a package version number.
Package Installation Key
To ensure the security of the metadata in your package, you must specify an installation key when creating a package version.
Package creators provide the key to authorized subscribers so they can install the package. Package installers provide the key during
installation, whether installing the package from the CLI or from a browser. An installation key is the first step during installation.
The key ensures that no package information, such as the name or components, is disclosed until the correct installation key is
supplied.
Extract Dependency Information from Unlocked Packages
For an installed unlocked package, you can now run a simple SOQL query to extract its dependency information. You can also create
a script to automate the installation of unlocked packages with dependencies.
Understanding Namespaces
A namespace is a 1-15 character alphanumeric identifier that distinguishes your package and its contents from other packages in
your org.
212
Configure Unlocked PackagesUnlocked Packages

Share Release Notes and Post-Install Instructions
Share details about what’s new and changed in a released unlocked package with your users.
Specify Unpackaged Metadata or Apex Access for Apex Tests (Unlocked Packages)
Best Practices for Unlocked Packages
We suggest that you follow these best practices when working with unlocked packages.
Package IDs and Aliases for Unlocked Packages
During the package lifecycle, packages and package versions are identified by an ID or package alias. When you create a package or
package version, Salesforce CLI creates a package alias based on the package name, and stores that name in the
sfdx-project.json file. When you run CLI commands or write scripts to automate packaging workflows, it’s often easier to
reference the package alias, instead of the package ID or package version ID.
Frequently Used Unlocked Packaging Operations
Project Configuration File for Unlocked Packages
The project configuration file is a blueprint for your project. The settings in the file create an outline of your package and determine the
package attributes and package contents.
Here are the parameters you can specify in the project configuration file.
Default if Not SpecifiedRequired?Name
None. Assign permission sets and permission set licenses to the
user in context when your Apex tests run at package version
creation.
"apexTestAccess": {
"permissionSets": [
NoapexTestAccess
"Permission_Set_1",
"Permission_Set_2"
],
"permissionSetLicenses": [
"SalesConsoleUser"
]
}
See Specify Unpackaged Metadata or Apex Access for Apex Tests
(Unlocked Packages)
None. If your package has an associated branch, but your package
dependency is associated with a different branch, use this format.
"dependencies": [
{
Nobranch
"package": "pkgB",
"versionNumber":
"1.3.0.LATEST",
"branch": "featureC"
}
]
213
Project Configuration File for Unlocked PackagesUnlocked Packages

Default if Not SpecifiedRequired?Name
If your package has an associated branch, but your package
dependency doesn’t have an associated branch, use this format.
"dependencies": [
{
"package": "pkgB",
"versionNumber":
"1.3.0.LATEST",
"branch": ""
}
]
See Use Branches in Unlocked Packaging
true
Indicates the default package directory. Use the sf project
retrieve command to copy metadata from your scratch org
to your default package directory.
Yes, if you’ve
specified more than
one package
directory
default
There can be only one package directory in which the default is
set to true.
None. A reference to an external .json file used to specify the
features and org settings required for the metadata of your package,
such as the scratch org definition.
Example:
"definitionFile":
"config/project-scratch-def.json",
NodefinitionFile
None. Specify the dependencies on other packages.
To specify dependencies for unlocked packages within the same
Dev Hub, use either the package version alias or a combination of
the package name and the version number.
"dependencies": [
{
Nodependencies
"package": "[email protected]"
}
]
"dependencies": [
{
"package": "MyPackageName",
"versionNumber": "0.1.0.LATEST"
}
]
214
Project Configuration File for Unlocked PackagesUnlocked Packages

Default if Not SpecifiedRequired?Name
To specify dependencies for unlocked packages outside of the Dev
Hub use:
"dependencies": [
{
"package": "[email protected]"
}
]
Note: You can use the LATEST keyword for the version
number to set the dependency.
To denote dependencies with package IDs instead of package
aliases, use:
•
The 0Ho ID if you specify the package ID along with the
version number
•
The 04t ID if you specify only the package version ID
If the package has more than one dependency, provide a
comma-separated list of packages in the order of installation. For
example, if a package depends on the package Expense Manager
- Util, which in turn depends on the package External Apex Library,
the package dependencies are:
"dependencies": [
{
"package" : "External Apex Library -
1.0.0.4"
},
{
"package": "Expense Manager - Util",
"versionNumber": "4.7.0.LATEST"
}
]
See: Extract Dependency Information from Unlocked Packages and
Considerations for Promoting Packages with Dependencies
False. Setting this parameter to true ensures that user licenses
associated with profiles in unlocked packages are retained during
NoincludeProfileUserLicenses
package version creation. By default, unlocked packages remove
profile information not pertinent to the packaged metadata.
"packageDirectories": [
{
"package": "PackageA",
"path": "common",
"versionName": "ver 0.1",
"versionNumber":
"0.1.0.NEXT",
215
Project Configuration File for Unlocked PackagesUnlocked Packages

Default if Not SpecifiedRequired?Name
"default": false,
"includeProfileUserLicenses": true
}
]
None. A 1–15 character alphanumeric identifier that distinguishes
your package and its contents from packages of other developers.
nonamespace
The package name specified in the project json file.Yespackage
Salesforce CLI updates the project file with aliases when you create
a package or package version. You can also manually update this
YespackageAliases
section for existing packages or package versions. You can use the
alias instead of the cryptic package ID when running CLI sf
package commands.
If you don’t specify a path, Salesforce CLI uses a placeholder when
you create a package.
Yespath
None. A URL to post-install instructions for subscribers.NopostInstallUrl
None. A URL to release notes.NoreleaseNotesUrl
None.
NoseedMetadata
Specify the path to your seedMetadata directory.
Seed metadata is available to standard value sets only. If your
package depends on standard value sets, you can specify a seed
metadata directory that contains the value sets.
Example:
"packageDirectories": [
{
"seedMetadata": {
"path":
"my-unpackaged-seed-directory"
}
},
]
None. See Specify Unpackaged Metadata or Apex Access for Apex
Tests (Unlocked Packages)
NounpackagedMetadata
None.NoversionDescription
If not specified, the CLI uses versionNumber as the version
name.
NoversionName
216
Project Configuration File for Unlocked PackagesUnlocked Packages

Default if Not SpecifiedRequired?Name
None. Version numbers are formatted as major.minor.patch.build.
For example, 1.2.1.8.
To automatically increment the build number to the next available
build for the package, use the keyword NEXT (1.2.1.NEXT).
YesversionNumber
When you specify a parameter using Salesforce CLI, it overrides the value listed in the project definition file.
The Salesforce DX project definition file is a JSON file located in the root directory of your project. Use the sf project generate
CLI command to generate a project file that you can build upon. Here’s how the parameters in packageDirectories appear.
{
"namespace": "",
"sfdcLoginUrl": "https://login.salesforce.com",
"sourceApiVersion": "61.0",
"packageDirectories": [
{
"path": "util",
"default": true,
"package": "Expense Manager - Util",
"versionName": "Summer ‘24",
"versionDescription": "Welcome to Summer 2024 Release of Expense Manager Util
Package",
"versionNumber": "4.7.0.NEXT",
"definitionFile": "config/scratch-org-def.json"
},
{
"path": "exp-core",
"default": false,
"package": "Expense Manager",
"versionName": "v 3.2",
"versionDescription": "Summer 2024 Release",
"versionNumber": "3.2.0.NEXT",
"postInstallUrl": "https://expenser.com/post-install-instructions.html",
"releaseNotesUrl": "https://expenser.com/summer-2024-release-notes.html",
"definitionFile": "config/scratch-org-def.json",
"dependencies": [
{
"package": "Expense Manager - Util",
"versionNumber": "4.7.0.LATEST"
},
{
"package" : "External Apex Library - 1.0.0.4"
}
]
}
],
"packageAliases": {
"Expense Manager - Util": "0HoB00000004CFpKAM",
217
Project Configuration File for Unlocked PackagesUnlocked Packages

"Expense Manager": "0HoB00000004CFuKAM"}
}
What If I Don’t Want My Salesforce DX Project Automatically Updated?
In some circumstances, you don’t want to have automatic updates to the sfdx-project.json file. When you require more control,
use these environment variables to suppress automatic updates to the project file.
Set This Environment Variable to TrueFor This Command
SFDX_PROJECT_AUTOUPDATE_DISABLE_FOR_PACKAGE_CREATEsf package create
SFDX_PROJECT_AUTOUPDATE_DISABLE_FOR_PACKAGE_VERSION_CREATEsf package version create
Unlocked Packaging Keywords
A keyword is a variable that you can use to specify a package version number.
You can use keywords to automatically increment the value of the package build numbers, ancestor version numbers, set the package
dependency to the latest version, or the latest released and promoted version.
ExampleUse the Keyword
"dependencies": [
{
LATEST to specify the latest version of the package dependency
when you create a package version.
"package": "MyPackageName",
"versionNumber": "0.1.0.LATEST"
}
]
"versionNumber": "1.2.0.NEXT"
NEXT to increment the build number to the next available for the
package version.
If you don’t use NEXT, and you also forget to update the version
number in your sfdx-project.json file, the new package
version uses the same number as the previous package version.
Although we don’t enforce uniqueness on package version
numbers, every package version is assigned a unique subscriber
package version ID (starts with 04t).
"dependencies": [
{
RELEASED to specify the latest promoted and released version of
the package dependency when you create a package version.
"package": "pkgB",
"versionNumber": "2.1.0.RELEASED"
}
]
"packageDirectories": [
{
HIGHEST to automatically set the package ancestor to the highest
promoted and released package version number.
Use only with ancestor version or ancestor ID.
218
Unlocked Packaging KeywordsUnlocked Packages

ExampleUse the Keyword
"path": "util",
"package": "Expense Manager - Util",
"versionNumber": "4.7.0.NEXT",
"ancestorVersion": "HIGHEST"
},
"packageDirectories": [
{
NONE in the ancestor version or ancestor ID field.
Ancestry defines package upgrade paths. If the package ancestor
is set to NONE, an existing customer can’t upgrade to that package
version.
"path": "util",
"package": "Expense Manager - Util",
"versionNumber": "4.7.0.NEXT",
"ancestorVersion": "NONE"
},
Package Installation Key
To ensure the security of the metadata in your package, you must specify an installation key when creating a package version. Package
creators provide the key to authorized subscribers so they can install the package. Package installers provide the key during installation,
whether installing the package from the CLI or from a browser. An installation key is the first step during installation. The key ensures
that no package information, such as the name or components, is disclosed until the correct installation key is supplied.
To set the installation key, add the --installation-key parameter to the command when you create the package version. This
command creates a package and protects it with the installation key.
sf package version create --package "Expense Manager" --installation-key "JSB7s8vXU93fI"
Supply the installation key when you install the package version in the target org.
sf package install --package "Expense Manager" --installation-key "JSB7s8vXU93fI”
Change the Installation Key for an Existing Package Version
You can change the installation key for an existing package version with the sf package version update command.
sfd package version update --package "Expense [email protected]" --installation-key
“HIF83kS8kS7C”
Create a Package Version Without an Installation Key
If you don’t require security measures to protect your package metadata, you can create a package version without an installation key.
sf package version create --package "Expense Manager" --directory common \
--tag 'Release 1.0.0' --installation-key-bypass
Check Whether a Package Version Requires an Installation Key
To determine whether a package version requires an installation key, use either the sf package version list or sf package
version report CLI command.
219
Package Installation KeyUnlocked Packages

Extract Dependency Information from Unlocked Packages
For an installed unlocked package, you can now run a simple SOQL query to extract its dependency information. You can also create a
script to automate the installation of unlocked packages with dependencies.
The SubscriberPackageVersion Tooling API object now provides dependency information. Using a SOQL query on SubscriberPackageVersion,
you can identify the packages on which your unlocked package has a dependency. You can get the (04t) IDs and the correct install order
for those packages.
Example: Package B has a dependency on package A. Package D depends on packages B and C. Here’s a sample
sfdx-project.json that you would have specified while creating a package version. Package D dependencies are noted
as packages A, B, and C.
{
"packageDirectories": [
{
"path": "pkg-a-workspace",
"package": "pkgA",
"versionName": "ver 4.9",
"versionNumber": "4.9.0.NEXT",
"default": true
},
{
"path": "pkg-b-workspace",
"package": "pkgB",
"versionName": "ver 3.17",
"versionNumber": "3.17.0.NEXT",
"default": false,
"dependencies": [
{
"package": "pkgA",
"versionNumber": "3.3.0.LATEST"
}
]
},
{
"path": "pkg-c-workspace",
"package": "pkgC",
"versionName": "ver 2.1",
"versionNumber": "2.1.0.NEXT",
"default": false
},
{
"path": "pkg-d-workspace",
"package": "pkgD",
"versionName": "ver 1.1",
"versionNumber": "1.1.0.NEXT",
"default": false,
"dependencies": [
{
"package": "pkgA",
"versionNumber": "3.3.0.LATEST"
},
{
"package": "pkgB",
220
Extract Dependency Information from Unlocked PackagesUnlocked Packages

"versionNumber": "3.12.0.LATEST"
},
{
"package": "pkgC",
"versionNumber": "2.1.0.LATEST"
}
]
}
],
"namespace": "",
"sfdcLoginUrl": "https://login.salesforce.com",
"sourceApiVersion": "44.0",
"packageAliases": {
"pkgA": "0HoB00000008Oq6KAE",
"pkgB": "0HoB00000008OqBKAU",
"pkgC": "0HoB00000008OqGKAU",
"pkgD": "0HoB00000008OqGKAQ"
}
}
Before installing pkgD (with ID=04txx000000082hAAA), use this SOQL query to determine its dependencies. The username is
typically the target subscriber org where the unlocked package is to be installed.
sf data query -u {USERNAME} -t
-q "SELECT Dependencies FROM SubscriberPackageVersion
WHERE Id='04txx000000082hAAA'" --json
You see this output when you run the query, with the (04t) IDs for pkgA, pkgB, and pkgC in that order.
"Dependencies":{"Ids":[
{"subscriberPackageVersionId":"04txx000000080vAAA"},
{"subscriberPackageVersionId":"04txx000000082XAAQ"},
{"subscriberPackageVersionId":"04txx0000000AiGAAU"}]}
Understanding Namespaces
A namespace is a 1-15 character alphanumeric identifier that distinguishes your package and its contents from other packages in your
org.
When you specify a package namespace, every component added to a package has the namespace prefixed to the component API
name. Let’s say you have a custom object called Insurance_Agent with the API name, Insurance_Agent__c. If you add this
component to a package associated with the Acme namespace, the API name becomes Acme__Insurance_Agent__c.
You can choose to create unlocked packages with or without a specific namespace. A namespace is assigned to a package at the time
that it’s created and can’t be changed.
Use Namespace Packages IfUse No-Namespace Packages If
You’re new to packaging and you’re adopting packages in several
stages. Using a namespace prefix such as Acme__ can help you
You want to migrate metadata from your org’s monolith of
unpackaged metadata to unlocked packages. Creating a
identify what’s packaged and what’s still unpackaged metadata in
your production orgs
no-namespace package gives you more control over how you
organize and distribute parts of an application.
221
Understanding NamespacesUnlocked Packages
Use Namespace Packages IfUse No-Namespace Packages If
You have more than one development team. A namespace can
ensure your API names don’t collide with another team.
In general, working with a single namespace is easier, and you can
easily share code across packages that share a namespace.
You want to retain the API name of previously unpackaged
metadata elements.
Important: When creating a namespace, use something that’s useful and informative to users. However, don’t name a namespace
after a person (for example, by using a person's name, nickname, or private information).
When you work with namespaces, keep these considerations in mind.
•
You can develop more than one unlocked package with the same namespace but you can associate each package with only a single
namespace.
•
If you work with more than one namespace, we recommend that you set up one project for each namespace.
Create and Register Your Namespace
With unlocked packages, you can share a single namespace with multiple packages. Since sharing of code is much easier if your
package shares the same namespace, we recommend that if use namepaces, you use a single namespace for your namespaced
unlocked packages.
Avoid Namespace Collisions
Namespaces impact the combination of package types you can install in an org.
Namespace-Based Visibility for Apex Classes in Unlocked Packages
The @namespaceAccessible makes public Apex in a package available to other packages that use the same namespace.
Without this annotation, Apex classes, methods, interfaces, and properties defined in an unlocked package aren’t accessible to the
other packages with which they share a namespace. Apex that is declared global is always available across all namespaces, and
needs no annotation.
Create and Register Your Namespace
With unlocked packages, you can share a single namespace with multiple packages. Since sharing of code is much easier if your package
shares the same namespace, we recommend that if use namepaces, you use a single namespace for your namespaced unlocked packages.
To create a namespace:
1. Sign up for a new Developer Edition org.
2. In Setup, enter Package Manager in the Quick Find box, and select Package Manager.
3. In Namespace Settings, click Edit.
4. Enter a namespace and select Check Availability.
5. (Optional) Select a package to associate with this namespace , or select None, then click Review.
6. Review your selections, and then click Save.
To register a namespace:
1. To link the namespace that you created with your Dev Hub, use Namespace Registry. See Link a Namespace to a Dev Hub for details.
2. In the sfdx-project.json file, specify your namespace using the namespace attribute. When you create a new unlocked
package, the package is associated with the namespace specified in the sfdx-project.json file.
222
Understanding NamespacesUnlocked Packages

Avoid Namespace Collisions
Namespaces impact the combination of package types you can install in an org.
To understand how namespaces affect the types of packages you can install in a namespaced or no-namespace org, review this table.
First-generation
Managed Package
(1GP)
Second-generation
Managed Package
(2GP)
Namespaced
Unlocked Package
No-namespace
Unlocked Package
Installation Org
Pass.
If the namespace of the
1GP is different from the
Pass (scratch orgs)
If the namespace of the
2GP is different from the
Pass.
If the namespace of the
unlocked package is
Fail.
You can’t install a
no-namespace unlocked
Org with a namespace
For example, a 1GP
packaging org, 1GP patch
namespace of the org,namespace of the scratchdifferent from thepackage in an org with a
namespace.
org, Developer Edition
org with namespace, or a
scratch org with
namespace
you can install one or
many packages.
Fail.
org, you can install one or
many packages.
Fail (1GP packaging and
patch orgs).
namespace of the org,
you can install one or
many packages.
If the namespace of the
1GP is the same as theTo prevent 1GP packages
from depending on 2GP namespace of the org,
packages, we block the you can’t install the 1GP
into the org.installation of 2GP
packages in a 1GP
packaging or patch org.
We also block the
installation of 2GP
packages in Developer
Edition (DE) orgs that
have an associated
namespace, unless it’s a
DE scratch org.
Pass.
Can install one or many
1GP packages.
Pass.
Can install one or many
2GP packages.
Pass.
Can install one or many
namespaced unlocked
packages.
Pass.
Can install one or many
no-namespace unlocked
packages.
Org without a
namespace
To understand how namespaces affect the combination of packages that can be installed into one org, review this table.
First-generation Managed
Package (1GP) with
Namespace Y
Second-generation
Managed Package (2GP)
with Namespace Y
Unlocked Package with
Namespace Y
Namespace and Package
Type
Pass.
If each 1GP uses a unique
namespace, you can install
Pass.
If the 1GP and 2GP use a unique
namespace, you can install them
in the same org.
Pass.
If the 1GP and unlocked package
use unique namespaces, you
can install them in the same org.
First-generation Managed
Package (1GP) with
namespace X
multiple 1GP packages in the
same org.
223
Understanding NamespacesUnlocked Packages

First-generation Managed
Package (1GP) with
Namespace Y
Second-generation
Managed Package (2GP)
with Namespace Y
Unlocked Package with
Namespace Y
Namespace and Package
Type
Fail.
If the 1GP packages share a
namespace, you can’t install
them in the same org.
Fail.
If the 1GP and 2GP share a
namespace, you can’t install
them in the same org.
Fail.
If the 1GP and unlocked package
share a namespace, you can’t
install them in the same org.
First-generation Managed
Package (1GP) with
namespace Y
Pass.
If the 1GP packages use unique
namespaces, you can install
Pass.
You can install multiple 2GP
packages with unique
Pass.
You can install a 2GP and a
namespaced unlocked package
Second-generation Managed
Package (2GP) with
namespace X
multiple 1GP packages in the
same org.
namespaces, or the same
namespace.
in the same org. The packages
can share a namespace or use
unique namespaces.
Fail.
If the 1GP and 2GP share a
namespace, you can’t install
them in the same org.
Pass.
You can install multiple 2GP
packages with the same
namespace in the same org.
Pass.
You can install a 2GP and a
namespaced unlocked package
in the same org. The packages
can share a namespace or use
unique namespaces.
Second-generation Managed
Package (2GP) with
namespace Y
Namespaces and Package Dependencies
A namespaced unlocked package can’t depend on an unlocked package without a namespace.
Namespace-Based Visibility for Apex Classes in Unlocked Packages
The @namespaceAccessible makes public Apex in a package available to other packages that use the same namespace. Without
this annotation, Apex classes, methods, interfaces, and properties defined in an unlocked package aren’t accessible to the other packages
with which they share a namespace. Apex that is declared global is always available across all namespaces, and needs no annotation.
Considerations for Apex Accessibility Across Packages
•
A Lightning component outside the package can access a public Apex method installed from a no-namespace unlocked package.
The component can be installed from another package or created in the org. For accessing Apex methods, a no-namespace unlocked
package is treated the same as an unmanaged package.
•
You can't use the @namespaceAccessible annotation for an @AuraEnabled Apex method.
•
You can add or remove the @namespaceAccessible annotation at any time, even on managed and released Apex code.
Make sure that you don’t have dependent packages relying on the functionality of the annotation before adding or removing it.
•
When adding or removing @namespaceAccessible Apex from a package, consider the impact to users with installed versions
of other packages that reference this package’s annotation. Before pushing a package upgrade, ensure that no user is running a
package version that would fail to fully compile when the upgrade is pushed.
224
Understanding NamespacesUnlocked Packages

This example shows an Apex class marked with the @namespaceAccessible annotation. The class is accessible to other packages
within the same namespace. The first constructor is also visible within the namespace, but the second constructor isn’t.
// A namespace-visible Apex class
@namespaceAccessible
public class MyClass {
private Boolean bypassFLS;
// A namespace-visible constructor that only allows secure use
@namespaceAccessible
public MyClass() {
bypassFLS = false;
}
// A package private constructor that allows use in trusted contexts,
// but only internal to the package
public MyClass (Boolean bypassFLS) {
this.bypassFLS = bypassFLS;
}
@namespaceAccessible
protected Boolean getBypassFLS() {
return bypassFLS;
}
}
Share Release Notes and Post-Install Instructions
Share details about what’s new and changed in a released unlocked package with your users.
Share details about what’s new and changed in an unlocked package with your users. You can specify a release notes URL to display on
the package detail page in the user’s org. And you can share instructions about using your package by specifying a post install URL. The
release notes and post install URLs display on the Installed Packages page in Setup, after a successful package installation. For users who
install packages using an installation URL, the package installer page displays a link to release notes. And users are redirected to your
post install URL following a successful package installation or upgrade.
Specify the postInstallUrl and releaseNotesUrl attributes in the packageDirectories section for the package.
"packageDirectories": [
{
"path": "expenser-schema",
"default": true,
"package": "Expense Schema",
"versionName": ""ver 0.3.2"",
"versionNumber": "0.3.2.NEXT",
"postInstallUrl": "https://expenser.com/post-install-instructions.html",
"releaseNotesUrl": "https://expenser.com/winter-2020-release-notes.html"
},
],
{
"namespace": "",
"sfdcLoginUrl": "https://login.salesforce.com",
"sourceApiVersion": "47.0",
"packageAliases": {
"Expenser Schema": "0HoB00000004CzHKAU",
225
Share Release Notes and Post-Install InstructionsUnlocked Packages

"Expenser [email protected]": "04tB0000000719qIAA"
}
}
You can also use the --post-install-url and the --release-notes-url Salesforce CLI parameters with the sf
package version create command. The CLI parameters override the URLs specified in the sfdx-project.json file.
Specify Unpackaged Metadata or Apex Access for Apex Tests (Unlocked
Packages)
Specify Unpackaged Metadata for Package Version Creation Tests
Specify the path to the unpackaged metadata in your sfdx-project.json file.
In this example, metadata in the my-unpackaged-directory is available for test runs during the package version creation of
the TV_unl package.
"packageDirectories": [
{
"path": "force-app",
"package": "TV_unl",
"versionName": "ver 0.1",
"versionNumber": "0.1.0.NEXT",
"default": true,
"unpackagedMetadata": {
"path": "my-unpackaged-directory"
}
},
]
The unpackagedMetadata attribute is intended for metadata that isn’t part of your package. You can’t include the same metadata
in both an unpackaged directory and a packaged directory.
Manage Apex Access for Package Version Creation Tests
Sometimes the Apex tests that you write require a user to have certain permission sets or permission set licenses. Use the
apexTestAccess setting to assign permission sets and permission set licenses to the user in whose context your Apex tests get
run at package version creation.
"packageDirectories": [
{
"path": "force-app",
"package": "TV_unl",
"versionName": "ver 0.1",
"versionNumber": "0.1.0.NEXT",
"default": true,
"unpackagedMetadata": {
"path": "my-unpackaged-directory"
},
"apexTestAccess": {
"permissionSets": [
"Permission_Set_1",
226
Specify Unpackaged Metadata or Apex Access for Apex
Tests (Unlocked Packages)
Unlocked Packages

"Permission_Set_2"
],
"permissionSetLicenses": [
"SalesConsoleUser"
]
}
},
]
Note: To assign user licenses, use the runAs Method. User licenses can't be assigned in the sfdx-project.json file.
Best Practices for Unlocked Packages
We suggest that you follow these best practices when working with unlocked packages.
•
We recommend that you work with only one Dev Hub, and enable Dev Hub in a production org.
•
The Dev Hub org against which you run the sf package create command becomes the owner of the package. If the Dev
Hub org associated with a package expires or is deleted, its packages no longer work.
•
Use care in deciding how to utilize namespaces. For most customers, we recommend working with no namespace or a single
namespace to avoid unnecessary complexity in managing components. If you’re test-driving unlocked packages, use a test namespace.
Use real namespaces only when you’re ready to embark on a development path headed for release in a production org.
Note: You can’t install a no-namespace, unlocked package into any org with a namespace (for example, a scratch org with
a namespace).
•
Include the --tag option when you use the sf package version create and sf package version update
commands. This option helps you keep your version control system tags in sync with specific package versions.
•
Create user-friendly aliases for packaging IDs, and include those aliases in your Salesforce DX project file and when running CLI
packaging commands. See: Package IDs and Aliases for Unlocked Packages.
Package IDs and Aliases for Unlocked Packages
During the package lifecycle, packages and package versions are identified by an ID or package alias. When you create a package or
package version, Salesforce CLI creates a package alias based on the package name, and stores that name in the sfdx-project.json
file. When you run CLI commands or write scripts to automate packaging workflows, it’s often easier to reference the package alias,
instead of the package ID or package version ID.
Package aliases are stored in the sfdx-project.json file as name-value pairs, in which the name is the alias and the value is the
ID. You can modify package aliases for existing packages and package versions in the project file.
At the command line, you also see IDs for things like package members (a component in a package) and requests (like a sf package
version create request).
Note: As a shortcut, the documentation sometimes refers to an ID by its three-character prefix. For example, a package version
ID always starts with 04t.
Here are the most commonly used IDs.
227
Best Practices for Unlocked PackagesUnlocked Packages

DescriptionShort ID NameID Example
Use this ID when contacting Salesforce for
packaging or security review support. To
Subscriber Package ID033J0000dAb27uxVRE
locate this ID for your package, run sf
package list --verbose against
the Dev Hub that owns the package.
Use this ID to install a package version.
Returned by sf package version
create.
Subscriber Package Version ID04t6A0000004eytQAA
Use this ID on the command line to create
a package version. Or enter it into the
Package ID0Hoxx00000000CqCAI
sfdx-project.json file and use the
directory name. Generated by sf
package create.
Use this ID to view the status and monitor
progress for a specific request to create a
Version Creation Request ID08cxx00000000BEAAY
package version such as sf package
version create report
Frequently Used Unlocked Packaging Operations
For a complete list of Salesforce CLI packaging commands, see: Salesforce Command Line Reference Guide.
What it DoesSalesforce CLI command
Creates a package. When you create a package, you specify its
package type and name, among other things.
sf package create
Creates a package version.sf package version create
Installs a package version in a scratch, sandbox, or production org.sf package install
Removes a package that has been installed in an org. This process
deletes the metadata and data associated with the package.
sf package uninstall
Changes the state of the package version from beta to the
managed-released state.
sf package version promote
Creates a scratch org.sf org create scratch
Opens an org in the browser.sf org open
How We Handle Profile Settings in Unlocked Packages
When you package a profile in an unlocked package or second-generation managed package, the build system inspects the contents
of the profile during package creation and preserves only the profile settings that are directly related to the metadata in the package.
The profile itself, and any profile settings unrelated to the package’s metadata are discarded from the package.
228
Frequently Used Unlocked Packaging OperationsUnlocked Packages

During package installation, the preserved profile settings are applied only to existing profiles in the subscriber org. The profile itself isn’t
installed in the subscriber org.
To control which profile settings are included, use the scopeProfiles parameter in the project configuration file.
Note: Packages that contain only profiles and no additional metadata aren’t allowed and fail during package version creation.
This installation option is available
via…
The packaged profile settings are
applied to...
When you select…
The System Administrator profile in the
subscriber org.
CRUD access to custom objects is granted
automatically to the System Administration
profile.
Install for Admins Only
•
The package installer page
•
Salesforce CLI sf package
install command
The default behavior for CLI-based package
installs is to install for admins only.
The System Administrator profile and all
cloned profiles in the subscriber org.
CRUD access to custom objects is granted
automatically to the System Administration
profile, and all cloned profiles.
Install for All Users
•
The package installer page
•
Salesforce CLI sf package
install command
To install for all users via the CLI, include the
security type parameter.
Standard profiles can’t be modified.
sf package install
--security-type AllUsers
Specific profiles in the subscriber org. This
selection lets the person installing your
Install for Specific Profiles
•
The package installer page
Not available for CLI-based package
installations.
package determine how to map the profile
settings you packaged to specific profiles in
their org.
To test the behavior of your packaged profile, install your package in a scratch org.
1. From Setup, enter Profile in the Quick Find box, and then locate and inspect the profiles you selected during package installation.
2. Check whether your profile settings have been applied to that profile.
Repeat this step for any other profile you expect to contain your profile settings. Don’t look for the profile name you created; we
apply profile settings to existing profiles in the subscriber org.
Whenever possible, use package permission sets instead of profile settings. Subscribers who install your package can easily assign your
permission set to their users.
Note: During a push upgrade, some profile settings related to Apex classes and field-level security aren’t automatically assigned
to the System Admin profile. To ensure that user access is set up correctly after a push upgrade, communicate with your customer.
Make sure they review and update their profile settings after a push upgrade.
229
How We Handle Profile Settings in Unlocked PackagesUnlocked Packages

Retain License Settings in Unlocked Packages
By default, license settings in profiles are removed during package creation. To retain these settings, specify the
includeProfileUserLicenses parameter in your sfdx-project.json file. In this scenario, the license settings are
retained and applied to the profiles in the subscriber org that are selected during package installation.
"packageDirectories": [
{
"package": "PackageA",
"path": "common",
"versionName": "ver 0.1",
"versionNumber": "0.1.0.NEXT",
"default": false,
includeProfileUserLicenses: true
}
]
Develop Unlocked Packages
A package is a top-level container that holds important details about the app or package: the package name, description, and associated
namespace.
You supply the package details in the package descriptor section of your sfdx-project.json project configuration file.
Create and Update an Unlocked Package
When you’re ready to test or share your package, use the sf package create command to create a package.
Create New Versions of an Unlocked Package
A package version is a fixed snapshot of the package contents and related metadata. The package version lets you manage changes
and track what’s different each time you release or deploy a specific set of changes.
Code Coverage for Unlocked Packages
Before you can promote and release an unlocked package, the Apex code must meet a minimum 75% code coverage requirement.
You can install package versions that don't meet code coverage requirements only in scratch orgs and sandboxes.
Considerations for Promoting Packages with Dependencies
If your company is developing a package that has a package dependency, ask yourself these questions before promoting (releasing)
a new package version.
Release an Unlocked Package
Each new package version is marked as beta when its created. As you develop your package, you may create several package versions
before you create a version that is ready to be released and installed in production orgs.
Update an Unlocked Package Version
You can update most properties of a package version from the command line. For example, you can change the package version
name or description. One important exception is that you can’t change the release status.
Hard-Deleted Components in Unlocked Packages
When these components are removed from an unlocked package, they're hard deleted from the target install org during the package
upgrade.
230
Develop Unlocked PackagesUnlocked Packages

Delete an Unlocked Package or Package Version
Use the sf package version delete and sf package delete to delete packages and package versions that you
no longer need.
View Package Details
View the details of previously created packages and package versions from the command line.
Create and Update an Unlocked Package
When you’re ready to test or share your package, use the sf package create command to create a package.
If you are using a namespace, specify the package namespace in the sfdx-project.json file. To learn more, see Understanding
Namespaces.
To create the package, change to the project directory. The name becomes the package alias, which is automatically added to the project
file. You can choose to designate an active Dev Hub org user to receive email notifications for Apex gacks, and install, upgrade, or uninstall
failures associated with your packages.
sf package create --name "Expenser App" --package-type Unlocked --path \
"expenser-main" --target-dev-hub my-hub --error-notification-username [email protected]
The output is similar to this example.
sfdx-project.json has been updated.
Successfully created a package. 0HoB00000004CzHKAU
=== Ids
NAME VALUE
────────── ──────────────────
Package Id 0HoB00000004CzHKAU
Update the Package
To update the name, description, or the user to receive error notifications of an existing package, use this command.
sf package update --package "Expense App" --name "Expense Manager App" \
--description "New Description" --error-notification-username [email protected]
Note: You can’t change the package namespace or package type after you create the package.
Create New Versions of an Unlocked Package
A package version is a fixed snapshot of the package contents and related metadata. The package version lets you manage changes and
track what’s different each time you release or deploy a specific set of changes.
Before you create a package version, first verify package details, such as the package name, dependencies, and update the versionNumber
parameter in the sfdx-project.json file. Verify that the metadata you want to change or add in the new package version is in
the package’s main directory.
When you create a package version, you have three options regarding how package validations are handled.
•
(Default) Complete all validations of dependencies, package ancestors, and metadata before the package version is returned.
•
Perform validations asynchronously.
•
Skip validation on the package version.
231
Create and Update an Unlocked PackageUnlocked Packages

Create an Unlocked Package Version (Default Option)
Create the package version with this command. Specify the package alias or ID (0Ho). You can also include a scratch definition file that
contains a list of features and setting that the metadata of the package version depends on.
sf package version create --package "Expenser App" --installation-key “HIF83kS8kS7C” \
--definitionfile config/project-scratch-def.json --wait 10
Note: When creating a package version, specify a --wait time to run the command. If the package version is created within
that time, the sfdx-project.json file is automatically updated with the package version information. If not, you must
manually edit the project file.
It can be a long-running process to create a package version, depending on the package size and other variables. You can easily view
the status and monitor progress.
sf package version create report --package-create-request-id 08cxx00000000YDAAY
The output shows details about the request.
=== Package Version Create Request
NAME VALUE
───────────────────────────── ────────────────────
Version Create Request Id 08cB00000004CBxIAM
Status InProgress
Package Id 0HoB00000004C9hKAE
Package Version Id 05iB0000000CaaNIAS
Subscriber Package Version Id 04tB0000000NOimIAG
Tag git commit id 08dcfsdf
Branch
CreatedDate 2024-05-08 09:48
Installation URL
https://login.salesforce.com/packaging/installPackage.apexp?p0=04tB0000000NOimIAG
You can find the request ID (08c) in the initial output of sf package version create.
Depending on the size of the package and other variables, the create request can take several minutes. When you have more than one
pending request to create package versions, you can view a list of all requests with this command.
sf package version create list --created-last-days 0
Details for each request display as shown here (IDs and labels truncated).
=== Package Version Create Requests [3]
ID STATUS PACKAGE2 ID PKG2 VERSION ID SUB PKG2 VER ID TAG BRANCH CREATED DATE ===
08c... Error 0Ho...
08c... Success 0Ho... 05i... 04t... 2024-06-22 12:07
08c... Success 0Ho... 05i... 04t... 2024-06-23 14:55
Async Validation
Async validation creates a new package version before completing package validations. If your development team is using continuous
integration (CI) scripts, you can leverage async validation to get an installable artifact sooner so you can start post-package creation
steps.
To specify async validation, include the - -async-validation parameter.
sf package version create --async-validation <rest of command syntax>
232
Create New Versions of an Unlocked PackageUnlocked Packages

Sample Command-Line Output
Version create.... Create version status: PerformingValidations
The validations for this package version are in progress, but you can now begin testing
this package version.
To determine whether all package validations complete successfully, run "sf package version
create report --package-create-request-id 08cxx", and review the Status.
Async validated package versions can be promoted only if all validations complete
successfully.
Successfully created the package version [08cxx. Subscriber Package Version Id: 04txx
Package Installation URL:
https://login.salesforce.com/packaging/installPackage.apexp?p0=04txx
As an alternative, you can use the "sf package:install" command.
The command-line output provides you a package creation request ID that starts with 08c. To confirm whether all package validations
complete successfully, use the 08cxx ID when and run sf package version create report
--package-create-request-id 08cxx. Then validate that the Status is listed as Success. Async validated package
versions can be promoted only if all validations complete successfully.
Skip Validation
Skips validation of dependencies, package ancestors, and metadata during package version creation. Skipping validation significantly
reduces the time it takes to create a new package version, but package versions created using skip validation can’t be promoted to the
released state.
Note: You can't specify both skip validation and code coverage, because code coverage is calculated during validation.
You also can't specify both skip validation and async validation at the same time.
Use Keyword NEXT to Ensure Package Version Numbers Are Unique
To ensure your version number is unique, use the keyword NEXT when you set the version number in your sfdx-project.json
file.
For example, "versionNumber": "1.2.0.NEXT".
If you don’t use NEXT, and you also forget to update the version number in your sfdx-project.json file, the new package
version uses the same number as the previous package version. Although we don’t enforce uniqueness on package version numbers,
every package version is assigned a unique subscriber package version ID (starts with 04t).
How Many Package Versions Can I Create Per Day?
Run this command to see how many package versions you can create per day and how many you have remaining.
sf limits api display
Look for the Package2VersionCreates entry.
NAME REMAINING MAXIMUM
───────────────────────────────────── ───────── ─────────
Package2VersionCreates 23 50
233
Create New Versions of an Unlocked PackageUnlocked Packages

Simplify Unlocked Package Development by Creating and Specifying an Org Shape
If your package’s metadata depends on a complex set of features, settings, or licenses, it can be difficult to declaratively specify these
dependencies in a scratch org definition file. Instead, create an org shape of your production org, or another development org, and
specify that source org’s ID in your scratch org definition file. During package creation, we mimic the source org’s environment when
we build and validate your package’s metadata.
Use Branches in Unlocked Packaging
Development teams who use branches in their source control system (SCS), often build package versions based on the metadata
in a particular branch of code.
Target a Specific Release for Your Unlocked Packages During Salesforce Release Transitions
During major Salesforce release transitions, you can specify preview or previous when creating a package version. Specifying
the release version for a package allows you to test upcoming features, run regression tests, and support customers regardless of
which Salesforce release their org is on. Previously, you could only create package versions that matched the Salesforce release your
Dev Hub org was on.
Simplify Unlocked Package Development by Creating and Specifying an Org Shape
If your package’s metadata depends on a complex set of features, settings, or licenses, it can be difficult to declaratively specify these
dependencies in a scratch org definition file. Instead, create an org shape of your production org, or another development org, and
specify that source org’s ID in your scratch org definition file. During package creation, we mimic the source org’s environment when
we build and validate your package’s metadata.
Before using this feature, get familiar with how Org Shape for Scratch Orgs works.
Then enable the scratch org setting in your source org, generate the org shape, and edit your scratch org definition file to include the
org name and 15-character source org ID.
{
"orgName": "Acme",
"sourceOrg": "00DB1230400Ifx5"
}
Use Branches in Unlocked Packaging
Development teams who use branches in their source control system (SCS), often build package versions based on the metadata in a
particular branch of code.
To identify which branch in your SCS a package version is based on, tag your package version with a branch name using --branch
attribute in this Salesforce CLI command.
sf package version create --branch featureA
You can specify any alphanumeric value up to 240 characters as the branch name.
You can also specify the branch name in the package directories section of the sfdx-project.json file.
"packageDirectories": [
{
"path": "util",
"default": true,
"package": "pkgA",
"versionName": "Spring ‘21",
"versionNumber": "4.7.0.NEXT",
234
Create New Versions of an Unlocked PackageUnlocked Packages

"branch": "featureA"
}]
When you specify a branch, the package alias for that package version is automatically appended with the branch name. You can view
the package alias in the sfdx.project.json file.
"packageAliases": {
"[email protected]":"04tB0000000IB1EIAW"}
Keep in mind that version numbers increment within each branch, and not across branches. For example, you could have two or more
beta package versions with the version number 1.3.0.1.
Package Version AliasBranch Name
[email protected]featureA
[email protected]featureB
[email protected]Not specified
Although more than one beta package version can have the same version number, there can be only one promoted and released
package version for a given major.minor.patch package version.
Package Dependencies and Branches
By default, your package can have dependencies on other packages in the same branch. For package dependencies based on packages
in other branches, explicitly set the branch attribute in the sfdx.project.json file.
Use this formatTo specify a package dependency
"dependencies": [
{
Using the branch attribute
"package": "pkgB",
"versionNumber": "1.3.0.LATEST",
"branch": "featureC"
}]
"dependencies": [
{
Using the most recent promoted and released version of package
"package": "pkgB",
"versionNumber": "2.1.0.RELEASED"
}]
"dependencies": [
{
If your package has an associated branch, but the dependent
package doesn’t have a branch
"package": "pkgB",
"versionNumber": "1.3.0.LATEST",
"branch": ""
}]
235
Create New Versions of an Unlocked PackageUnlocked Packages
Use this formatTo specify a package dependency
"dependencies": [
{
Using the package alias
"package": "[email protected]"
}]
Target a Specific Release for Your Unlocked Packages During Salesforce Release
Transitions
During major Salesforce release transitions, you can specify preview or previous when creating a package version. Specifying
the release version for a package allows you to test upcoming features, run regression tests, and support customers regardless of which
Salesforce release their org is on. Previously, you could only create package versions that matched the Salesforce release your Dev Hub
org was on.
To create a package version based on a preview or previous Salesforce release version, create a scratch org definition file that includes
either:
{
"release": "previous"
}
or
{
"release": "preview"
}
In the sfdx-project.json file, set the sourceApiVersion to correspond with the release version of the package version
you’re creating. If you are targeting a previous release, any sourceApiVersion value below the current release is accepted.
Then when you create your package version, specify the scratch org definition file.
sf package version create --package pkgA --definition-file config/project-scratch-def.json
Preview start date is when sandbox instances are upgraded. Preview end date is when all instances are on the GA release.
Preview End DatePreview Start DateRelease Version
June 15, 2024May 12, 2024Summer ’24
October 12, 2024September 8, 2024Winter ’25
February 15, 2025January 5, 2025Spring ’25
Code Coverage for Unlocked Packages
Before you can promote and release an unlocked package, the Apex code must meet a minimum 75% code coverage requirement. You
can install package versions that don't meet code coverage requirements only in scratch orgs and sandboxes.
Important: Unlocked package versions that were promoted to the released state before Winter ‘21 aren’t subject to code coverage
requirements.
236
Code Coverage for Unlocked PackagesUnlocked Packages
To compute code coverage using Salesforce CLI, use the --code-coverage parameter when you run the sf package
version create command.
Package version creation can take longer to complete when code coverage is being computed, so consider when in the development
cycle to include the code coverage parameter. You can choose to skip code coverage, and you can skip all validation by specifying the
--skip-validation parameter. You can promote package versions only if they’re validated and meet code coverage requirements.
View code coverage information for a package version using sf package version list with the --verbose parameter,
or the sf package version report command in Salesforce CLI.
We don’t calculate code coverage for org-dependent unlocked packages.
Considerations for Promoting Packages with Dependencies
If your company is developing a package that has a package dependency, ask yourself these questions before promoting (releasing) a
new package version.
Are you:
•
Developing the base and extension package in parallel?
•
Specifying skip validation when creating new package versions?
•
Using the keywords LATEST or RELEASED when specifying the package dependency?
If you answered no to all these questions, your package doesn't have any tricky dependency scenarios and you can promote it when it's
ready. If you answered yes to any of these questions, keep reading.
Specifying Skip Validation
When you create a package version and specify skip validation, the version is created without validating dependencies, package ancestors,
or metadata.
If you develop your base package using skip validation, test your extension package using either a stable and previously promoted
version of the base package, or a non-skip validated base package version.
Most importantly, if you’re developing a version of your base package and extension package in parallel, ensure that you:
•
First promote the base package version.
•
Then specify the promoted package version in the dependency section of your extension package using the keyword RELEASED.
•
Finally, create the extension package version.
After testing the extension package version, you then promote it. This process ensures that the extension package version that you
promote to the released state has as its dependency the promoted base package version.
Using the Keyword LATEST or RELEASED
A keyword is a variable that you can use to specify a package version number. The keyword LATEST maps to the most recently created
package version, which might not be the same as the promoted and released package version.
The keyword RELEASED maps to the promoted and released package version.
For example: If you create versions 1.0.0.1, 1.0.0.2, and 1.0.0.3, and promote version 1.0.0.2, then 1.0.0.RELEASED = 1.0.0.2, but 1.0.0.LATEST
= 1.0.0.3.
237
Considerations for Promoting Packages with DependenciesUnlocked Packages

Example
Your company created a base package called PkgBase, and an extension package called PkgExtn.
PkgBase is under active development, and the development team is creating versions that specify --skip-validation.
PkgExtn version 2.3 is under active development and references its dependency on PkgBase by using the following definition in the
sfdx-project.json.
{
"path": "pkg-extension",
"default": false,
"package": "PkgExtn",
"versionName": "v 2.3",
"versionDescription": "Winter 2025",
"versionNumber": "2.3.0.NEXT",
"dependencies": [
{
"package": "PkgBase",
"versionNumber": "1.1.0.LATEST"
},
Before promoting version 2.3 of PkgExtn, you must test it using the promoted version 1.1.0 of PkgBase. Update the PkgExtn dependency
section of your sfdx-project.json and change the dependency from 1.1.0.LATEST to 1.1.0.RELEASED. If the tests succeed, then
create a new version of PkgExtn and ensure it works as expected with the promoted base package version.
Release an Unlocked Package
Each new package version is marked as beta when its created. As you develop your package, you may create several package versions
before you create a version that is ready to be released and installed in production orgs.
Before you promote the package version, ensure that the user permission, Promote a package version to released, is enabled in the
Dev Hub org associated with the package. Consider creating a permission set with this user permission, and then assign the permission
set to the appropriate user profiles.
When you’re ready to release, use sf package version promote.
sf package version promote --package "Expense [email protected]"
If the command is successful, a confirmation message appears.
Successfully promoted the package version, ID: 04tB0000000719qIAA to released.
After the update succeeds, view the package details.
sf package version report --package "Expense [email protected]"
Confirm that the value of the Released property is true.
=== Package Version
NAME VALUE
────────────────────────────── ───────────────────
Name ver 1.0
Alias Expense Manager-1.0.0.5
Package Version Id 05iB0000000CaahIAC
Package Id 0HoB0000000CabmKAC
238
Release an Unlocked PackageUnlocked Packages

Subscriber Package Version Id 04tB0000000NPbBIAW
Version 1.0.0.5
Description update version
Branch
Tag git commit id 08dcfsdf
Released true
Created Date 2018-05-08 09:48
Installation URL
https://login.salesforce.com/packaging/installPackage.apexp?p0=04tB0000000NPbBIAW
You can promote and release only once for each package version number, and you can’t undo this change.
Update an Unlocked Package Version
You can update most properties of a package version from the command line. For example, you can change the package version name
or description. One important exception is that you can’t change the release status.
If the most recent package version has been released, increment either the major, minor, or patch version number for the next package
version you create.
Package version numbers use the format major.minor.patch.build. For example, if you released package 1.0.0.2, you could use 1.1.0.0,
2.0.0.0, or 1.0.1.0 for the next package version.
Example:
sf package version update --package "Your Package Alias"
Hard-Deleted Components in Unlocked Packages
When these components are removed from an unlocked package, they're hard deleted from the target install org during the package
upgrade.
•
AccountForecastSettings
•
AcctMgrTargetSettings
•
ActionableListDefinition
•
ActionPlanTemplate
•
AccountingFieldMapping
•
AccountingModelConfig
•
AdvAccountForecastSet
•
AdvAcctForecastDimSource
•
AdvAcctForecastPeriodGroup
•
AIApplicationConfig
•
AIUsecaseDefinition
•
AnalyticSnapshot
•
ApexClass
•
ApexComponent
•
ApexPage
•
ApexTrigger
•
ApplicationRecordTypeConfig
239
Update an Unlocked Package VersionUnlocked Packages
•
ApplicationSubtypeDefinition
•
AppointmentAssignmentPolicy
•
AssessmentQuestion
•
AssessmentQuestionSet
•
AssistantContextItem
•
AssistantSkillQuickAction
•
AssistantSkillSobjectAction
•
AssistantVersion
•
AuraDefinitionBundle
•
BatchCalcJobDefinition
•
BatchProcessJobDefinition
•
BenefitAction
•
BldgEnrgyIntensityCnfg
•
BrandingSet
•
BriefcaseDefinition
•
BusinessProcessGroup
•
BusinessProcessTypeDefinition
•
CareBenefitVerifySettings
•
CareLimitType
•
CareProviderSearchConfig
•
CareRequestConfiguration
•
ChannelObjectLinkingRule
•
ClaimFinancialSettings
•
ClauseCatgConfiguration
•
CompactLayout
•
ContractType
•
ConversationVendorInfo
•
CustomApplication
•
CustomPageWebLink
•
CustomPermission
•
CustomTab
•
Dashboard
•
DecisionMatrixDefinition
•
DecisionMatrixDefinitionVersion
•
DecisionTable
•
DecisionTableDatasetLink
•
DisclosureDefinition
•
DisclosureDefinitionVersion
•
DisclosureType
•
DiscoveryAIModel
240
Hard-Deleted Components in Unlocked PackagesUnlocked Packages
•
DiscoveryGoal
•
Document
•
DocumentGenerationSetting
•
DocumentType
•
EmailServicesFunction
•
EmailTemplate
•
EmbeddedServiceBranding
•
EmbeddedServiceConfig
•
EmbeddedServiceLiveAgent
•
EmbeddedServiceMenuSettings
•
ESignatureConfig
•
ESignatureEnvelopeConfig
•
ExplainabilityActionDefinition
•
ExplainabilityActionVersion
•
ExplainabilityMsgTemplate
•
ExpressionSetDefinition
•
ExpressionSetDefinitionVersion
•
ExpressionSetObjectAlias
•
ExternalAIModel
•
ExternalClientApplication
•
ExtlClntAppMobileSettings
•
ExtlClntAppOauthSettings
•
ExternalDataSrcDescriptor
•
ExternalServiceRegistration
•
FeatureParameterBoolean
•
FeatureParameterDate
•
FeatureParameterInteger
•
FieldRestrictionRule
•
FieldServiceMobileExtension
•
FlexiPage
•
FuelType
•
FuelTypeSustnUom
•
GatewayProviderPaymentMethodType
•
HomePageComponent
•
HomePageLayout
•
IdentityVerificationProcDef
•
InstalledPackage
•
IntegrationHubSettings
•
IntegrationHubSettingsType
•
IntegrationProviderDef
241
Hard-Deleted Components in Unlocked PackagesUnlocked Packages
•
Layout
•
Letterhead
•
LicenseDefinition
•
LightningComponentBundle
•
LightningExperienceTheme
•
LightningMessageChannel
•
LightningOnboardingConfig
•
ListView
•
LiveChatAgentConfig
•
LiveChatButton
•
LiveChatSensitiveDataRule
•
LocationUse
•
LoyaltyProgramSetup
•
MarketingAppExtActivity
•
MarketingAppExtension
•
MatchingRule
•
MfgProgramTemplate
•
MLDataDefinition
•
MLPredictionDefinition
•
NamedCredential
•
NetworkBranding
•
ObjectHierarchyRelationship
•
OcrSampleDocument
•
OcrTemplate
•
OmniDataTransform
•
OmniIntegrationProcedure
•
OmniScript
•
OmniUiCard
•
PaymentGatewayProvider
•
PermissionSet
•
PermissionSetGroup
•
PermissionSetLicense
•
PipelineInspMetricConfig
•
PlatformEventSubscriberConfig
•
ProductAttributeSet
•
ProductSpecificationTypeDefinition
•
Profile
•
QuickAction
•
RecordAlertCategory
•
RecordAlertDataSource
242
Hard-Deleted Components in Unlocked PackagesUnlocked Packages
•
RegisteredExternalService
•
RelatedRecordAssocCriteria
•
RelationshipGraphDefinition
•
RemoteSiteSetting
•
Report
•
ReportType
•
RestrictionRule
•
SalesAgreementSettings
•
SchedulingRule
•
SchedulingObjective
•
ScoreCategory
•
ServiceAISetupDefinition
•
ServiceAISetupField
•
ServiceProcess
•
SharingReason
•
SharingRecalculation
•
SlackApp
•
StaticResource
•
StnryAssetEnvSrcCnfg
•
SustainabilityUom
•
SustnUomConversion
•
SvcCatalogCategory
•
SvcCatalogFulfillmentFlow
•
SvcCatalogItemDef
•
TimelineObjectDefinition
•
UIObjectRelationConfig
•
UserAccessPolicy
•
UserLicense
•
UserProfileSearchScope
•
ValidationRule
•
VehicleAssetEmssnSrcCnfg
•
ViewDefinition
•
VirtualVisitConfig
•
WaveApplication
•
WaveComponent
•
WaveDashboard
•
WaveDataflow
•
WaveDataset
•
WaveLens
•
WaveRecipe
243
Hard-Deleted Components in Unlocked PackagesUnlocked Packages

•
WaveTemplateBundle
•
WaveXmd
•
WebLink
•
WebStoreTemplate
•
WorkflowAlert
•
WorkflowFieldUpdate
•
WorkflowFlowAction
•
WorkflowOutboundMessage
•
WorkflowRule
•
WorkflowTask
All other components are marked as deprecated when removed from an unlocked package. An admin can choose to remove deprecated
components. If the package is uninstalled, all components, including the deprecated components previously associated with the package,
are deleted from the org.
Delete an Unlocked Package or Package Version
Use the sf package version delete and sf package delete to delete packages and package versions that you no
longer need.
To delete a package or package version, users need the Delete Second-Generation Packages user permission. Before you delete a package,
first delete all associated package versions.
Can I delete released packages and
package versions?
Can I delete beta packages and
package versions?
Package Type
NoYesSecond-Generation Managed Packages
YesYesUnlocked Packages
Considerations for Deleting a Package or Package Version
•
Deletion is permanent.
•
Attempts to install a deleted package version will fail.
•
Before deleting, ensure that the package or package version isn’t referenced as a dependency.
Examples:
$ sf package delete -p "Your Package Alias"
$ sf package delete -p 0Ho...
$ sf package version delete -p "Your Package Version Alias"
$ sf package version delete -p 04t...
These CLI commands can’t be used with first-generation managed packages or package versions. To delete a first-generation managed
package, see View Package Details in the First-Generation Managed Packaging Developer Guide.
244
Delete an Unlocked Package or Package VersionUnlocked Packages

View Package Details
View the details of previously created packages and package versions from the command line.
To display a list of all packages in the Dev Hub org, use this command.
sf package list --target-dev-hub my-hub
You can view the namespace, package name, ID, and other details in the output.
Name Id Alias Description Type
─────────────── ────────────────── ────────────── ─────────── ─────────── ───────
Expenser App 0HoB00000004CzRKAU Expenser App Unlocked
Expenser Logic 0HoB00000004CzMKAU Expenser Logic Unlocked
Expenser Schema 0HoB00000004CzHKAU Expenser Schema Unlocked
Include optional parameters to filter the list results based on the modification date, creation date, and to order by specific fields or
package IDs. To limit the details, use --concise. To show expanded details, use --verbose.
To display a list of all package versions in the Dev Hub org, use this command.
sf package version list --target-dev-hub my-hub
You can view the namespace, version name, and other details in the output.
Package Name Namespace Version Sub Pkg Ver Id Alias
Installation Key Released
─────────────── ────────── ─────── ─────────────────── ───────────────────────
───────────────── ───────
true
true
false
true
false
true
true
true
true
Push a Package Upgrade for Unlocked Packages
Push upgrades enable you to upgrade packages installed in subscriber orgs, without asking customers to install the upgrade themselves.
You can choose which orgs receive a push upgrade, what version the package is upgraded to, and when you want the upgrade to occur.
Push upgrades are particularly helpful If you need to push a change for a hot bug fix.
245
View Package DetailsUnlocked Packages

Use SOAP API to initiate the push upgrade, track the status of each job, and review error messages if any push upgrades fail. Here are
the objects that help with push upgrades.
Use This Object:To Do This:
MetadataPackageVersion SOAP APIRetrieve details about your package version.
PackageSubscriber SOAP APIRetrieve information about the subscriber org, such as the org ID
and the package version currently installed.
PackagePushRequest SOAP APISchedule a push upgrade, or check the status of the push upgrade.
PackagePushJob SOAP APISpecify the org to receive the push upgrade. Create an individual
package push job for every org receiving the push upgrade.
PackagePushError SOAP APIReview any error messages associated with a push upgrade request.
Push Upgrade Considerations for Unlocked Packages
•
You can include new and changed features, or remove features during a push upgrade.
•
When a push upgrade is installed, the Apex in the package is compiled.
•
You can use push upgrades even if the package version requires a password.
Install an Unlocked Package
Install unlocked packages using the CLI or the browser. You can install package versions in a scratch org, sandbox org, DE org, or production
org.
Install Packages with the CLI
If you’re working with the Salesforce CLI, you can use the sf package install command to install packages in a scratch
org or target subscriber org.
Install Unlocked Packages from a URL
Install unlocked packages from the CLI or from a browser, similar to how you install managed packages.
Upgrade a Version of an Unlocked Package
A package upgrade occurs when you install a new package version into an org that has a previous version of that package installed.
Sample Script for Installing Unlocked Packages with Dependencies
Use this sample script as a basis to create your own script to install packages with dependencies. This script contains a query that
finds dependent packages and installs them in the correct dependency order.
Install Packages with the CLI
If you’re working with the Salesforce CLI, you can use the sf package install command to install packages in a scratch org or
target subscriber org.
Before you install a package to a scratch org, run this command to list all the packages and locate the ID or package alias.
sf package version list
246
Install an Unlocked PackageUnlocked Packages

Identify the version you want to install. Enter this command, supplying the package alias or package ID (starts with 04t).
sf package install --package "Expense [email protected]" --target-org [email protected]
By default, the package install command provides admins access to the installed package. To provide access to all users, specify
--security-type AllUsers when you run the package install command.
If you’ve already set the scratch org with a default username, enter just the package version ID.
sf package install --package "Expense [email protected]"
Note: If you’ve defined an alias (with the -a parameter), you can specify the alias instead of the username for --target-org.
The CLI displays status messages regarding the installation.
Waiting for the subscriber package version install request to get processed. Status =
InProgress Successfully installed the subscriber package version: 04txx0000000FIuAAM.
Control Package Installation Timeouts
When you issue a sf package install command, it takes a few minutes for a package version to become available in the target
org and for installation to complete. To allow sufficient time for a successful install, use these parameters that represent mutually exclusive
timers.
•
--publish-wait defines the maximum number of minutes that the command waits for the package version to be available
in the target org. The default is 0. If the package is not available in the target org in this time frame, the install is terminated.
Setting --publish-wait is useful when you create a new package version and then immediately try to install it to target orgs.
Note: If --publish-wait is set to 0, the package installation immediately fails, unless the package version is already
available in the target org.
•
--wait defines the maximum number of minutes that the command waits for the installation to complete after the package is
available. The default is 0. When the --waitinterval ends, the install command completes, but the installation continues until it
either fails or succeeds. You can poll the status of the installation using sf package install report.
Note: The --wait timer takes effect after the time specified by --publish-wait has elapsed. If the
--publish-wait interval times out before the package is available in the target org, the --wait interval never starts.
For example, consider a package called Expense Manager that takes five minutes to become available on the target org, and 11 minutes
to install. The following command has publish-wait set to three minutes and wait set to 10 minutes. Because Expense Manager
requires more time than the set publish-wait interval, the installation is aborted at the end of the three-minute publish-wait
interval.
sf package install --package "Expense [email protected]" --publish-wait 3 --wait 10
The following command has publish-wait set to six minutes and wait set to 10 minutes. If not already available, Expense
Manager takes five minutes to become available on the target org. The clock then starts ticking for the 10-minute wait time. At the
end of 10 minutes, the command completes because the wait time interval has elapsed, although the installation is not yet complete.
247
Install Packages with the CLIUnlocked Packages

At this point, sf package install report indicates that the installation is in progress. After one more minute, the installation
completes and sf package install report indicates a successful installation.
sf package install --package "Expense [email protected]" --publish-wait 6 --wait 10
SEE ALSO:
Salesforce CLI Command Reference package install
Salesforce Help: Determine Which Users Can Access a Package
Install Unlocked Packages from a URL
Install unlocked packages from the CLI or from a browser, similar to how you install managed packages.
If you create packages from the CLI, you can derive an installation URL for the package by adding the subscriber package ID to your Dev
Hub URL. You can use this URL to test different deployment or installation scenarios.
For example, if the package version has the subscriber package ID, 04tB00000009oZ3JBI, add the ID as the value of apvId.
https://MyDomainName.lightning.force.com/packagingSetupUI/ipLanding.app?apvId=04tB00000009oZ3JBI
Anyone with the URL and a valid login to a Salesforce org can install the package.
To install the package:
1. In a browser, enter the installation URL.
2. Enter your username and password for the Salesforce org in which you want to install the package, and then click Login.
3. If the package is protected by an installation key, enter the installation key.
4. For a default installation, click Install.
A message describes the progress. You receive a confirmation message when the installation is complete.
SEE ALSO:
Salesforce Help: Determine Which Users Can Access a Package
Upgrade a Version of an Unlocked Package
A package upgrade occurs when you install a new package version into an org that has a previous version of that package installed.
To upgrade a package, use the package install CLI command
sf package install --package 04t... --target-org [email protected]
For more examples and details about this command, see package install in the Salesforce CLI Command Reference.
When you perform a package upgrade, here’s what to expect for metadata changes.
When you upgrade to a new unlocked package version, you choose whether to require successful compilation of all Apex in the org
and package (--apex-compile all), or only the Apex in the package (--apex-compile package).
•
Metadata introduced in the new version is installed as part of the upgrade.
•
If an upgraded component has the same API name as a component already in the target org, the component is overwritten with
the changes.
•
If a component in the upgrade was deleted from the target org, the component is re-created during the upgrade.
248
Install Unlocked Packages from a URLUnlocked Packages

•
Metadata that was removed in the new package version is also removed from the target org as part of the upgrade. Removed
metadata is metadata not included in the current package version install, but present in the previous package version installed in
the target org. If metadata is removed before the upgrade occurs, the upgrade proceeds normally. Some examples where metadata
is deprecated and not deleted are:
–
User-entered data in custom objects and fields are deprecated and not deleted. Admins can export such data if necessary.
–
An object such as an Apex class is deprecated and not deleted if it’s referenced in a Lightning component that is part of the
package.
•
In API version 45.0 and later (Salesforce CLI version 45.0.9 or later), you can specify what happens to removed metadata during
package upgrade. Use the sf package install command’s -t | --upgrade-type parameter, specifying one of these
values:
–
Delete specifies to delete all removed components, except for custom objects and custom fields, that don’t have dependencies.
–
DeprecateOnly specifies that all removed components must be marked deprecated. The removed metadata exists in the
target org after package upgrade, but is shown in the UI as deprecated from the package. This option is useful when migrating
metadata from one package to another.
–
Mixed (the default) specifies that some removed components are deleted, and other components are marked deprecated.
For more information on hard-deleted components, see Hard-Deleted Components in Unlocked Packages.
Beta packages aren’t upgradeable. To install a new beta package or released version, first uninstall the beta package.
It's possible to install a lower package version on top of a higher package version, but seriously consider this scenario before attempting
it. This is not the same as a rollback, which isn't possible.
Note: For package installs into production orgs, or any org that has Apex Compile on Deploy enabled, the platform compiles all
Apex in the org after the package install or upgrade operation completes. This approach assures that package installs and upgrades
don’t impact the performance of an org, and is done even if --apex-compile package is specified.
Sample Script for Installing Unlocked Packages with Dependencies
Use this sample script as a basis to create your own script to install packages with dependencies. This script contains a query that finds
dependent packages and installs them in the correct dependency order.
Sample Script
Note: Be sure to replace the package version ID and scratch org user name with your own specific details.
#!/bin/bash
# The execution of this script stops if a command or pipeline has an error.
# For example, failure to install a dependent package will cause the script
# to stop execution.
set -e
# Specify a package version id (starts with 04t)
249
Sample Script for Installing Unlocked Packages with
Dependencies
Unlocked Packages

# If you know the package alias but not the id, use sf package version list to find it.
PACKAGE=04tB0000000NmnHIAS
# Specify the user name of the subscriber org.
# Specify the timeout in minutes for package installation.
WAIT_TIME=15
echo "Retrieving dependencies for package Id: "$PACKAGE
# Execute soql query to retrieve package dependencies in json format.
RESULT_JSON=`sf data query -u $USER_NAME -t -q "SELECT Dependencies FROM
SubscriberPackageVersion WHERE Id='$PACKAGE'" --json`
# Parse the json string using python to test whether the result json contains a list of
ids or not.
DEPENDENCIES=`echo $RESULT_JSON | python -c 'import sys, json; print
json.load(sys.stdin)["result"]["records"][0]["Dependencies"]'`
# If the parsed dependencies is None, the package has no dependencies. Otherwise, parse
the result into a list of ids.
# Then loop through the ids to install each of the dependent packages.
if [[ "$DEPENDENCIES" != 'None' ]]; then
DEPENDENCIES=`echo $RESULT_JSON | python -c '
import sys, json
ids = json.load(sys.stdin)["result"]["records"][0]["Dependencies"]["ids"]
dependencies = []
for id in ids:
dependencies.append(id["subscriberPackageVersionId"])
print " ".join(dependencies)
'`
250
Sample Script for Installing Unlocked Packages with
Dependencies
Unlocked Packages

echo "The package you are installing depends on these packages (in correct dependency
order): "$DEPENDENCIES
for id in $DEPENDENCIES
do
echo "Installing dependent package: "$id
sf package install --package $id -u $USER_NAME -w $WAIT_TIME --publish-wait 10
done
else
echo "The package has no dependencies"
fi
# After processing the dependencies, proceed to install the specified package.
echo "Installing package: "$PACKAGE
sf package install --package $PACKAGE -u $USER_NAME -w $WAIT_TIME --publish-wait 10
exit 0;
Migrate Deprecated Metadata from Unlocked Packages
You can deprecate metadata in an unlocked package, move that metadata to a new package, and then install the new package in your
production org.
As you create more unlocked packages, you can refactor your package and move metadata from one unlocked package to another
unlocked package if necessary.
To move production metadata from package A to package B, follow these steps.
1. Identify the metadata to be moved from package A to package B.
2. Remove the metadata from package A, create a version, and release the package.
3. Add the metadata to package B, create a version, and release the package.
4. In your production org, upgrade package A.
5. In your production org, install package B.
Your metadata is now a part of package B in your production org.
251
Migrate Deprecated Metadata from Unlocked PackagesUnlocked Packages

Uninstall an Unlocked Package
You can uninstall a package from an org using Salesforce CLI or from the Setup UI. When you uninstall unlocked packages, all components
in the package, as well as any deprecated components previously associated with the package, are deleted from the org.
To use the CLI to uninstall a package from the target org, authorize the Dev Hub org and run this command.
sf package uninstall --package "Expense [email protected]"
You can also uninstall a package from the web browser. Open the Salesforce org where you installed the package.
sf org open -u [email protected]
Then uninstall the package.
1. From Setup, enter Installed Packages in the Quick Find box, then select Installed Packages.
2. Click Uninstall next to the package that you want to remove.
3. Determine whether to save and export a copy of the package’s data, and then select the corresponding radio button.
4. Select Yes, I want to uninstall and click Uninstall.
Considerations on Uninstalling Packages
•
If you’re uninstalling a package that includes a custom object, all components on that custom object are also deleted. Deleted items
include custom fields, validation rules, custom buttons, and links, workflow rules, and approval processes.
•
You can’t uninstall a package whenever a component not included in the uninstall references any component in the package. For
example:
–
When an installed package includes any component on a standard object that another component references, Salesforce prevents
you from uninstalling the package. An example is a package that includes a custom user field with a workflow rule that gets
triggered when the value of that field is a specific value. Uninstalling the package would prevent your workflow from working.
–
When you’ve installed two unrelated packages that each include a custom object and one custom object component references
a component in the other, you can’t uninstall the package. An example is if you install an expense report app that includes a
custom user field and create a validation rule on another installed custom object that references that custom user field. However,
uninstalling the expense report app prevents the validation rule from working.
–
When an installed folder contains components you added after installation, Salesforce prevents you from uninstalling the package.
–
When an installed letterhead is used for an email template you added after installation, Salesforce prevents you from uninstalling
the package.
–
When an installed package includes a custom field that’s referenced by Einstein Prediction Builder or Case Classification, Salesforce
prevents you from uninstalling the package. Before uninstalling the package, edit the prediction in Prediction Builder or Case
Classification so that it no longer references the custom field.
•
You can’t uninstall a package that removes all active business and person account record types. Activate at least one other business
or person account record type, and try again.
•
You can’t uninstall a package if a background job is updating a field added by the package, such as an update to a roll-up summary
field. Wait until the background job finishes, and try again.
Transfer an Unlocked Package to a Different Dev Hub
You can transfer the ownership of an unlocked package from one Dev Hub org to another.
252
Uninstall an Unlocked PackageUnlocked Packages

Note: This package transfer feature is available only to unlocked packages and second-generation managed packages. Dev Hub
orgs aren’t used with first-generation managed packages or unmanaged packages, so this feature doesn’t apply to those package
types.
Request a Package Transfer to a Different Dev Hub
Start by logging a case with Salesforce Customer Support, and provide the following details:
Subject: Unlocked Package Transfer to a different Dev Hub
Description:
In the description, list:
•
Subscriber package ID of the package you’re transferring. This ID starts with 033.
To verify the 033 ID of your package, run the sf package list command with the -–verbose flag on the source Dev
Hub org.
•
Dev Hub org ID for the source org.
•
Dev Hub org ID for the destination org. The destination Dev Hub org can’t be a Developer Edition org or a trial org.
•
(Optional) Namespace of the package being transferred. If the package is a no-namespace unlocked package, skip this step.
•
Acknowledge that you’ve reviewed and completed the steps listed in the Prepare to Transfer Your Package section,
including linking your namespace to the destination Dev Hub, and clearing your Apex Error Notification User.
If you’re transferring more than one package, file a separate case for each package.
After your case has been reviewed and approved, someone from Salesforce Customer Support will contact you to arrange a time to
initiate the package transfer.
Note: For security reasons, package transfers between a Dev Hub located in Government Cloud and a Dev Hub located outside
Government Cloud aren’t permitted.
Prepare to Transfer Your Package
Here’s how you can help ensure a smooth package transfer.
•
If the package you’re transferring has a namespace, keep the namespace linked to the source Dev Hub. Before the package transfer,
the namespace must be linked to both the source and destination Dev Hub orgs.
•
Before the package transfer process is initiated, ensure all push upgrades or package version creation processes have completed.
•
Delete package versions that are no longer needed.
•
If specified, clear the package’s Error Notification User using the sf package update
--error-notification-username= command. If you’re transferring the package to a Dev Hub org you own, you can
set the Error Notification User to a user in the destination Dev Hub after the package transfer is complete. Note: Specifying
--error-notification-username= with no value after the equals sign clears any previously set username.
During the Package Transfer Process
All push upgrades or package version creation processes must be complete before the package transfer process is initiated. Salesforce
Customer Support will alert you about the date the package transfer will occur.
253
Transfer an Unlocked Package to a Different Dev HubUnlocked Packages

After the Package Transfer Is Complete
Run sf package list and verify that the package is no longer associated with your Dev Hub.
Impact of Package Transfers on Package IDs
After package transfer is complete
…
ID starts withID Type
This ID remains the same.033Subscriber Package ID
This ID remains the same.04tSubscriber Package Version ID
The transferred package receives a new and
unique package ID.
0HoPackage ID
Update Your Package Project File
Before you create new packages or package versions on your Dev Hub, update your sfdx-project.json file and remove all
references to the transferred package from the package directory and package alias sections.
If you have packages in your Dev Hub that depend on the package that you’re transferring, update the package dependency section in
your sfdx-project.json file to explicitly specify the 04t ID of the transferred package that you depend on.
For example, if you transferred pkgA to a different Dev Hub, and your sfdx-project.json file lists the package dependency like
this.
"dependencies": [
{
"package": "pkgA"
"versionNumber": "2.0.0.LATEST"
}
]
Update the dependency to either specify the 04t ID of pkgA.
"dependencies": [
{
"package": "04tB0000000UzH5IAK"
}
]
Or specify the dependency using a package alias.
"dependencies": [
{
"package": "pkgA2.0.0-1"
}
"packageAliases": {
"pkgA2.0.0-1": "04tB0000000UzH5IAK"
}
]
254
Transfer an Unlocked Package to a Different Dev HubUnlocked Packages

What Package History Is Transferred?
When a package is transferred, all package versions, and all lines of ancestry are transferred. Upgrade paths aren’t affected.
Regardless of whether the package transfer occurred between two Dev Hub orgs you own, or the package was transferred externally to
a Dev Hub you don’t own, we transfer the package version history.
We transfer:
•
Package name, namespace, type, and IDs. One exception is that the transferred package gets a new 0Ho ID.
•
Package version info. This includes all the info that is typically displayed when you run the sf package version list or
sf package version report command.
We don’t transfer:
•
Push upgrade history.
•
Package version create requests.
•
The username of the Dev Hub user who received Apex and other types of error notifications. This optional user is set using
--error-notification-username.
Take Ownership of an Unlocked Package Transferred from a Different Dev Hub
You can take ownership of an unlocked package that is transferred from another Dev Hug org.
Take Ownership of an Unlocked Package Transferred from a Different Dev
Hub
You can take ownership of an unlocked package that is transferred from another Dev Hug org.
To initiate a package transfer from your Dev Hub org, see Transfer an Unlocked Package to a Different Dev Hub.
Note: For security reasons, package transfers between a Dev Hub located in Government Cloud and a Dev Hub located outside
Government Cloud aren’t permitted.
Receive a Package Transfer
Link the namespace of the package you’re receiving to your Dev Hub org. See Link a Namespace to a Dev Hub Org in the Salesforce DX
Developer Guide. If the package isn’t associated with a namespace, skip this step.
After the Package Transfer Is Complete
After the package transfer is complete, you’ll be notified by Salesforce Customer Support.
To verify that the transferred package is associated with your Dev Hub, run sf package list.
Impact of Package Transfers on Package IDs
After package transfer is complete
…
ID starts withID Type
This ID remains the same.033Subscriber Package ID
This ID remains the same.04tSubscriber Package Version ID
255
Take Ownership of an Unlocked Package Transferred from
a Different Dev Hub
Unlocked Packages

After package transfer is complete
…
ID starts withID Type
The transferred package receives a new and
unique package ID.
0HoPackage ID
Update Your Package Project File
Open and review the contents of the sfdx-project.json file associated with the transferred package.
Open and review the contents of any scratch org definition files associated with the transferred package. Definition files help in setting
up your scratch orgs during development. Use the –definition-file parameter to specify a definition file when you create a
new package version.
If the package directories section lists additional packages that weren’t transferred to you, remove those references from the
sfdx-project.json file.
Next, review the package alias section of the sfdx-project.json file, and remove any references to package aliases that aren’t
associated with the package that was transferred.
Update the package alias of the transferred package to specify its 0Ho package ID.
Before You Create a New Package Version
Similar to how you go about creating new package versions, you must update the sfdx-project.json file, and update the
version number.
To designate a Dev Hub user to receive email notifications for unhandled Apex exceptions, and install, upgrade, or uninstall failures
associated with your package, run the sf package update command, and use the --error-notification-username
parameter.
What Package History Is Transferred?
We transfer:
•
Package name, namespace, type, and IDs. One exception is that the transferred package gets a new 0Ho ID.
•
Package version info. This includes all the info that is typically displayed when you run the sf package version list or
sf package version report command.
We don’t transfer:
•
Push upgrade history.
•
Package version create requests.
•
The username of the Dev Hub user who received Apex and other types of error notifications.
256
Take Ownership of an Unlocked Package Transferred from
a Different Dev Hub
Unlocked Packages

CHAPTER 12 Continuous Integration
Continuous integration (CI) is a software development practice in which developers regularly integrate
their code changes into a source code repository. To ensure that the new code does not introduce bugs,
automated builds and tests run before or after developers check in their changes.
In this chapter ...
• Continuous
Integration Using
CircleCI
Many third-party CI tools are available for you to choose from. Salesforce DX easily integrates into these
tools so that you can set up continuous integration for your Salesforce applications.
SEE ALSO:
Salesforce Help: Install and Configure DevOps Center
Salesforce Help: Manage and Release Changes Easily and Collaboratively with DevOps Center
• Continuous
Integration Using
Jenkins
• Continuous
Integration with
Travis CI
• Sample CI Repos for
Org Development
Model
• Sample CI Repos for
Package
Development Model
257

Continuous Integration Using CircleCI
CircleCI is a commonly used integration tool that integrates with your existing version control system to push incremental updates to
the environments you specify. CircleCI can be used as a cloud-based or on-premise tool. These instructions demonstrate how to use
GitHub, CircleCI, and your Dev Hub org for continuous integration.
Configure Your Environment for CircleCI
Before integrating your existing CircleCI framework, configure your Dev Hub org and CircleCI project.
Connect CircleCI to Your DevHub
Authorize CircleCI to push content to your Dev Hub org via a connected app.
SEE ALSO:
CircleCI
The sfdx-circleci-package Github Repo
The sfdx-circleci-org Github Repo
Configure Your Environment for CircleCI
Before integrating your existing CircleCI framework, configure your Dev Hub org and CircleCI project.
1. Set up your GitHub repository with CircleCI. You can follow the sign-up steps on the CircleCI website to access your code on GitHub.
2. Install the Salesforce CLI, if you haven’t already.
3. Follow Authorize an Org Using the JWT Flow for your Dev Hub org, if you haven’t already.
4. Encrypt your server key.
a. First, generate a key and initialization vector (iv) to encrypt your server.key file locally. CircleCI uses the key and iv to decrypt
your server key in the build environment.
Run the following command in the directory containing your server.key file. For the <passphrase> value, enter a
word of your own choosing to create a unique key.
openssl enc -aes-256-cbc -k <passphrase> -P -md sha1 -nosalt
The key and iv value display in the output.
key=****24B2
iv =****DA58
b. Note the key and iv values, you need them later.
c. Encrypt the server.key file using the newly generated key and iv values. Run the following command in the directory
containing your server.key file, replacing <key> and <iv> with the values from the previous step.
openssl enc -nosalt -aes-256-cbc -in server.key -out server.key.enc -base64 -K <key>
-iv <iv>
Note: Use the key and iv values only once, and don't use them to encrypt more than the server.key. While you can
reuse this pair to encrypt other things, it is considered a security violation to do so.
258
Continuous Integration Using CircleCIContinuous Integration

You generate a new key and iv value every time you run the command in step a. In other words, you can't regenerate the same
pair. If you lose these values you must generate new ones and encrypt again.
Next, you’ll store the key, iv, and contents of server.key.enc as protected environment variables in the CircleCI UI. These values
are considered secret, so take the appropriate precautions to protect them.
Connect CircleCI to Your DevHub
Authorize CircleCI to push content to your Dev Hub org via a connected app.
1. Make sure that you have Salesforce CLI installed. Check by running sf version and confirm that you see version information.
If you don't have it installed, see Install Salesforce CLI.
2. Confirm you can perform a JWT-based authorization from the directory containing your server.key file. Run the following
command from the directory containing your server.key (replace <your_consumer_key> and <your_username>
values where indicated).
sf org login jwt --client-id <your_consumer_key> --jwt-key-file server.key --username
<your_username> --set-default-dev-hub
3. Fork the sfdx-circleci repo into your GitHub account using the Fork link at the top of the page.
4. Create a local directory for this project and clone your forked repo locally into the new directory. Replace <git_username>
with your own GitHub username.
git clone https://github.com/<git_username>/sfdx-circleci.git
5. Retrieve the generated consumer key from your JWT-Based Authorization connected app. From Setup, in the Quick Find box, enter
App, and then select App Manager. Select View in the row-menu next to the connected app.
6. In the CircleCI UI, you see a project named sfdx-circleci. In the project settings, store the consumer key in a CircleCI environment
variable named HUB_CONSUMER_KEY. For more information, see the CircleCI documentation Setting an Environment Variable
in a Project.
7. Store the username that you use to access your Dev Hub in a CircleCI environment variable named HUB_SFDX_USER using the
CircleCI UI.
8. Store the key and iv values from Encrypt Your Server Key in CircleCI environment variables named DECRYPTION_KEYand
DECRYPTION_IV, respectively. When you finish setting the environment variables, your project screen looks like the following
image.
259
Connect CircleCI to Your DevHubContinuous Integration

Note: In the directory containing your server.key file, use the command rm server.key to remove the
server.key. Never store keys or certificates in a public place.
You’re ready to go! Now when you commit and push a change, your change kicks off a CircleCI build.
•
Contribute to the repository – If you find any issues or opportunities for improving this repository, fix them! Feel free to contribute
to this project, fork this repository, and then change the content. After you make your changes, share them with the community by
sending a pull request. See How to send pull requests for more information about contributing to GitHub projects.
•
Report issues – If you find any issues with this demo that you can't fix, feel free to report them in the issues section of this repository.
Continuous Integration Using Jenkins
Jenkins is an open-source, extensible automation server for implementing continuous integration and continuous delivery. You can
easily integrate Salesforce DX into the Jenkins framework to automate testing of Salesforce applications against scratch orgs.
To integrate Jenkins, we assume:
•
You are familiar with how Jenkins works. You can configure and use Jenkins in many ways. We focus on integrating Salesforce DX
into Jenkins multibranch pipelines.
•
The computer on which the Jenkins server is running has access to your version control system and to the repository that contains
your Salesforce application.
Configure Your Environment for Jenkins
Before integrating your Dev Hub and scratch orgs into your existing Jenkins framework, configure your Jenkins environment. Our
example assumes that you’re working in a package development model.
260
Continuous Integration Using JenkinsContinuous Integration
Jenkinsfile Walkthrough
The sample Jenkinsfile shows how to integrate your Dev Hub and scratch orgs into a Jenkins job. The sample uses Jenkins Multibranch
Pipelines. Every Jenkins setup is different. This walkthrough describes one of the ways to automate testing of your Salesforce
applications. The walkthrough highlights Salesforce CLI commands to create a scratch org, upload your code, and run your tests.
Sample Jenkinsfile
A Jenkinsfile is a text file that contains the definition of a Jenkins Pipeline. This Jenkinsfile shows how to integrate
Salesforce CLI commands to automate testing of your Salesforce applications using scratch orgs.
SEE ALSO:
Jenkins
Pipeline-as-code with Multibranch Workflows in Jenkins
Configure Your Environment for Jenkins
Before integrating your Dev Hub and scratch orgs into your existing Jenkins framework, configure your Jenkins environment. Our example
assumes that you’re working in a package development model.
1. In your Dev Hub org, create a connected app as described by the JWT-based authorization flow. This step includes obtaining or
creating a private key and digital certificate.
Make note of your consumer key (sometimes called a client ID) when you save the connected app. You need the consumer key to
set up your Jenkins environment. Also have available the private key file used to sign the digital certificate.
2. On the computer that’s running the Jenkins server, do the following.
a. Download and install Salesforce CLI.
b. Store the private key file as a Jenkins Secret File using the Jenkins Admin Credentials interface. Make note of the new entry’s ID.
You later reference this Credentials entry in your Jenkinsfile.
c. Set the following variables in your Jenkins environment.
•
SF_USERNAME—The username for the Dev Hub org, such as [email protected].
•
SF_INSTANCE_URL—The login URL of the Salesforce instance that hosts the Dev Hub org. The default is
https://login.salesforce.com. We recommend that you update this value to the My Domain login URL for the Dev Hub org.
You can find an org’s My Domain login URL on the My Domain page in Setup.
•
SF_CONSUMER_KEY—The consumer key that was returned after you created a connected app in your Dev Hub org.
•
SERVER_KEY_CREDENTALS_ID—The credentials ID for the private key file that you stored in the Jenkins Admin Credentials
interface.
•
PACKAGE_NAME-The name of your package, such as My Package.
•
PACKAGE_VERSION-The version of your package, which starts with 04t.
•
TEST_LEVEL-The test level for your package, such as RunLocalTests.
The names for these environment variables are just suggestions. You can use any name as long as you specify it in the
Jenkinsfile.
You can also optionally set the SF_AUTOUPDATE_DISABLE variable to true to disable auto-update of Salesforce CLI. CLI
auto-update can interfere with the execution of a Jenkins job.
3. Set up your Salesforce DX project so that you can create a scratch org.
261
Configure Your Environment for JenkinsContinuous Integration

4. (Optional) Install the Custom Tools Plugin into your Jenkins console, and create a custom tool that references Salesforce CLI. The
Jenkins walkthrough assumes that you created a custom tool named toolbelt in the /usr/local/bin directory, which is the
directory in which Salesforce CLI is installed.
SEE ALSO:
Authorize an Org Using the JWT Flow
Salesforce CLI Setup Guide
Jenkins: Credentials Binding Plugin
Project Setup
Jenkinsfile Walkthrough
The sample Jenkinsfile shows how to integrate your Dev Hub and scratch orgs into a Jenkins job. The sample uses Jenkins Multibranch
Pipelines. Every Jenkins setup is different. This walkthrough describes one of the ways to automate testing of your Salesforce applications.
The walkthrough highlights Salesforce CLI commands to create a scratch org, upload your code, and run your tests.
This walkthrough relies on the sfdx-jenkins-package Jenkinsfile. We assume that you’re familiar with the structure of the Jenkinsfile,
Jenkins Pipeline DSL, and the Groovy programming language. This walkthrough demonstrates implementing a Jenkins pipeline using
Salesforce CLI and scratch orgs. See the CLI Command Reference regarding the commands used.
This workflow most closely corresponds to Jenkinsfile stages.
•
Define Variables
•
Check Out the Source Code
•
Wrap All Stages in a withCredentials Command
•
Wrap All Stages in a withEnv Command
•
Authorize Your Dev Hub Org and Create a Scratch Org
•
Push Source and Assign a Permission Set
•
Run Apex Tests
•
Delete the Scratch Org
•
Create a Package
•
Create a Scratch Org and Display Info
•
Install Package, Run Unit Tests, and Delete Scratch Org
Define Variables
Use the def keyword to define the variables required by Salesforce CLI commands. Assign each variable the corresponding environment
variable that you previously set in your Jenkins environment.
def SF_CONSUMER_KEY=env.SF_CONSUMER_KEY
def SERVER_KEY_CREDENTALS_ID=env.SERVER_KEY_CREDENTALS_ID
def TEST_LEVEL='RunLocalTests'
def PACKAGE_NAME='0Ho1U000000CaUzSAK'
def PACKAGE_VERSION
def SF_INSTANCE_URL = env.SF_INSTANCE_URL ?: "https://MyDomainName.my.salesforce.com"
Define the SF_USERNAME variable, but don’t set its value. You do that later.
def SF_USERNAME
262
Jenkinsfile WalkthroughContinuous Integration

Although not required, we assume that you used the Jenkins Global Tool Configuration to create the toolbelt custom tool that
points to the CLI installation directory. In your Jenkinsfile, use the tool command to set the value of the toolbelt variable to
this custom tool.
def toolbelt = tool 'toolbelt'
You can now reference the Salesforce CLI executable in the Jenkinsfile using ${toolbelt}/sf.
Check Out the Source Code
Before testing your code, get the appropriate version or branch from your version control system (VCS) repository. In this example, we
use the checkout scm Jenkins command. We assume that the Jenkins administrator has already configured the environment to
access the correct VCS repository and check out the correct branch.
stage('checkout source') {
// when running in multi-branch job, one must issue this command
checkout scm
}
Wrap All Stages in a withCredentials Command
You previously stored the JWT private key file as a Jenkins Secret File using the Credentials interface. Therefore, you must use the
withCredentials command in the body of the Jenkinsfile to access the secret file. The withCredentials command
lets you name a credential entry, which is then extracted from the credential store and provided to the enclosed code through a variable.
When using withCredentials, put all stages within its code block.
This example stores the credential ID for the JWT key file in the variable SERVER_KEY_CREDENTALS_ID. You defined the
SERVER_KEY_CREDENTALS_ID earlier and set it to its corresponding environment variable. The withCredentials command
fetches the contents of the secret file from the credential store and places the contents in a temporary location. The location is stored
in the variable server_key_file. You use the server_key_file variable with the org login jwt command to specify
the private key securely.
withCredentials([file(credentialsId: SERVER_KEY_CREDENTALS_ID, variable: 'server_key_file')])
# all stages will go here
}
Wrap All Stages in a withEnv Command
When running Jenkins jobs, it’s helpful to understand where files are being stored. There are two main directories to be mindful of: the
workspace directory and the home directory. The workspace directory is unique to each job while the home directory is the same for
all jobs.
The withCredentials command stores the JWT key file in the Jenkins workspace during the job. However, Salesforce CLI auth
commands store authentication files in the home directory; these authentication files persist outside of the duration of the job.
This setup isn’t a problem when you run a single job but can cause problems when you run multiple jobs. So, what happens if you run
multiple jobs using the same Dev Hub or other Salesforce user? When the CLI tries to connect to the Dev Hub as the user you authenticated,
it fails to refresh the token. Why? The CLI tries to use a JWT key file that no longer exists in the other workspace, regardless of the
withCredentials for the current job.
If you set the home directory to match the workspace directory using withEnv, the authentication files are unique for each job.
Creating unique auth files per job is also more secure because each job has access only to the auth files it creates.
263
Jenkinsfile WalkthroughContinuous Integration

When using withEnv, put all stages within its code block,
withEnv(["HOME=${env.WORKSPACE}"]) {
# all stages will go here
}
Note: If you don’t use a pipeline or you run commands outside of a pipeline stage, add a home environment specification to your
script: export HOME=$WORKSPACE.
Authorize Your Dev Hub Org and Create a Scratch Org
This sfdx-jenkins-package example uses two stages: one stage to authorize the Dev Hub org and another stage to create a
scratch org.
// -------------------------------------------------------------------------
// Authorize the Dev Hub org with JWT key and give it an alias.
// -------------------------------------------------------------------------
stage('Authorize DevHub') {
rc = command "${toolbelt}/sf org login jwt --instance-url ${SF_INSTANCE_URL} --client-id
${SF_CONSUMER_KEY} --username ${SF_USERNAME} --jwt-key-file ${server_key_file}
--set-default-dev-hub --alias HubOrg"
if (rc != 0) {
error 'Salesforce dev hub org authorization failed.'
}
}
// -------------------------------------------------------------------------
// Create new scratch org to test your code.
// -------------------------------------------------------------------------
stage('Create Test Scratch Org') {
rc = command "${toolbelt}/sf org create scratch --target-dev-hub HubOrg --set-default
--definition-file config/project-scratch-def.json --alias ciorg --wait 10 --duration-days
1"
if (rc != 0) {
error 'Salesforce test scratch org creation failed.'
}
}
Use org login jwt to authorize your Dev Hub org.
You’re required to run this step only one time, but we suggest you add it to your Jenkinsfile and authorize each time you run
the Jenkins job. This way you’re always sure that the Jenkins job isn’t aborted due to lack of authorization. There’s typically little harm in
authorizing multiple times, but keep in mind that the API call limit for your scratch org’s edition still applies.
Use the flags of the org login jwt command to provide information about the Dev Hub org that you’re authorizing. The values
for the --client-id, --username, and --instance-url flags are the SF_CONSUMER_KEY, HubOrg, and SF_INSTANCE_URL
environment variables you previously defined, respectively. The value of the --jwt-key-file flag is the server_key_file
variable that you set in the previous section using the withCredentials command. The --set-default-dev-hub flag
specifies that this HubOrg is the default Dev Hub org for creating scratch orgs.
Note: It’s a best practice to have a unique authentication file for each Jenkins job using the withEnv wrapper. But it’s possible
to authorize a Dev Hub on your Jenkins machine instead. The advantage is that your authentication is set centrally on your machine
264
Jenkinsfile WalkthroughContinuous Integration

for any Jenkins job you run. The disadvantage is security: Every job has access to all authenticated users whether you want them
to or not.
If you do want to auth to your Dev Hub on your Jenkins machine, follow these steps:
•
On the Jenkins machine as the Jenkins user, authorize to your Dev Hub using any of the org login commands.
•
In your Jenkinsfile, remove the withCredentials, withEnv, and org login jwt statements.
Use the org create scratch CLI command to create a scratch org. In the example, the CLI command uses the
config/project-scratch-def.json file (relative to the project directory) to create the scratch org. The --json flag
specifies the output as JSON format. The --set-default flag sets the new scratch org as the default.
The Groovy code that parses the JSON output of the org create scratch command extracts the username that was auto-generated
as part of the org creation. This username, stored in the SF_USERNAME variable, is used with the CLI commands that push source, assign
a permission set, and so on.
Push Source and Assign a Permission Set
Let’s populate your new scratch org with metadata. This example uses the project deploy start command to deploy your
source to the org. The source includes all the pieces that make up your Salesforce application: Apex classes and test classes, permission
sets, layouts, triggers, custom objects, and so on.
// -------------------------------------------------------------------------
// Push source to test scratch org.
// -------------------------------------------------------------------------
stage('Push To Test Scratch Org') {
rc = command "${toolbelt}/sf project deploy start --target-org ciorg"
if (rc != 0) {
error 'Salesforce push to test scratch org failed.'
}
}
Recall the SF_USERNAME variable that contains the auto-generated username that was output by the org create scratch
command in an earlier stage. The code uses this variable as the argument to the --target-org flag to specify the username for
the new scratch org.
The project deploy start command deploys all the Salesforce-related files that it finds in your project. Add a .forceignore
file to your repository to list the files that you don’t want pushed to the org.
Run Apex Tests
Now that your source code and test source are pushed to the scratch org, run the apex run test command to run Apex tests.
// -------------------------------------------------------------------------
// Run unit tests in test scratch org.
// -------------------------------------------------------------------------
stage('Run Tests In Test Scratch Org') {
rc = command "${toolbelt}/sf apex run test --target-org ciorg --wait 10 --result-format
tap --code-coverage --test-level ${TEST_LEVEL}"
if (rc != 0) {
error 'Salesforce unit test run in test scratch org failed.'
265
Jenkinsfile WalkthroughContinuous Integration

}
}
You can specify various flags to the apex run test CLI command. In the example:
•
The --test-level ${TEST_LEVEL} flag runs all tests in the scratch org, except tests that originate from installed managed
packages. You can also specify RunLocalTests to run only local tests, RunSpecifiedTests to run only certain Apex tests
or suites or RunAllTestsInOrg to run all tests in the org.
•
The --result-format tap flag specifies that the command output is in Test Anything Protocol (TAP) format. The test results
that are written to a file are still in JUnit and JSON formats.
•
The --target-org ciorg flag specifies the username for accessing the scratch org (the value in SF_USERNAME).
The apex run test command writes its test results in JUnit format.
Delete the Scratch Org
Salesforce reserves the right to delete a scratch org a specified number of days after it was created. You can also create a stage in your
pipeline that uses org delete scratch to explicitly delete your scratch org when the tests complete. This cleanup ensures better
management of your resources.
// -------------------------------------------------------------------------
// Delete package install scratch org.
// -------------------------------------------------------------------------
stage('Delete Package Install Scratch Org') {
rc = command "${toolbelt}/sf org delete scratch --target-org installorg --no-prompt"
if (rc != 0) {
error 'Salesforce package install scratch org deletion failed.'
}
}
Create a Package
Now, let’s create a package. If you’re new to packaging, you can think about a package as a container that you fill with metadata. It
contains a set of related features, customizations, and schema. You use packages to move metadata from one Salesforce org to another.
After you create a package, add metadata and create a new package version.
// -------------------------------------------------------------------------
// Create package version.
// -------------------------------------------------------------------------
stage('Create Package Version') {
if (isUnix()) {
output = sh returnStdout: true, script: "${toolbelt}/sf package version create
--package ${PACKAGE_NAME} --installation-key-bypass --wait 10 --json --target-dev-hub
HubOrg"
} else {
output = bat(returnStdout: true, script: "${toolbelt}/sf package version create
--package ${PACKAGE_NAME} --installation-key-bypass --wait 10 --json --target-dev-hub
HubOrg").trim()
output = output.readLines().drop(1).join(" ")
}
266
Jenkinsfile WalkthroughContinuous Integration

// Wait 5 minutes for package replication.
sleep 300
def jsonSlurper = new JsonSlurperClassic()
def response = jsonSlurper.parseText(output)
PACKAGE_VERSION = response.result.SubscriberPackageVersionId
response = null
echo ${PACKAGE_VERSION}
}
Create a Scratch Org and Display Info
Remember when you created a scratch org earlier? Now let’s create a scratch org to install your package into, and display info about
that scratch org.
// -------------------------------------------------------------------------
// Create new scratch org to install package to.
// -------------------------------------------------------------------------
stage('Create Package Install Scratch Org') {
rc = command "${toolbelt}/sf org create scratch --target-dev-hub HubOrg --set-default
--definition-file config/project-scratch-def.json --alias installorg --wait 10
--duration-days 1"
if (rc != 0) {
error 'Salesforce package install scratch org creation failed.'
}
}
// -------------------------------------------------------------------------
// Display install scratch org info.
// -------------------------------------------------------------------------
stage('Display Install Scratch Org') {
rc = command "${toolbelt}/sf org display --target-org installorg"
if (rc != 0) {
error 'Salesforce install scratch org display failed.'
}
}
Install Package, Run Unit Tests, and Delete Scratch Org
To finish up, install your package in your scratch org, run unit tests, then delete the scratch org. That’s it!
// -------------------------------------------------------------------------
// Install package in scratch org.
// -------------------------------------------------------------------------
stage('Install Package In Scratch Org') {
267
Jenkinsfile WalkthroughContinuous Integration

rc = command "${toolbelt}/sf package install --package ${PACKAGE_VERSION} --target-org
installorg --wait 10"
if (rc != 0) {
error 'Salesforce package install failed.'
}
}
// -------------------------------------------------------------------------
// Run unit tests in package install scratch org.
// -------------------------------------------------------------------------
stage('Run Tests In Package Install Scratch Org') {
rc = command "${toolbelt}/sf apex run test --target-org installorg --result-format tap
--code-coverage --test-level ${TEST_LEVEL} --wait 10"
if (rc != 0) {
error 'Salesforce unit test run in pacakge install scratch org failed.'
}
}
// -------------------------------------------------------------------------
// Delete package install scratch org.
// -------------------------------------------------------------------------
stage('Delete Package Install Scratch Org') {
rc = command "${toolbelt}/sf org delete scratch --target-org installorg --no-prompt"
if (rc != 0) {
error 'Salesforce package install scratch org deletion failed.'
}
}
SEE ALSO:
Sample Jenkinsfile
Pipeline-as-code with Multibranch Workflows in Jenkins
TAP: Test Anything Protocol
Configure Your Environment for Jenkins
Salesforce CLI Command Reference
Sample Jenkinsfile
A Jenkinsfile is a text file that contains the definition of a Jenkins Pipeline. This Jenkinsfile shows how to integrate Salesforce
CLI commands to automate testing of your Salesforce applications using scratch orgs.
The Jenkinsfile Walkthrough topic uses this sfdx-jenkins-package Jenkinsfile as an example.
#!groovy
import groovy.json.JsonSlurperClassic
node {
268
Sample JenkinsfileContinuous Integration

def SF_CONSUMER_KEY=env.SF_CONSUMER_KEY
def SF_USERNAME=env.SF_USERNAME
def SERVER_KEY_CREDENTALS_ID=env.SERVER_KEY_CREDENTALS_ID
def TEST_LEVEL='RunLocalTests'
def PACKAGE_NAME='0Ho1U000000CaUzSAK'
def PACKAGE_VERSION
def SF_INSTANCE_URL = env.SF_INSTANCE_URL ?: "https://login.salesforce.com"
def toolbelt = tool 'toolbelt'
// -------------------------------------------------------------------------
// Check out code from source control.
// -------------------------------------------------------------------------
stage('checkout source') {
checkout scm
}
// -------------------------------------------------------------------------
// Run all the enclosed stages with access to the Salesforce
// JWT key credentials.
// -------------------------------------------------------------------------
withEnv(["HOME=${env.WORKSPACE}"]) {
withCredentials([file(credentialsId: SERVER_KEY_CREDENTALS_ID, variable:
'server_key_file')]) {
// -------------------------------------------------------------------------
// Authorize the Dev Hub org with JWT key and give it an alias.
// -------------------------------------------------------------------------
stage('Authorize DevHub') {
rc = command "${toolbelt}/sf org login jwt --instance-url ${SF_INSTANCE_URL}
--client-id ${SF_CONSUMER_KEY} --username ${SF_USERNAME} --jwt-key-file ${server_key_file}
--set-default-dev-hub --alias HubOrg"
if (rc != 0) {
error 'Salesforce dev hub org authorization failed.'
}
}
// -------------------------------------------------------------------------
// Create new scratch org to test your code.
// -------------------------------------------------------------------------
stage('Create Test Scratch Org') {
rc = command "${toolbelt}/sf org create scratch --target-dev-hub HubOrg
--set-default --definition-file config/project-scratch-def.json --alias ciorg --wait 10
--duration-days 1"
if (rc != 0) {
269
Sample JenkinsfileContinuous Integration

error 'Salesforce test scratch org creation failed.'
}
}
// -------------------------------------------------------------------------
// Display test scratch org info.
// -------------------------------------------------------------------------
stage('Display Test Scratch Org') {
rc = command "${toolbelt}/sf org display --target-org ciorg"
if (rc != 0) {
error 'Salesforce test scratch org display failed.'
}
}
// -------------------------------------------------------------------------
// Push source to test scratch org.
// -------------------------------------------------------------------------
stage('Push To Test Scratch Org') {
rc = command "${toolbelt}/sf project deploy start --target-org ciorg"
if (rc != 0) {
error 'Salesforce push to test scratch org failed.'
}
}
// -------------------------------------------------------------------------
// Run unit tests in test scratch org.
// -------------------------------------------------------------------------
stage('Run Tests In Test Scratch Org') {
rc = command "${toolbelt}/sf apex run test --target-org ciorg --wait 10
--result-format tap --code-coverage --test-level ${TEST_LEVEL}"
if (rc != 0) {
error 'Salesforce unit test run in test scratch org failed.'
}
}
// -------------------------------------------------------------------------
// Delete test scratch org.
// -------------------------------------------------------------------------
stage('Delete Test Scratch Org') {
rc = command "${toolbelt}/sf org delete scratch --target-org installorg
--no-prompt"
if (rc != 0) {
error 'Salesforce test scratch org deletion failed.'
}
}
270
Sample JenkinsfileContinuous Integration

// -------------------------------------------------------------------------
// Create package version.
// -------------------------------------------------------------------------
stage('Create Package Version') {
if (isUnix()) {
output = sh returnStdout: true, script: "${toolbelt}/sf package version
create --package ${PACKAGE_NAME} --installation-key-bypass --wait 10 --json --target-dev-hub
HubOrg"
} else {
output = bat(returnStdout: true, script: "${toolbelt}/sf package version
create --package ${PACKAGE_NAME} --installation-key-bypass --wait 10 --json --target-dev-hub
HubOrg").trim()
output = output.readLines().drop(1).join(" ")
}
// Wait 5 minutes for package replication.
sleep 300
def jsonSlurper = new JsonSlurperClassic()
def response = jsonSlurper.parseText(output)
PACKAGE_VERSION = response.result.SubscriberPackageVersionId
response = null
echo ${PACKAGE_VERSION}
}
// -------------------------------------------------------------------------
// Create new scratch org to install package to.
// -------------------------------------------------------------------------
stage('Create Package Install Scratch Org') {
rc = command "${toolbelt}/sf org create scratch --target-dev-hub HubOrg
--set-default --definition-file config/project-scratch-def.json --alias installorg --wait
10 --duration-days 1"
if (rc != 0) {
error 'Salesforce package install scratch org creation failed.'
}
}
// -------------------------------------------------------------------------
// Display install scratch org info.
// -------------------------------------------------------------------------
stage('Display Install Scratch Org') {
rc = command "${toolbelt}/sf org display --target-org installorg"
if (rc != 0) {
error 'Salesforce install scratch org display failed.'
}
271
Sample JenkinsfileContinuous Integration

}
// -------------------------------------------------------------------------
// Install package in scratch org.
// -------------------------------------------------------------------------
stage('Install Package In Scratch Org') {
rc = command "${toolbelt}/sf package install --package ${PACKAGE_VERSION}
--target-org installorg --wait 10"
if (rc != 0) {
error 'Salesforce package install failed.'
}
}
// -------------------------------------------------------------------------
// Run unit tests in package install scratch org.
// -------------------------------------------------------------------------
stage('Run Tests In Package Install Scratch Org') {
rc = command "${toolbelt}/sf apex run test --target-org installorg
--result-format tap --code-coverage --test-level ${TEST_LEVEL} --wait 10"
if (rc != 0) {
error 'Salesforce unit test run in pacakge install scratch org failed.'
}
}
// -------------------------------------------------------------------------
// Delete package install scratch org.
// -------------------------------------------------------------------------
stage('Delete Package Install Scratch Org') {
rc = command "${toolbelt}/sf org delete scratch --target-org installorg
--no-prompt"
if (rc != 0) {
error 'Salesforce package install scratch org deletion failed.'
}
}
}
}
}
def command(script) {
if (isUnix()) {
return sh(returnStatus: true, script: script);
} else {
return bat(returnStatus: true, script: script);
272
Sample JenkinsfileContinuous Integration

}
}
SEE ALSO:
Jenkinsfile Walkthrough
Continuous Integration with Travis CI
Travis CI is a cloud-based continuous integration (CI) service for building and testing software projects hosted on GitHub.
For help with setting up Travis CI, see:
•
Sample Travis CI repo for Org Development model
•
Sample Travis CI repo for Package Development model
SEE ALSO:
sfdx-travisci Sample GitHub Repo
Travis CI
Sample CI Repos for Org Development Model
Get started quickly with CI by cloning a sample repository from your vendor of choice. Each repo has a sample configuration file and a
comprehensive README.md with step-by-step information.
These sample repositories support the org development model. This model uses Salesforce CLI, a source control system, and sandboxes
during the application life cycle. To determine if this model is right for you, head over and earn your badge by completing the Org
Development Model module.
Link to GitHub RepositoryVendor
https://github.com/forcedotcom/sfdx-appveyor-orgAppVeyor
https://github.com/forcedotcom/sfdx-bamboo-orgBamboo
https://github.com/forcedotcom/sfdx-bitbucket-orgBitbucket
https://github.com/forcedotcom/sfdx-circleci-orgCircleCI
https://github.com/forcedotcom/sfdx-gitlab-orgGitLab
https://github.com/forcedotcom/sfdx-jenkins-orgJenkins
https://github.com/forcedotcom/sfdx-travisci-orgTravisCI
Sample CI Repos for Package Development Model
Get started quickly with CI by cloning a sample repository from your vendor of choice. Each repo has a sample configuration file and a
comprehensive README.md with step-by-step information.
273
Continuous Integration with Travis CIContinuous Integration

These sample repositories support the package development model. This model uses Salesforce CLI, a source control system, scratch
orgs for development, and sandboxes for testing and staging. To determine if this model is right for you, head over and earn your badge
by completing the Package Development Model module.
Link to GitHub RepositoryVendor
https://github.com/forcedotcom/sfdx-appveyor-packageAppVeyor
https://github.com/forcedotcom/sfdx-bamboo-packageBamboo
https://github.com/forcedotcom/sfdx-bitbucket-packageBitbucket
https://github.com/forcedotcom/sfdx-circleci-packageCircleCI
https://github.com/forcedotcom/sfdx-gitlab-package
CI/CD template for Salesforce/Apex apps:
GitLab
https://gitlab.com/sfdx/sfdx-cicd-template
https://github.com/forcedotcom/sfdx-jenkins-packageJenkins
https://github.com/forcedotcom/sfdx-travisci-packageTravisCI
274
Sample CI Repos for Package Development ModelContinuous Integration


CLI Version Information
Use these commands to view version information about Salesforce CLI.
sf plugins --core // Version of the CLI and all installed plug-ins
sf --version // CLI version
Error: No default dev hub found
You see this error when you try to create a scratch org due to an authorization issue.
Let’s say you successfully authorize a Dev Hub org using the --set-default-dev-hub flag. The username associated with the
org is your default Dev Hub username. You then successfully create a scratch org without using the --target-dev-hub flag. But
when you try to create a scratch org another time using the same CLI command, you get this error:
Error (1): No default dev hub found. Use -v or --target-dev-hub to specify an environment.
What happened?
Answer: You’re no longer in the directory where you ran the authorization command. The directory from which you use the
--set-default-dev-hub flag matters.
If you run the authorization command from the root of your project directory, the target-dev-hub config variable is set locally.
The value applies only when you run the command from the same project directory. If you change to a different directory and run org
create scratch, the local setting of the default Dev Hub org no longer applies and you get an error.
Solve the problem by doing one of the following.
•
Set target-dev-hub globally so that you can run org create scratch from any directory.
sf config set target-dev-hub=<devhubusername> --global
•
Run org create scratch from the same project directory where you authorized your Dev Hub org.
•
Use the --target-dev-hub flag with org create scratch to run it from any directory.
sf target-dev-hub --definition-file <file> --target-dev-hub <devhubusername> --alias
my-scratch-org
•
To check whether you’ve set configuration values globally or locally, use this command and check the Location column.
sf config list
SEE ALSO:
How Salesforce Developer Experience (DX) Tooling Changes the Way You Work
Unable to Work After Failed Org Authorization
Sometimes you try to authorize a Dev Hub org or a scratch org using the Salesforce CLI or an IDE, but you don’t successfully log in to
the org. The port remains open for the stray authorization process, and you can’t use the CLI or IDE. To proceed, end the process manually.
276
CLI Version InformationTroubleshoot Salesforce DX

macOS or Linux
To recover from a failed org authorization on macOS or Linux, use a terminal to kill the process running on port 1717.
1. From a terminal, run:
lsof -i tcp:1717
2. In the results, find the ID for the process that’s using the port.
3. Run:
kill -9 <the process ID>
Windows
To recover from a failed org authorization on Windows, use the Task Manager to end the Node process.
1. Press Ctrl+Alt+Delete, then click Task Manager.
2. Select the Process tab.
3. Find the process named Node.
Note: If you’re a Node.js developer, you can have several running processes with this name.
4. Select the process that you want to end, and then click End Process.
Error: The consumer key is already taken
Let’s say you run project retrieve start on an org in which you’ve created a connected app. When you try to deploy the
retrieved source to a different org, the deploy fails with the error The consumer key is already taken. What happened?
Connected apps include a consumer key that a website or app uses to identify itself to Salesforce. Consumer keys must be unique across
the entire Salesforce ecosystem. When you try to deploy the retrieved (and unchanged) source file associated with the connected app
to a new org, the deploy fails due to duplicate consumer keys.
You have a few options to work around this problem.
•
Remove the connected app source file from your project before you deploy your source to the new org. As a result, the connected
app isn’t created. The connected app source file is named something like
force-app/main/default/connectedApps/MyConnApp.connectedApp-meta.xml.
•
Update the file for the connected app and change the value of the <consumerKey> element to a unique value. Here’s a snippet
of a sample connected app file that shows the <consumerKey> element.
<?xml version="1.0" encoding="UTF-8"?>
<ConnectedApp xmlns="http://soap.sforce.com/2006/04/metadata">
<contactEmail>[email protected]</contactEmail>
<contactPhone>5556789</contactPhone>
<label>MyConnApp</label>
<oauthConfig>
<callbackUrl>http://localhost:1717/OauthRedirect</callbackUrl>
<consumerKey>3MVG9PG9sFc71i9n55UWbx2</consumerKey>
277
Error: The consumer key is already takenTroubleshoot Salesforce DX


CHAPTER 14 Limitations for Salesforce DX
Here are some known issues you could run into while using Salesforce DX.
For the latest known issues, visit the Trailblazer Community’s Known Issues page and the issues tab in
the Salesforce CLI’s main GitHub repo.
Salesforce CLI
Can’t Import Record Types Using Salesforce CLI
Description: We don't support RecordType when running the data tree import command.
Workaround: None.
Limited Support for Shell Environments on Windows
Description: Salesforce CLI is tested on the Command Prompt (cmd.exe) and Powershell. There
are known issues in the Cygwin and Min-GW environments, and with Windows Subsystem for Linux
(WSL). Until these environments are tested and supported in a future release, we recommend that
you use a supported shell.
Workaround: None.
Dev Hub and Scratch Orgs
Salesforce CLI Sometimes Doesn’t Recognize Scratch Orgs with Communities
Description: Sometimes, but not in all cases, the Salesforce CLI doesn’t acknowledge the creation
of scratch orgs with the Communities feature. You can’t open the scratch org using the CLI, even
though the scratch org is listed in Dev Hub.
Workaround: You can try this workaround, although it doesn’t fix the issue in all cases. Delete the
scratch org in Dev Hub, then create a new scratch org using the CLI. Deleting and recreating scratch
orgs counts against your daily scratch org limits.
Error Occurs If You Pull a Community and Deploy It
Description: The error occurs because the scratch org doesn’t have the required guest license.
Workaround: In your scratch org definition file, if you specify the Communities feature, also specify
the Sites feature.
279

Source Management
ERROR: Entity of type 'RecordType' named 'Account.PersonAccount' cannot be found
Description: Although you can turn on Person Accounts in your scratch org by adding the feature
to your scratch org definition, running project deploy start or project deploy
retrieve results in an error.
Workaround: None.
project convert source Doesn’t Add Post-Install Scripts to package.xml
Description: If you run project convert source, package.xml doesn’t include the
post install script.
Workaround: To fix this issue, choose one of these methods:
•
Manually add the <postInstallClass> element to the package.xml in the metadata
directory that project convert source produces.
•
Manually add the element to the package in the release org or org to which you are deploying
the package.
Must Manually Enable Feed Tracking in an Object's Metadata File
Description: If you enable feed tracking on a standard or custom object, then run project
retrieve start, feed tracking doesn't get enabled.
Workaround: In your Salesforce DX project, manually enable feed tracking on the standard or
custom object in its metadata file (-meta.xml) by adding
<enableFeeds>true</enableFeeds>.
Unable to Push Lookup Filters to a Scratch Org
Description: When you execute the project deploy start command to deploy the source
of a relationship field that has a lookup filter, you sometimes get this error:
duplicate value found: <unknown> duplicates value on record with
id: <unknown> at line num, col num.
Workaround: None.
Deployment
Compile on Deploy Can Increase Deployment Times in Scratch Orgs
Description: If your deployment times for Apex code are slow, your scratch org might have the
enableCompileOnDeploy setting set to true.
Workaround:To turn it off, set it to false (the default) or delete the setting from the scratch org
definition.
{
"orgName": "My Company",
"edition": "Developer",
"features": [],
"settings": {
"lightningExperienceSettings": {
"enableS1DesktopEnabled": true
},
"apexSettings": {
280
Limitations for Salesforce DX

"enableCompileOnDeploy": false
}
}
}
Managed First-Generation Packages
When You Install a Package in a Scratch Org, No Tests Are Performed
Description: If you include tests as part of your continuous integration process, those tests don’t
run when you install a package in a scratch org.
Workaround: You can manually execute tests after the package is installed.
New Terminology in CLI for Managed Package Password
Description: When you use the CLI to add an installation key to a package version or to install a
key-protected package version, the flag name of the key is --installationkey. When you
view a managed package version in the Salesforce user interface, the same package attribute is
called “Password”. In the API, the corresponding field name, “password”, is unchanged.
Workaround: None.
Managed Second-Generation Packages
Unable to Specify a Patch Version for Managed Packages
Description: The four-part package version number includes a patch segment, defined as
major.minor.patch.build. However, you can’t create a patch for a second-generation managed
package. Package creation fails if you set a patch number in the package descriptor. We plan to
provide this functionality for managed packages in the Winter ’20 release.
Workaround: Always set the patch segment of the version number to 0. For example, 1.2.0.1 is valid
but 1.2.1.1 is not.
Protected Custom Metadata and Custom Settings are Visible to Developers in a Scratch Org If
Installed Packages Share a Namespace
Description: Use caution when you store secrets in your second-generation packages using protected
custom metadata or protected custom settings. You can create multiple second-generation packages
with the same namespace. However, when you install these packages in a scratch org, these secrets
are visible to any of your developers that are working in a scratch org with a shared namespace. In
the future, we might add a “package-protected” keyword to prevent access to package secrets in
these situations.
Workaround: None.
Unlocked Packages
Protected Custom Metadata and Custom Settings are Visible to Developers in a Scratch Org If
Installed Packages Share a Namespace
Description: Use caution when you store secrets in your unlocked packages using protected custom
metadata or protected custom settings. You can create multiple unlocked packages with the same
namespace. However, when you install these packages in a scratch org, these secrets are visible to
281
Limitations for Salesforce DX
any of your developers that are working in a scratch org with a shared namespace. In the future, we
might add a “package-protected” keyword to prevent access to package secrets in these situations.
Workaround: None.
282
Limitations for Salesforce DX
