
Northbrook Public Library – Basic Excel – Version 3 Page 1
Basic Excel 2007
Microsoft’s Excel 2007 is the electronic spreadsheet program within the Microsoft Office Suite. An electronic
spreadsheet is an application you use to perform numeric calculations and to analyze and present numeric data.
Loading (starting) the Excel 2007 Program
There are several ways to start, or load the Excel program. The two most common methods are by using the Start
menu (far left-bottom of the screen) or by clicking a desktop shortcut for the Excel program if it is available. If you
use the Start menu, the steps will vary slightly depending on the version of Windows you are using. At this time,
we will load the Excel 2007 program from the Start menu, and observe the screen layout.
Getting started with Excel 2007 you will notice that there are many similar features to previous versions. You will
also notice that there are many new features that you’ll be able to utilize. There are three features that you should
remember as you work within Excel 2007: the Microsoft Office Button, the Quick Access Toolbar, and the
Ribbon. The function of these features will be more fully explored below.
Spreadsheets
A spreadsheet is an electronic document that stores various types of data. There are vertical columns and horizontal
rows. A cell is where the column and row intersect. A cell can contain data and can be used in calculations of data
within the spreadsheet. An Excel spreadsheet can contain workbooks and worksheets. The workbook is the holder
for related worksheets.
Entering Data
Data – Three types of data are entered onto worksheets:
Text – starts with an alphabetic character
Numbers – starts with a number
Formulas and functions – starts with “=”

Northbrook Public Library – Basic Excel – Version 3 Page 2
Exercise 1 - Creating a Workbook <depress the “Enter” key or the arrow keys after each line>
Cell Type this data
A1 NPL-Basic Excel Example 1
A3 Type your actual first and last name (example: “Joe Smith”)
C5 Travel Books
D5 Qty
C6 Hawaii
C7 California
C8 Florida
D6 10
D7 2
D8 4
D9 =d6+d7+d8
Home tab: Font, Alignment and Number groups
Font Group – Font shape and size; bold, italics and underline; fill and font color
Alignment group – left, center and right justification; top, middle, and bottom align
Number group – Number, currency, percentage, date, text,”$”, and more
Exercise 2 - Manipulating Data - Excel allows you to move, copy, and paste cells and cell content through
cutting and pasting and copying and pasting. You must “Select” the data prior to moving or deleting.
Select Data - To select a cell or data to be copied or cut:
Click the cell – click cell C5
Click and drag the cursor to select many cells in a range from C5 to D9
Cut and Paste - To cut (move) and paste data:
On the Clipboard group of the Home tab, click the scissors icon meaning Cut

Northbrook Public Library – Basic Excel – Version 3 Page 3
Within the spreadsheet, click on cell C15
On the Clipboard group of the Home tab, click Paste
Undo and Redo - To undo or redo your most recent actions, In the Quick Access Toolbar - Click Undo or Redo
Exercise 3 - Modifying a Worksheet – depress “Enter” key or arrow keys after each line
Cell Type this data
E4 Average
E5 Cost
E6 18
E7 22
E8 20
F5 Total
F6 =D6*E6
F7-F8 we will select cell F6, and fill down through cell F8
F9 =Sum(F6:F8)
Insert Cells, Rows, and Columns - To insert cells, rows, and columns in Excel:
Place the cursor in the row below where you want the new row, or in the column to the left of
where you want the new column
Click the Insert button on the Cells group of the Home tab
Click the appropriate choice: Cell, Row, or Column

Northbrook Public Library – Basic Excel – Version 3 Page 4
Exercise 4 - Modifying a Worksheet – Inserting a row
Insert a row after row 7 (between California and Florida):
Cell C8: Illinois Cell D8: 5 Cell E8: 15 Cell F8: fill down from cell F7
Is there a Problem?
To show formulas within the worksheet
Click “Formulas” tab
In the “Formula Auditing” group, click “Show Formulas”
Ribbon
The ribbon is the panel at the top portion of the document and has seven tabs: Home, Insert, Page Layouts,
Formulas, Data, Review, and View. Each tab is divided into groups. The groups are logical collections of
features designed to perform function that you will utilize in developing or editing your Excel spreadsheets.
Commonly utilized features are displayed on the Ribbon. To view additional features within each group,
click the arrow at the bottom right corner of each group.
Tabs Groups contained within the Tab
Home: Clipboard, Fonts, Alignment, Number, Styles, Cells, Editing
Insert: Tables, Illustrations, Charts, Links, Text
Page Layouts: Themes, Page Setup, Scale to Fit, Sheet Options, Arrange
Formulas: Function Library, Defined Names, Formula Auditing, Calculation
Data: Get External Data, Connections, Sort & Filter, Data Tools, Outline
Review: Proofing, Comments, Changes
View: Workbook Views, Show/Hide, Zoom, Window, Macros

Northbrook Public Library – Basic Excel – Version 3 Page 5
Quick Access Toolbar
The quick access toolbar is a customizable toolbar that contains commands that you may want to use. You can
place the quick access toolbar above or below the ribbon. To change the location of the quick access toolbar, click
on the arrow at the end of the toolbar and click “Show Below the Ribbon”.
You can also add items to the quick access toolbar. Right click on any item in the Office Button or the Ribbon and
click Add to Quick Access Toolbar and a shortcut will be added.
Mini Toolbar
A new feature in Office 2007 is the Mini Toolbar. This is a floating toolbar that is displayed when you select text
or right-click text. It displays common formatting tools, such as Bold, Italics, Fonts, Font Size and Font Color.
Microsoft Office Button
The Microsoft Office Button performs many of the functions that were located in the File menu of older versions of
Excel. This button allows you to create a new workbook, Open an existing workbook, save, print, send, or close.

Northbrook Public Library – Basic Excel – Version 3 Page 6
Delete Cells, Rows and Columns - To delete cells, rows, and columns:
Place the cursor in the cell, row, or column that you want to delete
Click the Delete button on the Cells group of the Home tab
Click the appropriate choice: Cell, Row, or Column
Find and Replace - To find data or find and replace data:
Click the Find & Select button on the Editing group of the Home tab
Choose Find or Replace
Complete the Find What text box
Click on Options for more search options
Exercise 5 – Using Find and Replace
Find your first name, and replace it with the word: Excel
Go to the Quick Access toolbar, and click “Undo”

Northbrook Public Library – Basic Excel – Version 3 Page 7
Exercise 6 - Save a Workbook - When you save a workbook, you have two choices: Save or Save As.
To save a document:
Click the Microsoft Office Button
Click Save As (directs the file to a folder and names the file)
You may need to use the Save As feature when you need to save a workbook under a different name or to save it
for earlier versions of Excel. Remember that older versions of Excel will not be able to open an Excel 2007
worksheet unless you save it as an Excel 97-2003 Format. To use the “Save as” feature:
Click the Microsoft Office Button
Click Save As
Type in the name for the Workbook
In the Save as Type box, choose Excel 97-2003 Workbook (extension is “.xls”)
Save As “Excel Workbook” will save file in Excel 2007 format (extension is “.xlsx”)
Northbrook Public Library – Basic Excel – Version 3 Page 8
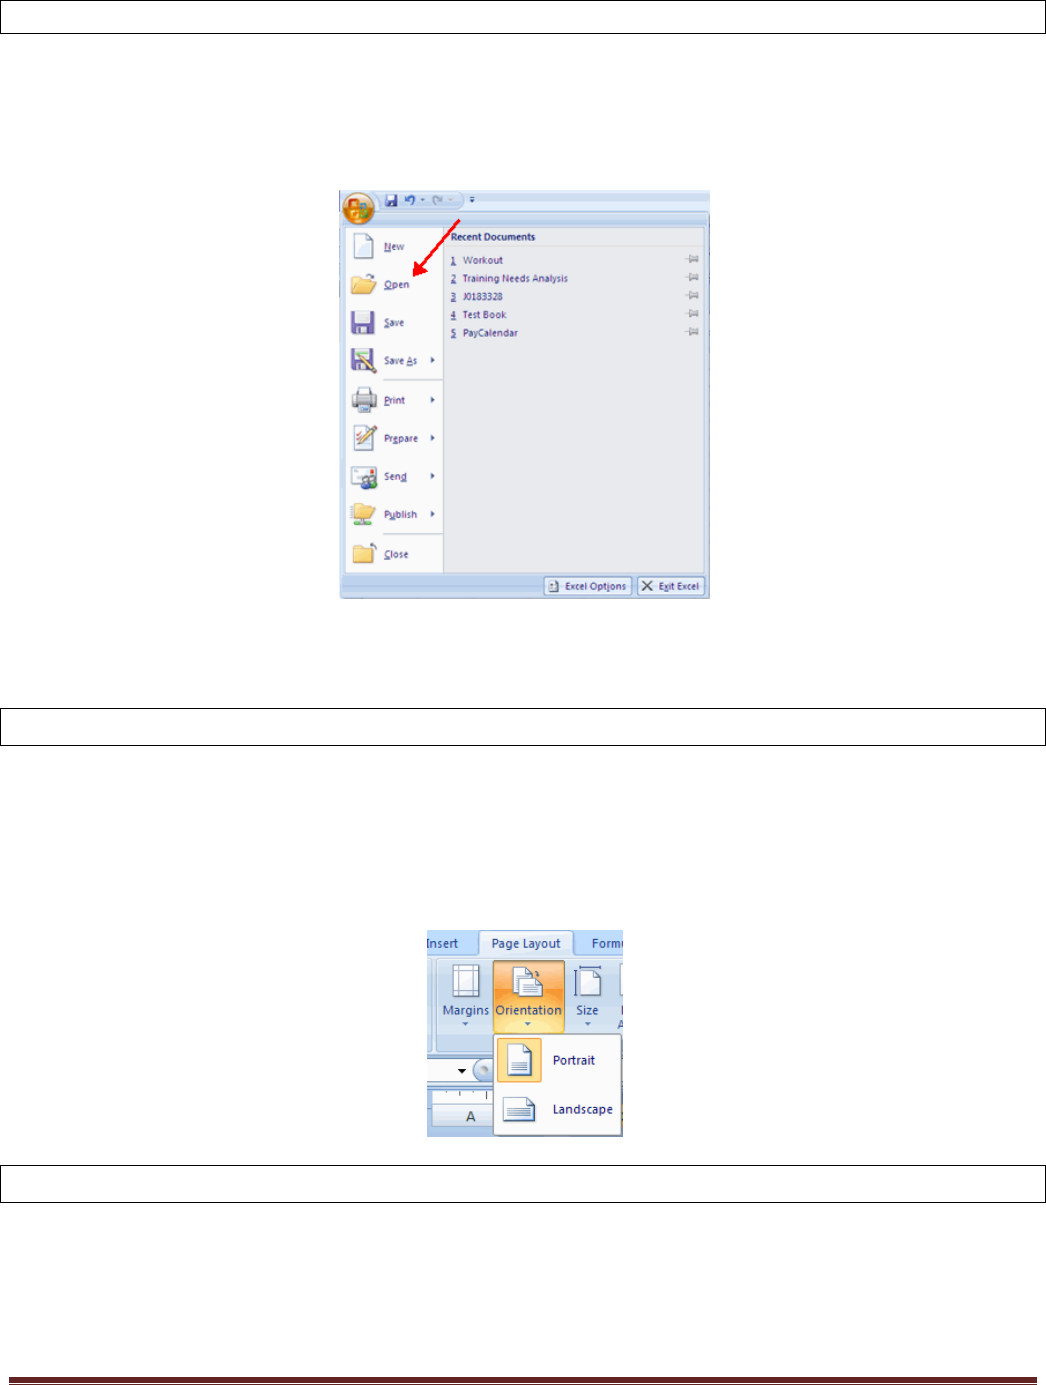
Exercise 7 - Open a Workbook - To open an existing workbook:
Click the Microsoft Office Button
Click Open
Browse to the workbook you want to open, and then click the title of the workbook
Click Open
Exercise 8 - Page properties and printing
Change Page Orientation
To change the page orientation from portrait to landscape:
Click the Page Layout tab
At the Page Setup group, Choose Orientation, then Portrait or Landscape
Exercise 9 - Printing
Click the Office Button at the top-left corner of the screen
Choose Print, then Print
OR, just click in the Quick Access Toolbar, the Quick Print icon

Northbrook Public Library – Basic Excel – Version 3 Page 9
Exercise 10 – Change the “look” of your worksheet
Click the “Page Layout” tab
Within the “Themes” group, click the “Themes” icon
Click the “Aspect” theme
~~~~~~~~~~~~~~~~~~~~~~~~~~~~~~~~~~~~~~~~~~~~~~~~~~~~~~~~~~~~~~~~~~~~~~~~
Practice / Practice / Practice
The best way to retain what you learned today …
… practice using Excel daily for the next several days
Thank you for participating in Basic Excel 2007
Consider enrolling in the next session
INTERMEDIATE EXCEL 2007
Covers inserting charts into spreadsheets, validating formulas and functions, page
numbering, changing chart types, and reviewing Excel templates.
