
Online Invoicing System
User guide 2021

Contents
1. Accessing the system
Logging In 4
Logging Out 5
2. Managing your profile and password
If you forget your password 6
Changing your personal details 7
Changing your security questions 8
3. Home Page
Account Summary
See Latest Transactions 9
Statements Download 9
See Latest Invoice 11
Receive Invoices by Email 12
Opt-out of Invoices by Email 13
4. Pay invoice
Set Up Direct Debit 14
Update Direct Debit Details 15
Cancel Direct Debit 15
Pay Invoice by Card 16
Apply Credit Memo 18
5. Invoice Disputes
Raise Invoice Dispute 19
Review Invoice Dispute Status 21
6. Credit Refund
Credit Refund (when Direct Debit Set Up) 22
Credit Refund (Direct Debit Not Set Up) 24
Online Invoicing System – User Guide 2

7. Fee Tariff Data
Providing Requested Fee Tariff Data 26
Providing Additional Requested Fee Tariff Data 28
8. Manage Firms
Remove Firm Access 30
Request Firm Access 31
9. Manage Contacts
Remove Firm Contact Access 33
Re-request Contact Access 34
10. Switch Firms 35
Online Invoicing System – User Guide 3


Please note: If you have access to only one firm you will not be
required to select the firm from a dropdown list.
Logging Out
You can log out of the system at any time by clicking on Logout in the top
right corner of the page.
Online Invoicing System – User Guide 5

2. Managing your profile and password
If you forget your password
If you forget your password, click on the Forgot Your Password? link on the
login page.
You’ll be asked to provide your registered email address, which is also your
Online Invoicing System username.
An email will be sent to your registered email address. The email will contain
a link which can be used only once – if you forget your password again, you
will have to request a new link.
When you click on the link within the email, you’ll be asked to provide a new
password. When choosing a new password, remember:
• Passwords must be at least 8 characters, a mix of uppercase,
lowercase, and at least one special character: !#$%-_=+<>
• The new password you choose cannot be one of the last 12 passwords
you have used before.
Online Invoicing System – User Guide 6

Changing your personal details
Step 1: click on Manage Profile on the login page
Step 2: update Personal Details
For security reasons, you cannot change your email address – the field is
displayed but cannot be edited.
Should your email address change while you are working with the same
organisation, you must contact our Supervision Hub who will update your
profile with your new email address.
Step 3: select save profile details to save the changes
Please always keep your contact details up to date. These details
will be used in our correspondence for all cases where you have
been indicated as the Primary Contact.
Online Invoicing System – User Guide 7

Changing your security questions
Step 1: click on Manage Profile on the login page
Step 2: click on Change Security Details
Step 3: enter Current Security Answer, Select New Security Question
and enter New Security Answer
Online Invoicing System – User Guide 8

Step 4: click on Save Security Details to save the changes
When you click Save Security Details, you will see the Update Profile
Confirmation message
Online Invoicing System – User Guide 9

3. Home Page
The Home Page provides summary information regarding your fees account
and useful links.
Online Invoicing System – User Guide 10

Account Summary
This section will display your firm’s account balance and a breakdown by
type of transaction (i.e. unpaid invoices).
See Latest Transactions
Step 1: on the homepage select See Latest Transactions, you’ll be directed
to the account activity page
Refining your transactions search
The system allows you to refine your search using the following search
criteria:
Online Invoicing System – User Guide 11

By selecting Show More Filters you can further refine your search using the
following search criteria:
Please note: You will be required to select Apply Filters to apply
filter(s) to the search.
Online Invoicing System – User Guide 12

Statements Download
You’ll be able to download the following types of statement:
• Current Debt Statement
• Statement from April 2021
• Historical Statement to end March 2021 (3-year history)
Step 1: select type of statement
Step 2: click on the statement to open a new window displaying the selected
statement
Step 3: at the top of the page on the right-hand side you’ll be able to save or
print the document
Please note: As a new window will open displaying the statement you
will be required to enable pop-ups on the browser.
Online Invoicing System – User Guide 13

See Latest Invoice
On the homepage select See Latest Invoice
Click on View Paper Copy to view or download your full invoice (PDF
format).
Receive Invoices by Email
By selecting Get Invoice by Email on the online invoicing homepage you’ll
be able to receive invoices attached to your invoice notifications. You must
select Save Notification Settings to save the changes.
Once you select Save Notification Settings, you’ll receive confirmation on
screen.
Online Invoicing System – User Guide 14

Opt-out of Invoices by Email
By deselecting Get Invoice by Email on the online invoicing homepage you’ll
be able stop receiving invoices attached to your invoice notifications. You must
select Save Notification Settings to save the changes.
Once you select Save Notification Settings, you’ll receive confirmation on
screen.
Online Invoicing System – User Guide 15

Pay Invoice
Set Up Direct Debit
Step 1: select Manage Direct Debit
Step 2: enter Direct Debit Details
Step 3: click verify sort code
Once the sort code has been verified the system will populate Name and
Branch of Bank or Building Society
IMPORTANT: The system verifies only the sort code number. Ensure
that you have typed the correct Account Name and Account number
Online Invoicing System – User Guide 16

Step 4: accept terms and conditions and click Submit Direct Debit
Request
When you click Submit Direct Debit Request, you will see the Submit
Direct Debit Request Confirmation message and an email will be sent to
all your firms’ registered users. The direct debit status will update to
“Requested” on the portal.
Online Invoicing System – User Guide 17
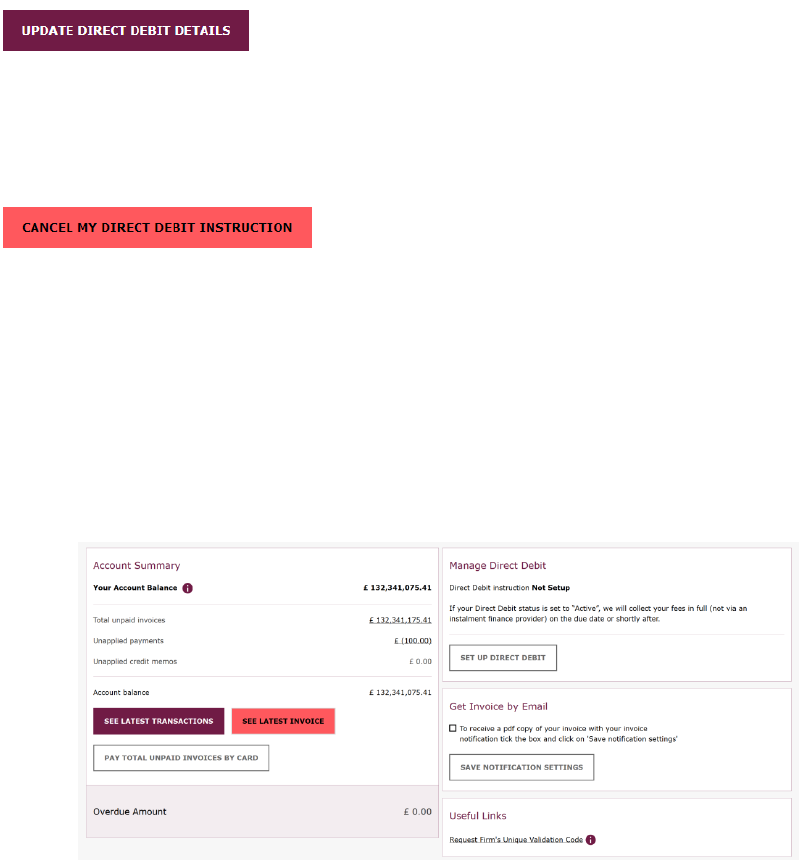
Update Direct Debit Details
If you wish to amend your direct debit details, select Update Direct Debit
Details at the bottom of the page, enter your new bank details, accept terms
and conditions and click Submit Direct Debit Request (as per Steps 2-4
above). The direct debit status will update to “Requested” on the portal.
Cancel Direct Debit
If you wish to cancel the direct debit, select Cancel My Direct Debit
Instruction at the bottom of the page.
Pay Invoice by Card
Please make sure you have applied all open credit memos before paying
invoices by card.
Step 1: if you wish to pay all unpaid invoices, select Pay Total Unpaid
Invoices by Card, you’ll be directed to the Pay By Card – Transactions
Details Page
Alternatively, click on the Account Activity page and select the invoice(s) you
wish to pay.
Step 2: select to confirm you have reviewed and agree with the Payment
information, then select Make Payment
Online Invoicing System – User Guide 18

Step 3: enter card details and select Proceed to Pay
When you click Proceed to Pay, you may be required to undertake additional
payment authentication. Once complete, will see the Payment Confirmation
message. A PDF copy of the payment confirmation is available on the Account
Activity page. Please wait until the payment has been applied (this may take 5
minutes) before using the View PDF Copy action. To return to the Account
Activity page, click on the See Account Activity.
Please note: You can pay a maximum of £25,000 per card transaction.
Online Invoicing System – User Guide 19

Apply Credit Memo
Please make sure you have applied all open credit memos before paying
invoices by card.
You can only apply a credit memo to one invoice online, if you wish to apply
a credit memo to additional invoices please send your request to
Step 1: on the Account Activity page, identify relevant Transaction and
select Apply Credit
Step 2: ensure correct invoice number has been selected and select Apply
Credit to Invoice
If you no longer wish to apply credit to the selected invoice, then select
Cancel Apply Credit.
Step 3: select Submit Apply Credit
If you selected the incorrect invoice, select Back to Select Invoice to select
the correct invoice.
If you no longer wish to apply credit to the selected invoice, then select
Cancel Apply Credit.
When you click Submit Apply Credit, the credit memo will be applied to the
selected invoice. To return to the Account Activity page, click on the See
Account Activity.
Online Invoicing System – User Guide 20

5. Invoice Disputes
Raise Invoice Dispute
Please note: You can only raise one dispute per invoice.
Step 1: select See Latest Transactions, you’ll be directed to the Account
Activity page
Step 2: identify relevant transaction and select Dispute Invoice
Step 3: select a Reason for the Dispute from the dropdown list
Step 4: select Enter Dispute Details
Online Invoicing System – User Guide 21

If you no longer wish dispute the invoice, then select Cancel Dispute.
Step 5: enter the details of the dispute
Step 6: select Dispute Amount
If Partial Dispute Amount is selected, you must enter the amount. If
Partial Dispute Percentage is selected, you must enter a percentage.
If you wish to amend the dispute details, select Back to Dispute Reason. If
you no longer wish dispute the invoice, then select Cancel Dispute.
Step 7: once you have reviewed the dispute details, select Review &
Submit This Dispute
Online Invoicing System – User Guide 22

If you wish to change the dispute details, then select Back to Dispute
Details. If you no longer wish dispute the invoice, then select Cancel
Dispute.
Step 8: select Submit the Dispute
When you click Submit the Dispute, you will see the Dispute Confirmation
message. To return to the Account Activity page, click on the See Account
Activity.
Review Invoice Dispute Status
You can review the status of a dispute on the Account Activity page under
section Disputes.
Online Invoicing System – User Guide 23

To view dispute details select See Dispute Details.
Online Invoicing System – User Guide 24

6. Credit Refund
If you are entitled to a credit refund, a message will be displayed on the
Home Page.
Credit Refund (when Direct Debit Set Up)
Step 1: click on the Credit Refund link or select the Credit Refund page
from the Account Activity menu
Step 2: the Credit Refund Page will display the sort code and bank account
details will return the funds to
Online Invoicing System – User Guide 25

Step 3: select I confirm the Credit Refund instruction has been
approved by an authorised signatory of the bank account stated above
and click Submit Refund Request.
Step 4: to confirm credit refund request select Yes, Confirm Credit Refund
Request. If you wish to cancel the refund, then select No, Cancel.
When you click Yes, Confirm Credit Refund Request, you will see the
Credit Refund Confirmation message and an email will be sent to all your
firm’s registered users. To return to the Account Activity page, click on the
See Account Activity.
Please note: If you want your credit refund paid to another sort code/bank
account please email fcafees@fca.org.uk with the details.
Online Invoicing System – User Guide 26

Credit Refund Direct Debit Not Set Up
Step 1: click on the Credit Refund link or select the Credit Refund page
from the Account Activity menu
Step 2: enter Credit Refund Details
Step 3: enter click verify sort code
Online Invoicing System – User Guide 27

Once the sort code has been verified the system will populate Name and
Branch of Bank or Building Society Step 4: select I confirm the Credit
Refund instruction has been approved by an authorised signatory of
the bank account stated above and click Submit Credit Refund Request.
Step 5: to confirm credit refund request select Yes, Confirm Credit Refund
Request. If you wish to cancel the refund, then select No, Cancel.
When you select Yes, Confirm Credit Refund Request, you will see the
Credit Refund Confirmation message and an email will be sent to your
firm’s registered users. To return to the Account Activity page, click on the
See Account Activity.
Online Invoicing System – User Guide 28

7. Fee Tariff Data Request
Providing Requested Fee Tariff Data
We will send you an email notification if you are required to submit fee tariff
data to the FCA. You will see a message on the homepage with a link to the
Fee Tariff Data page. If you can also follow the steps below to view and
submit Fee Tariff Data to the FCA.
Step 1: select Fee Tariff Data Request
You can view guidance notes for a fee block by selecting the following icon:
. Please also refer to our “FAQs”.
Step 2: enter Current Year’s Data
Step 3: select Variance Reason from dropdown list
Please note: Variance Details are only required for some variance
reasons when year-on-year data variances are more than +/-15%.
Step 4: add variance details
Online Invoicing System – User Guide 29
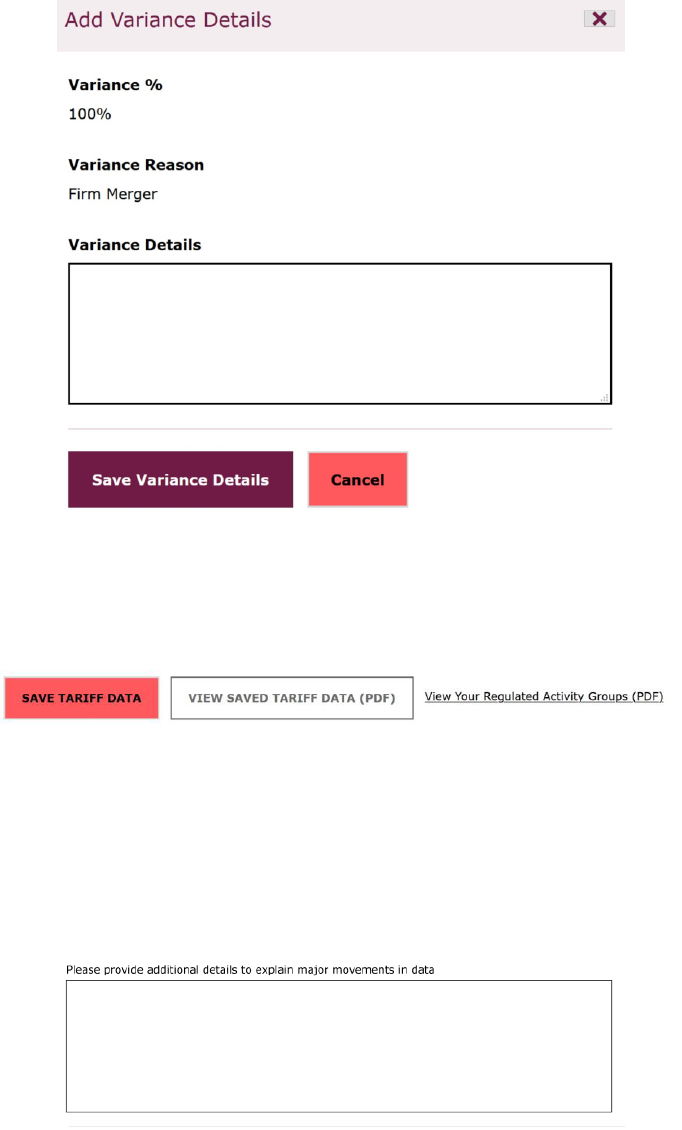
If you want to edit variance details, select Manage Variance Details
Step 5: select Save Tariff Data
Use the Save Tariff Data button regularly to ensure data entered is not lost
should you move from this page or your session times out (after 30 minutes
of inactivity).
Step 6: enter additional details to explain major movements in data – this is
not a mandatory field
Step 7: to confirm that the information is correct, and the data submitted has
been reviewed by an individual at the appropriate level select “I verify
that:..”
Please note: All data fields must be completed before you can submit
your Fee Tariff Data.
Step 8: select Submit Tariff Data
Online Invoicing System – User Guide 30

Step 9: to submit revised tariff data form select Yes, Submit Fee Tariff
Data. If you wish to cancel, then select No, Cancel.
When you click Yes, Submit Fee Tariff Data, you will see the Fee Tariff
Data Request Confirmation message. To see account summary, select See
Account Summary or select View Saved Fee Tariff Data to see saved
tariff data.
You can review previously submitted Fee Tariff Data by selecting Fee Tariff
Data Submission History.
Online Invoicing System – User Guide 31

Providing Additional Requested Fee Tariff Data
We will send you an email notification if you are required to provide additional
information regarding your Fee Tariff Data. You will see a message on the
homepage with a link to the Fee Tariff Data page. You can also follow the
steps below to view and submit additional Fee Tariff Data to the FCA.
Please note: You will be required to provide a response to each
specific query and have an opportunity to revise your data for the
current year.
Step 1: select Fee Tariff Data Request
Step 2: review Current Year’s Data for the FCA queried fee blocks and
submit revised data if required
Step 3: review FCA query and enter detailed firm response
Online Invoicing System – User Guide 32
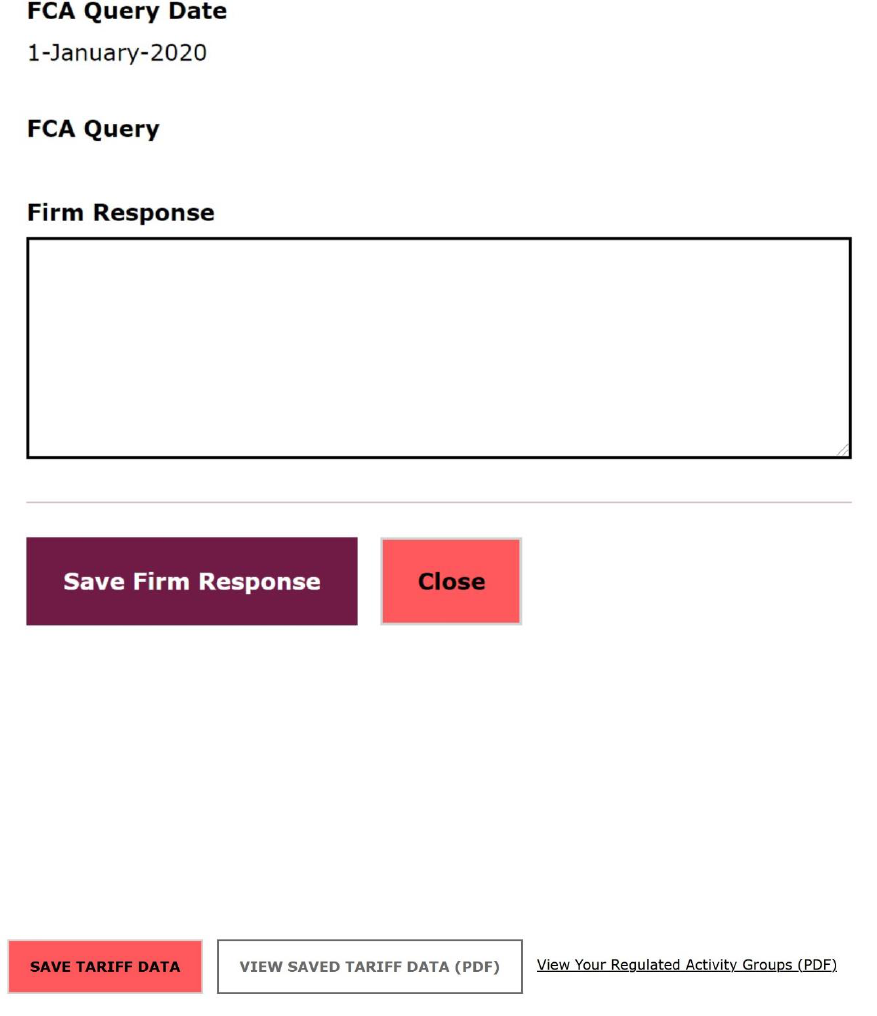
Step 4: Select Save Firm Response
If you wish to edit the firm response, then Select Edit Firm Response or
select Show More Information to see firm response details (you can also
edit the response when Show More Information is selected).
Step 5: select Save Tariff Data
Use the Save Tariff Data button regularly to ensure data entered is not lost
should you move from this page or your session times out (after 30 minutes
of inactivity).
Step 6: enter additional details to explain major movements in data – this is
not a mandatory field
Online Invoicing System – User Guide 33

Step 7: to confirm that the information is correct, and the data submitted has
been reviewed by an individual at the appropriate level select “I verify that:”
Please note: All FCA queries require a response before you can re-
submit your Fee Tariff Data.
Step 8: select Submit Revised Form
Step 9: to submit revised tariff data form select Yes, Submit Fee Tariff
Data. If you wish to cancel, then select No, Cancel.
When you click Yes, Submit Fee Tariff Data, you will see the Fee Tariff
Data Request Confirmation message. To see account summary, select See
Account Summary or select View Saved Fee Tariff Data to see saved
tariff data.
Online Invoicing System – User Guide 34

8. Manage Firms
You will be able to manage access to firms
Remove Firm Access
Step 1: select firm from dropdown list
Please note: If you have access to only one firm you will not be
required to select the firm from a dropdown list.
Step 2: select Manage Firms and Contacts
Step 3: select Manage Firms
Step 4: locate relevant firm and select Remove Firm Access
Online Invoicing System – User Guide 35

Step 5: select Yes, Confirm Remove Firm Access to confirm the removal of
firm access
If you no longer wish remove firm access, then select No, Cancel.
When you click Yes, Confirm Remove Firm Access, you will see the
Remove Firm Access Confirmation message. Select Manage Firm Access
to go back to the Manage Firms and Contacts page.
Request Firm Access
Step 1: select any firm from dropdown list
Please note: If you have access to only one firm you will not be
required to select the firm from a dropdown list.
Step 2: select Manage Firm
Step 3: select Request Additional Firm Access
Step 5: enter Firm Reference Number (FRN) and Unique Verification
Code (UVC)
Online Invoicing System – User Guide 36

Please note: To obtain a Unique Validation Code you will need to email
[email protected].uk or call the Supervision Hub on 0300 500 0597.
Step 6: select Submit Firm Request
When you click Submit Firm Request, you will see the Request Firm
Access Confirmation message. Select Home to go back to the homepage.
Online Invoicing System – User Guide 37

9. Manage Contacts
You will be able to manage Contacts’ access to firms
Remove Firm Contact Access
Step 1: select firm from dropdown list
Please note: If you have access to only one firm you will not be
required to select the firm from a dropdown list.
Step 2: select Manage Firms and Contacts
Step 3: select Manage Contacts
If there are more than one contact for the firm, you can enter the contact
name and select apply Filters to refine your search.
Online Invoicing System – User Guide 38

Step 4: locate relevant contact and select Remove Access
Step 5: select Yes, Confirm Remove Account Access to confirm the
removal of account access
If you no longer wish to remove account access, then select No, Cancel.
When you click Yes, Confirm Remove Account Access, you will see the
Remove Firm Account Confirmation message.
Re-request Contact Access
If removing a Contact’s access was an error, you can re-activate the user by
selecting Restore Access.
If all firm Contacts become Inactive, the user will need to use the Manage
Firm Access procedure in section 8 to obtain access.
Online Invoicing System – User Guide 39

10. Switch Firms
Step 1: select Switch Firm
Step 2: select a firm from dropdown list
Step 3: select Yes, Select This Firm
If you no longer wish to switch firms, then select No, cancel.
Please note: If you have access to only one firm you will not be able to
switch firms.
Online Invoicing System – User Guide 40
