
For problems with this
equipment please call
216.368.HELP (4357)
Getting Started
The default screen for the Technology Enhanced Classroom (TEC) system is
the Windows® desktop of the system’s built-in PC. Use the PC connected
to the system as you would a normal computer.
For security purposes, the TEC computer has been protected with
Faronics Deep Freeze software. All documents, settings, or newly installed
applications will be erased from the computer after it is logged out or
restarted. When you are done using the TEC computer, please save your
files using a flash drive, by uploading them to Google Docs, or sending
them as an email attachment to yourself. If you have any questions, please
contact the ITS Service Desk at 216.368.HELP (4357) for assistance.
Start Screen
02-12_TECCards

For problems with this
equipment please call
216.368.HELP (4357)
Using the Annotation Feature
Annotation Screen
Touch the Annotation button in the
upper-right corner of the TEC display to
draw or write over the connected device’s
display or a chalkboard background.
To erase what you have drawn or written on the screen, touch the Eraser
option [C] and drag your finger across what you want to erase. Clear all
annotations by touching the Clear All button [D].
Write or draw by dragging your finger on the touch display. Change the line
width between small, medium, and large by touching the appropriate options
at the top of the screen [A].
Change the color of the line drawn by touching the color swatches at the top of
the screen [B]. Toggle the background display from the chalkboard to the image
from the connected device by touching the Chalk Board button [E]. To exit the
annotation screen, touch the red “X” labeled Close [F].
1
2
3
4
B C
E
02-12_TECCards

Touch the Picture Mute [B]
button to prevent the image
from displaying on the screen.
Touch Picture Mute [B] button
again to resume displaying the
image.
1
1
2 2
For problems with this piece
of equipment, please call
216.368.HELP (4357)
more instructions on back
Using Non-TEC Equipment
Select the Auxiliary [A] button if you are using (1) equipment such as a
digital camcorder or video game console or (2) VCRs available via special
request. The images from the auxiliary device will be displayed on the
screen.
If you have requested a VCR, the VCR will be controlled using the buttons
located on the unit.
To prevent the picture from
displaying on the screen:
To make the picture full-
screen on the TEC display:
Touch the Full Screen button
[C] to make the image from the
connected device display full-
screen on the TEC display.
Touch anywhere on the TEC
display to bring back the
TEC menu.

To adjust the volume:
To annotate over the display picture:
Touch the Annotation button [F]
to enter a mode where you can
annotate (draw or write) over the
image displayed or a chalkboard
background.
To erase what you have drawn or
written on the screen by touch the
Eraser option and drag your finger
across what you want to erase.
Clear all annotations by touching
the Clear All button.
Write or draw by dragging your
finger on the touch display. Change
the line width between small,
medium, and large by touching the
appropriate options at the top of
the screen.
Using Non-TEC Equipment
1 2
Touch the up arrow and down arrow
buttons [D] to adjust the volume of
the TEC system.
To mute the volume, touch the
MUTE button [E]. Touch MUTE again
to unmute the volume.
Change the color of the line drawn
by touching the color swatches
at the top of the screen. Toggle
the background display from the
chalkboard to the image from the
connected device by touching the
Chalk Board button.
1
2
3
4
For problems with this piece of equipment, please call 216.368.HELP (4357)
Touch the Picture Mute [B]
button to prevent the image
from displaying on the projector.
Touch Picture Mute [B] again to
resume displaying the image.
1
2
For problems with this
equipment, please call
216.368.HELP (4357)
more instructions on back
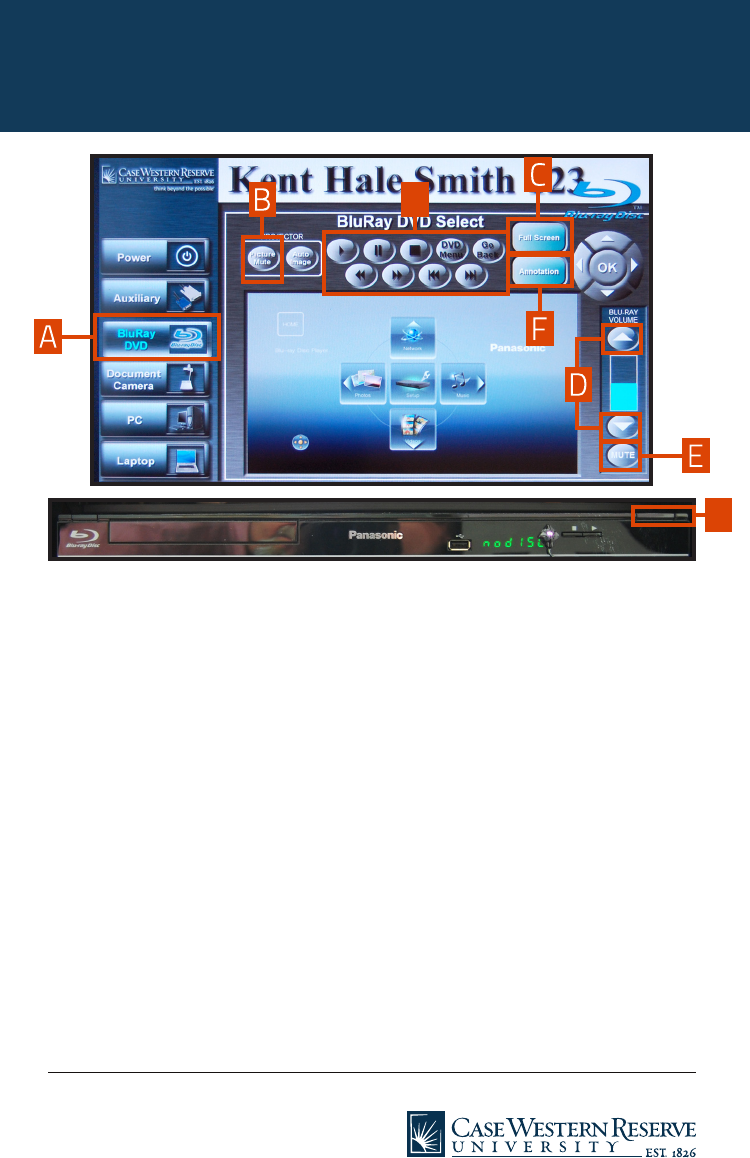
Using the BluRay DVD Player
To use the Blu-Ray player, select the Blu-Ray/DVD option [A]. It is capable of playing
regular DVDs and high-definition Blu-Ray discs.
To insert a DVD or Blu-Ray disc push the open/close button [H]. The disc’s menu will
appear on the TEC display and on the projector. The player can be controlled either with the
buttons at the top of the TEC display [G], on the Blu-Ray player, or on the remote control.
To prevent the picture from
displaying on the screen:
G
To adjust the volume:
1
2
Touch the UP arrow and DOWN
arrow buttons [D] to adjust the
volume of the TEC system.
To mute the volume, touch the
MUTE button [E]. Touch MUTE again
to unmute the volume.
H

To annotate over the display picture:
Touch the Annotation button [F]
to enter a mode where you can
annotate (draw or write) over the
image displayed or a chalkboard
background.
To erase what you have drawn or
written on the screen, touch the
Eraser option and drag your finger
across what you want to erase.
Clear all annotations by touching
the Clear All button.
Write or draw by dragging your
finger on the touch display. Change
the line width between small,
medium, and large by touching the
appropriate options at the top of
the screen.
Using the BluRay DVD Player
Change the color of the line drawn
by touching the color swatches
at the top of the screen. Toggle
the background display from the
chalkboard to the image from the
BluRay/DVD Player by touching the
Chalk Board button.
1
2
3
4
For problems with this equipment, please call 216.368.HELP (4357)
1 2
To make the picture full screen on the TEC display:
Touch the Full Screen button
[C] to make the image from the
connected device display full
screen on the TEC display.
Touch anywhere on the TEC
display to bring back the
TEC menu.
02-12_TECCards

For problems with this
equipment, please call
216.368.HELP (4357)
Connectors
Connectors
HDMI connector.If your laptop has a High-Definition Multimedia Interface
(HDMI) make sure that the HDMI IN is not separated. Press the Laptop
button and select the Laptop HDMI IN option that will appear.
Ethernet cable. Plug this cable into your laptop to connect it to the CWRU
wired network. Please note that in order to make use of the ethernet cable
included with the TEC system, your laptop must be registered on the CWRU
wired network.
If your laptop is not registered on the network when it is plugged in to the
ethernet cable, you will be redirected to setup.case.edu upon opening a web
browser. Simply follow the steps on the webpage and your laptop will be
registered on the wired network within an hour. If you need assistance with
the registration process, please contact the ITS Service Desk at 216.368.
HELP (4357).
The TEC system will also work with a laptop that is using a wireless network.
VGA connector. If your laptop has a VGA port, connect it to the TEC system
with this cable. Press the Laptop button and select the Laptop VGA IN
option that will appear.
A
B
C
B
C
02-12_TECCards

For problems with this
equipment, please call
216.368.HELP (4357)
more instructions on back
Using the Document Camera
Select the Document Camera option [A] to use the document camera.
Touch the Picture Mute [D]
button to prevent the image
from displaying ON the screen.
Touch Picture Mute [D] again to
resume displaying the image.
1
2
To prevent the picture from
displaying ON the screen:
Touch the ON [B] button at the
top of the screen to turn the
document camera on.
Touch the OFF [C] button at the
top of the screen to turn the
document camera OFF.
1
2
To turn the document camera
ON or OFF:
B C
G
H
E
I
Touch the Light button [F] to turn the
light ON the document camera ON or OFF.
Touch the Zoom Out [G] or Zoom In [H]
buttons at the top of the TEC display to
zoom in or out of the document camera
display.
To control the document
camera’s light:
To zoom in or out in the
document camera display:

To annotate over the display picture:
Touch the Annotation button [I]
to enter a mode where you can
annotate (draw or write) over the
image displayed or a chalkboard
background.
To erase what you have drawn or
written on the screen, touch the
Eraser option and drag your finger
across what you want to erase.
Clear all annotations by touching
the Clear All button.
Write or draw by dragging your
finger on the touch display. Change
the line width between small,
medium, and large by touching the
appropriate options at the top of
the screen.
Using the Document Camera
Change the color of the line drawn
by touching the color swatches
at the top of the screen. Toggle
the background display from the
chalkboard to the image from the
document camera by touching the
Chalk Board button. To exit the
annotation screen, touch the red “X”
labeled Close.
1
2
3
4
For problems with this equipment, please call 216.368.HELP (4357)
1
2
To make the picture full screen on the TEC display:
Touch the Full Screen
button [E] to make the
image from the document
camera display full screen
on the TEC display.
Touch anywhere on the TEC
display to bring back the TEC
menu.
02-12_TECCards

TEC Station Equipment
System Overview
A D
B E
C F
Touch Screen Display Built-in PC
Document Camera Blu-Ray/DVD Player
RCA jacks
(plug into VCR or other
auxiliary equipment)
VCR
(only available if
requested)
A
B
C
E
F
D
For problems with this
equipment please call
216.368.HELP (4357)
02-12_TECCards

For problems with this
equipment, please call
216.368.HELP (4357)
more instructions on back
Using Your Laptop
Select the Laptop option [A] to display the desktop of a laptop connected to
the TEC system with the projector.
Touch Laptop VGA IN [B] if your
laptop is connected to the VGA
cable (the large connector with
thumbscrews).
Touch Laptop HDMI IN [C] if
your laptop is connected to the
HDMI cable (the small connector
without thumbscrews).
B
C
E
H
Touch the Picture Mute [D]
button to prevent the image
from displaying on the projector.
1
Touch Picture Mute [D] again to
resume displaying the image.
2
OR
To prevent the Laptop from displaying on the projector:
G
Please note that in order to use the ethernet cable included with the TEC system,
your laptop must be registered on the CWRU wired network. If your laptop is not
registered on the network and the ethernet cable is plugged in, you will be redirected
to setup.case.edu upon opening a web browser. Simply follow the steps on the
webpage and your laptop will be registered within an hour. If you need assistance
with the registration process, please contact the ITS Service Desk at 216.368.HELP
(4357). The TEC system will also work with a laptop that is using a wireless network.

To annotate over the display picture:
Touch the Annotation button [H]
to enter a mode where you can
annotate (draw or write) over the
image displayed or a chalkboard
background.
To erase what you have drawn or
written on the screen, touch the
Eraser option and drag your finger
across what you want to erase.
Clear all annotations by touching
the Clear All button.
Write or draw by dragging your
finger on the touch display. Change
the line width between small,
medium, and large by touching the
appropriate options at the top of
the screen.
Using Your Laptop
Change the color of the line drawn
by touching the color swatches
at the top of the screen. Toggle
the background display from the
chalkboard to the image from the
laptop by touching the Chalk Board
button. To exit the annotation screen,
touch the red “X” labeled Close.
1
2
3
4
1
To make the picture full
screen on the TEC display:
Touch the Full Screen button
[E] to make the image from
the connected device display
full screen on the TEC display.
2
Touch anywhere on the TEC
display to bring back the TEC
menu.
To adjust the volume:
1
2
Touch the UP arrow and DOWN
arrow buttons [F] to adjust the
volume of the TEC system.
To mute the volume, touch the
MUTE button [G]. Touch MUTE again
to unmute the volume.
For problems with this equipment, please call 216.368.HELP (4357)
02-12_TECCards

For problems with this
equipment, please call
216.368.HELP (4357)
more instructions on back
Using the TEC Computer
Select the PC option [A] to use the TEC system’s built-in computer with the projector.
B
C
E
H
Use these settings to display anything on the TEC system’s computer. To use PowerPoint™
in the Presenter View, refer to the instructions on the other side. (Note: The touch screen
will not work to perform tasks on the computer such as locating a file or opening an
application. Use the mouse instead of the touch screen for tasks such as these.)
Display the PC desktop:
Touch the Picture Mute [D] button to
prevent the image from displaying
on the projector.
1
Touch the Picture Mute [D] button again to
resume displaying the image.
2
To prevent the PC from
displaying on the screen:
1
To make the picture full screen
on the TEC display:
Touch the Full Screen button [E] to make
the image from the computer display full
screen on the TEC display.
2
Touch anywhere on the TEC display
to bring back the TEC menu.
To adjust the volume:
1 2
Touch the UP arrow and DOWN arrow
buttons [F] to adjust the volume of the
TEC system.
To mute the volume, touch the MUTE
button [G]. Touch MUTE again to
unmute the volume.
G

To annotate over the display picture:
Touch the Annotation button [H] to
enter a mode where you can annotate
(draw or write) over the image displayed
or a chalkboard background.
To erase what you have drawn or
written on the screen, touch the Eraser
option and drag your finger across what
you want to erase. Clear all annotations
by touching the Clear All button.
Write or draw by dragging your finger on
the touch display. Change the line width
between small, medium, and large by
touching the appropriate options at the
top of the screen.
Change the color of the line drawn by
touching the color swatches at the top
of the screen. Toggle the background
display from the chalkboard to the
image from the computer by touching
the Chalk Board button. To exit the
annotation screen, touch the red “X”
labeled Close.
1
2
3
4
PowerPoint Presenter View allows presenters to have a customized view
of the presentation on a separate monitor while the audience views the
slide show on a projector.
Touch the PowerPoint Presentation
button [C] to turn the TEC display’s
PowerPoint setting on. Touch it again to
turn off the PowerPoint setting.
To activate Presenter View in PowerPoint,
click the Slide Show tab at the top of the
window and check the Presenter View
checkbox.
To stop using Presenter View, or if you need
to perform other tasks with the TEC display
that do not involve PowerPoint, select the
Normal PC Mode [B] button. In this mode,
your PowerPoint presentation slides will be
displayed normally on both the projector and
the TEC display.
From the Show On: drop‐down menu,
choose Monitor 2 Generic PnP Monitor
(or whichever option is not the Primary
Monitor). The Presenter View will appear
on the TEC display. Presenter View
enables you to see presenter notes or
select slides out of order.
1 2
43
Display a PowerPoint presentation with Presenter View:
For problems with this equipment, please call 216.368.HELP (4357)
Using the TEC Computer
02-12_TECCards

For problems with this
equipment please call
216.368.HELP (4357)
more instructions on back
Turning ON/OFF the Projector
Touch the Power button [A] to turn the overhead projector ON or OFF.
To turn the projector on, touch the System ON button [B].
1
3
2
4
5
Wait for the projector to warm up. A progress bar on the top of the TEC
screen will track the progress of the projector as it warms up. [C]
To turn the projector OFF, touch the Power OFF button [A].
Touch the System OFF button [D].
A
B D
C

Turning On/OFF the Projector
6
The screen will ask if you are sure you want to power OFF the projector.
Touch the Yes, Shutdown button [E] to turn the projector OFF, or touch
the No, Go Back button [F] to leave the projector ON.
E F
For problems with this equipment please call 216.368.HELP (4357)
02-12_TECCards

Touch the Picture Mute [B]
button to prevent the image
from displaying on the screen.
Touch the Picture Mute [B]
button again to resume
displaying the image.
1
1
2 2
For problems with this
equipment, please call
216.368.HELP (4357)
more instructions on back
Using Non-TEC Equipment
Select the Auxiliary [A] button if you are using (1) equipment such as a
digital camcorder or video game console or (2) VCRs available via special
request. The images from the auxiliary device will be displayed on the
screen.
If you have requested a VCR, the VCR will be controlled using the buttons
located on the unit.
To prevent the picture from
displaying on the screen:
To make the picture full
screen on the TEC display:
Touch the Full Screen button
[C] to make the image from the
connected device display full
screen on the TEC display.
Touch anywhere on the TEC
display to bring back the
TEC menu.

To adjust the volume:
To annotate over the display picture:
Touch the Annotation button [F]
to enter a mode where you can
annotate (draw or write) over the
image displayed or a chalkboard
background.
To erase what you have drawn or
written on the screen, touch the
Eraser option and drag your finger
across what you want to erase.
Clear all annotations by touching
the Clear All button.
Write or draw by dragging your
finger on the touch display. Change
the line width between small,
medium, and large by touching the
appropriate options at the top of
the screen.
Using Non-TEC Equipment
1 2
Touch the UP arrow and DOWN
arrow buttons [D] to adjust the
volume of the TEC system.
To mute the volume, touch the
MUTE button [E]. Touch MUTE again
to unmute the volume.
Change the color of the line drawn
by touching the color swatches
at the top of the screen. Toggle
the background display from the
chalkboard to the image from the
connected device by touching the
Chalk Board button.
1
2
3
4
For problems with this equipment, please call 216.368.HELP (4357)
02-12_TECCards
