
User Guide

TABLE OF
CONTENTS
p. 2LEGO.com/mindstorms
LEGOtheLEGOlogoMINDSTORMSandtheMINDSTORMSlogoaretrademarksofthe/
sontdesmarquesdecommercedu/sonmarcasregistradasdeLEGOGroup©TheLEGOGroup
EV3 Programmer App
+ Minimum System Requirements
............................................................. 47
+ Installing the Programmer App ................................................................ 47
+ Lobby ............................................................................................................................. 48
+ Robot Missions ....................................................................................................... 49
+ Programming ........................................................................................................... 50
+ Programming Blocks and Palettes ....................................................... 51
+ Hardware Page ...................................................................................................... 52
Troubleshooting
+ Updating the EV3 Software
.......................................................................... 53
+ Firmware Update .................................................................................................. 54
+ Resetting the EV3 Brick .................................................................................. 55
Useful Information
+ Sound File List ........................................................................................................ 56
+ Image File List ........................................................................................................ 61
+ Brick Program App—Assets List ............................................................. 65
+ Element List .............................................................................................................. 66
Introduction
+ Welcome
...................................................................................................................... 3
+ How to Use This Guide .................................................................................... 4
+ Help ................................................................................................................................. 5
EV3 Technology
+ Overview
..................................................................................................................... 6
+ EV3 Brick ..................................................................................................................... 7
Overview ...................................................................................................................... 7
Installing Batteries ............................................................................................... 10
Turning On the EV3 Brick ................................................................................ 11
+ EV3 Motors ................................................................................................................. 12
Large Motor ............................................................................................................... 12
Medium Motor ......................................................................................................... 12
+ EV3 Sensors ............................................................................................................. 13
Color Sensor ............................................................................................................. 13
Touch Sensor ........................................................................................................... 14
Infrared Sensor and Remote Infrared Beacon .............................. 15
+ Connecting Sensors and Motors ............................................................ 17
+ Connecting the EV3 Brick to Your Computer ................................ 18
USB Cable .................................................................................................................. 18
Wireless—Bluetooth ........................................................................................... 19
Wireless—Wi-Fi ....................................................................................................... 20
+ Connecting the EV3 Brick to Your Tablet ......................................... 23
Making a Bluetooth Connection to Your iPad ................................ 23
Making a Bluetooth Connection to Your Android Tablet ....... 24
+ EV3 Brick Interface ............................................................................................. 25
Run Recent ................................................................................................................ 25
File Navigation ......................................................................................................... 25
Brick Apps .................................................................................................................. 26
Settings ......................................................................................................................... 30
EV3 Software
+ Minimum System Requirements
............................................................. 34
+ Installing the Software ..................................................................................... 34
+ Lobby ............................................................................................................................. 35
+ Project Properties and Structure ............................................................ 36
+ Robot Missions ....................................................................................................... 38
+ Programming ........................................................................................................... 39
+ Programming Blocks and Palettes ....................................................... 40
+ Hardware Page ...................................................................................................... 42
+ Content Editor ......................................................................................................... 44
+ Tools ................................................................................................................................ 45

p. 3LEGO.com/mindstorms
LEGOtheLEGOlogoMINDSTORMSandtheMINDSTORMSlogoaretrademarksofthe/
sontdesmarquesdecommercedu/sonmarcasregistradasdeLEGOGroup©TheLEGOGroup
INTRODUCTION
Welcome to the world of LEGO
®
MINDSTORMS
®
In this LEGO
®
MINDSTORMS
®
EV3 robotics set you have all
theelements you need to create and command thousands of LEGO
robots.
If you have never built a LEGO MINDSTORMS robot before, we
recommend that you start by building one of the five cool robot
characters pictured on the EV3 packaging. In the Robot Missions
inside the EV3 programming software and tablet-based Programmer
App, you’ll find building instructions and examples of how to program
these robots. The robots have been created by LEGO MINDSTORMS
designers to demonstrate some of the ways you can build and
program with the LEGO MINDSTORMS EV3 robotics system. Before
you know it, you’ll be turning your own LEGO creations into live
robots of every type and with many different kinds of behavior!
With LEGO MINDSTORMS EV3, building and programming your
own robot has never been easier. Think of a robot and then build
it. Use the motors and sensors to add behavior and movement.
Thesoftware will guide you in bringing your robot to life.
Create: Build your robot using the LEGO elements, motors, and
intelligent sensors included in the set.
Command: Program your robot in the intuitive icon-based
programming interface. Drag and drop the actions that you want
into the programming window and adjust them to suit your robot’s
behavior.
Go! Once you have built and programmed your robot, it’s time to
play!
Visit LEGO.com/mindstorms to see what’s new and what others are
doing with their LEGO MINDSTORMS set. When you and other LEGO
MINDSTORMS fans share your creations and your experiences, we
all benefit.
See you there!
Welcome

p. 4LEGO.com/mindstorms
LEGOtheLEGOlogoMINDSTORMSandtheMINDSTORMSlogoaretrademarksofthe/
sontdesmarquesdecommercedu/sonmarcasregistradasdeLEGOGroup©TheLEGOGroup
INTRODUCTION
In this guide, we’ll tell you everything you need to know to get started
with LEGO
®
MINDSTORMS
®
EV3 Technology. From the EV3 Brick,
sensors, and motors, to the computer-based LEGO MINDSTORMS
EV3 Software and tablet-edition EV3 Programmer App, this guide
will have you creating, programming and playing with your own
robots in no time!
EV3 Technology
We start off by introducing you to the programmable intelligent EV3
Brick. Then we take you through the various motors and sensors
that you can connect to the EV3 Brick to transform it into your very
own robot, ready to perform any task. Next, we show you how to
connect your EV3 Brick to a computer or tablet and then explain the
various functions and settings available in the EV3 Brick Interface.
EV3 Software
In the next chapter, we introduce you to the computer-based EV3
Software, including the installation process and various screens,
tutorials, and tools.
EV3 Programmer App
Next, we introduce you to the various features and functions of the
tablet-based EV3 Programmer App.
Troubleshooting
In this chapter, we show you how to keep your EV3 technology in
top shape, from updating your firmware and software to resetting
your EV3 Brick.
Useful Information
In the final chapter, we list all the fun sounds and images that you
can incorporate into your programs, either via the EV3 Software
and EV3 Programmer App or directly from the EV3 Brick Interface.
Lastly, we’ve included a visual overview of every LEGO element you
get with your LEGO MINDSTORMS EV3 set.
Notes
Look out for the special hexagon-shaped notes placed throughout
this guide. They include handy hints, tips, warnings, and anything
else we think you need to know to get you off to the best possible
start.
How to Use This Guide

p. 5LEGO.com/mindstorms
LEGOtheLEGOlogoMINDSTORMSandtheMINDSTORMSlogoaretrademarksofthe/
sontdesmarquesdecommercedu/sonmarcasregistradasdeLEGOGroup©TheLEGOGroup
INTRODUCTION
EV3 Software Help
The EV3 Software includes comprehensive, structured help
documentation, as well as context-sensitive information about
objects that you select within the application. Access the EV3
Software Help and Context Help under the EV3 Software Help menu.
This is the first place to look if you need help or more information
on how to use the EV3 Software.
The EV3 Software Help explains how to best use and program
with the sensors and motors included in the LEGO
®
MINDSTORMS
®
EV3 set. This information is useful, whether you are using the EV3
Software or the EV3 Programmer App.
The EV3 Software Lobby also includes a series of Quick Start videos
that introduce the main features of the EV3 Software.
EV3 Programmer Help
The EV3 Programmer App Help documentation will help you
understand the various icons, buttons, and areas found within the
app. Context-sensitive help is also available wherever you see a
question mark icon, like when you’re setting programming block
modes and parameters. We’ve also included a Quick Start Video
tutorial that shows you how to connect your EV3 Brick to your tablet,
navigate the various programming blocks, create a basic program,
and then run it on your EV3 Brick.
If you want to know even more, such as how to use the various
sensors and motors, then check out the EV3 Software Help.
Help
NOTE:
Some of the program
examples in the EV3Software Help
include programming blocks
that are not available in the
EV3Programmer App.

p. 6LEGO.com/mindstorms
LEGOtheLEGOlogoMINDSTORMSandtheMINDSTORMSlogoaretrademarksofthe/
sontdesmarquesdecommercedu/sonmarcasregistradasdeLEGOGroup©TheLEGOGroup
EV3
TECHNOLOGY
Overview
Touch Sensor
+ Recognizes three
conditions: touched,
bumped, and released.
EV3 Brick
+ Serves as the control center
and power station for your
robot.
Remote Infrared Beacon
+ Remote controls your robot
from a distance.
Large Motor
+ Lets you program
precise and powerful
robotic action.
Medium Motor
+ Maintains precision, while
trading some power for
compact size and faster
response.
Color Sensor
+ Recognizes seven different
colors and measures light
intensity.
Infrared Sensor
+ Detects objects and can
track and find the Remote
Infrared Beacon.

p. 7LEGO.com/mindstorms
LEGOtheLEGOlogoMINDSTORMSandtheMINDSTORMSlogoaretrademarksofthe/
sontdesmarquesdecommercedu/sonmarcasregistradasdeLEGOGroup©TheLEGOGroup
EV3
TECHNOLOGY
EV3 Brick
Overview
The Display shows you what is going on inside the EV3 Brick and
enables you to use the Brick Interface. It also allows you to add
text and numerical or graphic responses into your programming or
experiments. For example, you might want to program the Display
to show a happy face (or a sad face) for a comparison response or
to display a number that is the result of a mathematical calculation
(learn more about using the Display Block in the EV3 Software Help).
The Brick Buttons allow you to navigate inside the EV3 Brick
Interface. They can also be used as programmable activators. For
example, you might program a robot to raise its arms if the Up button
is pressed or to lower them if the Down button is pressed (for more
information, see Using the Brick Buttons in the EV3 Software Help).
Wireless Connection
Status Icons
(from the left):
Bluetooth enabled but not
connected or visible to other
Bluetooth devices
Bluetooth enabled and visible
to other Bluetooth devices
Bluetooth enabled and your
EV3 Brick is connected to
another Bluetooth device
Bluetooth enabled and visible
and your EV3 Brick is connected
to another Bluetooth device
Wi-Fi enabled but not connected
to a network
Wi-Fi enabled and connected
to a network
Battery level
USB connection established
to another device
Brick Buttons
Back
This button is used to reverse
actions, to abort a running
program, and to shut down
theEV3 Brick.
Center
Pressing the Center button says
“OK” to various questions—to shut
down, to select desired settings,
or to select blocks in theBrick
Program App. You would, for
example, press this button to
select a checkbox.
Left, Right, Up, Down
These four buttons are used to
navigate through the contents of
the EV3 Brick.
Brick Name

p. 8LEGO.com/mindstorms
LEGOtheLEGOlogoMINDSTORMSandtheMINDSTORMSlogoaretrademarksofthe/
sontdesmarquesdecommercedu/sonmarcasregistradasdeLEGOGroup©TheLEGOGroup
EV3
TECHNOLOGY
The Brick Status Light that surrounds the Brick Buttons tells you
the current status of the EV3 Brick. It can be green, orange, or red,
and can pulse. Brick Status Light codes are the following:
+ Red = Startup, Updating, Shutdown
+ Red pulsing = Busy
+ Orange = Alert, Ready
+ Orange pulsing = Alert, Running
+ Green = Ready
+ Green pulsing = Running program
You can also program the Brick Status Light to show different colors
and to pulse when different conditions are met (learn more about
using the Brick Status Light Block in the EV3 Software Help).
EV3 Brick
Technical
Specifications
for the EV3 Brick
+Operating System—LINUX
+300 MHz ARM9 Controller
+Flash Memory—16 MB
+RAM—64 MB
+Brick Screen Resolution—178x128/Black & White
+USB 2.0 Communication to Host PC—Up to 480 Mbit/sec
+USB 1.1 Host Communication—Up to 12 Mbit/sec
+Micro SD Card—Supports SDHC, Version 2.0, Max
32 GB
+Motor and Sensor Ports
+Connectors—RJ12
+Support Auto ID
+Power—6 AA batteries
Brick Status Light – Red Brick Status Light – Orange Brick Status Light – Green

p. 9LEGO.com/mindstorms
LEGOtheLEGOlogoMINDSTORMSandtheMINDSTORMSlogoaretrademarksofthe/
sontdesmarquesdecommercedu/sonmarcasregistradasdeLEGOGroup©TheLEGOGroup
EV3
TECHNOLOGY
Input Ports
Input Ports 1, 2, 3, and 4 are
used to connect sensors to
theEV3 Brick.
PC Port
The Mini-USB PC Port, located
next to the D port, is used
to connect theEV3 Brick to
acomputer.
Output Ports
Output Ports A, B, C, and D
are used to connect motors to
the EV3 Brick.
Speaker
All sounds from the EV3 Brick
come through this speaker—
including any sound effects used
in programming your robots.
When the quality of the sound
is important to you, try to leave
the speaker uncovered while
designing your robot.
Check out the cool sound files
that can be programmed with
in the EV3 Software (learn more
about using the Sound Block in
the EV3 Software Help).
SD Card Port
The SD Card Port increases
theavailable memory for your
EV3 Brick with an SD card
(maximum 32 GB—not included).
USB Host Port
The USB Host Port can be used
to add a USB Wi-Fi dongle for
connecting to a wireless network,
or to connect up to four EV3
Bricks together (daisy chain).
EV3 Brick
AA, 1.5V x 6
p. 10LEGO.com/mindstorms
LEGOtheLEGOlogoMINDSTORMSandtheMINDSTORMSlogoaretrademarksofthe/
sontdesmarquesdecommercedu/sonmarcasregistradasdeLEGOGroup©TheLEGOGroup
EV3
TECHNOLOGY
EV3 Brick
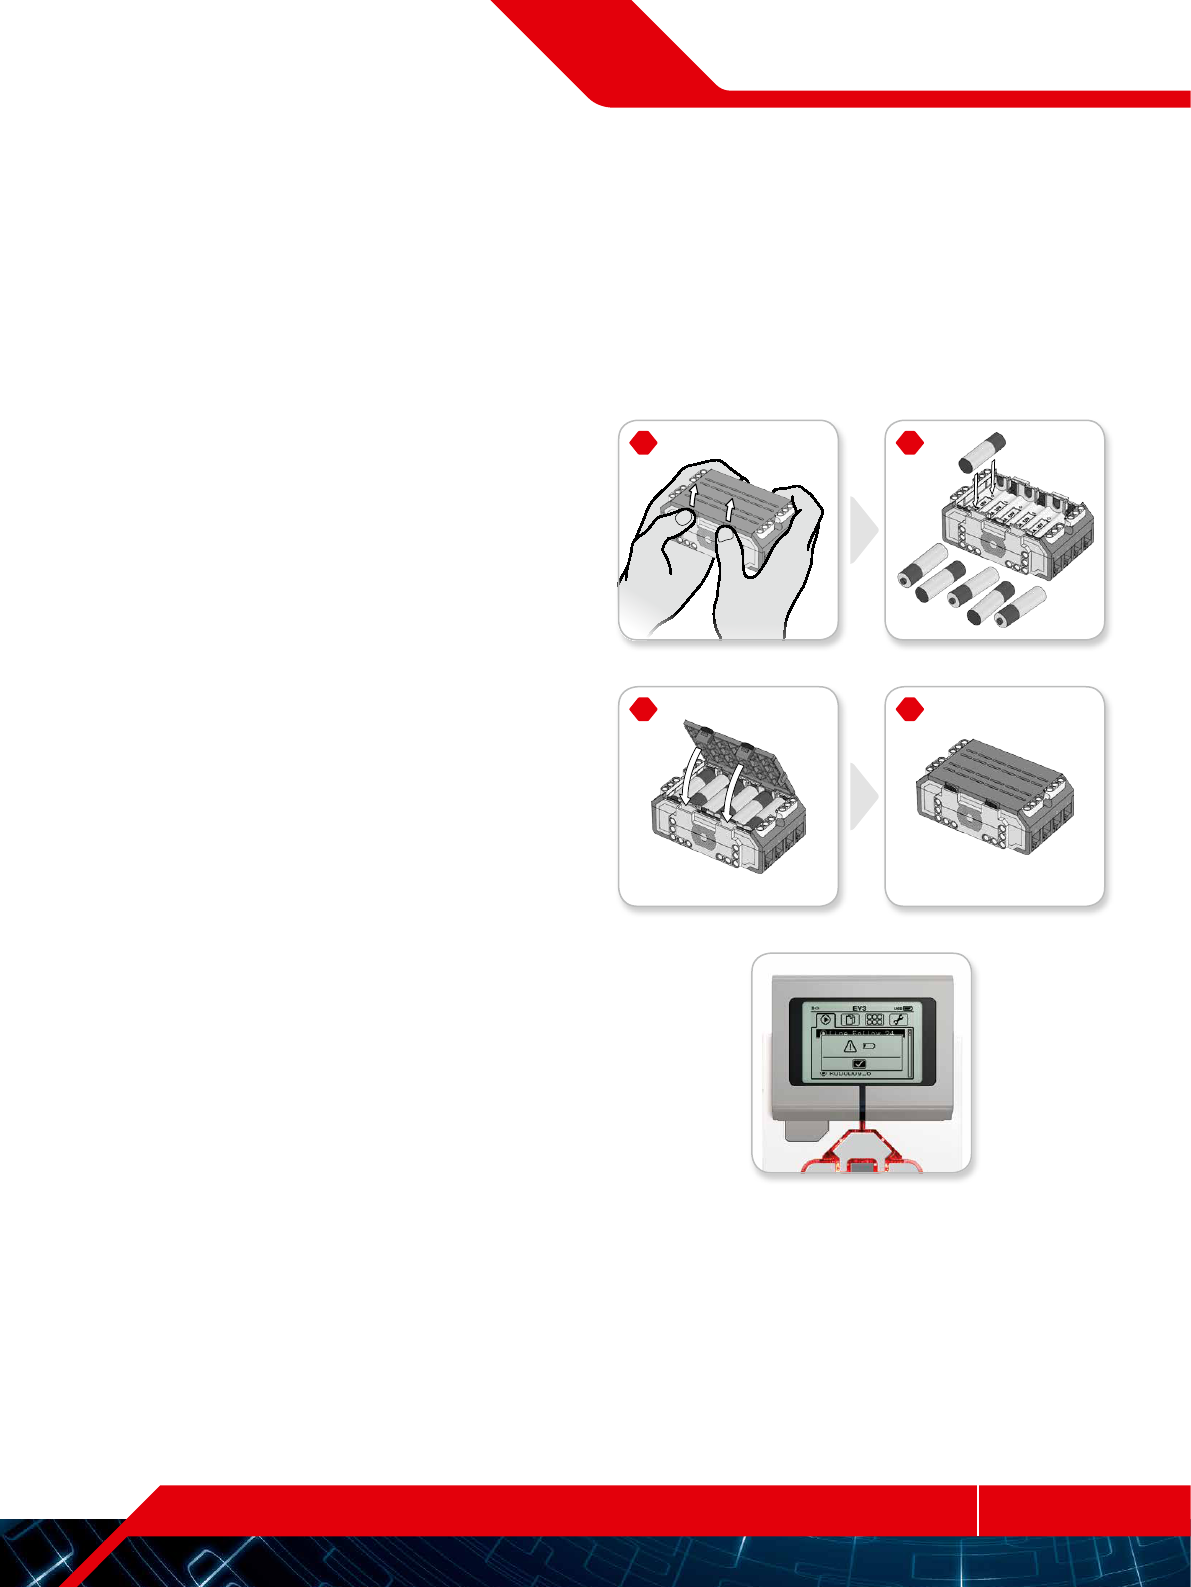
Installing Batteries
in the EV3 Brick
The EV3 Brick requires six AA/LR6 batteries. Alkaline or rechargeable
Lithium Ion AA batteries are recommended.
To install the AA batteries, remove the battery cover on the back of
the EV3 Brick by pressing the two plastic tabs on the side. After you
have inserted the six AA batteries, attach the battery cover again.
Some important information about batteries:
+ Never use different kinds of batteries together
(including mixing old and new).
+ Remove batteries from the EV3 Brick when not in use.
+ Never use damaged batteries.
+ Use the correct battery charger under the supervision of
an adult.
+ Never attempt to recharge batteries that are not rechargeable.
Note: If your batteries are weak, the Brick Status Light may stay red
after you press the Start button, while the Display continues to say
“Starting.”
Power-Saving Practices
+ Remove the batteries between use.
Remember to keep each set of batteries in its own storage
container so they can be used together.
+ Reduce the volume.
+ Adjust the Sleep Setting.
+ Turn off Bluetooth and Wi-Fi when not in use.
+ Avoid unnecessary wear on the motors.
Low Battery Power Indicator

p. 11LEGO.com/mindstorms
LEGOtheLEGOlogoMINDSTORMSandtheMINDSTORMSlogoaretrademarksofthe/
sontdesmarquesdecommercedu/sonmarcasregistradasdeLEGOGroup©TheLEGOGroup
EV3
TECHNOLOGY
Turning On the EV3 Brick
To turn on the EV3 Brick, press the Center button. After you press
thebutton, the Brick Status Light will turn red and the Starting screen
will be displayed.
When the light changes to green, your EV3 Brick is ready.
To turn the EV3 Brick off, press the Back button until you see theShut
Down screen.
The Abort X will already be selected. Use the Right button to select
the Accept check mark, then press the Center button for OK. Your
EV3 Brick is now turned off. If you press OK while the X is selected,
you will return to the Run Recent screen.
EV3 Brick
Starting screen
Shut Down screen

p. 12LEGO.com/mindstorms
LEGOtheLEGOlogoMINDSTORMSandtheMINDSTORMSlogoaretrademarksofthe/
sontdesmarquesdecommercedu/sonmarcasregistradasdeLEGOGroup©TheLEGOGroup
EV3
TECHNOLOGY
EV3 Motors
Large Motor
The Large Motor is a powerful “smart” motor. It has a built-in Rotation
Sensor with 1-degree resolution for precise control. The Large Motor
is optimized to be the driving base on your robots.
By using the Move Steering or Move Tank programming block, the
Large Motors will coordinate the action simultaneously.
Medium Motor
The Medium Motor also includes a built-in Rotation Sensor (with
1-degree resolution), but it is smaller and lighter than the Large
Motor. That means it is able to respond more quickly than the Large
Motor.
The Medium Motor can be programmed to turn on or off, control its
power level, or to run for a specified amount of time or rotations.
Compare the Two Motors:
+ The Large Motor runs at 160–170 rpm, with a running torque of
20 Ncm and a stall torque of 40 Ncm (slower, but stronger).
+ The Medium Motor runs at 240–250 rpm, with a running torque
of 8 Ncm and a stall torque of 12 Ncm (faster, but less powerful).
+ Both motors are Auto ID supported.
For more information on using the Rotation Sensor in your
programming, see Using the Motor Rotation Sensor in the EV3
Software Help.
Large Motor
Medium Motor

p. 13LEGO.com/mindstorms
LEGOtheLEGOlogoMINDSTORMSandtheMINDSTORMSlogoaretrademarksofthe/
sontdesmarquesdecommercedu/sonmarcasregistradasdeLEGOGroup©TheLEGOGroup
EV3
TECHNOLOGY
Color Sensor
The Color Sensor is a digital sensor that can detect the color
or intensity of light that enters the small window on the face of
thesensor. This sensor can be used in three different modes: Color
Mode, Reflected Light Intensity Mode, and Ambient Light Intensity
Mode.
In Color Mode, the Color Sensor recognizes seven colors—black,
blue, green, yellow, red, white, and brown—plus No Color. This
ability to differentiate between colors means your robot might be
programmed to sort colored balls or blocks, speak the names of
colors as they are detected, or stop action when it sees red.
In Reflected Light Intensity Mode, the Color Sensor measures
theintensity of light reflected back from a red light–emitting lamp.
The sensor uses a scale of 0 (very dark) to 100 (very light). This
means your robot might be programmed to move around on a white
surface until a black line is detected, or to interpret a color-coded
identification card.
In Ambient Light Intensity Mode, the Color Sensor measures
thestrength of light that enters the window from its environment,
such as sunlight or the beam of a flashlight. The sensor uses a scale
of 0 (very dark) to 100 (very light). This means your robot might be
programmed to set off an alarm when the sun rises in the morning,
or stop action if the lights go out.
The sample rate of the Color Sensor is 1 kHz/sec.
For the best accuracy, when in Color Mode or Reflected Light
Intensity Mode, the sensor must be held at a right angle, close
to—but not touching—the surface it is examining.
For more information, see Using the Color Sensor in the EV3
Software Help.
EV3 Sensors
Color Mode
Reflected Light Intensity Mode
Ambient Light Intensity Mode
Color Sensor
p. 14LEGO.com/mindstorms
LEGOtheLEGOlogoMINDSTORMSandtheMINDSTORMSlogoaretrademarksofthe/
sontdesmarquesdecommercedu/sonmarcasregistradasdeLEGOGroup©TheLEGOGroup
EV3
TECHNOLOGY
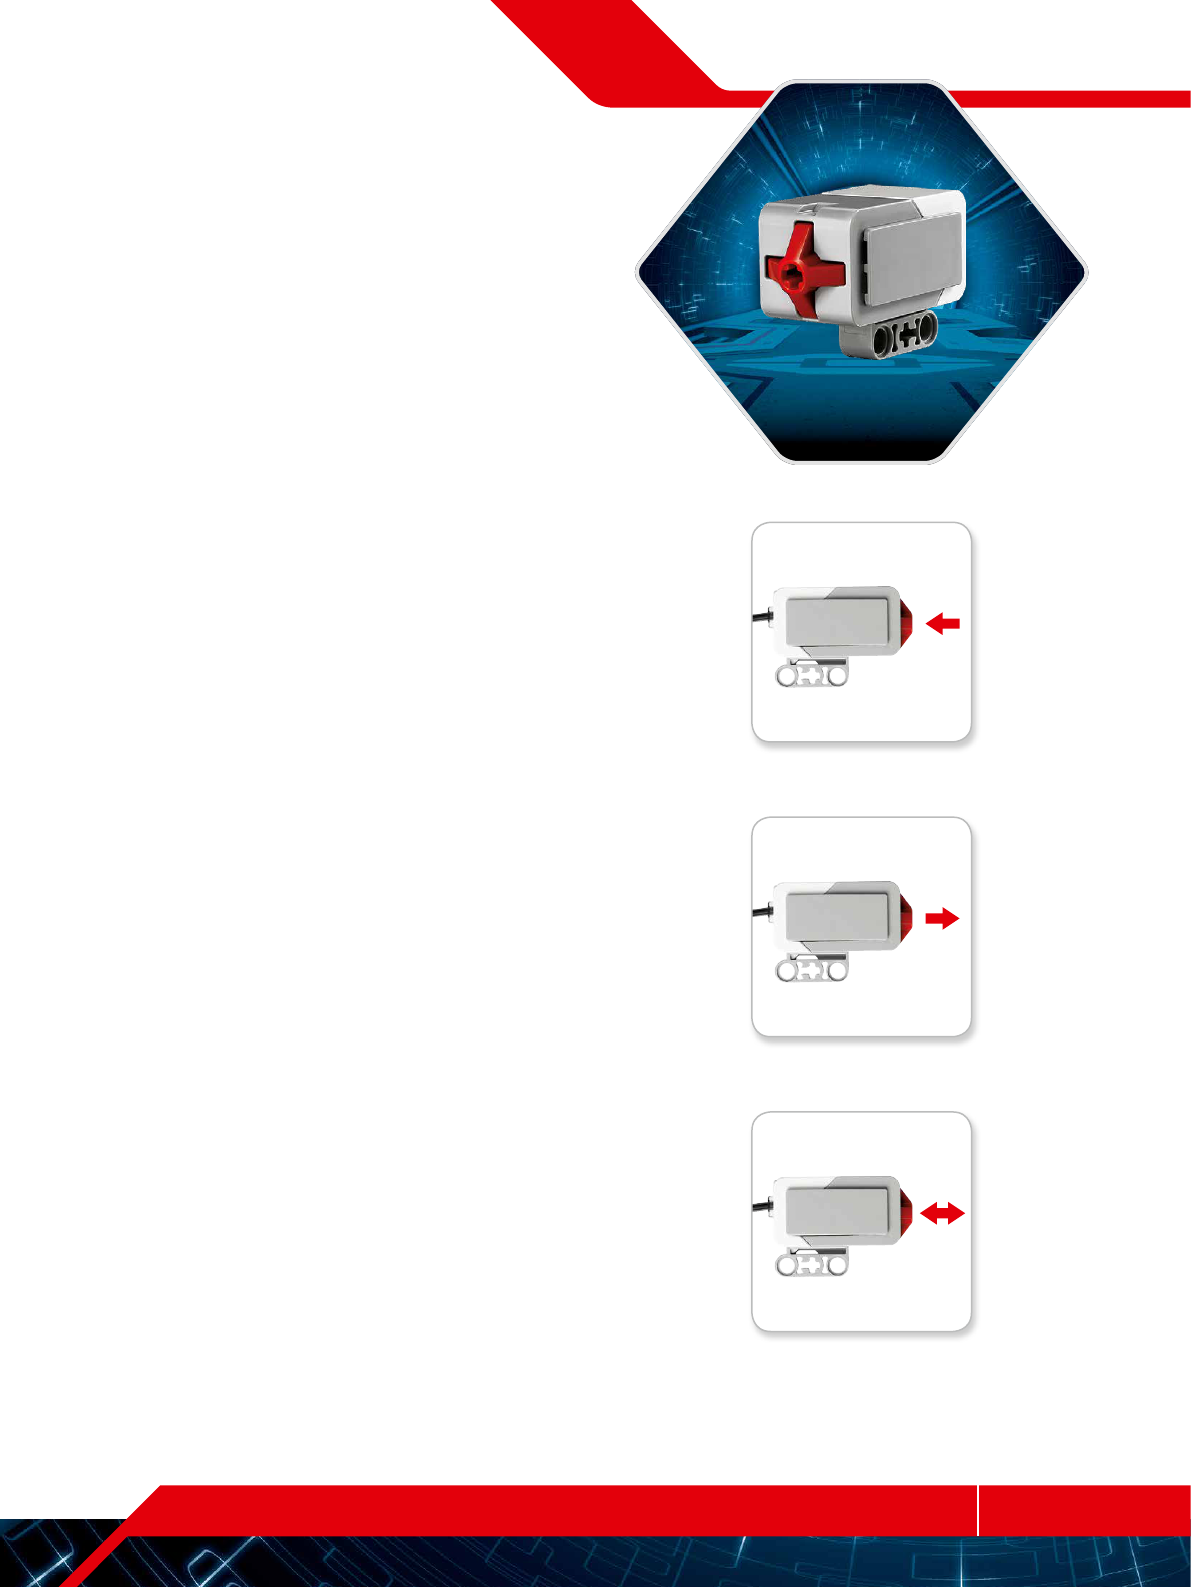
Touch Sensor
The Touch Sensor is an analog sensor that can detect when
thesensor’s red button has been pressed and when it is released.
That means the Touch Sensor can be programmed to action using
three conditions—pressed, released, or bumped (both pressed and
released).
Using input from the Touch Sensor, a robot can be programmed
to see the world as a blind person might, reaching a hand out and
responding when it touches something (pressed).
You might build a robot with a Touch Sensor pressed against
thesurface beneath it. You might then program the robot to respond
(Stop!) when it is about to drive off the edge of a table (when
thesensor is released).
A fighting robot might be programmed to keep pushing forward
against its challenger until the challenger retreats. That pair of
actions—pressed, then released—would constitute bumped.
For more information, see Using the Touch Sensor in the EV3
Software Help.
EV3 Sensors
Touch Sensor
Released
Bumped
Pressed
70cm / 27inch
200cm / 79inch
70cm / 27inch
200cm / 79inch
p. 15LEGO.com/mindstorms
LEGOtheLEGOlogoMINDSTORMSandtheMINDSTORMSlogoaretrademarksofthe/
sontdesmarquesdecommercedu/sonmarcasregistradasdeLEGOGroup©TheLEGOGroup
EV3
TECHNOLOGY
Infrared Sensor and
Remote Infrared Beacon
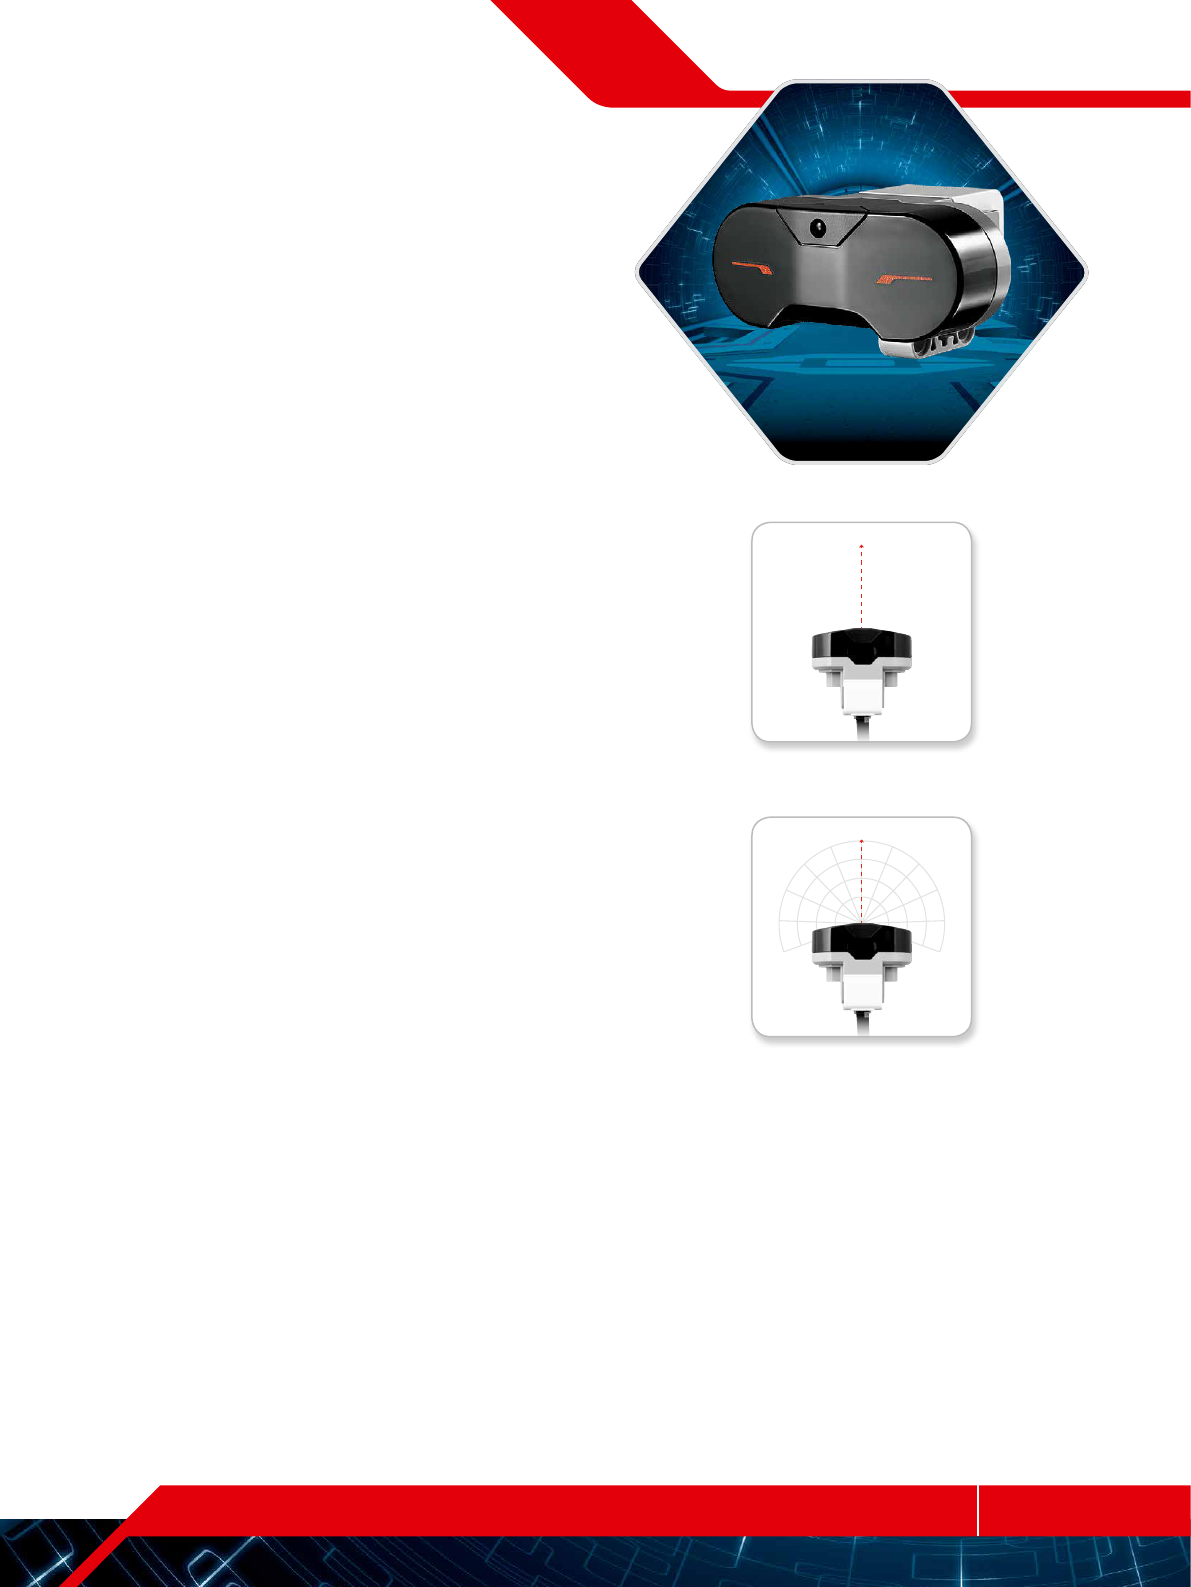
The Infrared Sensor is a digital sensor that can detect infrared light
reflected from solid objects. It can also detect infrared light signals
sent from the Remote Infrared Beacon.
The Infrared Sensor can be used in three different modes: Proximity
Mode, Beacon Mode, and Remote Mode.
Proximity Mode
In Proximity Mode, the Infrared Sensor uses the light waves reflected
back from an object to estimate the distance between the sensor
and that object. It reports the distance using values between 0 (very
close) to 100 (far away), not as a specific number of centimeters or
inches. The sensor can detect objects up to 70 cm away, depending
on the size and shape of the object.
For more information, see Using the Infrared Sensor Proximity Mode
in the EV3 Software Help.
Beacon Mode
Choose one of the Remote Infrared Beacon’s four channels from
the red Channel Selector. The Infrared Sensor will detect a beacon
signal matching the channel that you specify in your program up
to a distance of approximately 200 cm in the direction it is facing.
Once detected, the sensor can estimate the general direction
(heading) of and the distance (proximity) to the beacon. With this
information, you can program a robot to play hide-and-seek, using
the Remote Infrared Beacon as the target of its search. Theheading
will be a value of between -25 and 25, with 0 indicating that
thebeacon is directly in front of the Infrared Sensor. The proximity
will be values between 0 and 100.
For more information, see Using the Infrared Sensor Beacon Mode
in the EV3 Software Help.
EV3 Sensors
Proximity Mode
Beacon Mode
Infrared Sensor
p. 16LEGO.com/mindstorms
LEGOtheLEGOlogoMINDSTORMSandtheMINDSTORMSlogoaretrademarksofthe/
sontdesmarquesdecommercedu/sonmarcasregistradasdeLEGOGroup©TheLEGOGroup
EV3
TECHNOLOGY
The Remote Infrared Beacon is a separate device that can be
handheld or built into another LEGO
®
model. It requires two AAA
alkaline batteries. To turn the Remote Infrared Beacon on, press
the big Beacon Mode button on the top of the device. A green LED
Indicator will turn on, indicating the device is active and transmitting
continuously. Another press on the Beacon Mode button will turn
it off (after one hour of inactivity, the beacon will automatically turn
itself off).
Remote Mode
You can also use the Remote Infrared Beacon as a remote control
for your robot. When in Remote Mode, the Infrared Sensor can detect
which button (or combination of buttons) on the beacon is pressed.
There are a total of eleven possible button combinations:
= No button (and Beacon Mode is off)
= Button 1
= Button 2
= Button 3
= Button 4
= Both Button 1 and Button 3
= Both Button 1 and Button 4
= Both Button 2 and Button 3
= Both Button 2 and Button 4
= Beacon Mode is on
= Both Button 1 and Button 2
= Both Button 3 and Button 4
For more information, see Using the Infrared Sensor Remote Mode
in the EV3 Software Help.
EV3 Sensors
Remote Mode
Remote Infrared
Beacon

p. 17LEGO.com/mindstorms
LEGOtheLEGOlogoMINDSTORMSandtheMINDSTORMSlogoaretrademarksofthe/
sontdesmarquesdecommercedu/sonmarcasregistradasdeLEGOGroup©TheLEGOGroup
EV3
TECHNOLOGY
In order to function, motors and sensors must be connected to
theEV3 Brick.
Using the flat black Connector Cables, link sensors to the EV3 Brick
using Input Ports 1, 2, 3, and 4.
If you create programs while your EV3 Brick is disconnected from
your device, the software will assign sensors to the following default
ports:
+ Port 1: Touch Sensor
+ Port 2: No sensor
+ Port 3: Color Sensor
+ Port 4: Infrared Sensor
If the EV3 Brick is connected to your device while you program, the
EV3 Software/Programmer App will automatically identify which port
is being used for each sensor and motor.
Using the flat black Connector Cables, link motors to the EV3 Brick
using Output Ports A, B, C, and D.
As with the sensors, if the EV3 Brick is not connected when you
are writing a program, each motor will be assigned to the following
default ports:
+ Port A: Medium Motor
+ Port B and C: Two Large Motors
+ Port D: Large Motor
If the EV3 Brick is connected to your device while you are
programming, the EV3 Software/Programmer App will automatically
assign the correct port in your programs.
Connecting Sensors and Motors
Connecting Sensors
Connecting Motors
NOTE:
The software cannot
distinguish between two or
more identical sensors
or motors.

p. 18LEGO.com/mindstorms
LEGOtheLEGOlogoMINDSTORMSandtheMINDSTORMSlogoaretrademarksofthe/
sontdesmarquesdecommercedu/sonmarcasregistradasdeLEGOGroup©TheLEGOGroup
EV3
TECHNOLOGY
Connect the EV3 Brick to your computer by USB Cable or wirelessly
using either Bluetooth or Wi-Fi.
USB Cable
Using the USB Cable, plug the Mini-USB end into the EV3 Brick’s PC
Port (located next to Port D). Plug the USB end into your computer.
USB Cable connection
Connecting the EV3 Brick to Your Computer

p. 19LEGO.com/mindstorms
LEGOtheLEGOlogoMINDSTORMSandtheMINDSTORMSlogoaretrademarksofthe/
sontdesmarquesdecommercedu/sonmarcasregistradasdeLEGOGroup©TheLEGOGroup
EV3
TECHNOLOGY
Wireless—Bluetooth
If your computer is not Bluetooth enabled, you will need a Bluetooth
USB dongle for your computer.
Making a Bluetooth Connection to the Computer
Before you can make a Bluetooth connection between the EV3
Brick and the computer running the EV3 Software, you will need to
enable Bluetooth on the EV3 Brick. Directions for this can be found
on page 31.
Once you have enabled Bluetooth on the EV3 Brick, it can now be
connected to the computer and EV3 Software.
First, confirm that the EV3 Brick is turned on.
Open a new or existing program in the EV3 Software
(see theEV3 Software chapter on page 35 for directions
on how to do this).
Go to the Hardware Page at the lower right of the screen—
expand thewindow if collapsed (learn more about
theHardware Page on page 42).
Click on the Available Bricks tab. If your EV3 Brick is not
already listed, click the Refresh button to locate the EV3 Brick
and check the Bluetooth box that will appear.
Accept the connection on your EV3 Brick manually,
then enter the passkey and press the Center button for OK.
The default is 1234. Repeat this in the EV3 Software.
The connection is now established and a “<>” symbol
is shown on the top left of the EV3 Brick Display
(next to the Bluetooth icon) to confirm the connection.
To disconnect the EV3 Brick from the computer, click on
theDisconnect button next to the Refresh button in the Hardware
Page.
More information about Bluetooth settings on the EV3 Brick can be
found on page 31.
Wireless connection
Connecting the EV3 Brick to Your Computer

p. 20LEGO.com/mindstorms
LEGOtheLEGOlogoMINDSTORMSandtheMINDSTORMSlogoaretrademarksofthe/
sontdesmarquesdecommercedu/sonmarcasregistradasdeLEGOGroup©TheLEGOGroup
EV3
TECHNOLOGY
NOTE:
The EV3 Brick only
supports the following
network encryption
modes: None and
WPA2.
Wireless—Wi-Fi
Your first step in connecting to Wi-Fi is to acquire a Wi-Fi USB
dongle. For a list of compatible dongles, go to the official LEGO
®
MINDSTORMS
®
website (www.LEGO.com/mindstorms).
To begin the setup, you must have access to a wireless network,
and know the network’s name and its password.
If the EV3 Software is open, close it and insert your Wi-Fi dongle
into the EV3 Brick using the USB Host Port.
Before you can connect the EV3 Brick to a network, you will need
to enable Wi-Fi on the EV3 Brick. Directions for this can be found
on page 33.
Settings screen
Connecting the EV3 Brick to Your Computer
NOTE:
Because of keyboard
limitations, the password for
the network must be made up
of numbers, capital letters, and
lowercase letters. You will not be
able to use some symbols, such
as the # sign, or letters and
symbols from non-Latin
alphabets.

p. 21LEGO.com/mindstorms
LEGOtheLEGOlogoMINDSTORMSandtheMINDSTORMSlogoaretrademarksofthe/
sontdesmarquesdecommercedu/sonmarcasregistradasdeLEGOGroup©TheLEGOGroup
EV3
TECHNOLOGY
Connecting the EV3 Brick to a network
After selecting Wi-Fi on the Settings screen, use the Up and Down
buttons to select Connections and press the Center button for OK.
The EV3 Brick will now search for and list available Wi-Fi networks.
Using the Up and Down buttons for navigation, find your network on
the list. If the EV3 Brick is not already connected to your network
(indicated by a check mark), select your network using the Center
button.
In the Network dialog box that appears, select Connect and press OK
with the Center button. You will now be asked to enter the encryption
type and the network password using the Left, Right, Up, and Down
buttons to navigate (upper and lower cases do matter here).
Once you have entered the correct password, press the check mark
for OK. You will now be connected to the network.
If the EV3 Brick does not find your network in its search, the network
may be hidden. To connect to a hidden network, select “Add hidden.”
You will then be asked to enter the name, encryption type, and
password for the hidden network you wish to add (upper and
lower cases do matter here). Once done, the EV3 Brick will be
connected to the hidden network and the network will be included
in thenetwork list.
NOTE:
Once you have
connected to a network
using its password, the EV3
Brick will remember the password
for future connections. Known
networks are indicated in
the list with an asterisk
“*” symbol.
Network list Connect to network
Network password Add hidden network
Connecting the EV3 Brick to Your Computer

p. 22LEGO.com/mindstorms
LEGOtheLEGOlogoMINDSTORMSandtheMINDSTORMSlogoaretrademarksofthe/
sontdesmarquesdecommercedu/sonmarcasregistradasdeLEGOGroup©TheLEGOGroup
EV3
TECHNOLOGY
Making a Wi-Fi Connection from the Computer to the EV3 Brick
Using the USB Cable, connect the EV3 Brick to the computer.
Open an EV3 Software program. Access the Wireless Setup tool in
the Hardware Window (at the bottom right of the screen), or select
Wireless Setup from the Tools Menu.
The computer will display which networks it detects.
Select the network you want to connect to and click on “Connect” to
configure the connection. To add a network that is not broadcasting
its Network Name (SSID), click “Add.”
To edit the settings of a previously configured network, click “Edit.”
Click “OK” to establish a Wi-Fi connection. Once the connection is
established, you can unplug the USB Cable.
Wireless Setup tool
Connecting the EV3 Brick to Your Computer
p. 23LEGO.com/mindstorms
LEGOtheLEGOlogoMINDSTORMSandtheMINDSTORMSlogoaretrademarksofthe/
sontdesmarquesdecommercedu/sonmarcasregistradasdeLEGOGroup©TheLEGOGroup
EV3
TECHNOLOGY
Making a Bluetooth Connection to
Your iPad
To download and run programs that you create in the
EV3 Programmer App, connect your iPad to the EV3 Brick via
Bluetooth using the following steps (to view an animation of the
connection process, watch the Quick Start Video in the Help section
of the EV3 Programmer App Lobby Menu):
Confirm that the EV3 Brick is turned on.
Enable Bluetooth on the EV3 Brick and enable the
iPhone/iPad/iPod setting (see page 31 for further details).
Make sure Bluetooth is enabled on the iPad.
Open a new or existing program in the EV3 Programmer App.
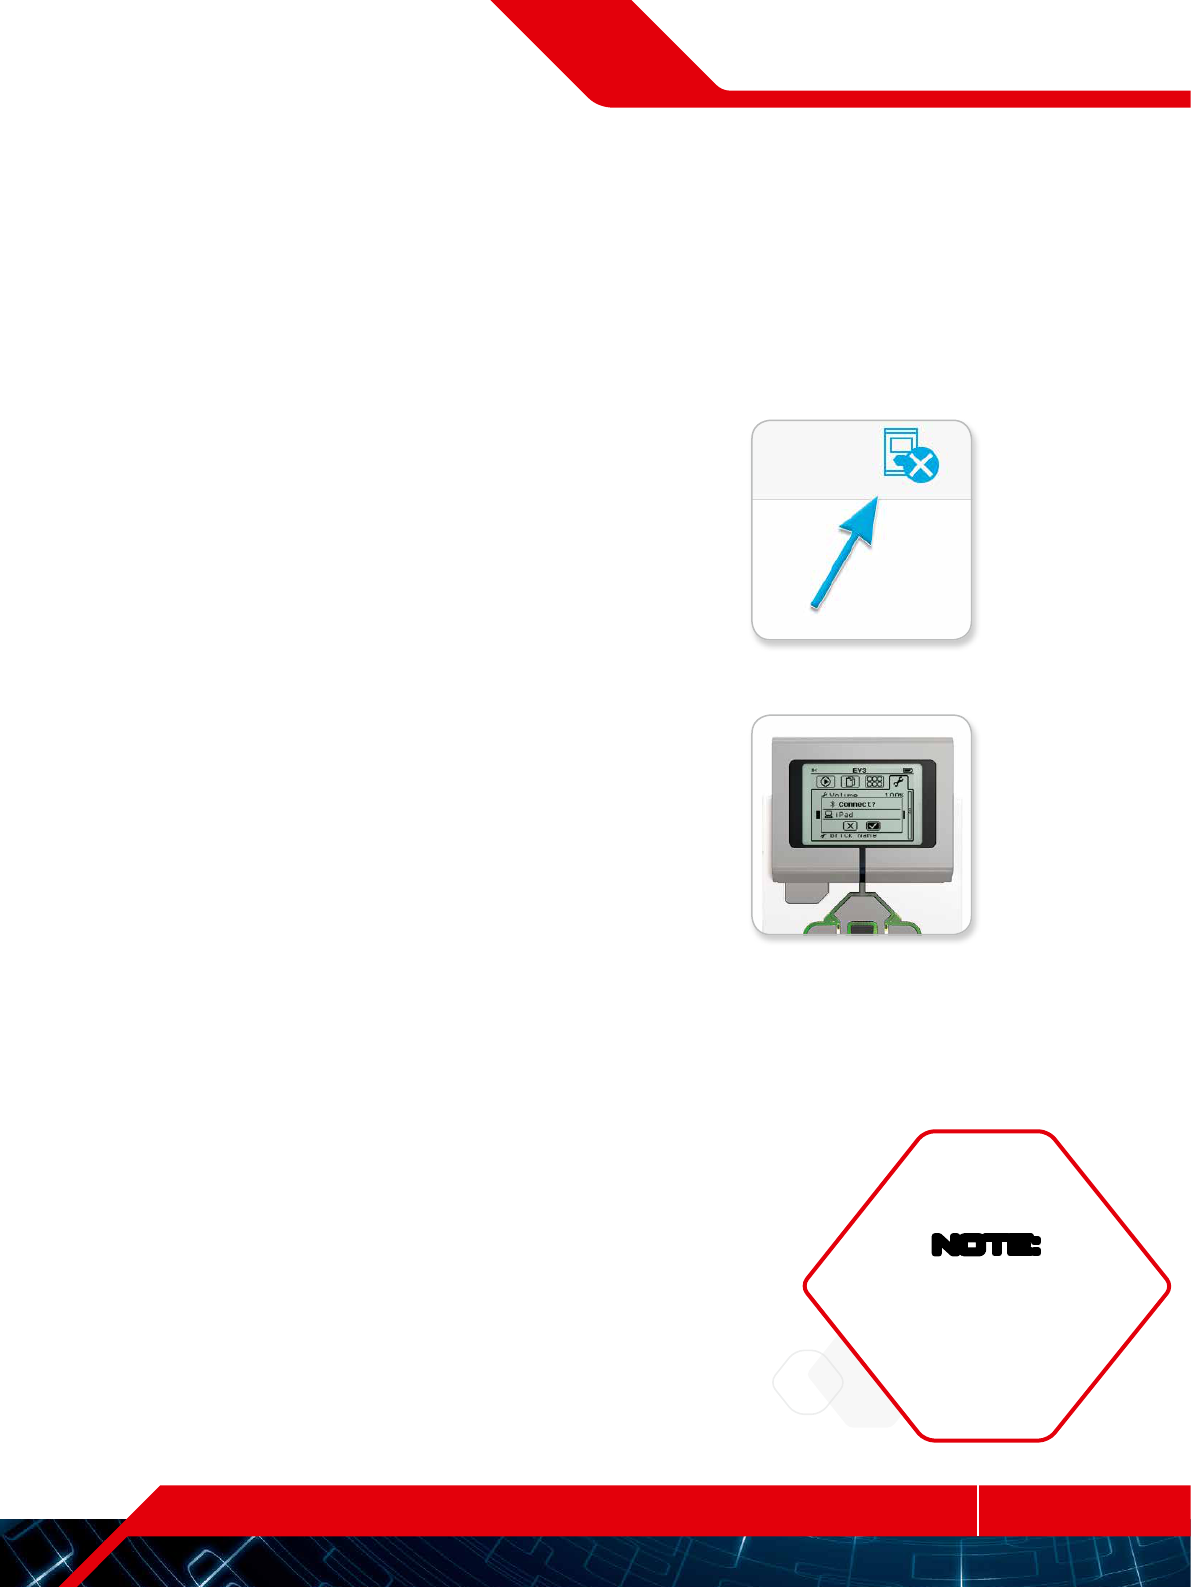
Tap the No Device Connected icon at the top right corner.
Tap the “Connect” button.
Select the EV3 Brick you want to connect to from the list of
available bricks.
Accept the connection on your EV3 Brick manually,
then enter the passkey and press the Center button for OK.
The default is 1234. Enter the same passkey in the
EV3 Programmer App.
The connection is now established and a “<>” symbol
is shown at the top left of the EV3 Brick Display
(next to the Bluetooth icon) to confirm the connection.
To disconnect the EV3 Brick from your iPad, go to the Hardware Page
and tap the “Disconnect” button. See page 52 for further details.
You can find out more about Bluetooth settings on the EV3 Brick
on page 31.
Connecting the EV3 Brick to Your Tablet
No Device Connected icon
Accept the connection on
your EV3 Brick
NOTE:
For a full list of supported
devices go to:
www.LEGO.com/mindstormsapps

p. 24LEGO.com/mindstorms
LEGOtheLEGOlogoMINDSTORMSandtheMINDSTORMSlogoaretrademarksofthe/
sontdesmarquesdecommercedu/sonmarcasregistradasdeLEGOGroup©TheLEGOGroup
EV3
TECHNOLOGY
Making a Bluetooth Connection to
Your Android Tablet
To download and run programs that you create in the
EV3 Programmer App on an Android tablet, connect your tablet to
the EV3 Brick via Bluetooth using the following steps (to view an
animation of the connection process, watch the Quick Start Video
in the Lobby Menu of the EV3 Programmer App):
Confirm that the EV3 Brick is turned on.
Enable Bluetooth on the EV3 Brick and ensure the
iPhone/iPad/iPod setting is unchecked
(see page 31 for further details).
Make sure Bluetooth is enabled on your tablet.
Open a new or existing program in the EV3 Programmer App.
Tap the No Device Connected icon at the top right corner.
Tap the “Connect” button.
Select the EV3 Brick you want to connect to from the list of
available bricks.
Accept the connection on your EV3 Brick manually,
then enter the passkey and press the Center button for OK.
The default is 1234. Enter the same passkey in the
EV3 Programmer App.
The connection is now established and a “<>” symbol
is shown at the top left of the EV3 Brick Display
(next to the Bluetooth icon) to confirm the connection.
To disconnect the EV3 Brick from your Android tablet, go to the
Hardware Page and tap the “Disconnect” button. See page 52 for
further details.
You can find out more about Bluetooth settings on the EV3 Brick
on page 31.
Connecting the EV3 Brick to Your Tablet
Accept the connection on
your EV3 Brick
No Device Connected icon
NOTE:
For a full list of supported
devices go to:
www.LEGO.com/mindstormsapps

p. 25LEGO.com/mindstorms
LEGOtheLEGOlogoMINDSTORMSandtheMINDSTORMSlogoaretrademarksofthe/
sontdesmarquesdecommercedu/sonmarcasregistradasdeLEGOGroup©TheLEGOGroup
EV3
TECHNOLOGY
The EV3 Brick is the control center for bringing your robots to life.
Using the Display and the Brick Buttons, the EV3 Brick Interface
contains four basic screens that give you access to an amazing array
of functions unique to the EV3 Brick. It can be something as simple
as starting and stopping a program, or something as complicated
as writing the program itself.
Run Recent
This screen will be blank until you begin to download and run
programs. The most recently run programs will be displayed on this
screen. The program at the top of the list that is selected by default
is the latest program run.
File Navigation
This screen is where you will access and manage all the files on
your EV3 Brick, including files stored on an SD card.
Files are organized in Project folders, which, in addition to the actual
program files, also contain sounds and images used in each project.
In the File Navigator, files can be moved or deleted. Programs
created using the Brick Program app are stored separately in
theBrkProg_SAVE folder.
EV3 Brick Interface
Run Recent screen
File Navigation screen
Open folder in File Navigation

p. 26LEGO.com/mindstorms
LEGOtheLEGOlogoMINDSTORMSandtheMINDSTORMSlogoaretrademarksofthe/
sontdesmarquesdecommercedu/sonmarcasregistradasdeLEGOGroup©TheLEGOGroup
EV3
TECHNOLOGY
Brick Apps
The EV3 Brick comes with four brick applications preinstalled and
ready to use. In addition, you can also make your own apps in theEV3
Software. Once downloaded to the EV3 Brick, the homemade apps
will be displayed here.
The four preinstalled apps are the following:
Port View
On the first screen in the Port View, you will see, at a glance, which
ports have sensors or motors attached. Use the EV3 Brick Buttons
to navigate to one of the occupied ports and you will see thecurrent
readings returned from the sensor or motor. Attach some sensors and
motors and experiment with the different settings. Press theCenter
button to see or change the current settings for theattached motors
and sensors. Press the Back button to get back to the Brick Apps
main screen.
Motor Control
Control the forward and reverse movement of any motor connected
to one of the four output ports. There are two different modes. In
one mode, you will be able to control motors connected to Port A
(using the Up and Down buttons) and to Port D (using the Left and
Right buttons). In the other mode, it is motors connected to Port B
(using the Up and Down buttons) and Port C (using the Left and
Right buttons) that you control. Use the Center button to toggle
between the two modes. Press the Back button to get back to
theBrick Apps main screen.
EV3 Brick Interface
Brick Apps screen
Port View app
Motor Control app

p. 27LEGO.com/mindstorms
LEGOtheLEGOlogoMINDSTORMSandtheMINDSTORMSlogoaretrademarksofthe/
sontdesmarquesdecommercedu/sonmarcasregistradasdeLEGOGroup©TheLEGOGroup
EV3
TECHNOLOGY
IR Control
Control the forward and reverse motion of any motor connected
to one of the four output ports using the Remote Infrared Beacon
as remote control and the Infrared Sensor as receiver (the Infrared
Sensor must be connected to Port 4 in the EV3 Brick). There are
two different modes. In one mode, you will be using Channels 1 and
2 on theRemote Infrared Beacon. On Channel 1, you will be able
to control motors connected to Port B (using Buttons 1 and 2 on
the Remote Infrared Beacon) and to Port C (using Buttons 3 and 4
on the Remote Infrared Beacon). On Channel 2, you will be able to
control motors connected to Port A (using Buttons 1 and 2) and to
Port D (using Buttons 3 and 4). In theother mode, you can control
your motors in the exact same way by using Channels 3 and 4 on
the Remote Infrared Beacon instead. Use the Center button to toggle
between the two modes. Press theBack button to get back to the
Brick Apps main screen.
EV3 Brick Interface
IR Control app

p. 28LEGO.com/mindstorms
LEGOtheLEGOlogoMINDSTORMSandtheMINDSTORMSlogoaretrademarksofthe/
sontdesmarquesdecommercedu/sonmarcasregistradasdeLEGOGroup©TheLEGOGroup
EV3
TECHNOLOGY
Brick Program
The EV3 Brick comes with an on-brick programming application
similar to the Programming Canvas in the EV3 Software and EV3
Programmer App. These instructions tell you everything you’ll need
to know to get started.
Create a Program
Open up your Brick Program App.
The Start screen provides you with a Start and a Loop block that
are connected via a Sequence Wire. The vertical broken Add Block
line in the middle indicates that you can add more blocks to your
program. Press the Up button to add a new block from the Block
Palette.
In the Block Palette, you can choose which new block to add by
navigating using the Left, Right, Up, and Down buttons. Navigating
farther up, additional blocks will show. Navigating all the way down
will take you back to your program. Generally, there are two types
of blocks—Action and Wait. The Action Block Indicator is a small
arrow at the top right on the block. The Wait Block Indicator is a small
hourglass. In total, there are six different Action blocks and eleven
different Wait blocks to choose from.
When you find the block you want, navigate to it and press theCenter
button. You will be taken back to your program.
In your program, you can navigate between the blocks using the Left
and Right buttons. Press the Center button to change the settings of
the highlighted block (always the block in the middle of the screen)
or to add a new block when the Sequence Wire is highlighted and
the Add Block line is visible.
On each programming block, you can change one setting using
theUp and Down buttons. For example, on the Action Move Steering
block, you can change the direction of your robot’s path. When you
have chosen the setting you want, press the Center button.
EV3 Brick Interface
Start screen Block Palette
Full Block Palette
New block added Adjust block setting

p. 29LEGO.com/mindstorms
LEGOtheLEGOlogoMINDSTORMSandtheMINDSTORMSlogoaretrademarksofthe/
sontdesmarquesdecommercedu/sonmarcasregistradasdeLEGOGroup©TheLEGOGroup
EV3
TECHNOLOGY
Delete Blocks
If you want to delete a block from a program, highlight the block you
want to delete and press the Up button to go to the Block Palette.
In the Block Palette, navigate to the trashcan on the far left and press
the Center button. The block is now deleted.
Run Program
To run your program, use the Left button to navigate to the Start
block at the very beginning of the program. Press the Center button
and your program will run.
Save and Open Program
To save your program, navigate to the Save icon on the far left of
your program. When clicking on the Save icon, you will be asked to
name your program or accept the default name. Once you are done,
click OK and your program is now saved in the BrkProg_SAVE folder
that can be accessed from the File Navigation screen (see page 25).
You can also open any existing EV3 Brick Program by clicking on
the Open icon located above the Save icon. Use the Up and Down
buttons to toggle between those two icons.
EV3 Brick Interface
Delete block
Run program
Save program

p. 30LEGO.com/mindstorms
LEGOtheLEGOlogoMINDSTORMSandtheMINDSTORMSlogoaretrademarksofthe/
sontdesmarquesdecommercedu/sonmarcasregistradasdeLEGOGroup©TheLEGOGroup
EV3
TECHNOLOGY
Settings
This screen will enable you to see and adjust various general
settings on the EV3 Brick.
Volume
There may be occasions when you will want to adjust the volume
of the sound coming from the EV3 Brick Speaker. To change
thespeaker volume, go to the Settings screen. As the top menu,
Volume will already be highlighted. Press the Center button.
Use the Right and Left buttons to change the volume setting, which
can be intervals from 0% to 100%. Press the Center button to accept.
This will return you to the Settings screen.
Sleep
To change the amount of inactive time that passes before the EV3
Brick goes into Sleep Mode, go to the Settings screen and navigate
to the Sleep menu using the Down button. Press the Center button.
Use the Right and Left buttons to select a lower or higher time period,
which can be intervals from 2 minutes to never. Press theCenter
button to accept. This will return you to the Settings screen.
EV3 Brick Interface
Settings screen
Adjust volume
Adjust sleep

p. 31LEGO.com/mindstorms
LEGOtheLEGOlogoMINDSTORMSandtheMINDSTORMSlogoaretrademarksofthe/
sontdesmarquesdecommercedu/sonmarcasregistradasdeLEGOGroup©TheLEGOGroup
EV3
TECHNOLOGY
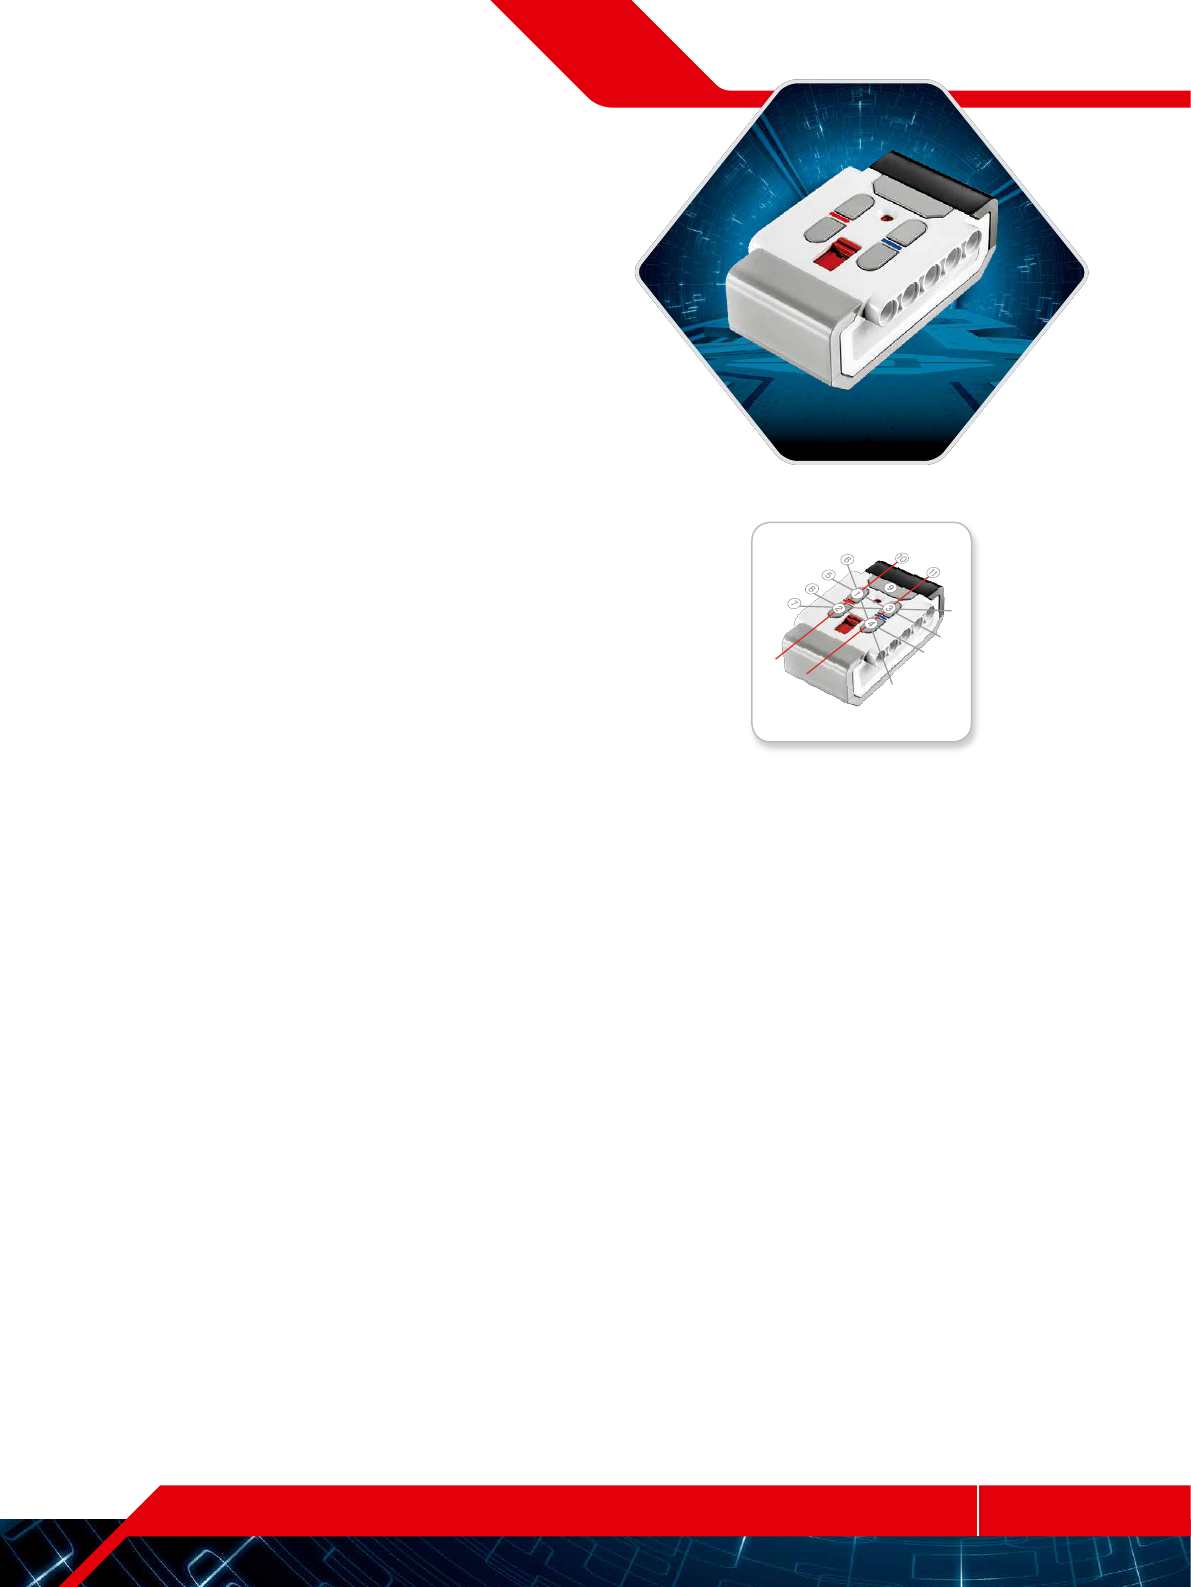
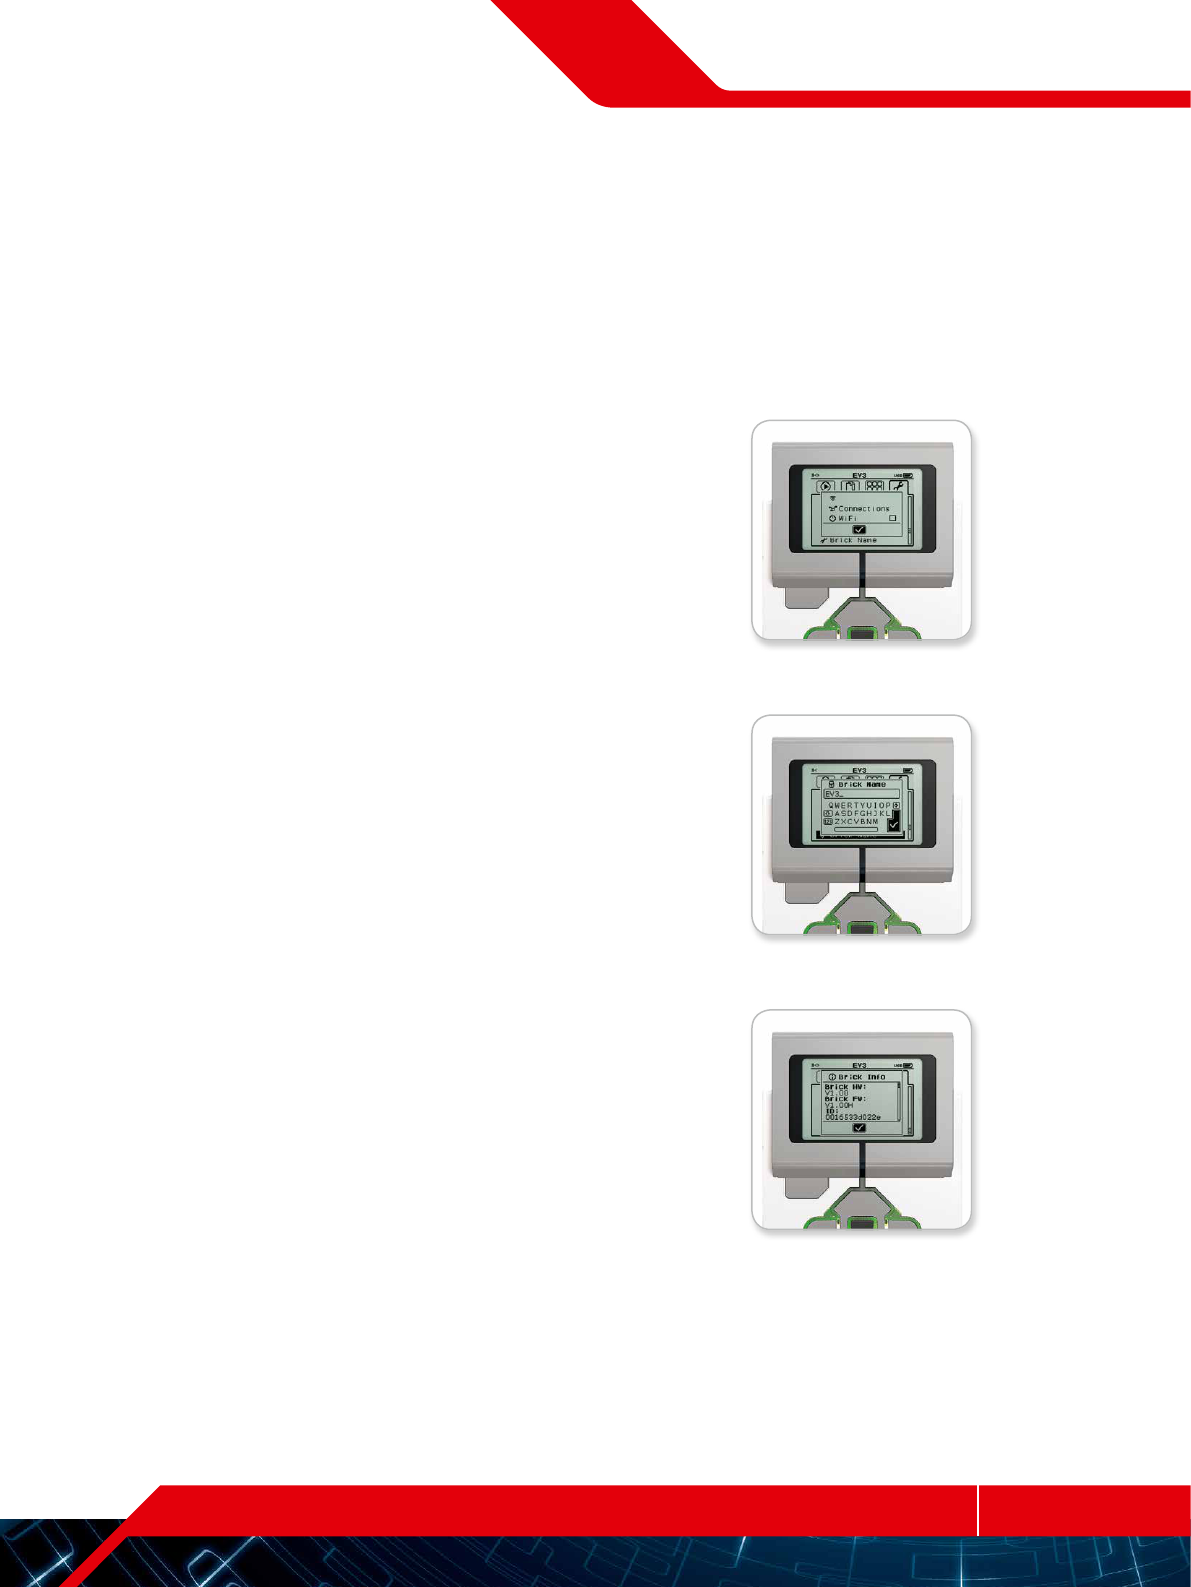
Bluetooth
This is where Bluetooth is enabled on the EV3 Brick, and where you
can choose some specific privacy and Apple iOS settings. Here
you can also connect to other Bluetooth devices such as another
EV3 Brick.
When you select Bluetooth on the Settings page, there are four
options presented—Connections, Visibility, Bluetooth, and iPhone/
iPad/iPod. To go back to the main Settings screen, press theDown
button until the check mark at the bottom of the screen is highlighted,
then press the Center button for OK.
Bluetooth
It is here that you enable standard Bluetooth on the EV3 Brick. Using
the Up and Down buttons, select the word “Bluetooth,” then press
theCenter button for OK. A check mark will appear in the Bluetooth
box. Bluetooth is now enabled on your EV3 Brick, and a Bluetooth
icon will be shown in the top left of the EV3 Brick Display.
Note: To connect to an iOS device, you will also need to select
the iPhone/iPad/iPod setting (see below). For all other devices,
including EV3 Bricks and Android devices, make sure that the
iPhone/iPad/iPod setting is unchecked.
To disable Bluetooth, repeat the above procedure, this time
unchecking the Bluetooth box.
iPhone/iPad/iPod
Select this setting if you want to connect your EV3 Brick to Apple iOS
devices—iPhones, iPads, and iPods—using Bluetooth (make sure
Bluetooth is enabled on your iOS device). This setting must also be
enabled when connecting to the EV3 Programmer App on an iPad.
Note: Using this setting will prevent your EV3 Brick from connecting
to other non-iOS Bluetooth devices, including computers, Android
devices, and other EV3 Bricks!
You cannot enable both standard Bluetooth and Bluetooth
communication for iOS devices at the same time.
To enable and disable Bluetooth communication for iOS devices,
use the Up and Down buttons to select “iPhone/iPad/iPod” and then
press the Center button for OK. A Bluetooth icon will be shown in
the top left of the EV3 Brick Display.
EV3 Brick Interface
Enable Bluetooth
NOTE:
Your EV3 Brick will
run more efficiently if you
disable theBluetooth
setting when it is
not in use.

p. 32LEGO.com/mindstorms
LEGOtheLEGOlogoMINDSTORMSandtheMINDSTORMSlogoaretrademarksofthe/
sontdesmarquesdecommercedu/sonmarcasregistradasdeLEGOGroup©TheLEGOGroup
EV3
TECHNOLOGY
Connections
This option allows you to discover and choose other available
Bluetooth devices (make sure Bluetooth is enabled). If you click
on “Connections,” you will be taken to a Favorites screen, where
thedevices you trust are displayed and identified with a check mark.
No passkeys are needed for your trusted devices. Using the check
boxes, you can manage which devices you wish to have as Favorites.
If you then click on “Search,” the EV3 Brick will scan the area for all
detectable Bluetooth-emitting devices—including other EV3 Bricks.
Your favorite devices will be shown with an asterisk “*” symbol.
Use the Up and Down buttons to select the device on the list you
wish to connect to. Press the Center button for OK. If you choose to
connect to a device not yet marked as a Favorite, you will be asked
to enter the passkey to establish the connection. Once theother
device verifies the passkey, you are automatically connected to
thedevice.
Visibility
If the Visibility setting is selected, other Bluetooth devices (including
other EV3 Bricks) will be able to discover and connect to your EV3
Brick. If Visibility is unchecked, the EV3 Brick will not respond to
search commands from other Bluetooth devices.
EV3 Brick Interface
Favorites list
Device list
p. 33LEGO.com/mindstorms
LEGOtheLEGOlogoMINDSTORMSandtheMINDSTORMSlogoaretrademarksofthe/
sontdesmarquesdecommercedu/sonmarcasregistradasdeLEGOGroup©TheLEGOGroup
EV3
TECHNOLOGY
EV3 Brick Interface
Wi-Fi
This is where you enable Wi-Fi communication on the EV3 Brick and
connect to a wireless network. After selecting Wi-Fi on the Settings
screen, use the Up and Down buttons to select the word “WiFi” and
press the Center button for OK. A check mark will appear in the WiFi
box. Wi-Fi is now enabled on your EV3 Brick, and a Wi-Fi icon will be
shown in the top left of the EV3 Brick Display.
To go back to the main Settings screen, press the Down button until
the check mark at the bottom of the screen is highlighted, then press
the Center button for OK.
For information on how to connect your EV3 Brick to a wireless
network, see the Connecting the EV3 Brick to Your Computer
section on page 20.
Note: Wi-Fi connectivity between the EV3 Programmer App and your
EV3 Brick is not supported.
Brick Name
This menu allows you to view and change the name of the EV3 Brick.
Go to the Settings screen and navigate to the Brick Name menu
using the Down button. Press the Center button.
The current EV3 Brick name is displayed. To change it, use the Up,
Down, Left, and Right brick buttons to enter the new name. Finally,
highlight the Enter key on the display keyboard and press the Center
button to save the new EV3 Brick name.
Note: The Brick Name feature requires firmware V1.07 or above.
Brick Info
When you need to know the current technical specifications of your
EV3 Brick, such as hardware and firmware version and EV3 Brick OS
build, this is where you will find that information. This is also where
you can find out how much free memory you have available.
Brick Name
Brick Info
Enable Wi-Fi

p. 34LEGO.com/mindstorms
LEGOtheLEGOlogoMINDSTORMSandtheMINDSTORMSlogoaretrademarksofthe/
sontdesmarquesdecommercedu/sonmarcasregistradasdeLEGOGroup©TheLEGOGroup
EV3
SOFTWARE
While building robots is fun, the heart of robotics is bringing
them to life—making them move and accomplish tasks. You will
find theLEGO
®
MINDSTORMS
®
EV3 Software to be an easy, intuitive,
and icon-based programming interface.
Installing the Software
Once you have confirmed that your computer meets the minimum
system requirements, you are ready to install the software. Close all
other programs, then double-click on the installation file in the EV3
Software application folder. Installation will now begin.
Minimum
System
Requirements
Operating Systems:
+Windows: Windows Vista (32/64 bit) with latest service
packs or later versions of Windows
+Macintosh: Mac OS X v10.6 with latest service packs or later
versions of Mac OS
System Requirements:
+Dual core processor 2.0 GHz or better
+2 GB of RAM or more
+2 GB of available hard disk space
+XGA display (1024 x 768)
+1 available USB port
LEGO
®
MINDSTORMS
®
EV3 does not support
certain netbooks with hardware
that does not meet the above
requirements.

p. 35LEGO.com/mindstorms
LEGOtheLEGOlogoMINDSTORMSandtheMINDSTORMSlogoaretrademarksofthe/
sontdesmarquesdecommercedu/sonmarcasregistradasdeLEGOGroup©TheLEGOGroup
EV3
SOFTWARE
Every time you open the EV3 Software, you will automatically start
out in theLobby area. The Lobby makes it easy to locate and work
with thesoftware and gives you access to everything you need.
In the Lobby you will find the following options and resources:
Lobby Tab—This button always returns you to the Lobby.
Add Project—Here you add a new project so that you can start
programming your own robot.
Robot Missions—Here you can get started with building and
programming the five main models.
Open Recent—Get easy access to the latest projects you
have worked with.
Quick Start—Support resources such as short introduction
videos, EV3 User Guide, and Software Help.
News—Small stories and news splashes from
LEGO.com/mindstorms (Internet connection is required).
More Robots—Access to building and programming more
models (Internet connection is required).
Lobby
Lobby overview

p. 36LEGO.com/mindstorms
LEGOtheLEGOlogoMINDSTORMSandtheMINDSTORMSlogoaretrademarksofthe/
sontdesmarquesdecommercedu/sonmarcasregistradasdeLEGOGroup©TheLEGOGroup
EV3
SOFTWARE
When you open a new program, it will automatically create a project
folder file. All programs, images, sounds, videos, instructions, and
other assets that are used within a project will automatically be
stored in this project folder. This makes it easy to store your project
and share it with others.
Each project will be displayed in the form of a tab at the top of the
screen. Underneath, you will see tabs for the programs that belong
to the selected project. You can add a new project or program by
clicking on the+button to the right of the other tabs. Clicking on
an X will close the tab.
Project Properties Page
If you click on the tab with the wrench to the far left of the program
tabs, you will be taken to the Project Properties page. This page
gives you an orderly display of the project that is currently selected,
including all programs, images, sound, and other assets. Here you
can describe your project with text, images, and video that will
determine how the project shows up in the Lobby.
Project Properties and Structure
Project and Program tabs

p. 37LEGO.com/mindstorms
LEGOtheLEGOlogoMINDSTORMSandtheMINDSTORMSlogoaretrademarksofthe/
sontdesmarquesdecommercedu/sonmarcasregistradasdeLEGOGroup©TheLEGOGroup
EV3
SOFTWARE
Project Properties displayed include:
Project Description—Give your project a title, describe it,
and insert any images and video you would like to appear
in theLobby when theproject is previewed.
Project Content Overview—Here you will find all assets
included in the project: for example, programs, images,
sounds, and My Blocks.
Daisy Chain Mode—This check box enables the Daisy Chain
Mode, so you can program up to four connected EV3 Bricks.
Share—Here you can easily share your project on
LEGO.com/mindstorms (Internet connection is required).
Project Properties and Structure
Project Properties page

p. 38LEGO.com/mindstorms
LEGOtheLEGOlogoMINDSTORMSandtheMINDSTORMSlogoaretrademarksofthe/
sontdesmarquesdecommercedu/sonmarcasregistradasdeLEGOGroup©TheLEGOGroup
EV3
SOFTWARE
In the EV3 Software Lobby area, five cool robots are featured:
TRACK3R, SPIK3R, EV3RSTORM, R3PTAR, and GRIPP3R. These
robots have been created by LEGO
®
designers to demonstrate some
of the ways you can build and program with LEGO
®
MINDSTORMS
®
EV3. Click on any of therobots and you will be taken to the Mission
Overview of that particular robot. Missions are designed to take you
through the essentials of programming and getting to know the EV3
hardware and building system.
Each Mission helps you build and program a part of the robot. You
start with the first Mission and then move on to the next once it is
completed. When you have completed all the Missions, therobot
is built and ready to receive your commands. All Missions are
structured in four steps:
+ Objective
+ Create
+ Command
+ Go!
Robot Missions
Robot Missions

p. 39LEGO.com/mindstorms
LEGOtheLEGOlogoMINDSTORMSandtheMINDSTORMSlogoaretrademarksofthe/
sontdesmarquesdecommercedu/sonmarcasregistradasdeLEGOGroup©TheLEGOGroup
EV3
SOFTWARE
Program your robot in the intuitive icon-based Programming
Environment. Drag and drop the actions that you want into the
programming window and adjust them to suit your robot’s behavior.
The EV3 Programming Environment consists of
the following main areas:
Programming Canvas—Lay out your program here.
Programming Palettes—Find the building blocks for your
program here.
Hardware Page—Establish and manage your communication
with theEV3 Brick here and see what motors and sensors are
connected where. This is also where you download programs
to the EV3 Brick.
Content Editor—A digital workbook integrated into the software.
Get instructions or document your project using text, images,
and videos.
Programming Toolbar—Find basic tools for working with your
program here.
Programming
Programming Environment

p. 40LEGO.com/mindstorms
LEGOtheLEGOlogoMINDSTORMSandtheMINDSTORMSlogoaretrademarksofthe/
sontdesmarquesdecommercedu/sonmarcasregistradasdeLEGOGroup©TheLEGOGroup
EV3
SOFTWARE
Programming Blocks and Palettes
All the programming blocks that are used for controlling your
robot are located in Programming Palettes at the bottom of the
Programming interface underneath the Programming Canvas.
TheProgramming blocks are divided into categories according to
type and nature, making it easy to find the block you need.
To learn more about the EV3 Programming interface and see
how you can get started with your first program, see the Getting
Started and Software Overview videos in the Quick Start section
of theLobby.
You can also find more information about how to program in theEV3
Software Help.
Action Blocks
(In order from left to right)
+ Medium Motor
+ Large Motor
+ Move Steering
+ Move Tank
+ Display
+ Sound
+ Brick Status Light
Flow Blocks
(In order from left to right)
+ Start
+ Wait
+ Loop
+ Switch
+ Loop Interrupt
Sensor Blocks
(In order from left to right)
+ Brick Buttons
+ Color Sensor
+ Infrared Sensor
+ Motor Rotation
+ Timer
+ Touch Sensor

p. 41LEGO.com/mindstorms
LEGOtheLEGOlogoMINDSTORMSandtheMINDSTORMSlogoaretrademarksofthe/
sontdesmarquesdecommercedu/sonmarcasregistradasdeLEGOGroup©TheLEGOGroup
EV3
SOFTWARE
Programming Blocks and Palettes
Data Blocks
(In order from left to right)
+ Variable
+ Constant
+ Array Operations
+ Logic Operations
+ Math
+ Round
+ Compare
+ Range
+ Te x t
+ Random
Advanced Blocks
(In order from left to right)
+ File Access
+ Messaging
+ Bluetooth Connection
+ Keep Awake
+ Raw Sensor Value
+ Unregulated Motor
+ Invert Motor
+ Stop Program
My Blocks
When you are repeatedly
using the same segment of
aprogram in many programs,
that is a good time to create
a My Block. Once your My
Block is created, you can
simply insert that single block
into future programs within
the same project.

p. 42LEGO.com/mindstorms
LEGOtheLEGOlogoMINDSTORMSandtheMINDSTORMSlogoaretrademarksofthe/
sontdesmarquesdecommercedu/sonmarcasregistradasdeLEGOGroup©TheLEGOGroup
EV3
SOFTWARE
The Hardware Page provides a range of information about your
EV3 Brick. It is always located in the lower right-hand corner when
working with programs and can be collapsed when needed using
the Expand/Collapse tab. Even when collapsed, the Hardware Page
Controller will be visible, allowing you to download your program
or experiment.
The different Hardware Page Controller buttons have
the following functionality:
Download—Downloads the program to the EV3 Brick.
Download and Run—Downloads the program to the EV3 Brick
and runs it immediately.
Download and Run Selected—Downloads only the highlighted
blocks to the EV3 Brick and runs them immediately.
The EV3 text in the small window at the top will turn red when an
EV3 Brick is connected to your computer.
Hardware Page
Hardware Page Controller

p. 43LEGO.com/mindstorms
LEGOtheLEGOlogoMINDSTORMSandtheMINDSTORMSlogoaretrademarksofthe/
sontdesmarquesdecommercedu/sonmarcasregistradasdeLEGOGroup©TheLEGOGroup
EV3
SOFTWARE
Brick Information
The Brick Information tab displays important information about
theEV3 Brick that is currently connected, such as EV3 Brick name,
battery level, firmware version, connection type, and memory bar. It
also gives you access to the Memory Browser and Wireless Setup
tools.
Port View
The Port View tab displays information about the sensors and motors
connected to the EV3 Brick. When your EV3 Brick is connected to
thecomputer, this information is automatically identified and you will
be able to see the live values. If your EV3 Brick is not connected,
you can still set up the Port View tab manually. Select a port, then
select the appropriate sensor or motor from the list.
Available Bricks
The Available Bricks tab shows the EV3 Bricks that are currently
available for connection. You are able to choose which EV3 Brick
you want to connect to and the type of communication. Also, you
can disconnect an existing EV3 Brick connection.
You can find more information about how to use the Hardware Page
in theEV3 Software Help.
Hardware Page
Brick Information tab
Port View tab
Available Bricks tab

p. 44LEGO.com/mindstorms
LEGOtheLEGOlogoMINDSTORMSandtheMINDSTORMSlogoaretrademarksofthe/
sontdesmarquesdecommercedu/sonmarcasregistradasdeLEGOGroup©TheLEGOGroup
EV3
SOFTWARE
The Content Editor offers a convenient way for users to document
thepurpose, process, and analysis of their projects. You can include
text, images, videos, sound effects, and even building instructions.
Content Editor is also the place where already-made content—for
example, theRobot Missions—are displayed and used.
Each page can be customized with different layouts and can
automatically perform a range of actions, such as opening specific
programs or highlighting a particular programming block.
The Content Editor is located in the top right corner of the EV3
Software and is available whenever you are working on a project. You
open the Content Editor using the large button with the book icon.
Once the Content Editor is open, you will be able to see whatever
content has been made for a project or program.
The Content Editor consists of the following main areas
and features:
Open/Close Content Editor—Here you open and close
theContent Editor.
Edit/View Mode—Allows you to view or edit your pages.
Page Navigation—Go to the next or previous page.
Page Title—Add a title to your page.
Page Area—This is where the main content is shown
and edited.
Icons—Select what content type you wish to add to
the page area.
Page Thumbnails—Go to a specific page using the thumbnail
images.
Add/Delete Page—When adding a page, you get to choose
from fourteen different templates.
Page Setup—Make special settings for each page, such as
format, page action, and navigation to the next page.
You can find more information about how to use the Content Editor
in the EV3 Software Help.
Content Editor
Content Editor

p. 45LEGO.com/mindstorms
LEGOtheLEGOlogoMINDSTORMSandtheMINDSTORMSlogoaretrademarksofthe/
sontdesmarquesdecommercedu/sonmarcasregistradasdeLEGOGroup©TheLEGOGroup
EV3
SOFTWARE
In the top menu bar of the EV3 Software you will find a number of
small Tools that can add extra functionality and support to your EV3
Software experience.
You can learn more about the Tools in the EV3 Software Help.
Sound Editor
Create your own sound effects or customize one from our selection
of official EV3 Sound files. The sounds can then be used for
programming your robot by use of the Sound Programming Block.
Image Editor
Make creative use of the EV3 Brick Display by designing original
images or customizing existing images. The images can then
be used for programming your robot by the use of the Display
Programming Block.
My Block Builder
Sometimes you make a great miniprogram that you want to use
again in another project or program. My Block Builder helps you take
this miniprogram and create a unique My Block where you define
the name, icon, and parameters that are relevant for you. My Blocks
will automatically be archived in the My Block Programming Palette.
Firmware Update
Periodically, updated firmware will become available for your EV3
Brick. We recommend that you install new versions as they become
available. This tool will tell you if there is a new firmware version
available and help you update it on your EV3 Brick.
Wireless Setup
In case you wish your EV3 Software to communicate with your EV3
Brick using Wi-Fi, this tool will help set up the wireless connection.
To do so, you will need to acquire a Wi-Fi USB dongle for the EV3
Brick and enable Wi-Fi communication on the EV3 Brick.
Block Import
Add new blocks to your Programming Palettes. This can be
new LEGO
®
Programming Blocks or blocks developed by other
manufacturers: for example, in relation to a third-party sensor. These
Blocks first need to be downloaded to your computer—then you can
import them into your EV3 Software using this tool.
Tools

p. 46LEGO.com/mindstorms
LEGOtheLEGOlogoMINDSTORMSandtheMINDSTORMSlogoaretrademarksofthe/
sontdesmarquesdecommercedu/sonmarcasregistradasdeLEGOGroup©TheLEGOGroup
EV3
SOFTWARE
Memory Browser
It is easy to lose track of what you have stored on your EV3 Brick.
The Memory Browser provides an overview of memory use on your
EV3 Brick (including an SD card if you have it inserted). You can use
the Memory Browser to transfer programs, sounds, graphics, and
other files between your EV3 Brick and a computer, and copy and
delete files that are already on your EV3 Brick.
Download as App
Advanced users may enjoy the challenge of creating applications
for generic tasks on the EV3 Brick. An EV3 Brick app is made as
anormal EV3 program, but when downloaded to the EV3 Brick
using this tool, it will show up as a new app in the Brick Apps screen,
together with the default apps such as Brick Programming and Port
View.
Import Brick Program
This tool will enable you to import a program made in the Brick
Program App on the EV3 Brick to the EV3 Software programming
environment. Your program can then be further refined using the full
functionality of the EV3 Software.
Tools

p. 47LEGO.com/mindstorms
LEGOtheLEGOlogoMINDSTORMSandtheMINDSTORMSlogoaretrademarksofthe/
sontdesmarquesdecommercedu/sonmarcasregistradasdeLEGOGroup©TheLEGOGroup
EV3
PROGRAMMER
APP
The LEGO
®
MINDSTORMS
®
Programmer App is a great way to
learn all about R3PTAR, TRACK3R, EV3RSTORM, SPIK3R, and
GRIPP3R, and program them from your tablet using a programming
environment just like the one in the EV3 Software. You’ll love taking
on the challenging Robot Missions that we’ve created, and when
you’ve mastered them, you’ll be able to create your very own
programs to bring your own robots to life.
Installing the
Programmer App
Once you have confirmed that your tablet meets the minimum
system requirements, open the App Store/Google Play on your
device. Then search for the free app—LEGO MINDSTORMS EV3
Programmer—and install it.
Minimum System
Requirements
Minimum supported OS:
+iOS: iOS 8.0
+Android: Creamy Lollipop Sandwich
Supported devices/tablets:
+iPad 2 or later
For a full list of supported devices and minimum system
requirements go to:
www.LEGO.com/mindstormsapps

p. 48LEGO.com/mindstorms
LEGOtheLEGOlogoMINDSTORMSandtheMINDSTORMSlogoaretrademarksofthe/
sontdesmarquesdecommercedu/sonmarcasregistradasdeLEGOGroup©TheLEGOGroup
EV3
PROGRAMMER
APP
The Lobby is where you start each time you open the Programmer
App. The Lobby makes it easy to create programs, open saved
programs that you previously created, view the Robot Missions, and
access other resources that will help you familiarize yourself with
the Programmer App.
In the Lobby you will find the following options and resources:
Help—View an overlay highlighting the main components of the
Lobby.
My Programs Tab—Create a new program or load previously
created programs. You can also delete and duplicate
programs, as well as share them (see below for further details).
Note: Tap the program name to modify it.
Robot Missions—Tap each robot to access a series of
challenging Missions.
Expand—Increases the size of the lower pane to view more
programs at once.
Select—Select programs which you can then delete or
duplicate.
Share—Share your programs via compatible apps installed on
your tablet, such as e-mail.
Note: Select “Desktop” if you want to export your program in
a format that is compatible with the EV3 Software on your
computer.
Menu—Tap this icon to view the following options:
+ Help—View the Quick Start Video and EV3 User Guide.
+ Terms of Use—View the LEGO Group Privacy Policy, Cookie
Policy, Terms of Use, and Support Information.
+ Languages—Choose the language that you would like the
Programmer App to be displayed in.
Lobby
Lobby overview

p. 49LEGO.com/mindstorms
LEGOtheLEGOlogoMINDSTORMSandtheMINDSTORMSlogoaretrademarksofthe/
sontdesmarquesdecommercedu/sonmarcasregistradasdeLEGOGroup©TheLEGOGroup
EV3
PROGRAMMER
APP
In the Lobby, you’ll see five cool robots: R3PTAR, TRACK3R,
EV3RSTORM, SPIK3R and GRIPP3R. These robots have been
created by LEGO
®
designers to demonstrate some of the ways
you can build and program with LEGO MINDSTORMS
®
EV3. Tap
each robot to access the Mission Overview, which shows you all the
missions available for that particular robot. You can program R3PTAR
to slither like a snake, SPIK3R to catch a bug, GRIPP3R to grab an
object… you get the idea. Each mission includes a short video of
the robot carrying out the mission, plus building instructions and a
short mission description. We’ve also provided you with the finished
program, which includes useful notes on how to modify the program
and troubleshoot problems you might run into during the mission.
Each Robot Mission helps you build and program a part of the robot.
That’s why we suggest that you take on each of the challenges in
sequence. When you’ve completed all the missions, your robot is
complete and ready to carry out programs that you will now be able
to create on the Programming Canvas.
Robot Missions
Robot Missions

p. 50LEGO.com/mindstorms
LEGOtheLEGOlogoMINDSTORMSandtheMINDSTORMSlogoaretrademarksofthe/
sontdesmarquesdecommercedu/sonmarcasregistradasdeLEGOGroup©TheLEGOGroup
EV3
PROGRAMMER
APP
Like the EV3 Software, the Programmer App has a graphical
programming environment that’s so easy to use, you’ll be sending
your robot around the room in no time.
The Programming Environment features the following
main areas:
Programming Canvas—Create your program here using the
various programming blocks.
Programming Palettes—Find the building blocks for your
program here.
Port View—View the sensors and motors connected to your
EV3 Brick. Tap to open the Hardware Page and view more
detailed information (see the Hardware Page section on page
52). The EV3 Brick name is also shown above the Port View.
Resize and Center—Resize the Programming Canvas to show
all objects that you have placed on it.
Download—Download the active program to your EV3 Brick.
Note: This will only be displayed if your EV3 Brick is
connected.
Run—Download the active program to your EV3 Brick
and run it.
Note: The time taken to download a program will depend on
the number of images and sounds it includes.
Program Name—Shows the name of the currently
open program.
Undo/Redo—Undo or redo the last change you made to
the program.
Help—View a series of pages showing the main parts of
the Programming Environment, and how to manipulate
programming blocks on the Programming Canvas.
Lobby—Return to the Lobby.
Programming
Programming Environment

p. 51LEGO.com/mindstorms
LEGOtheLEGOlogoMINDSTORMSandtheMINDSTORMSlogoaretrademarksofthe/
sontdesmarquesdecommercedu/sonmarcasregistradasdeLEGOGroup©TheLEGOGroup
EV3
PROGRAMMER
APP
Programming Blocks and Palettes
Programming blocks are your way of telling your robot what you
want it to do. Located in the Programming Palettes area below
the Programming Canvas, the blocks are divided into categories
according to their type and nature to make it easy to find the block
you need.
Action Blocks
(In order from left to right)
+ Medium Motor
+ Large Motor
+ Move Steering
+ Move Tank
+ Display
+ Sound
+ Brick Status Light
Flow Blocks
(In order from left to right)
+ Start
+ Wait
+ Loop
+ Switch
Comment Boxes
When you create a program,
it can be helpful to add
Comment Boxes to describe
what your program does.
Use green Comment Boxes
for Action Blocks, orange for
Flow Block comments, and
purple for general comments
about the program. For some
good examples, check out the
comments that we’ve added
for you in the various Robot
Missions.

p. 52LEGO.com/mindstorms
LEGOtheLEGOlogoMINDSTORMSandtheMINDSTORMSlogoaretrademarksofthe/
sontdesmarquesdecommercedu/sonmarcasregistradasdeLEGOGroup©TheLEGOGroup
EV3
PROGRAMMER
APP
Tap anywhere in the Port View (visible from the Programming
Environment) to display the Hardware Page.
The Hardware Page consists of the following main areas:
Brick Information—This area shows lots of information about
the currently connected EV3 Brick, including the brick name,
battery level, firmware version, and free/used memory space.
Here you can also rename your EV3 Brick, disconnect it, and
connect to other available EV3 Bricks.
Brick Port Information—Here you can see which sensors and
motors are connected to your EV3 Brick’s ports. Tap a sensor
to change its mode or tap a motor to change the displayed
value, including current speed, rotations, and degrees turned.
Here you can also reset any attached motors.
Download—Download the active program to your EV3 Brick.
Note: This will only be displayed if your EV3 Brick is connected.
Run—Download the active program to your EV3 Brick
and run it.
Note: The time taken to download a program will depend on
the number of images and sounds it includes.
Program Name—Shows the name of the currently
open program.
Help—View an overlay showing the main components of the
Hardware Page.
Back—Return to the Programming Environment.
Hardware Page
Hardware Page

p. 53LEGO.com/mindstorms
LEGOtheLEGOlogoMINDSTORMSandtheMINDSTORMSlogoaretrademarksofthe/
sontdesmarquesdecommercedu/sonmarcasregistradasdeLEGOGroup©TheLEGOGroup
TROUBLE-
SHOOTING
Under the Help menu in the EV3 Software, click Check for Software
Updates to check for the latest version of the EV3 Software (Internet
connection required). If an update is available and you choose to
install it, you will be taken to a website where you can download the
update to your local drive.
To install the update, ensure that you first close the EV3 Software
and then run the downloaded update file.
You can also have the EV3 Software check for updates every time
you launch it by clicking the “Automatically check for software
updates” checkbox.
Updating the EV3 Software

p. 54LEGO.com/mindstorms
LEGOtheLEGOlogoMINDSTORMSandtheMINDSTORMSlogoaretrademarksofthe/
sontdesmarquesdecommercedu/sonmarcasregistradasdeLEGOGroup©TheLEGOGroup
TROUBLE-
SHOOTING
NOTE:
Firmware updates
are not supported in the
EV3Programmer App and
must be carried out via
the EV3Software.
NOTE:
Updating firmware will
delete all existing files and
projects in theEV3
Brick memory!
Firmware is the software that is inside the EV3 Brick. Without its
firmware, the EV3 Brick will not work. Occasionally, the LEGO Group
may release new versions of the firmware that add enhanced
functions or fix software bugs.
To update the firmware, you need a USB connection from your
computer to your EV3 Brick. Your computer must also be connected
to the Internet.
Turn your EV3 Brick on and connect it to your computer.
Select Firmware Update in the Tools menu.
Click the Check button to see if new firmware updates are
available.
Select the most recent firmware version from the Available
firmware files.
If you want to use a firmware version located on your computer
instead, use the Browse button to find and select the correct
firmware file.
Click the Download button to download the new firmware to
your EV3 Brick. The progress bars at the bottom of theFirmware
Update dialog box will show you how the firmware update is
proceeding. Once complete, your EV3 Brick will restart itself.
If for some reason your EV3 Brick stops working during the firmware
update process, you will need to manually update the firmware by
doing the following (the EV3 Brick still needs a USB connection to
your computer):
Hold down the Back, Center, and Right buttons on the EV3 Brick.
When the EV3 Brick restarts, release the Back button.
When the screen says “Updating,” release the Center and Right
buttons and click the Download button in the Firmware Update
tool. The firmware will be downloaded to your EV3 Brick, which
will restart itself.
If the manual firmware update does not make your EV3 Brick work
the first time, repeat the manual update process.
Firmware Update
Firmware Update tool
NOTE:
Check your EV3 Brick
batteries before repeating
manual firmware updates.
The problem may simply
be due to worn-down
batteries!

p. 55LEGO.com/mindstorms
LEGOtheLEGOlogoMINDSTORMSandtheMINDSTORMSlogoaretrademarksofthe/
sontdesmarquesdecommercedu/sonmarcasregistradasdeLEGOGroup©TheLEGOGroup
TROUBLE-
SHOOTING
If your EV3 Brick suddenly stops working and cannot be shut down
through the normal process, you will need to reset your EV3 Brick.
Resetting the EV3 Brick does not delete existing files and projects
from previous sessions in the EV3 Brick memory. Files and projects
from the existing session will be lost.
Make sure that the EV3 Brick is turned on.
Hold down the Back, Center, and Left buttons on the EV3 Brick.
When the screen goes blank, release the Back button.
When the screen says “Starting,” release the Center and Left
buttons.
Resetting the EV3 Brick
NOTE:
Check your EV3 Brick
batteries before reinstalling
firmware. Problems may
simply be due to worn-
down batteries!

p. 56LEGO.com/mindstorms
LEGOtheLEGOlogoMINDSTORMSandtheMINDSTORMSlogoaretrademarksofthe/
sontdesmarquesdecommercedu/sonmarcasregistradasdeLEGOGroup©TheLEGOGroup
USEFUL
INFORMATION
Sound File List
Animals Colors
Catpurr Black
Dogbark Blue
Dogbark Brown
Doggrowl Green
Dogsniff Red
Dogwhine White
Elephantcall Yellow
Insectbuzz
Insectbuzz
Insectchirp
Snakehiss
Snakerattle
T-rexroar

p. 57LEGO.com/mindstorms
LEGOtheLEGOlogoMINDSTORMSandtheMINDSTORMSlogoaretrademarksofthe/
sontdesmarquesdecommercedu/sonmarcasregistradasdeLEGOGroup©TheLEGOGroup
USEFUL
INFORMATION
Sound File List
Communication Expressions
Bravo Boing
EV Boo
Fantastic Cheering
Gameover Crunching
Go
Goodjob
Good
Crying
Fanfare
Goodbye Kungfu
Hello Laughing
Hi Laughing
LEGO Thankyou Magicwand
MINDSTORMS Yes
Morning
No
Ouch
Shouting
Okay Smack
Okey-dokey Sneezing
Sorry Snoring
Uh-oh

p. 58LEGO.com/mindstorms
LEGOtheLEGOlogoMINDSTORMSandtheMINDSTORMSlogoaretrademarksofthe/
sontdesmarquesdecommercedu/sonmarcasregistradasdeLEGOGroup©TheLEGOGroup
USEFUL
INFORMATION
Sound File List
Information Mechanical
Activate Airrelease
Analyze Airbrake
Backwards Backingalert
Color Blip
Detected
Down
Erroralarm
Blip
Blip
Error Blip
Flashing Horn
Forward Horn
Left Turn Laser
Object Up
Right
Searching
Motoridle
Motorstart
Start Motorstop
Stop Ratchet
Touch Sonar
Ticktack
Walk

p. 59LEGO.com/mindstorms
LEGOtheLEGOlogoMINDSTORMSandtheMINDSTORMSlogoaretrademarksofthe/
sontdesmarquesdecommercedu/sonmarcasregistradasdeLEGOGroup©TheLEGOGroup
USEFUL
INFORMATION
Sound File List
Movements Numbers
Arm Eight
Arm Five
Arm Four
Arm Nine
Dropload
Liftload
Servo One
Servo Seven
Servo Six
Servo Speeding Ten
Slideload
Snap
Speeddown Three
Speedidle Two
Speedup Zero

p. 60LEGO.com/mindstorms
LEGOtheLEGOlogoMINDSTORMSandtheMINDSTORMSlogoaretrademarksofthe/
sontdesmarquesdecommercedu/sonmarcasregistradasdeLEGOGroup©TheLEGOGroup
USEFUL
INFORMATION
Sound File List
System
Click
Powerdown
Ready
Startup
Confirm
Connect
Download
Generalalert
Overpower
p. 61LEGO.com/mindstorms
LEGOtheLEGOlogoMINDSTORMSandtheMINDSTORMSlogoaretrademarksofthe/
sontdesmarquesdecommercedu/sonmarcasregistradasdeLEGOGroup©TheLEGOGroup
USEFUL
INFORMATION
Image File List
Expressions
Bigsmile
Heartlarge
Heartsmall
Mouthopen
Mouthshut
Mouthopen
Mouthshut ZZZ
Sad
Sick
Smile
Swearing
Talking
Wink
Disappointed
Angry Dizzy
Awake Down
Blackeye Evil
Bottomleft Hurt
Bottomright Knockedout
Crazy Love
Crazy
Up
Sleeping
Pinchright
TearMiddleleft
Winking
Middleright
TiredleftNeutral
TiredmiddleNuclear
TiredrightPinchleft
ToxicPinchmiddle
Eyes
p. 62LEGO.com/mindstorms
LEGOtheLEGOlogoMINDSTORMSandtheMINDSTORMSlogoaretrademarksofthe/
sontdesmarquesdecommercedu/sonmarcasregistradasdeLEGOGroup©TheLEGOGroup
USEFUL
INFORMATION
Image File List
INFORMATION
Accept
Backward
Decline
Forward
Left
Nogo
Questionmark
Right
Stop
Stop
Thumbsdown
Thumbsup
Warning
Colorsensor
EVicon
EV
Gyrosensor
IRbeacon
IRsensor
Largemotor
USsensor
LEGO
Mediummotor
MINDSTORMS
Soundsensor
Tempsensor
Touchsensor
LEGO

ProgressProgress
p. 63LEGO.com/mindstorms
LEGOtheLEGOlogoMINDSTORMSandtheMINDSTORMSlogoaretrademarksofthe/
sontdesmarquesdecommercedu/sonmarcasregistradasdeLEGOGroup©TheLEGOGroup
USEFUL
INFORMATION
Image File List
DialBar
DialBar
DialBar
DotsBar
DotsBar
DotsDial
DotsDial Timer
Hourglass Timer
Hourglass Waterlevel
Hourglass Waterlevel
Timer Waterlevel
Timer Waterlevel
Timer
Objects
Bomb
Boom
Fire
Flowers
Forest
Lightoff
Lighton
Lightning
Night
Pirate
Snow
Target
Objects

p. 64LEGO.com/mindstorms
LEGOtheLEGOlogoMINDSTORMSandtheMINDSTORMSlogoaretrademarksofthe/
sontdesmarquesdecommercedu/sonmarcasregistradasdeLEGOGroup©TheLEGOGroup
USEFUL
INFORMATION
Image File List
System
Accept
Accept
Alert
Box
Decline
Decline
Dotempty
Slider
Slider
Dotfull
SliderEVsmall
SliderBusy
SliderBusy
SliderPlay
SliderSlider
Slider
p. 65LEGO.com/mindstorms
LEGOtheLEGOlogoMINDSTORMSandtheMINDSTORMSlogoaretrademarksofthe/
sontdesmarquesdecommercedu/sonmarcasregistradasdeLEGOGroup©TheLEGOGroup
USEFUL
INFORMATION
Images
Accept
Pinchright
Pirate
Neutral
Hurt
Decline
Questionmark
Awake
Warning
Stop
Boom
EVicon
Brick Program App—Assets List
Sounds
Hello
Fanfare
Start
Goodbye
Erroralarm
Stop
Object
Blip
Snap
Ouch
Arm
Laser

x
p. 66LEGO.com/mindstorms
LEGOtheLEGOlogoMINDSTORMSandtheMINDSTORMSlogoaretrademarksofthe/
sontdesmarquesdecommercedu/sonmarcasregistradasdeLEGOGroup©TheLEGOGroup
USEFUL
INFORMATION
Element List
x
x
x
x
x
x
x
x
x
x
x
x
x
x
x
x
x
x
x
x
x
x
x
x
x
x
x
x
x
x
x
x
x

p. 67LEGO.com/mindstorms
LEGOtheLEGOlogoMINDSTORMSandtheMINDSTORMSlogoaretrademarksofthe/
sontdesmarquesdecommercedu/sonmarcasregistradasdeLEGOGroup©TheLEGOGroup
USEFUL
INFORMATION
x
x
x
x
x
x
x
x
x
x
x
x
x
x
x
x
x
x
x
x
x
x
x
x
x
x
x
x
x
x
x
5,5
p. 68LEGO.com/mindstorms
LEGOtheLEGOlogoMINDSTORMSandtheMINDSTORMSlogoaretrademarksofthe/
sontdesmarquesdecommercedu/sonmarcasregistradasdeLEGOGroup©TheLEGOGroup
USEFUL
INFORMATION
x
x
x
x
x
x
x
x
x
x
x
x
x
x
x
x
x
x
x
x
x
x
x
x
x

cm/in
cm/in
cm/in
p. 69LEGO.com/mindstorms
LEGOtheLEGOlogoMINDSTORMSandtheMINDSTORMSlogoaretrademarksofthe/
sontdesmarquesdecommercedu/sonmarcasregistradasdeLEGOGroup©TheLEGOGroup
USEFUL
INFORMATION
x
x
x
x
x
x
x
x
x
x
x
iPad, iPhone and iPod touch are
trademarks of Apple Inc., registered in
the U.S. and other countries.
