
Kyocera Cloud Print and
Scan
User Guide
Legal notes
Unauthorized reproduction of all or part of this guide is prohibited.
The information in this guide is subject to change without notice.
We cannot be held liable for any problems arising from the use of this product,
regardless of the information herein.
©
2023 KYOCERA Document Solutions Inc.
Regarding trademarks
Box
®
and Box Enterprise
®
are registered trademarks of Box, Inc. and/or its
affiliates.
Android
®
, Google Chrome
®
, Chromebook
®
, Google Drive
™
, and Google
Workspace
®
are trademarks of Google LLC.
Macintosh
®
, Safari
®
, macOS
®
, and iOS
®
are trademarks of Apple Inc., registered
in the U.S. and other countries and regions.
Microsoft
®
, Windows
®
, Microsoft Edge
®
, Active Directory
®
, Azure
®
, Microsoft
Word, OneDrive
®
, OneDrive for Business
®
, SharePoint
®
and SharePoint Online
®
are registered trademarks of Microsoft Corporation in the U.S and/or other
countries.
All other brand and product names herein are registered trademarks or
trademarks of their respective companies.

Table of Contents
Chapter 1 Product information
Kyocera Cloud Print and Scan documentation.................................................................................1-1
Conventions...........................................................................................................................................1-1
System requirements...........................................................................................................................1-1
Chapter 2 Introduction
Features..................................................................................................................................................2-1
Chapter 3 Getting started
About the Log in page.........................................................................................................................3-1
Activate your account.......................................................................................................................... 3-3
Activate your account: Azure AD users............................................................................................. 3-4
Edit your Kyocera Cloud Print and Scan user profile...................................................................... 3-4
General.............................................................................................................................................3-5
Password..........................................................................................................................................3-6
Advanced......................................................................................................................................... 3-7
Storage...........................................................................................................................................3-10
Chapter 4 Jobs
About the Jobs tab............................................................................................................................... 4-1
File upload............................................................................................................................................. 4-1
Add files using drag and drop..................................................................................................... 4-1
Add files manually..........................................................................................................................4-2
Chapter 5 Scanned documents
About the Scanned documents tab................................................................................................... 5-1
Chapter 6 Applications
Install the Desktop client.....................................................................................................................6-1
Install and set up the Windows Desktop client......................................................................... 6-1
Install and set up the Macintosh Desktop client....................................................................... 6-7
Install the Desktop client for Windows: Silent mode................................................................ 6-9
Go to the Kyocera Cloud Print and Scan portal home page........................................................ 6-11
Go to the portal home page: Windows Desktop client...........................................................6-12
Go to the portal home page: Macintosh Desktop client.........................................................6-12
Kyocera Cloud Print and Scan i

Check Desktop client settings...........................................................................................................6-12
Check the Windows Desktop client settings............................................................................ 6-13
Check Macintosh Desktop client settings................................................................................. 6-13
Change the Desktop client Organization name.............................................................................6-14
Change the Windows Desktop client organization name.......................................................6-14
Change the Macintosh Desktop client organization name.................................................... 6-15
Update the Desktop client................................................................................................................ 6-16
Update the Windows Desktop client......................................................................................... 6-17
Update the Macintosh Desktop client.......................................................................................6-18
Uninstall the Desktop client..............................................................................................................6-19
Uninstall the Windows Desktop client.......................................................................................6-19
Uninstall the Windows Desktop client: Silent mode................................................................6-19
Uninstall the Macintosh Desktop client.................................................................................... 6-20
Set up the Windows KX Driver......................................................................................................... 6-20
Install the Cloud Print and Scan Chrome Extension......................................................................6-21
Chapter 7 Print and scan at the device
Log in and log out................................................................................................................................7-1
Printing...................................................................................................................................................7-2
About the Desktop client Auto-logout feature...........................................................................7-4
Print using the Desktop client......................................................................................................7-4
Print using the KX Driver (Windows-only).................................................................................. 7-6
Print from cloud storage...............................................................................................................7-8
Print from Scanned documents................................................................................................. 7-10
Print using the Cloud Print and Scan Chrome Extension....................................................... 7-12
Scanning...............................................................................................................................................7-14
Scan to cloud................................................................................................................................ 7-15
Scan to me.................................................................................................................................... 7-17
Chapter 8 Appendix
Integrating KYOCERA Mobile Print with Kyocera Cloud Print and Scan....................................... 8-1
Android.............................................................................................................................................8-1
iOS.....................................................................................................................................................8-7
ii User Guide

1
Product information
Product information
Kyocera Cloud Print and Scan documentation
Kyocera Cloud Print and Scan
User Guide
Provides instruction on how to set up and
effectively use Kyocera Cloud Print and Scan.
Conventions
The following conventions may be used in this guide:
• Bold text is used for menu items and buttons
• Screen, text box, and drop-down menu titles are spelled and punctuated
exactly as they are displayed on the screen
• Italics are used for document titles
• Text or commands that a user enters are displayed as text in a different font
or in a text box as shown in these examples:
1. On the command line, enter net stop program
2. Create a batch file that includes these commands:
net stop program
gbak -rep -user PROGRAMLOG.FBK
• Icons are used to draw your attention to certain pieces of information.
Examples:
This indicates information that is useful to know.
This indicates important information that you should know,
including such things as data loss if the procedure is not done
properly.
System requirements
Important privacy information
Kyocera Cloud Print and Scan (KCPS) is a software product
for a single person using their own dedicated PC account. The
simultaneous access on shared PCs or a similar environment, is NOT
supported.
Kyocera Cloud Print and Scan 1-1

Product information
When using KCPS on a shared PC, please log in to the PC with your own account
and be sure to log out from the PC after use.
Supported web browsers
• Google Chrome: Latest version
• Microsoft Edge: Latest version (Chromium-based only)
• Apple Safari: Latest version
You are notified on the screen if you are using an unsupported
browser.
Desktop client minimum requirements
A. Operating systems
Any operating system that has reached EOL (End of Life) is not
supported.
Windows 10 / 11
macOS 10.15 / 11 / 12 / 13
B. Hardware requirements
Processor
• Intel Pentium 4 processor or later (SSE2 capable)
• M1 or M2 (Macintosh)
RAM OS minimum/recommended
Hard disk space 600 MB
C. Port requirements
5571 Port 5571 is used for the Desktop client. If port 5571 is not
available, users cannot open the Desktop client.
Cloud Print and Scan Chrome Extension
The Cloud Print and Scan Chrome Extension is only guaranteed to work on a
Chromebook using the latest version of Chrome.
Direct print
The following are the requirements to use the "Direct print" feature with a non-
HyPAS device. See the Set up the Windows Desktop client for Direct print topic in the
Applications chapter of this guide for more information.
• "Bonjour Print Services for Windows" installed on your computer
• The Desktop Client, version 1.7 or later, installed and set up on your computer
• The device information for the device you want to use the "Direct print"
feature with
1-2 User Guide

Product information
Your KCPS admin can tell you which devices are set up for the "Direct
print" feature.
Kyocera Cloud Print and Scan 1-3

2
Introduction
Introduction
Kyocera Cloud Print and Scan is a cloud printing and scanning solution for office
environments.
Features
You interact with your Kyocera Cloud Print and Scan (KCPS) account in three
different ways:
Access type Description
Customer portal (A) Use your computer or mobile device to access the
Customer portal. In the Customer portal, you can
manage your KCPS account and the documents you
plan to print.
Your "Activation Confirmation" email provides the
link to go to the Log in screen on the Customer portal.
Kyocera Cloud Print and Scan 2-1

Introduction
Access type Description
Desktop client (B) Use the KCPS Desktop client to send files from your
computer's applications to KCPS. The Desktop client
is available for both Windows and Macintosh unless
your organization's Customer admin has hidden the
ability to download the Desktop client.
You can also use the "Direct print" feature along with
the Desktop client to print to registered non-HyPAS
devices.
Chromebook users can use Cloud Print
and Scan Chrome Extension to send files
to KCPS.
HyPAS application (C) Use an MFP (multi-function printer) with the KCPS
HyPAS application installed to scan documents to and
print documents from your KCPS account.
You can also scan documents to and print documents
from third-party cloud storage services like Box,
Box Enterprise, OneDrive, OneDrive for Business,
SharePoint Online, Google Drive, and Google Drive for
Google Workspace with the HyPAS application. Your
organization needs to make these services available
to you before you can access them.
For all access types (Customer portal, Desktop client, and HyPAS
application):
• Your account is locked after three failed attempts to log in within
15 minutes
• Your account is automatically unlocked after 30 minutes to allow
you to retry logging in.
• If you have forgotten your login information, select the Forgot
password link on the Customer portal home page and follow the
instructions. If your organization uses "Sign in with Microsoft" for
log in authentication, you cannot change your password in KCPS.
Contact your IT team for assistance.
Your KCPS admin can help you if you need any assistance.
2-2 User Guide

3
Getting started
Getting started
Before you can use your Kyocera Cloud Print and Scan (KCPS) account, you need
to:
• Activate and log in to your KCPS account. Your KCPS admin creates an account
for you and sends you an activation email.
If your company uses "Sign in with Microsoft" for authentication,
you do not have to activate your account, and you will not receive
an activation email.
You must log in to your KCPS account using "Sign in with
Microsoft" in the Customer portal before you can print, scan, or
use any native features such as copy on a device.
• Link your third-party cloud storage accounts. Box, Box Enterprise, OneDrive,
OneDrive for Business, SharePoint Online, and Google Drive are supported.
• Install the KCPS Desktop client on your computer. This software lets you print
to your KCPS account from your computer. Both Windows and Macintosh
software is available. See the Applications chapter to download, install, and set
up the Desktop client.
• If you have an ID card, register it at a device where you plan to print or scan.
About the Log in page
The Log in page for Kyocera Cloud Print and Scan (KCPS), besides being used to
log in, has additional features to help you use the product.
You are notified on the screen if you are using an unsupported
browser.
Your log in page may be either the standard KCPS log in page or the "Sign in with
Microsoft" log in page if your company uses Microsoft for authentication.
Standard KCPS log in page
As shown in the image below, the standard log in page is used if your company
does not use "Sign in with Microsoft" for authentication.
Kyocera Cloud Print and Scan 3-1

Getting started
Item
number
Item Description
1 Information Select the icon and then the guide name
to open a PDF Guide for the portal you are
viewing. This icon is also available on other
pages.
2 Language Make a selection from this menu to
change the user interface language. This
icon is also available on other pages.
3 Forgot password If you have forgotten your password,
select this link to reset it.
4 Version Displays the version of the KCPS software
you are using.
5 Privacy Statement Depending on how the system is set
up, you may have a link to a Privacy
Statement. Select this link, if available, to
view how your data is handled.
6 License Agreement Select this link to view license information
about this product.
Sign in with Microsoft log in page
As shown in the image below, the "Sign in with Microsoft" log in page is used if
your organization uses Microsoft for authentication.
Use your Microsoft credentials to log in. You do not have to activate your KCPS
account.
3-2 User Guide

Getting started
Item
number
Item Description
1 Information Select the icon and then the guide name
to open a PDF Guide for the portal you are
viewing. This icon is also available on other
pages.
2 Language Make a selection from this menu to
change the user interface language. This
icon is also available on other pages.
3 Admin log in This link is for your KCPS Admin to log in
for maintenance purposes. It is not for
general KCPS users.
4 Version Displays the version of the KCPS software
you are using.
5 Privacy Statement Depending on how the system is set
up, you may have a link to a Privacy
Statement. Select this link, if available, to
view how your data is handled.
6 License Agreement Select this link to view license information
about this product.
Activate your account
If your organization uses "Sign in with Microsoft" for log in
authentication you do not have to activate your account. Skip this
topic and go to the Activate your account: Azure AD users topic.
Kyocera Cloud Print and Scan 3-3

Getting started
After your Kyocera Cloud Print and Scan (KCPS) admin creates an account for
you, you are notified by email that your account is ready for activation.
1
Open your email from KCPS and read the contents carefully.
2
(Optional) If there is a Privacy Statement link, select it to view how your
data is to be treated.
3
In the email, select Activate now.
A browser window opens and displays your KCPS username already
entered. Note this username since you need it to log in to the system.
4
Enter a new password and password confirmation. When you select
the password text box, you see the password requirements. When your
password and password confirmation meet the requirements and match,
the Save button becomes available.
5
Select Save.
A welcome notice displays.
6
Read the welcome notice and select the "I have read and accept the End
User License Agreement" check box.
7
Select OK.
The KCPS "Log in" window displays. KCPS also sends you an email to
confirm your activation. The email contains a button that also takes you to
the "Log in" window.
8
On the "Log in" windows, enter your user name and password and select
Log in.
After a successful log in, the KCPS Home page displays. It is from this page that
you can manage your account.
Activate your account: Azure AD users
If your organization uses "Sign in with Microsoft" for log in authentication you do
not have to activate your account. However, you do have to accept the End User
License Agreement (EULA).
1
Open your browser window and log into your KCPS account using the
"Sign in with Microsoft" button.
A welcome notice displays.
2
Read the welcome notice and select the "I have read and accept the End
User License Agreement" check box.
3
Select OK.
After a successful log in, the KCPS Home page displays. It is from this page that
you can manage your account.
Edit your Kyocera Cloud Print and Scan user profile
You can edit your user profile at any time. Four tabs contain settings you can
change:
3-4 User Guide

Getting started
General
On the General tab, you can change your first name, last name, user
name, and email. See the General tab topic for more information.
If your organization uses "Sign in with Microsoft" for log in
authentication the information on the General tab is read-only
and cannot be changed.
Password
On the Password tab, you can change your current password. See the
Password tab topic for more information.
The Password tab is not displayed if your organization uses
"Sign in with Microsoft" for log in authentication.
Advanced
On the Advanced tab, you can enable or disable contact-free printing,
view and update your PIN authentication, and manage ID cards. See the
Advanced tab topic for more information.
Storage
On the Storage tab, you can link or unlink to cloud storage accounts. See
the Storage tab topic for more information.
General
The General tab contains the following settings:
If your organization uses "Sign in with Microsoft" for log in
authentication, the information on the General tab is read-only and
cannot be changed.
First name
Displays your current first name. The first name can be up to a maximum
of 255 characters. Space, hyphen and . @ _ ' ! # ^ ~ characters are allowed.
Last name
Displays your current last name. The last name can be up to a maximum
of 255 characters. Space, hyphen and . @ _ ' ! # ^ ~ characters are allowed.
User name
Displays your current user name. Your user name can be a minimum of
4 up to a maximum of 64 characters. Space, hyphen and . @ _ ' ! # ^ ~
characters are allowed.
User name is not displayed if your organization uses "Sign in
with Microsoft" for log in authentication.
Kyocera Cloud Print and Scan 3-5

Getting started
Email address
Displays your current email address. Your email address can be up to 132
characters.
If you change your email address on this page, an email is
sent to both your old and new email addresses. You must go
to your new email account, open the email from Kyocera Cloud
Print and Scan and select Change email address within 24
hours for the email change to take effect.
Password
The Password tab contains settings to change Customer Admin password.
Change your password
You can change your Kyocera Cloud Print and Scan (KCPS) password.
You cannot change your password if your organization uses "Sign
in with Microsoft" for log in authentication. Contact your IT team for
assistance.
1
Open your browser window and log into your KCPS account.
2
Select your user name and then select User profile.
3
Select the Password tab.
4
Enter your current password and then your new password and a
confirmation of the new password.
5
Select Save.
The changes you make are effective immediately. Note your new password since
you must use it the next time you log in.
Forgot your password
If you forgot your password, request a password reset from the "Log in" window.
The Forgot password link is not displayed if your organization uses
"Sign in with Microsoft" for log in authentication. Contact your IT
team for assistance.
1
Open your browser and go to the Kyocera Cloud Print and Scan (KCPS)
"Log in" page.
2
Select Forgot password.
The "Reset password" window displays.
3
Enter the email address you use for KCPS.
3-6 User Guide

Getting started
4
Select Reset password.
A "Reset password" message displays.
5
Select OK.
A password reset email is sent to the email address you entered. You have
24 hours to reset your password before the reset link expires.
6
Go to the email account that you entered for the password reset.
7
Open the "Reset Your Password" email from KCPS.
8
Select Reset password.
The KCPS "Enter a new password'' window displays.
9
Enter a new password and password confirmation. If the password and
confirmation match, the Save button becomes available.
10
Select Save.
The password edit is saved, and you are returned to the "Log in" window.
Log in using your new password.
You are sent a "Your Password Has Changed" email to confirm that your
password is updated.
Advanced
The Advanced tab contains the following settings:
Enable contract-free printing
Allows you to print up to 20 of your queued print jobs one after another
using the settings made from the Desktop client or printer driver. See the
Enable contact-free printing topic for more information.
PIN authentication
Allows you to view your current PIN or generate a new PIN. See the PIN
authentication topic or the Generate a new PIN topic for more information.
ID card
Allows you to view and manage your ID cards. See the ID card status topic
or the Register an ID card topic for more information.
Skip HyPAS App print settings
Allows you to skip the print settings screen on the KCPS HyPAS application
when printing at a device. See the Skip HyPAS App print settings topic for
more information.
Enable contact-free printing
When you set "Enable contact-free printing" to On, you can print up to 20 of your
queued print jobs one after another using the settings made from the Desktop
client or KX Driver. After you log in on a supported device, you are not asked at
the device to specify settings for each job.
Kyocera Cloud Print and Scan 3-7

Getting started
If "Enable contact-free printing" is set to On, your documents print in
order from the newest document you added to the oldest.
1
Open your browser and log into your Kyocera Cloud Print and Scan (KCPS)
account.
2
In the top right corner of the KCPS window, select your user name and
then User profile.
3
Select the Advanced tab
4
In the "Enable contact free-printing" area, select On.
5
Select Save.
To turn off "Enable contact-free printing," repeat the steps except select Off.
PIN authentication
If you can enter a PIN to log in to a device, the PIN authentication area displays
on your User profile.
Your current 6-digit PIN displays in the PIN authentication area.
Generate a new PIN
You can generate a new PIN at any time. After generating a new PIN, you must
wait 7 days before you can generate another new PIN. The date and time you last
generated a new PIN are displayed in the PIN authentication area.
1
Open your browser and log into your Kyocera Cloud Print and Scan (KCPS)
account.
2
In the top right corner of the KCPS window, select your user name and
then User profile.
3
Select the Advanced tab.
4
Scroll to the "PIN authentication" area.
5
Select Generate PIN.
If the Generate PIN button is not available, 7 days have not
elapsed since your last new PIN was generated.
A new PIN is generated and displayed in the PIN authentication area. You receive
an email after your PIN is updated.
ID card status
You can check and manage the ID cards currently registered to your account.
1
Open your browser and log into your Kyocera Cloud Print and Scan (KCPS)
account.
3-8 User Guide

Getting started
2
In the top right corner of the KCPS window, select your user name and
then User profile.
3
Select the Advanced tab.
4
Scroll to the "ID card" area.
The cards currently registered to your account are displayed. If there
are no cards registered to your card, see the Register an ID card topic for
information about registering an ID card.
5
You can manage or deactivate any of the cards listed.
Register an ID card
There are two ways to register an ID card with Kyocera Cloud Print and Scan
(KCPS):
• Register the card at a device with an ID card reader.
• Add the card to your KCPS user profile using a web browser.
Register an ID card at a device
You can register multiple ID cards to your account, but you cannot share an ID
card with another user. Another user cannot register a card you have already
registered.
1
Go to a device that has KCPS installed.
2
Make sure the Log in screen is displayed and swipe your ID card.
A message displays that your ID card is not registered.
3
Select Yes to register your ID card.
The ID card registration screen displays.
4
Log in to your KCPS account to register your ID card.
After registering your ID card, you can either use the card to log in or enter your
username and password. You can manage your ID cards on your User profile
page.
If your organization uses "Sign in with Microsoft" for authentication,
you can only use your ID card or PIN to log in at a device.
Register an ID card on your KCPS user profile
You can register your ID cards on your KCPS user profile.
Multiple ID cards can be registered to your account, but you cannot share an ID
card with another user. Another user cannot register a card you have already
registered.
1
Open your browser and log into your KCPS account.
Kyocera Cloud Print and Scan 3-9
Getting started
2
In the top right corner of the KCPS window, select your user name and
then User profile.
3
Select the Advanced tab.
4
Scroll to the "ID card" area.
Any cards currently registered to your account are displayed.
5
In the text box, enter the ID card number.
Up to 31 characters are allowed. Numbers 0-9 and characters a-z, A-Z are
allowed. Any upper case characters you enter are converted to lower case
when saved. Duplicate ID cards are not allowed.
6
Select Add.
The ID card is registered. A message displays if you have entered a
duplicate ID card number.
7
If you have more than one card to register, repeat steps 5 through 7 for
each additional card.
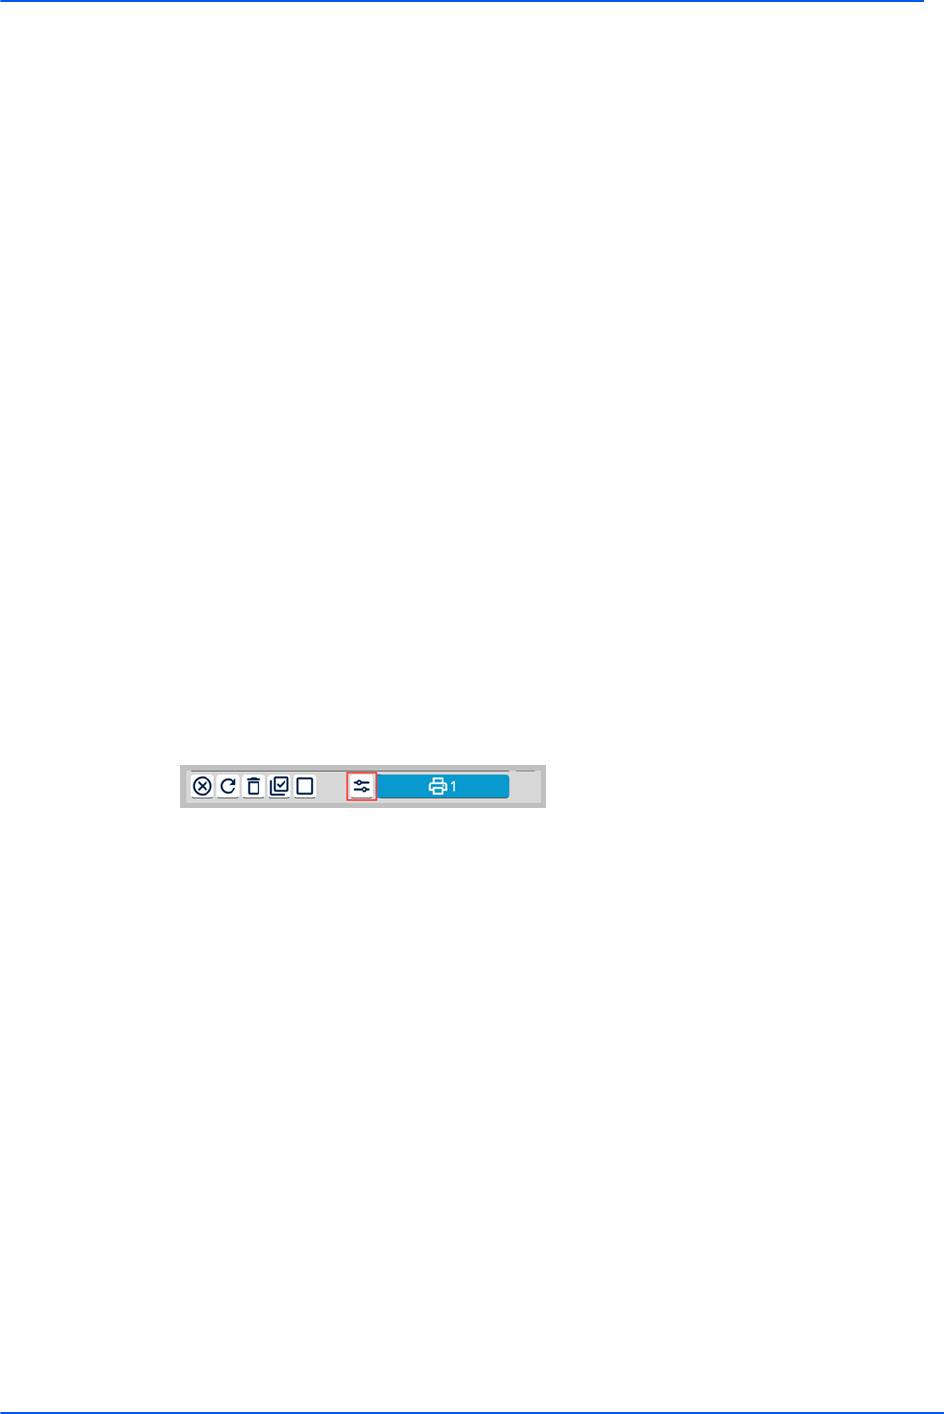
Skip HyPAS App print settings
If you always use the default print settings when printing at a device using KCPS,
you can set "Skip HyPAS App print settings" to Enable, to save a step when
printing. After choosing documents, select the Print icon to initiate printing
without seeing the printer options screen.
If you need to change the print settings after choosing documents and this
setting is enabled, select the "Print preference" icon next to the Print icon to view
the printer options screen.
1
Open your browser and log into your KCPS account.
2
In the top right corner of the KCPS window, select your user name and
then User profile.
3
Select the Advanced tab.
4
Scroll to the "Skip HyPAS App print settings" area.
5
Select Enable.
6
Select Save.
You can disable the "Skip HyPAS App print settings" feature at any time by
repeating the steps above and selecting Disable and then Save.
Storage
The Storage tab contains settings for:
3-10 User Guide

Getting started
Link a storage account
Lets you link to available cloud storage accounts. See the Link a storage
account topic or the Disconnect from a storage account topic for more
information.
Default linked storage account
Lets you specify which linked cloud storage account to use as the default
linked cloud storage account on the HyPAS application at a device.
Link a storage account
You can link to these third-party cloud storage services if your organization has
made them available to your organization:
• Box
• Box Enterprise
• Google Drive
• Google Drive for Google Workspace
• OneDrive
• OneDrive for Business
• SharePoint Online
Once linked, you can print documents from your third-party cloud storage and
scan documents to store on these services. Any print quotas or policies that
apply to your Kyocera Cloud Print and Scan (KCPS) account apply as well when
you are printing from any third-party cloud service.
If you do not use a linked storage account for 90 days, the linking for
that storage account expires. When this happens, a "Re-link expired
linked account" message displays on the KCPS HyPAS screen. See the
"Re-link expired linked account" message topic for more information.
1
Open your browser and log into your KCPS account.
2
In the top right corner of the KCPS window, select your user name and
then User profile.
3
Select the Storage tab.
4
Scroll to the "Link a storage account" area. You can link to any or all of the
storage services listed.
Only third-party storage services available to you display. If
your organization has not made a service available, it does not
display in the "Link a storage account" area.
5
Select Link next to a cloud storage service name.
Kyocera Cloud Print and Scan 3-11

Getting started
6
Follow the instructions provided on-screen to access and validate your
cloud storage account.
Once the service is activated, a green check mark displays next to the
Unlink button (A).
When you log in at a device to print or scan using KCPS, your linked cloud storage
services display as locations where you can send scans or where you can retrieve
print-ready documents for printing.
Your KCPS admin may restrict printing from or saving scans to third-
party cloud storage services. Check with your KCPS admin if you have
any questions.
"Re-link expired linked account" message
The "Re-link expired linked account" message displays on a device when you
try to use a linked storage account where the account log in information you
provided has expired. If you do not use a linked storage account for 90 days, the
linking for that storage account expires. You can resolve this issue by linking the
expired storage account again.
See the "Link a storage account" topic for information about linking the storage
account.
Disconnect from a storage account
1
Open your browser and log into your Kyocera Cloud Print and Scan (KCPS)
account.
2
In the top right corner of the KCPS window, select your user name and
then User profile.
3
Select the Storage tab.
4
To disconnect from a third-party cloud storage service, select Unlink next
to the service name.
The "Unlink storage account" window displays.
5
Select OK.
The Unlink button changes to Link.
The cloud storage service is no longer linked to your Kyocera Cloud Print and
Scan account. You can re-link to the service at any time.
3-12 User Guide

Getting started
Default linked storage account
You can specify which linked cloud storage account to use as the default cloud
storage on the KCPS HyPAS application. For example, if you linked Box, selecting
it as the default will automatically use Box as the storage when logging in on the
HyPAS app on a device.
None is the default setting.
• If "None" is selected, but there is only one available linked storage, the
"Service menu screen" (Storage selection screen) is skipped, and that storage
page is displayed on the KCPS HyPAS application.
• If you do not specify a default linked storage account and have more than
one available, you must select a storage account each time you use the KCPS
HyPAS application.
1
Open your browser and log into your KCPS account.
2
In the top right corner of the KCPS window, select your user name and
then User profile.
3
Select the Storage tab.
4
Scroll to the "Default linked storage account" area and select the linked
storage account you want to use as the default.
Only the storage services you have linked display in the menu.
Unlinked storage services do not display in the "Default linked
storage account" menu.
5
Select Save.
After logging in to KCPS on a device, your default linked storage account default
displays as the first screen.
If you want to use a different linked storage account, select the back icon in the
top left corner and select a linked storage account from the list.
Kyocera Cloud Print and Scan 3-13

4
Jobs
Jobs
Use the Jobs tab to upload and monitor jobs that you have submitted to Kyocera
Cloud Print and Scan.
About the Jobs tab
• View your current monthly print limits and any print policies that apply to your
account on the Jobs tab.
• Upload .pdf, .jpg, .jpeg, .tiff, or .tif files to KCPS. See the File upload topic for
more information.
• For jobs listed on the Jobs tab, you can preview a thumbnail view of the first
page of the document by selecting View.
• Use the Search box to find any jobs that are not displaying on the current
page if you have a large number of jobs.
• Select a job and then select Delete to remove the job permanently from the
Jobs tab. You can select multiple or all jobs to delete all at once.
Your jobs are not stored permanently in KCPS. Ask your admin
about how many days your jobs are retained before being
automatically deleted.
• The maximum size of any print job that can be successfully processed is 500
MB.
File upload
On the Jobs tab, you can upload files from your computer to KCPS using drag and
drop or by manually by browsing for the files to upload.
If your KCPS Customer Admin has set "Job storage" to “Local spool,”
you cannot view or upload jobs on the Jobs tab. “Local spool” stores
your print jobs locally on the Desktop client until you release the jobs.
• You can upload a maximum of 10 files at a time.
• Only .pdf, .jpg, .jpeg, .tiff, or .tif files can be uploaded on the Jobs tab.
• Each file cannot be larger than 10 MB.
To upload files larger than 10 MB, open and submit the file to KCPS using the
Desktop client.
Add files using drag and drop
You can add files to KCPS using the drag and drop method.
• You can upload a maximum of 10 files at one time. If you try to drag and drop
more than 10 files, an error message displays, and no files are uploaded.
Kyocera Cloud Print and Scan 4-1

Jobs
• Only .pdf, .jpg,, .jpeg, .tiff, or .tif files can be uploaded on the Jobs tab.
• The maximum file size for any individual file that you drag and drop is 10 MB.
1
Open your browser window and log into your KCPS account.
2
Select the Jobs tab.
3
Select Upload.
The "Upload to Jobs" window displays.
4
Drag files from your computer's file system onto the Drag and drop your
files here or Browse area.
The "Upload to Jobs" window displays and shows the progress of the
uploads. If there are files that do not meet the requirements for uploading,
a message displays and they are not uploaded.
5
After the uploads are complete, select the trash can icon to remove
any documents you do not want to upload. You can also drag and drop
additional files up to the maximum.
6
When satisfied with your list of files, select Add to add the documents to
the Jobs tab.
The uploaded documents display on the Jobs tab and are available for printing.
Add files manually
You can add files manually to KCPS instead of using drag and drop.
• You can upload a maximum of 10 documents at one time. If you try to upload
more than 10 documents, an error message displays and no documents are
uploaded.
• Only .pdf, .jpg, .jpeg, .tiff, or .tif files can be uploaded on the Jobs tab.
• The maximum file size for any individual document that you add manually is
10 MB.
1
Open your browser window and log into your KCPS account.
2
Select the Jobs tab.
3
Select Upload.
The "Upload to Jobs" window displays.
4
Select anywhere in the Drag and drop your files here or Browse area to
open the "File Upload" window.
5
Browse and select the documents you want to add and select Open.
The "Upload to Jobs" window displays and shows the progress of the
uploads. If there are files that do not meet the requirements for uploading,
a message displays and they are not uploaded.
6
After the uploads are complete, select the trash can icon to remove any
documents you do not want to upload. You can also select Browse to add
additional files up to the maximum.
4-2 User Guide

Jobs
7
When satisfied with your list of files, select Add to add the documents to
the Jobs tab.
The uploaded documents display on the Jobs tab and are available for printing.
Kyocera Cloud Print and Scan 4-3
5
Scanned documents
Scanned documents
Use the Scanned documents tab to view and download scan jobs that you have
submitted to Kyocera Cloud Print and Scan (KCPS).
About the Scanned documents tab
• For jobs listed on the Scanned documents tab, you can preview a thumbnail
view of the first page of the document by selecting View. You can also
download your scan jobs to your computer from this tab.
• Use the Search box to find any scan jobs that are not displaying on the
current page if you have a large number of jobs.
• Select a scan job and then select Delete to remove the job permanently from
the Scanned documents tab. You can select multiple or all scan jobs to delete
all at once.
Your jobs are not stored permanently in KCPS. Ask your admin
about how many days your jobs are retained before being
automatically deleted. Download any scan jobs you want to keep.
• The accuracy of scan counts may be affected by the occurrence of feeder jams
or canceled jobs.
• The maximum size of any scan job that can be successfully processed is 500
MB.
Kyocera Cloud Print and Scan 5-1

6
Applications
Applications
Use the Applications tab to download the Windows and macOS Desktop clients.
The Desktop clients are used to send your jobs to Kyocera Cloud Print and Scan.
The Applications tab is not visible if your organization's Customer
admin has hidden the ability to download the Desktop client.
Install the Desktop client
You use the Desktop client to "print" to Kyocera Cloud Print and Scan (KCPS)
from applications you use on your computer. Documents sent from the Desktop
client are added to your Jobs tab in KCPS.
• If the Desktop client is already installed on your computer by your KCPS
Admin or your IT team, you will log in to the Desktop client when your
computer restarts, when you try to print to KCPS, or when you select the
Kyocera Cloud Print and Scan icon in the notification area.
• If you plan to use the "Direct print" feature of the Windows Desktop client,
you must install Bonjour first. The "Direct print" feature is available in
Windows Desktop Client versions 1.7 and later.
• If the Desktop client is not installed on your computer, follow the instructions
in the Install and set up the Windows Desktop client or Install and set up the
Macintosh Desktop client topics.
Install and set up the Windows Desktop client
If you plan to use the "Direct print" feature of the Windows Desktop client, you
must install "Bonjour Print Services for Windows" first. The "Direct print" feature
is available in the Windows Desktop Client versions 1.7 and later. The installation
of Bonjour is an optional step in this procedure that can be skipped if you are not
going to use "Direct print."
1
(Optional) If you plan on using the "Direct print" feature, you must install
Apple Bonjour first on your computer. Bonjour contains the required
protocols used to communicate with printers.
Check with your KCPS admin if you have questions about
"Direct print" and installing Bonjour and the Kyocera printers
Kyocera Cloud Print and Scan 6-1

Applications
that are available in your organization that can use "Direct
print."
a) Open your browser and go to https://support.apple.com/kb/dl999?
locale=en_US to download the "Bonjour Print Services for Windows"
software.
b) Install the software using the default settings. Follow the onscreen
prompts.
c) Follow the remaining steps in this procedure to set up the Desktop
Client and then see the Set up the Windows Desktop client for Direct
print topic for additional instructions.
2
Open your browser and log in to your Kyocera Cloud Print and Scan (KCPS)
account.
3
Select the Applications tab.
4
Select for Windows.
5
Download and then open the application installer once the download
finishes.
6
On the KCPS setup window, select Install and follow the onscreen
prompts.
7
Select Close when the installation finishes.
A window displays to enter your organization name.
8
Your organization name is displayed above any KCPS tabbed window and
also appears in the Activation Confirmation email you received from KCPS.
Enter your organization name and then select OK.
9
Enter your KCPS user name and password and select OK.
a) If your organization uses "Sign in with Microsoft" for authentication,
a Microsoft "Sign in" window displays. Enter your Microsoft user
credentials and follow the onscreen prompts. If a "Permissions
requested" window displays, select Accept.
b) If your organization uses "Sign in with Microsoft" for authentication
and you have never logged in to KCPS and have not accepted the
"End User License Agreement" (EULA) before, a message displays.
Follow the onscreen prompts to open the web portal and accept
the EULA. You must agree to the EULA before using KCPS and the
Desktop client.
10
Return to the Desktop client and log in. If your organization uses "Sign in
with Microsoft," select your account and log in.
The Kyocera Cloud Print and Scan - Print status window displays.
6-2 User Guide

Applications
11
If you cannot connect to KCPS, an error message displays at the top of
the log in window. You may need to configure the Desktop client proxy
settings. Your KCPS admin will provide you with the settings to enter:
After the Desktop client is installed, you can change the proxy
settings from the notifications area. See the Change the Windows
Desktop client proxy settings topic for more information.
a) In the error message, select proxy settings.
The Kyocera Cloud Print and Scan proxy settings window displays.
b) Select Use HTTP proxy.
c) Enter the information that your admin provided and select OK.
d) Enter your KCPS user name and password in the Desktop client and
select OK.
Note the following:
• Your account is locked after three failed attempts to log in within
15 minutes
• Your account is automatically unlocked after 30 minutes to allow
you to retry logging in.
• If you have forgotten your login information, select the Forgot
password link on the Customer portal home page and follow the
instructions.
When you are logged into the Desktop client, you can see the status of files you
send to KCPS. You can also refresh the window, delete any listed jobs, close the
window, or log out of the Desktop client from this window.
If you print to KCPS from one of your applications, such as Microsoft Word,
and you are not logged in, a window displays and prompts you for your log in
information.
Change the Windows Desktop client proxy settings
You can change the Kyocera Cloud Print and Scan Desktop client proxy settings
from the Windows notification area.
Kyocera Cloud Print and Scan 6-3

Applications
1
In the notifications area, right-click the Kyocera Cloud Print and Scan icon
(2) and select Proxy settings (3). You may have to select the "Show hidden
icons" caret ( ^ ) (1) to display the icon.
The Kyocera Cloud Print and Scan proxy settings window displays.
2
Select Use HTTP proxy.
3
Enter the information that your admin provided and select OK.
4
Enter your KCPS user name and password and select OK.
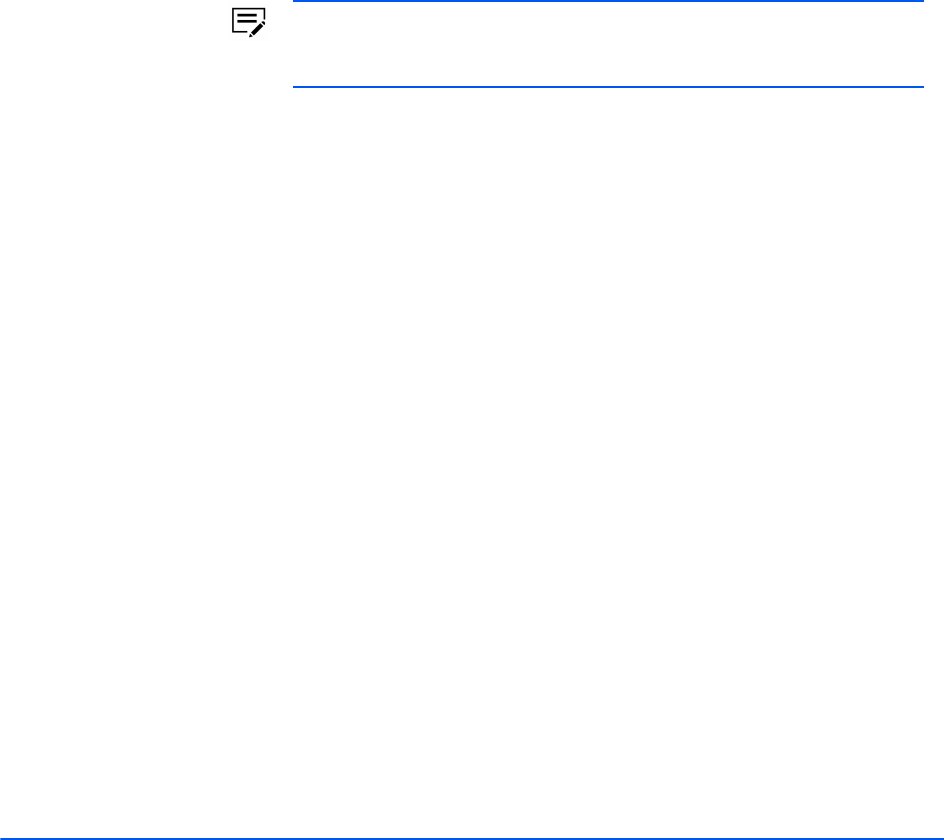
Change the Windows Desktop client log in behavior
After installation, if you are not logged in, the Desktop client log in window opens
periodically to remind you to log in. This is the default Desktop client behavior.
You can change this behavior by clearing the "Automatically show Desktop client
when not signed in" check box on the "Advanced settings" window.
1
In the notifications area, right-click the Kyocera Cloud Print and Scan icon
(2) and select Advanced settings (3). You may have to select the "Show
hidden icons" caret ( ^ ) (1) to display the icon.
The "Advanced settings" window displays.
6-4 User Guide
Applications
2
Clear the "Automatically show Desktop client when not signed in" check
box, as shown below.
3
Select OK.
The Desktop client only displays the log in window now in the following
circumstances:
• You print a document to Kyocera Cloud Print and Scan and are not already
logged in.
• You select the Kyocera Cloud Print and Scan icon in the notifications area and
are not already logged in.
Set up the Windows Desktop client for Direct print
The "Direct print" feature lets you print to Kyocera non-HyPAS devices directly
from your computer.
The "Direct print" feature is only available for Windows.
These are the requirements to use this feature:
• "Bonjour Print Services for Windows" installed on your computer
• The Desktop Client, version 1.7 or later, installed and set up on your computer
• The device information for the device you want to use the "Direct print"
feature with
Your KCPS admin can tell you which devices are set up for the
"Direct print" feature.
Kyocera Cloud Print and Scan 6-5

Applications
1
In the notifications area, right-click the Kyocera Cloud Print and Scan icon
(2) and select Direct print (3). You may have to select the "Show hidden
icons" caret ( ^ ) (1) to display the icon.
The Kyocera Cloud Print and Scan "Direct print" window displays.
2
Select the "Direct print" check box (4). The "Direct print" feature begins
pulling the devices list from the devices available in the KCPS Customer
Portal.
If you see an error message, check your Desktop Client settings
and login status and try this step again. You cannot activate
"Direct print" if you are not logged in to the Desktop Client.
3
After the pulling the devices list process finishes, select the "Direct print"
device from the list where you want the jobs printed and select OK (5).
You can only select one printer from the list.
6-6 User Guide

Applications
Your selected device is registered as your "Direct print" device with the Desktop
Client. All jobs you print using "Kyocera Cloud Print and Scan" as the device are
sent directly to the selected device.
To return to using HyPAS devices, repeat steps 1 and 2 except clear the "Direct
print" check box and select OK.
Install and set up the Macintosh Desktop client
1
Open your browser and log in to your Kyocera Cloud Print and Scan (KCPS)
account.
2
Select the Applications tab.
3
Select for macOS.
4
Download and then open the application installer once the download
finishes.
5
Follow the installer instructions.
When the installation completes, a window displays to enter your
organization name.
6
Your organization name is displayed above any tabbed window in KCPS
and also appears in the Activation Confirmation email you received from
KCPS. Enter your organization name and then select OK.
7
Enter your KCPS user name and password and select OK
a) If your organization uses "Sign in with Microsoft" for authentication,
a Microsoft "Sign in" window displays. Enter your Microsoft user
credentials and follow the onscreen prompts. If a "Permissions
requested" window displays, select Accept.
b) If your organization uses "Sign in with Microsoft" for authentication
and you have never logged in to KCPS and have not accepted the
"End User License Agreement" (EULA) before, a message displays.
Follow the onscreen prompts to open the web portal and accept
the EULA. You must agree to the EULA before using KCPS and the
Desktop client.
8
Return to the Desktop client and log in. If your organization uses "Sign in
with Microsoft," select your account and log in.
The "Kyocera Cloud Print and Scan - Print status" window displays.
9
If you cannot connect to KCPS, an error message displays at the top of
the log in window. You may need to configure the Desktop client proxy
settings. Your KCPS admin will provide you with the settings to enter:
After the Desktop client is installed, you can change the
proxy settings from the notifications area. See the Change
Kyocera Cloud Print and Scan 6-7

Applications
the Macintosh Desktop client proxy settings topic for more
information.
a) In the error message, select proxy settings.
The KCPS proxy settings window displays.
b) Select Use HTTP proxy.
c) Enter the information that your admin provided and select OK.
d) Enter your KCPS user name and password in the Desktop client and
select OK.
Note the following:
• Your account is locked after three failed attempts to log in within
15 minutes
• Your account is automatically unlocked after 30 minutes to allow
you to retry logging in.
• If you have forgotten your login information, select the Forgot
password link on the Customer portal home page and follow the
instructions.
When you are logged into the Desktop client, you can see the status of files you
send to KCPS. You can also refresh the window, delete any listed jobs, close the
window, or log out of the Desktop client from this window.
If you print to KCPS from one of your applications, such as Microsoft Word,
and you are not logged in, a window displays and prompts you for your log in
information.
Change the Macintosh Desktop client proxy settings
You can change the Kyocera Cloud Print and Scan Desktop client proxy settings
from the Macintosh top menu bar.
1
On the top menu bar, select the Kyocera Cloud Print and Scan icon (1) and
select Kyocera Cloud Print and Scan proxy settings (2).
The Kyocera Cloud Print and Scan proxy settings window displays.
2
Select Use HTTP proxy.
3
Enter the information that your admin provided and select OK.
4
Enter your KCPS user name and password in the Desktop client and select
OK.
6-8 User Guide

Applications
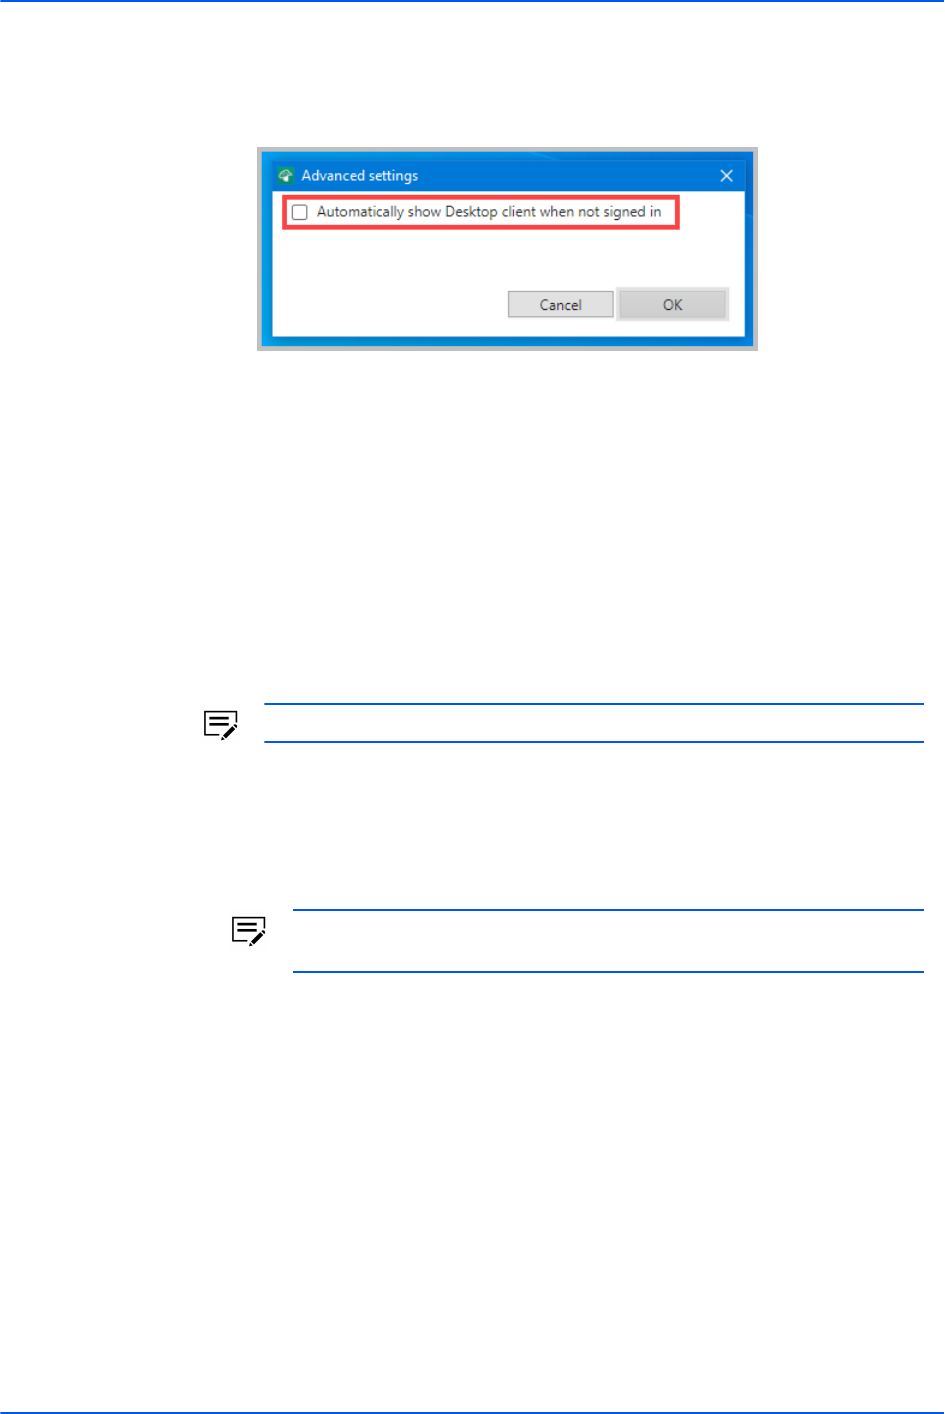
Change the Macintosh Desktop client log in behavior
After installation if you are not logged in, the Desktop client log in window opens
periodically to remind you to log in. This is the default Desktop client behavior.
You can change this behavior by clearing the "Automatically show Desktop client
when not signed in" check box on the "Advanced settings" window.
1
On the top menu bar, select the Kyocera Cloud Print and Scan icon (1) and
select Advanced settings (2).
The "Advanced settings" window displays.
2
Clear the "Automatically show Desktop client when not signed in" check
box, as shown below.
3
Select OK.
The Desktop client only displays the log in window now in the following
circumstances:
• You print a document to Kyocera Cloud Print and Scan and are not already
logged in.
• You select the Kyocera Cloud Print and Scan icon in the notifications area and
are not already logged in.
Install the Desktop client for Windows: Silent mode
Use the Windows Desktop client installation package (exe) for silent installation
of the Desktop client application.
Messages are not displayed for silent installations.
For the silent mode install, the command format is:
cloudprintscan_*.exe -s -on "organization name"
Kyocera Cloud Print and Scan 6-9

Applications
where cloudprintscan_*.exe is the full file name of the installation file you
are using.
If proxy settings are required, the -on option is not supported. See
the Silent mode install options topic for more information.
Example of a silent installation:
1
Open a Command Prompt window.
2
Enter the command with any options that need to be set, substituting the
you organization name. This is an example command:
cloudprintscan_1.3.029.exe -s -on "Your organization's
name"
Messages are not displayed for silent installations.
3
Once the installation is finished, close the Command Prompt window.
The Desktop client for Windows automatically starts after the installation
finishes:
• A desktop shortcut for Kyocera Cloud Print and Scan is added.
• An icon for Kyocera Cloud Print and Scan displays in the notification area.
• A Kyocera Cloud Print and Scan login window displays. If "Sign in with
Microsoft" is being used for authentication, a Microsoft Sign in window
displays.
The authentication window can be closed without logging in. You are asked to
authenticate at the next restart of the computer, if you try to print to KCPS, or
if you select the Kyocera Cloud Print and Scan icon in the notification area.
Silent mode install options
Option Description
-s Install the software using silent mode. If proxy settings
are required, the -on option is not supported. See the -on
option for more information.
6-10 User Guide

Applications
Option Description
-on "organization
name"
The option -on requires the organization name in
parentheses. Enter your organization's name registered
in KCPS. Your organization's name can be found at the
top of the KCPS window (1) after logging in.
If proxy settings are required, perform the following
steps to silently install the software and modify the proxy
settings after installation:
1. Run the silent installation.
After the installation, a Kyocera Cloud Print and
Scan window displays where you enter your
Organization name.
2. Before entering the organization name, change the
proxy settings using the instructions in the Change
the Windows Desktop client proxy settings topic.
3. After changing the proxy settings, return to the
Kyocera Cloud Print and Scan window and enter the
Organization name.
4. Select OK. The log in page displays after entering
the Organization name.
Go to the Kyocera Cloud Print and Scan portal home page
You can use the Desktop client to open the KCPS portal home page (log in page)
using your default browser.
Kyocera Cloud Print and Scan 6-11

Applications
If your default browser already has KCPS open, a new tab displays the
log in page.
Go to the portal home page: Windows Desktop client
1
In the notifications area, right click the Kyocera Cloud Print and Scan icon
(2) and select Go to home page (3). You may have to select the "Show
hidden icons" caret ( ^ ) (1) to display the icon.
The KCPS portal Log in page displays.
2
Log in to KCPS.
Go to the portal home page: Macintosh Desktop client
1
On the top menu bar, select the Kyocera Cloud Print and Scan icon (1) and
select Go to home page (2).
The KCPS portal Log in page displays.
2
Log in to KCPS.
Check Desktop client settings
You can check the Desktop client settings to confirm the current Domain and
Organization name.
6-12 User Guide

Applications
Check the Windows Desktop client settings
You can check the Kyocera Cloud Print and Scan Desktop client settings from the
Windows notification area.
1
In the notifications area, right click the Kyocera Cloud Print and Scan icon
(2) and select Organization settings (3). You may have to select the "Show
hidden icons" caret ( ^ ) (1) to display the icon.
The "Organization settings" menu item is not available if you
have not already set the Organization. See Install and set up the
Windows Desktop client for more information.
The "Organization settings" window displays.
2
The current "Domain" (1) and "Organization name" (2) display in the
window.
3
Select Cancel to close the window.
Check Macintosh Desktop client settings
You can check the Kyocera Cloud Print and Scan Desktop client Domain and
"Organization name" settings from the Macintosh top menu bar.
Kyocera Cloud Print and Scan 6-13

Applications
1
On the top menu bar, select the Kyocera Cloud Print and Scan icon (1) and
select Organization settings (2).
The "Organization settings" menu item is not available if you
have not already set the Organization. See Install and set up the
Macintosh Desktop client for more information.
The "Organization settings" window displays.
2
The current "Domain" (1) and "Organization name" (2) display in the
window.
3
Select Cancel to close the window.
Change the Desktop client Organization name
The Desktop client "Organization name" is set when the Desktop client is initially
installed. If you entered the name incorrectly at installation time or are traveling
to an affiliated company in another country using KCPS, use the “Organization
settings” feature to make updates.
Change the Windows Desktop client organization name
The Desktop client "Organization name" is set when the Desktop client is initially
installed. You can change the "Organization name" used by the Desktop client.
All your local data, such as log in information and local spooled jobs,
are removed after changing your organization.
6-14 User Guide

Applications
1
In the notifications area, right-click the Kyocera Cloud Print and Scan icon
(2) and select Organization settings (3). You may have to select the "Show
hidden icons" caret ( ^ ) (1) to display the icon.
The "Organization settings" menu item is not available if you
have not already set the Organization. See Install and set up the
Windows Desktop client for more information.
The "Organization settings" window displays and the current "Domain" (1)
and "Organization name" (2) display in the window.
2
In the "New Organization name" text box, enter the new organization
name and select OK.
A confirmation message displays.
3
Select Yes to confirm the organization change.
The Desktop client is updated and you can now use the Desktop client with KCPS.
• If the new organization requires proxy settings, an error message displays.
See the Change the Windows Desktop client proxy settings topic for more
information.
• If you entered an invalid organization name, check the organization spelling.
Entering a Provider organization name also displays this error message.
Change the Macintosh Desktop client organization name
The Desktop client "Organization name" is set when the Desktop client is initially
installed. You can change the "Organization name" used by the Desktop client.
Kyocera Cloud Print and Scan 6-15

Applications
1
On the top menu bar, select the Kyocera Cloud Print and Scan icon (1) and
select Organization settings (2).
The "Organization settings" menu item is not available if you
have not already set the Organization. See Install and set up the
Macintosh Desktop client for more information.
The "Organization settings" window displays.
2
The current "Domain" (1) and "Organization name" (2) display in the
window.
3
In the "New Organization name" text box, enter the new organization
name and select OK.
A confirmation message displays.
4
Select Yes to confirm the organization change.
The Desktop client is updated and you can now use the Desktop client with KCPS.
• If the new organization requires proxy settings, an error message displays.
See the Change the Macintosh Desktop client proxy settings topic for more
information.
• If you entered an invalid organization name, check the organization spelling.
Entering a Provider organization name also displays this error message.
Update the Desktop client
You can only update the Desktop client if you have been given the
right to install software yourself. If you cannot install software, you
will not see any update notifications to update the Desktop client.
Your IT team will update the Desktop client for you when an update is
available.
6-16 User Guide

Applications
If there is an update to the Desktop client, a notice displays when your computer
restarts or when you try to print to KCPS.
Follow the instructions in the Update the Windows Desktop client or Update the
Macintosh Desktop client topics to update the Desktop client.
Update the Windows Desktop client
If you see the "Update available" message when your computer restarts or when
you try to print to KCPS, a new version of the Desktop client is available.
If you do not want to update the Desktop client, select Remind me later. The
next time your computer restarts or when you try to print to KCPS, you will see
the message again.
If you have been given the right to install software, you can update the Desktop
client. Information, such as organization name and proxy settings, are retained
during the update.
1
On the "Updates available" window, select Download.
A browser window opens to the standard KCPS log in page or, if your
organization uses Microsoft for authentication, to the "Sign in with
Microsoft" page.
2
Log in to your account.
3
Select the Applications tab.
4
Select for Windows.
5
Download and then open the application installer once the download
finishes.
6
Select Install on the Kyocera Cloud Print and Scan setup window and
follow the onscreen prompts.
If you sent jobs for printing to KCPS using the previous version
of the Desktop client, you will see a message about those jobs
being deleted. You can cancel the Desktop client installation,
print the jobs, and restart the update or continue with the
update. Continuing with the update deletes your existing jobs,
which cannot be recovered.
Kyocera Cloud Print and Scan 6-17

Applications
7
Select Close when the installation finishes.
8
Enter your KCPS user name and password and select OK
If your organization uses "Sign in with Microsoft" for authentication, a
Microsoft "Sign in" window displays. Enter your Microsoft user credentials
and follow the onscreen prompts. If a "Permissions requested window
displays, select Accept.
The KCPS Print status window displays with your organization name and
user name listed at the top.
Update the Macintosh Desktop client
If you see the "Update available" message when your computer restarts or when
you try to print to KCPS, a new version of the Desktop client is available.
If you do not want to update the Desktop client, select Remind me later. The
next time your computer restarts or when you try to print to KCPS, you will see
the message again.
If you have been given the right to install software, you can update the Desktop
client. Information, such as organization name and proxy settings, are retained
during the update.
1
On the "Updates available" window, select Download.
A browser window opens to the standard KCPS log in page or, if your
organization uses Microsoft for authentication, to the "Sign in with
Microsoft" page.
2
Log in to your account.
3
Select the Applications tab.
4
Select for macOS.
5
Download and then open the application installer once the download
finishes.
6
Select Continue on the "InstallKyocera Cloud Print and Scan" window and
follow the onscreen prompts.
If you sent jobs for printing to KCPS using the previous version
of the Desktop client, you will see a message about those jobs
6-18 User Guide

Applications
being deleted. You can cancel the Desktop client installation,
print the jobs, and restart the update or continue with the
update. Continuing with the update deletes your existing jobs,
which cannot be recovered.
7
Select Close when the installation finishes.
8
Enter your KCPS user name and password and select OK
If your organization uses "Sign in with Microsoft" for authentication, a
Microsoft "Sign in" window displays. Enter your Microsoft user credentials
and follow the onscreen prompts. If a "Permissions requested window
displays, select Accept.
The KCPS Print status window displays with your organization name and
user name listed at the top.
Uninstall the Desktop client
If the Kyocera Cloud Print and Scan Desktop client is no longer needed, you can
remove it from your computer.
Uninstall the Windows Desktop client
1
Select Start > KYOCERA.
2
Right-click the Kyocera Cloud Print and Scan program name and select
Uninstall.
The "Uninstall or change a program" window displays.
3
Locate the Kyocera Cloud Print and Scan program in the list.
4
Right-click the program name and select Uninstall/Change.
5
Follow the prompts to uninstall the Desktop client.
Any print jobs you currently have may be deleted during the
uninstall.
6
Select Uninstall.
7
Close any open windows to finish the uninstall. You can delay a restart of
your computer or let the uninstaller restart your computer.
Uninstall the Windows Desktop client: Silent mode
Use the Windows Desktop client installation package (exe) for a silent uninstall of
the Desktop client application.
For the silent mode install, the command format is:
cloudprintscan_*.exe -s -uninstall
Kyocera Cloud Print and Scan 6-19

Applications
where cloudprintscan_*.exe is the full file name of the installation file you
are using.
Example of a silent uninstall:
1
Open a Command Prompt window.
2
Change to the folder where the .exe file is located and enter the command.
This is an example command:
cloudprintscan_1.3.029.exe -s -uninstall
3
Once the uninstall is finished, close the Command Prompt window.
The Desktop client for Windows is removed once the uninstall finishes
Uninstall the Macintosh Desktop client
1
On your Macintosh, select the Finder icon in the Dock to open the Finder.
2
On the top menu bar, select Go > Go to folder.
3
In the "Go to the folder" text box, enter the following path:
/Library/Application Support/Kyocera Cloud Print and Scan
4
Select OK.
The Kyocera Cloud Print and Scan window displays.
5
Double-click the Kyocera Cloud Print and Scan - uninstaller icon.
6
Follow the on-screen instructions to uninstall the application.
7
Close any open windows once the uninstall finishes.
Set up the Windows KX Driver
If you would prefer to use the KX Driver to print to Kyocera Cloud Print and Scan
(KCPS), there are some settings changes that you need to make to the KX Driver.
• This procedure assumes you are setting up a locally-installed KX
Driver. This procedure is not intended for use with shared drivers
on a client server.
• A port named KcoPort is created when installing the Desktop
client. It is used to "print" from an application to KCPS.
• Check with your KCPS administrator if you need assistance with
printing or making these settings changes.
1
If not already installed, install the Desktop client.
6-20 User Guide

Applications
2
On your Windows computer, select Start > Settings (gear icon) >
Devices > Printers & scanners.
3
Select the KX Driver printer that you want to use and then select Manage.
4
From the "Manage your device" list, select Printer properties.
The Properties window for the printer driver displays.
5
Select the Ports tab.
6
From the list of ports displayed, select KcoPort.
7
Select Apply.
8
Select the Device Settings tab.
9
Select the PDL button.
The "Page Description Languages" window displays.
10
Select PCL XL and then select OK.
11
Select OK to close the Properties window.
When you print to the printer whose driver settings you have modified, your
print jobs are sent to KCPS. If you have not logged in to the Desktop client
already, the Desktop client window displays for you to enter your log in
information.
When specifying the paper source and output destination or selecting
a finishing option, for example, staple or punch, use the KX Driver for
the printer model you are using and has had the settings changed.
Specifying these settings when using the KX Driver designed for a
different printer model may result in unexpected print results.
If you want to print a job duplex (2-sided), make sure to select that
feature from the KX Driver before sending your job.
Install the Cloud Print and Scan Chrome Extension
Chromebook users can print from their Chromebook to KCPS after they install
the Cloud Print and Scan Chrome Extension, available from the Chrome Web
Store. Files sent from the Chromebook are automatically converted to PDF and
sent to KCPS.
The Cloud Print and Scan Chrome Extension is only guaranteed to
work on a Chromebook using the latest version of Chrome.
1
Log in to the Chrome Web Store and search for Cloud Print and Scan
Chrome Extension.
2
Select Add to Chrome.
Kyocera Cloud Print and Scan 6-21

Applications
3
Review the types of data that the extension can access.
4
Select Add extension.
5
After a successful installation, select the Extensions icon (1) to display the
list of available extensions.
6
Select the pin icon (2) next to "Cloud Print and Scan Chrome Extension" to
always display the extension in the Extensions area (3).
7
Log in to the KCPS portal using the Chrome browser. After successfully
logging in, the "Print to Cloud Print and Scan" extension displays a
message. The message includes the username of the logged-in user (4)
that the extension is ready to send print jobs (5).
The Cloud Print and Scan Chrome Extension login stays active until you log out of
or power down the Chromebook.
See the Print using the Cloud Print and Scan Chrome Extension topic in the
Applications chapter for more information.
6-22 User Guide

7
Print and scan at the
device
Print and scan at the device
Kyocera Cloud Print and Scan (KCPS) lets you print at the device from KCPS
storage or any of your linked storage accounts. You can also scan at the device to
KCPS storage or any of your linked storage accounts
Your KCPS administrator controls access to the printing and scanning
features for each storage account. If you cannot print from or scan
to any of your storage accounts when at the device, check with your
KCPS administrator if any restrictions are active for storage accounts.
To reduce the risk of miscounting billing counts, KCPS blocks the
next job from running while the current job is running. As a result,
the next job cannot start until the preceding job finishes. Additionally,
you cannot operate the KCPS panel while printing received FAX
documents or direct printing from the KX Driver is in progress, which
is expected behavior per design specifications.
Log in and log out
To use Kyocera Cloud Print and Scan (KCPS) to print or scan, you must log in at
the device. When you have finished using KCPS, log out to prevent unauthorized
or accidental use of your account.
KCPS automatically logs you out of the device after a period of
inactivity. It is always good practice to manually log yourself out.
Log in
You use any of these methods to log in:
• Swipe your ID card. You must have registered your ID card to use it to log in.
See the Register an ID card topic.
• Enter your PIN, if available. If you don't know your current PIN, see the PIN
authentication topic for more information.
• Enter your user name and password. This method is not available if "Sign in
with Microsoft" is used for authentication.
Note the following:
• Your account is locked after three failed attempts to log in within
15 minutes
• Your account is automatically unlocked after 30 minutes to allow
you to retry logging in.
• If you have forgotten your log in information, select the Forgot
password link on the Customer portal home page and follow
the instructions. Forgot password is not available if "Sign in with
Kyocera Cloud Print and Scan 7-1

Print and scan at the device
Microsoft" is used for authentication. Check with your IT team for
password reset information.
Log out
You can use any of these methods to log out:
• Swipe your ID card. You must have registered your ID card to use it to log out.
See the Register an ID card topic
• Select the Authentication/Log out button on the device
• Select Log out on the KCPS interface.
All jobs that are still running when you log out are canceled.
Printing
Kyocera Cloud Print and Scan (KCPS) allows you to print documents using any of
these methods:
• From documents sent from your computer applications via the Desktop client
or the KX Driver.
Printing using the KX Driver, other print drivers, or printing
directly to a printer may be restricted. Check with your Customer
Admin if you have questions.
• From documents saved on the "Scanned documents" tab.
• From print-ready documents already stored on third-party cloud storage
services.
• From documents sent from your Chromebook via the Print menu. The Cloud
Print and Scan Chrome Extension, available from the Chrome Web Store, must
be installed to print to KCPS.
General printing information when using KCPS storage
• Documents that you want to print must be uploaded to Kyocera Cloud Print
and Scan (KCPS) to be available for printing on a device.
• KCPS allows each user to store up to 200 print jobs.
• Print jobs that are printed are deleted once printing is finished.
• Print jobs that are not printed are automatically deleted after the number
of days set by your administrator.
The number of days when auto-deletion occurs on unprinted
print jobs is between 1 and 28. Check with your KCPS
administrator for the exact number of days set for your
organization.
• If "Enable contact-free printing" is set to On, your documents print in order
from the newest document you added to the oldest.
• Windows and Macintosh: You must be logged in to the Desktop client to
print from any of your computer applications. If you are not logged in, the
Desktop client opens for you to provide your login credentials.
7-2 User Guide

Print and scan at the device
• Chromebook: You must be logged in to the Cloud Print and Scan Chrome
Extension. If you are not logged in, the extension ask you log in to the KCPS
portal to provide your login credentials.
• You can delete jobs using the Desktop client or in KCPS on the Jobs tab.
• Select the Refresh button to update job information
• When logged in to KCPS at a device, you can configure and apply the available
settings to your print job.
• Depending on the device, selected files, and your current quota, some
settings may not be available.
If you have activated the "Contact-free printing" feature, the
first 20 of your submitted documents print immediately after
authenticating at the device. Your documents print in order
from the newest document you added to the oldest. See the
Contact-free printing topic for more information.
• The maximum size of any print job that can be successfully processed is 500
MB.
Print limits
If your admin has applied monthly print limits for you or your team, these limits
display when you select the User icon at the top of the Kyocera Cloud Print and
Scan (KCPS) device window and on the KCPS web interface (1) on the Jobs tab.
You may see no limits, one limit, or both limits, depending on what your admin
has set. If a limit is reached, you cannot make any additional prints. Contact your
admin if you have reached your print limit.
Print policy
If your admin has applied print policies for you or your team, only items you have
permission to use display on the device panel when you try to print.
Print policies can also be viewed on the Kyocera Cloud Print and Scan (KCPS) web
interface (1) on the Jobs tab when you select View.
Kyocera Cloud Print and Scan 7-3

Print and scan at the device
You may see no policies set to On, one policy, or both policies set to On,
depending on what your admin has set. You cannot override any policies set to
On.
About the Desktop client Auto-logout feature
The Desktop client may have the Auto-logout feature activated to log you out
after a period of inactivity. Your KCPS admin activates the Auto-logout time for
your entire organization, and it cannot be overridden. Ask your KCPS admin if the
feature is active and for the Auto-logout time limit.
Actions you make that reset the Auto-logout limit are:
• hovering over the job list
• interacting with the job list
• printing from an application, specifically when the Desktop client receives
print data from the printer driver
If the Auto-logout feature is active, regardless of the time limit setting, when
you lock your computer or if your computer goes to sleep, your Desktop client
session is automatically logged out.
Print using the Desktop client
You can print to Kyocera Cloud Print and Scan (KCPS) from any application
on your computer by selecting KCPS as the printer. Once your print jobs are
uploaded, you can go to the device where you want to print your documents to
release the jobs. Check with your KCPS administrator if you need assistance with
printing.
The KCPS Desktop client allows you to print any file format supported by the
applications on your computer from which you are printing. File formats include,
but are not limited to, Office documents, .pdf, .jpg, and .tiff, for example.
If your administrator allows printing without using KCPS as the
printer, you can use the KX Driver for devices that have been
registered with KCPS. See the Print using the Windows KX Driver topic
for information about printing with the KX Driver.
1
From your application, select Print.
The maximum size of any print job that can be successfully
processed is 500 MB.
7-4 User Guide

Print and scan at the device
2
Select the KCPS printer and then print the document.
A log in window displays if you are not logged in to the Desktop
client. Enter your KCPS user name and password and select Log
in.
Documents you print display on both the Jobs tab in KCPS and the Desktop
client Print status window.
• If you do not want to print a job, select the job and then select Delete in
either the Jobs tab or the Desktop client.
• If your job does not appear in the window after a period of time, select
Refresh.
3
If you are using the "Direct print" feature on the Desktop Client:
a) Your job is printed directly to the device you set up in the Desktop
Client. You do not need to log in to the printer to release your job.
The job is automatically printed.
b) The Desktop Client automatically reports to KCPS about your print
job.
c) Skip the rest of this procedure and collect your print job.
4
If you are not using the "Direct print" feature, go to the device where you
want to print your documents and log in to KCPS.
The default screen for the device displays.
5
Select the KCPS icon.
The service menu displays. Other selections are the third-party cloud
storage services you have linked to your account.
If you have set a default third-party cloud storage account that is not
Kyocera Cloud Print and Scan, select the back icon at the top of the window
to return to the list of your linked storage accounts.
See the Default linked storage account topic in the Getting started chapter for
more information about this feature.
6
Select Kyocera Cloud Print and Scan.
A list of print-ready documents display. If your admin has set print policies,
a window displays to show any printing restrictions in effect. Select OK to
dismiss the window.
Kyocera Cloud Print and Scan 7-5

Print and scan at the device
7
Select one or more documents from the list displayed.
• You can touch the "Select all" icon to select all the print jobs currently
displayed on the page. The "Select all" icon only selects print jobs on the
current page.
• You can move to the next page to select additional print jobs if all your
jobs are not displayed.
• You can select any already-selected print job to clear the check mark.
• The printer icon displays the number of print jobs currently selected.
If you set the "Skip HyPAS App print settings" feature to
Enable, skip to step 9. To change print options with this
feature enabled, touch the "Print preference" icon on the
bottom row and skip to step 8.
See the Skip HyPAS App print settings topic in the Getting
started chapter for more information about this feature.
8
Select the printer icon when you are finished selecting documents.
The print options screen displays.
9
Set any print options you want to apply to all your documents.
Depending on the device, selected files, and your current quota, some
items may not be available.
If print policies are in effect, some choices are unavailable.
10
Select Print
All the print jobs you selected are printed using the print options you set. After
a job has completed printing, the job is removed from the "My jobs" window.
Change windows to print another job or select Log out.
Print using the KX Driver (Windows-only)
You can print to Kyocera Cloud Print and Scan (KCPS) from any application on
your computer by selecting a KX Driver printer driver that has had the settings
modified for KCPS. Once your print jobs are uploaded, you can go to the device
where you want to print your documents to release the jobs.
See the Set up the Windows KX Driver topic for information about the settings
required for the KX Driver when printing to KCPS.
7-6 User Guide

Print and scan at the device
The maximum size of any print job that can be successfully processed
is 500 MB.
Check with your KCPS administrator if you need assistance with
printing or setting up the KX Driver.
The KX Driver allows you to print any file format supported by the applications
on your computer from which you are printing. File formats include, but are not
limited to, Office documents, .pdf, .jpg, and .tiff, for example.
1
From your application, select Print.
When specifying the paper source and output destination or selecting a
finishing option, for example, staple or punch, use the KX Driver for the
printer model you are using. Specifying these settings when using the KX
Driver designed for a different printer model may result in unexpected
print results.
2
Select the KX Driver you want to use and then print the document.
A log in window displays if you are not logged in to the Desktop
client. Enter your KCPS user name and password and select Log
in.
Documents you print display on both the Jobs tab in KCPS and the Desktop
client Print status window.
• If you do not want to print a job, select the job and then select Delete in
either the Jobs tab or the Desktop client.
• If your job does not appear in the window after a period of time, select
Refresh.
• The preview function in the KCPS portal does not support KX Driver jobs.
3
Go to the device where you want to print your documents and log in to
KCPS.
The default screen for the device displays.
4
Select the KCPS icon.
The service menu displays. Other selections are the third-party cloud
storage services you have permission to access.
If you have set a default third-party cloud storage account that is not
Kyocera Cloud Print and Scan, select the back icon at the top of the window
to return to the list of your linked storage accounts.
See the Default linked storage account topic in the Getting started chapter for
more information.
Kyocera Cloud Print and Scan 7-7

Print and scan at the device
5
Select Kyocera Cloud Print and Scan.
A list of print-ready documents display. If your admin has set print policies,
a window displays to show any printing restrictions in effect. Select OK to
dismiss the window.
6
Select one or more documents from the list displayed.
• You can touch the "Select all" icon to select all the print jobs currently
displayed on the page. The "Select all" icon only selects print jobs on the
current page.
• You can move to the next page to select additional print jobs if all your
jobs are not displayed.
• You can select any already-selected print job to clear the check mark.
• The printer icon displays the number of print jobs currently selected.
If you set the "Skip HyPAS App print settings" feature to
Enable, skip to step 9. To change print options with this
feature enabled, touch the "Print preference" icon on the
bottom row and skip to step 8.
See the Skip HyPAS App print settings topic in the Getting
started chapter for more information about this feature.
7
Select the printer icon when you are finished selecting documents.
The print options screen displays.
8
Set any print options you want to apply to all your documents.
Depending on the device, selected files, and your current quota, some
items may not be available.
If print policies are in effect, some choices are unavailable.
9
Select Print
All the print jobs you selected are printed using the print options you set. After
a job has completed printing, the job is removed from the "My jobs" window.
Change windows to print another job or select Log out.
Print from cloud storage
You can print from any third-party cloud storage service you have associated
with your Kyocera Cloud Print and Scan (KCPS) account. If you have not linked
storage accounts yet, see: Link to third-party cloud storage.
7-8 User Guide

Print and scan at the device
The maximum size of any print job that can be successfully processed
is 500 MB.
You cannot manage documents stored in a third-party cloud service
using KCPS.
1
Go to the device where you want to print your documents and log in to
KCPS.
The default screen for the device displays.
2
Select the KCPS icon.
The service menu displays. Other selections are the third-party cloud
storage services you have permission to access.
If you have set a default third-party cloud storage account, select the back
icon at the top of the window to return to the list of your linked storage
accounts.
See the Default linked storage account topic in the Getting started chapter for
more information.
3
Select one of your third-party cloud storage services.
If a "Re-link expired linked account" message displays, you have not used
the selected third-party cloud storage within the last 90 days and the link
has expired. See the Link a storage account topic in the Getting started
chapter for more information.
A list of folders and print-ready documents display. Folders and documents
that are dimmed are unavailable and cannot be selected for printing.
• All third-party cloud storage services, with the exception of the "Recent"
folder, display folders first with a 0-9, A-z sort order and then a 0-9, A-z
sort order for files.
• For SharePoint Online, selecting the "Following" folder on the KCPS
HyPAS screen displays your followed SharePoint Online sites.
• For OneDrive, "My Files" displays folders first with a 0-9, A-z sort order
and then a 0-9, A-z sort order for files..
"Recent" displays files based on when they were last modified. The files
are sorted from newest to oldest based on their last modified date and
time.
"Shared" displays shared files based on when they were last modified.
The files are sorted from newest to oldest based on their last modified
date and time.
If your admin has set print policies, a window displays to show any printing
restrictions in effect. Select OK to dismiss the window.
Kyocera Cloud Print and Scan 7-9

Print and scan at the device
4
If your documents are in a sub-folder, select that folder to view your
document list.
5
Select one or more documents from the list displayed.
You can only print .pdf, .jpg, and .tiff format files from third-
party cloud services using KCPS.
• You can touch the "Select all" icon to select all the documents currently
displayed on the page. The "Select all" icon only selects documents on
the current page.
• You can move to the next page to select additional documents if all your
all the documents you want to print are not displayed.
• You can select any already-selected document to clear the check mark.
• The printer icon displays the number of documents currently selected.
If you set the "Skip HyPAS App print settings" feature to
Enable, skip to step 8. To change print options with this
feature enabled, touch the "Print preference" icon on the
bottom row and skip to step 7.
See the Skip HyPAS App print settings topic in the Getting
started chapter for more information about this feature.
6
Select the printer icon when you are finished selecting documents.
The print options screen displays.
7
Set any print options you want to apply to all your documents.
Depending on the device, selected files, and your current quota, some
items may not be available.
If print policies are in effect, some choices are unavailable.
8
Select Print
All the documents you selected are printed using the print options you set.
Documents remain unchanged in your cloud service. Change windows to print
another document or select Log out.
Print from Scanned documents
You can print documents that are saved to the Scanned documents tab in KCPS.
7-10 User Guide

Print and scan at the device
Even if Contact-free printing is set to On, you must select documents
to print. Documents in the Scanned documents tab do not use the
Contact-free printing feature.
1
Go to the device where you want to print your documents and log in to
KCPS.
The default screen for the device displays.
2
Select the KCPS icon.
The service menu displays. Other selections are the third-party cloud
storage services you have permission to access.
If you have set a default third-party cloud storage account that is not
Kyocera Cloud Print and Scan, select the back icon at the top of the window
to return to the list of your linked storage accounts.
See the Default linked storage account topic in the Getting started chapter for
more information.
3
Select Kyocera Cloud Print and Scan.
4
Select the Scanned documents folder.
A list of scanned documents display. If your admin has set print policies,
a window displays to show any printing restrictions in effect. Select OK to
dismiss the window.
5
Select one or more documents from the displayed list.
• You can touch the "Select all" icon to select all the documents currently
displayed on the page. The "Select all" icon only selects documents on
the current page.
• You can move to the next page to select additional documents if all your
all the documents you want to print are not displayed.
• You can select any already-selected document to clear the check mark.
• The printer icon displays the number of documents currently selected.
• You cannot delete documents from the displayed list.
If you set the "Skip HyPAS App print settings" feature to
Enable, skip to step 8. To change print options with this
feature enabled, touch the "Print preference" icon on the
bottom row and skip to step 7.
Kyocera Cloud Print and Scan 7-11

Print and scan at the device
See the Skip HyPAS App print settings topic in the Getting
started chapter for more information about this feature.
6
Select the printer icon when you are finished selecting documents.
The print options screen displays.
7
Set any print options you want to apply to all your documents.
Depending on the device, selected files, and your current quota, some
items may not be available.
If print policies are in effect, some choices are unavailable.
8
Select Print
Print using the Cloud Print and Scan Chrome Extension
You can print to Kyocera Cloud Print and Scan (KCPS) from any application on
your Chromebook by selecting the "Print to Cloud Print and Scan" printer. Once
your print jobs are uploaded to KCPS, you can go to the device where you want to
print your documents to release the jobs.
All the print jobs you send are converted to PDF before being sent to KCPS.
See the Install the Cloud Print and Scan Chrome Extension topic for information
about installing and setting up the extension.
The Cloud Print and Scan Chrome Extension is only guaranteed to
work on a Chromebook using the latest version of Chrome.
1
Select the "Cloud Print and Scan" icon (1) in the Extensions area of your
Chrome browser to check if you are logged in to KCPS. If you are logged in
both your user name (2) and a message that the extension is ready to send
print jobs (3) display. If you are not logged in, open the KCPS portal and log
in.
2
From your application, select Print or press CTRL + P on your keyboard.
The Print dialog displays.
7-12 User Guide

Print and scan at the device
3
In the Destination area, select Print to Cloud Print and Scan. If "Print to
Cloud Print and Scan" is not visible in the list, select See more to view all
available printers, and select Print to Cloud Print and Scan.
4
Made any changes to the settings for the document such as copies. Select
More settings for additional settings you can make before sending the
document.
5
Select Print.
Documents you print display on the Jobs tab in KCPS.
• If you do not want to print a job, select the job and then select Delete
on the Jobs tab.
• If your job does not appear in the Jobs tab window after a period of
time, select Refresh.
6
Go to the device where you want to print your documents and log in to
KCPS.
The default screen for the device displays.
7
Select the KCPS icon.
The service menu displays. Other selections are the third-party cloud
storage services you have permission to access.
If you have set a default third-party cloud storage account that is not
Kyocera Cloud Print and Scan, select the back icon at the top of the window
to return to the list of your linked storage accounts.
See the Default linked storage account topic in the Getting started chapter for
more information.
8
Select Kyocera Cloud Print and Scan.
A list of print-ready documents display. If your admin has set print policies,
a window displays to show any printing restrictions in effect. Select OK to
dismiss the window.
Kyocera Cloud Print and Scan 7-13

Print and scan at the device
9
Select one or more documents from the list displayed.
• You can touch the "Select all" icon to select all the print jobs currently
displayed on the page. The "Select all" icon only selects print jobs on the
current page.
• You can move to the next page to select additional print jobs if all your
jobs are not displayed.
• You can select any already-selected print job to clear the check mark.
• The printer icon displays the number of print jobs currently selected.
If you set the "Skip HyPAS App print settings" feature to
Enable, skip to step 9. To change print options with this
feature enabled, touch the "Print preference" icon on the
bottom row and skip to step 8.
See the Skip HyPAS App print settings topic in the Getting
started chapter for more information about this feature.
10
Select the printer icon when you are finished selecting documents.
The print options screen displays.
11
Set any print options you want to apply to all your documents.
Depending on the device, selected files, and your current quota, some
items may not be available.
If print policies are in effect, some choices are unavailable.
Scanning
You can scan documents and have the resulting files saved for later printing or
distribution. There are two methods available for scanning:
• Scan to cloud: Send scanned documents to your to Kyocera Cloud Print and
Scan (KCPS) account or a third-party cloud storage service.
• Scan to me: Send yourself a link to your scanned documents via email.
7-14 User Guide

Print and scan at the device
General scanning information
• KCPS allows each user to store up to 1,000 scan jobs.
• Scan jobs are automatically deleted after the number of days set by your
administrator.
The number of days when auto-deletion occurs is between
1 and 28. Check with your KCPS administrator for the exact
number of days set for your organization.
• You can configure scan settings before scanning your documents. Settings
include:
• Color mode
• Scan side
• File format:
• Resolution
• Scan orientation
• Original image
• Scan to me only supports scanning to your email address. Sending to an email
address that is not yours is not supported.
• The accuracy of scan counts in reports may be affected by the occurrence of
feeder jams or canceled jobs.
• The maximum size of any scan job that can be successfully processed is 500
MB. If a scan job did not process, try changing to a lower scan resolution.
Scan to cloud
You can send scanned documents to your Kyocera Cloud Print and Scan (KCPS)
"Scanned documents" tab or any of your third-party cloud storage services using
the "Scan to cloud" feature.
You cannot manage third-party cloud storage documents in cloud
storage using KCPS.
1
Go to the device where you want to scan your documents and log in to
KCPS.
The default screen for the device displays.
2
Select the KCPS icon.
The service menu displays. Other selections are the third-party cloud
storage services you have permission to access.
If you have set a default third-party cloud storage account that
is not Kyocera Cloud Print and Scan, select the back icon at the
top of the window to return to the list of your linked storage
accounts.
Kyocera Cloud Print and Scan 7-15

Print and scan at the device
See the Default linked storage account topic in the Getting started
chapter for more information.
3
Select Kyocera Cloud Print and Scan or one of your third-party cloud
storage services.
If a "Re-link expired linked account" message displays, you have not used
the selected third-party cloud storage within the last 90 days and the link
has expired. See the Link a storage account topic in the Getting started
chapter for more information.
• All third-party cloud storage services, with the exception of the "Recent"
folder, display folders first with a 0-9, A-z sort order and then a 0-9, A-z
sort order for files.
• For SharePoint Online, selecting the "Following" folder on the KCPS
HyPAS screen displays your followed SharePoint Online sites.
• For OneDrive, "My Files" displays folders first with a 0-9, A-z sort order
and then a 0-9, A-z sort order for files..
"Recent" displays files based on when they were last modified. The files
are sorted from newest to oldest based on their last modified date and
time.
"Shared" displays shared files based on when they were last modified.
The files are sorted from newest to oldest based on their last modified
date and time.
4
Select the folder where the scanned document will be saved.
5
Select Store File.
The "Scan to cloud" screen displays.
If the cloud storage service you selected does not allow
documents to be stored in the root folder, the Store File button
is not available. Select a folder where the document can be
saved.
6
Edit the file name or leave it as the default file name.
7
Edit the scan settings to match the document you are scanning and the
output you want.
8
Place your documents in the document feeder.
7-16 User Guide
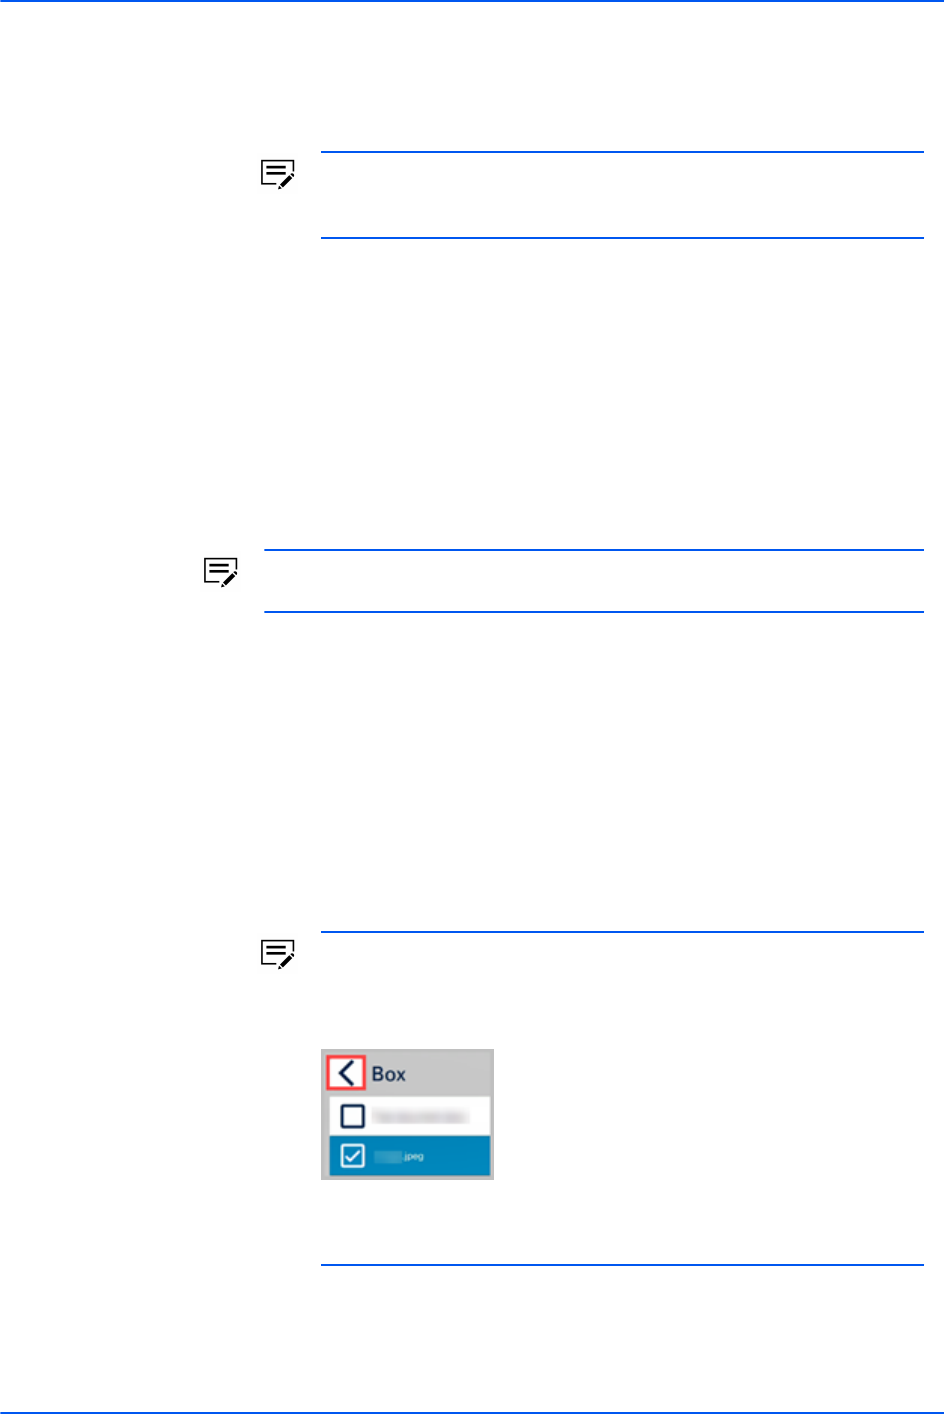
Print and scan at the device
9
Select Scan.
A message displays when the scan finishes.
The maximum size of any scan job that can be successfully
processed is 500 MB. If a scan job did not process, try changing
to a lower scan resolution.
10
Select OK.
• If you selected KCPS as the destination, your documents are listed on the
Scanned documents tab on the KCPS portal.
• If you selected a third-party cloud storage service as the destination, your
documents are located in the folder you specified.
Scan to me
You can send a scanned document to your email address using the "Scan to me"
feature.
Sending a scanned document to anyone other than yourself is not
supported.
When scanning documents that produce large file sizes, the email sent from
KCPS containing the attached document may be too large for your organization's
email system, preventing you from receiving the email. If you are not receiving
"Scan to me" emails sent via KCPS, your KCPS admin should check the "Scan to
me" feature settings and their organization's email system settings.
1
Go to the device where you want to scan your documents and log in to
Kyocera Cloud Print and Scan (KCPS).
The default screen for the device displays.
2
Select the KCPS icon.
The service menu displays. Other selections are the third-party cloud
storage services you have linked to your account.
If you have set a default third-party cloud storage account that
is not Kyocera Cloud Print and Scan, select the back icon at the
top of the window to return to the list of your linked storage
accounts.
See the Default linked storage account topic in the Getting started
chapter for more information about this feature.
3
Select Scan to me.
The "Scan to me" screen displays.
Kyocera Cloud Print and Scan 7-17

Print and scan at the device
4
Edit the file name or leave it as the default file name.
5
Edit the scan settings to match the document you are scanning and the
output you want.
6
Place your documents in the document feeder.
7
Select Scan.
A message displays when the scan finishes.
The maximum size of any scan job that can be successfully
processed by KCPS is 500 MB. If a scan job did not process, try
changing to a lower scan resolution.
8
Select OK.
The email you receive contains either the scanned file as an attachment or a
link to download your scanned file. Selecting the link opens a browser window
that asks you to log in. Log in with your KCPS account. Once you have been
successfully authenticated, your scanned file downloads.
Your KCPS Customer admin sets the maximum size of emails with
attachments sent by the "Scan to me" feature. KCPS sends emails
with download links if the email with an attachment exceeds the size
limit.
7-18 User Guide

8
Appendix
Appendix
Integrating KYOCERA Mobile Print with Kyocera Cloud Print and Scan
You can integrate KYOCERA Mobile Print (KMP) to upload print jobs to Kyocera
Cloud Print and Scan (KCPS). Both Android and iOS versions of the KMP
application are supported.
Prerequisites
Both KMP and KCPS must be configured and operational.
Limitations
If KCPS authentication is enabled in KMP, you will not be able to scan, copy, or fax
from KMP. Instead. log in to KCPS on the MFP and perform the procedure on the
MFP.
Further information about KMP
For information on how to use KMP, see the KMP FAQ:
KYOCERA Mobile Print FAQ | KYOCERA Document Solutions
Android
There two ways to set up KMP with KCPS. Use the set up method based on how
you log in to KCPS:
• If you log in using your username and password to KCPS, use the Android: Set
up KMP with KCPS topic.
• If you log in using the Sign in with Microsoft button, use the Android: Set up
KMP with KCPS using "Sign in with Microsoft" topic.
Android: Set up KMP with KCPS
Before using KMP with KCPS on Android, make these settings changes on the
KMP application.
Kyocera Cloud Print and Scan 8-1

Appendix
1
Start the KYOCERA Mobile Print application and then select the Printing
Preferences icon (1) at the bottom of the screen.
2
At the bottom of the Printing Preferences screen, select Kyocera Cloud
Print and Scan (2).
The Kyocera Cloud Print and Scan dialog displays.
3
You must enter the Kyocera Cloud Print and Scan Domain Name,
Organization, and your KCPS User name and password. The Domain Name
and Organization can be provided by your KCPS Customer Admin or you
can locate this information yourself.
a) Tap the text box below Domain Name and enter the Kyocera Cloud
Print and Scan Domain Name. The URL to access your organization's
KCPS web site provides you this information. For example, if the
URL you use is https://acmecompany.yyy.dms-xxxx.org, then
yyy.dms.xxxx.org is your Domain name.
b) Tap the text box below Organization and enter the Kyocera Cloud
Print and Scan Organization. Your organization name is displayed
above any tabbed window in KCPS and also appears in the Activation
Confirmation email you received from KCPS. It contains the correct
capitalization of your organization's name.
8-2 User Guide

Appendix
c) Tap the text box below User name and enter your Kyocera Cloud
Print and Scan User name.
d) Tap the text box below Password and enter your Kyocera Cloud Print
and Scan password.
e) Select OK.
4
After a successful log in, the connection to Kyocera Cloud Print and Scan
is enabled, a "Success" message displays, and the "Printing Preferences"
window closes.
Kyocera Cloud Print and Scan displays at the bottom of the screen.
The KMP application is now set up and can be used to send documents or photos
to KCPS for printing.
If you are logged out of KCPS on the KMP application, follow the steps again to
re-authenticate yourself.
Android: Set up KMP with KCPS using "Sign in with
Microsoft"
If you use "Sign in with Microsoft" to log in to KCPS, make these settings changes
on the KMP application.
The "Sign in with Microsoft" authentication method you use to log in
is set by your organization. If you have any questions ask your KCPS
Customer Admin for help.
Kyocera Cloud Print and Scan 8-3
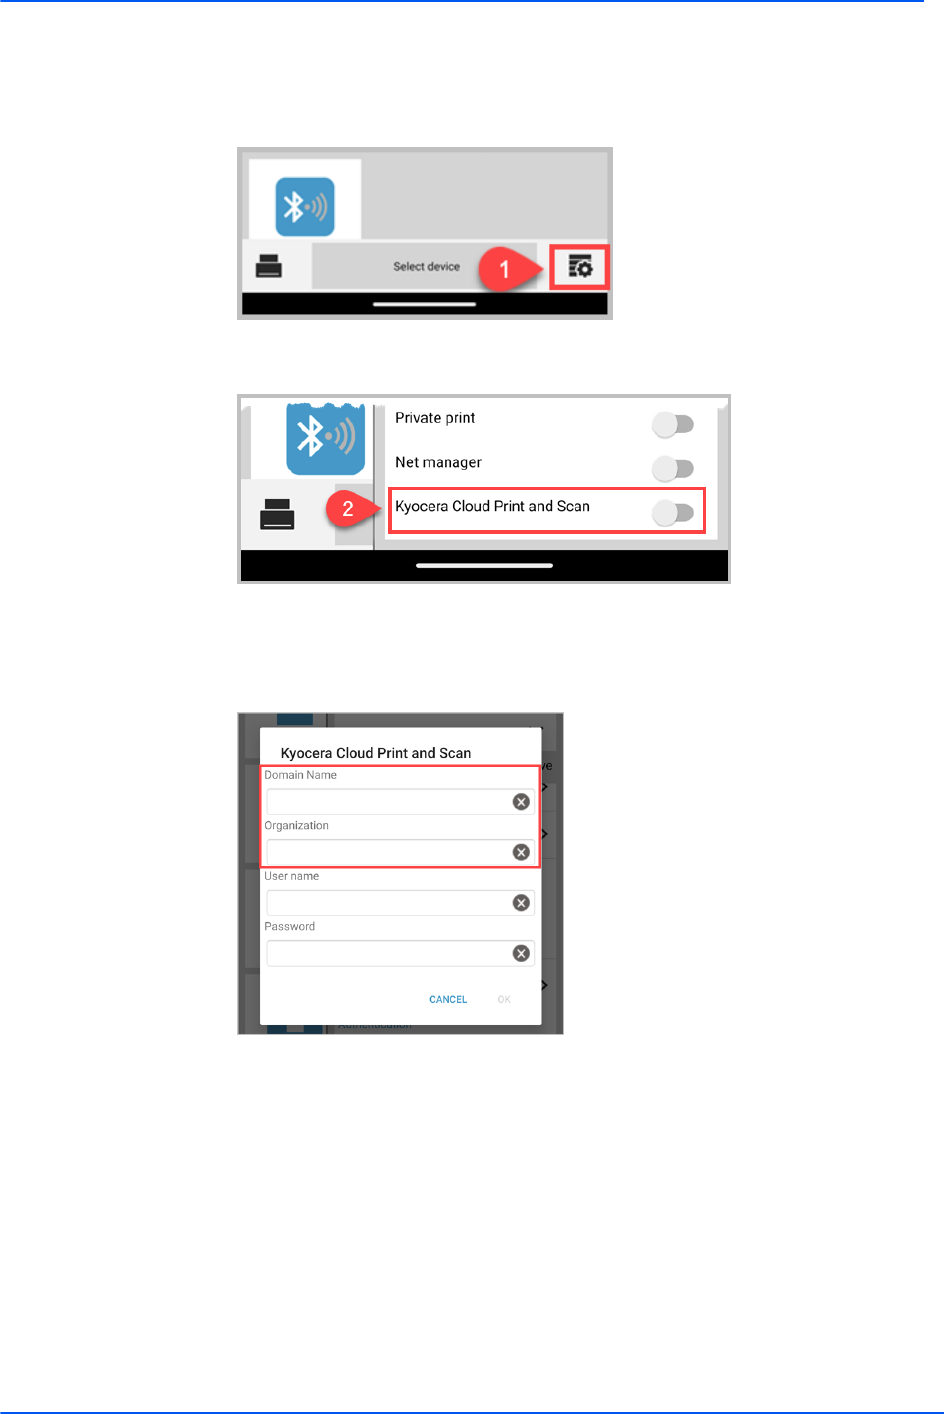
Appendix
1
Start the KYOCERA Mobile Print application and then select the Printing
Preferences icon (1) at the bottom of the screen.
2
At the bottom of the Printing Preferences screen, select Kyocera Cloud
Print and Scan (2).
The Kyocera Cloud Print and Scan dialog displays.
3
You must enter the Kyocera Cloud Print and Scan Domain Name and
Organization. The Domain Name and Organization can be provided by
your KCPS Customer Admin or you can locate this information yourself.
a) Tap the text box below Domain Name and enter the Kyocera Cloud
Print and Scan Domain Name. The URL to access your organization's
KCPS web site provides you this information. For example, if the
URL you use is https://acmecompany.yyy.dms-xxxx.org, then
yyy.dms.xxxx.org is your Domain name.
b) Tap the text box below Organization and enter the Kyocera Cloud
Print and Scan Organization. Your organization name is displayed
above any tabbed window in KCPS and also appears in the Activation
Confirmation email you received from KCPS. It contains the correct
capitalization of your organization's name.
8-4 User Guide

Appendix
c) Select OK to validate your settings and activate the connection to
KCPS.
If your organization uses "Sign in with Microsoft" for authentication
and you have never logged in to KCPS and have not accepted the
"End User License Agreement" (EULA) before, a message displays.
Follow the onscreen prompts to open the web portal and accept
the EULA. You must agree to the EULA before using KCPS and the
Desktop client.
4
After a successful log in, the connection to Kyocera Cloud Print and Scan
is enabled, a "Success" message displays, and the "Printing Preferences"
window closes.
Kyocera Cloud Print and Scan displays at the bottom of the screen.
The KMP application is now set up and can be used to send documents or photos
to KCPS for printing.
If you are logged out of KCPS on the KMP application, follow the steps again to
re-authenticate yourself.
Send jobs from KMP to KCPS
After integrating the KMP Android application with KCPS, you can send job from
KMP to KCPS.
You must be authenticated to KCPS before you can send jobs. See the
appropriate "Set up KMP to KCPS" topic if you are not authenticated.
1
Open the KMP application.
2
Select the document or photo you want to print.
Kyocera Cloud Print and Scan 8-5

Appendix
3
Select Print.
The "Printing Preferences" screen displays.
4
Set the number of copies, paper size, and orientation.
Orientation and Paper size are not available for PDF and image
files. Copies can not be specified for image files.
8-6 User Guide

Appendix
5
Select Print.
A "Done" message displays after the job is uploaded to the KCPS server.
The job can be now printed from a MFP that has the KCPS HyPAS application
installed.
iOS
There two ways to set up KMP with KCPS. Use the set up method based on how
you log in to KCPS:
• If you log in using your username and password to KCPS, use the iOS: Set up
KMP with KCPS topic.
• If you log in using the Sign in with Microsoft button, use the iOS: Set up KMP
with KCPS using "Sign in with Microsoft" topic.
iOS: Set up KMP with KCPS
Before using KMP with KCPS on iOS, make these settings changes on the KMP
application.
1
Start the KYOCERA Mobile Print application and then select the Printing
Preferences icon (1) at the bottom of the screen.
2
At the bottom of the Printing Preferences screen, select Kyocera Cloud
Print and Scan (2).
The Kyocera Cloud Print and Scan dialog displays.
3
You must enter the Kyocera Cloud Print and Scan Domain, Organization,
and your KCPS Login user name and password. Your KCPS Customer
Kyocera Cloud Print and Scan 8-7

Appendix
Admin can provide the Domain and Organization, or you can locate this
information yourself.
a) Tap the text box below Domain and enter the Kyocera Cloud Print
and Scan Domain name. The URL to access your organization's
KCPS web site provides you this information. For example, if the
URL you use is https://acmecompany.yyy.dms-xxxx.org, then
yyy.dms.xxxx.org is your Domain name.
b) Tap the text box below Organization and enter the Kyocera Cloud
Print and Scan Organization. Your organization name is displayed
above any tabbed window in KCPS and also appears in the Activation
Confirmation email you received from KCPS. It contains the correct
capitalization of your organization's name.
c) Tap the text box below Login user name and enter your Kyocera
Cloud Print and Scan User name.
d) Tap the text box below Password and enter your Kyocera Cloud Print
and Scan password.
e) Next to Kyocera Cloud Print and Scan, select the Off toggle to
validate your settings and credentials and activate the connection to
KCPS.
After a successful log in, a "Success" message displays, and the toggle for
Kyocera Cloud Print and Scan is set to On.
8-8 User Guide

Appendix
4
Select Done and then select anywhere outside of the Printing Preferences
screen to return to the main menu.
Kyocera Cloud Print and Scan displays at the bottom of the screen.
The KMP application is now set up and can be used to send documents or photos
to KCPS for printing.
If you are logged out of KCPS on the KMP application, follow the steps again to
re-authenticate yourself.
iOS: Set up KMP for KCPS using "Sign in with
Microsoft"
If you use "Sign in with Microsoft" to log in to KCPS, make these settings changes
on the KMP application.
The "Sign in with Microsoft" authentication method you use to log in
is set by your organization. If you have any questions ask your KCPS
Customer Admin for help.
1
Start the KYOCERA Mobile Print application and then select the Printing
Preferences icon (1) at the bottom of the screen.
Kyocera Cloud Print and Scan 8-9

Appendix
2
At the bottom of the Printing Preferences screen, select Kyocera Cloud
Print and Scan (2).
The Kyocera Cloud Print and Scan dialog displays.
3
You must enter the Kyocera Cloud Print and Scan Domain, and
Organization. Your KCPS Customer Admin can provide the Domain and
Organization, or you can locate this information yourself.
a) Tap the text box below Domain and enter the Kyocera Cloud Print
and Scan Domain name. The URL to access your organization's
KCPS web site provides you this information. For example, if the
URL you use is https://acmecompany.yyy.dms-xxxx.org, then
yyy.dms.xxxx.org is your Domain name.
b) Tap the text box below Organization and enter the Kyocera Cloud
Print and Scan Organization. Your organization name is displayed
above any tabbed window in KCPS and also appears in the Activation
Confirmation email you received from KCPS. It contains the correct
capitalization of your organization's name.
c) Next to Kyocera Cloud Print and Scan, select the Off toggle to
validate your settings and activate the connection to KCPS.
If your organization uses "Sign in with Microsoft" for authentication and
you have never logged in to KCPS and have not accepted the "End User
License Agreement" (EULA) before, a message displays.
Follow the onscreen prompts to open the web portal and accept the EULA.
You must agree to the EULA before using KCPS and the Desktop client.
8-10 User Guide

Appendix
4
If this is the first time you have used KCPS, you must select Open Web
Portal.
You can quit the set up of KMP at this point to accept the "End
User License Agreement" on a computer if more convenient for
you. Then repeat this entire procedure and skip this step.
a) Log in to the KCPS web portal using your "Sign in with Microsoft"
credentials.
b) Select Accept on the "Permissions requested" screen.
c) Read and accept the KCPS End User License Agreement and select
OK.
5
After a successful log in, a "Success" message displays, and the toggle for
Kyocera Cloud Print and Scan is set to On.
Select Done and then select anywhere outside of the Printing Preferences
screen to return to the main menu.
Kyocera Cloud Print and Scan displays at the bottom of the screen.
The KMP application is now set up and can be used to send documents or photos
to KCPS for printing.
If you are logged out of KCPS on the KMP application, follow the steps again to
re-authenticate yourself.
Kyocera Cloud Print and Scan 8-11

Appendix
iOS: Send jobs from KMP to KCPS
After integrating the KMP application with KCPS, you can send job from KMP to
KCPS.
You must be authenticated to KCPS before you can send jobs. See the
appropriate "Set up KMP to KCPS" topic if you are not authenticated.
1
Open the KMP application.
2
Select the document or photo you want to print.
3
Select the Printing Preferences icon.
4
On the Printing Preferences screen, set the number of copies, paper size,
and orientation.
Orientation and Paper size are not available for PDF and image
files. Copies can not be specified for image files.
5
Select anywhere outside the Printing Preferences screen to return to the
preview window.
8-12 User Guide

Appendix
6
Select Print.
A "Done" message displays after the job is uploaded to the KCPS server.
The job can be now printed from a MFP that has the KCPS HyPAS application
installed.
Kyocera Cloud Print and Scan 8-13

For the KYOCERA contact in your region, see Sales Sites sections here
ご利⽤の地域でのお問い合わせ先については、下記リンクから京セラ本⽀店‧営業所の⼀覧をご覧ください。
https://www.kyoceradocumentsolutions.com/company/directory.html
is a trademark of KYOCERA Corporation
は、京セラ株式会社の商標です。
KCPSUGKDEN170.2023.10
