

Laravel and AngularJS
Learn how to build apps with AngularJS in the
client and Laravel on server
Daniel Schmitz and Daniel Pedrinha Georgii
This book is for sale at http://leanpub.com/laravel-and-angularjs
This version was published on 2015-10-22
This is a Leanpub book. Leanpub empowers authors and publishers with the Lean
Publishing process. Lean Publishing is the act of publishing an in-progress ebook
using lightweight tools and many iterations to get reader feedback, pivot until you
have the right book and build traction once you do.
©2015 Daniel Schmitz and Daniel Pedrinha Georgii
Contents
Part 1- Introduction and installation . . . . . . 2
Chapter 1 - Introduction . . . . . . . . . . . . . . . . . . . . . . . . . . . . 3
Windows, Mac or Linux? . . . . . . . . . . . . . . . . . . . . . . . . . . 3
Source Code . . . . . . . . . . . . . . . . . . . . . . . . . . . . . . . . . 3
Chapter 2 - Preparing the environment in Windows . . . . . . . . . . . . 5
Apache . . . . . . . . . . . . . . . . . . . . . . . . . . . . . . . . . . . . 6
Creating the virtual domain (virtual host) . . . . . . . . . . . . . . . . 11
PHP . . . . . . . . . . . . . . . . . . . . . . . . . . . . . . . . . . . . . . 16
MySql . . . . . . . . . . . . . . . . . . . . . . . . . . . . . . . . . . . . 17
Composer . . . . . . . . . . . . . . . . . . . . . . . . . . . . . . . . . . 18
Testing the Composer . . . . . . . . . . . . . . . . . . . . . . . . . . 20
Laravel . . . . . . . . . . . . . . . . . . . . . . . . . . . . . . . . . . . . 21
Bower . . . . . . . . . . . . . . . . . . . . . . . . . . . . . . . . . . . . 23
Chapter 3 - Preparing the environment in Linux . . . . . . . . . . . . . . 28
Apache . . . . . . . . . . . . . . . . . . . . . . . . . . . . . . . . . . . . 29
Creating the virtual domain (virtual host) . . . . . . . . . . . . . . . . 30
PHP . . . . . . . . . . . . . . . . . . . . . . . . . . . . . . . . . . . . . . 34
MySql Server . . . . . . . . . . . . . . . . . . . . . . . . . . . . . . . . . 35
Composer . . . . . . . . . . . . . . . . . . . . . . . . . . . . . . . . . . 37
Laravel . . . . . . . . . . . . . . . . . . . . . . . . . . . . . . . . . . . . 38
Bower . . . . . . . . . . . . . . . . . . . . . . . . . . . . . . . . . . . . 40
AngularJS + Bootstrap . . . . . . . . . . . . . . . . . . . . . . . . . . . . 41
CONTENTS
Part 2 - Laravel . . . . . . . . . . . . . . . . . . . . . . . . . . . 42
Chapter 4- Getting to know the Laravel . . . . . . . . . . . . . . . . . . . 43
Configuring the virtual host . . . . . . . . . . . . . . . . . . . . . . . . . 44
Directory permission . . . . . . . . . . . . . . . . . . . . . . . . . . . . 46
Generating an encryption key . . . . . . . . . . . . . . . . . . . . . . . . 47
Routes . . . . . . . . . . . . . . . . . . . . . . . . . . . . . . . . . . . . 47
Routing types (verbs) . . . . . . . . . . . . . . . . . . . . . . . . . . . . 51
Passing parameters in routing . . . . . . . . . . . . . . . . . . . . . . . . 52
Using regular expressions . . . . . . . . . . . . . . . . . . . . . . . . . . 54
Naming routings . . . . . . . . . . . . . . . . . . . . . . . . . . . . . . . 56
Grouping routes . . . . . . . . . . . . . . . . . . . . . . . . . . . . . . . 57
Middleware . . . . . . . . . . . . . . . . . . . . . . . . . . . . . . . . . 59
Controllers . . . . . . . . . . . . . . . . . . . . . . . . . . . . . . . . . . 59
Implicit Controllers (automatic) . . . . . . . . . . . . . . . . . . . . . . . 60
Controllers and Resource . . . . . . . . . . . . . . . . . . . . . . . . . . 62
Explicit controllers (manual) . . . . . . . . . . . . . . . . . . . . . . . . 64
Implicit or explicit routing? . . . . . . . . . . . . . . . . . . . . . . . . . 66
Ajax . . . . . . . . . . . . . . . . . . . . . . . . . . . . . . . . . . . . . 66
JSON Response . . . . . . . . . . . . . . . . . . . . . . . . . . . . . . . . 68
Exceptions in JSON format . . . . . . . . . . . . . . . . . . . . . . . . . 71
Chapter 5 - Database and persistence . . . . . . . . . . . . . . . . . . . . . 76
Configuration . . . . . . . . . . . . . . . . . . . . . . . . . . . . . . . . 76
Using Laravel to create the tables (Migration) . . . . . . . . . . . . . . . 79
Migration fields creation types . . . . . . . . . . . . . . . . . . . . . . . 81
Running the migration . . . . . . . . . . . . . . . . . . . . . . . . . . . 84
Create a new record in the table . . . . . . . . . . . . . . . . . . . . . . 85
Rollback a migration . . . . . . . . . . . . . . . . . . . . . . . . . . . . . 89
Additional migration operations . . . . . . . . . . . . . . . . . . . . . . 89
Referencing columns from other tables . . . . . . . . . . . . . . . . . . . 90
Adding data . . . . . . . . . . . . . . . . . . . . . . . . . . . . . . . . . 91
Tables and additional data . . . . . . . . . . . . . . . . . . . . . . . . . . 92
Creating the posts data . . . . . . . . . . . . . . . . . . . . . . . . . 92
Creating the comments table . . . . . . . . . . . . . . . . . . . . . . . 95
Creating the table tags . . . . . . . . . . . . . . . . . . . . . . . . . . 98
CONTENTS
Creating the post_tag . . . . . . . . . . . . . . . . . . . . . . . . . . . 100
Recreating the full database structure . . . . . . . . . . . . . . . . . . . 103
Query Builder . . . . . . . . . . . . . . . . . . . . . . . . . . . . . . . . 105
Consulting the SQL generated by the Query Builder . . . . . . . . . . 105
Returning all records in the table . . . . . . . . . . . . . . . . . . . . 105
Stepping through the records after the query . . . . . . . . . . . . . . 107
Returning the first row of a table . . . . . . . . . . . . . . . . . . . . 107
Returning a list of values from a table . . . . . . . . . . . . . . . . . . 108
Aggregating values . . . . . . . . . . . . . . . . . . . . . . . . . . . . 108
Selecting fields . . . . . . . . . . . . . . . . . . . . . . . . . . . . . . 108
Joins . . . . . . . . . . . . . . . . . . . . . . . . . . . . . . . . . . . . 109
Unions . . . . . . . . . . . . . . . . . . . . . . . . . . . . . . . . . . . 110
Where . . . . . . . . . . . . . . . . . . . . . . . . . . . . . . . . . . . 111
Grouping Wheres . . . . . . . . . . . . . . . . . . . . . . . . . . . . . 112
Order . . . . . . . . . . . . . . . . . . . . . . . . . . . . . . . . . . . 113
GroupBy e Having . . . . . . . . . . . . . . . . . . . . . . . . . . . . 113
Logging Eloquent’s SQLs . . . . . . . . . . . . . . . . . . . . . . . . . . 113
Eloquent ORM . . . . . . . . . . . . . . . . . . . . . . . . . . . . . . . . 115
Creating the model . . . . . . . . . . . . . . . . . . . . . . . . . . . . . 116
Agreements between tables and model . . . . . . . . . . . . . . . . . . . 117
Use of the Timestamp . . . . . . . . . . . . . . . . . . . . . . . . . . . . 118
Testing the User model . . . . . . . . . . . . . . . . . . . . . . . . . . . 118
Routing . . . . . . . . . . . . . . . . . . . . . . . . . . . . . . . . . . 119
Create the method on the controller . . . . . . . . . . . . . . . . . . . 119
Understanding the UserController . . . . . . . . . . . . . . . . . . . . 120
Relationships in Eloquent . . . . . . . . . . . . . . . . . . . . . . . . . . 121
Relationships between users and posts . . . . . . . . . . . . . . . . . 121
Relationship between Posts and Comments . . . . . . . . . . . . . . . 124
Relationship between Posts and Tags . . . . . . . . . . . . . . . . . . 126
One-to-one relationship . . . . . . . . . . . . . . . . . . . . . . . . . 129
One-to-many relationship through (Has Many Through) . . . . . . . 131
Analyzing the existence of records in a relationship . . . . . . . . . . 132
Eager Loading vs Lazy Loading and the N+1 problem . . . . . . . . . . . 133
Eager Loading and more advanced queries . . . . . . . . . . . . . . . . . 134
Inserting and updating records . . . . . . . . . . . . . . . . . . . . . . . 139
CONTENTS
Removing records . . . . . . . . . . . . . . . . . . . . . . . . . . . . . . 141
Using scopes . . . . . . . . . . . . . . . . . . . . . . . . . . . . . . . . . 142
Events . . . . . . . . . . . . . . . . . . . . . . . . . . . . . . . . . . . . 143
Accessors & Mutators . . . . . . . . . . . . . . . . . . . . . . . . . . . . 144
Serializing data in JSON . . . . . . . . . . . . . . . . . . . . . . . . . . . 146
Removing fields from JSON serialization . . . . . . . . . . . . . . . . . . 147
Adding Accessor serialization . . . . . . . . . . . . . . . . . . . . . . . . 148
Adding relationships in Serialization . . . . . . . . . . . . . . . . . . . . 148
Part 3 - AngularJS and Bootstrap . . . . . . . . . 149
Chapter 6 - Introduction to AngularJS . . . . . . . . . . . . . . . . . . . . 150
Expressions . . . . . . . . . . . . . . . . . . . . . . . . . . . . . . . . . . 152
DataBind . . . . . . . . . . . . . . . . . . . . . . . . . . . . . . . . . . . 154
Controllers . . . . . . . . . . . . . . . . . . . . . . . . . . . . . . . . . . 154
Methods in the controller . . . . . . . . . . . . . . . . . . . . . . . . . . 156
Loops . . . . . . . . . . . . . . . . . . . . . . . . . . . . . . . . . . . . . 158
Forms . . . . . . . . . . . . . . . . . . . . . . . . . . . . . . . . . . . . . 159
Routes and Deep linking . . . . . . . . . . . . . . . . . . . . . . . . . . . 160
Chapter 7 - Bootstrap . . . . . . . . . . . . . . . . . . . . . . . . . . . . . . 167
Installing the Bootstrap . . . . . . . . . . . . . . . . . . . . . . . . . . . 167
Grid System . . . . . . . . . . . . . . . . . . . . . . . . . . . . . . . . . 169
Working with offsets . . . . . . . . . . . . . . . . . . . . . . . . . . . . 170
Typography . . . . . . . . . . . . . . . . . . . . . . . . . . . . . . . . . 171
Alignment . . . . . . . . . . . . . . . . . . . . . . . . . . . . . . . . . . 171
Creating emphasis to text with colors . . . . . . . . . . . . . . . . . . . 171
Abbreviation . . . . . . . . . . . . . . . . . . . . . . . . . . . . . . . . . 172
Blockquotes . . . . . . . . . . . . . . . . . . . . . . . . . . . . . . . . . 172
Lists . . . . . . . . . . . . . . . . . . . . . . . . . . . . . . . . . . . . . . 173
Unstyled . . . . . . . . . . . . . . . . . . . . . . . . . . . . . . . . . . 173
Side by side (inline) . . . . . . . . . . . . . . . . . . . . . . . . . . . . 173
Lists with horizontal description . . . . . . . . . . . . . . . . . . . . . 173
Tables . . . . . . . . . . . . . . . . . . . . . . . . . . . . . . . . . . . . . 174
Simple table . . . . . . . . . . . . . . . . . . . . . . . . . . . . . . . . . 174
CONTENTS
Striped rows . . . . . . . . . . . . . . . . . . . . . . . . . . . . . . . . . 176
Borders . . . . . . . . . . . . . . . . . . . . . . . . . . . . . . . . . . . . 177
Highlighting rows . . . . . . . . . . . . . . . . . . . . . . . . . . . . . . 177
Smaller tables (condensed) . . . . . . . . . . . . . . . . . . . . . . . . . 178
Contextual lines . . . . . . . . . . . . . . . . . . . . . . . . . . . . . . . 178
Merging classes . . . . . . . . . . . . . . . . . . . . . . . . . . . . . . . 179
Forms . . . . . . . . . . . . . . . . . . . . . . . . . . . . . . . . . . . . . 179
Understand the form-group . . . . . . . . . . . . . . . . . . . . . . . . . 179
Inline form . . . . . . . . . . . . . . . . . . . . . . . . . . . . . . . . . . 180
Horizontal forms . . . . . . . . . . . . . . . . . . . . . . . . . . . . . . . 181
Supported components . . . . . . . . . . . . . . . . . . . . . . . . . . . 183
Checkbox and radio . . . . . . . . . . . . . . . . . . . . . . . . . . . . . 183
Static controls . . . . . . . . . . . . . . . . . . . . . . . . . . . . . . . . 183
Disabled fields . . . . . . . . . . . . . . . . . . . . . . . . . . . . . . . . 184
Validations . . . . . . . . . . . . . . . . . . . . . . . . . . . . . . . . . . 184
Field Size . . . . . . . . . . . . . . . . . . . . . . . . . . . . . . . . . . . 185
Hint text . . . . . . . . . . . . . . . . . . . . . . . . . . . . . . . . . . . 185
Buttons . . . . . . . . . . . . . . . . . . . . . . . . . . . . . . . . . . . . 186
Size of the buttons . . . . . . . . . . . . . . . . . . . . . . . . . . . . . . 187
Group buttons . . . . . . . . . . . . . . . . . . . . . . . . . . . . . . . . 187
Icons . . . . . . . . . . . . . . . . . . . . . . . . . . . . . . . . . . . . . 187
Dropdown buttons (menu) . . . . . . . . . . . . . . . . . . . . . . . . . 188
Differentiated inputs with group . . . . . . . . . . . . . . . . . . . . . . 189
AngularJS, Bootstrap and validations . . . . . . . . . . . . . . . . . . . . 189
Displaying custom error messages . . . . . . . . . . . . . . . . . . . . . 191
Synchronizing errors and submit buttons . . . . . . . . . . . . . . . . . 192
Extra themes . . . . . . . . . . . . . . . . . . . . . . . . . . . . . . . . . 194
Chapter 8 - AngularJS and Ajax . . . . . . . . . . . . . . . . . . . . . . . . 196
$http usage . . . . . . . . . . . . . . . . . . . . . . . . . . . . . . . . . . 196
Handling ajax errors . . . . . . . . . . . . . . . . . . . . . . . . . . . . . 203
Creating a global loading . . . . . . . . . . . . . . . . . . . . . . . . . . 207
Disabling the button while sending data . . . . . . . . . . . . . . . . . . 212
$resource usage . . . . . . . . . . . . . . . . . . . . . . . . . . . . . . . 214
CONTENTS
Part 4 - Laravel and AngularJS . . . . . . . . . . . . 219
Chapter 9 - Connecting Laravel and AngularJS . . . . . . . . . . . . . . . 220
Introduction . . . . . . . . . . . . . . . . . . . . . . . . . . . . . . . . . 220
Workflow . . . . . . . . . . . . . . . . . . . . . . . . . . . . . . . . . . 221
Installing AngularJS on Laravel . . . . . . . . . . . . . . . . . . . . . . . 221
Reconfiguring the routes.php . . . . . . . . . . . . . . . . . . . . . . . . 225
Site header . . . . . . . . . . . . . . . . . . . . . . . . . . . . . . . . . . 226
Using DeepLink on the blog . . . . . . . . . . . . . . . . . . . . . . . . . 230
Getting posts . . . . . . . . . . . . . . . . . . . . . . . . . . . . . . . . . 231
Inserting the amount of comments . . . . . . . . . . . . . . . . . . . . . 237
Insert the Post author . . . . . . . . . . . . . . . . . . . . . . . . . . . . 238
Reviewing the Query Builder . . . . . . . . . . . . . . . . . . . . . . . . 241
Filling the side menu . . . . . . . . . . . . . . . . . . . . . . . . . . . . 242
Handle errors . . . . . . . . . . . . . . . . . . . . . . . . . . . . . . . . 248
Creating a loading global . . . . . . . . . . . . . . . . . . . . . . . . . . 254
User page . . . . . . . . . . . . . . . . . . . . . . . . . . . . . . . . . . . 257
Comment screen . . . . . . . . . . . . . . . . . . . . . . . . . . . . . . . 261
Tag screen . . . . . . . . . . . . . . . . . . . . . . . . . . . . . . . . . . 264
Chapter 10 - Authentication . . . . . . . . . . . . . . . . . . . . . . . . . . 268
Creating the login form . . . . . . . . . . . . . . . . . . . . . . . . . . . 268
Performing the login . . . . . . . . . . . . . . . . . . . . . . . . . . . . . 270
Adding features to the site with the user properly logged in . . . . . . . 272
Logout of the application . . . . . . . . . . . . . . . . . . . . . . . . . . 274
Login and logout on Laravel . . . . . . . . . . . . . . . . . . . . . . . . 275
Creating a user from login . . . . . . . . . . . . . . . . . . . . . . . . . 277
Chapter 11 - Blog administration screen . . . . . . . . . . . . . . . . . . . 285
Creating the admin.html file . . . . . . . . . . . . . . . . . . . . . . . . 291
Configuring admin routing . . . . . . . . . . . . . . . . . . . . . . . . . 295
Getting the user login again . . . . . . . . . . . . . . . . . . . . . . . . . 297
Protecting the other pages against improper access . . . . . . . . . . . . 298
Creating the CRUD of Tags . . . . . . . . . . . . . . . . . . . . . . . . . 299
Implementing the crud via $resource . . . . . . . . . . . . . . . . . . . . 300
Configuring the tag.html template . . . . . . . . . . . . . . . . . . . . . 302
CONTENTS
Formatting the date on the table . . . . . . . . . . . . . . . . . . . . . . 306
Setting up Laravel . . . . . . . . . . . . . . . . . . . . . . . . . . . . . . 307
Securing access to the server . . . . . . . . . . . . . . . . . . . . . . . . 310
The CRUD comments . . . . . . . . . . . . . . . . . . . . . . . . . . . . 311
CRUD for Posts . . . . . . . . . . . . . . . . . . . . . . . . . . . . . . . 320
CRUD for users . . . . . . . . . . . . . . . . . . . . . . . . . . . . . . . 329
The user profile view . . . . . . . . . . . . . . . . . . . . . . . . . . . . 336
CONTENTS 1
If you find a mistake, you want to request an additional content, you missed
something in the book or simply have any questions, feel free to contact us through
Part 1- Introduction and
installation
Chapter 1 - Introduction
The main objective of this book is to address the best web development technologies
on the market today. On the web, we are always splitting the systems development
into two parts: server and client.
On the server, we will cover the programming language PHP 5.4, and the framework
Laravel, in addition to the MySql database. We chose Laravel because it is a simple
and powerful framework, with a growing acceptance in the market.
On the client, we have the Javascript language, which has consolidated its position
as the best programming language for browsers. As a framework, we chose the
AngularJS, which makes all the manipulation of data in forms and tables much easier.
We also have the CSS, in which we use the Bootstrap framework to facilitate the
development of web applications interface.
Even with two different technologies, their integration is entirely possible and this
will be the main theme discussed throughout the chapters. Note that we will not
introduce the two technologies in a separate way, we will be addressing how the
technologies interact. The communication between them is RESTful, and we will be
using it extensively for the development of our final application.
After addressing the main concepts of both technologies, we will create a small blog
that will illustrate everything we learned.
Windows, Mac or Linux?
Use the operating system that is best for you. In this work we will learn how to
install the necessary software for both Windows and Linux. After the installation,
the operating system will not influence the development.
Source Code
The source code of this work is available on GitHub, at the following address:
Chapter 2 - Preparing the
environment in Windows
In this chapter, we will be installing all necessary software to develop in Laravel. The
list below contains all the software that we will install:
Apache
The web server that will host everything on the server. Perhaps you know
Apache or at least have a certain knowledge of how it works. In this work
we will also learn how to create a virtual domain and perform more complex
setups.
MySql
Will be our default database, for all our examples.
Composer
How to install the frameworks on the server is changing radically. Before,
we needed to download a zip file and unzip it on the server. With the rapid
evolution of PHP in recent years, appeared the package managers and among
them we have the Composer, which allow us to place several frameworks
in PHP through the command line (shell). Very similar to apt-get from
Linux/Debian and its derivatives. The Composer works a little different from
the other package managers because it is not installed globally in the operating
system, but rather locally in your PHP project. In this way, the Composer is a
dependency Manager of your project, not a project manager as we know.
Bower
The Bower is also a package manager, except for the javascript libraries that we
will use. Combining the Bower and the Composer, we can install any library
for both the server and the client without the need to perform any type of
external download. We also have the advantage of being able to update the
libraries instantly.

Chapter 2 - Preparing the environment in Windows 6
Laravel
We will install Laravel via the Composer.
AngularJS
AngularJS will be installed via the Bower.
Bootstrap
The Bootstrap is a Javascript/CSS library that will provide a significant
improvement on the visual layer of the application. It will also be installed
by Bower.
Sublime Text
The Sublime Text is a versatile and powerful text editor. You can use it in all the
processes of web development of this work. In fact, this book was written using
the Sublime. To install the Sublime Text, go to http://www.sublimetext.com/
and do the installation according to your operating system.
Apache
Initially we will install Apache + PHP + MySql, and this can be done very easily with
the Wamp Server. This package will install the Apache web server, PHP and MySql
as well.
Go to http://www.wampserver.com/en/¹ and click Download. Download the program
according to your operating system, 32 or 64-bits. After selecting this option, click
the download link. After download, run the installer to get a screen similar to the
following screen:
¹http://www.wampserver.com/en/

Chapter 2 - Preparing the environment in Windows 7
In this first window are displayed all the programs to be installed. Click the Next
button to accept the license agreement and, after clicking Next again, comes up the
window to set the path where the WampServer is installed. We will leave the default,
which is c:\wamp, as the following image:

Chapter 2 - Preparing the environment in Windows 8
Click again on the Next button and select the option to Create a Desktop icon. This
is necessary so that we can start WampServer if it is inactive. After this window, click
on the Install to start the installation. The files will be copied and, eventually, it will
be necessary to inform the browser that you want to use. In this case, we will choose
the default system browser, and for this it is necessary to find the file explorer.exe,
in which the WampServer Installer automatically opens.
MSVCR100.dll error
If you find an error message saying that the dll MSVCR100.dll is missing,
click this link² to install the Microsoft Visual C++ Redistributable Package,
and then reinstall the Wamp Server.
Click Next and finish the installation. Let selected the option to start the WampServer
and check if there’s a Windows tray icon as shown in the following image.
²http://www.microsoft.com/en-us/download/details.aspx?id=30679

Chapter 2 - Preparing the environment in Windows 9
Click with the left mouse button on this icon to access the WampServers options
menu, similar to the following figure.
Open your browser and go to the following address: http://localhost. The default page
of the WampServer shows up, as in the following figure.

Chapter 2 - Preparing the environment in Windows 10
If you see the WampServer page, the Apache/php/mysql are properly installed. If the
page did not show up, check if the WampServer is properly started. To do this, in the
Windows tray, locate the WampServer icon and make sure that it is in color green.
This page is located at c:\wamp\www\index.php, since c:\wamp\www is the webroot
setup. We will see more details about these settings from Apache in the next chapter.
What we need to know right now is that whenever we typed http://localhost, Apache
points to the address c:\wamp\www.
You must also enable an Apache module called mod_rewrite. Click the Wamp icon
and go to Apache >> Apache Modules >> rewrite_module. Leave this option checked,
as shown in the following figure.

Chapter 2 - Preparing the environment in Windows 11
Creating the virtual domain (virtual host)
It is very helpful to create a virtual domain for each system that we develop. With a
virtual domain we can easily “simulate” a web address in our own computer, without
the need to setup external servers. As an example, we will setup the domain
Initially, create a folder named mysite in the c:\wamp\www folder, and add file called
index.html, with the following content:

Chapter 2 - Preparing the environment in Windows 12
c:\wamp\www\mysite\index.html
<!DOCTYPE html>
<html>
<head>
<meta charset="UTF-8">
<title>MySite</title>
</head>
<body>
This is my site !
</body>
</html>
Now we must set up the httpd.conf file of Apache. This file is located at:
C:\wamp\bin\apache\apache2.4.9\conf
Open it and add the following configuration at the end of the file:
httpd.conf
<VirtualHost *>
ServerName mysite.com
DocumentRoot "c:/wamp/www/mysite"
<Directory "c:/wamp/www/mysite">
Options FollowSymLinks
AllowOverride All
Order allow,deny
Allow from all
</Directory>
</VirtualHost>
The Apache configuration file is similar to the following image:

Chapter 2 - Preparing the environment in Windows 13
This setting creates the virtual domain in Apache, pointing directly at c:/wamp/www/mysite.
It is necessary to restart Apache so that the configuration is reloaded. To restart,
click with the left mouse button on the WampServer icon, in the Windows tray, and
choose the option Restart All Services. The icon will turn red for a while and
then green.
To finish the configuration, it is necessary to change the hosts file of Windows. This
file is located in C:\Windows\System32\drivers\etc. So you can edit it, it is neces-
sary to open it as system administrator. The best way to do this is to open Notepad
as administrator (right-click in the Notepad icon and select run as administrator).
After opening Notepad, open the file C:\Windows\System32\drivers\etc\hosts ,
which should be similar to the following image.

Chapter 2 - Preparing the environment in Windows 14
Add the following statement at the end of the file:
C:WindowsSystem32\drivers\etc\hosts
#virtual hosts
127.0.0.1 mysite.com
The hosts configuration is similar to the following figure.

Chapter 2 - Preparing the environment in Windows 15
After saving the host file, open the browser and go to the following address:
mysite.com (without the www). You should see a page like in the following figure:

Chapter 2 - Preparing the environment in Windows 16
The loaded page is precisely the page c:\wamp\www\mysite\index.html, as config-
ured by the Apache and the Windows host file.
PHP
PHP is installed together with the Apache, thanks to Wamp Server. To test it, create
the file index.php in the folder c:\wamp\www\mysite with the following code:
c:\wamp\www\mysite\index.php
<?php
phpinfo();
The result of the code above is similar to the following image:

Chapter 2 - Preparing the environment in Windows 17
MySql
To test MySql, we could create a PHP file to display the database created during
installation. To do this, create the file mysql.php into directory c:\wamp\www\mysite,
with the following code:
c:\wamp\www\mysite\mysql.php
<?php
$dbh = new PDO( "mysql:host=localhost", "root", "" );
$dbs = $dbh->query( 'SHOW DATABASES' );
while( ( $db = $dbs->fetchColumn( 0 ) ) !== false )
{
echo $db.'<br>';
}
The result of the code above is similar to the following image:

Chapter 2 - Preparing the environment in Windows 18
Composer
Access this url³ and install the Composer for Windows. During Setup, select the
option Install Menu Shell, as in the following figure, leaving the other installation
options as default. Note that the Composer needs the PHP executable, which will be
found in Wamp Server.
³https://getcomposer.org/Composer-Setup.exe

Chapter 2 - Preparing the environment in Windows 19

Chapter 2 - Preparing the environment in Windows 20
Testing the Composer
We will perform a test on the composer, installing the Laravel. Open the folder
c:\wamp\www\mysite by the Windows Explorer and right-click the folder. Click the
option Use Composer Here, to start the package manager, as shown in the following
figure:
To install the Laravel, type the following command:
composer create-project laravel/laravel --prefer-dist

Chapter 2 - Preparing the environment in Windows 21
Through this command, a copy of the Laravel application will be installed in the
current directory. You can install the Laravel this way, but there is another way to
do this.
Laravel
The Laravel installation is done by the following command, which can be executed
via the Windows Prompt (use the option run as administrator):
cd c:\wamp\www\mysite
composer global require "laravel/installer=~1.1"
After the installation, we must make the Laravel an application that can be executed
via command line. For that, you need to add the following directory:

Chapter 2 - Preparing the environment in Windows 22
C:\Users\USER\AppData\Roaming\Composer\vendor\bin
on the PATH of Windows. Be sure to change the USER for the user name you are
logged in.
After you add the PATH, open the Windows command line and type laravel. The
result should be similar to the following figure:
With laravel installed, you can run the following command:
cd c:\wamp\www\
laravel new blog
This command will create an implementation of the Laravel whose name is blog.

Chapter 2 - Preparing the environment in Windows 23
Bower
Bower requires the installation of the Node, npm and git. To install the Node in
Windows, go to https://nodejs.org⁴ and click Download for Windows. Download the
msi file and run it. Make sure the npm package is installed according to following
image:
To install the git, visit http://git-scm.com⁵ and click Download for Windows.
Download and install using the following option: “Use Git from the Windows
Command Prompt”.
⁴https://nodejs.org
⁵http://git-scm.com/

Chapter 2 - Preparing the environment in Windows 24

Chapter 2 - Preparing the environment in Windows 25
After you install these two programs, you can install Bower. To do this, open the
terminal (cmd.exe) in Windows and use the following command:
npm install -g bower

Chapter 2 - Preparing the environment in Windows 26
After installation, we can test bower by installing the AngularJS. To do this, go to
the directory c:\wamp\www\mysite\ in the command window and type the following
command:
bower install angular bootstrap

Chapter 2 - Preparing the environment in Windows 27

Chapter 3 - Preparing the
environment in Linux
In this chapter we will be installing all necessary programs so that we can begin to
develop in Laravel and AngularJS. We’re using the Ubuntu 14.04, which is based on
Debian and the package manager apt-get.
When we reference the path of a file in Linux, we always use user
directory home/user. Be sure to change to the directory equivalent to your
username.
The list of programs below contains all the programs that we will install:
Apache
The web server that will host everything on the server. Perhaps you know
Apache or at least have a certain knowledge of how it works. In this work
we will also learn how to create a virtual domain and perform more complex
setups.
MySql
Will be our default database, for all our examples.
Composer
How to install the frameworks on the server is changing radically. Before,
we needed to download a zip file and unzip it on the server. With the rapid
evolution of PHP in recent years, appeared the package managers and among
them we have the Composer, which allow us to place several frameworks
in PHP through the command line (shell). Very similar to apt-get from
Linux/Debian and its derivatives. The Composer works a little different from
the other package managers because it is not installed globally in the operating
system, but rather locally in your PHP project. In this way, the Composer is a
dependency Manager of your project, not a project manager as we know.
Chapter 3 - Preparing the environment in Linux 29
Bower
The Bower is also a package manager, except for the javascript libraries that we
will use. Combining the Bower and the Composer, we can install any library
for both the server and the client without the need to perform any type of
external download. We also have the advantage of being able to update the
libraries instantly.
Laravel
We will install Laravel via the Composer, since this is the only way to install
it.
AngularJS
AngularJS will be installed via the Bower.
Bootstrap
The Bootstrap is a Javascript/CSS library that will provide a significant
improvement on the visual layer of the application. It will also be installed
by Bower.
Sublime Text
The Sublime Text is a versatile and powerful text editor. You can use it in all the
processes of web development of this work. In fact, this book was written using
the Sublime. To install the Sublime Text, go to http://www.sublimetext.com/
and do the installation according to your operating system.
Apache
To install Apache on Linux, you can use the apt-get package manager, available in
Ubuntu and in any Linux operating system that has Debian as a base.
$ sudo apt-get install apache2 apache2-utils
After installation, Apache is already running, and may be tested accessing http://localhost
in the browser, with the following response:

Chapter 3 - Preparing the environment in Linux 30
Creating the virtual domain (virtual host)
It is very helpful to create a virtual domain for each system that we develop. With
a virtual domain we can easily “simulate” a web address in our own computer,
without the need to setup external servers. As an example, we will setup the domain
mysite.com, so when we type www.mysite.com on the Browser, Apache will point
to the folder /home/user/www/mysite. Remember that the real site will no longer be
accessible, at least while the server is active, then do not use known sites for your
tests.
Initially, create the folder home/<user>/www/mysite, and add the file index.html
with the following content:
$ mkdir www
$ mkdir www/mysite

Chapter 3 - Preparing the environment in Linux 31
/home/user/www/mysite/index.html
<!DOCTYPE html>
<html>
<head>
<meta charset="UTF-8">
<title>MySite</title>
</head>
<body>
This is my site !
</body>
</html>
Now, create the file mysite.com.conf in /etc/apache2/sites-available:
$ sudo gedit /etc/apache2/sites-available/mysite.com.conf
<VirtualHost *:80>
ServerAdmin [email protected]
ServerName mysite.com
ServerAlias www.mysite.com
DocumentRoot /home/user/www/mysite/
ErrorLog /home/user/www/mysite.error.log
CustomLog /home/user/www/mysite.access.log combined
</VirtualHost>
After you create the configuration file, you must enable the site with the following
command:
$ sudo a2ensite mysite.com
To allow apache to access the directory /home/user/www, you need to add this
permission in /etc/apache2/apache2.conf file, as follows:
Chapter 3 - Preparing the environment in Linux 32
$ sudo gedit /etc/apache2/apache2.conf
Add the following configuration:
<Directory /home/user/www>
Options Indexes FollowSymLinks
AllowOverride None
Require all granted
</Directory>
And finally restart apache:
$ sudo service apache2 restart
With the apache configuration ready, we should change the hosts file of Linux, as
follows:
$ sudo gedit /etc/hosts
And add the following configuration:
127.0.0.1 mysite.com

Chapter 3 - Preparing the environment in Linux 33
With all the settings ready, open the url mysite.com, the result should be similar to
the following figure:

Chapter 3 - Preparing the environment in Linux 34
PHP
To install PHP on Linux, run the following command:
$ sudo apt-get install php5 php5-mysql php-pear php5-mcrypt
After installation, create the file /home/user/www/mysite/index.php with the fol-
lowing contents:
/home/user/www/mysite/index.php
<?php
phpinfo();
And access the file index.php in the browser with the url http://mysite.com/index.php,
obtaining the following result:

Chapter 3 - Preparing the environment in Linux 35
MySql Server
To install the MySql Server, run the following command:
$ sudo apt-get install mysql-server
Note that some information will be requested such as the password for user root. In
this case, leave the password blank, because we are creating a test environment.

Chapter 3 - Preparing the environment in Linux 36
After installation, we can test the MySql creating the file /home/user/www/mysite in
mysql.php with the following contents:
/home/user/www/mysite/mysql.php
<?php
$dbh = new PDO( "mysql:host=localhost", "root", "" );
$dbs = $dbh->query( 'SHOW DATABASES' );
while( ( $db = $dbs->fetchColumn( 0 ) ) !== false )
{
echo $db.'<br>';
}
The code above produces the following result:

Chapter 3 - Preparing the environment in Linux 37
Composer
To install the Composer on Linux, run the following command:
$ curl -sS https://getcomposer.org/installer | php
If your Linux does not have curl, install it with the command sudo apt-get install
curl.
After installation, note that there is a file composer.phar in the directory where
you ran the above command. You can run this file with PHP. For instance, run the
following command line:
$ php composer.phar --version
To become the global operating system composer, you must move it to the directory
/usr/local/bin , with the following command:
Chapter 3 - Preparing the environment in Linux 38
$ sudo mv composer.phar /usr/local/bin/composer
After that, you can verify that the composer is properly installed by running the
following command:
$ composer --version
Laravel
The Laravel will be installed by the Composer. To install it, run the following
command:
$ composer global require "laravel/installer=~1.1"
After the installation, you must add the directory ∼/.composer/vendor/bin to
PATH of the system. In Ubuntu, this can be done by editing the file .profile, by
the following command:
$ gedit /home/user/.profile
At the end of the file, add the following line:
PATH="$PATH:~/.composer/vendor/bin"

Chapter 3 - Preparing the environment in Linux 39
After saving the file .profile, is necessary to login again on Linux, so that the
profile is reloaded. After the login, open the terminal and type laravel, to have
a response similar to the following image:

Chapter 3 - Preparing the environment in Linux 40
This means that the laravel is installed in the system, and you can run several
commands that it provides. For example, to create a new application, simply run:
$ laravel new blog
Whose result is the application “blog” duly established with all its default structure.
Bower
To install the Bower, you need to install the git and the npm:
$ sudo apt-get install git npm
After installing these packages, run:
$ sudo npm install -g bower
And, after installation, run the following command:
Chapter 3 - Preparing the environment in Linux 41
$ sudo ln -s /usr/bin/nodejs /usr/bin/node
After that, you can install most javascript frameworks on the market by executing
the command bower install. The following example installs the jQuery.
$ bower install jquery
With the above command, jQuery will be installed in the directory and you can
reference it in the file html as follows:
<script src="bower_components/jquery/dist/jquery.min.js"></script>
AngularJS + Bootstrap
You can install the AngularJS with the Bootstrap using the Bower, as follows:
$ bower install angular bootstrap
Part 2 - Laravel

Chapter 4- Getting to know the
Laravel
Now that we have all libraries properly installed, we can initiate the study of Laravel.
An application in Laravel can be created by the following command:
laravel new blog
With this command, an application with the name blog is created. Let’s run this
command in the web directory of our system, which can be /home/user/www on
Linux or c:\wamp\www on Windows .
The file structure created in the project “blog” is similar to the following figure:

Chapter 4- Getting to know the Laravel 44
Configuring the virtual host
The first task after you create the application is to set up your virtual host. Let’s as-
sume that this application should be accessed via the url blog.com. For the Windows
environment, edit the file C:\wamp\bin\apache\apache2.4.9\conf\httpd.conf in-
cluding the following text in the end:
Chapter 4- Getting to know the Laravel 45
<VirtualHost *>
ServerName blog.com
DocumentRoot "c:/wamp/www/blog/public"
<Directory "c:/wamp/www/blog/public">
Options FollowSymLinks
AllowOverride All
Order allow,deny
Allow from all
</Directory>
</VirtualHost>
And change the hosts file including the following text:
127.0.0.1 blog.com
After restart the Wamp Server, open the url blog.com, getting the response:

Chapter 4- Getting to know the Laravel 46
For Linux environments
Follow the steps in Chapter 3 to create the virtual host, as done for the
domain mysite.com.
Note that the virtual domain was created pointing to the folder blog/public, which
should be the only directory visible to external access. For security reasons, the other
directories of the application, such as “app” and “config”, should never have public
access. Do not create the virtual domain pointing to the directory of the application,
especially on production servers. Always create it pointing to the public directory.
Directory permission
If you have any problem related to permission while accessing the url blog.com,
for instance Failed to open stream: Permission denied, you must give written

Chapter 4- Getting to know the Laravel 47
permission to the storage directory of the application. On Linux, do:
$ sudo chmod -R 777 www/blog/storage
Generating an encryption key
It is important for the security of your application to encrypt any type of information
that will be allocated in the session or the cookies that the system creates. To do this,
you must run the following command:
php artisan key:generate
Run it in the blog directory, as shown in the following figure:
Routes
In the simplest definition of HTTP access, we always have two common actions in
any web technology: Request and Response. A * Request * is performed when the
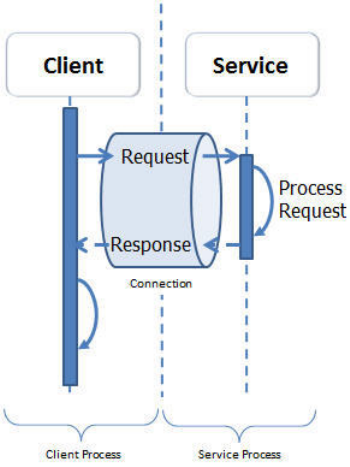
Chapter 4- Getting to know the Laravel 48
browser (which we call client) makes an access to a server via an URL. This URL
contains, in the most basic format, the access path to the server, which is commonly
called web address, and the type of the request, which can be GET and POST, among
others. After the web server processes this request, it sends a response to the client,
usually in text format. This “conversation” between the client and the server can be
illustrated in the following figure:
This idea must be understood so that we can continue to the routing definition.
Defining a route is setting up a particular URL to perform something unique within
our system. That is, through the routing we can create URLs that will define how the
AngularJS will access the server to get data. This step is critical for us to understand
how AngularJS will “talk” to the Laravel.
First, let’s open the Laravel routing, which is located in app/Http/routes.php:

Chapter 4- Getting to know the Laravel 49
blog\appHttp\routes.php
<?php
Route::get('/', function () {
return view('welcome');
});
Using the Route::get we are creating a custom configuration for the GET request,
which is the request made by the browser when we access any URL. The first
parameter of this method is / which means the root of the Web site address, in
this case blog.com. The second parameter is an anonymous function that will be
executed to set the response to the client. This function contains the following code
return view('welcome'); that defines the creation of a view from laravel, as in the
following image:

Chapter 4- Getting to know the Laravel 50
Let’s do a simple change to the code so that instead of generating a view from Laravel,
it returns the text “Hello World”. See:
blog\appHttp\routes.php
<?php
Route::get('/', function () {
return "Hello World";
});
After refreshing the blog.com page, we have the following result:
With this, we can use the Laravel routing to create all the necessary functions for the
AngularJS to communicate with the server. When we create a real project, you will
see that the starting point of the project is to create the routing configuration, that

Chapter 4- Getting to know the Laravel 51
we will call RESTful API, even though the term API is not the correct definition for
this process.
To create a RESTful API, it is necessary to know all the routing configurations that
the Laravel provides, and we will see that below in detail.
Routing types (verbs)
A web request can be classified in many different types, that we call by the term
VERBS. In our examples, we will use the following types: GET, POST, PUT, DELETE.
Each type will define a common action, which can be understood by the following
table:
Method Action Example
GET Responds with simple
information about a resource
GET blog.com/user/1
POST Used to add data and
information
POST blog.com/user
PUT Used to edit data and
information
PUT blog.com/user
DELETE Used to remove an
information
DELETE blog.com/user/1
To use other types of request in addition to GET, you can use the following code:
blog\app\Http\routes.php
<?php
Route::get('/', function () {
return "Hello World";
});
Route::post('user/', function () {
return "POST USER";
});
Route::put('user/', function () {
return "PUT USER";

Chapter 4- Getting to know the Laravel 52
});
Route::delete('user', function () {
return "DELETE USER";
});
You can also use more than one type of request, as in the following example:
blog\app\Http\routes.php
<?php
Route::match(['get', 'post'], '/', function () {
return 'Hello World with GET or POST';
});
Is valid to remember that, by convention, everytime we change data, we should use
POST or PUT, and when any data is deleted, use DELETE. In current browsers, PUT
and DELETE are not yet supported, but that will not be a problem for our system
because all AngularJS client requests made to the Laravel server will be via Ajax.
Passing parameters in routing
You can configure one or more parameters that must be passed by the URL. For
instance, the URL “/hello/bob” has the following response: “Hello world!”. To do this,
create the parameter {name}, according to the code as follows:
blog\app\Http\routes.php
<?php
Route::get('/hello/{name}', function ($name) {
return "Hello World, $name";
});

Chapter 4- Getting to know the Laravel 53
Note that the parameter created is defined in the URL with the use of keys, and also
set as a parameter in the anonymous function. The result of the code above should
be as below:
You can create as many parameters as needed, recommending only that use / to
each of them. You can also pass an optional parameter through the use of the ?. The
following example shows a simple way to add 2 or 3 numbers:
blog\app\Http\routes.php
<?php
Route::get('/sum/{value1}/{value2}/{value3?}',
function ($value1,$value2,$value3=0) {
$sum = $value1+$value2+$value3;
return "Sum: $sum";
});

Chapter 4- Getting to know the Laravel 54
Using regular expressions
Sometimes it is necessary to set up a condition for the routing to be success-
ful. In the sum of numbers example, what would happen if we used the url
“blog.com/sum/1/two/4”? Possibly throw an error in PHP, since we need to sum only
numbers. In this way, we can use the attribute where as a condition for routing to
be performed. The following example ensures that the sum is performed only with
numbers:
blog\app\Http\routes.php
<?php
Route::get('/sum/{value1}/{value2}/{value3?}',
function ($value1,$value2,$value3=0) {
$sum = $value1+$value2+$value3;
return "Sum: $sum";
})->where([
'value1'=>'[0-9]+',
'value2'=>'[0-9]+',
'value3'=>'[0-9]+'
]);
To validate a string, you can use [A-Za-z]. Any level of regular expression validation
can be used.
Many routes use the primary key of the record in their URLs, which makes it
necessary to verify if this key is an integer. For example, to delete a user, we could
use the following setup:

Chapter 4- Getting to know the Laravel 55
blog\app\Http\routes.php
<?php
Route::delete('/user/{id}', function ($id) {
return "delete from user where idUser=$id";
})->where('id', '[0-9]+');
The example above is perfectly valid, but assume that almost all its routes have ids,
and must be validated. In that case all routes would have the ->where(), making the
code more repetitive and breaking the DRY (Don’t Repeat Yourself) principle.
To fix this problem we can set up that every variable called id must be a number. To
do this in Laravel, we must add a pattern in the file app/Providers/RouteServi-
ceProvider.php, as follows:
blog\app\Providers\RouteServiceProvider.php
<?php
namespace App\Providers;
use Illuminate\Routing\Router;
use Illuminate\Foundation\Support\Providers\RouteServiceProvider as \
ServiceProvider;
class RouteServiceProvider extends ServiceProvider
{
protected $namespace = 'App\Http\Controllers';
public function boot(Router $router)
{
$router->pattern('id', '[0-9]+');
parent::boot($router);
}

Chapter 4- Getting to know the Laravel 56
/// code continues
}
The class RouteServiceProvider provides all the routing functionality of your
application, including the creation of routes that are in the file app\http\routes.php.
Using the pattern you can set a default regular expression for a variable, in this case
id. This way, any variable called id in routing will have the regular expression tested.
Naming routings
You can add a name to a route to use it in other routes. This avoids the use of writing
directly to the URL route, improving the code stream. In the following example,
assume two distinct routes, it will create a new user and return a text with a link to
his profile. You can write the following code:
blog\app\Http\routes.php
<?php
Route::get('user/{id}/profile', function ($id) {
return "Show Profile id: $id";
});
Route::get('user/new', ['as' => 'newUser', function () {
return "User created. <a href='blog.com/user/1/profile'>See Pro\
file</a> ";
}]);
Note that the link < a href ... > created, include the domain name and the path
of blog.com route, which is not good because if there is any change in the name of
the domain or URL of the route this link will no longer work. To fix it, we should
initially name the route that displays the user’s profile, as follows:

Chapter 4- Getting to know the Laravel 57
blog\app\Http\routes.php
<?php
Route::get('user/{id}/profile',
['as' => 'profileUser', function ($id) {
return "User profile id: $id";
}]);
Note that the second parameter of the method Route::get becomes an array, which
contains two elements, the first being identified by the key and containing the name
of the routing, and the second the function we already know.
After you create the name of the route, you can get the full URL using the route, as
in the following code:
blog\app\Http\routes.php
<?php
Route::get('user/{id}/profile',
['as' => 'profileUser', function ($id) {
return "User profile id $id";
}]);
Route::get('user/new', ['as' => 'newUser', function () {
$userProfileLink = route('profileUser',['id'=>1]);
return "User Created.
<a href='$userProfileLink'>Profile</a>";
}]);
In this code, we use the route method passing the name of the route and the
parameter id.
Grouping routes
Laravel routes configuration allows the grouping of routes to keep a better reading
of the source code. The following example is perfectly valid:

Chapter 4- Getting to know the Laravel 58
blog\app\Http\routes.php
<?php
Route::get('/post/new', function () {
return "/post/new";
});
Route::get('/post/edit/{id}', function ($id) {
return "/post/edit/$id";
});
Route::get('/post/delete/{id}', function ($id) {
return "/post/delete/$id";
});
But the code of these 3 routes can be improved with the command Route::group and
a prefix, as follows:
blog\app\Http\routes.php
<?php
Route::group(['prefix' => 'post'], function () {
Route::get('/new', function () {
return "/post/new";
});
Route::get('/edit/{id}', function ($id) {
return "/post/edit/$id";
});
Route::get('/delete/{id}', function ($id) {
return "/post/delete/$id";
});
});
That is, by creating a prefix, all routes within the Route::group will be bound to it.

Chapter 4- Getting to know the Laravel 59
Middleware
A middleware is a way to filter the requests that are processed by Laravel. There are
routes that, for instance, can only be performed if the user is authenticated, or any
other type of requirement. A middleware is created in the folder app/Http/Middle-
ware, which already has some ready for use.
To better understand the concept, let’s focus on authentication. The Laravel already
has a system ready to authenticate (login) the user, and we will use it here to perform
a test. The authentication middleware is located in app/Http/Middleware/Authen-
ticate.php and you can use it on its route through the following example:
blog\app\Http\routes.php
<?php
Route::get('/testLogin', ['middleware' => 'auth', function () {
return "logged!";
}]);
In this code, by accessing blog.com/testLogin, the page will either be redirected
to the login screen, or throw an unauthorized access error. These details can be
viewed in the file app/Http/Middleware/Authenticate.php, on the handle method.
The main idea of the middleware is providing a way to perform actions before and
after the request, in order to accomplish some specific task.
Controllers
Until now we addressed several concepts about the routing in Laravel and how
we can, through the URL of an application, perform different tasks. The file
blog\app\Http\routes.php create several routes, but we will not program all the
system functionalaties in it. Following the MVC development pattern, most of the
functionality of the system are allocated in the controller and the model of the
application.
A controller is a piece of the application that usually reflects a common entity. For
example, a blog have several entities such as the user, a post and a comment. All

Chapter 4- Getting to know the Laravel 60
these entities, which usually are also system tables, have their own controllers. With
that we leave the routes.php file to configure less common routes of the application,
and use the controllers to set up routes that relate to the entity in question. That is,
the routes related to the user will be configured in the User controller, and the routes
related to a comment will be set up in the Comment controller. All the controllers are
created in the folder app\Http\Controllers, with the suffix “Controller”.
Create a controller is relatively simple, you can create a php file or use the command
line, as the following example:
php artisan make:controller UserController
Implicit Controllers (automatic)
After running the command, the controller UserController is created, with some
relevant code. But what we want for our system is link the routing to the methods
of the controller. That is, after we create the controller UserController we want to
somehow make the URL “blog.com/user/new” to call a method within the controller,
there is no more need to edit the file routes.php. Setting up is relatively easy with

Chapter 4- Getting to know the Laravel 61
the code Route::controller, which must be added to the routes.php file, and must
reference the part of the URL that will contain the redirection and the controller
itself.
In the case of the controller UserController:
blog\app\Http\routes.php
<?php
Route::get('/', function () {
return "Hello World";
});
Route::controller("user","UserController");
After you setting up the URL, that contains /user, will call UserController methods,
we just need to create these methods, whose default is to prefix the request type (Get,
Post, Put, etc) and concatenate with the method name. We can then change the class
blog\app\Http\Controllers\UserController.php to:
blog\app\Http\Controllers\UserController.php
<?php
namespace App\Http\Controllers;
use Illuminate\Http\Request;
use App\Http\Requests;
use App\Http\Controllers\Controller;
class UserController extends Controller
{
public function getIndex(){
return "user/";
}

Chapter 4- Getting to know the Laravel 62
// ....
}
This means that, when performing a call GET with the URL “blog.com/user/show/1”,
the method getShow of class UserController is called, assigning the parameter
id of the method, and returning the text “get user/show/1”. Note that only the
configuration of the controller is in the routes.php, and the whole Setup to access
the methods of the entity User is in the UserController class.
Controllers and Resource
We have seen how to call the routes of an application to a specific controller, but
we can go a little further in the configuration of a controller and create a resource,
which is a set of preconfigured methods with its pre-designed request types. When
we create the controller with the PHP command make artisan: controller the
following methods are created automatically:

Chapter 4- Getting to know the Laravel 63
Create a resource in the routes.php file , with the following code:
blog\app\Http\routes.php
<?php
Route::get('/', function () {
return "Hello World";
});
Route::controller("user","UserController");
//Resource:
Route::resource('user', 'UserController');
We have enabled the following configuration:
Chapter 4- Getting to know the Laravel 64
Type Path Action Method
GET /user index user.index
GET /user/create create user.create
POST /user store user.store
GET /user/{id} show user.show
GET /user/{id}/edit edit user.edit
PUT /user/{id} update user.update
DELETE /user/{id} delete user.delete
Explicit controllers (manual)
When we use Route::controller, we define an automatic access between the
request and the controller, needing only to prefix the method name of the controller.
There is another way to set up the controller application access with the creation of
each method, as the following example:
blog\app\Http\routes.php
<?php
Route::get('/', function () {
return "Hello World";
});
Route::get('user/', 'UserController@index');
Route::get('user/create', 'UserController@create');
Route::post('user/', 'UserController@store');
Route::get('user/{id}', 'UserController@show');
Route::get('user/{id}/edit', 'UserController@edit');
Route::put('user/{id}', 'UserController@update');
Route::delete('user/{id}', 'UserController@delete');
In this way, you need to write each route in the routes.php file, but the implemen-
tation of each route continues in the controller. There are some small advantages
in writing the routes manually. One of them is to use the PHP command artisan
route:list to get the list of routes of your application, as the following image.

Chapter 4- Getting to know the Laravel 65
This will be very useful for the server access API documentation. Another advantage
is having the accurate control of how your web application is being exposed via the
API, thus ensuring a better comfort when debugging the code.
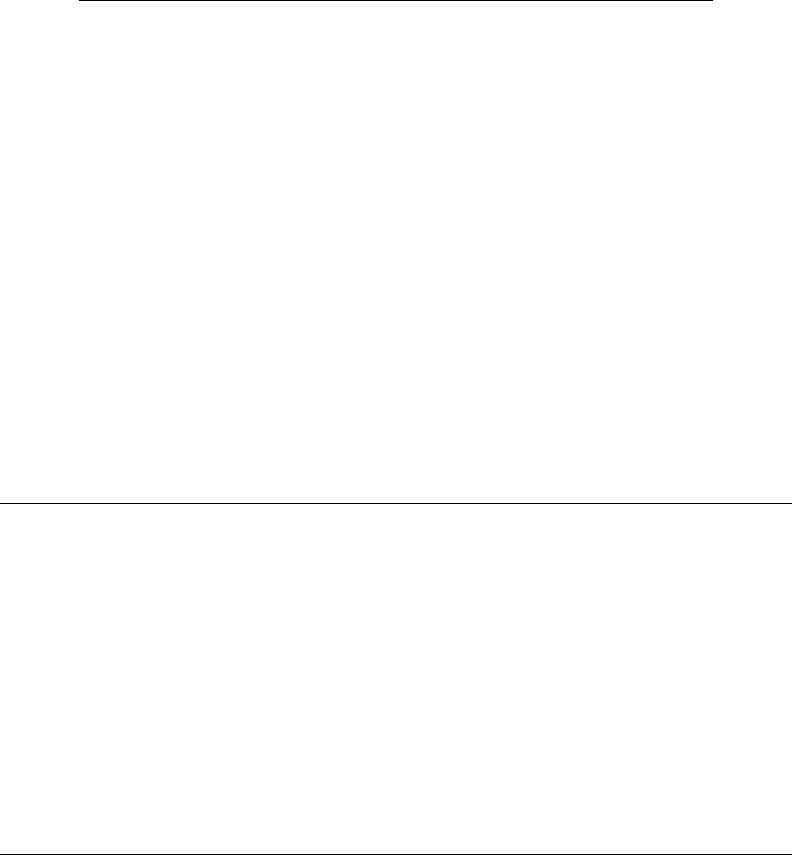
You can also create a routing to display all existing routes in the browser itself, as
the following code:
blog\app\Http\routes.php
<?php
Route::get('routes', function() {
\Artisan::call('route:list');
return "<pre>".\Artisan::output();
});
It displays the following output:
Chapter 4- Getting to know the Laravel 66
Implicit or explicit routing?
There is no consensus among the most correct way. Many programmers like the
implicit mode because they don’t have to define all the routes in the routes.php file,
while others argue that creating these routes manually is the right thing to do. In
this work, the focus is to create something that is simple and intuitive, so instead of
having various methods in the controller that can be accessed freely by AngularJS,
we have, in the routes.php file, all access setting, clearly and concisely.
The way, when we program the server access methods with AngularJS, we know that
these methods are in a single file (API). There are other advantages to use the explicit
access, as the response data formatting (JSON or XML), which will be discussed in a
later chapter.
Ajax
A request is the client (browser) access to the server. In this work, we will be
addressing a Request as being AngularJS connecting to Laravel, via Ajax. This

Chapter 4- Getting to know the Laravel 67
process is widely used to get data from the server, to populate an AngularJS table
or just to persist data.
When Laravel respond to AngularJS, we have the answer (Response), which must
necessarily be performed with a standard format, called JSON, which is a lighter
format than XML and widely used in Ajax requests. The following image illustrates
the process.
We are here setting a data communication standard between the AngularJS and the
Laravel, a pattern used in any client/server communication via Ajax. One of the
advantages of this pattern is that both sides, server and client, are independent in the
process, which means that if any some reason there is an change in the technology
on the client or on the server, the pattern will stay the same.
For example, if there is a need to change the Laravel for some framework in Java
(note that we changed even the programming language), simply create the same API
with the same JSON responses and the client in AngularJS will stay the same.
Similarly, if we keep the Laravel on the server and use another client, as Android in
a mobile device, it can make Ajax requests to the server and get the same data from
the AngularJS.

Chapter 4- Getting to know the Laravel 68
JSON Response
For the Laravel to reply in JSON, all we need is that the method on the controller
return an Array or an object from Eloquent (we will see Eloquent in a later chapter).
For example, assuming the routes.php file contains:
blog\app\Http\routes.php
<?php
Route::get('user/', 'UserController@index');
And the index method of the UserController is:
blog\app\Http\Controllers\UserController.php
<?php
namespace App\Http\Controllers;
use Illuminate\Http\Request;
use App\Http\Requests;
use App\Http\Controllers\Controller;
class UserController extends Controller
{
public function index(){
$array = array('foo', 'bar');
return $array;
}
// .......
}

Chapter 4- Getting to know the Laravel 69
We have the following response in the browser:
That is the Array in JSON format. If there is the need to return an object, the ideal is
to add this object to an Array and return it, as in the following example:
blog\app\Http\Controllers\UserController.php
<?php
namespace App\Http\Controllers;
use Illuminate\Http\Request;
use App\Http\Requests;
use App\Http\Controllers\Controller;
class UserController extends Controller
{
public function index(){
$object = new \stdClass();
$object->property = 'Here we go';
return array($object);

Chapter 4- Getting to know the Laravel 70
}
// .......
}
Whose answer will be:
You can also use the method response ()->json(), as the following example:
blog\app\Http\Controllers\UserController.php
<?php
namespace App\Http\Controllers;
use Illuminate\Http\Request;
use App\Http\Requests;
use App\Http\Controllers\Controller;
class UserController extends Controller
{

Chapter 4- Getting to know the Laravel 71
public function index(){
$object = new \stdClass();
$object->property = 'Here we go';
return response()->json($object);
}
// .......
}
The result is displayed in the following image.
By Convention, we can define the Laravel Controller will always return an array or
an object of Eloquent, always in JSON format.
Exceptions in JSON format
It is vital that the exceptions in Laravel return the same JSON format that we are
adopting. In the following example, when you create a generic exception:

Chapter 4- Getting to know the Laravel 72
blog\app\Http\Controllers\UserController.php
<?php
namespace App\Http\Controllers;
use Illuminate\Http\Request;
use App\Http\Requests;
use App\Http\Controllers\Controller;
class UserController extends Controller
{
public function index(){
throw new \Exception("My error");
return array("ok");
}
// .......
}
We got the following reply:

Chapter 4- Getting to know the Laravel 73
What definitely is not valid for the standard JSON. We have to somehow return this
error in JSON. Fortunately this is entirely possible with Laravel, simply change the
file app\Exceptions\Handler.php as shown in the following code:
blog\app\Exceptions\Handler.php
<?php
namespace App\Exceptions;
use Exception;
use Symfony\Component\HttpKernel\Exception\HttpException;
use Illuminate\Foundation\Exceptions\Handler as ExceptionHandler;
class Handler extends ExceptionHandler
{
protected $dontReport = [
HttpException::class,
];
public function report(Exception $e)
{

Chapter 4- Getting to know the Laravel 74
return parent::report($e);
}
public function render($request, Exception $e)
{
if ($request->wantsJson()){
$error = new \stdclass();
$error->message = $e->getMessage();
$error->code = $e->getCode();
$error->file = $e->getFile();
$error->line = $e->getLine();
return response()->json($error, 400);
}
return parent::render($request, $e);
}
}
In this code, change the method render including a custom error in JSON format.
This error will only be generated in Ajax requests, thanks to if ($request-
>wantsJson()). This is useful to define how the message is presented to the user.
In order to be able to test this error, we must simulate an Ajax request to Laravel,
and this can be accomplished with an extension of Google Chrome called Postman,
adding the URL blog.com/user to the header in the GET request, as the following
image:

Chapter 4- Getting to know the Laravel 75
Summing up, the error is displayed as the request, and as the AngularJS will always
make an Ajax call to Laravel, the error will also be displayed in the JSON format.

Chapter 5 - Database and
persistence
In this chapter we will learn how to manipulate the database from the application via
Laravel, using its tools and persistence library, the Eloquent ORM. We will also learn
how to create the tables with migration and enter the initial data (seeders). As our
purpose in this work is to create a fully functional blog using Laravel and AngularJS,
we will create a table structure similar to the following image.
Configuration
To configure MySQL database access, you must change the file config/database.php,
informing the data needed for access, as shown in the following code:

Chapter 5 - Database and persistence 77
blog\config\database.php
<?php
//..........
'mysql' => [
'driver' => 'mysql',
'host' => 'localhost',
'database' => 'blog',
'username' => 'root',
'password' => '',
'charset' => 'utf8',
'collation' => 'utf8_unicode_ci',
'prefix' => '',
'strict' => false,
],
//..........
Note that the database in this example is “blog”, but he has not yet been created.
To do this, open the terminal and access the MySQL command line. In Windows,
navigate to the folder of the Wamp MySQL Server, according to the following image.
On Linux, just enter mysql-u root in the terminal, in order to obtain the same result.

Chapter 5 - Database and persistence 78
After entering the MySQL command line, create the database “blog” with the
following command:
create database blog

Chapter 5 - Database and persistence 79
With the database created, we can create the system tables.
Using Laravel to create the tables (Migration)
Laravel as other robust frameworks have a concept called Migration, which defines
a way to create tables, fields, indexes etc, as if we were in a file version control. That
means that instead of run instructions like “create table …” in the database, Laravel
will take care of it, according to what we want.
As a test, let’s take advantage of Laravel’s ready template, which is the User class, that
is created since we generate the application blog in the previous chapter. This class is
located in /app/User.php and has, initially, three fields: name, email, and password.
As the class has already been created by Laravel, the migration for it is also created.
All migration files are located in the folder blog/database/migrations. Check this
folder and find the file XXXX_XX_XX_XXXXX_create_users_table.php, where X is a
date when the migration was created. This date is important for Laravel to know the

Chapter 5 - Database and persistence 80
order of migration to be performed. Analyzing migration “create_users_table”, we
have:
blog\database\migrationsXXXX_create_users_table.php
<?php
use Illuminate\Database\Schema\Blueprint;
use Illuminate\Database\Migrations\Migration;
class CreateUsersTable extends Migration
{
/**
* Run the migrations.
*
* @return void
*/
public function up()
{
Schema::create('users', function (Blueprint $table) {
$table->increments('id');
$table->string('name');
$table->string('email')->unique();
$table->string('password', 60);
$table->rememberToken();
$table->timestamps();
});
}
/**
* Reverse the migrations.
*
* @return void
*/
public function down()
{

Chapter 5 - Database and persistence 81
Schema::drop('users');
}
}
Note that we have two methods in the class, up and down. They exist so that we have
the ability to move forward in the maintenance of the database, or back, as needed.
This means that, if a table is created in the up method, it must be removed in the
method down. The same for a field or index.
Inspecting the up method, we find the command Schema::create('users')....
that initiates the creation of the users table. Note that a class in the template called
User has a plural table called users. To keep this pattern (which is followed in all
frameworks), let’s keep the Model class names in singular, and table names in plural.
Migration fields creation types
After create the table users, we have several statements to create the table fields.
The following list enumerate the main commands:
Command Description
$table-
>bigIncrements(id);
Creates a primary
key to increment
using the field “big
integer”
$table-
>bigInteger(votes);
Equivalent to the
BIGINT type
$table->binary(data); Equivalent to the
BLOB type
$table-
>boolean(confirmed);
Equivalent to a
BOOLEAN type
$table->char(name, 4); Equivalent to type
CHAR, with defined
size
$table-
>date(created_at);
Equivalent to type
DATE

Chapter 5 - Database and persistence 82
Command Description
$table-
>dateTime(created_-
at);
Equivalent to the
DATETIME type
$table-
>decimal(amount, 5,
2);
Equivalent to
DECIMAL (5.2)
$table-
>double(column, 15,
8);
Equivalent to type
DOUBLE (15.8)
$table-
>enum(choices,
[foo, bar]);
Equivalent to the
ENUM type
$table-
>float(amount);
Equivalent to type
FLOAT
$table-
>increments(id);
Equivalent to
auto-increment
primary key
$table-
>integer(votes);
Equivalent to type
INTEGER
$table-
>json(options);
Equivalent to the
JSON type
$table-
>jsonb(options);
equivalent to JSONB
type
$table-
>longText(description);
Equivalent to
LONGTEXT
$table-
>mediumInteger(numbers);
Equivalent to
MEDIUMINT type
$table-
>mediumText(description);
Equivalent to
MEDIUMTEXT type

Chapter 5 - Database and persistence 83
Command Description
$table-
>morphs(taggable);
Adds a column
“taggable_id” of type
INTEGER and
another column
“taggable_type” of
type STRING
$table-
>nullableTimestamps();
Equivalent to
Timestamps(),
allowing null
$table-
>rememberToken();
Adds a field
“remember_token” as
VARCHAR (100)
$table-
>smallInteger(votes);
Equivalent to type
SMALLINT
$table->softDeletes(); Adds a deleted_at
column
$table-
>string(email);
Equivalent to
VARCHAR type
$table->string(name,
100);
Equivalent to the
type VARCHAR (100)
$table-
>text(description);
Equivalent to type
TEXT
$table-
>time(sunrise);
Equivalent to the
TIME type
$table-
>tinyInteger(numbers);
Equivalent to the
type TINYINT
$table-
>timestamp(added_-
on);
Equivalent to the
TYMESTAMP type
$table->timestamps(); Adds two columns,
“created_at” and
“updates_at”
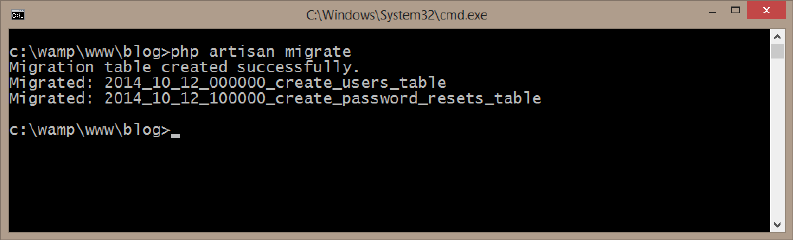
Chapter 5 - Database and persistence 84
Running the migration
With migration ready, we can run it with the following command:
php artisan migrate
The response to this command is similar to the following image.
To verify that the table was created correctly, use the command show tables with
the database blog selected, as in the following image.

Chapter 5 - Database and persistence 85
If the php artisan migrate command is executed again the response will be Nothing
to migrate since all migrations were already done.
Create a new record in the table
Now let’s suppose we need to add a new field to table users, for example the field
phone, of type VARCHAR (30). At this point you should not add the field directly to
the table, or change the migration that created the table users, but rather add a new
migration, with the command:
php artisan make:migration add_phone_to_users_table --table=users
This command generates the following result:

Chapter 5 - Database and persistence 86
After running the command, see that the file: blog/database/migrations/XXXXX_-
add_phone_to_users_table.php was created, which should be similar to the follow-
ing code:
blog\database\migrations\XXXX-add_phone_to_users_table.php
<?php
use Illuminate\Database\Schema\Blueprint;
use Illuminate\Database\Migrations\Migration;
class AddPhoneToUsersTable extends Migration
{
/**
* Run the migrations.
*
* @return void
*/
public function up()
{
Schema::table('users', function (Blueprint $table) {
//
});
}

Chapter 5 - Database and persistence 87
/**
* Reverse the migrations.
*
* @return void
*/
public function down()
{
Schema::table('users', function (Blueprint $table) {
//
});
}
}
In the up, the users table is referenced, since we used the the parameter --
table=users to create the migration command. To add a new field to the table, use
$table->string('phone', 30); in the Schema::table, not forgetting to also remove
the field in the method down. The final code for this migration is:
blog\database\migrations\XXXX-add_phone_to_users_table.php
<?php
use Illuminate\Database\Schema\Blueprint;
use Illuminate\Database\Migrations\Migration;
class AddPhoneToUsersTable extends Migration
{
/**
* Run the migrations.
*
* @return void
*/
public function up()
{
Schema::table('users', function (Blueprint $table) {

Chapter 5 - Database and persistence 88
$table->string('phone', 30);
});
}
/**
* Reverse the migrations.
*
* @return void
*/
public function down()
{
Schema::table('users', function (Blueprint $table) {
$table->dropColumn('phone');
});
}
}
When we execute the command php artisan migrate we have:
After migration is complete, the phone field is added to the table, as shown in the
following image:

Chapter 5 - Database and persistence 89
Rollback a migration
To return a migration, use the command php artisan migrate:rollback. If we run
this command after creating the phone, the migration will be reversed and the field
will be removed.
Additional migration operations
In theory, all the table-level operations and fields can be performed with migration.
The following list displays the main operations.

Chapter 5 - Database and persistence 90
Command Description
$table->engine = InnoDB; Sets the engine table for tables in
MySql.
Schema::rename($from, $to); Renames a table
$table->string(name,
50)->change();
Changes the size of the field to 50
$table->string(name)->nullable(); Allows the column to have null
value
$table->string(email)->unique(); Creates an index on the field
email
$table->unique(email); Creates an index on the field
email
$table->dropUnique(users_-
email_unique);
Removes the index
$table->first(“); Adds the first type the column
(MySql Only)
$table->default($value); Add the default value to the field
$table->unsigned(“); Set the field as UNSIGNED
Referencing columns from other tables
You can create a relationship between the tables, as the following example:
Schema::table(`posts`, function ($table) {
$table->foreign(`user_id`)->references(`id`)->on(`users`);
});
In this example, the field “user_id” will reference the “id” field of the table users.
You can also inform the kind of integrity between the columns, as in the following
example:

Chapter 5 - Database and persistence 91
$table->foreign(`user_id`)->references(`id`)->on(`users`)
->onDelete(`cascade`);
Adding data
You can add dummy data in the tables. This process is called “seed”. To create data
in table users, run the following command:
php artisan make:seeder UserTableSeeder
Then check if the file blog/database/seeds/UserTableSeeder.php was created, and
then edit it adding the following code in the run() method:
blog\database\seeds\UserTableSeeder.php
<?php
use Illuminate\Database\Seeder;
class UserTableSeeder extends Seeder
{
/**
* Run the database seeds.
*
* @return void
*/
public function run()
{
DB::table('users')->insert([
'name' => "joe",
'password' => bcrypt('secret'),
]);
DB::table('users')->insert([

Chapter 5 - Database and persistence 92
'name' => "mike",
'password' => bcrypt('secret2'),
]);
}
}
See that we added 2 records in the table. To perform exclusively this seed, type:
php artisan db:seed --class=UserTableSeeder
If the attribute --class is not informed, the file DatabaseSeeder.php will be
executed. In it, you can reference the file UserTableSeeder.php .
Tables and additional data
Creating the posts data
As we are creating a blog, we need to create a few more tables, such as posts and
comments. To create the posts table, run a migration again:
php artisan make:migration create_posts_table
After you run this command, the file XXXX-create_posts_table.php is created in
the folder blog/database/migrations. Edit the file by adding the following fields:

Chapter 5 - Database and persistence 93
blog\database\migrations\XXXX-create_posts_table.php
<?php
use Illuminate\Database\Schema\Blueprint;
use Illuminate\Database\Migrations\Migration;
class CreatePostsTable extends Migration
{
/**
* Run the migrations.
*
* @return void
*/
public function up()
{
Schema::create('posts', function (Blueprint $table) {
$table->increments('id');
$table->string('title');
$table->text('text')->nullable();
$table->boolean('active')->default(true);
$table->timestamps();
$table->integer('user_id')->unsigned();
$table->foreign('user_id')->references('id')
->on('users') ->onDelete('restrict');
});
}
/**
* Reverse the migrations.
*
* @return void
*/
public function down()
{
Schema::drop('posts');

Chapter 5 - Database and persistence 94
}
}
Add the fields that are related to a post, such as title, the text of the post, if it is
active, among others. In the end, we add the field user_id which relates the author
of the Post, from the table users. This defines a one-to-many relationship between
the tables users and posts. Run the migration as follows:
php artisan migrate
With the table posts created, let’s add some data. First, run the command PHP
artisan make:seeder PostTableSeeder and change the file PostTableSeeder.php
in the folder blog/database/seeds, by inserting the following content:
blog\database\seeds\PostTableSeeder.php
<?php
use Illuminate\Database\Seeder;
class PostTableSeeder extends Seeder
{
/**
* Run the database seeds.
*
* @return void
*/
public function run()
{
DB::table('posts')->insert([
'title' => "My First Post",
'text' => 'Lorem ipsum dolor sit amet, consectetur adipi\
scing elit, sed do eiusmod tempor incididunt ut labore et dolore mag\
na aliqua. Ut enim ad minim veniam, quis nostrud exercitation ullamc\
o laboris nisi ut aliquip ex ea commodo consequat',

Chapter 5 - Database and persistence 95
'user_id' => 1
]);
DB::table('posts')->insert([
'title' => "My Second Post",
'text' => ' Duis aute irure dolor in reprehenderit in vo\
luptate velit esse cillum dolore eu fugiat nulla pariatur. Excepteur\
sint occaecat cupidatat non proident, sunt in culpa qui officia des\
erunt mollit anim id est laborum.',
'user_id' => 1
]);
DB::table('posts')->insert([
'title' => "Hello World",
'text' => 'Sed ut perspiciatis unde omnis iste natus err\
or sit voluptatem accusantium doloremque laudantium, totam rem aperi\
am, eaque ipsa quae ab illo inventore veritatis et quasi architecto \
beatae vitae dicta sunt explicabo',
'user_id' => 2
]);
}
}
After including these three records, run the command to populate the table with the
Seeder data:
php artisan db:seed --class=PostTableSeeder
Creating the comments table
We already have the tables users and posts. Now we will create the table comments,
which are the comments of the blog readers to each Post. First, we create the
migration:

Chapter 5 - Database and persistence 96
php artisan make:migration create_comments_table
And then we create the columns in table comments:
blog\database\migrations\XXXX-create_comments_table.php
<?php
use Illuminate\Database\Schema\Blueprint;
use Illuminate\Database\Migrations\Migration;
class CreateCommentsTable extends Migration
{
/**
* Run the migrations.
*
* @return void
*/
public function up()
{
Schema::create('comments', function (Blueprint $table) {
$table->increments('id');
$table->text('text');
$table->string('email')->nullable();
$table->boolean('active')->default(false);
$table->timestamps();
$table->integer('post_id')->unsigned();
$table->foreign('post_id')->references('id')
->on('posts')
->onDelete('restrict');
});
}
/**
* Reverse the migrations.
*

Chapter 5 - Database and persistence 97
* @return void
*/
public function down()
{
Schema::drop('comments');
}
}
With the migration complete, execute the command php artisan migrate to
generate the table comments and php artisan make:seeder CommentTableSeeder to
create the seeder and add some records, as the following code:
blog\database\seeds\CommentTableSeeder.php
<?php
use Illuminate\Database\Seeder;
class CommentTableSeeder extends Seeder
{
/**
* Run the database seeds.
*
* @return void
*/
public function run()
{
DB::table('comments')->insert([
'text' => 'Very Nice!',
'active' => true,
'post_id' => 1
]);
DB::table('comments')->insert([

Chapter 5 - Database and persistence 98
'text' => 'So dark',
'post_id' => 1
]);
DB::table('comments')->insert([
'text' => 'Very funny lol',
'active' => true,
'post_id' => 1
]);
}
}
After adding some data for the comments, we use php artisan db:seed--class =
CommentTableSeeder to populate the data into the table.
Creating the table tags
Another table matches the tags of the Post. First, create the table tags, with the
command php make artisan: migration create_tags_table and with the
following fields:
blog\database\migrations\XXXX-create_tags_table.php
<?php
use Illuminate\Database\Schema\Blueprint;
use Illuminate\Database\Migrations\Migration;
class CreateTagsTable extends Migration
{
/**
* Run the migrations.
*

Chapter 5 - Database and persistence 99
* @return void
*/
public function up()
{
Schema::create('tags', function (Blueprint $table) {
$table->increments('id');
$table->string('title');
$table->timestamps();
});
}
/**
* Reverse the migrations.
*
* @return void
*/
public function down()
{
Schema::drop('tags');
}
}
Then, execute the command php artisan migrate to generate the table and the the
command php artisan make:seeder TagTableSeeder to populate table tags:
blog\database\seeds\TagTableSeeder.php
<?php
use Illuminate\Database\Seeder;
class TagTableSeeder extends Seeder
{
/**
* Run the database seeds.
*

Chapter 5 - Database and persistence 100
* @return void
*/
public function run()
{
DB::table('tags')->insert([
['title' => "php"],
['title' => "laravel"],
['title' => "angular"],
['title' => "book"]
]);
}
}
Note that the file TagTableSeeder.php, instead of using multiple commands DB::table()-
>insert we use it only once, but we pass an array of records instead of a single record.
Remember to run php artisan db:seed --class=TagTableSeeder to populate the
data in the table.
Creating the post_tag
Our last table is a little more complex than the others, just for being part of the
“many-to-many” relationship between table posts and tags. It has a composite key
that is the reference between the two tables. Initially create the migration with the
command:
php artisan make:migration create_post_tag_table
The file XXXX-create_post_tag_table.php contains:

Chapter 5 - Database and persistence 101
blog\database\migrations\XXXX-create_post_tag_table.php
<?php
use Illuminate\Database\Schema\Blueprint;
use Illuminate\Database\Migrations\Migration;
class CreatePostTagTable extends Migration
{
/**
* Run the migrations.
*
* @return void
*/
public function up()
{
Schema::create('post_tag', function (Blueprint $table) {
$table->integer('post_id')->unsigned();
$table->foreign('post_id')->references('id')
->on('posts')
->onDelete('restrict');
$table->integer('tag_id')->unsigned();
$table->foreign('tag_id')->references('id')
->on('tags')
->onDelete('restrict');
$table->timestamps();
$table->primary(array('post_id','tag_id'));
});
}
/**
* Reverse the migrations.
*
* @return void
*/
public function down()

Chapter 5 - Database and persistence 102
{
Schema::drop('post_tag');
}
}
After running the command php artisan migrate to create the table, run the
command php artisan make:seeder PostTagTableSeeder to create the initial data
in table post_tag:
blog\database\seeds\PostTagTableSeeder.php
<?php
use Illuminate\Database\Seeder;
class PostTagTableSeeder extends Seeder
{
/**
* Run the database seeds.
*
* @return void
*/
public function run()
{
DB::table('post_tag')->insert([
'post_id' => 1,
'tag_id' => 1
]);
DB::table('post_tag')->insert([
'post_id' => 1,
'tag_id' => 2
]);
DB::table('post_tag')->insert([
'post_id' => 2,
'tag_id' => 1
]);

Chapter 5 - Database and persistence 103
DB::table('post_tag')->insert([
'post_id' => 2,
'tag_id' => 2
]);
}
}
And add this data with the command php artisan db:seed --class=PostTagTableSeeder.
Recreating the full database structure
If there is the need to recreate the entire database structure for blog, you can run the
following command:
php artisan migrate:refresh
For the data to be inserted, you must edit the file seeds\DatabaseSeeder.php,
including all the seeds that we created:
blog\database\migrations\DatabaseSeeder.php
<?php
use Illuminate\Database\Seeder;
use Illuminate\Database\Eloquent\Model;
class DatabaseSeeder extends Seeder
{
/**
* Run the database seeds.
*
* @return void
*/
public function run()

Chapter 5 - Database and persistence 104
{
Model::unguard();
$this->call('UserTableSeeder');
$this->call('PostTableSeeder');
$this->call('TagTableSeeder');
$this->call('PostTagTableSeeder');
$this->call('CommentTableSeeder');
Model::reguard();
}
}
After including all seeds in that file, just run the command:
php artisan migrate:refresh --seed
To get a result similar to this:
Chapter 5 - Database and persistence 105
This way, your original database is ready for use and now we can address another
very important concept in Laravel, the Query Builder.
Query Builder
Laravel’s Query Builder is a library used to perform queries in the database. We
are still not addressing the persistence (ORM Eloquent), but learn to manipulate the
Query Builder is important because you can use it also on persistence.
Consulting the SQL generated by the Query Builder
Whenever you want you can return the SQL generated by the Query Builder using
the toSQL() method. The following example illustrates this process.
echo DB::table('users')->toSql();
Result:
select * from `users`
Returning all records in the table
At first, we will test the Query Builder on blog.com website default route, in
file /app/blog Http/routes.php . All commands can be tested according to the
following example:
Route::get('/', function () {
$users = DB::table('users')->get();
return $users;
});
This code returns the following result in the browser:

Chapter 5 - Database and persistence 106
For all instances on the Query Builder, we will always use the Route::get ('/', but
display only the code of the Query Builder. In other words, the above example should
be in this format:
$users = DB::table('users')->get();
return $users;
And the answer in this format:
[
{
"id":1,
"name":"joe",
"created_at":"0000-00-00 00:00:00",
"updated_at":"0000-00-00 00:00:00",
"phone":""
},
{
"id":2,
"name":"mike",
"created_at":"0000-00-00 00:00:00",
"updated_at":"0000-00-00 00:00:00",
"phone":""
Chapter 5 - Database and persistence 107
}
]
Stepping through the records after the query
The method get(), seen above, returns an object that can be iterated, in accordance
with the following code:
$users = DB::table('users')->get();
foreach ($users as $user) {
echo $user->name;
echo "<br/>";
}
Result:
joe
mike
Returning the first row of a table
You can use the method first() for the first record in the table.
$user = DB::table('users')->where('name','mike')->first();
return $user->name;
Result:
mike
If you want to return a single value of a single record, you can use the value()
method ‘:
Chapter 5 - Database and persistence 108
$email = DB::table('users')->where('name','mike')->value('email');
return $email;
Result:
mike@gmail.com
Returning a list of values from a table
For a list of values of a given table field, use the method lists():
$tags = DB::table('tags')->lists('title');
return $tags;
Result:
["php","laravel","angular","book"]
Aggregating values
The Query Builder provides various methods for aggregation of values. They are:
count(), max(), min(), avg(), sum(). Examples:
$tags = DB::table('tags')->count();
return $tags;
Result: 4
Selecting fields
Use the select() method to select fields from a query. For example:
Chapter 5 - Database and persistence 109
$users = DB::table('users')
->select("name","email","created_at as joinDate")
->get();
return $users;
Result:
[
{
"name": "joe",
"joinDate": "0000-00-00 00:00:00"
},
{
"name": "mike",
"joinDate": "0000-00-00 00:00:00"
}
]
Joins
You can use
joins
by the Query Builder in the same way we do with a common SQL.
The following code sample gets all posts with its author’s name.
$posts = DB::table('posts')
->join("users","users.id","=","posts.user_id")
->select("users.name","posts.title")
->get();
return $posts;
Result:
[
{
Chapter 5 - Database and persistence 110
"name": "joe",
"title": "My First Post"
},
{
"name": "joe",
"title": "My Second Post"
},
{
"name": "mike",
"title": "Hello World"
}
]
To perform a left join, just use ->leftJoin().
Unions
To join two SQL, use the function ->union(), as follows:
$first = DB::table('posts')
->select("title")
->where("active","=",true);
$second = DB::table('posts')
->select("title")
->union($first)
->where("user_id","=",1)
->get();
return $second;
Result:
[
{
"title": "My First Post"
Chapter 5 - Database and persistence 111
},
{
"title": "My Second Post"
},
{
"title": "Hello World"
}
]
Where
The where clause will be one of the most used to perform queries. To create a filter,
use the function ->where() as shown in the following examples:
$users = DB::table('users')
->where('votes', '>=', 100)
->get();
$users = DB::table('users')
->where('votes', '<>', 100)
->get();
$users = DB::table('users')
->where('name', 'like', 'T%')
->get();
In these examples, we have the use of like together with the % sign to truncate the
filter, displaying all values that begin with the letter T.
Everytime multiple ordered ->where() are used, it is established that the operator
AND is assigned to each clause. To use the operator OR, we must use the function -
>orWhere(). And for a range of values we use the function ->whereBetween(), as the
following example.
Chapter 5 - Database and persistence 112
$users = DB::table('users')
->whereBetween('votes', [1, 100])->get();
The same goes for whereNotBetween(), which will exclude the range of values.
The statement IN of SQL is represented by whereIn(), as the following example. The
same goes for function whereNotIn().
$users = DB::table('users')
->whereIn('id', [1, 2, 3])
->get();
The NOT NULL SQL is represented by the function whereNotNull(), which will check
if the field is not null. The same goes for whereNull().
Grouping Wheres
You can combine filters by adding an anonymous function in ->where(). This
function should have as first parameter a variable that represents the query itself.
The following example illustrates this process.
$sql = DB::table('users')
->where('name', '=', 'John')
->orWhere(function ($query) {
$query->where('votes', '>', 100)
->where('title', '<>', 'Admin');
})
->toSql();
return $sql;
Result:
select * from `users` where `name` = `John` or (`votes` > 100 and `t\
itle` <> `Admin`)
Chapter 5 - Database and persistence 113
Note that when creating an anonymous function for the collation between the fields
votes and title, the Query Builder added the brackets, for the statement to be
correct.
Order
To set the order of the query, you use the function ->orderBy(), as in the following
example.
$users = DB::table('users')
->orderBy('name', 'desc')
->get();
GroupBy e Having
Use GroupBy and Having follow the same style of other of Query Builder functions,
as the following example.
$users = DB::table('users')
->groupBy('account_id')
->having('account_id', '>', 100)
->get();
Logging Eloquent’s SQLs
With the following code, we can easily analyze all the Eloquent generated SQLs
in ORM, which we’ll cover next. Copy the code below and paste into the file
app\Http\routes.php.
Chapter 5 - Database and persistence 114
1 <?
2 //Display all SQL executed in Eloquent
3 // in a storage/logs/sql.log file
4 use Monolog\Logger;
5 use Monolog\Handler\StreamHandler;
6 \DB::listen(function($sql, $bindings, $time) {
7
8 if (App::environment()=="local"){
9 $xsql = explode("?", $sql);
10 $nsql = "";
11 for ($i=0; $i < count($xsql)-1; $i++) {
12 $nsql .= $xsql[$i] . $bindings[$i];
13 }
14 $view_log = new Logger("SQL");
15 $view_log->pushHandler(
16 new StreamHandler(storage_path().'/logs/sql.log')
17 );
18 $view_log->addInfo($nsql?:$sql);
19 }
20 });
On lines 4 and 5 we added the Logger and StreamHandler classes of the Monolog
library that Laravel uses. At line 6, we added a listener, that will be executed
whenever any SQL in Laravel is executed. With this listener we can capture the
SQL to be executed. At line 8 check whether the application is running locally, to
avoid generating log in production environment. Lines 9 to 13 edit the SQL for better
reading. At line 14 we created a new Logger and at line 15 we define this Logger will
be saved in the file storage/logs/SQL.log. In this way we will have a file with only
the SQL executed by Laravel. Finally, at line 18, add the SQL to this log.
In later chapters, when testing the queries of Eloquent, you will see the log being
generated in the file storage/logs/SQL.log, similar to the following image.

Chapter 5 - Database and persistence 115
Eloquent ORM
Eloquent is the object-relational mapping library from Laravel. With the imple-
mentation of a design pattern called Active Record, that matches the Model of an
application, Eloquent makes it possible to carry out operations on the database
without the need to write SQL. Instead of SQL, you use objects to persist data in
the database.
The first step in Eloquent is to set the models of the application. At first, each table
corresponds to a model, that is, the table users corresponds to the User model, that
has already been created by Laravel. For example, with the following diagram, we
need to create the following templates:
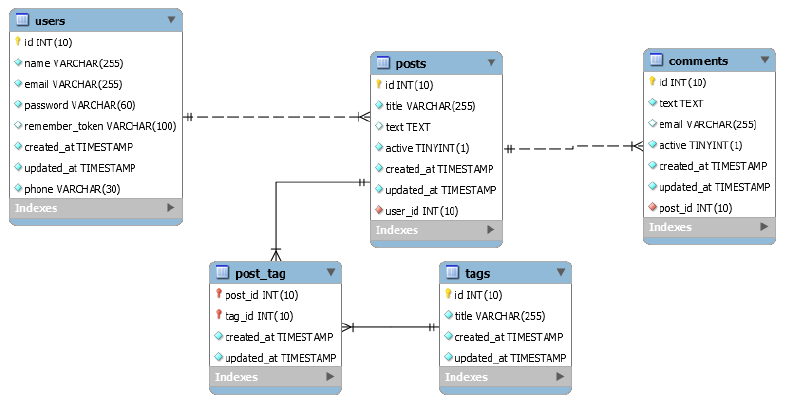
Chapter 5 - Database and persistence 116
• Post
• Tag
• Comment
Note that the table post_tag won’t have its model, because we will set up the Post
model access to the Tag model later.
Creating the model
To create the model, open the command line, navigate to the blog folder and type:
php artisan make:model User
php artisan make:model Tag
php artisan make:model Comment
The result of the above command is similar to the following image.
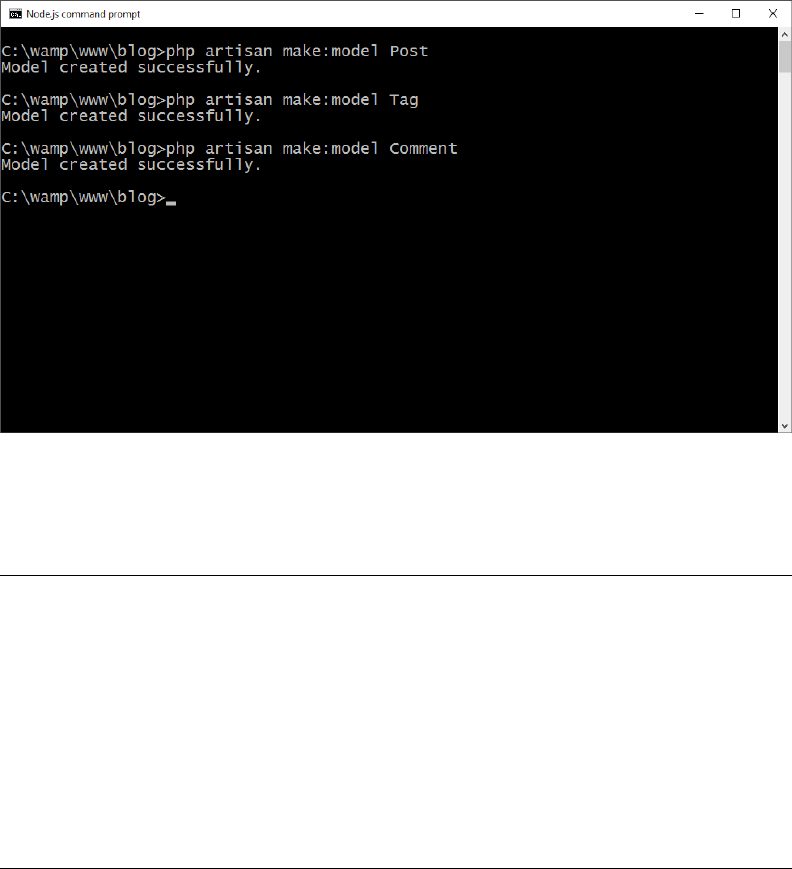
Chapter 5 - Database and persistence 117
The model is created in blog/app, for example, the model Post is created in the file
blog/app/Post.php, initially with the following code:
/blog/app/Post.php
<?php
namespace App;
use Illuminate\Database\Eloquent\Model;
class Post extends Model
{
//
}
Agreements between tables and model
Note that the class Post is created, which extends directly from the class Illumi-
nate\Database\Eloquent\Model and that it is, initially, empty. As we did in creating

Chapter 5 - Database and persistence 118
the tables and on migration, we are keeping the default model names in the singular,
class names in plural, primary keys are “id” fields and foreign keys are the name of
the class followed by the prefix “_id”. All this is necessary for Eloquent to access the
tables. If there is any difference in the name of the class or the primary key, you must
report this change to the class itself. For example, if the table name of the model Post
was blog_post and the name of the primary key was postid, Post should possess
two extra properties $table and $primaryKey, as the following example:
/blog/app/Post.php
<?php
namespace App;
use Illuminate\Database\Eloquent\Model;
class Post extends Model
{
protected $table = 'blog_post';
protected $primaryKey = 'postid';
}
Use of the Timestamp
The timestamp fields created_at and updates_at will be filled in automatically
by Eloquent. If you do not want to use them, create the following variable public
$timestamps = false; in the class.
Testing the User model
With this example we verify the use of Eloquent. Remember that the process to create
several routines in Laravel follows basically the same pattern shown below.

Chapter 5 - Database and persistence 119
Routing
The file app\Http\routes.php, create an entry for the url blog.com/users to call the
getAll method of the controller App\Http\Controllers\UserController.php.
/blog/app/Http/routes.php
<?php
Route::get('/users', 'UserController@getAll');
Create the method on the controller
After setting up the routing, create the method in the controller, as shown in the
following code.
/blog/app/Http/Controllers/UserController.php
1 <?php
2
3 namespace App\Http\Controllers;
4
5 use App\Http\Controllers\Controller;
6 use App\User;
7
8 class UserController extends Controller
9 {
10
11 public function getAll()
12 {
13 return User::all();
14 }
15
16 }

Chapter 5 - Database and persistence 120
The result for the above code is illustrated in the following image:
Understanding the UserController
The code of the UserController class brings us many new features. Initially, at line 3,
we have the definition of the class namespace, which from version 5 of PHP became
a best practice to use. At lines 5 and 6 we include the classes Controller and User,
again a good practice (we will not use the include command).
At line 11 we created the getAll method that has only single line, which is just to
call the User class followed by the static method all, with code User::all(). Note
that we return the output of the all() method, in which Laravel will automatically
parse to JSON, because its his default behavior when a method returns an * array *
or an Eloquent object.
Now, create the other controllers for our blog: TagController, PostController and
CommentController.
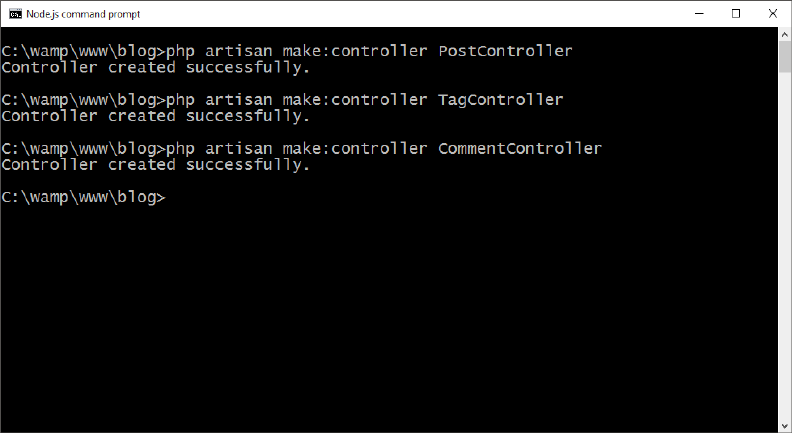
Chapter 5 - Database and persistence 121
Relationships in Eloquent
After creating the model, initially without any information, we need to inform
what are the relationships between the classes. This relationship is a mirror of the
relationship between the tables. Rather than list the types of existing relationships,
we go through our tables diagram to set up each of the existing relationships.
Relationships between users and posts
There is a one-to-many relationship between the User and Post classes. It means that
a User can have many Posts. To accomplish this, simply create the method posts in
the User class, as follows:

Chapter 5 - Database and persistence 122
/blog/app/User.php
<?php
namespace App;
use Illuminate\Auth\Authenticatable;
use Illuminate\Database\Eloquent\Model;
use Illuminate\Auth\Passwords\CanResetPassword;
use Illuminate\Contracts\Auth\Authenticatable as AuthenticatableCont\
ract;
use Illuminate\Contracts\Auth\CanResetPassword as CanResetPasswordCo\
ntract;
class User extends Model implements AuthenticatableContract, CanRese\
tPasswordContract
{
/// ....initial code....
public function posts(){
return $this->hasMany('App\Post');
}
}
The method posts() returns the instruction $this->HasMany('App\Post') and with
we can state that a User may have many posts. You need to also set up the
relationship between Post and User, i.e. a Post has only one User. To do this, add
the following method in the class app\Post:

Chapter 5 - Database and persistence 123
/blog/app/Post.php
<?php
namespace App;
use Illuminate\Database\Eloquent\Model;
class Post extends Model
{
public function user(){
return $this->belongsTo("App\User");
}
}
In this way we concluded the relationship between the two classes. To better
understand how this relationship will work, let’s create a method in the routes.php
illustrating its use.
/blog/app/Http/routes.php
1 <?
2
3 use App\User;
4 use App\Post;
5 Route::get('/users_posts', function () {
6
7 $users = User::all();
8
9 foreach ($users as $user) {
10 echo "<h1>{$user->name}</h1>";
11 echo "<ul>";
12 foreach ($user->posts as $post) {
13 echo "<li>{$post->title}</li>";
14 }
15 echo "</ul>";

Chapter 5 - Database and persistence 124
16 }
17
18 });
This method gets all Users at line 7, and loops through them. At line 10, it uses
the property $user->name to return the name of the user, where name is the field
of the table. With a special feature of PHP (called magic methods), it is possible to
connect the columns in the table with the properties of the class. At line 12 we use
the property $user->posts, where posts is precisely the statement ->hasMany() of
the model. With that, posts returns a list of posts from that user. At line 13, use
$post->title to get the value of the column title in the table posts. The result of
this code is shown below.
Relationship between Posts and Comments
We have a one-to-many relationship. The code of the two classes is displayed below.

Chapter 5 - Database and persistence 125
/blog/app/Comment.php
<?php
namespace App;
use Illuminate\Database\Eloquent\Model;
class Comment extends Model
{
public function post(){
return $this->belongsTo("App\Post");
}
public function scopeActive($query)
{
return $query->where('active', 1);
}
}
/blog/app/Post.php
<?php
namespace App;
use Illuminate\Database\Eloquent\Model;
class Post extends Model
{
public function user(){
return $this->belongsTo("App\User");
}
public function comments(){

Chapter 5 - Database and persistence 126
return $this->hasMany('App\Comment');
}
}
Relationship between Posts and Tags
The relationship between these two classes is many-to-many, i.e. a Post can have
many Tags and a Tag can have many Posts. This relationship is defined in tables
diagram with an additional post_tag table with a composite key between tables
Post and Tag. The table post_tag will not be represented in the form of Eloquent
class, it only serves to support the NxM relationship of the classes.
The following code configures this relationship between the classes.
/blog/app/Post.php
<?php
namespace App;
use Illuminate\Database\Eloquent\Model;
class Post extends Model
{
public function user(){
return $this->belongsTo("App\User");
}
public function comments(){
return $this->hasMany('App\Comment');
}
public function tags()
{
return $this->belongsToMany('App\Tag');
}

Chapter 5 - Database and persistence 127
}
/blog/app/Tag.php
<?php
namespace App;
use Illuminate\Database\Eloquent\Model;
class Tag extends Model
{
public function posts()
{
return $this->belongsToMany('App\Post');
}
}
Note that this relationship between the two classes will work only if the tables are
in the default set for classes in this default NxM table that references the two classes
is called “post_tag” and has two keys, post_id and tag_id.
To test this relationship, we will modify the file routes.php with the following code:
/blog/app/Http/routes.php
1 <?php
2 use App\User;
3 use App\Post;
4 Route::get('/users_posts', function () {
5
6 $users = User::all();
7 foreach ($users as $user) {
8 echo "<h1>{$user->name}</h1>";
9 echo "<ul>";

Chapter 5 - Database and persistence 128
10 foreach ($user->posts as $post) {
11 echo "<li>{$post->title}</li>";
12
13 if ( count($post->tags) > 0 )
14 {
15 echo "Tags:<ol>";
16 foreach ($post->tags as $tag) {
17 echo "<li>$tag->title</li>";
18 }
19 echo "</ol>";
20 }
21 }
22 echo "</ul>";
23 }
24 });
At line 13, we added a check for $post->tags->count(), that will count how many
tags a post has. If the $post own tags, we make a new foreach displaying them, as
in the following image.

Chapter 5 - Database and persistence 129
One-to-one relationship
We still don’t have this situation, but if there is a need to create a one-to-one
relationship, we must use the methods hasOne in a class and belongsTo on the other,
as the following example (taken from Laravel documentation).
Chapter 5 - Database and persistence 130
<?php
namespace App;
use Illuminate\Database\Eloquent\Model;
class User extends Model
{
/**
* Get the phone record associated with the user.
*/
public function phone()
{
return $this->hasOne('App\Phone');
}
}
<?php
namespace App;
use Illuminate\Database\Eloquent\Model;
class Phone extends Model
{
/**
* Get the user that owns the phone.
*/
public function user()
{
return $this->belongsTo('App\User');
}
}
Chapter 5 - Database and persistence 131
One-to-many relationship through (Has Many Through)
There is another form of special relationship in Eloquent which is the mapping
“through” of other classes. As an example, suppose the need to see the comments of
all the posts by a particular user. That is, given a User, I want to get all the comments
that were made about the posts that he has. Instead of creating a bond of all posts
and get all the comments of that post, we will create the property user comments
that can be used as a relationship, calling the relationship user->posts->comments.
For simplicity, we have:
User
id
name
Post
id
user_id
title
Comment
id
post_id
text
To set up this relationship, we create the method comments in the User class, as
follows:

Chapter 5 - Database and persistence 132
/blog/app/User.php
<?php
namespace App;
use Illuminate\Database\Eloquent\Model;
class User extends Model
{
/// .....initial code.....
public function comments(){
return $this->hasManyThrough('App\Comment','App\Post');
}
}
After this Setup, you can test it by accessing the comments of the User class.
Analyzing the existence of records in a relationship
You can use the method has to verify the existence of records in relationships. In the
following example, only Posts with comments will be returned.
Post::has('comments')->get();
You can analyze the amount of records, such as in the following example, which only
returns the Posts with more than three comments.
Post::has('comments','>=',3)->get();
Another important feature is to obtain records of relationships via consultation, as
in the following example that gets all posts that contain the word “nice” in their
comments.
Chapter 5 - Database and persistence 133
Post::whereHas(`comments`, function ($query) {
$query->where(`text`, `like`, `nice%`);
})->get();
In this case, we use whereHas instead of has.
Eager Loading vs Lazy Loading and the N+1
problem
If you reviewed the various examples of SQLs generated so far, you may have realized
that Eloquent work in a way called “lazy”, that is, it executes the SQLs according to
the need. In the following code, we have an example of how lazy loading works.
User::find(1)->posts;
This code produces the following SQLs:
select * from `users` where `users`.`id` = 1
select * from `posts` where `posts`.`user_id` = 1
In other words, first it ran a SQL to get all the data from the table users, and then
another SQL to get all the data in table posts. Here we have a problem, instead of
using join, Eloquent performed two SQLs.
In this next example we have a better characterization of the problem “N + 1”.
$posts = Post::all();
foreach ($posts as $post) {
echo $post->user->name . ",";
}
Analyzing the SQLs generated, we have:

Chapter 5 - Database and persistence 134
select * from `posts`
select * from `users` where `users`.`id` = 1
select * from `users` where `users`.`id` = 1
select * from `users` where `users`.`id` = 2
As in the table we have 3 posts, Eloquent ran 3 distinct SQLs to get each user
information, plus the original SQL, which means 4 SQLs for 3 records in the table. If
there were 100 posts in the table, 101 SQLs would be executed and this is bad for the
performance of the database.
Do not think, at this point, that Eloquent is working incorrectly. There is
the “flip side” where getting all the data at once can slow down the SQL
query. We need to know how the ORM works to get the best from it.
To solve the problem “N + 1,” we should inform Eloquent, in that query, replace the
lazy loading by the eager Loading, and this is accomplished with the with method,
as the following example.
$posts = Post::with(`user`)->get();
foreach ($posts as $post) {
echo $post->user->name . ",";
}
When we use the with('user'), the set of SQLs generated is:
select * from `posts`
select * from `users` where `users`.`id` in (1, 2)
That means that only 2 SQLs were executed to achieve the same result, thus solving
the N + 1 problem.
Eager Loading and more advanced queries
The following example will return all posts with their comments and tags.
Chapter 5 - Database and persistence 135
Post::with([`comments`,`tags`])->get();
The result for this code is as follows:

Chapter 5 - Database and persistence 136

Chapter 5 - Database and persistence 137
See that all the fields of each table were added. If you want to improve this result,
you can create an anonymous function for each sub class, informing the fields that
you want to return, as shown in the following code:
Post::with([`comments`=>function($query){
$query->select(`post_id`,`text`);
}])->select(`id`,`text`)->get();
The result for this query is displayed below.

Chapter 5 - Database and persistence 138
Attention
When selecting columns with ->select() inform the ids of the main table
and the foreign keys of related tables, so that Eloquent can perform the
proper relationships.
Still on the issue of the ids, highlighted in the above, let’s assume that we want to
return all posts, followed by all the comments and name of the author of the post.
Note that we are referencing now 3 tables, and the query is a little more complex.
Post::with([`comments`=>function($query){
$query->select(`post_id`,`text`);
},`user`=>function($query){
$query->select(`id`,`name`);
}])->select(`id`,`user_id`,`text`)->get();
The query above returns the following result.

Chapter 5 - Database and persistence 139
It is crucial to understand that you must inform the ids of the relationships between
the tables. In other words, you need to inform the id of the users and, in addition,
you must inform the field user_id from the main table.
Inserting and updating records
To insert or update records by Eloquent, just use the save() method. The following
example will create a new user and then update it.
Chapter 5 - Database and persistence 140
$newUser = new App\User();
$newUser->name = "Paul";
$newUser->email = "[email protected]";
$newUser->save();
$newUserId = $newUser->id;
$existingUser = App\User::find($newUserId);
$existingUser->phone = "1111 2222";
$existingUser->save();
The SQLs generated with the above code are:
insert into `users` (`name`, `email`, `updated_at`, `created_at`\
) values (`Paul`, `paul@gmail.com`, `2015-08-13 15:12:16`, `2015-08-\
13 15:12:16`)
select * from `users` where `users`.`id` = 3
update `users` set `phone` = 1111 2222, `updated_at` = 2015-08-1\
3 15:12:16 where `id` = 3
You can insert a new record by passing an array of values using the method create.
Using the method create you can enter a new record faster, but you have to be
careful, because if this array comes from an Ajax call, it can be manipulated to add
more fields that which we do not want to change. For example, suppose a field named
“admin,” in which can be manipulated by the Ajax request to be true, thus making
the user an administrator of the system. To avoid this kind of problem, Eloquent
requires to be informed in the definition of the model which are the fields that will
be updated using the create. This configuration is done by setting the fillable
property, as the following example.

Chapter 5 - Database and persistence 141
/blog/app/User.php
<?php
namespace App;
use Illuminate\Database\Eloquent\Model;
class User extends Model
{
/**
* The attributes that are mass assignable.
*
* @var array
*/
protected $fillable = ['name','email','phone'];
/// .....code.....
}
After you configure the property $fillable, you can add a new record, as follows:
App\User::create([`name`=>`Zoe`,
`email`=>`zoe@gmail.com`,
`phone`=>`1111 1111`]
);
Removing records
There are several ways to remove a record from the table. The following examples
show each of these ways.

Chapter 5 - Database and persistence 142
<?php
$flight = App\Flight::find(1);
$flight->delete();
App\Flight::destroy(1);
App\Flight::destroy([1, 2, 3]);
App\Flight::destroy(1, 2, 3);
$deletedRows = App\Flight::where('active', 0)->delete();
Using scopes
Eloquent ORM allows you to create “aliases” for pre defined queries. The name of
this functionality is scope. For example, suppose that we want to create an alias for
all comments that are active (active = 1). To do this, change the App\Comment class
by adding the following code:
/blog/app/Comment.php
<?php
namespace App;
use Illuminate\Database\Eloquent\Model;
class Comment extends Model
{
public function post(){
return $this->belongsTo("App\Post");
}
public function scopeActive($query)

Chapter 5 - Database and persistence 143
{
return $query->where('active', 1);
}
}
The method to define the shortcut must begin with the word scope. In the example
above we create the scopeActive. Then we can define the following query:
App\Comment::active()->get();
This query will return all the comments that are active (active = 1).
Events
Laravel makes use of events in almost all the features of your framework. In Eloquent,
almost all operations dispatches events that can be handled. For example, there is the
event saving executed by before saving a record, and there is the saved event run
after you save the record. All in all, we have these available events: creating, created,
updating, updated, saving, saved, deleting, deleted, restoring, restored.
The events should be handled in the boot method of the AppServiceProvider class,
as the following example:
<?php
namespace App\Providers;
use App\User;
use Illuminate\Support\ServiceProvider;
class AppServiceProvider extends ServiceProvider
{
public function boot()
Chapter 5 - Database and persistence 144
{
User::creating(function ($user) {
if ( ! $user->isValid()) {
return false;
}
});
}
public function register()
{
//
}
}
In this code, we will create the method isValid in the User class, and if it returns
false, the event User:creating returns false and the record will not be created on
table users.
Accessors & Mutators
You can create extra class’s properties by treating them as if they were fields from
the table. An Accessor is a way to create a field for reading, such as the definition of
the age of a person, since we have only the date of birth, or your email but truncated,
since we do not want to display the actual email to the user (in the case of a password
verification).
Let us create a User class property called chunk_email. It will get the user’s email,
Accessor, you must create a method with the prefix get and the suffix Attribute,
then the method will be called “getChunkEmailAttribute”, as seen in the following
example:

Chapter 5 - Database and persistence 145
/blog/app/User.php
<?php
namespace App;
class User extends Model implements AuthenticatableContract, CanRese\
tPasswordContract
{
/// .... code ....
public function getChunkEmailAttribute($value){
$arrayEmail = explode("@", $this->email);
if (count($arrayEmail)!=2) return $value;
$chunkEmail1 = substr($arrayEmail[0],0,2);
$chunkEmail2 = $arrayEmail[1];
return $chunkEmail1 . "...@" . $chunkEmail2;
}
}
After you create the getChunkEmailAttribute method, we can treat it as a property,
and the following code:
echo App\User::find(1)->chunk_email;
record of table users.
While an Accessor is used to obtain a custom value of a class as if it were a property, a
Mutator is used to populate a property of a class. A good example of using a Mutator
is on filling dates, which are usually in a different format than the client interface.

Chapter 5 - Database and persistence 146
Serializing data in JSON
Our main task in Laravel is to create an API that will communicate with the
AngularJS via JSON. To do this, both the data sent to Laravel as the data returned
from Laravel to the AnglularJS will be in this format. Fortunately, Laravel is already
set up for this feature and any Eloquent array or object that a Controller method
return will be properly formatted to JSON.
The following example returns an Eloquent object of class User.
/blog/app/Htp/routes.php
<?php
Route::get('/', function () {
return App\User::find(1);
});
In the browser, the result of the previous code is:

Chapter 5 - Database and persistence 147
Removing fields from JSON serialization
For a field to not appear in Laravel automatic serialization, use the variable $hidden
in the class, indicating that it should not be displayed. If you look at the class
App\User.php, you will see that the fields password and remember_token are not
displayed in the serialization, as specified in this variable.

Chapter 5 - Database and persistence 148
Adding Accessor serialization
When we create the Accessor chunk_email in the User class, it did not appeared in
the serialization we did in the previous example. For it to appear, you must point it
out with the $appends class, as follows:
protected $appends = [`chunk_email`];
Adding relationships in Serialization
Use Eloquent relationships notation to display relationships in JSON format, espe-
cially the with method, as the following example.
/blog/app/Http/routes.php
<?php
Route::get('/', function () {
return App\User::with('posts')->find(1);
});
Part 3 - AngularJS and Bootstrap

Chapter 6 - Introduction to
AngularJS
After better understanding Laravel and some of its features, let’s begin our approach
to AngularJS. The AngularJS is a framework written in Javascript, which means
we can forget for a while everything we have created on the server level, request,
response, JSON etc. Let’s focus first on understanding how AngularJS works and
from this point, perform the integration between AngularJS and Laravel.
Remember!
First let’s learn AngularJS in a simple and clear way, and continue to the
connection between AngularJS and Laravel. This chapter is ideal for those
who have never studied AngularJS and for those who want to dig a little
deeper. Do not feel pressured to integrate the two technologies now, we
will see many examples on how to do it in the next chapters.
Let’s create a simple file called index.html which contains the bare minimum for
AngularJS to work. In this file we will be mixing both HTML code as Javascript,
which is not good for a complex system like the one we will create, but for learning
it is almost perfect.
The base file index.html is shown below:
Chapter 6 - Introduction to AngularJS 151
<!doctype html>
<html ng-app>
<head>
<script src="https://ajax.googleapis.com/ajax/libs/angularjs/1.4\
.4/angular.min.js"></script>
</head>
<body>
<div>
<label>Name:</label>
<input type="text" ng-model="yourName" placeholder="Enter a na\
me here">
<hr>
<h1>Hello {{yourName}}!</h1>
</div>
</body>
</html>
You must place this file in the root directory of your web server, which is c:\wamp\www\
in Windows or /home/<user>/www/ on Linux. Remember that when you place this
file in the web directory, you can access it via http://localhost. If you wish, create a
directory named “angularjs” and create each example into separate files by accessing
them with the address http://localhost/angularjs/ (disable blog.com virtual hosts if
necessary).
The file index.html has two particularities. First, the tag <html> has the definition
ng-app that is telling AngularJS that all tags inside the <html> will be managed by
AngularJS. This mark is called a directive. The prefix ng- comes from the phonetic
sound of the word AngularJS itself, while the suffix app indicates that the document
is an AngularJS application. And the header of the html document have the inclusion
of AngularJS library in its latest version. In this chapter we will be including this file
directly from the web (a CDN file), that means in order for AngularJS to work, you
must be connected to the internet, or have the javascript file in cache.
Only with these two details it is possible to begin our study on AngularJS. But what is
AngularJS? What does it do? The AngularJS main functionality is to add more control
to the HTML document, as if it were an extension of it. This is a little different than
Chapter 6 - Introduction to AngularJS 152
jQuery, whose main feature is to manipulate the DOM. To better understand about
AngularJS, let’s review a few key points.
Expressions
With AngularJS we have power to manipulate HTML documents, and even create
new tags and define new functions in a Web application. To understand this, we
need to initially master a concept called expressions or expression. In AngularJS,
an expression is defined as a way to access parts of the HTML document, perform
calculations, get data etc, in a simple and clear way.
An expression is defined in the form of two keys, {{...}}, where we can execute the
following examples:
<!doctype html>
<html ng-app>
<head>
<script src="https://ajax.googleapis.com/ajax/libs/angularjs/1.4\
.4/angular.min.js"></script>
</head>
<body>
<div>
<h1> Expressions </h1>
<p> 2+2 = {{ 2+ 2}} </p>
<p> 2 == 2 ? {{ 2 == 2 }} </p>
<p> '2' == 2 ? {{ '2' == 2 }} </p>
<p> '2' === 2 ? {{ '2' === 2 }} </p>
<p> Method: {{ 'angular'+'js'.toUpperCase() }} </p>
Chapter 6 - Introduction to AngularJS 153
<p> Assigns: {{ n = 10; n+n }} </p>
<p> if:
{{ banana=1 ; 'i have ' + banana + (banana==1?' banana'\
:' bananas')}}
</p>
<p>
Databind:
<input type='text' ng-model="myName"/>
Hello {{myName}}
</p>
</div>
</body>
</html>
These examples of AngularJS expressions produce the following result:

Chapter 6 - Introduction to AngularJS 154
As we can see, several expressions were executed when we used {{ ... }}. This
is just one of the features of AngularJS. In the last example, we use ng-model that
defines a databind that we will see below.
DataBind
One of the main advantages of AngularJS is its DataBind. This term is understood as
a way of automatically bind a variable to another. Generally, the DataBind is used
to bind a JavaScript variable (or an object) to some element of the HTML document.
Before we introduce more examples about DataBinds, let’s address another very
interesting concept in AngularJS, which is the use of controllers.
Controllers
A controller is, in most cases, a JavaScript file that contains functions that belong to
part of the HTML document. There is no rule for the controller (for example having
Chapter 6 - Introduction to AngularJS 155
one controller for each HTML file) but rather a way to synthesize the business rules
(javascript functions) in a separate place to the HTML document.
Below we have an example of how to use a controller, initially in the same html file
so we can understand its operation.
1 <!doctype html>
2 <html ng-app="app">
3 <head>
4 <script src="https://ajax.googleapis.com/ajax/libs/angularjs\
5 /1.4.4/angular.min.js"></script>
6 <script>
7 var app = angular.module('app', []);
8
9 app.controller('simpleController', function ($scope) {
10 $scope.user = {name:"Daniel"}
11 });
12 </script>
13 </head>
14 <body ng-controller="simpleController">
15 Hello <input type="text" ng-model="user.name"/>
16 <hr/>
17 <h1>Hello {{user.name}}</h1>
18 </body>
19 </html>
Let’s look at this example line by line. Initially, at line 2, we use the ng-app='app'
directive. Notice that now we are stating a name to ng-app. This is because we
can have several “apps” in the same html document, so it is essential to define a
name for each of them. After informing the AngularJS library at line 4, we have the
beginning of javascript code at line 6. At line 7, we have a new AngularJS method
that is the angular.module. It defines a module of the HTML document, the same
as application. Note that we define a module named app with the code: var app =
angular.module ('app', []);. This app is the same as the ng-app='app' created at
line 2. In short, the module called app will manage everything below the tag <html>.

Chapter 6 - Introduction to AngularJS 156
For now, let’s leave the second parameter angular.module blank. It will be reviewed
later.
At line 9 we created a controller called simpleController. This controller has an
anonymous function that represents all of the functionality of this controller. Note
also that there is a parameter called $scope which is the module scope ‘app’. With
the $scope we can create a connection between the controller and the module.
At line 10 we create a variable named user. This variable is created along with the
scope of your module, i.e. $scope.user. With this, we can tell AngularJS that the
variable user is global to all the module ‘app’ of the html document. The user variable
is created as an object, which means, scope.user = {name:'Daniel'} create the user
object that has the name property, whose value is Daniel.
At line 14 we have a new policy, ng-controller. Note that we added the directive
ng-controller='simpleController' to the <body>, which will tell AngularJS that
the element <body> is being managed by the simpleController that was created at
line 9.
At line 15 we have the creation of a text box with the ng-model directive, which offers
the DataBind. When set to ng-model='user.name', we are saying that this text box
is connected directly to the name property of the user object that is created in the
scope of simpleController.
At line 17 we have the expression {{user.name}} which again is a databind to
property name of the user object in the simpleController.
Understand this example!
Understanding this example of simpleController is 50% of what you
need to know about AngularJS.
Methods in the controller
The controller is also used to handle business rules which may or may not change
the models. In the following example, we use the controller to set a variable and a
method to increment this variable by 1.
Chapter 6 - Introduction to AngularJS 157
<!doctype html>
<html ng-app="app">
<head>
<script src="https://ajax.googleapis.com/ajax/libs/angularjs\
/1.4.4/angular.min.js"></script>
<script>
var app = angular.module('app', []);
app.controller('countController', function ($scope) {
$scope.counter = 0;
$scope.addOne = function(){
$scope.counter++;
}
});
</script>
</head>
<body ng-controller="countController">
<a href="#" ng-click="addOne()">Add 1</a>
<p>Counter value: {{counter}}</p>
</body>
</html>
In this example, we create the method addOne in countController, and we call it
on tag <a> of the HTML document. When we click on this link, the method will be
called incrementing the variable, which will automatically be updated in the view.
Note that there are three ways to display a controller variable, directly with the use
of keys, with the directive ng-bind or with ng-model if it is a form field. The policy
that calls the method addOne is the ng-click, performed when the user clicks the
link.
As you can see, AngularJS is formed by some directives that we should know. To
have a complete domain on AngularJS, beside understanding these two controllers
examples, it is necessary to know a few more directives that we will see below.
Chapter 6 - Introduction to AngularJS 158
Loops
A loop in AngularJS is formed by the repetition of a template. A loop is always carried
out with the property ‘ng-repeat’ and obeys to a variable which is typically an array
of data.
The following example illustrates this process, using the tag read to display a list.
<!doctype html>
<html ng-app="app">
<head>
<title>Hello Counter</title>
<script src="https://ajax.googleapis.com/ajax/libs/angularjs\
/1.4.4/angular.min.js"></script>
<script type="text/javaScript">
var app = angular.module('app', []);
app.controller('loopController', function ($scope) {
$scope.fruits = ['banana','apple','orange'];
});
</script>
</head>
<body ng-controller="loopController">
<ul>
<li ng-repeat="fruit in fruits">{{fruit}}</li>
</ul>
</body>
</html>
In this example, we create the Array fruits in the controller, and use it to repeat the
tag <li> via the ng-repeat, which performs a kind of foreach, as in PHP. The term
fruits as fruit to interact in each element of the array fruits relating to variable
fruit.
Chapter 6 - Introduction to AngularJS 159
Forms
There are several characteristics that a form contains, such as validation, error
messages, fields formatting, among others. In this case, we use AngularJS in different
ways, and we use several parameters ‘ng’ to control the entire process.
The following example displays only some of these properties, so that you can
understand how the process works, but during the work we will go through all the
details needed to build a form.
<!doctype html>
<html ng-app>
<head>
<title>Simple Form</title>
<script src="https://ajax.googleapis.com/ajax/libs/angularjs/1.4\
.4/angular.min.js"></script>
</head>
<body>
<form name="myForm">
<span ng-show="myForm.$invalid">
Found erros in the form!
</span>
<input type="text" ng-model="name" name="Name" value="Your N\
ame" required/>
<button ng-disabled="myForm.$invalid"/>Save</button>
</form>
</body>
</html>
In this form, we use some properties, such as ‘ng-show’ that will display whether or
not the tag <span> containing the error message of the form and ‘ng-disabled’ that
disables the form submission button.
The use of myForm.$invalid is a feature of AngularJS that defines whether a form
is invalid or not. Since we used a text box with the required property, if the field is
not filled in, the form will be invalid.

Chapter 6 - Introduction to AngularJS 160
Routes and Deep linking
The AngularJS has a feature called Deep Linking, which is to create routes in the URI
of the HTML document to handle parts of the HTML code independently, and thus
separate the layers of your application.
In the simplest case, suppose you have a list of data that is displayed in a table, and
that when you click on an item in this list, you want to display a form with the data
from that line.
In the HTML document created, there are two well-defined components by the
application. The first is the table with the information, and the second, the form
for editing the data.
Attention
The use of Deep Linking uses Ajax to load templates dynamically, so it is
necessary that the whole example is tested on a web server.
If we organize this little application in archives, we have:
index.html
The main application file, which contains the html code, ‘ng-app’, the inclusion
of AngularJS, among other properties. We also have a new policy, ng-view,
which indicates that all routing content should be rendered on it.
app.js
Contains all the javascript code that defines the business rules of the applica-
tion. Here we decided to create a separate javascript file from index.html file,
since the javascript part is more extensive than the examples presented so far.
list.html
Contains a table that lists the data.
form.html
Contains the form for editing and creating a new record.

Chapter 6 - Introduction to AngularJS 161
index.html
<!doctype html>
<html ng-app="app">
<head>
<title>DeepLinking Example</title>
<script src="https://ajax.googleapis.com/ajax/libs/angularjs/1.4.4/\
angular.js"></script>
<script src="https://ajax.googleapis.com/ajax/libs/angularjs/1.4.4/\
angular-route.js"></script>
<script src="app.js"></script>
</head>
<body>
<h1>DeepLink Example</h1>
<div ng-view></div>
</body>
</html>
Initially create the file index.html, which contains the call to the javascript files of
the application. In addition to the javaScript files, we also use the property ng-app,
that we learned to use in any application that uses this framework.
We also added a second javascript file, which is responsible for managing the route,
called angular-route.js.
..
Attention
If you look at the inclusion of the javascript file, you will notice that we have
included the file angular.js and not angular.min.js.
The reason is to show that both files work, but the “min” file with the extension
.min.js is incomprehensible for us to detect javascript errors.
In the other hand, the angular.js file is understandable for our reading and
javascript errors that we made can be analyzed with more efficiency.

Chapter 6 - Introduction to AngularJS 162
..
In short, use the file angular.min.js only when your system is ready and in
production. Otherwise, use the file angular.js
This module is created by defining a name for the ng-app this way: ng-app='app'.
So, we are creating a module named app that must be defined by the application.
As we can see, the file index.html has no content, only the header and a div that has
the policy ng-view. This property tells AngularJS that all the generated code should
go within this tag.
This setting is done in the file app.js, whose initial part is described below.
app.js
1 var app = angular.module('app',['ngRoute']);
2
3 app.config(['$routeProvider',function($routeProvider){
4 $routeProvider.
5 when('/',{controller:'listController',
6 templateUrl:'list.html'}).
7 when('/edit/:name',{controller:'editController',
8 templateUrl:'form.html'}).
9 when('/new',{controller:'newController',
10 templateUrl:'form.html'}).
11 otherwise({redirectTo:'/'});
12 }]);
13
14 app.run(['$rootScope',function($rootScope){
15 $rootScope.fruits = ["banana","apple","orange"];
16 console.log('app.run');
17 }]);
In this first part, we use the method angular.module to create a module, whose name
is app. The second parameter is a reference to module ngRoute, which is used to create
the routes (remember that it should be included, as seen in the index.html file).

Chapter 6 - Introduction to AngularJS 163
After you create the module and assign it to the app variable, use the config method
to set up the module, in this case we are configuring a feature called Router, that loads
templates and controllers according to a URI, i.e. an address passed by the browser.
At line 5 we have the first configuration using the when, which tells the Router that,
when accessing the root web address where the index.html file is, it must also load
listController and the list.html template.
..
Both the template and the controller will be loaded into the html element that
contains the property ng-view from index.html.
At line 6, we added one more route, and now set that when the URI is /edit/:name,
the controller editController and the template form.html will be loaded. The
attribute :name is a variable that can be obtained in the controller.
Both line 6 and 7 use the same template form.html which contains a form for editing
or inserting a record.
At line 8, we set the default route of URI, which is activated when no set route is
found.
At line 11 we use the method app.run to set the variable $scope to the application,
in a global context to the module. In this method we create the variable fruits that
has a global context for the application.
Continuing in the app.js file, we have:
app.js
14 app.controller('listController',function ($scope) {
15 console.log('listController');
16 });
17
18 app.controller('editController',
19 function ($scope,$location,$routeParams) {
20
21 $scope.title = "Edit";

Chapter 6 - Introduction to AngularJS 164
22 $scope.fruit = $routeParams.name;
23
24 $scope.fruitIndex = $scope.fruits.indexOf($scope.fruit);
25
26 $scope.save = function(){
27 $scope.fruits[$scope.fruitIndex]=$scope.fruit;
28 $location.path('/');
29 }
30 });
31
32 app.controller('newController',
33
34 function ($scope,$location,$routeParams) {
35
36 $scope.title = "new";
37 $scope.fruit = "";
38
39 $scope.save = function(){
40 $scope.fruits.push($scope.fruit);
41 $location.path('/');
42 }
43 });
We create three controllers for the application, and although listController is not
necessary yet, it can be useful in the future.
At line 18 we have the controller editController that has three parameters:
• scope Is the scope of the application that can be used in the controller template
created.
• location Used to perform redirects among the routes.
• routeParams The parameters passed by the URI (in this case the :name).
At line 19 we filled the variable $scope.title to change the title of the form. Note
that the form is used to create a new record and to edit one.

Chapter 6 - Introduction to AngularJS 165
At line 20 we take as a parameter the name of the fruit that was passed by the URI.
This value is taken according to the parameter :name created by the route, at line 6.
At line 22 we get the index of the item to be edited. We use it to be able to edit the
item in the save method created next.
At line 24 we have the save method that is used to save the record in the global array.
In a real application, we would be using Ajax to persist the data to the server. At line
26 we redirect the application and with that, load another template.
At line 30, created the controller newController, which is similar to the editCon-
troller and have the save method to insert a new record into the fruits array.
We will analyze the list.html file which is a template loaded directly by the module
routing (app.js, line 5).
list.html
<h2>Fruits ({{fruits.length}})</h2>
<ul>
<li ng-repeat="fruit in fruits">
<a href="#/edit/{{fruit}}">{{fruit}}</a>
</li>
</ul>
<a href="#/new">New</a>
The template does not need inform its controller, as this was done by the AngularJS
module (app.js, line 5). As the variable fruits has a global scope, it can be used by
the template and at line 1, displaying how many items there are in the array.
At line 3 we start the loop of the elements that belong to the fruits array and include
in the loop a link to #/edit/. This is the way AngularJS routing works, starting with
# and passing the URI. At line 5, we create another link to add a new record. Again
we use the URI that will be used by the AngularJS routing.
The last file of this small example is the form that will edit or insert a new record.

Chapter 6 - Introduction to AngularJS 166
form.html
<h2> {{title}} </h2>
<form name="myForm">
<input type="text" ng-model="fruit" name="fruit" required>
<button ng-click="save()" ng-disabled="myForm.$invalid">
Save</button>
</form>
<a href="#/">Cancel</a>
At line 1 we use the {{title}} to insert a title that is created by the controller. The
form has only one field whose ng-model is fruit that will be used by the controller
(app.js, lines 25 and 36). In this form we also use ng-disabled so that the button is
enabled only if there is some text typed in the text box.
The button save has the ng-click property, which will call the save() method of
the controller.

Chapter 7 - Bootstrap
Bootstrap is the framework that defines how the application will be “drawn”. It has
a set of classes in Javascript and CSS capable of bringing new features to HTML. For
example, if you want to create a properly formatted alert message, a popup window
or an area within a form that can be hidden, we will do it with Bootstrap.
Installing the Bootstrap
To begin with our examples, create the folder “angularbootstrap” in the web directory
of your operating system, which is c:\wamp\www for Windows and home/<user>/www
for Linux users. After creating the folder, add the AngularJS and Bootstrap by bower,
as follows:
$ bower install angular bootstrap

Chapter 7 - Bootstrap 168
After this installation, we have the following structure:
Now we create the file index.html which contains the basic structure of an Angular
application along with Bootstrap.
index.html
<!doctype html>
<html ng-app="app">
<head>
<meta name="viewport" content="width=device-width, initial-scale=1">
<link rel="stylesheet" href="bower_components/bootstrap/dist/css/bo\
otstrap.min.css">
</head>
<body>
<div class="container">
<h1>AngularJS base file</h1>
</div>
<script src="bower_components/jquery/dist/jquery.min.js"></script>
<script src="bower_components/bootstrap/dist/js/bootstrap.min.js"></\
script>
<script src="bower_components/angular/angular.min.js"></script>
<script src="app.js"></script>
</body>
</html>
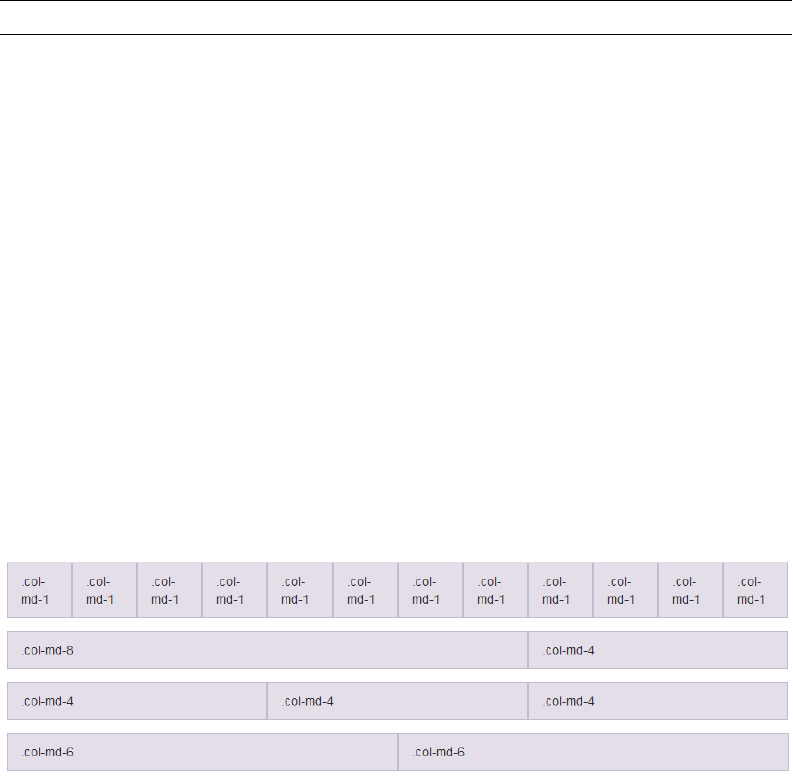
Chapter 7 - Bootstrap 169
app.js
var app = angular.module('app');
This is the ideal structure for working with AngularJS + Bootstrap, where the
JavaScript files must be added at the end of the page, in the order established: jQuery,
Bootstrap, Angular, and App.
With this basic structure, we can address some particularities of Bootstrap. The
following examples can be inserted below the <h1> of the index.html file.
Grid System
Bootstrap works with a divs alignment called the grid, in which you can create
horizontal blocks of content. The width of these blocks is not scaled by percentages
or pixels, but rather in a system of 12 columns.
In this approach, a “line” can be separated into 12 blocks, or columns, and with
Bootstrap you can set up these blocks to fit the size you desire.
The following image illustrates this process.
Grid System
The grid system is the basis for you to draw a screen that is compatible both with
mobile devices as desktop. The use of the grid system is important because it will
not be you who will define the sizes and margins of each block, but the framework,
in accordance with the current width of the screen. This means that Bootstrap can
even define what a block will be below another, even with horizontal configuration.
Chapter 7 - Bootstrap 170
Lets make a simple example, creating 2 blocks of text to a web page. The first block
has a size smaller than the second, as if the first had 30% of width and the second
70%.
<div class="row">
<div class="col-lg-4">Column 1</div>
<div class="col-lg-8">Column 2</div>
</div>
Working with offsets
An offset is a blank space added to the left of the content block. For example, if
you want to add content only in the second block of 12 available, you can use the
following class: with-md-offset-1 in this class, we use the md to set the standard
for screen sizes medium, and the -1 offset to shift the content block in block 1.
In the following example, we create a content block that omits the first two blocks,
and the last two, leaving the text interface more centralized.
<div class="row">
<div class="col-md-12" style="background-color:#aaa">
without Offset
</div>
<div class="col-md-8 col-md-offset-2"
style="background-color:#ddd">
with Offset
</div>
</div>
Note that we add some colors in the background, so that you can view the Offset
area.
Chapter 7 - Bootstrap 171
Typography
We will see that Bootstrap alters the typography of HTML tags so that they can be
used in creating your pages. Initially, the <body> tag receives a 14 pixels size, and
other attributes. Paragraph <p> also receives a lower margin, plus a special class
called lead, which highlights better a paragraph in relation to the others.
<p class="lead">
Lorem ipsum dolor sit amet, consectetur adipisicing elit, sed do e\
iusmod
</p>
Alignment
You can also align the text of a paragraph by using the classes text-left, text-right
and text-center:
<p class="text-left">left align</p>
<p class="text-center">center align</p>
<p class="text-right">right align</p>
Creating emphasis to text with colors
It is possible to give a certain highlight to texts using colors instead of the bold (<b>)
and italic (<i>). Of course it is possible to change the color of a text with <font
color=''>, but it should never be done.
In order to have a logical pattern of colors, which are applied not only to texts, but
also to the buttons, links and message boxes, we should use a reference to 6 specific
situations. They are mute, primary, success, info, warning, and danger.
Each one has a specific color that is standard within Bootstrap. Let’s test the text
highlighting:
Chapter 7 - Bootstrap 172
<p class="text-muted">A "muted" text</p>
<p class="text-primary">Primary Text</p>
<p class="text-success">Text with a success message</p>
<p class="text-info">A info text message</p>
<p class="text-warning">Warning, something wrong text</p>
<p class="text-danger">Danger or error text</p>
Abbreviation
The abbreviation is a new element in html 5 that uses the tag <abbr> in conjunction
with the property title. See the following example:
<p>
<abbr title="HyperText Markup Language">HTML</abbr>
it's the best markup language in the world.
</p>
Blockquotes
This tag is used for quoting a text with a little more emphasis. The tag used is
<blockquote>, and Bootstrap added some extra classes to give more meaning to
the blockquote. You can use <small> inside the block, including the tag <cite> that
defines the name of the person cited in the block. You can also use class .pull-right
to float the text to the right.
<blockquote >
<p>Lorem ipsum dolor sit amet, consectetur adipiscing
elit. Integer posuere erat a ante.</p>
<small>Someone famous in
<cite title="Source Title">Source Title</cite></small>
</blockquote>
Chapter 7 - Bootstrap 173
Lists
Html lists are created with the tags <ul>, <ol> and <dl>. Bootstrap adds some extra
functionality so we can work better with these lists. Let’s see each option below.
Unstyled
The class list-unstyled removes the tag from the list that may be the point to the
list with <ul> or the numbering of a list <ol>.
<ul class="list-unstyled">
<li>...</li>
</ul>
Side by side (inline)
If you want to group the items in a list, rather than one below the other, use the
list-inline class, as follows:
<ul class="list-inline">
<li>Lorem</li>
<li>Ipsum</li>
<li>dolor</li>
</ul>
Lists with horizontal description
The tag <dl> creates lists with the use of <dt> and <dd>. Each list has an item that is
the title (<dt>) and another that is the description (<dd>).
In the following example, we use the list in the original format, see:
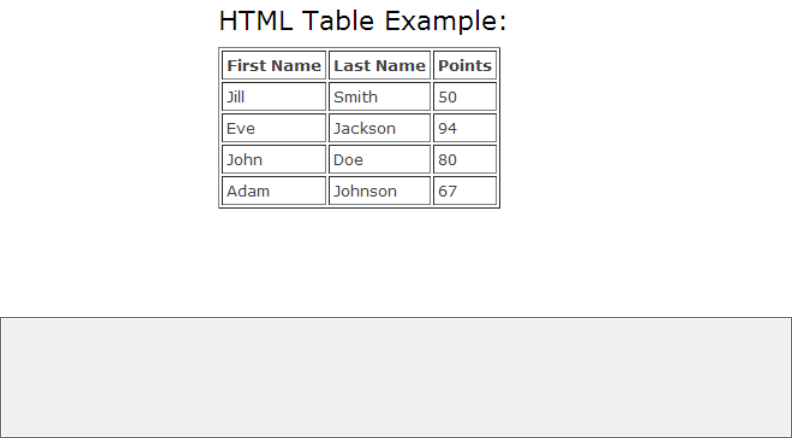
Chapter 7 - Bootstrap 174
<dl>
<dt>...</dt>
<dd>...</dd>
</dl>
And we use the list with horizontal format:
Tables
Tables are the most common way to organize data in lists, especially if there are
many fields to be displayed. The tables were implemented since the beginning of the
HTML, via <table> and require a large amount of visual optimization in order to
have a nice presentation.
With Bootstrap, using tables becomes something simple and without any complex
customization, simply define the class table, plus some extra properties.
..
In all of our examples, we use also the tags <thead> to set the table header, and
<tbody> to set the body of the table.
Simple table
To create a table in Bootstrap, use the tag <table> and class table, in the following
way:
Chapter 7 - Bootstrap 175
<table class="table">
...
</table>
In the previous example, when you apply the class table, we have the following
result:
<table class="table">
<thead>
<tr>
<th>First Name</th>
<th>Last Name</th>
<th>Points</th>
</tr>
</thead>
<tbody>
<tr>
<td>Jill</td>
<td>Smith</td>
<td>50</td>
</tr>
<tr>
<td>Eve</td>
<td>Jackson</td>
<td>94</td>
</tr>
<tr>
<td>John</td>
<td>Doe</td>
<td>80</td>
</tr>
<tr>
<td>Adam</td>
<td>Johnson</td>
<td>67</td>

Chapter 7 - Bootstrap 176
</tr>
</tbody>
</table>
Striped rows
An easy way to leave the table in zebra format, with one line with a white background
and another one with a gray background, alternately, is using the class table-
striped, as follows:
<table class="table table-striped">
...
</table>

Chapter 7 - Bootstrap 177
Borders
Do not include borders using border='1', use the class table-bordered so that
Bootstrap can include the borders properly to the table.
<table class="table table-bordered">
...
</table>
Highlighting rows
The hover effect is well known for us web developers. It changes a color or format
when the mouse pointer is activated at that point. In the tables, you can add this
effect for highlighting the row when the mouse hovers. To do this, use the class
table-hover.
<table class="table table-hover">
...
</table>

Chapter 7 - Bootstrap 178
Smaller tables (condensed)
If the space between each cell (padding and margin) of the table are disturbing
the layout, you can remove them with the class table-condensed, as the following
example:
<table class="table table-condensed">
...
</table>
Contextual lines
It is possible to add a context to a table row, with the active, success, warning or
danger classes. The classes must be applied in the <tr> tag that defines a table row.
<table class="table">
<tbody>
<tr class="danger">...</tr>
</tbody>
</table>
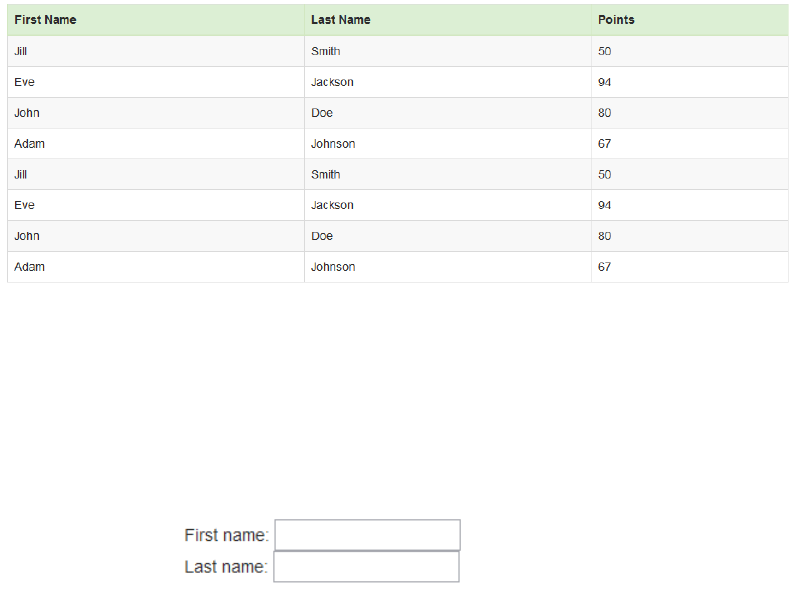
Chapter 7 - Bootstrap 179
Merging classes
You can merge all classes available for table formatting, in order to obtain a better
formatting. For example, you can use the classes table-striped and table-bordered
together.
Forms
The forms, whose tag line is <form>, constitute the primary means of data entry in
web pages. As there are several ways to create a form, and can even merge various
ways, let’s see the the main features Bootstrap has.
Understand the form-group
The class form-group is used to delimit a single group of a form, which in most cases
is defined as a field. To create a form with many fields, it is necessary to create a
form with multiple elements with the class form-group. In the following example,
we create a form with two elements, name and email, in which each is defined by a
div with class form-group.

Chapter 7 - Bootstrap 180
<form>
<div class="form-group">
<label for="name">Name</label>
<input type="text" class="form-control" id="name">
</div>
<div class="form-group">
<label for="email">Email</label>
<input type="text" class="form-control" id="email">
</div>
</form>
In this example, we can see that the width of each input field has been changed to
100%, and that the form is properly formatted to meet web standards. This formatting
is obtained with the class form-control that is present in the tag <input>. Obviously,
all html form control should have this class.
..
The differences between a simple form and Bootstrap’s are set up primarily with
the creation of <div> with the class form-group and <input> with the class
form-control.
Inline form
An inline form is a form where the fields are side by side. For these fields, it is
necessary to inform the width of each of them. In addition, even if the headers of
each field does not appear, they should be informed for semantic purposes, and can
be hidden with the class sr-only.
In the following example, we added only the class form-inline in the tag <form>.
Chapter 7 - Bootstrap 181
<form class="form-inline">
<div class="form-group">
<label for="name">Name</label>
<input type="text" class="form-control" id="name">
</div>
<div class="form-group">
<label for="email">Email</label>
<input type="text" class="form-control" id="email">
</div>
</form>
We can refine the form and include the class sr-only to hide the labels, making them
available only to the semantics of the page. We also use placeholder to set the field
label in itself.
<form class="form-inline">
<div class="form-group">
<label for="name" class="sr-only">Name</label>
<input type="text" class="form-control" id="name"
placeholder="Name">
</div>
<div class="form-group">
<label for="email" class="sr-only">Email</label>
<input type="text" class="form-control" id="email"
placeholder="Email">
</div>
</form>
Horizontal forms
These are the most commonly types used for data entry. A horizontal form is defined
by the class form-horizontal insite <form> tag and should define the size of each
label of each field. The sizes are defined the same way as in Chapter 3, by the grids
system.
In the following example, we a form with the of horizontal type:
Chapter 7 - Bootstrap 182
1 <form class="form-horizontal">
2 <div class="form-group">
3 <label for="name" class="col-sm-2 control-label">name</label>
4 <div class="col-sm-5">
5 <input type="text" class="form-control" id="name"
6 placeholder="your name"/>
7 </div>
8 </div>
9 <div class="form-group">
10 <label for="email" class="col-sm-2 control-label">Email</label>
11 <div class="col-sm-5">
12 <input type="text" class="form-control" id="email"
13 placeholder="your email"/>
14 </div>
15 </div>
16 <div class="form-group">
17 <div class="col-sm-offset-2 col-sm-4">
18 <button type="submit" class="btn btn-default">Send</button>
19 </div>
20 </form>
This example contains important details about Bootstrap. Initially, at line 1, we create
the <form> with the class form-horizontal and then the first form-group.
At line 3, we added the class with-sm-2 on the grid system occupying 2 of the 12
spaces available. We also use the class control-label that will format the label
according to the horizontal form.
At line 4 we included a div that has the col-sm-5 class, which will be used to include
the text box. At line 6 we insert the text box with the input tag. The same happens
for the e-mail field at line 9.
An line 16 we create a div to insert the submit button of the form. At line 17 we
use the class col-sm-offset-2 that will generate an offset with 2 spaces in the div,
aligning the button with the text box.
Chapter 7 - Bootstrap 183
Supported components
Bootstrap supports all common controls of a form, such as: text, password, datetime,
datetime, date, month, week, time, number, email, url, search, tel, and color. Some of
them have extra options, that we will see below.
Checkbox and radio
Bootstrap offers an extra option to these controls in order to make each item in the
horizontal, as shown in the following code:
<label class="checkbox-inline">
<input type="checkbox" id="inlineCheckbox1" value="option1"> 1
</label>
<label class="checkbox-inline">
<input type="checkbox" id="inlineCheckbox2" value="option2"> 2
</label>
<label class="checkbox-inline">
<input type="checkbox" id="inlineCheckbox3" value="option3"> 3
</label>
Static controls
You can add a static control, usually a label, whose only objective is to inform a
field that has already been filled. This configuration is performed by the class form-
control-static.

Chapter 7 - Bootstrap 184
<div class="form-group">
<label class="col-sm-2 control-label">Email</label>
<div class="col-sm-10">
<p class="form-control-static">[email protected]</p>
</div>
</div>
Disabled fields
To disable a field, just add the disabled attribute to it, as the following example:
<input class="form-control" id="disabledInput" type="text"
placeholder="Disabled input here..." disabled>
..
You can disable a fieldset as well: <fieldset disabled>
Validations
Bootstrap does not perform validation itself, but it offers ways to show field
validation. The validation will be performed with the AngularJS.
<div class="form-group has-success">
<label class="control-label" for="inputSuccess">
Input with success</label>
<input type="text" class="form-control" id="inputSuccess">
</div>
<div class="form-group has-warning">
<label class="control-label" for="inputWarning">
Input with warning</label>
<input type="text" class="form-control" id="inputWarning">
Chapter 7 - Bootstrap 185
</div>
<div class="form-group has-error">
<label class="control-label" for="inputError">
Input with error</label>
<input type="text" class="form-control" id="inputError">
</div>
In this example, we use the classes has-success, has-warning and ‘has-error’ to
define validations.
Field Size
You can set several predefined sizes for the form fields. The most common sizes are
defined in input tag itself, with the classes input-lg, for a larger field and input-sm
for a smaller field.
The field width must be configured in the grid system, using, for example, col-xs,
col-sm, among others, for example:
<div class="row">
<div class="col-xs-2">
<input type="text" class="form-control" placeholder=".col-xs-2">
</div>
<div class="col-xs-3">
<input type="text" class="form-control" placeholder=".col-xs-3">
</div>
<div class="col-xs-4">
<input type="text" class="form-control" placeholder=".col-xs-4">
</div>
</div>
Hint text
It is very common in forms to use a help text below the field as a way to explain
something on the field in question. This text must be inserted into a tag <span class
=help-block> soon after <input>, as the following example:
Chapter 7 - Bootstrap 186
<div class="form-group">
<label for="email" class="col-sm-2 control-label">Email</label>
<div class="col-sm-5">
<input type="text" class="form-control" id="email"
placeholder="Digite o seu email"/>
<span class="help-block">We need a valid email</span>
</div>
</div>
Buttons
Bootstrap can create buttons for different purposes, for example: default, primary,
success, info, warning, danger. Each of these buttons are defined by their class,
as follows:
<!-- Default Button -->
<button type="button" class="btn btn-default">Default</button>
<!-- Has a different color and is defined as a
button that identifies the main action of a set of buttons
-->
<button type="button" class="btn btn-primary">Primary</button>
<!--button that indicates a successful action-->
<button type="button" class="btn btn-success">Success</button>
<!--button that indicates an info message-->
<button type="button" class="btn btn-info">Info</button>
<!--button that indicates warning, danger-->
<button type="button" class="btn btn-warning">Warning</button>
<!--button that indicates something potentially negative, or an erro\
r-->
<button type="button" class="btn btn-danger">Danger</button>
Chapter 7 - Bootstrap 187
<!--this button takes the behavior of a link-->
<button type="button" class="btn btn-link">Link</button>
As we can see in the above code, the buttons need basically two classes. The first is
the default btn which tells Bootstrap that that element is a button. The second is just
the way the button is, and can indicate success or an error, for example.
Size of the buttons
You can use the following classes to define the size of a button:
btn-lg : Large
btn-sm : Small
btn-xs : Extra Small
Group buttons
If you want to add a set of buttons, you can use the class btn-group, as the following
code:
<div class="btn-group">
<button type="button" class="btn btn-default">Left</button>
<button type="button" class="btn btn-default">Middle</button>
<button type="button" class="btn btn-default">Right</button>
</div>
Icons
There is a Bootstrap functionality that uses a library of ready icons, which are the
Glyphicons. To use them, you must add the icon to the element class.
For example, if you want to add an icon with a plus sign, you can add it with the
following code:
Chapter 7 - Bootstrap 188
<span class="glyphicon glyphicon-search"></span>
The icons can be used with the button, as follows:
<button type="button" class="btn btn-default btn-lg">
<span class="glyphicon glyphicon-star"></span> Star
</button>
Dropdown buttons (menu)
To create a button with options, it should be a set of html tags and classes as shown
in the following code:
<div class="btn-group">
<button type="button"
class="btn btn-default dropdown-toggle"
data-toggle="dropdown">
File <span class="caret"></span>
</button>
<ul class="dropdown-menu" role="menu">
<li><a href="#">Open</a></li>
<li><a href="#">Save</a></li>
<li><a href="#">Save as</a></li>
<li class="divider"></li>
<li><a href="#">Close</a></li>
</ul>
</div>
Initially we created a div that has the class btn-group, which will group the button
with the text and the dropdown that opens the menu items. Note that after the word
file we include an icon with the class caret which is a down arrow.
The dropdown menu is formed by the set of tags <ul> <li>, followed by the type
dropdown-menu. What opens the menu with the click of the button is button data-
toggle='dropdown' property.
Chapter 7 - Bootstrap 189
Differentiated inputs with group
One of the options that Bootstrap offers when creating fields is the creation of
groups between an input and a class or button. The following examples illustrate
this process, we use the input-group class to attach a text to a text box.
<div class="input-group">
<span class="input-group-addon">@</span>
<input type="text" class="form-control"
placeholder="Username">
</div>
<div class="input-group">
<input type="text" class="form-control">
<span class="input-group-addon">.00</span>
</div>
<div class="input-group">
<span class="input-group-addon">$</span>
<input type="text" class="form-control">
<span class="input-group-addon">.00</span>
</div>
If you want to add a button to an input group, do as follows:
<div class="input-group">
<input type="text" class="form-control">
<span class="input-group-btn">
<button class="btn btn-default" type="button">Go</button>
</span>
</div>
AngularJS, Bootstrap and validations
The AngularJS provides with the directive ng-form a set of methods for integrating
the form to Bootstrap, especially for validations. To validate a form using AngularJS,

Chapter 7 - Bootstrap 190
you should use the variable $valid in the requested context (can be in a field, or the
entire form).
In this first example, we create a field of type e-mail and use the expression
form1.email.$invalid which will return true if the form is invalid. This value will
be assigned to the class ‘has-error’ of Bootstrap by adding an effect of error to the
e-mail field border.
<h2>Form 1</h2>
<form name="form1">
<div class="form-group"
ng-class="{ 'has-error': form1.email.$invalid }" >
<input type="email" class="form-control" name="email"
ng-model="user.email" required />
</div>
</form>
The problem with this first example is that as soon as the user loads the page, the
field is empty and the required email field invalidates the form, leaving it with the
red border. We don’t want that all required fields are in red when the form opens for
the first time. For this exists in the AngularJS the $dirty expression, which indicates
a new field without changed data. In the next example, form2, use this expression
along with what we already have.

Chapter 7 - Bootstrap 191
<h2>Form 2</h2>
<form name="form1">
<div class="form-group"
ng-class="{ 'has-error': form2.email.$invalid }" >
<input type="email" class="form-control"
name="email" ng-model="user.email" required />
</div>
</form>
The difference between the form1 and form2 is realized in the following image, when
loading the page for the first time the email field of the form1 presents the error, while
the form2 field waits for the input from the user.
Displaying custom error messages
You can, in addition to displaying a red border in the field, display a custom error
message. This message only appears if the error happens. To do this, we use the same
expressions with $invalid and $dirty, as in the following example.

Chapter 7 - Bootstrap 192
<h2>Form 3</h2>
<form name="form3">
<div class="form-group"
ng-class="{ 'has-error': form3.email.$invalid &&
form3.email.$dirty}" >
<input type="email" class="form-control"
name="email" ng-model="user.email" required />
<span class="label label-danger"
ng-show="form3.email.$dirty && form3.email.$invalid">
<span ng-show="form3.email.$error.required">
Required</span>
<span ng-show="form3.email.$error.email">
Email inválido</span>
</span>
</div>
</form>
In this form, we have created an area where visibility is tested by the ng-show.
We used ng-show only if the validations fail, displaying the message similar to the
following image.
Synchronizing errors and submit buttons
Most forms have a submit button that will process the form in a Post or in a AngularJS
controller. It is interesting, in this case, to display an error message if the form is
submitted. For this, we use the variable $submitted in conjunction with $dirty and
$invalid, as in the following example.

Chapter 7 - Bootstrap 193
<h2>Form 4</h2>
<form name="form4" novalidate>
<div class="form-group"
ng-class="{ 'has-error': (form4.$submitted ||
form4.email.$dirty) && form4.email.$invalid}" >
<input type="email" class="form-control"
name="email" ng-model="user.email" required />
<span class="label label-danger"
ng-show="(form4.$submitted ||
form4.email.$dirty) && form4.email.$invalid\
">
<span ng-show="form4.email.$error.required">
Required</span>
<span ng-show="form4.email.$error.email">
Invalid Email</span>
</span>
</div>
<button type="submit" class="btn btn-primary"
ng-click="go()">Go</button>
</form>
This example shows the use of novalidate in the <form> tag, which nullifies the
browser validation in the fields, which is useful in this case. When you click the
“Go” button, the response of the form to the user is similar to the following image.
Chapter 7 - Bootstrap 194
Extra themes
The site Bootswatch.com provides numerous themes for your web application with
Bootstrap. For example, the theme * Cosmos * can be accessed via this link: https:
//bootswatch.com/cosmo/. To install a theme, use the Bower:
$ bower install bootswatch-dist#cosmo
After installation, the folder /bower_components/bootswatch-dist is created, and
it contains the file css/bootstrap.min.css that must replace the original Bootstrap
css, as the template below:
<!doctype html>
<html ng-app="app">
<head>
<meta name="viewport" content="width=device-width, initial-scale=1">
<!--<link rel="stylesheet" href="bower_components/bootstrap/dist/cs\
s/bootstrap.min.css">-->
<link rel="stylesheet" href="bower_components/bootswatch-di\
st/css/bootstrap.min.css">
</head>
<body>
<div class="container">
<h1>AngularJS base file</h1>
</div>
<script src="bower_components/jquery/dist/jquery.min.js"></script>
<script src="bower_components/bootstrap/dist/js/bootstrap.min.js"></\
script>
<script src="bower_components/angular/angular.min.js"></script>
<script src="app.js"></script>
</body>
</html>

Chapter 7 - Bootstrap 195
To view other themes, just install the new theme by choosing it according to what
the bower asks you, as in the following image:
Chapter 8 - AngularJS and Ajax
In this chapter we will see how AngularJS communicates with the server via Ajax.
We use Ajax for sending and receiving data. First, let’s create a small example in the
folder angularbootstrap, and after understanding its operation we can integrate
AngularJS and Laravel.
Create the file data.php in the folder angularbootstrap with the following content:
<?php
$user = new stdclass();
$user->name = "Joe";
$user->email = "[email protected]";
echo json_encode($user);
This is a simple example of response in JSON from the server. We will use this
example so that AngularJS can get this data.
$http usage
AngularJS provides two different ways to work with these connections. The first,
and simplest, is with the $http service, which can be injected into a controller. The
second way is with the $resource service which is a RESTful abstraction, working
as a data source. The use of $http should not be ignored, even with the $resource
being more powerful. In simple applications, or when you want to get data in a quick
way, $http should be used. At first, we will use the $http to connect in the data.php
file and get the data of the variable $user, which is in JSON format.
Create the user.html file that is a copy of the file angularbootstrap\index.html.
Instead of using the file app.js, we will create the file user.js that will contain
the controller UserController, responsible for connecting to the server. The initial
version of file user.html is shown below.

Chapter 8 - AngularJS and Ajax 197
user.html
<!doctype html>
<html ng-app="app">
<head>
<meta name="viewport" content="width=device-width, initial-scale\
=1">
<link rel="stylesheet"
href="bower_components/bootswatch-dist/css/bootstrap.min.css">
</head>
<body ng-controller="UserCtrl">
<div class="container">
<h1>User</h1>
</div>
<script src="bower_components/jquery/dist/jquery.min.js">
</script>
<script src="bower_components/bootstrap/dist/js/bootstrap.min.js">
</script>
<script src="bower_components/angular/angular.min.js">
</script>
<script src="user.js"></script>
</body>
</html>
user.js
var app = angular.module('app',[]);
app.controller('UserCtrl',function($scope){
});
After creating the basic template user.html, let’s add a button that will call the
method getData.

Chapter 8 - AngularJS and Ajax 198
<h1>User</h1>
<button class="btn btn-default" type="button" ng-click="getData()">G\
et Data</button>
Note that we use the ng-click to call the getData() method. Now we must create
this method in the Controller, as follows:
var app = angular.module('app',[]);
app.controller('UserCtrl',function($scope){
$scope.getData = function(){
console.log("get data");
}
});
When we create the method getData, we use the function console.log to display
the message in the console of Chrome/Firefox, accessible via the F12 key, as shown
in the following image.
Now, rather than display a message we will put a request to the server at the address
“http://localhost/angularbootstrap/data.PHP” and display its response in the browser
console.

Chapter 8 - AngularJS and Ajax 199
..
If http://localhost/angularbootstrap/ isn’t working, disable “blog.com” and
“mysite.com” virtual host in the http.conf apache config file. To disable, comment
each line with # and restart web server.
1 var app = angular.module('app',[]);
2
3 app.controller('UserCtrl',function($scope,$http){
4
5 $scope.getData = function(){
6 console.log("get data");
7
8 $http.get("data.php").then(function(response){
9 console.log(response);
10 })
11 }
12 });
The first change in the user.js file was the inclusion of the $http variable in the
definition of the controller, at line 3. This is necessary for AngularJS to inject an
instance of the http class in this variable. At line 8, we use $http.get to make
a GET request to the server. The parameter passed is the URL to access, in this
case data.PHP. After you create the GET method, use the success method that will
be called when the server replies. Since we know that the data.PHP file prints a
be returned to AngularJS by the response, which is the first parameter of the
anonymous function generated after using the then. At line 9 we print this variable
in the browser console. The result can be seen in the following image:

Chapter 8 - AngularJS and Ajax 200
See that the variable response is actually an object with some properties, one being
the data property, which is the JSON returned by the server already converted to an
object, with the properties name and email. To finish our example, we need to create
the Databind between the variable response and the user object, in addition to using
the ng-model in the view to display the values on the screen.
user.html
<!doctype html>
<html ng-app="app">
<head>
<meta name="viewport" content="width=device-width, initial-scale\
=1">
<link rel="stylesheet"
href="bower_components/bootswatch-dist/css/bootstrap.min.css">
</head>
<body ng-controller="UserCtrl">
Chapter 8 - AngularJS and Ajax 201
<div class="container">
<h1>User</h1>
<form class="form-horizontal">
<div class="form-group">
<label for="inputNameLabel"
class="col-sm-2 control-label">Name</label>
<div class="col-sm-10">
<input ng-model="user.name"
type="text" class="form-control"
id="inputName" placeholder="Name">
</div>
</div>
<div class="form-group">
<label for="inputEmailLabel"
class="col-sm-2 control-label">
Email
</label>
<div class="col-sm-10">
<input ng-model="user.email"
type="email" class="form-control"
id="inputEmail" placeholder="Email">
</div>
</div>
</form>
<button class="btn btn-default"
type="button"
ng-click="getData()">
Get Data</button>
</div>

Chapter 8 - AngularJS and Ajax 202
// ... code ....
user.js
var app = angular.module('app',[]);
app.controller('UserCtrl',function($scope,$http){
$scope.user = {};
$scope.getData = function(){
console.log("get data");
$http.get("data.php").then(function(response){
$scope.user = response.data;
})
}
});
The result of this code is similar to the following image.
Just as the $http.get, there are others functions, as the following list:

Chapter 8 - AngularJS and Ajax 203
• $http.get
• $http.head
• $http.post
• $http.put
• $http.delete
• $http.jsonp
For all of these methods, AngularJS automatically configures the header of the HTTP
request. For example, in a POST request, the headers are populated as:
• Accept: application/json, text/plain, * / *
• X-Requested-With: XMLHttpRequest
• Content-Type: application/json
In addition to the headers, AngularJS also serializes the JSON object that is passed
between requests. If an object is sent to the server, it is converted to JSON. If a JSON
string returns from the server, it is converted to object using a JSON parser.
Handling ajax errors
An Ajax request is not always successful, there may be errors in both the request
and the PHP code that we should prevent. With the use of the $http we can create
a second function after then, as in the following example.
user.js
var app = angular.module('app',[]);
app.controller('UserCtrl',function($scope,$http){
$scope.user = {};
$scope.getData = function(){
console.log("get data");

Chapter 8 - AngularJS and Ajax 204
$http.get("data2.php").then(function(response){
console.log(response);
},function(response){
console.warn(response);
});
}
});
Note that we changed the URL address to turn to data2.PHP. This will generate an
error and the response object will have the status of the error response, which in this
case is 404-not found.
There are several ways of displaying this error message in the form, where the easiest
way is to display a modal window with the error message. First let’s create the modal
window in the file user.html:

Chapter 8 - AngularJS and Ajax 205
user.html
<h1>User</h1>
<div id="errorModal" class="modal fade">
<div class="modal-dialog">
<div class="modal-content">
<div class="modal-header bg-warning">
<button type="button" class="close"
data-dismiss="modal" aria-label="Close">
<span aria-hidden="true">×</span>
</button>
<h4 class="modal-title ">{{error.title}}</h4>
</div>
<div class="modal-body">
<p>{{error.message}}</p>
</div>
<div class="modal-footer">
<button type="button" class="btn btn-default"
data-dismiss="modal">Close</button>
</div>
</div>
</div>
</div>
A modal window is a div containing the class modal. Initially she does not appear on
the form, only if it is called with a button or by javascript. After creating it, let’s go
back to the controller and create an error object, filling it when the error is triggered:

Chapter 8 - AngularJS and Ajax 206
user.js
var app = angular.module('app',[]);
app.controller('UserCtrl',function($scope,$http){
$scope.user = {};
$scope.error = {};
$scope.getData = function(){
console.log("get data");
$http.get("data2.php").then(function(response){
console.log(response);
},function(response){
$scope.error.title = "Error " + response.status
$scope.error.message = response.statusText;
$('#errorModal').modal();
console.warn(response);
});
}
});
Now the UserController has a variable called $scope.error, which is used to fill in
the title and the message of the error, if it occurs. In the error method of $http.get
we use the method $('#errorModal').modal(); to display the message, similar to
the following image.

Chapter 8 - AngularJS and Ajax 207
Creating a global loading
This example was taken from: http://mandarindrummond.com/articles/angular-global-
loading-indicator/index.html
Whenever there is an Ajax call, it is useful to display a feedback to the user indicating
that the page is processing the request. Suppose that, in the data.PHP file, we have
the following situation:
<?php
sleep(3);
$user = new stdclass();
$user->name = "Joe";
$user->email = "[email protected]";
echo json_encode($user);
Chapter 8 - AngularJS and Ajax 208
We delayed the PHP code for 3 seconds. To test the page in the browser, by clicking
the Get Data, the page stays static for 3 seconds, and shortly after comes the answer
with the two fields being filled. To minimize this situation, we can create an indicator
that the page is running. To do this we need to initially use some AngularJS features.
First, we use the object httpProvider to create a process called interceptor, which
will intercede on Ajax request and change some elements of the page. This process
is described in the following code:
app.config(function($httpProvider) {
$httpProvider.interceptors.push(function($q, $rootScope) {
return {
'request': function(config) {
$rootScope.$broadcast('loading-started');
return config || $q.when(config);
},
'response': function(response) {
$rootScope.$broadcast('loading-complete');
return response || $q.when(response);
}
};
});
});
In this code, when a request is made, there is a broadcast with the message loading-
started. When the request returns from the server another message is broadcasted,
with the message loading-complete. The next step is to create a component that will
be the indicator of the page, and we do this by creating a new policy, in accordance
with the following code:

Chapter 8 - AngularJS and Ajax 209
app.directive("loadingIndicator", function() {
return {
restrict : "A",
template: "<div> <img src='loading.gif'/>Loading...</div>",
link : function(scope, element, attrs) {
element.css({"display" : "none"});
scope.$on("loading-started", function(e) {
element.css({"display" : ""});
});
scope.$on("loading-complete", function(e) {
element.css({"display" : "none"});
});
}
};
});
This directive, called the loadingIndicator features a simple template, formed of
a text and an image (loading.gif, you can get it at http://www.ajaxload.info/). In
addition to the template, create two functions that are executed according to the
broadcast. When the loading-started is dispatched, the component is shown, by
changing the css attribute: display:''. When the loading-complete is dispatched,
the loading is hidden via the display: none.
Now that we created the directive, just use it in code, inserting it anywhere in the
form. The complete loading code is displayed below:
user.js
var app = angular.module('app',[]);
app.config(function($httpProvider) {
$httpProvider.interceptors.push(function($q, $rootScope) {
return {
'request': function(config) {
$rootScope.$broadcast('loading-started');
return config || $q.when(config);
Chapter 8 - AngularJS and Ajax 210
},
'response': function(response) {
$rootScope.$broadcast('loading-complete');
return response || $q.when(response);
}
};
});
});
app.directive("loadingIndicator", function() {
return {
restrict : "A",
template: "<div id='loading'>
<img src='loading.gif'/>Loading...</div>",
link : function(scope, element, attrs) {
element.css({"display" : "none"});
scope.$on("loading-started", function(e) {
element.css({"display" : ""});
});
scope.$on("loading-complete", function(e) {
element.css({"display" : "none"});
});
}
};
});
app.controller('UserCtrl',function($scope,$http){
$scope.user = {};
$scope.error = {};
$scope.getData = function(){
console.log("get data");
$http.get("data.php").then(function(response){

Chapter 8 - AngularJS and Ajax 211
$scope.user = response.data;
},function(response){
$scope.error.title = "Error " + response.status
$scope.error.message = response.statusText;
$('#errorModal').modal();
console.warn(response);
});
}
});
user.html
...
<button class="btn btn-default" type="button"
ng-click="getData()">Get Data</button>
<div loading-indicator></div>
....
The result is seen in the following image.

Chapter 8 - AngularJS and Ajax 212
Disabling the button while sending data
It is a good programming practice to disable the “Get Data” button immediately after
the user clicks on it, until the server responds to the request. We can handle this with
the ng-disabled policy, as follows:
user.html
<button class="btn btn-default"
type="button" ng-click="getData()"
ng-disabled="btnGetDataDisabled">
Get Data
</button>
<div id="loading" loading-indicator></div>
In the html file, referring to the ng-disabled='btnGetDataDisabled', where bt-
nGetDataDisabled is a variable created in the controller and manipulated in the Ajax
request:

Chapter 8 - AngularJS and Ajax 213
user.js
app.controller('UserCtrl',function($scope,$http){
$scope.user = {};
$scope.error = {};
$scope.btnGetDataDisabled = false;
$scope.getData = function(){
console.log("get data");
$scope.btnGetDataDisabled = true;
$http.get("data.php").then(function(response){
$scope.user = response.data;
$scope.btnGetDataDisabled = false;
},function(response){
$scope.error.title = "Error " + response.status
$scope.error.message = response.statusText;
$('#errorModal').modal();
$scope.btnGetDataDisabled = false;
console.warn(response);
});
}
});
With that, the “Get Data” button is disabled in the process of request to the server,
along with the loading, similar to the following image.

Chapter 8 - AngularJS and Ajax 214
$resource usage
We learned how to perform Ajax calls with the $http and if needed, we can abstract
even more the way AngularJS accesses the server. The $resource works as an
“instance” of the server, thus it will be possible to simulate the access to server as if
it was instantiated.
Imagine that we have a method called saveUser on the controller, we would use the
$resource as follows:
$scope.saveUser = function(){
u = new User();
u.name="joe";
u.email="[email protected]";
u.save();
By using the ‘u.save()’ method the $resource itself will perform the Ajax request. In
the case of the ‘save()’, will send a POST to the “/users” url.

Chapter 8 - AngularJS and Ajax 215
That means that the $resource establishes a Restful communication standard
between the application and the server. Instead of using the $http.post, we do only
a variable.save() so that the request is made.
To use this library you need to add the angular-resource.js file in the HTML
document. That is, besides the default library “angular.min.js” we must also include
angular-resource.min.js library. First, we must install the library with Bower, as
follows:
$ bower install angular-resource
And after installing the library, we need to reference it in the html file:

Chapter 8 - AngularJS and Ajax 216
user.html
... code ...
<body ng-controller="UserCtrl">
... code ...
<script src="bower_components/jquery/dist/jquery.min.js">
</script>
<script src="bower_components/bootstrap/dist/js/bootstrap.min.js">
</script>
<script src="bower_components/angular/angular.min.js">
</script>
<script src="bower_components/angular-resource/angular-resource.min.\
js">
</script>
<script src="user.js"></script>
</body>
</html>
After installation of the library, we can import the library in the creation of the
module:
user.js
var app = angular.module('app',['ngResource']);
..........
We will now create a new controller, with the use of $resource. First, we implement
the getData method.

Chapter 8 - AngularJS and Ajax 217
user.js
var app = angular.module('app',['ngResource']);
// ... code ...
app.controller('UserCtrl',
function($scope,$http,$resource){
$scope.user = {};
$scope.error = {};
$scope.btnGetDataDisabled = false;
var userResource = $resource("/users/:id");
$scope.getData = function(){
$scope.btnGetDataDisabled = true;
userResource.get({},function(response){
console.log(response);
},function(response){
$scope.btnGetDataDisabled = false;
console.warn(response);
});
}
});
In this new implementation, we are creating the controller using the $resource,
via function ($scope, $http, $resource). Then we instantiate the variable
userResource with $resource('/users/:id') stating the URL for access to the
server, followed by the parameter that sets the key of the table.
When the user clicks the “Get Data” button, we execute the method userRe-
source.get that will do a GET request to the server, as in the following image:

Chapter 8 - AngularJS and Ajax 218
As you can see, the GET request to the address “/users” results in an error, since
our test server is not optimized for this (we created only a file called data.PHP). The
use of $resource will be implemented correctly when we integrate AngularJS and
Laravel.
Part 4 - Laravel and AngularJS

Chapter 9 - Connecting Laravel
and AngularJS
Introduction
In this chapter we will go back to the example created in Chapter 4, when we created
the blog.com, and integrate it to AngularJS. To recap, we created Laravel project using
the artisan, laravel new blog and then a whole structure of tables and classes to
create a simple blog. The tables are as follows:
We also created the model and controller classes:
• App\User.php and App\Http\Controllers\UserController.php
• App\Post.php and App\Http\Controllers\PostController.php
• App\Tag.php and App\Http\Controllers\Tag.php
• App\Comment.php and App\Http\Controllers\Comment.php
Chapter 9 - Connecting Laravel and AngularJS 221
Workflow
The flow to create the system basically consists of:
1. Defining the features that the customer will need;
2. Setting the URL of the features in the routes.php, as well as the connection
type and parameters;
3. Creating the method in the controller, accessing the model and persisting the
data;
4. Testing the browser access (if it is a POST method, use Postman);
5. Creating the HTML page that includes all the features that the customer needs;
6. Defining a controller of AngularJS, along with your $resource/$http;
7. Configuring the $resource/$html with the features required;
8. Creating the html/javascript code that uses the functionality.
Installing AngularJS on Laravel
Laravel exposes its user interface in the public folder. In this folder, we have the
index.html file that configures all that Laravel needs (we call him entrypoint) from
the application. To add AngularJS in it, we have to initially perform the installation
of libraries with Bower.
Make sure you are in the directory blog/public and run the following command:
$blog\public> bower install angular angular-resource angular-route
bootstrap bootswatch-dist#cosmo
The above command produces the following output:

Chapter 9 - Connecting Laravel and AngularJS 222
The above command produces the following output:

Chapter 9 - Connecting Laravel and AngularJS 223
Now we need to create the index.html file that will be the main page of the blog. In
addition to this, we will also create the directory js to put the javascript files of the
application and the “css” folder for the style and customization files.
Finally edit the index.html file that loads AngularJS and Bootstrap libraries.

Chapter 9 - Connecting Laravel and AngularJS 224
blog/public/index.html
<!doctype html>
<html ng-app="app">
<head>
<meta name="viewport" content="width=device-width,
\
initial-scale=1">
<link rel="stylesheet"
href="bower_components/bootswatch-dist/css/bootstrap.min.css">
<link rel="stylesheet" href="css/custom.css">
<title> My Blog </title>
</head>
<body>
<div class="container">
My Blog
</div>
<script src="bower_components/jquery/dist/jquery.min.js">
</script>
<script src="bower_components/bootstrap/dist/js/bootstrap.min.js">
</script>
<script src="bower_components/angular/angular.min.js">
</script>
<script src="bower_components/angular-route/angular-route.min.js">
</script>
<script src="bower_components/angular-resource/angular-resource.min.\
js">
</script>
<script src="js/app.js"></script>
</body>
</html>

Chapter 9 - Connecting Laravel and AngularJS 225
blog/public/js/app.js
app = new angular.module('app',[]);
To test the index.html file in your browser, we need to adjust the routes.php.
Reconfiguring the routes.php
Several tests were made in the file blog/app/Http/routes.php, it should contain
many codes that are no longer needed. Delete or comment all of your content so
that we can create a new entry, which sets up that, when the user access “blog.com”
Laravel will redirect to “blog.com/index.html”.
blog/app/Http/routes.php
<?php
Route::get('/', function () {
return Redirect::to('/index.html');
});
Route::get('routes', function() {
\Artisan::call('route:list');
return "<pre>".\Artisan::output();
});
In addition to the main entrance blog.com/, we also set up blog.com/routes to
provide a list of routes that are configured for the application. After editing the routes,
visit blog.com in your browser:

Chapter 9 - Connecting Laravel and AngularJS 226
When using the inspect tool from Google Chrome/Firefox (F12), we can see that the
index.html file is loaded with AngularJS and Bootstrap libraries.
Site header
Let’s reuse the Bootstrap standard template (http://getbootstrap.com/examples/starter-
template/) and begin the construction of the header of the blog. The header will
contain some links like the main page, the users page, comments and tags.

Chapter 9 - Connecting Laravel and AngularJS 227
blog/public/index.html
.....
<body>
<nav class="navbar navbar-inverse navbar-fixed-top">
<div class="container">
<div class="navbar-header">
<button type="button" class="navbar-toggle collapsed"
data-toggle="collapse" data-target="#navbar"
aria-expanded="false" aria-controls="navbar">
<span class="sr-only">Toggle navigation</span>
<span class="icon-bar"></span>
<span class="icon-bar"></span>
<span class="icon-bar"></span>
</button>
<a class="navbar-brand" href="#">blog.com</a>
</div>
<div id="navbar" class="collapse navbar-collapse">
<ul class="nav navbar-nav">
<li class="active"><a href="/">Home</a></li>
<li><a href="#/users">users</a></li>
<li><a href="#/comments">Comments</a></li>
<li><a href="#/tags">Tags</a></li>
</ul>
<div class="navbar-right ">
<ul class="nav navbar-nav">
<li><a href="#/login">Login</a></li>
</ul>
</div>
</div>
</div>
</nav>
<div class="container">

Chapter 9 - Connecting Laravel and AngularJS 228
My Blog
</div>
....
As the header is defined with a <div>, whose class is navbar, it has an “overflow”
behavior over the content of the page, making our original text “My Blog” to be
behind the menu. To fix this problem, edit the custom.css file so that the top margin
of the site is greater than the height of the menu, in this case, 50 pixels is enough.
blog/public/css/custom.css
body{
margin-top: 50px;
}
So far we have the following design:

Chapter 9 - Connecting Laravel and AngularJS 229
The central part of the Blog, we are going to split it into 2 blocks, in a proportion of
70% and 30%, IE 8 and 4 blocks, as shown in the following code:
blog/public/index.html
// header....
<div class="container">
<div class="row">
<div class="col-sm-8">Content</div>
<div class="col-sm-4">Menu</div>
</div>
</div>

Chapter 9 - Connecting Laravel and AngularJS 230
In the content blocks we will insert the posts of the blog, in chronological order, and
in the menu blocks, insert the tags used in the website and the latest comments.
Using DeepLink on the blog
We will use AngularJS’s Deeplink feature to load parts of the blog. Initially, we must
set up that we will use the content blocks for this content. For that we use the ng-view
directive:
On theapp.js file we set up the routing as follows:
blog/public/js/app.js
app = new angular.module('app',['ngRoute']);
app.config(['$routeProvider',function($routeProvider){
$routeProvider.
when('/',{controller:'mainController',
templateUrl:'templates/main.html'}).
when('/users',{controller:'userController',
templateUrl:'templates/user.html'}).
when('/comments',{controller:'commentController',
templateUrl:'templates/comment.html'}).
when('/tags',{controller:'tagController',
templateUrl:'templates/tag.html'}).
when('/login',{controller:'loginController',
templateUrl:'templates/login.html'}).
otherwise({redirectTo:'/'});
}]);
app.controller('mainController',function ($scope) {
$scope.userName="daniel";
});
We create in this configuration the routes for the top menu links, in addition to
the mainController. Each route has a controller and a template file, which we will

Chapter 9 - Connecting Laravel and AngularJS 231
creat gradually. The first one is the main.html for route /, which must be created in
blog/public/template/main.html, initially with a simple text.
Note that in the main.html file we can use AngularJS, and he is already getting a
variable username from the controller.
Getting posts
Initially it is necessary to display the latest posts on the main page of the blog. For
this, we will use the workflow that we created earlier in this chapter to perform all
the steps.
The client needs the last 3 posts created in chronological order (can be by post id),
in addition to the related tags to that post and the amount of comments. Let’s not
initially display the comments for each post.
The URI for this request will be “/posts/last/3” which will call the method getLast
passing the parameter 3, meaning the amount of posts to be returned. The number 3
is the default, so if there is a call to the server with the url “/posts/last”, 3 posts will
be returned.
Add the following route in the routes.php file:

Chapter 9 - Connecting Laravel and AngularJS 232
blog/app/Http/routes.php
<?php
// ... code ...
Route::get('/posts/last/{n?}', 'PostController@last');
Now we will use the Laravel Query Builder to obtain this information, which will
be on the last method of PostController class:
blog/app/Http/Controllers/PostController.php
1 <?php
2
3 namespace App\Http\Controllers;
4
5 use Illuminate\Http\Request;
6
7 use App\Http\Requests;
8 use App\Http\Controllers\Controller;
9 use App\Post;
10
11 class PostController extends Controller
12 {
13 // ...code...
14
15 public function last($n=3){
16
17 return Post::select('id','title', 'text','active')
18 ->with(['tags'=>function($q){
19 $q->select('id','title');
20 }])
21 ->with(['comments'=>function($q){
22 $q->active()->select('active','post_id');
23 }])

Chapter 9 - Connecting Laravel and AngularJS 233
24 ->orderBy('id', 'desc')
25 ->take($n)
26 ->get();
27 }
28 }
Let’s look at this query line. The last method has a $n parameter (line 21), which is
the amount of posts that should be returned in the query. If no amount is reported, the
value 3 is assumed. At line 23 we returned an instance of Post, followed by various
parameters. Note that at line 9, we included the file App\Post with the command use
and therefore we can use the Post directly at line 23. The first method Post::select
make the selection of which fields should be returned by the query. At line 24 we
used ->with to add a relationship to this query. It is necessary to include the tags
from that post, since we use ->with([tags ... , and at line 25, we defined that only
the fields id and title of tag table will be returned.
At line 27 we have the same case of the selection of tags, but with the comments. We
are selecting the active field and we need to select the field post_id, so that Laravel
can make the relationship between N to one of the object, as explained above in
Chapter 5. Another detail at line 28 is the use of ->active() which was configured
in App\Comment.php, which is a scope, detailed in Chapter 5.
At line 30 we have the use of the ->order(id , desc) that will sort the query by id, in
reverse order. At line 31 we have the ->take($n) which will obtain as many records
as the value of $n.
As the method returns this entire query, Laravel will take care of transforming it in
JSON format, which can be seen according to the following image.

Chapter 9 - Connecting Laravel and AngularJS 234
The part of the query server is ready, now we need to program on the client to obtain
this information. For that, we use $http in the MainController of the application,
initially with the following code:
blog/public/js/app.js
// ...code...
app.controller('mainController',function ($scope,$http) {
$scope.$on('$viewContentLoaded', function(){
$http.get("/posts/last/3").then(function(response){
console.log(response);
},function(response){
console.warn(response);
});
});
});
In this code, we use scope.$on('$viewContentLoaded', function () { that will
run the anonymous function as soon as the view is loaded. In this function, we use
$http to perform a GET call to the server, where the Ajax query will be performed
and the response will be contained in the first parameter of method then. At the

Chapter 9 - Connecting Laravel and AngularJS 235
moment we are only displaying the HTTP query response in the browser console,
which is similar to the following image.
With the servers response, we can add it to a variable, e.g. posts‘:
blog/public/js/app.js
app.controller('mainController',function ($scope,$http) {
$scope.posts = [];
$scope.$on('$viewContentLoaded', function(){
$http.get("/posts/last/3").then(function(response){
console.log(response);
$scope.posts = response.data;
},function(response){
console.warn(response);
});
});

Chapter 9 - Connecting Laravel and AngularJS 236
});
In this code, we create the variable $scope.posts, which is populated when the
server request returns. After making this reference, we will program the file tem-
plate/main.html to display the posts to the user.
blog/public/template/main.html
<div ng-repeat="post in posts">
<h2>{{post.title}}</h2>
<p>
{{post.text}}
<br/><a href="#/post/{{post.id}}">More</a>
<p class="text-right">
<span ng-repeat="tag in post.tags"
class="label label-primary tag">{{tag.title}}</span>
</p>
<hr/>
</p>
</div>
In this code, we use the ng-repeat to create a loop and, for each iteration, display a
post on the screen. In each iteration of the loop, the variable post is set and we can
reference it for its properties, such as the title and the content of the post. You can
also perform a new loop to display the tags of each post. The result of this template
is similar to the following image.
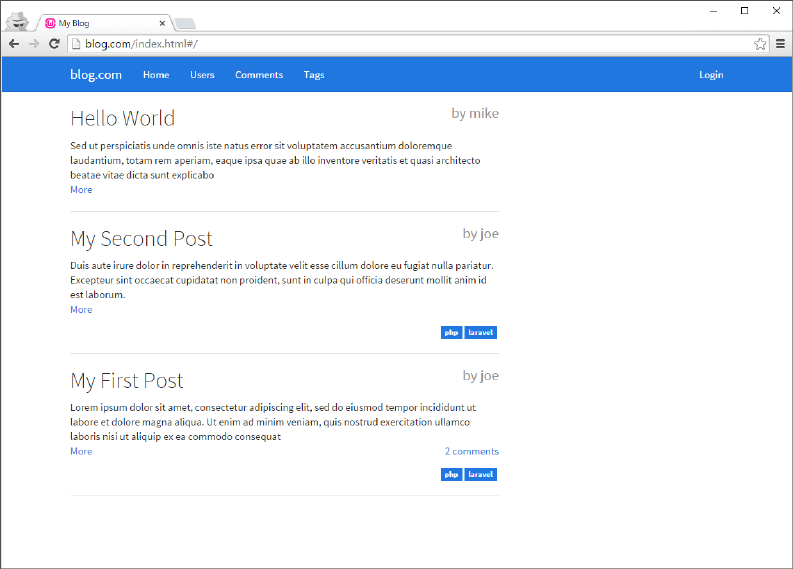
Chapter 9 - Connecting Laravel and AngularJS 237
Inserting the amount of comments
The comments of each post are returned by the Ajax call, then to display the quantity,
just change the template by entering the information on the comments, as the
following code:

Chapter 9 - Connecting Laravel and AngularJS 238
blog/public/template/main.html
<div ng-repeat="post in posts">
<h2>{{post.title}}</h2>
<p>
{{post.text}}
<br/>
<a href="#/post/{{post.id}}">More</a>
<span ng-init="lengthComments = post.comments.length">
<a ng-show="lengthComments>0" class="pull-right"
href="#/post/{{post.id}}">
{{lengthComments}}
comment{{ lengthComments != 1 ? 's' : ''}} </a>
</span>
<p class="text-right">
<span ng-repeat="tag in post.tags"
class="label label-primary tag">{{tag.title}}</span>
</p>
<hr/>
</p>
</div>
In this new implementation, we use the ng-init to get the number of comments for
that post and, if it is greater than 0, we display the amount. To display or not the
information we use the ng-show and to distinguish whether the word “comment”
has the “s” at the end use the ternary operator.
Insert the Post author
After you create the blog home page, containing the last three posts, we are going
to insert the information from the author of the Post, which was not informed until
now, so we can have a chance to review the concepts learned so far. First we need to
edit the method PostsController@last inserting the author of the post, as follows:

Chapter 9 - Connecting Laravel and AngularJS 239
blog/app/Http/Controllers/PostController.php
<?php
namespace App\Http\Controllers;
use Illuminate\Http\Request;
use App\Http\Requests;
use App\Http\Controllers\Controller;
use App\Post;
class PostController extends Controller
{
// ...code...
public function last($n=3){
return Post::select('id','title', 'text','active','user_id')
->with(['tags'=>function($q){
$q->select('id','title');
}])
->with(['comments'=>function($q){
$q->active()->select('active','post_id');
}])
->with(['user'=>function($q){
$q->select('id','name','email');
}])
->orderBy('id', 'desc')
->take($n)
->get();
}
}
We included the user_is field in the post select. This is required so that the Query

Chapter 9 - Connecting Laravel and AngularJS 240
Builder can connect the User to the Post. After the inclusion of the comments of the
Post, use the with to include the User, with the fields id, name and email.
After this modification, the field post.user.name will be available on the client’s
JSON, which we can insert into the template, as follows:
blog/public/template/main.html
<div ng-repeat="post in posts">
<h2>{{post.title}}
<small class="pull-right">
by {{post.user.name}}
</small></h2>
<p>
{{post.text}}
<br/>
<a href="#/post/{{post.id}}">More</a>
<span ng-init="lengthComments = post.comments.length">
<a ng-show="lengthComments>0" class="pull-right"
href="#/post/{{post.id}}">
{{lengthComments}}
comment{{ lengthComments != 1 ? 's' : ''}} </a>
</span>
<p class="text-right">
<span ng-repeat="tag in post.tags"
class="label label-primary tag">{{tag.title}}</span>
</p>
<hr/>
</p>
</div>
Note that we add the {{post.user.name}} next to the title of the post, resulting in
the following image:
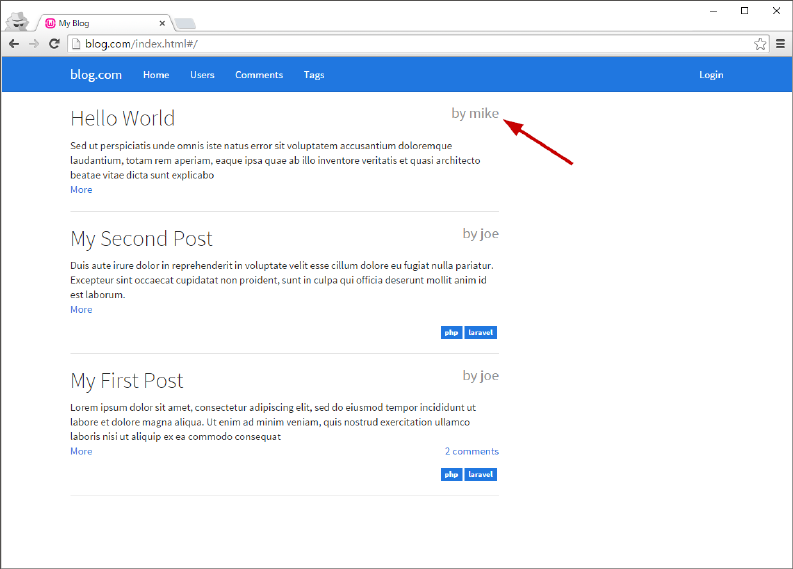
Chapter 9 - Connecting Laravel and AngularJS 241
Reviewing the Query Builder
It is very important to realize that in the Query of the PostsController@last method
we must always indicate the key fields that make the relationship between the tables.
For example, on 1xN relationship between Post and Comment, we should bring the
field post_id in with('comment'). Similarly, the relationship between User and Post
Nx1, should bring user_id in the select of Post. Forget these fields is one of the most
common error causes in relationships of the Query Builder. The following image will
help you to understand the process:

Chapter 9 - Connecting Laravel and AngularJS 242
Filling the side menu
The side menu of the Web site will contain two information about the Blog. The first
are all the tags used on the blog, and the second, the last three comments. See that
there are two distinct informations that should be in their respective controllers, for
example: TagController@getAll() and CommentController@last().

Chapter 9 - Connecting Laravel and AngularJS 243
blog/app/Http/Controllers/CommentController.php
<?php
namespace App\Http\Controllers;
use Illuminate\Http\Request;
use App\Http\Requests;
use App\Http\Controllers\Controller;
use App\Comment;
class CommentController extends Controller
{
// ... code ...
public function last($n=3){
return Comment::select('id','text','post_id')
->active()
->orderBy('id', 'desc')
->with(['post'=>function($q){
$q->select('id','title');
}])
->take($n)
->get();
}
}

Chapter 9 - Connecting Laravel and AngularJS 244
blog/app/Http/Controllers/TagController.php
<?php
namespace App\Http\Controllers;
use Illuminate\Http\Request;
use App\Http\Requests;
use App\Http\Controllers\Controller;
use App\Tag;
class TagController extends Controller
{
// ... code ...
public function getAll(){
return Tag::select('id','title')->get();
}
}
Even if they are different, we can group information in one single Ajax call, that we
can organize into a new controller, called BlogController. This controller will have
methods for the site itself, and not the system tables. To create the controller, use the
artisan:
blog$ php artisan make:controller BlogController
In this controller, we create the method getMenuInfo, which will bring together the
information from the tags and comments.

Chapter 9 - Connecting Laravel and AngularJS 245
blog/app/Http/Controllers/BlogController.php
<?php
namespace App\Http\Controllers;
use Illuminate\Http\Request;
use App\Http\Requests;
use App\Http\Controllers\Controller;
class BlogController extends Controller
{
public function getMenuInfo(){
$tagController = new TagController();
$commentController = new CommentController();
return array(
$tagController->getAll(),
$commentController->last()
);
}
}
After you create the method in BlogController, we can add it in the routes.php
file, as follows:
blog/app/Http/routes.php
<?php
Route::get('/', function () {
return Redirect::to('/index.html');
});
Route::get('/posts/last/{n?}', 'PostController@last');
Route::get('/menuinfo', 'BlogController@getMenuInfo');

Chapter 9 - Connecting Laravel and AngularJS 246
// ... code ....
And test in your browser with the address http://blog.com/menuinfo.
Finishing the server part and Laravel, let’s display the customer information in that
column right next to the posts. This column is set by the html code: <div class="col-
sm-4">Menu</div> where we will change to:
blog/public/index.html
/// ... code ....
<div class="container">
<div class="row">
<div class="col-sm-8" ng-view></div>
<div class="col-sm-4" ng-controller="menuController">
<h3>Tags</h3>
<span ng-repeat="tag in tags" class="badge tag">
{{tag.title}}
</span>
<hr/>
<h3>Lasts comments</h3>
<blockquote ng-repeat="comment in comments">
{{comment.text}}
<small> {{comment.post.title}} </small>
</blockquote>
</div>
</div>
</div>
// ... code ...
Note that we created a new AngularJS controller, called “MenuController”. This
controller connects to the server and populates the variables $scope.tags and
$scope.comments as the following code:

Chapter 9 - Connecting Laravel and AngularJS 247
blog/public/js/app.js
app = new angular.module('app',['ngRoute']);
app.config(['$routeProvider',function($routeProvider){
// ... code ...
}]);
app.controller('mainController',function ($scope,$http) {
// ... code ...
});
app.controller('menuController',function ($scope,$http) {
$scope.tags = [];
$scope.comments = [];
console.log('view');
$http.get("/menuinfo").then(function(response){
console.log(response);
$scope.tags = response.data[0];
$scope.comments = response.data[1];
},function(response){
console.warn(response);
});
});
After creating the MenuController, we have the following interface for the site:

Chapter 9 - Connecting Laravel and AngularJS 248
Handle errors
We haven’t programmed what happens if any errors happen in the application. There
may be several types of errors, and the ones that we must display to the user are
relative to the connection to the server, especially errors caused by exceptions.
Before detailing this process, let’s add a library called “bootstrap-notify”, installed
by bower. Open the terminal, go to the folder “blog/public” and run the following
command:
blog/public $ bower install bootstrap-notify

Chapter 9 - Connecting Laravel and AngularJS 249
After installing the library, we need to add the necessary files to use the bootstrap-
notify. It is done on the blog/public/index.html file as the following code:
blog/public/index.html
<!doctype html>
<html ng-app="app">
<head>
<meta name="viewport" content="width=device-width, initial-scale\
=1">
<link rel="stylesheet"
href="bower_components/bootswatch-dist/css/bootstrap.min.cs\
s">
<link rel="stylesheet"
href="bower_components/bootstrap-notify/css/bootstrap-notify\
.css">
<link rel="stylesheet" href="css/custom.css">
<title> My Blog </title>
</head>
<body>

Chapter 9 - Connecting Laravel and AngularJS 250
// ... code ...
<div class='notifications bottom-right'></div>
<script
src="bower_components/jquery/dist/jquery.min.js">
</script>
<script
src="bower_components/bootstrap/dist/js/bootstrap.min.js">
</script>
<script
src="bower_components/bootstrap-notify/js/bootstrap-notify.js">
</script>
<script
src="bower_components/angular/angular.min.js">
</script>
<script
src="bower_components/angular-route/angular-route.min.js">
</script>
<script
src="bower_components/angular-resource/angular-resource.min.js">
</script>
<script src="js/app.js"></script>
</body>
</html>
See that we added bootstrap-notify.css and javascript bootstrap-notify.js to
the index.html file. We alse created a div, which is where the message is instantiated.
This div also reports where the notification message appears, in this case bottom-
right.
The notification library is ready, now we need to use it. To do this, we will create
two functions in app.js file. One of them will display a normal notification message,
while the other displays an error message.

Chapter 9 - Connecting Laravel and AngularJS 251
blog/public/js/app.js
app = new angular.module('app',['ngRoute']);
function notifyOk(message){
$('.bottom-right').notify({
message: { text: message}
}).show();
}
function notifyError(error){
message = "";
if (error.data!=null)
if (error.data.message!=null)
message += error.data.message;
if (message=="")
if (error.statusText!=null)
message = "Error: " + error.statusText;
if (message=="")
if (typeof error == "string")
message = error;
$('.bottom-right').notify({
message: { text: message},
type: 'danger',
}).show();
$('#loading').css('display','none');
}
// ... code

Chapter 9 - Connecting Laravel and AngularJS 252
These two functions are used throughout the site, the first being used to display a
message either as “User saved successfully”, and the second used in case of errors.
In this second function, notifyError, we use the property error.data.message as a
message, if it is filled. This property is an exception error message from PHP.
If there is any error in AngularJS request to Laravel, the second function of the
method then will be called. Until now, we were using console.warn and, with the
method notifyError ready, we can use the following code:
blog/public/js/app.js
app = new angular.module('app',['ngRoute']);
app.config(['$routeProvider',function($routeProvider){
//...
}]);
//Notifications
function notifyOk(message){
//...
}
function notifyError(error){
//...
}
app.controller('mainController',function ($scope,$http) {
$scope.posts = [];
$scope.$on('$viewContentLoaded', function(){
$http.get("/posts/last/3").then(function(response){
$scope.posts = response.data;
},function(response){
notifyError(response)
});
});
});
app.controller('menuController',function ($scope,$http) {

Chapter 9 - Connecting Laravel and AngularJS 253
$scope.tags = [];
$scope.comments = [];
console.log('view');
$http.get("/menuinfo").then(function(response){
//console.log(response);
$scope.tags = response.data[0];
$scope.comments = response.data[1];
},function(response){
notifyError(response.statusText);
});
});
Now, instead of console.warn(response) we are using notifyError. To perform a
test, let’s add an exception in the method BlogController@getMenuInfo:
blog/app/Http/Controllers/BlogController.php
<?php
namespace App\Http\Controllers;
use Illuminate\Http\Request;
use App\Http\Requests;
use App\Http\Controllers\Controller;
class BlogController extends Controller
{
public function getMenuInfo(){
$tagController = new TagController();
$commentController = new CommentController();
return array(
$tagController->getAll(),
$commentController->last()
);

Chapter 9 - Connecting Laravel and AngularJS 254
}
}
When realoading the page the error will be displayed:
Attention!
Whenever throuwing an exception in PHP, use ** \Exception ** Don‘t
forget the back slash!
Creating a loading global
Let’s use the concepts learned in the previous section to create a global loading
feedback, indicating that some Ajax content is running. Initially we need to create

Chapter 9 - Connecting Laravel and AngularJS 255
the app.js file interceptors that will capture when an Ajax event is being running.
Then, we need to create the loadingIndicator, and insert it on the main page of the
site.
blog/public/js/app.js
app = new angular.module('app',['ngRoute']);
app.config(function($httpProvider) {
$httpProvider.interceptors.push(
function($q, $rootScope) {
return {
'request': function(config) {
$rootScope.$broadcast('loading-started');
return config || $q.when(config);
},
'response': function(response) {
$rootScope.$broadcast('loading-complete');
return response || $q.when(response);
}
};
});
});
app.directive("loadingIndicator", function() {
return {
restrict : "A",
template: "<div id='loading'>
<img src='images/loading.gif'/>Loading...</div>",
link : function(scope, element, attrs) {
element.css({"display" : "none"});
scope.$on("loading-started", function(e) {
element.css({"display" : ""});
});
scope.$on("loading-complete", function(e) {
element.css({"display" : "none"});

Chapter 9 - Connecting Laravel and AngularJS 256
});
}
};
});
// ... code ...
We changed the main page of the site creating a div with the directive loadingIndi-
cator, as in the following example.
// ... code ...
<div class="container">
<div id="loading" loading-indicator></div>
<div class="row">
<div class="col-sm-8" ng-view></div>
<div class="col-sm-4" ng-controller="menuController">
// ... code ...
The result of the loading feedback is shown in the following image.

Chapter 9 - Connecting Laravel and AngularJS 257
User page
The user page is the second item in the top menu of the site. On this page, we will
display the sites users and their respective posts. First, create the entry
in the routes.php‘:
Route::get(`/users/posts`, `UserController@getAllPosts`);
After you set up the routes.php, you must create the method getAllPosts on class
App\User.php, containing the following code:

Chapter 9 - Connecting Laravel and AngularJS 258
blog/app/Http/Controllers/UserController.php
<?php
namespace App\Http\Controllers;
use App\Http\Controllers\Controller;
use App\User;
class UserController extends Controller
{
public function getAllPosts()
{
return User::select('id','name','email')
->with(['posts'=>function($q){
$q->select('id','title','user_id')->active();
}])
->get();
}
}
Note that, when we get the Posts of the User class, we use ->active() to get only the
active posts (field of the active table). If this information is not already in the model
Post, located at app\Post.php, add it as follows:

Chapter 9 - Connecting Laravel and AngularJS 259
blog/app/Post.php
<?php
namespace App;
use Illuminate\Database\Eloquent\Model;
class Post extends Model
{
public function user(){
return $this->belongsTo("App\User");
}
public function comments(){
return $this->hasMany('App\Comment');
}
public function tags()
{
return $this->belongsToMany('App\Tag');
}
public function scopeActive($query)
{
return $query->where('active', 1);
}
}
After you set up the server to get the information about users, we need to set up the
client, creating the template templates/user.html and the userController under
the routeProvider configuration file blog/public/js/app.js.

Chapter 9 - Connecting Laravel and AngularJS 260
blog/public/js/app.js
// ... code ...
app.controller('userController',function ($scope,$http) {
$scope.users = [];
$scope.$on('$viewContentLoaded', function(){
$http.get("/users/posts").then(function(response){
$scope.users = response.data;
},function(response){
notifyError(response)
});
});
});
The template is set up as follows:
blog/public/template/user.html
<div ng-repeat="user in users">
<h2>{{user.name}}</h2>
<small class="pull-right">{{user.email}}</small>
<ul>
<li ng-repeat="post in user.posts">
<a href='#/post/{{post.id}}'>
{{post.title}}
</a></li>
</ul>
<hr/>
</div>
After you set up the template, click the “users” link in the top menu, and get the users
screen similar to the following image.

Chapter 9 - Connecting Laravel and AngularJS 261
Comment screen
The comments screen can display all the blog comments, followed by which Post the
comment belongs to and its author. It is necessary to modify four files to create this
functionality:
blog/app/Http/routes.php
<?php
/// ... code ...
Route::get('/comments', 'CommentController@getAll');

Chapter 9 - Connecting Laravel and AngularJS 262
blog/app/Http/Controllers/CommentController.php
<?php
namespace App\Http\Controllers;
use Illuminate\Http\Request;
use App\Http\Requests;
use App\Http\Controllers\Controller;
use App\Comment;
class CommentController extends Controller
{
// ... code ...
public function last($n=3){
return Comment::select('id','text','post_id')
->active()
->orderBy('id', 'desc')
->with(['post'=>function($q){
$q->select('id','title');
}])
->take($n)
->get();
}
}

Chapter 9 - Connecting Laravel and AngularJS 263
blog/public/js/app.js
// ... code ...
app.controller('commentController',function ($scope,$http) {
$scope.comments = [];
$scope.$on('$viewContentLoaded', function(){
$http.get("/comments").then(function(response){
$scope.comments = response.data;
},function(response){
notifyError(response)
});
});
});
blog/public/template/comment.html
<h2>Comments</h2>
<div ng-repeat="comment in comments">
<h3>{{comment.post.title}}</h3>
<blockquote>{{comment.text}}</blockquote>
<small class="badge">by {{comment.email}}</small>
<hr/>
</div>

Chapter 9 - Connecting Laravel and AngularJS 264
Tag screen
The tags can display all the tags of the blog, followed by the posts that used it. It is
necessary to modify four files to create this functionality:
blog/app/Http/routes.php
<?php
/// ... code ...
Route::get('/tags/posts', 'TagController@getAllWithPosts');

Chapter 9 - Connecting Laravel and AngularJS 265
blog/app/Http/Controllers/TagController.php
<?php
namespace App\Http\Controllers;
use Illuminate\Http\Request;
use App\Http\Requests;
use App\Http\Controllers\Controller;
use App\Tag;
class TagController extends Controller
{
/// ... code ...
public function getAllwithPosts(){
return Tag::select('id','title')
->with(['posts'=>function($q){
$q->select('id','title')->active();
}])
->get();
}
}

Chapter 9 - Connecting Laravel and AngularJS 266
blog/public/js/app.js
// ... code ...
app.controller('tagController',function ($scope,$http) {
$scope.tags = [];
$scope.$on('$viewContentLoaded', function(){
$http.get("/tags/posts").then(function(response){
$scope.tags = response.data;
},function(response){
notifyError(response)
});
});
});
blog/public/template/tag.html
<h2>Tags</h2>
<div ng-repeat="tag in tags">
<h3>{{tag.title}}</h3>
<p>
<span ng-repeat="post in tag.posts"
class="label label-primary tag">
{{post.title}}
</span>
</p>
<hr/>
</div>
After finishing this first part of the blog, we can realize that AngularJS access to
Laravel conducted via the $http follows a logical sequence between changing the
routes, creating the method on the Laravel controller, creating the method in the
AngularJS controller and setting the template for the page.

Chapter 9 - Connecting Laravel and AngularJS 267

Chapter 10 - Authentication
In this chapter, we will see how to perform user authentication via login. Laravel
has all the implementation ready to perform login/logout of the application. When
we created the application blog, the User model and the users table were created as
well.
Creating the login form
The menu at the top of the site has the “Login” item, that initially points to #/login
in the AngularJS routing, loading the “login.html” template and “LoginController”
controller. The login form is shown below, and has two fields: email and password.
Several implementations were added to the form for fields validation, as seen in the
previous chapters.
blog/public/template/login.html
<h2>Login</h2>
<form name="form" novalidate>
<div class="form-group"
ng-class="{ 'has-error': (form.$submitted ||
form.loginEmail.$dirty)
&& form.loginEmail.$invalid }">
<label for="loginEmail">Email</label>
<input ng-model="user.email" type="email"
class="form-control" id="loginEmail"
name="loginEmail" placeholder="Email" required>
<span class="label label-danger"
ng-show="(form.$submitted ||
form.loginEmail.$dirty)
Chapter 10 - Authentication 269
&& form.loginEmail.$invalid">
<span
ng-show="form.loginEmail.$error.required">
Required</span>
<span
ng-show="form.loginEmail.$error.email">
Invalid email</span>
</span>
</div>
<div class="form-group"
ng-class="{ 'has-error':(form.$submitted
|| form.loginPassword.$dirty)
&& form.loginPassword.$invalid }">
<label for="loginPassword">Password</label>
<input ng-model="user.password" type="password"
class="form-control" id="loginPassword"
name="loginPassword"
placeholder="Password" required>
<span class="label label-danger"
ng-show="(form.$submitted ||
form.loginPassword.$dirty)
&& form.loginPassword.$invalid">
<span ng-show="form.loginPassword.$error.required">
Required</span>
</span>
</div>
<div class="form-group pull-right">
<button type="submit" class="btn btn-primary"
ng-click="doLogin()">Login</button>
</div>
<div class="form-group">
<span class="glyphicon glyphicon-chevron-right"
aria-hidden="true"></span>
<a href="#/new">New account</a>

Chapter 10 - Authentication 270
</div>
</form>
Login form with validation error
Performing the login
The login button runs the doLogin() method in loginController as the following
code:

Chapter 10 - Authentication 271
blog/public/js/app.js
// .... code ...
app.controller('loginController',
function ($scope,$http,$location,$rootScope) {
$scope.user = {};
$scope.doLogin = function(){
if ($scope.form.$invalid) {
console.warn("invalid form");
return;
}
$http.post("/login",
{
'email' : $scope.user.email,
'password' : $scope.user.password
}).then(function(response){
// login done,
// redirect to main page
$rootScope.authuser = response.data;
$location.path('/');
},function(response){
notifyError(response);
});
}
});
In this controller, we bring the new concepts of using the rootScope and location,
properly injected into the method. The $rootScope is a global variable to every
application (app), not only to the controller, in which we use the $scope. With that,
we can keep the information of the logged in user in the $rootScope.authuser. And
the $location is used to direct the AngularJS router for other pages. In this case, we
do the redirect to the main page, once the user is authenticated by Laravel.

Chapter 10 - Authentication 272
Adding features to the site with the user
properly logged in
Before reviewing the code in Laravel, we add two more functionality to the html
code, assuming the user is logged in and that the variable $rootScope.authuser is
not null. First, we add the following verification in the top menu:
<ul class="nav navbar-nav"
ng-show="$root.authuser==null">
<li><a href="#/login">Login</a></li>
</ul>
The code ng-show="$root.authuser==null" will cause the menu in the upper-right
corner of the page to only appears if authuser is null, that is, there is not a logged in
user. Another change will be in the right menu of the site, in the index.html file, as
follows:
blog/public/index.html
<div class="container">
<div id="loading" loading-indicator></div>
<div class="row">
<div class="col-sm-8" ng-view></div>
<div class="col-sm-4" ng-controller="menuController">
<h3>Tags</h3>
<span ng-repeat="tag in tags" class="badge tag">
{{tag.title}}
</span>
<hr/>
<h3>Last Comments</h3>
<blockquote ng-repeat="comment in comments">
{{comment.text}}
<small> {{comment.post.title}} </small>
</blockquote>

Chapter 10 - Authentication 273
<div ng-show="$root.authuser!=null">
<div class="panel panel-primary">
<div class="panel-heading">
Hi {{$root.authuser.name}}
</div>
<div class="panel-body">
<p>Welcome! </p>
</div>
<ul class="list-group">
<a href="admin.html" class="list-group-item">
Admin</a>
<a href="admin.html#/newpost" class="list-group-item">
New Post</a>
<a href="admin.html#/perfil" class="list-group-item">
Profile</a>
<a href="#/logout" class="list-group-item">
Logout</a>
</ul>
</div>
</div>
</div>
</div>
</div>
In the right menu we add another box, which now uses:
ng-show="$root.authuser!=null"
That means it will only be displayed if the variable $root.authuser is not null. This
box will display some links, as well as the button to leave, who will perform the
logout of the application. Logout is accomplished via logoutController, as shown
next.
When the user is logged on, the application looks similar to the following figure.
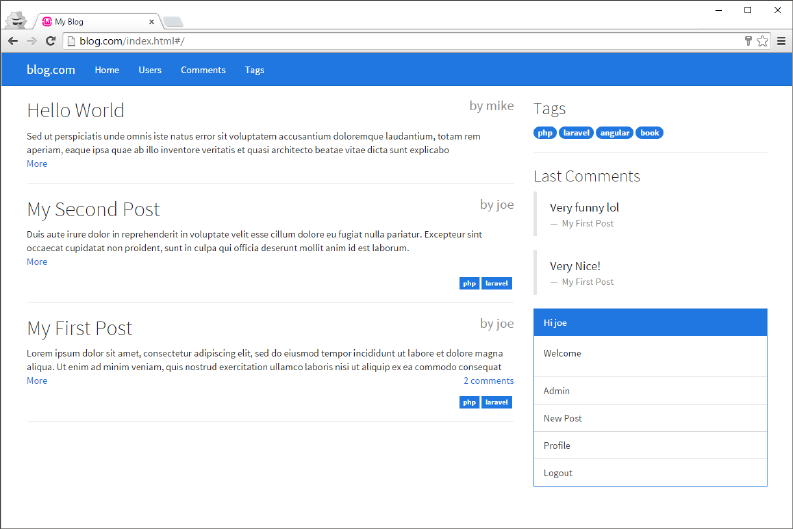
Chapter 10 - Authentication 274
Logout of the application
To perform the logout of the application, we need to perform a call to the server to
log out the user. You must also change the value of the property scopeRoot.authuser
to null, causing the blog interface to return to its previous state, when there is no user
logged in.

Chapter 10 - Authentication 275
blog/public/js/app.js
// ... code ...
app.controller('logoutController',
function ($scope,$http,$location,$rootScope) {
$http.get("/logout").then(function(response){
notifyOk("you have been logged");
$rootScope.authuser = null;
$location.path('#/');
},function(response){
notifyError(response);
});
});
Login and logout on Laravel
When the doLogin method from loginController is executed, a request to the
Laravel server via POST is executed, passing the variables email and password. It
is done by the blog.com/login URL, which must be configured in the routes.php
of the application.
blog/app/Http/routes.php
Route::post('/login','UserController@doLogin');
Route::get('/logout','UserController@doLogout');
We created the post(/login) and get(/logout) methods accessing the methods
doLogin and doLogout from UserController. This is the controller that we will
perform the login and logout of the user.

Chapter 10 - Authentication 276
blog/app/Http/Controllers/UserController.php
<?php
namespace App\Http\Controllers;
use App\Http\Controllers\Controller;
use App\User;
use Illuminate\Http\Request;
use Auth;
class UserController extends Controller
{
public function doLogin(Request $request){
if (Auth::attempt(
['email' => $request->email,
'password' => $request->password])) {
return Auth::user();
}else{
throw new \Exception(" Please try again. ");
}
}
public function doLogout(){
Auth::logout();
return Auth::user(); //must be null
}
}
The login is done with Auth::attemp, where we pass an array with the fields email
and password. If the login is successful, the method attemp returns true. With this,
we can return to the client with the user data, provided by the auth::user() method.
And logout is accomplished by the auth::logout().

Chapter 10 - Authentication 277
Creating a user from login
Let’s implement the functionality to create a user, available on the link “create
account” in the login form. This link points to “#/new,” which has not yet been created
in the AngularJS rootProvider, displayed below.
blog/public/js/app.js
/// ... code ...
app.config(['$routeProvider',function($routeProvider){
$routeProvider.
when('/',{controller:'mainController',
templateUrl:'templates/main.html'}).
when('/users',{controller:'userController',
templateUrl:'templates/user.html'}).
when('/comments',{controller:'commentController',
templateUrl:'templates/comment.html'}).
when('/tags',{controller:'tagController',
templateUrl:'templates/tag.html'}).
when('/login',{controller:'loginController',
templateUrl:'templates/login.html'}).
when('/logout',{controller:'logoutController',
templateUrl:'templates/logout.html'}).
when('/new',{controller:'newUserController',
templateUrl:'templates/newuser.html'}).
otherwise({redirectTo:'/'});
}]);
/// ... code ...
The form to create an account is contained in the template templates\newuser.html,
displayed below.

Chapter 10 - Authentication 278
blog/public/template/newuser.html
<h2>New User</h2>
<form name="form" novalidate>
<div class="form-group"
ng-class="{ 'has-error': (form.$submitted
|| form.email.$dirty)
&& form.email.$invalid }">
<label for="email">Email</label>
<input ng-model="user.email" type="email"
class="form-control"
id="email" name="email" placeholder="Email"
required>
<span class="label label-danger"
ng-show="(form.$submitted || form.email.$dirty)
&& form.email.$invalid">
<span ng-show="form.email.$error.required">
Required</span>
<span ng-show="form.email.$error.email">
Invalid Email</span>
</span>
</div>
<div class="form-group"
ng-class="{ 'has-error':(form.$submitted
|| form.password.$dirty)
&& form.password.$invalid }">
<label for="password">Password</label>
<input ng-model="user.password" type="password"
class="form-control"
id="password" name="password"
placeholder="Password" required>
<span class="label label-danger"
ng-show="(form.$submitted || form.password.$dirty)
Chapter 10 - Authentication 279
&& form.password.$invalid">
<span ng-show="form.password.$error.required">
Required</span>
</span>
</div>
<div class="form-group"
ng-class="{ 'has-error':
(form.$submitted || form.password2.$dirty)
&& form.password2.$invalid }">
<label for="password2">Confirm your password</label>
<input ng-model="user.password2" type="password"
class="form-control"
id="password2" name="password2" placeholder="Password"
required compare-to="user.password">
<span class="label label-danger"
ng-show="(form.$submitted || form.password2.$dirty)
&& form.password2.$invalid">
<span ng-show="form.password2.$error.required" >
Required</span>
<span ng-show="form.password2.$error.compareTo">
Password don't match</span>
</span>
</div>
<div class="form-group"
ng-class="{ 'has-error':(form.$submitted
|| form.name.$dirty)
&& form.name.$invalid }">
<label for="name">Your Name</label>
<input ng-model="user.name" type="text"
class="form-control"
id="name" name="name" placeholder="Password"
required>
<span class="label label-danger"

Chapter 10 - Authentication 280
ng-show="(form.$submitted || form.name.$dirty)
&& form.name.$invalid">
<span ng-show="form.name.$error.required">
Required:</span>
</span>
</div>
<div class="form-group pull-right">
<button type="submit" class="btn btn-primary"
ng-click="createUser()">Create User</button>
</div>
<div class="form-group">
<a href="#/">Back</a>
</div>
</form>
A new thing in this form is that the password fields must have the same value, as
shown in the following figure.

Chapter 10 - Authentication 281
To create this functionality, create the policy “compareTo” in the js\app.js of your
application with the following code:
blog/public/js/app.js
app.directive("compareTo",function() {
return {
require: "ngModel",
scope: {
otherModelValue: "=compareTo"
},
link: function(scope, element, attributes, ngModel) {
ngModel.$validators.compareTo = function(modelValue) {
return modelValue == scope.otherModelValue;
};
scope.$watch("otherModelValue", function() {
ngModel.$validate();

Chapter 10 - Authentication 282
});
}
};
});
After you create the policy, simply use it in the second field of comparison, in this
case we use compare-to="user.password" in the field user.password2
The “create” button will execute the method createUser in the newUserController
that has the following code.
blog/public/js/app.js
app.controller('newUserController',
function ($scope,$http,$location,$rootScope) {
$scope.user = {};
$scope.createUser = function(){
if ($scope.form.$invalid) {
console.warn("invalid form");
return;
}
$http.post("/user/newlogin",
{
'email' : $scope.user.email,
'password' : $scope.user.password,
'name':$scope.user.name
}).then(function(response){
// login done,
// redirect to main page
$rootScope.authuser = response.data;
$location.path('/');
},function(response){
notifyError(response);
});
}
});

Chapter 10 - Authentication 283
In this code, we do a POST to “/user/newlogin” passing the form data. On the server,
we create the user and return it already logged in, as in the following code.
blog/app/Http/Controllers/UserController.php
<?php
namespace App\Http\Controllers;
use App\Http\Controllers\Controller;
use App\User;
use Illuminate\Http\Request;
use Auth;
use Hash;
class UserController extends Controller
{
public function createLogin(Request $request){
$theUser = User::where('email','=', $request->email)
->first();
if ($theUser)
throw new \Exception("This email is already registered");
$user = new User();
$user->name = $request->name;
$user->email = $request->email;
$user->password = bcrypt($request->password);
$user->save();
Auth::login($user);
return Auth::user();
}
}

Chapter 10 - Authentication 284
In this code, we note the existence of the user via his email. If available, you should
throw an exception, since we can’t have 2 users with the same email. If the email
does not exist, create the user and use the auth::login method to log him on the
site, returning it to the client. Upon returning, in newUserController, the procedure
of logged in user will be performed by filling in the $rootScope.authuser.
Chapter 11 - Blog
administration screen
In this chapter we will create the Blog administration screen, containing the CRUD
for Post, Tag, Comment and User. This is a screen that requires the user login, and
as it has different features than the blog, we will create it in a separate file from the
index.html file, which is the main file of the site so far.
Our first task in this separation is to refactor the file app.js, since this belongs only
to the file index.html. In this step, we need to create 3 separate javascript files:
** base.js ** is the base file of any javascript file of the project. It contains any
implementation that is reused in other javascript files. For example, the notifyOk
and notifyError, just like the customized policies that will also be in this file.
** index.js ** we will rename the file app.js to index.js, since this javascript refers to
page index.html. In this file we will also remove the instantiation of the application,
the custom policies, notifyError and notifyOk methods, and everything that does
not belong to the index.html file. Only their internal implementations will stay intact.
** admin.js ** is the javascript file that contains all the implementations of the
blog.com administration, and is directly related to the file admin.html
To perform refactoring, do the following:
1-create the file blog/public/js/base.app. Move the following implementations
from app.js to base.js:
-the creation of app: app = new angular.module('app',['ngRoute']); -The
interceptor of the loading feedback -The loadingIndicator directive -The compareTo
directive -The notifyOk and notifyError methods
The file base.app is similar to the following code:

Chapter 11 - Blog administration screen 286
blog/public/js/base.js
app = new angular.module('app',['ngRoute']);
app.config(function($httpProvider) {
$httpProvider.interceptors.push(function($q, $rootScope) {
return {
'request': function(config) {
$rootScope.$broadcast('loading-started');
return config || $q.when(config);
},
'response': function(response) {
$rootScope.$broadcast('loading-complete');
return response || $q.when(response);
}
};
});
});
app.directive("loadingIndicator", function() {
return {
restrict : "A",
template: "<div id='loading'> <img src='images/loading.gif'/>
Loading...</div>",
link : function(scope, element, attrs) {
element.css({"display" : "none"});
scope.$on("loading-started", function(e) {
element.css({"display" : ""});
});
scope.$on("loading-complete", function(e) {
element.css({"display" : "none"});
});
}
};
});
Chapter 11 - Blog administration screen 287
app.directive("compareTo",function() {
return {
require: "ngModel",
scope: {
otherModelValue: "=compareTo"
},
link: function(scope, element, attributes, ngModel) {
ngModel.$validators.compareTo = function(modelValue) {
return modelValue == scope.otherModelValue;
};
scope.$watch("otherModelValue", function() {
ngModel.$validate();
});
}
};
});
function notifyOk(message){
$('.bottom-right').notify({
message: { text: message}
}).show();
}
function notifyError(error){
message = "";
if (error.data!=null)
if (error.data.message!=null)
message = error.data.message;
if (message=="")
if (error.statusText!=null)
message = "Error: " + error.statusText;

Chapter 11 - Blog administration screen 288
if (message=="")
if (typeof error == "string")
message = error;
$('.bottom-right').notify({
message: { text: message},
type: 'danger',
}).show();
$('#loading').css('display','none');
}
2- Rename the file app.js to index.js
The file index.js now has only implementations regarding the file index.html. The
following is how the file is, displaying only their methods:
blog/public/js/index.js
app.config(['$routeProvider',function($routeProvider){
$routeProvider.
when('/',{controller:'mainController',
templateUrl:'templates/main.html'}).
when('/users',{controller:'userController',
templateUrl:'templates/user.html'}).
when('/comments',{controller:'commentController',
templateUrl:'templates/comment.html'}).
when('/tags',{controller:'tagController',
templateUrl:'templates/tag.html'}).
when('/login',{controller:'loginController',
templateUrl:'templates/login.html'}).
when('/logout',{controller:'logoutController',
templateUrl:'templates/logout.html'}).
when('/new',{controller:'newUserController',
templateUrl:'templates/newuser.html'}).
Chapter 11 - Blog administration screen 289
otherwise({redirectTo:'/'});
}]);
app.controller('mainController',function ($scope,$http) {
///code...
});
app.controller('menuController',
function ($scope,$http,$rootScope) {
///code...
});
app.controller('userController',function ($scope,$http) {
///code...
});
app.controller('commentController', function ($scope,$http) {
///code...
});
app.controller('tagController', function ($scope,$http) {
///code...
});
app.controller('loginController',
function ($scope,$http,$location,$rootScope) {
///code...
});
app.controller('newUserController',
function ($scope,$http,$location,$rootScope) {
///code...
});

Chapter 11 - Blog administration screen 290
app.controller('logoutController',
function ($scope,$http,$location,$rootScope) {
///code...
});
3-Change the index.html file
Rather than add the file app.js, we need to add two files: base.js and index.js, as
in the following code.
blog/public/index.html
<!doctype html>
<html ng-app="app">
<head>
<meta name="viewport" content="width=device-width,
initial-scale=1">
<link rel="stylesheet" href="bower_components/
bootswatch-dist/css/bootstrap.min.css">
<link rel="stylesheet" href="bower_components/
bootstrap-notify/css/bootstrap-notify.css">
<link rel="stylesheet" href="css/custom.css">
<title> My Blog </title>
</head>
<body>
///code....
<script src="bower_components/jquery/dist/jquery.min.js">
</script>
<script src="bower_components/bootstrap/dist/js/
bootstrap.min.js"></script>
<script src="bower_components/bootstrap-notify/js/
bootstrap-notify.js"></script>
<script src="bower_components/angular/angular.min.js">
</script>

Chapter 11 - Blog administration screen 291
<script src="bower_components/angular-route/
angular-route.min.js"></script>
<script src="bower_components/angular-resource/
angular-resource.min.js"></script>
<script src="js/base.js"></script>
<script src="js/index.js"></script>
</body>
</html>
Now, we have the base.js file that will serve as the main javascript file of
any internal application of blog.com. We have, so far, two applications, the page
index.html just refactored and contain the start page, and the page admin.html,
which contains the administrative part of the blog, that we will create in this chapter.
Creating the admin.html file
Now that we have refactored the index.html file, we can create the admin.html. The
page layout is different from the blog, with an interface with a top menu and another
on the left side of the site, as the following layout.

Chapter 11 - Blog administration screen 292
This interface comes from the Dashboard example located in <http://getbootstrap.
com/examples/dashboard/> with the following code:
blog/public/admin.html
<!doctype html>
<html ng-app="app">
<head>
<meta name="viewport"
content="width=device-width, initial-scale=1">
<link rel="stylesheet"
href="bower_components/bootswatch-dist/css/bootstrap.min.css\
">
<link rel="stylesheet"
href="bower_components/bootstrap-notify/css/bootstrap-notify\
.css">
<link rel="stylesheet" href="css/admin.css">
Chapter 11 - Blog administration screen 293
<title> Admin - My Blog </title>
</head>
<body>
<nav class="navbar navbar-inverse navbar-fixed-top">
<div class="container-fluid">
<div class="navbar-header">
<button type="button"
class="navbar-toggle collapsed"
data-toggle="collapse" data-target="#navbar"
aria-expanded="false" aria-controls="navbar">
<span class="sr-only">Toggle navigation</span>
<span class="icon-bar"></span>
<span class="icon-bar"></span>
<span class="icon-bar"></span>
</button>
<a class="navbar-brand" href="#">Admin - Blog.com</a>
</div>
<div id="navbar" class="navbar-collapse collapse">
<ul class="nav navbar-nav navbar-right">
<li ><a href="#/">Home</a></li>
<li><a href="#/post">Posts</a></li>
<li><a href="#/tag">Tags</a></li>
<li><a href="#/comment">Comments</a></li>
<li><a href="#/user">Users</a></li>
<li><a href="#/profile">Profile</a></li>
<li><a href="#/logout">Sair</a></li>
</ul>
</div>
</div>
</nav>
<div class="container">
<div class="row">
<div class="col-sm-3 col-md-2 sidebar">
Chapter 11 - Blog administration screen 294
<ul class="nav nav-sidebar">
<li ><a href="#/">Home</a></li>
<li><a href="#/post">Posts</a></li>
<li><a href="#/tag">Tags</a></li>
<li><a href="#/comment">Comments</a></li>
<li><a href="#/user">Users</a></li>
<li><a href="#/profile">Profile</a></li>
<li><a href="#/logout">Sair</a></li>
</ul>
</div>
<div class="col-sm-9 col-sm-offset-2 main" ng-view>
</div>
</div>
</div>
<div class='notifications bottom-right'></div>
<script src="bower_components/jquery/dist/jquery.min.js">
</script>
<script src="bower_components/bootstrap/dist/js/bootstrap.min.js">
</script>
<script src="bower_components/bootstrap-notify/js/bootstrap-notify.j\
s">
</script>
<script src="bower_components/angular/angular.min.js">
</script>
<script src="bower_components/angular-route/angular-route.min.js">
</script>
<script src="bower_components/angular-resource/angular-resource.min.\

Chapter 11 - Blog administration screen 295
js">
</script>
<script src="js/base.js"></script>
<script src="js/admin.js"></script>
</body>
</html>
Note that, at the end of the file, we add admin.js and base.js. The javascript file
admin.js will contain all the controllers of this screen.
Configuring admin routing
Now that the main page admin.html is ready, we will create the routing using the
deepLinking feature of AngularJS, in the same way we did before. Initially, the
admin.js file contains the following code:
blog/public/js/admin.js
app.config(['$routeProvider',function($routeProvider){
$routeProvider.
when('/',{controller:'adminController',
templateUrl:'templates/admin/admin.html'}).
when('/post',{controller:'postController',
templateUrl:'templates/admin/post.html'}).
when('/tag',{controller:'tagController',
templateUrl:'templates/admin/tag.html'}).
when('/comment',{controller:'commentController',
templateUrl:'templates/admin/comment.html'}).
when('/user',{controller:'userController',
templateUrl:'templates/admin/user.html'}).
when('/profile',{controller:'profileController',
templateUrl:'templates/admin/profile.html'}).
when('/logout',{controller:'logoutController',
templateUrl:'templates/logout.html'}).
Chapter 11 - Blog administration screen 296
otherwise({redirectTo:'/'});
}]);
app.controller('adminController',function ($scope) {
});
app.controller('postController',function ($scope) {
});
app.controller('tagController',function ($scope) {
});
app.controller('commentController',function ($scope) {
});
app.controller('userController',function ($scope) {
});
app.controller('profileController',function ($scope) {
});

Chapter 11 - Blog administration screen 297
app.controller('logoutController',function ($scope) {
});
We created various routes, linking their controllers and templates, which are in
the folder “blog/public/templates/admin”. The first route is the one that displays
the admin main page, containing only a welcome message, but with an important
function, which is to get the user logged into the system.
Getting the user login again
As we moved from page index.html to admin.html, you must update the user logged
in again. Of course we won’t open a login form, as this has been done on the site.
There, the user logged in and then clicked on the link “Admin”, coming to the
page “admin.html”. Now, we must get this login again, and this will be done in the
adminController controller, as set up in the AngularJS routing. The code to get the
user’s login is displayed below.
blog/public/js/admin.js
// ...code...
app.controller('adminController',
function ($scope,$http,$rootScope,$location) {
$scope.$on('$viewContentLoaded', function(){
//Verify user login
$http.get("/login").then(function(response){
if (response.data.id){
$rootScope.authuser = response.data;
}else{
window.location.assign('index.html');
}
},function(response){
notifyError(response);

Chapter 11 - Blog administration screen 298
});
});
});
In this controller, we accessed, via GET, the address blog.com/login, that has the
following routing in the app/Http/routes.php file:
Route::get(`/login`,`UserController@getLogin`);
This routing calls the getLogin of UserController, that has the following code:
public function getLogin(){
return Auth::user();
}
When Laravel returns with the logged in user, the variable $rootScope.authuser is
set and may be used by the application.
Protecting the other pages against improper
access
Now that the variable $rootScope.authuser has a value, we can create a method to
protect any page or controller against improper access. To do this, we will create an
AngularJS service on the base.js file, to be able to inject it in any controller to verify
login.

Chapter 11 - Blog administration screen 299
blog/public/js/base.js
app = new angular.module('app',['ngRoute']);
// ...code...
app.service('login',function($rootScope){
this.check = function(){
if ($rootScope.authuser == null){
window.location.assign('/index.html');
}
}
});
In this code, we created the service with the name “login” and defined a method
called check(), which will check if the variable $rootScope.authuser has a value. If
not, we will use the javascript method window.location.assign to return the main
page of the Blog.
Create a service just to be able to use it in controllers, as follows:
app.controller(`postController`,function ($scope,login) {
login.check();
});
In this controller, we inject the service into the variable login, and call the check()
method.
Creating the CRUD of Tags
Now let’s create some crud screens, starting with “Tag”, which appears to be the
simplest. We use $resource to perform some operations, so check if the angular-
resource.js file is being added into admin.html file, and in the ‘base.app file, if the
$resource being loaded when defining the app variable:

Chapter 11 - Blog administration screen 300
app = new angular.module(`app`,[`ngRoute`,`ngResource`]);
Implementing the crud via $resource
After checking that the resource is being loaded properly, we can change the
admin.js file including the following code:
blog/public/js/admin.js
// ...code...
app.controller('tagController',
function ($scope,$resource,login) {
login.check();
//Page Title
$scope.title = "Tags";
$scope.rows = null;
$scope.row = null;
//Resource Tag
var Tag = $resource("tags/:id");
$scope.$on('$viewContentLoaded', function(){
$scope.loadAll();
});
$scope.loadAll = function(){
$scope.row = null;
$scope.title = "Tags";
Tag.query(function(data){
$scope.rows = data;

Chapter 11 - Blog administration screen 301
},function(response){
notifyError(response);
});
}
$scope.getById = function($id){
Tag.get({id:$id},function(data){
$scope.title = "Tag: " + data.title;
$scope.row = data;
},function(data){
notifyError(data);
});
}
$scope.createNew = function(){
$scope.row = {title:""};
}
$scope.save = function(){
if ($scope.form.$invalid) {
notifyError("Invalid values");
return;
}
Tag.save($scope.row,function(data){
notifyOk(data.title + " saved.");
$scope.loadAll();
},function(data){
notifyError(data);
});
}
});
This controller injects 3 variables. The first is $scope, used to access global variables
from tagController controller. The second is $resource, which we will use to access
the Laravel server. And the third is login, the service that we created to check if the
Chapter 11 - Blog administration screen 302
user is logged in.
At the beginning of the controller, beside checking for the login, we create the next
variables that will be used on the view:
• $scope.title the title that appears in the view, It can be “Tags” or the name of
the “Tag” that we are editing
• $scope.rows corresponds to the records that will populate the tags table
• $scope.row corresponds to a single record, used to fill the form for editing or
creating a tag.
• Tag this variable corresponds to the $resource itself, that we use to access the
server.
After defining the initial variables, we use the method $scope.$on that is executed
when the view of the controller is loaded. In this context, we call the loadAll()
method.
The loadAll() method is responsible for loading all the tags to the view, displaying
them in a table. Note that we used the resource Tag.query which will automatically
do a GET call to the server, using the Url /tags. When the server returns the
data, the first method of the Tag.query query is executed and, in it, we populate
the $scope.rows variable. Note that we are never working with the View, we are
just filling an object with an array of data. The act of filling the View is done
automatically by AngularJS.
The getById() method uses Tag.get to get a single tag, which is populated in the
variable $scope.row.
The createNew() method just adds an empty object in the variable $scope.row,
preparing to add a new record.
The save() method gets the data of $scope.row to save a tag. This procedure is used
to create or edit a tag, with the resource Tag.save.
Configuring the tag.html template
Now that we have created the CRUD logic for the tags, let’s create the view. The
template will have only Html code and the directives of AngularJS, showing how
the AngularJS is powerful in this context.

Chapter 11 - Blog administration screen 303
blog/public/template/admin/tag.html
<h2>{{title}}</h2>
<div ng-show="row==null">
<table class="table table-hover table-bordered">
<thead>
<tr>
<th>Id</th>
<th>Name</th>
<th>Updated at:</th>
</tr>
</thead>
<tbody>
<tr ng-repeat="row in rows">
<th >{{row.id}}</th>
<td><a href="#/tag" ng-click="getById(row.id)">
{{row.title}}</td>
<td>
{{ row.updated_at | date:'dd/MM/yyyy HH:mm:ss Z'\
}}
</td>
</tr>
</tbody>
</table>
<a href="#/tag" class="btn btn-primary"
ng-click="createNew()">New</a>
</div>
<div ng-show="row!=null">
<form name="form" novalidate>
<div class="form-group"
ng-class="{ 'has-error':
(form.$submitted || form.title.$dirty)

Chapter 11 - Blog administration screen 304
&& form.title.$invalid }">
<label for="title">Title</label>
<input ng-model="row.title" type="text" class="form-control"
id="title" name="title" placeholder="Title" required>
<span class="label label-danger"
ng-show="(form.$submitted || form.title.$dirty)
&& form.title.$invalid">
<span ng-show="form.title.$error.required">
Required</span>
</span>
</div>
<div class="form-group ">
<button type="submit" class="btn"
ng-click="loadAll()">Back</button>
<button type="submit" class="btn btn-primary pull-right"
ng-click="save()">Save</button>
</div>
</form>
</div>
This HTML code can be split into two parts. In the first, we have a <table> that is
displayed or not, according to the row variable. Note that, on the table, we looped row
in rows, where rowsis the $scope.rows from TagController as seen previously. On
the table rows we show the tag id, the tag title (that executes the getById method
when clicked) and the last edited date. After the table, we have a button to create a
new Tag.
In the second part of the view we have the form with the “title” field. This form has
the visibility controlled by ng-show="row!=null", that means, it will only be visible
if the variable $scope.row is not null. In this way we control the visibility of screen
elements solely by the state of the variable row. If the list displays null we show the
Tag list. And when the user clicks on a tag we populate the row variable, the table is
hidden and the form appears.
In the image below we have the situation in which the table is visible.

Chapter 11 - Blog administration screen 305
When you click on a tag, we have the following form:

Chapter 11 - Blog administration screen 306
Formatting the date on the table
As we have seen in the previous image, the update date of the record is displayed as
follows:
{{ row.updated_at | date:`dd/MM/yyyy HH:mm:ss Z`}}
AngularJS himself gets the data and formats it according to the defined format. But
for this to work you need to return the date from Laravel to the client in the form of
milliseconds, and for this we need to add the following code in the Tag.php model.

Chapter 11 - Blog administration screen 307
blog/app/Tag.php
<?php
namespace App;
use Illuminate\Database\Eloquent\Model;
class Tag extends Model
{
public function posts()
{
return $this->belongsToMany('App\Post');
}
public function getCreatedAtAttribute($value)
{
$value = date('U', strtotime($value));
return $value * 1000;
}
public function getUpdatedAtAttribute($value)
{
$value = date('U', strtotime($value));
return $value * 1000;
}
}
Setting up Laravel
With the client side code ready, we need to set up Laravel to provide the information
to AngularJS. Initially, we need to create the entries in the routes.php file, as follows:

Chapter 11 - Blog administration screen 308
blog/app/Http/routes.php
/// ...code...
//TagResource Routes
Route::get('/tags', 'TagController@index');
Route::get('/tags/{id}', 'TagController@show');
Route::post('/tags', 'TagController@save');
We create three entries that match all tags, get a tag and save a tag. Save encompasses
the operations of insert and edit that are in the file TagController.php, as in the
following code.
blog/app/Http/Controllers/TagController.php
<?php
namespace App\Http\Controllers;
use Illuminate\Http\Request;
use App\Http\Requests;
use App\Http\Controllers\Controller;
use App\Tag;
class TagController extends Controller
{
/**
* Display a listing of the resource.
*
* @return Response
*/
public function index()
{
return Tag::get();
}
Chapter 11 - Blog administration screen 309
/**
* Display the specified resource.
*
* @param int $id
* @return Response
*/
public function show($id)
{
return Tag::find($id);
}
public function save(Request $request){
$tag = null;
if ($request->id){ //edit
$tag=Tag::find($request->id);
}else{ //new
$tag = new Tag();
}
$tag->title = $request->title;
$tag->save();
return $tag;
}
public function getAll(){
return Tag::select('id','title')->get();
}
public function getAllwithPosts(){
return Tag::select('id','title')
->with(['posts'=>function($q){
$q->select('id','title')->active();
}])
Chapter 11 - Blog administration screen 310
->get();
}
}
The method show($id) returns a Tag, given an id. The save method analyzes whether
the $request->id exists, if the tag is in the process of editing, then use Tag::find to
get it. Otherwise, we are creating a new Tag via the new Tag(). After this verification,
update the value of the title, because it is the only field to be updated in the table,
and we use the save() method to persist the record in the tags. The last method,
getAll() returns all records from the table.
Securing access to the server
We have seen how you can protect the admin screen access on the client, using
AngularJS. But there are other checks that must be performed in Laravel also,
protecting agains improper access, especially when there are changes to the data
in the tables.
The best way to protect its routes agains improper access is to use the middleware
auth previously set up by Laravel. Remember that before accessing the Admin screen,
it’s necessary to log in and use Auth::login. A basic authentication middleware can
be set up as follows:
from:
Route::get(`/tags`, `TagController@index`);
to:
Route::get(`/tags`, [`middleware`=>`auth`,
`uses`=>`TagController@index`]);
Note that, instead of when we would return a second parameter to the Route::get,
we create an array with two keys. The first is called middleware and has the value
auth. This entry was created by Laravel and is defined in the class \App\Http\Middleware\Authenticate:class,
according to the file kernel.php. The second value of the array consists of the uses
and contains the controller route.
For the tags handling routes, we need to protect mainly the edition, as follows:

Chapter 11 - Blog administration screen 311
Route::post(`/tags`, [`middleware`=>`auth`,
`uses`=>`TagController@save`]);
The CRUD comments
The Comments CRUD follows the same Tags CRUD pattern with a few more
components. First, we display a table with the blog posts, and from this table, we
display the comments. This is a typical 1xN screen in which many systems have.
blog/public/js/admin.js
app.controller('commentController',function ($scope,$resource,login)\
{
login.check();
//Array de posts
$scope.posts = null;
$scope.post = null;
$scope.rows = null;
$scope.row = null;
//Resource
var Comment = $resource("comments/:id",{},{
getByPost: {url:'/comments/post/:id',
method:'GET',isArray:true}
});
//Resource
var Post = $resource("posts/:id",{},{
getTitles: {url:'/posts/getTitles',
Chapter 11 - Blog administration screen 312
method:'GET',isArray:true}
});
$scope.$on('$viewContentLoaded', function(){
$scope.loadAllPosts();
});
$scope.loadAllPosts = function(){
Post.getTitles(function(data){
$scope.posts = data;
});
}
$scope.selectPost = function($post){
$scope.post = $post;
$scope.row = null;
Comment.getByPost({id:$post.id},function(data){
$scope.rows = data;
});
}
$scope.selectComment = function($comment){
$scope.row = $comment;
}
$scope.save = function(){
if ($scope.form.$invalid) {
notifyError("Invalid Values");
return;
}
Comment.save($scope.row,function(data){
notifyOk("Saved.");
$scope.selectPost($scope.post);
},function(data){
notifyError(data);

Chapter 11 - Blog administration screen 313
});
}
});
The CommentController is slightly larger than the TagController, and has some
extra features. The first is the creation of custom methods in the $resource, both
for comments and posts. Note that we created the getByPost method in comments
$resource, because we want to get the comments related to a Post. The same happens
for the Posts $resource, where we want to get only the id and the title of the post,
without its contents.
When the CommentController loads, first we load all the Posts from the site. When
the user clicks on a Post, then we load the post comments. Finally, when the user
clicks on a comment, we load the comment on the form. In this form we use the
checkbox field with two new properties from AngularJS, ‘ng-true-value’ and ‘ng-
false-value’. They define when the selection box is checked or not. Here is the
comments template:
blog/public/template/admin/comment.html
<h2>Comments</h2>
<h3>Posts</h3>
<div>
<small>Select a post to display your comments</small>
<table class="table table-hover table-bordered">
<thead>
<tr>
<th>Id</th>
<th>Title</th>
</tr>
</thead>
<tbody>
<tr ng-repeat="post in posts">
Chapter 11 - Blog administration screen 314
<th >{{post.id}}</th>
<td><a href="#/comment"
ng-click="selectPost(post)">
{{post.title}}
</td>
</tr>
</tbody>
</table>
</div>
<div ng-show="post!=null">
<h3>Comments of the post <b>{{post.title}}</b></h3>
<table class="table table-hover table-bordered">
<thead>
<tr>
<th>Id</th>
<th>Text</th>
<th>Email</th>
<th>Active?</th>
</tr>
</thead>
<tbody>
<tr ng-repeat="row in rows">
<th ><a href="#/comment"
ng-click='selectComment(row)'>
{{row.id}}</a></th>
<td>{{row.text}}</td>
<td>{{row.email}}</td>
<td>{{row.active}}</td>
</tr>
</tbody>
</table>
</div>
<div ng-show="row!=null">
Chapter 11 - Blog administration screen 315
<h3>Edit <b>{{row.id}}</b></h3>
<form name="form" novalidate>
<div class="form-group"
ng-class="{ 'has-error':
(form.$submitted || form.text.$dirty)
&& form.text.$invalid }">
<label for="text">Text</label>
<input ng-model="row.text" type="text" class="form-control"
id="text" name="text" placeholder="Text" required>
<span class="label label-danger"
ng-show="(form.$submitted || form.text.$dirty)
&& form.text.$invalid">
<span ng-show="form.text.$error.required">
Required</span>
</span>
<div class="form-group"
ng-class="{ 'has-error':
(form.$submitted || form.email.$dirty)
&& form.email.$invalid }">
<label for="email">Email</label>
<input ng-model="row.email" type="email" class="form-control\
"
id="email" name="email" placeholder="Email" required>
<span class="label label-danger" ng-show="
(form.$submitted || form.email.$dirty)
&& form.email.$invalid">
<span ng-show="form.email.$error.required">
Required</span>
<span ng-show="form.email.$error.email">
Invalid Email</span>
</span>
<div class="form-group" >

Chapter 11 - Blog administration screen 316
<input type="checkbox"
ng-model="row.active"
ng-true-value="1"
ng-false-value="0"
> Active
</div>
</div>
<div class="form-group ">
<button type="submit"
class="btn btn-primary pull-right"
ng-click="save()">Save</button>
</div>
</form>
In Laravel, we have the creation of the PostController@getTitles and Comment-
Controller@getCommentsByPost methods, as in the following code.
blog/app/Http/routes.php
//...code...
//Posts routes
Route::get('/posts', 'PostController@index');
Route::get('/posts/getTitles', 'PostController@getTitles');
//Comments Routes
Route::get('/comments/post/{id}',
'CommentController@getCommentsByPost');
Route::post('/comments', ['middleware'=>'auth',
'uses'=>'CommentController@save']);

Chapter 11 - Blog administration screen 317
blog/app/Http/Controllers/CommentController.php
<?php
namespace App\Http\Controllers;
use Illuminate\Http\Request;
use App\Http\Requests;
use App\Http\Controllers\Controller;
use App\Comment;
class CommentController extends Controller
{
public function last($n=3){
return Comment::select('id','text','post_id')
->active()
->orderBy('id', 'desc')
->with(['post'=>function($q){
$q->select('id','title');
}])
->take($n)
->get();
}
public function getAll(){
return Comment::select('id','text','email','post_id')
->active()
->orderBy('id', 'desc')
->with(['post'=>function($q){
$q->select('id','title');
}])
->get();
}

Chapter 11 - Blog administration screen 318
public function getCommentsByPost($id){
return Comment::select('*')
->where('post_id','=',$id)
->get();
}
public function save(Request $request){
$comment = null;
if ($request->id){ //edit
$comment=Comment::find($request->id);
}else{ //new
$comment = new Comment();
}
$comment->text = $request->text;
$comment->active = $request->active;
$comment->email = $request->email;
$comment->save();
return $comment;
}
}
blog/app/Http/Controllers/PostController.php
<?php
namespace App\Http\Controllers;
use Illuminate\Http\Request;
use App\Http\Requests;
use App\Http\Controllers\Controller;
use App\Post;
Chapter 11 - Blog administration screen 319
class PostController extends Controller
{
/**
* Display a listing of the resource.
*
* @return Response
*/
public function index()
{
return Post::get();
}
public function getTitles()
{
return Post::select('id','title')->get();
}
/**
* Get posts in chronological order
* @param int $n number of posts
* @return Collection Posts collection
*/
public function last($n=3){
return Post::select('id','title', 'text','active','user_id')
->with(['tags'=>function($q){
$q->select('id','title');
}])
->with(['comments'=>function($q){
$q->active()->select('active','post_id');
}])
->with(['user'=>function($q){
$q->select('id','name','email');
}])
->orderBy('id', 'desc')

Chapter 11 - Blog administration screen 320
->take($n)
->get();
}
}
The feedback screen is similar to the following image.
CRUD for Posts
The view to create and edit posts follows the same pattern of the other views. The
main difference is that we have a verification of the logged in user on the controller,

Chapter 11 - Blog administration screen 321
and its use as the author of the post, which means that only the author of the post
can edit it.
blog/public/js/admin.js
// code...
app.controller('postController',function ($scope,login,$resource) {
login.check();
//Page Title
$scope.title = "Posts";
$scope.rows = null;
$scope.row = null;
//Resource Tag
var Post = $resource("posts/:id");
$scope.$on('$viewContentLoaded', function(){
$scope.loadAll();
});
$scope.loadAll = function(){
$scope.row = null;
$scope.title = "Posts";
Post.query(function(data){
$scope.rows = data;
},function(response){
notifyError(response);
});
}
$scope.getById = function($id){

Chapter 11 - Blog administration screen 322
Post.get({id:$id},function(data){
$scope.title = "Post: " + data.title;
$scope.row = data;
},function(data){
notifyError(data);
});
}
$scope.createNew = function(){
$scope.row = {title:"",active:0};
}
$scope.save = function(){
if ($scope.form.$invalid) {
notifyError("Invalid values");
return;
}
Post.save($scope.row,function(data){
notifyOk(data.title + " saved.");
$scope.loadAll();
},function(data){
notifyError(data);
});
}
});

Chapter 11 - Blog administration screen 323
blog/public/template/admin/post.html
<h2>{{title}}</h2>
<div ng-show="row==null">
<table class="table table-hover table-bordered">
<thead>
<tr>
<th>Id</th>
<th>Title</th>
<th>Update at</th>
<th>User:</th>
<th>Active?</th>
</tr>
</thead>
<tbody>
<tr ng-repeat="row in rows">
<th >{{row.id}}</th>
<td><a href="#/post"
ng-click="getById(row.id)">{{row.title}}</td>
<td>{{ row.updated_at | date:'dd/MM/yyyy HH:mm:ss Z'\
}}</td>
<td> {{row.user.name}} </td>
<td> {{row.active}} </td>
</tr>
</tbody>
</table>
<a href="#/post" class="btn btn-primary"
ng-click="createNew()">New</a>
</div>
<div ng-show="row!=null">
<form name="form" novalidate>
<div class="form-group"
Chapter 11 - Blog administration screen 324
ng-class="{ 'has-error':
(form.$submitted || form.title.$dirty)
&& form.title.$invalid }">
<label for="title">Title</label>
<input ng-model="row.title" type="text" class="form-control"
id="title" name="title" placeholder="Title" required>
<span class="label label-danger"
ng-show="(form.$submitted || form.title.$dirty)
&& form.title.$invalid">
<span ng-show="form.title.$error.required">
Required</span>
</span>
<div class="form-group"
ng-class="{ 'has-error':
(form.$submitted || form.text.$dirty)
&& form.text.$invalid }">
<label for="text">Text</label>
<textarea rows=5 cols=40 ng-model="row.text"
type="text" class="form-control"
id="text" name="text" placeholder="Title" required></textare\
a>
<span class="label label-danger"
ng-show="(form.$submitted || form.text.$dirty)
&& form.text.$invalid">
<span ng-show="form.text.$error.required">
Required</span>
</span>
<div class="form-group" >
<input type="checkbox"
ng-model="row.active"
ng-true-value="1"
ng-false-value="0"
> Active

Chapter 11 - Blog administration screen 325
</div>
</div>
<div class="form-group ">
<button type="submit" class="btn"
ng-click="loadAll()">Back</button>
<button type="submit"
class="btn btn-primary pull-right"
ng-click="save()">Save</button>
</div>
</form>
</div>
blog/app/Http/routes.php
//PostResource routes
Route::get('/posts', 'PostController@index');
Route::get('/posts/getTitles', 'PostController@getTitles');
Route::get('/posts/{id}', 'PostController@show');
Route::post('/posts', ['middleware'=>'auth',
'uses'=>'PostController@save']);
blog/app/Http/Controllers/PostController.php
<?php
namespace App\Http\Controllers;
use Illuminate\Http\Request;
use App\Http\Requests;
use App\Http\Controllers\Controller;
use App\Post;
Chapter 11 - Blog administration screen 326
use Auth;
class PostController extends Controller
{
/**
* Display a listing of the resource.
*
* @return Response
*/
public function index()
{
return Post::with(['user'=>function($q){
$q->select('id','name','email');
}])->get();
}
public function getTitles()
{
return Post::select('id','title')->get();
}
/**
* Display the specified resource.
*
* @param int $id
* @return Response
*/
public function show($id)
{
return Post::select('*')
->with(['user'=>function($q){
$q->select('id','name','email');
}])
->find($id);
}
Chapter 11 - Blog administration screen 327
public function save(Request $request){
if (Auth::user()==null)
throw new \Exception("Login needed");
if ($request->id!=null &&
Auth::user()->id!=$request->user_id)
throw new \Exception("You can edit
only your posts");
$post = null;
if ($request->id){ //edit
$post=Post::find($request->id);
}else{ //new
$post = new Post();
}
$post->user_id = Auth::user()->id;
$post->title = $request->title;
$post->text = $request->text;
$post->active = $request->active;
$post->save();
return $post;
}
/**
* Get posts in chronological order
* @param int $n number of posts
* @return Collection Posts collection
*/
public function last($n=3){
return Post::select('id','title', 'text','active','user_id')
->with(['tags'=>function($q){
$q->select('id','title');

Chapter 11 - Blog administration screen 328
}])
->with(['comments'=>function($q){
$q->active()->select('active','post_id');
}])
->with(['user'=>function($q){
$q->select('id','name','email');
}])
->orderBy('id', 'desc')
->take($n)
->get();
}
}
Editing posts is similar to the following image.

Chapter 11 - Blog administration screen 329
CRUD for users
The crud for users follows the pattern of others, but you will not be able to edit the
user’s password, only the name and email.

Chapter 11 - Blog administration screen 330
blog/public/js/admin.js
app.controller('userController',function ($scope,$resource,login) {
login.check();
//Page Title
$scope.title = "Users";
$scope.rows = null;
$scope.row = null;
//Resource Tag
var User = $resource("users/:id");
$scope.$on('$viewContentLoaded', function(){
$scope.loadAll();
});
$scope.loadAll = function(){
$scope.row = null;
$scope.title = "Users";
User.query(function(data){
$scope.rows = data;
},function(response){
notifyError(response);
});
}
$scope.getById = function($id){
User.get({id:$id},function(data){
$scope.title = "User: " + data.name;
$scope.row = data;
},function(data){
notifyError(data);

Chapter 11 - Blog administration screen 331
});
}
$scope.createNew = function(){
$scope.row = {name:""};
}
$scope.save = function(){
if ($scope.form.$invalid) {
notifyError("Invalid Values");
return;
}
User.save($scope.row,function(data){
notifyOk(data.title + "saved.");
$scope.loadAll();
},function(data){
notifyError(data);
});
}
});
blog/public/template/admin/user.html
<h2>{{title}}</h2>
<div ng-show="row==null">
<table class="table table-hover table-bordered">
<thead>
<tr>
<th>Id</th>
<th>Name</th>
<th>Email</th>
<th>Updated at:</th>
</tr>
Chapter 11 - Blog administration screen 332
</thead>
<tbody>
<tr ng-repeat="row in rows">
<th >{{row.id}}</th>
<td><a href="#/user" ng-click="getById(row.id)">
{{row.name}}
</td>
<td >{{row.email}}</td>
<td>{{ row.updated_at | date:'dd/MM/yyyy HH:mm:ss Z'}}</td>
</tr>
</tbody>
</table>
<a href="#/user" class="btn btn-primary"
ng-click="createNew()">
Create</a>
</div>
<div ng-show="row!=null">
<form name="form" novalidate>
<div class="form-group"
ng-class="{ 'has-error': (form.$submitted
|| form.name.$dirty)
&& form.name.$invalid }">
<label for="name">Title</label>
<input ng-model="row.name" type="text"
class="form-control"
id="name" name="name" placeholder="Title" required>
<span class="label label-danger" ng-show="
(form.$submitted || form.name.$dirty)
&& form.name.$invalid">
<span ng-show="form.name.$error.required">
Required</span>
</span>

Chapter 11 - Blog administration screen 333
<div class="form-group"
ng-class="{ 'has-error': (form.$submitted
|| form.email.$dirty)
&& form.email.$invalid }">
<label for="email">Email</label>
<input ng-model="row.email" type="email"
class="form-control"
id="email" name="email" placeholder="Email"
required>
<span class="label label-danger" ng-show="
(form.$submitted || form.email.$dirty)
&& form.email.$invalid">
<span ng-show="form.email.$error.required">
Required</span>
<span ng-show="form.email.$error.email">
Invalid Email</span>
</span>
</div>
</div>
<div class="form-group ">
<button type="submit" class="btn"
ng-click="loadAll()">Back</button>
<button type="submit"
class="btn btn-primary pull-right"
ng-click="save()">Save</button>
</div>
</form>
</div>

Chapter 11 - Blog administration screen 334
blog/app/Http/routes.php
//UserResource Routes
Route::get('/users', 'UserController@index');
Route::get('/users/{id}', 'UserController@show');
Route::post('/users', ['middleware'=>'auth',
'uses'=>'UserController@saveFromRequest']);
blog/app/Http/Controllers/UserController.php
<?php
namespace App\Http\Controllers;
use App\Http\Controllers\Controller;
use App\User;
use Illuminate\Http\Request;
use Auth;
use Hash;
class UserController extends Controller
{
public function getAllPosts()
{
return User::select('id','name','email')
->with(['posts'=>function($q){
$q->select('id','title','user_id')->active();
}])
->get();
}
public function doLogin(Request $request){
if (Auth::attempt(['email' => $request->email,
Chapter 11 - Blog administration screen 335
'password' => $request->password])) {
return Auth::user();
}else{
throw new \Exception("Unable login.
Try again.");
}
}
public function doLogout(){
Auth::logout();
return Auth::user();
}
public function getLogin(){
return Auth::user();
}
public function createLogin(Request $request){
$theUser = User::where('email','=',
$request->email)->first();
if ($theUser)
throw new \Exception("Email already
registered");
$user = new User();
$user->name = $request->name;
$user->email = $request->email;
$user->password = bcrypt($request->password);
$user->save();
Auth::login($user);
return Auth::user();
}

Chapter 11 - Blog administration screen 336
public function saveFromRequest(Request $request){
$user = null;
if ($request->id){ //edit
$user=User::find($request->id);
}else{ //new
$user = new User();
}
$user->name = $request->name;
$user->email = $request->email;
$user->save();
return $user;
}
public function index()
{
return User::get();
}
public function show($id)
{
return User::find($id);
}
}
The user profile view
This view displays some fields of the logged in user with email and password. Each
user can only change its own data.

Chapter 11 - Blog administration screen 337
blog/public/js/admin.js
app.controller('profileController',
function ($scope,login,$resource,$rootScope) {
login.check();
//Page title
$scope.title = "Profiles";
// a object'
$scope.row = null;
//Resource Tag
var User = $resource("users/:id");
$scope.$on('$viewContentLoaded', function(){
$scope.getById($rootScope.authuser.id);
});
$scope.getById = function($id){
User.get({id:$id},function(data){
$scope.row = data;
},function(data){
notifyError(data);
});
}
$scope.save = function(){
if ($scope.form.$invalid) {
notifyError("Invalid Values");
return;
}
User.save($scope.row,function(data){
notifyOk(data.name + " saved.");

Chapter 11 - Blog administration screen 338
$scope.getById($rootScope.authuser.id);
},function(data){
notifyError(data);
});
}
});
app.controller('logoutController',function ($scope) {
});
blog/public/template/admin/profile.html
<h2>{{title}}</h2>
<form name="form" novalidate>
<div class="form-group"
ng-class="{ 'has-error':
(form.$submitted || form.name.$dirty)
&& form.name.$invalid }">
<label for="name">Name:</label>
<input ng-model="row.name" type="text"
class="form-control"
id="name" name="name" placeholder="Title" required>
<span class="label label-danger"
ng-show="(form.$submitted || form.name.$dirty)
&& form.name.$invalid">
<span ng-show="form.name.$error.required">
Required</span>
</span>
<div class="form-group"
Chapter 11 - Blog administration screen 339
ng-class="{ 'has-error':
(form.$submitted || form.email.$dirty)
&& form.email.$invalid }">
<label for="email">Email</label>
<input ng-model="row.email" type="email" class="form-control"
id="email" name="email" placeholder="Email" required>
<span class="label label-danger"
ng-show="(form.$submitted || form.email.$dirty)
&& form.email.$invalid">
<span ng-show="form.email.$error.required">
Required</span>
<span ng-show="form.email.$error.email">
Invalid Email</span>
</span>
</div>
<div class="form-group pull-right">
<button type="submit" class="btn btn-primary pull-right"
ng-click="save()">Save</button>
</div>
<br/><br/><br/><br/>
<h3>Reset password:</h3>
<div class="form-group">
<label for="password">New password:</label>
<input ng-model="row.password" type="password"
class="form-control"
id="password" name="password" placeholder="Password">
</div>
<div class="form-group"
ng-class="{ 'has-error':(form.$submitted
|| form.password2.$dirty)

Chapter 11 - Blog administration screen 340
&& form.password2.$invalid }">
<label for="password2">Confirm password</label>
<input ng-model="row.password2" type="password"
class="form-control"
id="password2" name="password2" placeholder="Password"
compare-to="row.password">
<span class="label label-danger"
ng-show="(form.$submitted || form.password2.$dirty)
&& form.password2.$invalid">
<span ng-show="form.password2.$error.compareTo">
Password dont match</span>
</span>
</div>
<div class="form-group pull-right">
<button type="submit" class="btn btn-primary pull-right"
ng-click="save()">Save</button>
</div>
</form>
As the user changes the profile data on the UserController class, we didn‘t need to
change any information on the Laravel server side.
The user profile view is displayed below.

Chapter 11 - Blog administration screen 341
Logout is accomplished in the same way as done in the main blog, with the following
controller.
app.controller('logoutController',
function ($scope,$http,$location,$rootScope) {
$http.get("/logout").then(function(response){
notifyOk("Logout realizado.");
$rootScope.authuser = null;
window.location.assign('/index.html');
},function(response){
notifyError(response);
});
});
