
Getting Started with Arduino Nano
Thomas Bräunl, July 2015
!!!!!!!!!!!!!!!!! !
The Arduino Nano is a simple 8-bit microcontroller, ideal for beginners and simple
embedded projects. It is programmed via USB and has a number of I/O pins.
It uses the Atmel ATmega 328P microprocessor chip.
1. Install the required device driver
Several clone versions of the Nano are around, so you may have to try several
device drivers for your Mac or PC:
Win: http://robotics.ee.uwa.edu.au/nano/drivers/win/
Mac: http://robotics.ee.uwa.edu.au/nano/drivers/mac/
2. Install the Arduino programming environment
Download and install the latest Arduino Software from this site:
Win or Mac: https://www.arduino.cc/en/Main/Software
The Arduino Software allows some simple programming in a reduced C-like
language.
Once familiar with this system, you can also download the Atmel Studio / GNU
programming tools for programming in assembly or C (Atmel is the manufacturer of
the microprocessor). These are available for Windows only:
Win: http://www.atmel.com/tools/atmelstudio.aspx!
Win: http://sourceforge.net/projects/winavr/files/!
or: http://robotics.ee.uwa.edu.au/nano/win/
3. Connect your Arduino Nano via the USB cable to your Mac/PC
The power light should come on. (Different hardware versions use differently colored
LEDs)
4. Start the Arduino Software
• Under Tools / Board select: Arduino Nano
• Under Tools / Processor select: ATMega328
• Under Port select Mac: something like /dev/cu.usbserial.ABCDEFGH
Win: correct COM port
Selecting the correct USB port can be tricky and will only work if the correct
driver has been installed. Without the right port, you cannot upload software
to the Nano.
5. Select an Example Program
Select menu item File / Examples / 01. Basics / Blink
The example program will occur in the editor window.
Note that each program has two functions: setup and loop. So after an initial setup
at start time (e.g. power-up), every program will run in an endless loop (until you
disconnect power or overwrite it). This is how all embedded systems work.
6. Compile the Example Program
Compile the program by clicking on the tick button (✓) in the top left corner of the
window. A message should appear that says “Done compiling”, without any error
messages.
7. Upload the Executable Program to the Nano
Click on the arrow button (è) on top, second from left. You will get the message
“Uploading” with a progress bar and finally “Done uploading”. The program will be
stored permanently in the Nano’s flash memory. It will remain there, even if you
disconnect power and reconnect it later, until you eventually overwrite it with another
program.
If you get a red error message, then check your settings (step 4) or go back to driver
installation (step 1)
8. Running the Example Program
After successful upload, your program will start running immediately. In case of the
Blink example, the I/O LED will start blink in a sequence of 1 sec. on, 1 sec. off.
9. Write your own Programs
Start by modifying the Blink program. Change the delay times to change the blinking
frequency, then make it a whole new project altogether.
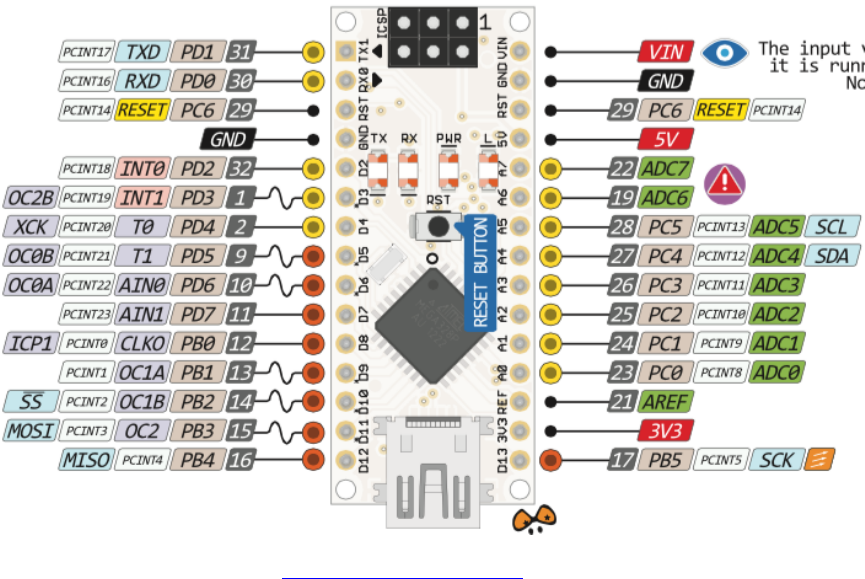
10. Add Input / Output
The important next step is to add I/O to the controller. See the diagram for all
available I/O lines.
For more information see: https://www.arduino.cc
