


ENGLISH
GETTING STARTED 4
INTRODUCTION 6
INSTALLATION 6
IMPORTANT INFORMATION 8
ST PROGRAMMING SOFTWARE 8
FRANÇAIS
DÉMARRAGE 17
INTRODUCTION 19
INSTALLATION 19
INFORMATION IMPORTANTE 21
ST PROGRAMMING SOFTWARE 26
DEUTSCH
ERSTE SCHRITTE 31
EINFÜHRUNG 33
SOFTWAREINSTALLATION 34
WICHTIGE INFORMATIONEN 35
ST PROGRAMMING SOFTWARE 40
ITALIANO
AVVIO 44
INTRODUZIONE 46
INSTALLAZIONE 46
INFORMAZIONI IMPORTANTI 48
ST PROGRAMMING SOFTWARE 53
ESPAÑOL
PRIMEROS PASOS 57
INTRODUCCIÓN 59
INSTALACIÓN 60
INFORMACÍON IMPORTANTE 61
ST PROGRAMMING SOFTWARE 66

4
GETTING STARTED : YOKE

5
ENGLISH
GETTING STARTED : QUADRANT
6
INTRODUCTION
Congratulations on buying the Saitek Pro Flight Yoke System. The Pro Flight Yoke
features realistic controls congurable for all the major ight simulation software to
make your ying experiences more realistic.
FEATURES:
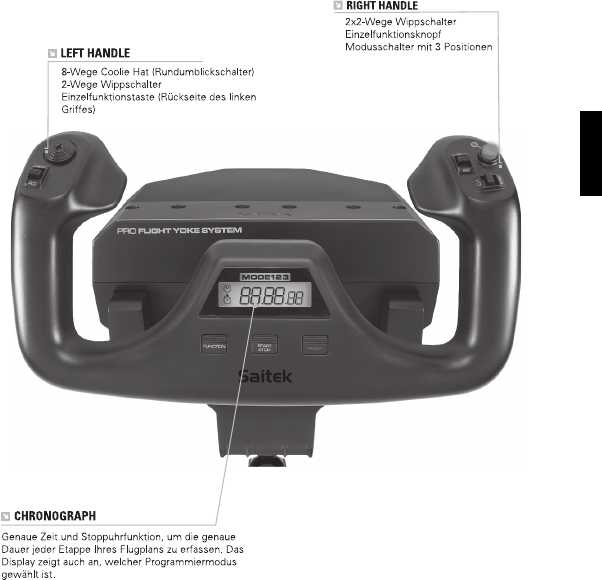
• 8-way point of view hat switch
• 6 x 2-way rocker switches
• 2 x Single-function buttons
• 3-position mode switch
• ST Programming Software (ST) allows gamers to congure their controls to suit their
preferred gaming style, and to save the congurations as personal proles.
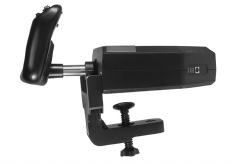
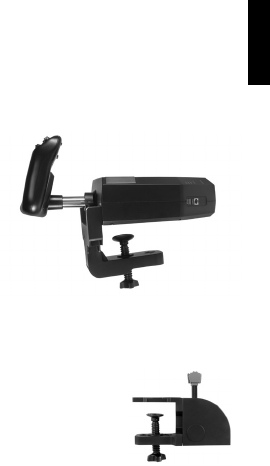
INSTALLING THE FLIGHT YOKE AND THROTTLE QUADRANT
First, x the Flight Yoke to your table or desk by inserting
the prongs of the mounting clamp into the holes on the
yoke base and then tightening the screw mechanism
until the yoke is rmly attached (be careful not to
overtighten the screw as you may damage the
clamp). Next, screw the mounting plate to the Throttle Quadrant
using the four screws provided. You can screw the plate to one
of two sides of the quadrant depending on how you want to mount the quadrant - either in
front and below your table or on top of it. Please note that whichever way you choose to
mount the quadrant, ensure that as you look at the unit the rocker switches are at the bottom.
Now tighten the throttle unit clamp’s screw mechanism until it is rmly attached to your table.
You can also position the Throttle Quadrant on the left or right side of the Flight Yoke.
Now, connect the Throttle Quadrant to the Flight Yoke with the PS/2 connector provided. Your
Throttle Quadrant comes supplied with additional lever knobs to congure any combination of
throttle, aps,

7
ENGLISH
mixture or prop pitch and you can also buy additional quadrants to
link together for more complex multi-engined aeroplane congurations.
Use the integrated USB Hub on the side of the Pro Flight Yoke to easily
connect other parts of the Saitek Pro Flight range of products, such as
additional Pro Flight ThrottleQuadrants, Pro Flight Rudder Pedals or
other peripherals.
INSTALLATION FOR WINDOWS® 8, 8.1, 7, AND VISTA. INCLUDES ALL 32- AND 64-BIT VERSIONS
IMPORTANT: PLEASE INSTALL DRIVERS BEFORE INSTALLING SOFTWARE
DRIVER INSTALLATION
1. Visit Saitek.com to download the latest drivers and software for your operating system.
2. With device disconnected, follow the onscreen instructions to complete the installation.
3. At the Driver Setup screen, only when prompted, insert USB cable into one of your
computer’s USB ports, then click Next.
4. At the Driver Setup screen, click Next to test your controller.
5. When the Saitek Controller screen appears, test the controls to verify device operation.
After the test, click OK.
SOFTWARE INSTALLATION
1. In the Software Setup screen, click Next and a pop-up box will ask if you “want to trust
software from Saitek.” Click yes, then click Next.
2. After installation, you have the option to Run Prole Editor, which will show you the
programming environment. To skip the Prole Editor now, uncheck the box and click
Finish to complete installation.
8
IMPORTANT INFORMATION
Driver updates
From time to time there may be updates to the driver and programming software for this
product. You can check for the latest software updates by visiting the Saitek website (www.
saitek.com) and clicking on Downloads. A drop-down menu will appear. Select Drivers and
Software.
Enabling your controller in the game
Most games support game controllers, but typically default to the mouse and keyboard until
you go into the option menu within the game. The rst time you start a game after installing
your controller, go to the options menu within the main menu of the game and make sure
your controller is set up correctly. If you are having trouble working out how to do this, or if
you’re unsure whether the game itself supports game controllers, then please refer to the
user manual of that game for more help.
PROGRAMMING YOUR SAITEK PRO FLIGHT YOKE AND THROTTLE QUADRANT WITH SAITEK ST
SOFTWARE
The Saitek Pro Flight Yoke System’s buttons, controls and axes correspond to
commonly used functions in Microsoft FS9 and FSX according to the tables below.
As with any software, if you wish to change the function of a button or control, you will
need to change the settings of the game software.
CONFIGURING YOUR SAITEK PRO FLIGHT YOKE AND THROTTLE QUADRANT FOR MICROSOFT FLIGHT
SIMULATOR 9 AND FSX
The Saitek Pro Flight Yoke System’s buttons, controls and axes correspond to commonly
used functions in Microsoft FS9 and FSX according to the tables below. As with any software,
if you wish to change the function of a button or control, you will need to change the settings
of the game software.

9
ENGLISH
Once you have done this, simply nd the command that you want to assign to your controller
from the list of commands, click it and then click the Change Assignment button. A window
will appear asking you to move the part of your controller that you
want to assign to that command - press/move the button/axis that you want to assign
to that command and then click OK.
Tip: You may nd that when you assign the levers on the quadrant to a command, that they
don’t appear to work when you test them in the game. If this happens then you must look in
the Sensitivities screen (Flight Simulator 2004) or the Calibration tab of the Controls screen
(Flight Simulator X) of the game, select the axis command in the list there and ensure that the
Sensitivity isn’t set too low (set the horizontal sensitivity slider control to around 70%).
PROGRAMMING YOUR SAITEK PRO FLIGHT YOKE AND THROTTLE QUADRANT WITH SAITEK ST
SOFTWARE
Introducing Saitek ST software programming software
Saitek ST software Programming Software is the software Saitek supplies to congure your
Saitek controller for enhanced functionality. ST delivers a powerful set of features, allowing
you to program your device with the ultimate conguration for total interaction. Despite a
level of sophistication previously unseen in the market, and because of the Saitek ST soft-
ware inside, the software remains simple and intuitive to use.
For a complete guide on how to program your Saitek controller, visit the Saitek website at
www.saitek.com or look at the help tab on your programming software menu.
Features of ST programming software:
• Quick and easy setup in any game
• Personalize the controller settings for your favorite games
• Congure your controller with an on-screen 3D model and interface
• Multiple setup option for each controller - ideal if a controller is used by several people and
you need more than one prole per device
• Program special moves with sophisticated timing features
• Special game setups available as ‘Proles’ from the Saitek website
• Download the latest version of Saitek ST software software from the Saitek website

10
FUNCTION OVERVIEW

11
ENGLISH
FLIGHT YOKE CONTROLS AND CORRESPONDING FUNCTIONS IN MICROSOFT FLIGHT SIMULATOR
Function
Default function in FS9 and
FSX
Yoke axis X axis Ailerons
Y axis Elevator
Main Buttons Button 1 Brakes (apply/release)
T1 (button 3) Elevator trim down
T2 (button 4) Elevator trim up
T3 (button 5) Flaps retract incrementally
T4 (button 6) Flaps extend incrementally
T5 (button 7) Knee board display/hide
T6 (button 8) Landing gear up/down
Button 2 Views (cycle)
POV Panoramic viewing
Other Controls Mode switch
Switches Mode when using Sai-
tek ST programming software
Clock Buttons Function Clock / stopwatch swap
Start/Stop Start/stop stopwatch
Reset Reset stopwatch

12
FUNCTION OVERVIEW

13
ENGLISH
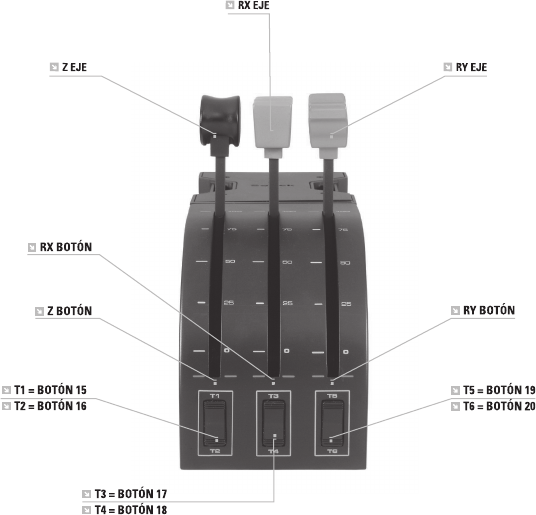
QUADRANT CONTROLS AND CORRESPONDING FUNCTIONS IN MICROSOFT FLIGHT SIMULATOR
Function Default function in FS9 and FSX
Quadrant Axis Z axis Throttle
Rx axis Flaps
Ry axis Spoiler
Axis buttons Z button Assignable in game
Rx button Assignable in game
Ry button Assignable in game
Toggle
switches
T1 (button 15) Assignable in game
T2 (button 16) Assignable in game
T3 (button 17) Assignable in game
T4 (button 18) Assignable in game
T5 (button 19) Assignable in game
T6 (button 20) Assignable in game
HOW TO ASSIGN PRO FLIGHT YOKE CONTROLS TO FLIGHT SIMULATOR FUNCTIONS
If you wish to change the controls or set up the additional buttons that have not been
assigned by Flight Simulator automatically, then you must use the Assignments (Flight
Simulator 2004) or Controls (Flight Simulator X) screen within the game. This is accessed
from the Settings menu within the game.
When you access the Assignments/Controls screen in Flight Simulator, ensure that the Saitek
Pro Flight Yoke is selected in the option labelled Joystick Type. If you wish to reassign any
of the axes on your controller, (the yoke itself or the levers on the throttle quadrant) you must
select Joystick Axes (Flight Simulator 2004) or Control Axes (Flight Simulator X) at the top of
the window. If you wish to reassign any of the buttons on your controller, you must rst select
the Buttons/Keys tab at the top of the window.
14
What is a Prole?
A Prole is a custom setup for improved gameplay - consisting of a set of commands that are
pre-assigned to the buttons or axes of your controller. Pre-written Proles are available on the
Product Companion Disk that accompanies this device or on the Saitek Website -
www.saitek.com. (Please check the website for new or improved Proles, which are added
regularly).
How do I program my controller?
After getting to know your controller, you can start creating your own personal Proles
with the Saitek ST software programming software. This software has virtually unlimited
programming capabilities and allows you to customize the controller to your exact gaming
needs.
The Prole Editor allows you to program the buttons on your controller to perform different
actions within your games - this is especially useful if the game you are using does not have
its own screen that allows reconguring of your buttons.
Getting Started
1. Double-click on the Saitek ST software icon the install left on your desktop.
2. In the Prole Editor, choose the control to which you wish to assign a keyboard command.
You do this by left-clicking on the control’s cell in the control list on the right of the screen.
3. With the cursor ashing, type in the key commands and then click on the green tick mark
when complete.
4. Repeat this procedure for all the buttons you would like to program and then click File,
Save at the top of the Prole Editor window.
5. Give the prole a name (it is recommended you name it after the game for which the
prole is intended) and then click Save.
6. To enable the prole either click the blue Prole Now icon at the top of the Prole Editor
or right-click on the controller icon in your taskbar and select the name of the prole from
the pop-up list of options.
7. You will notice that when a prole is loaded that the controller icon in your taskbar has a
green square behind it, indicating that a prole is currently loaded. If you wish to unload
a prole simply right-click on the controller icon and click Clear Prole from the pop-up
list of options.
If you require more detailed assistance with using the ST Programming Software, click on
Help at the top of the Prole Editor and then Manual.

15
ENGLISH
2-YEAR LIMITED WARRANTY
Mad Catz warrants this product to be free from defects in materials and workmanship for the
warranty period. This non-transferable, two- (2) year limited warranty is only to you, the rst
end-user purchaser. If a defect covered by this warranty occurs AND you provide proof of
purchase, Mad Catz, at its option, will repair or replace the product at no charge.
The Mad Catz two- (2) year limited warranty is available to North American and European
customers. Your sole and exclusive remedy is repair or replacement of your Mad Catz
product. In no event shall Mad Catz liability exceed the original purchase price of the product.
This warranty does not apply to: (a) normal wear and tear or abusive use; (b) industrial,
professional or commercial use; (c) if the product has been tampered with or modied.
NORTH AMERICA AND EUROPE
To receive warranty service, you must:
1. Obtain a Return Authorization Number from Mad Catz Technical Support via ONE of the
following methods:
a. Submit a Ticket at http://support.madcatz.com
b. Call the Mad Catz Tech Support Center nearest you:
- North America: 1-800-659-2287 (USA) or 1-619-683-2815 (outside USA)
- United Kingdom: 01633 928072
- Europe (outside UK): +44(0) 1633 883110
- France: 01 82 88 01 80
- Germany: 089-21094818
- Spain: 93 181 63 94
Once you have your unique Return Authorization Number, do the following:
1. Ship the product to Mad Catz at your expense for service.
2. Enclose a copy of the original sales receipt showing a purchase date.
3. Enclose a full return address with daytime and evening phone numbers.
TECHNICAL SUPPORT
Online Support: http://support.madcatz.com
North American telephone, available Monday through Friday (excluding holidays):

16
1-800-659-2287 (USA only) or 1-619-683-2815 (outside USA).
United Kingdom telephone, available Monday through Friday (excluding bank holidays):
01633 928072.
European telephone (outside UK), available Monday through Friday (excluding bank
holidays): +44(0) 1633 883110.
CAUTIONS
- Use this unit only as intended.
- To prevent re or shock hazard, do not expose this unit to rain or moisture. Do not use
within 30’ of any water such as swimming pools, bathtubs, or sinks.
- To avoid electrical shock, do not disassemble. Refer servicing to qualied personnel only.
- Never insert objects of any kind, other than authorized items, into the product as they
may touch dangerous voltage points or short out parts that could result in re or electrical
shock.
- Stop using this unit immediately if you begin to feel tired or if you experience discomfort or
pain in your hands and/or arms while operating the unit. If the condition persists, consult a
doctor.
- Do not attempt to operate the unit in any way except with your hands. Do not bring the unit
in contact with your head, face, or near the bones of any other part of your body.
- Avoid prolonged use of this unit. Take breaks every 30 minutes.
- Route all cords so that they are not likely to be walked on or tripped over. Make sure that
cords are not placed in a position or areas where they may become pinched or damaged.
- Do not wrap cords around any part of anyone’s body.
- Do not allow children to play with cords.
- This product contains small parts that may cause choking if swallowed. Not intended for
use by children under 3 years of age.
EU DECLARATION OF CONFORMITY:
As required, certain of these products have been tested and conform to the requirements
of the European Union Directives 2002/95/EC, 2002/96/EC, and 2004/108/EC. Authorized
signatory of the manufacturer is Mad Catz, Inc., 10680 Treena Street, Suite 500, San Diego,
CA 92131.

FRANÇAIS
17
DÉMARRAGE : YOKE

18
DÉMARRAGE : QUADRANT

FRANÇAIS
19
INTRODUCTION
Flight Yoke System. Le Pro Flight Yoke est doté de contrôles réalistes, congurables pour les
principaux logiciels de simulations de vol pour rendre votre expérience de vol plus réaliste.
FEATURES:
• Interrupteur 2 directions
• 2 x Bouton de fonction unique
• Interrupteur 6x2 directions
• Interrupteur de Mode 3 positions
• Chronographe
INSTALLATION DU FLIGHT YOKE ET DU THROTTLE QUADRANT
Fixez tout d’abord le Flight Yoke à la table ou au bureau
en insérant les ergots du mécanisme de xation dans
les trous situés à la base du volant, puis vissez le
mécanisme de serrage jusqu’à ce que le volant soit fermement
attaché (prenez garde de ne pas trop serrer la vis pour ne pas
endommager la xation). Vissez ensuite la plaque de xation sur
le Throttle Quadrant à l’aide des quatre vis fournies. Vous pouvez
visser la plaque sur l’un des deux cotés de la manette en fonction de la conguration
de montage que vous avez choisie (que ce soit sous la table, devant vous ou sur le
dessus de celle-ci). Veuillez noter que quelque soit le type d’installation que vous choisirez, il
faudra vous assurez qu’en regardant la manette, les interrupteurs soient en bas.
Serrez maintenant le mécanisme de xation du Throttle Quadrant jusqu’à
ce qu’il soit fermement attaché à la table. Vous pouvez aussi positionner le
Throttle Quadrant à droite ou à gauche du Flight Yoke. Connectez à présent le
Throttle Quadrant à l’arrière du Flight Yoke avec le connecteur type PS/2 fourni.
Utilisez le hub USB intégré sur le coté du Pro Flight Yoke pour connecter
facilementles autres produits de la gamme Saitek Pro Flight, tel que des Pro Flight Throttle
20
Quadrant additionnels, un Pro Flight Rudder Pedals ou d’autres périphériques.
INSTALLATION POUR WINDOWS® 8, 8.1, 7, ET VISTA. COMPATIBLE AVEC TOUTES LES VERSIONS 32
ET 64-BIT
IMPORTANT : VEUILLEZ INSTALLER LES PILOTES AVANT D’INSTALLER LE LOGICIEL
INSTALLATION DES PILOTES
1. Allez sur Saitek.com pour télécharger les derniers pilotes et logiciels pour votre système
d’exploitation.
2. Lorsque l’appareil est déconnecté, suivez les indications afchées à l’écran pour terminer
l’installation.
3. Lorsque l’écran de Conguration du pilote s’afche, et uniquement quand cette action est
demandée, insérez le câble USB dans l’un des ports USB de votre ordinateur et cliquez
sur Suivant.
4. Lorsque l’écran de Conguration du pilote s’afche, cliquez sur Suivant pour tester votre
manette.
5. Lorsque l’écran de la manette Saitek s’afche, essayez les commandes pour vérier le
fonctionnement de l’appareil. Après le test, cliquez sur OK.
INSTALLATION DU LOGICIEL
1. À l’écran Conguration du logiciel, cliquez sur Suivant, une fenêtre pop-up vous deman-
dera si vous « souhaitez faire conance au logiciel de Saitek. » Cliquez sur oui, puis sur
Suivant.
2. Après l’installation, vous avez la possibilité d’Exécuter l’éditeur de prol, qui vous
montrera l’environnement de programmation. Pour passer l’Éditeur de prol maintenant,
décochez la case et cliquez sur Finir pour terminer l’installation.

FRANÇAIS
21
INFORMATION IMPORTANTE
Un mot sur les mises a jour du pilote
De temps à autre, il peut y avoir des mises à jour du pilote et du logiciel de programmation
pour ce produit. Vous pouvez vous tenir informé(e) des toutes dernières mises à jour en vous
rendant sur le site Internet de Saitek et en cliquant sur Téléchargements. Un menu déroulant
va apparaître. Sélectionnez Pilotes + Logiciels.
CONFIGURATION DE VOTRE SAITEK PRO FLIGHT YOKE ET DU THROTTLE QUADRANT POUR MICRO-
SOFT FLIGHT SIMULATOR 9 ET FSX
Les boutons, les contrôles et les axes du Saitek Pro Flight Yoke correspondent aux fonctions
communément utilisées dans Microsoft FS9 et FSX comme décrites dans les tables
ci-dessous. De la même façon que dans tous logiciels, si vous souhaitez changer la fonction
d’un bouton ou d’un contrôle, vous aurez besoin de changer les réglages dans le logiciel de
jeu.

22
VUE D’ENSEMBLE DES FONCTIONS

FRANÇAIS
23
CADRANT DE CONTRÔLES ET FONCTION CORRESPONDANTE DANS MICROSOFT FLIGHT SIMULATOR
Fonctions Fonctions par default dans FS9
Axes du volant Axe X Ailerons
Axe Y Gouverne de profondeur
Boutons
Principaux
Bouton 1 Freins (sortir/rentrer)
T1 (Bouton 3) Baisser la gouverne de profondeur
T2 (Bouton 4) Augmenter la gouverne de profondeur
T3 (Bouton 5) Réduire les volets par incrémentation
T4 (Bouton 6) Augmenter les volets par
incrémentation
T5 (Bouton 7) Conseil de genou - afcher/la peau
T6 (Bouton 8) Train d’atterrissage (rentré/sorti)
Bouton 2 Vues (circulaire)
POV Vue panoramique
Autres contrôles Commutateur de mode Bascule entre les modes en utilisant le
logiciel De programmation Saitek Smart
Technologie
Boutons horloge Function Sélection du mode Horloge / Chronomètre
Démarrer / Arrêter Démarre / arrête le chronomètre
Réinitialisation Réinitialise le chronomètre

24
VUE D’ENSEMBLE DES FONCTIONS

FRANÇAIS
25
CADRANT DE CONTRÔLES ET FONCTION CORRESPONDANTE DANS MICROSOFT FLIGHT SIMULATOR
Fonction Fonctions par default dans FS9
Axes du
cadrant
Axe Z Manette des gaz
Axe Rx Volets
Axe Ry Spoiler
Boutons d’axes Z Bouton Assignable dans le jeu
Rx Bouton Assignable dans le jeu
Ry Bouton Assignable dans le jeu
Toggle switches T1 (Bouton 15) Assignable dans le jeu
T2 (Bouton 16) Assignable dans le jeu
T3 (Bouton 17) Assignable dans le jeu
T4 (Bouton 18) Assignable dans le jeu
T5 (Bouton 19) Assignable dans le jeu
T6 (Bouton 20) Assignable dans le jeu
COMMENT ASSIGNER LES CONTRÔLES DU PRO FLIGHT YOKE AUX FONCTIONS DE FLIGHT SIMULATOR
Si vous voulez changer les contrôles ou paramétrer les boutons additionnels qui n’ont pas été
assignés automatiquement par Flight Simulator, vous devez utiliser l’écran
Assignation (Flight Simulator 2004) ou l’écran Contrôles (Flight Simulator X) dans le jeu. Vous
pouvez y accéder à partir du menu Réglages dans le jeu.
Quand vous accédez à l’écran Assignations/Contrôles dans Flight Simulator, vériez que
le Saitek Pro Flight Yoke est sélectionné dans l’option Type de joystick. Si vous souhaitez
réassigner un bouton de votre contrôleur, vous devez d’abord sélectionner l’onglet Boutons/
Touches en haut de la fenêtre.
Si vous souhaitez réassigner un axe de votre contrôleur, (le volant ou les leviers sur le
26
Throttle Quadrant) vous devez sélectionner Axes du Joystick (Flight Simulator 2004)
ou Contrôle des Axes (Flight Simulator X) en haut de la fenêtre.
Une fois que vous avez fait cela, trouvez simplement la commande que vous voulez assigner
à votre contrôleur à partir de la liste de commandes. Cliquez dessus puis cliquez sur le bouton
Changer l’Assignation. Une fenêtre apparaitra vous demandant de bouger la partie du
contrôleur à laquelle vous voulez assigner la commande (pressez/bougez le bouton/axe que
vous voulez assigner à la commande puis cliquez OK.
Truc : Vous pourrez constater qu’en assignant les leviers du Throttle Quadrant à une
commande, celle-ci peut ne pas fonctionner quand vous la testez dans le jeu. Si cela ce
produit, vous devez regarder dans l’écran Sensibilité (Flight Simulator 2004) ou l’onglet
Calibration de l’écran Contrôles (Flight Simulator X) dans le jeu. Sélectionnez les commandes
des axes dans la liste et assurez-vous que la sensibilité n’est pas réglée trop basse (placez le
curseur horizontal de la sensibilité autour de 70%).
PROGRAMMATION DE VOTRE CONTRÔLEUR SAITEK À L’AIDE DU LOGICIEL SAITEK ST SOFTWARE
Introduction au logiciel de programmation Saitek ST software
Le logiciel de programmation Saitek ST software (ou ST) est le logiciel fourni avec votre
contrôleur pour vous permettre d’améliorer encore plus les fonctionnalités de votre produit
Saitek. ST met en effet à votre disposition une série d’outils puissants qui vous permettent de
programmer entièrement votre contrôleur, pour une conguration personnalisée. Malgré un
degré de sophistication jusqu’ici inégalé sur le marché, le logiciel reste cependant simple et
facile à utiliser grâce à la technologie intelligente développée par Saitek.
Pour un guide complet sur la programmation de votre contrôleur Saitek, veuillez visiter le site
web Saitek à l’adresse suivante : www.saitek.com.
Caractéristiques du logiciel de programmation Saitek ST software:
• Installation rapide et facile, quel que soit le jeu
• Possibilité de personnaliser les congurations de votre contrôleur pour vos jeux préférés
• Conguration du contrôleur à l’aide d’une interface graphique et d’un modèle en 3D
• Option “conguration multiple” pour chaque contrôleur : idéal si le contrôleur est utilisé par
plusieurs personnes
• Possibilité de programmer des mouvements spéciques avec des caractéristiques de

FRANÇAIS
27
minutage sophistiquées
• Paramètres de jeux (ou “prols”) disponibles sur le site web de Saitek
• Possibilité de télécharger la mise à jour du logiciel Saitek ST software à partir du site Web
de Saitek.
Qu’est-ce qu’un Prol de jeu ?
Un Prol de jeu est un chier de conguration qui améliore votre jouabilité : c’est une série
de commandes qui affecte aux boutons et manettes de votre contrôleur une action
pré-programmée. Plus de 200 prols sont disponibles sur le Product
Companion Disk fourni avec cet appareil ou sur le site Internet de Saitek : www.saitek.com.
(Sur notre site web, qui est régulièrement mis à jour, vous trouverez les tout derniers prols et
des prols améliorés).
Comment programmer mon contrôleur ?
Une fois familiarisé(e) avec votre contrôleur, vous pourrez commencer à créer vos propres
Prols de jeu à l’aide du logiciel de programmation Saitek ST software. Ce logiciel vous
permet d’utiliser des fonctionnalités de programmation
quasiment illimitées et de personnaliser votre contrôleur en fonction de vos besoins précis
pour chaque jeu.
L’Editeur de prol vous permet de programmer toutes les touches de votre joystick de
façon à ce qu’elles effectuent des actions spéciques dans chaque jeu. Cette fonctionnalité
est particulièrement utile si le jeu que vous utilisez ne comporte pas d’écran permettant de
congurer les touches de votre contrôleur.
Introduction
1. Faites un clic droit sur l’icône de votre contrôleur près de l’horloge puis un clic gauche
sur Prole Editor (Editeur de Prole).
2. Dans l’Editeur de prol, sélectionnez les commandes que vous désirez assigner à
chaque commande du clavier. Pour cela, cliquez à gauche sur la cellule de commande
dans la liste des commandes située à droite de l’écran.
3. Avec le curseur clignotant, entrez une commande et cliquez sur la case verte. L’éditeur
vous invitera ensuite à nommer la commande. Tapez donc le nom approprié (par exemple
“ Arme à Feu “) puis pressez “ Enter “ sur votre clavier.
4. Répétez cette procédure pour tous les boutons que vous voulez programmer puiscliquez
l’icône représentant un disque bleu (Sauvegarde) en haut de la fenêtre.
28
5. Donnez un nom au prol (nous vous recommandons de lui donner le nom du jeu pour
lequel le prol est destiné) puis cliquez sur Enregistrer.
6. Pour activer le prol, cliquez sur l’icône Activer le prol maintenant en haut de l’Editeur
de prol (l’icône ressemble à un viseur noir et jaune) ou cliquez à droite sur l’icône de
votre contrôleur dans la barre des tâches et sélectionnez le nom du prol dans le menu
déroulant.
7. Vous remarquerez que lorsqu’un prol est chargé, l’icône du contrôleur dans votre
barre des tâches apparaît avec, derrière elle, un carré vert. Ceci indique qu’un prol est
actuellement chargé. Si vous désirez désactiver un prol déjà chargé, il vous suft de
cliquer à droite sur l’icône du contrôleur et de cliquer sur Désactiver le prol dans le menu
déroulant.
8. Si vous souhaitez une aide plus détaillée lors de l’utilisation du Logiciel de Programmation
ST, cliquez sur Aide en haut de l’Éditeur de Prol, puis sur Manuel.
GARANTIE LIMITÉE DE 2 ANS
Mad Catz garantit ce produit contre tout vice de matériau ou de fabrication pendant la
période de garantie. Cette garantie limitée de deux (2) ans non transférable s’applique
à vous uniquement en tant qu’acheteur et premier utilisateur nal. Si un vice couvert par
cette garantie est décelé ET que vous fournissez une preuve d’achat, Mad Catz, à sa seule
discrétion, réparera ou remplacera le produit gratuitement.
La garantie limitée par Mad Catz à deux (2) ans est à la disposition des clients
Nord-Américains et Européens. Votre recours exclusif est la réparation ou le remplacement
de votre produit Mad Catz. En aucun cas la responsabilité de Mad Catz ne pourra dépasser
le prix d’achat d’origine du produit. Cette garantie ne s’applique pas à : (a) une usure normale
ou un mauvais usage ; (b) une utilisation industrielle, professionnelle ou commerciale ; (c) un
produit ayant fait l’objet de modications.
AMÉRIQUE DU NORD ET EUROPE
Pour bénécier de la garantie, vous devez :
1. Obtenir un numéro d’autorisation de retour auprès de l’assistance technique de Mad Catz

FRANÇAIS
29
par l’UNE des méthodes suivantes :
a. Soumettre un ticket à http://support.madcatz.com
b. Appelez le Centre Support technique de Mad Catz proche de chez vous :
- Amérique du Nord : +1-800-659-2287 (États-Unis) ou +1-619-683-2815 (en dehors des
États-Unis)
- Royaume-Uni : 01633 928072
- Europe (en dehors du Royaume-Uni) : +44(0) 1633 883110
- France : 01 82 88 01 80
- Allemagne : 089-21094818
- Espagne : 93 181 63 94
Une fois que vous avez votre numéro unique d’autorisation de retour, procédez comme suit:
1. Expédier le produit à Mad Catz à vos frais.
2. Joindre une copie du ticket de caisse original montrant la date d’achat.
3. Indiquer une adresse complète de retour avec numéros de téléphone où vous joindre
dans la journée et en soirée.
ASSISTANCE TECHNIQUE
Aide en ligne : http://support.madcatz.com
Téléphone pour l’Amérique du Nord : du lundi au vendredi (sauf jours fériés)
au +1-800-659-2287 (États-Unis uniquement) ou au +1-619-683-2815 (depuis l’étranger).
Téléphone pour la France : du lundi au vendredi (sauf jours fériés) au 01 82 88 01 80.
Téléphone pour la Royaume-Uni : du lundi au vendredi (sauf jours fériés) au 01633 928072.
Téléphone pour l’Europe (en dehors du Royaume-Uni) : du lundi au vendredi (sauf jours
fériés) au +44(0) 1633 883110.
ATTENTION
- N’utilisez cette unité que dans le but pour lequel elle a été conçue.
- Pour prévenir tout risque d’incendie ou de choc électrique, n’exposez pas cette unité à
la pluie ou à l’humidité. Ne l’utilisez pas à moins de 9 mètres de l’eau (par exemple une
piscine, une baignoire ou un évier).
- Pour éviter tout risque de choc électrique, ne démontez pas cette unité. Toute réparation
30
doit être effectuée uniquement par un personnel qualié.
- N’insérez aucun objet autre que ceux autorisés dans l’unité car ils pourraient toucher des
points de tension dangereuse ou provoquer un court-circuit résultant en un incendie ou un
choc électrique.
- Arrêtez immédiatement d’utiliser cette unité si vous vous sentez fatigué ou mal à l’aise,
ou si vous ressentez des douleurs dans les mains et/ou les bras lors de son emploi. Si les
symptômes persistent, consultez un médecin.
- Ne vous servez que de vos mains pour faire fonctionner l’unité. Ne mettez pas l’unité en
contact avec votre tête ou visage, ou près des os d’une partie quelconque de votre corps.
- Évitez l’emploi prolongé de cette unité. Prenez un peu de repos toutes les 30 minutes.
- Placez les câbles de façon à éviter qu’on ne marche ou ne trébuche dessus. Assurez-vous
que les câbles sont placés dans des positions ou des endroits où ils ne seront ni pincés ni
endommagés.
- N’enroulez pas de câble autour d’une partie du corps de quiconque.
- Ne laissez pas les enfants jouer avec les câbles.
- Ce produit contient des petites pièces qui présentent un risque d’étouffement si elles sont
avalées. Ce produit est déconseillé aux enfants de moins de trois ans.
DÉCLARATION DE CONFORMITÉ DE L’UE::
Comme exigé, certains de ces produits ont été testés et sont conformes aux exigences aux
directives de l’Union Européenne 2002/95/EC, 2002/96/EC, et 2004/108/EC. Le signataire
autorisé du constructeur est Mad Catz, Inc., 10680 Treena Street, Suite 500, San Diego, CA
92131.
DEUTSCH
31
ERSTE SCHRITTE : YOKE

32
ERSTE SCHRITTE : QUADRANT
DEUTSCH
33
EINFÜHRUNG
Herzlichen Glückwunsch zum Kauf des Saitek Pro Flight Yoke System. Das Pro Flight Yoke
System bietet realistische Bedienelemente, die für jede bekanntere Flugsimulationssoftware
konguriert werden können, um Ihr Flugerlebnis noch realistischer zu gestalten.
FEATURES:
• 8-Wege Coolie Hat (Rundumblickschalter)
• 6x2-Wege Wippschalter
• Einzelfunktionstaste
• Modusschalter mit 3 Positionen
• Chronograph
INSTALLATION VON FLIGHT YOKE UND THROTTLE QUADRANT
Befestigen Sie zuerst den Flight Yoke an Ihrem Tisch,
indem Sie die Zinken der Montageklemme in die Löcher
an der Flight Yoke-Basis schieben und dann den
Schraubmechanismus anziehen, bis der Flight Yoke
fest sitzt. (Achten Sie darauf, dass Sie die Schraube nicht
zu fest anziehen, da Sie sonst die Klemme beschädigen
könnten.) Dann schrauben Sie die Montageplatte mit Hilfe
der vier mitgelieferten Schauben an den Throttle Quadrant. Sie können die Platte an eine
der beiden Seiten des Quadranten schrauben, je nachdem, wie Sie ihn montieren wollen -
entweder vor, unter oder auf Ihrem Tisch. Achten Sie bitte darauf, dass sich die Wippschalter
unabhängig von der gewählten Montageart unten benden müssen,
wenn Sie auf das Gerät schauen. Ziehen Sie den Schraubmechanismus
der Klemme an, bis er fest an Ihrem Tisch sitzt. Sie können den Throttle
Quadrant auch links oder rechts vom Flight Yoke positionieren.
Jetzt verbinden Sie den Throttle Quadrant über den PS/2-Stecker mit der
Rückseite des Flight Yoke.
Verwenden Sie den integrierten USB-Hub an der Seite des Pro Flight Yoke, um andere
34
Geräte aus der Pro Flight Produktpalette von Saitek anzuschließen, wie beispielsweise
zusätzliche Pro Flight Throttle Quadranten, Pro Flight Rudder Pedals oder andere
Peripheriegeräte.
INSTALLATION FÜR WINDOWS® 8, 8.1, 7, UND VISTA. ENTHÄLT ALLE 32- UND 64-BIT-VERSIONEN
WICHTIG! VOR DEM INSTALLIEREN DER SOFTWARE SIND TREIBER ZU INSTALLIEREN
TREIBERINSTALLATION
1. Auf Saitek.com können Sie die aktuellen Treiber und Programme für Ihr Betriebssystem
herunterladen.
2. Wenn das Gerät getrennt ist, folgen Sie den Anweisungen auf dem Bildschirm, um die
Installation abzuschließen.
3. Wenn Sie im Bildschirm „Einrichtung des Treibers“ dazu aufgefordert werden, stecken Sie
das USB-Kabel in einen der USB-Anschlüsse Ihres Computers und klicken anschließend
auf Weiter.
4. Klicken Sie im Bildschirm „Einrichtung des Treibers“ auf Weiter, um Ihren Controller zu
testen.
5. Wenn der Saitek-Controller-Bildschirm angezeigt wird, testen Sie die Bedienelemente, um
die Funktionsfähigkeit des Geräts zu testen. Klicken Sie nach dem Test auf OK.
SOFTWARE-INSTALLATION
1. Klicken Sie im Bildschirm „Einrichtung der Software“ auf Weiter. Daraufhin werden Sie in
einem Pop-up-Fenster gefragt, ob Sie der Software von Saitek vertrauen möchten. Klicken
Sie auf Ja und anschließend auf Weiter.
2. Nach der Installation haben Sie die Möglichkeit, die Prolbearbeitung auszuführen,
woraufhin die Programmierumgebung angezeigt wird. Um die Prolbearbeitung zu über-
springen, deaktivieren Sie das Kontrollkästchen, und klicken Sie auf Fertigstellen, um die
Installation abzuschließen.

DEUTSCH
35
WICHTIGE INFORMATIONEN
Anmerkungen zur Treiber-Aktualisierung
Falls notwendig werden neuere Versionen der Treiber und der Programmier-Software für
dieses Produkt veröffentlicht. Sie erhalten jeweils die aktuellste Software auf der Saitek
Website unter der Rubrik Downloads unter dem Menüpunkt Treiber + Software.
KONFIGURATION IHRES SAITEK PRO FLIGHT YOKE UND THROTTLE QUADRANTEN FÜR MS FLIGHT
SIMULATOR 2004 (FS9) UND MS FLIGHT SIMULATOR X (FSX)
Die Knöpfe, Steuerungen und Achsen des Saitek Pro Flight Yoke Systems entsprechen
den üblichen in Microsoft FS9 und FSX benutzten Funktionen, wie in den untenstehenden
Tabellen beschrieben. Wie bei jeder Software müssen Sie, wenn Sie die Funktion eines
Knopfes oder eines Bedienelements ändern wollen, die Einstellung in der Software ändern.

36
FUNKTIONSÜBERSICHT

DEUTSCH
37
STEUERUNGEN DES FLIGHT YOKE UND ENTSPRECHENDE FUNKTIONEN IM MICROSOFT
FLUGSIMULATOR
Funktion Voreingestellte Funktion in
FS9 und FSX
Yoke-Achse X-Achse Querruder
Y-Achse Höhenruder
Hauptknöpfe Taste 1 Bremsen (anziehen/lösen)
T1 (Taste 3) Höhenruder abwärts trimmen
T2 (Taste 4) Höhenruder aufwärts trimmen
T3 (Taste 5) Klappen schrittweise einziehen
T4 (Taste 6) Klappen schrittweise ausfahren
T5 (Taste 7) Kniebrett ein-/ausblenden
T6 (Taste 8) Fahrwerk auf/ab
Taste 2 Ansichten (zyklisch)
Coolie Hat Rundumblick
Weitere
Bedienelemente
Modusschalter Schaltet bei Verwendung der
Programmier-Software Saitek
Smart Technology die
Modi um
Chronograph Function Umschalten Uhr/Stoppuhr
Start/Stop Start/Stopp Stoppuhr
Reset Rücksetzen Stoppuhr

38
FUNKTIONSÜBERSICHT

DEUTSCH
39
BEDIENELEMENTE DES QUADRANTEN UND ENTSPRECHENDE FUNKTIONEN IM MICROSOFT FLUG-
SIMULATOR
Funktion Voreingestellte Funktion in FS9
und FSX
Quadranten-
Achse
Z-Achse Triebwerk
Rx-Achse Lande-, Wölbklappen
Ry-Achse Brems-, Störklappen
Achsentasten
(0-Stellung)
Z Knopf Im Spiel zuweisbar
Rx Knopf Im Spiel zuweisbar
Ry Knopf Im Spiel zuweisbar
2-Wege
Wippschalter
T1 (Knopf 15) Im Spiel zuweisbar
T2 (Knopf 16) Im Spiel zuweisbar
T3 (Knopf 17) Im Spiel zuweisbar
T4 (Knopf 18) Im Spiel zuweisbar
T5 (Knopf 19) Im Spiel zuweisbar
T6 (Knopf 20) Im Spiel zuweisbar
WIE MAN DEN FLUGSIMULATORFUNKTIONEN DIE BEDIENELEMENTE DES PRO FLIGHT YOKE ZUWEIST
Wenn Sie die Bedienelemente verändern oder die zusätzlichen Knöpfe einstellen möchten,
die noch nicht automatisch vom Flugsimulator zugewiesen worden sind, müssen Sie den Bild-
schirm Zuweisungen (Flugsimulator 2004) oder Steuerungen (Flugsimulator X) innerhalb des
Spiels verwenden. Sie erreichen ihn über das Menü Einstellungen innerhalb des Spiels.
Beim Zugriff auf den Bildschirm Zuweisungen/Steuerungen im Flugsimulator achten Sie darauf,
dass in der Option Joysticktyp der Saitek Pro Flight Yoke ausgewählt ist. Wenn Sie Tasten an
Ihrem Steuergerät neu zuweisen möchten, klicken Sie zuerst oben im Fenster auf den Reiter
Knöpfe/Tasten.
40
Wenn Sie Achsen an Ihrem Steuergerät neu zuweisen möchten (den eigentlichen Steuerknüp-
pel oder die Hebel am Throttle Quadranten), wählen Sie oben im Fenster Joystick-Achsen
(Flugsimulator 2004) oder Steuerachsen (Flugsimulator X). Anschließend suchen Sie einfach
den Befehl aus der Befehlsliste aus, den Sie Ihrem Steuergerät zuweisen möchten, klicken ihn
an und klicken dann auf die Schaltäche “Zuweisung ändern”. Es erscheint ein Fenster, das Sie
auffordert, den Teil Ihres Steuergerätes zu bewegen, den Sie diesem Befehl zuweisen möchten
- drücken/bewegen Sie den betreffenden Knopf/die Achse und klicken Sie dann auf OK.
Tipp: Möglicherweise bemerken Sie, wenn Sie die Hebel am Quadranten einem Befehl
zugewiesen haben, dass sie nicht zu funktionieren scheinen, wenn Sie sie im Spiel testen.
Wenn das geschieht, gehen Sie im Spiel auf den Bildschirm Empndlichkeiten
(Flugsimulator 2004) oder auf den Reiter Kalibrierung des Bildschirms Steuerungen
(Flugsimulator X). In der dortigen Liste wählen Sie die Achsensteuerung aus und vergewissern
sich, dass die Empndlichkeit nicht zu niedrig eingestellt ist. (Stellen Sie den waagerechten
Schieberegler für die Empndlichkeit auf etwa 70 %.)
WIE SIE IHREN SAITEK CONTROLLER MIT DER SAITEK ST SOFTWARE PROGRAMMIEREN
Einführung in die Programmiersoftware
Saitek ST software ist eine Software, mit der Sie Ihren Saitek Controller unabhängig von den
Einstellmöglichkeiten in Spielen an Ihre eigenen Bedürfnisse anpassen können. Die ST bein-
haltet eine Vielzahl von Funktionen, um Ihr
Eingabegerät mit einer persönlichen Konguration zu versehen um maximalen Spielgenuss
zu erreichen. Obwohl die ST sehr viele Möglichkeiten bietet, bleibt Sie dennoch einfach und
intuitiv zu benutzen.
Die komplette Anleitung zur Programmierung Ihres Saitek Controllers, nden Sie auf der Saitek
Homepage unter www.saitek.de.
Eigenschaften der Saitek ST software Programmiersoftware:
• Schnelle und leichte Konguration für jedes Spiel
• Passt den Controller optimal an Ihre Lieblinsspiele an
• Konguration des Eingabegeräts mit Hilfe eines 3D Modells und einer Benutzeroberäche
• Mehrfachkongurationen sind für jeden Controller möglich - ideal falls der Controller von
mehreren Personen verwendet wird
• Programmierung komplexer Eingaben mit umfangreichen Zeiteinstellungen
• Vorgefertigte Einstellungen für spezielle Spiele sind als “Prole” auf der Saitek Webseite

DEUTSCH
41
• Die aktuellste Version der Saitek ST software Software nden Sie zum Download auf der
Saitek Homepage
WAS IST EIN PROFIL?
Ein Prol ist eine spezielle Einstellung für einen verbesserten Spielablauf, bestehend aus einer
Reihe von Befehlen, die den Buttons oder Achsen an Ihrem Controller im Voraus zugeteilt
werden. Auf der dem Gerät beiliegenden CD-ROM oder auf der Saitek-Website, www.saitek.
com, nden Sie über 200 fertige Prole. (Besuchen Sie unsere Website für neue oder verbes-
serte Prole, die regelmäßig ergänzt werden).
Wie kann ich meinen Controller programmieren?
Nachdem Sie sich mit Ihrem Saitek Controller besser vertraut gemacht haben, können Sie
damit beginnen Ihre persönlichen Spielprole mit der Saitek Smart Technologie Programmier-
software zu erstellen. Diese Software stellt nahezu unbegrenzte
Programmiermöglichkeiten zur Verfügung und ermöglicht es, Ihren Saitek Controller an Ihre
persönlichen Spielanforderungen anzupassen.
Mit dem Proleditor können Sie die Steuerelemente Ihres Eingabegerätes für verschiedenste
Spiele oder Spielsituationen beliebig belegen. Das ist besonders hilfreich, wenn im Spiel selbst
keine Kongurationsmöglichkeit des Controllers zur Verfügung steht.
Und so geht’s:
1. Klicken Sie mit der rechten Maustaste auf das Symbol für Ihren Controller, das sich neben
Ihrer Computeruhr bendet, und wählen Sie mit der linken Maustaste im Kontextmenü den
Eintrag Prole Editor (Proleditor) aus.
2. Im Proleditor wählen Sie eine Taste am Controller aus, der Sie einen Tastaturbefehl zu-
weisen wollen. Dies tun Sie, indem Sie in der Liste im rechten Teil des Bildschirmes mit der
Maus links klicken.
3. Der Cursor blinkt. Geben Sie die Tastenbefehle ein und klicken Sie anschließend auf das
grüne Häkchen. Der Editor fordert Sie auf, dem Befehl einen Namen zu geben. Geben Sie
den gewünschten Namen ein (z. B. Waffe abfeuern) und drücken Sie die Eingabetaste Ihrer
Tastatur.
4. Wiederholen Sie dieses Verfahren für alle Tasten, die Sie programmieren wollen, und klicken
Sie anschließend auf das Symbol mit der blauen Diskette (Speichern) oben im Fenster.
5. Benennen Sie das Prol nach Wunsch (in der Regel ist es sinnvoll das Prol nach dem
jeweiligen Spiel, für das es bestimmt ist zu benennen) und klicken Sie anschließend auf

42
Speichern.
6. Um das erstellte Prol im Spiel zu nutzen, klicken Sie auf Prol aktivieren im oberen Bereich
des Proleditors (ein schwarzgelbes Fadenkreuzsymbol), oder rechtsklicken Sie auf das
Joystick-Symbol in Ihrer Taskleiste und wählen dann das Prol aus dem erscheinenden
Menü aus.
7. Sie werden bemerken, dass sobald ein Prol aktiviert ist, das Joystick-Symbol in Ihrer
Taskleiste grün hinterlegt ist. Wenn Sie ein Prol deaktivieren möchten, rechtsklicken Sie
einfach auf das Joystick-Symbol und wählen Sie Prol löschen. Wenn Sie ausführliche Hilfe
für die Benutzung der ST Programmiersoftware benötigen, klicken Sie auf Hilfe in der Menül-
eiste des Prol Editors und dann auf Handbuch.
NORDAMERIKA UND EUROPA
Gehen Sie folgendermaßen vor, um eine Garantieleistung in Anspruch zu nehmen:
Fordern Sie mit EINER der folgenden Methoden eine Rücksende-Autorisierungsnummer (Return
Authorization Number) vom technischen Support von Mad Catz an:
a. Übermitteln Sie auf http://support.madcatz.com ein Ticket.
b. Setzen Sie sich telefonisch mit dem nächstgelegenen Technischen Supportzentrum von
Mad Catz in Verbindung:
- Deutschland: 089-21094818
- Großbritannien: 01633 928072
- Europa (außerhalb Großbritanniens): +44(0) 1633 883110
- Frankreich: 01 82 88 01 80
- Spanien: 93 181 63 94
- Nordamerika: 1-800-659-2287 (USA) oder 1-619-683-2815 (außerhalb der USA)
Nachdem Sie Ihre einmalige Rücksende-Autorisierungsnummer erhalten haben, gehen Sie
folgendermaßen vor:
1. Sende das Produkt auf eigene Kosten zur Überprüfung an Mad Catz.
2. Lege eine Kopie des originalen Kaufbelegs mit Kaufdatum bei.
3. Lege eine vollständige Rücksendeadresse mit Telefonnummern für tagsüber und abends bei.
TECHNISCHER SUPPORT
Online-Support: http://support.madcatz.com
Mo - Fr Telefonisch: 089-21094818
Telefonnummer für Nordamerika, Montag bis Freitag (außer an Feiertagen): 1-800-659-2287 (nur
USA) oder 1-619-683-2815 (außerhalb der USA).

DEUTSCH
43
Telefonnummer für Großbritannien, Nordamerika, Montag bis Freitag (außer an Feiertagen):
01633 928072.
Telefonnummer für Europa (außerhalb Großbritanniens), Montag bis Freitag (außer an
Feiertagen): +44(0) 1633 883110.
WARNHINWEISE
- Benutzen Sie die Einheit nur für den vorgesehenen Zweck.
- Um den Ausbruch eines Feuers oder eine andere Gefahrensituation zu verhindern,
setzen Sie die Einheit weder Regen noch Feuchtigkeit aus. Halten Sie einen ausreichend
großen Abstand zu Wasser (ca. 80 cm), z. B. in Schwimmbecken, in Badewannen oder
Waschbecken.
- Um elektrischen Schock zu vermeiden, nehmen Sie das Gerät nicht auseinander. Das Gerät
darf nur von qualiziertem Personal gewartet werden.
- Führen Sie, mit Ausnahme der zulässigen Elemente, keine Gegenstände jeglicher Art in das
Gerät ein, da sie gefährliche Spannungspunkte berühren oder einen Kurzschluss auslösen
können, was zum Ausbruch von Feuer oder elektrischem Schock führen kann.
- Wenn Sie sich müde oder unwohl fühlen oder Schmerzen in Ihrer Hand oder Ihrem Arm
haben, beenden Sie unverzüglich die Verwendung der Einheit. Suchen Sie einen Arzt auf,
wenn sich Ihr Zustand nicht bessert.
- Bedienen Sie die Einheit ausschließlich mit den Händen. Bringen Sie die Einheit nicht in
Kontakt mit Ihrem Kopf oder Ihrem Gesicht oder in die Nähe von anderen Körperteilen.
- Vermeiden Sie eine zu lange Verwendung der Einheit. Legen Sie alle 30 Minuten eine Pause
ein.
- Sichern Sie alle Kabel, damit Personen nicht auf sie treten oder über sie stolpern können.
Vergewissern Sie sich, dass die Kabel nicht eingeklemmt oder beschädigt werden.
- Keinen Wickeln die Kabel nicht um Körperteile von Personen.
- Halten Sie Kinder von den Kabeln fern.
- Dieses Produkt enthält Kleinteile, die beim Verschlucken Erstickungsgefahr darstellen. Für
Kinder unter 3 Jahren nicht geeignet.
EU-KONFORMITÄTSERKLÄRUNG:
Wie vorgeschrieben wurden bestimmte dieser Produkt getestet und sie erfüllen die
Anforderungen der EG-Richtlinien 2002/95/EG, 2002/96/EG, und 2004/108/EG. Der vom
Hersteller autorisierte Unterzeichner ist Mad Catz, Inc., 10680 Treena Street, Suite 500, San
Diego, CA 92131.

44
AVVIO : YOKE

ITALIANO
45
AVVIO : QUADRANT

46
INTRODUZIONE
Congratulazioni per avere acquistato il sistema Saitek Pro Flight Yoke. La cloche Pro Flight
Yoke è dotata di realistici controlli congurabili con tutti i principali simulatori di volo, per
rendere più realistiche le vostre esperienze di volo.
FEATURES:
• Vista Panoramica
• 6 x Interrupteur 2 directions
• Bouton de fonction unique
• Interrupteur de Mode 3 positions
• Chronomètre
INSTALLAZIONE DELLA CLOCHE E DEL THROTTLE QUADRANT
Per prima cosa, ssate la cloche al vostro tavolo o
scrivania inserendo i perni del morsetto di montaggio nei
fori della base della cloche, poi stringete le due viti no
a quando la cloche è solidamente ancorata (fate
attenzione a non stringere troppo la vite per evitare di
danneggiare il morsetto). Quando avete nito, avvitate la placca
di montaggio del throttle quadrant usando le quattro viti fornite.
Potete avvitare la placca a due diversi lati del gruppo in funzione
di come volete montare il quadrant - di fronte e sotto il piano del
tavolo o sulla parte superiore. In qualunque modo decidiate di montare il gruppo,
assicuratevi che, guardando l’unità, gli switch attuatori siano nella parte inferiore.
Ora stringete il meccanismo di ancoraggio a vite del throttle quadrant no a
quando è solidamente ssato al vostro tavolo. Potete anche posizionare il throttle quadrant
alla parte sinistra o destra della cloche.

ITALIANO
47
Ora collegate il throttle quadrant al retro della cloche con i connettori
PS/2 forniti. Usate l’hub USB integrato sul anco della cloche per collegare
facilmente le altre parti della linea di prodotti Saitek Pro Flight, come
ulteriori throttle quadrant Pro Flight, pedali per il timone Pro Flight o
altre periferiche.
INSTALLAZIONE PER WINDOWS® 8, 8.1, 7 E VISTA. INCLUDE TUTTE LE VERSIONI A 32 E 64 BIT
IMPORTANTE: INSTALLARE I DRIVER PRIMA DI INSTALLARE IL SOFTWARE
INSTALLAZIONE DEI DRIVER
1. Visitare Saitek.com per scaricare il software e i driver aggiornati per il proprio sistema
operativo.
2. Con il dispositivo scollegato, attenersi alle istruzioni a schermo per completare
l’installazione.
3. Nella schermata Driver Setup (Installazione driver), solo quando richiesto, inserire il cavo
USB in una delle porte USB del computer, quindi fare clic su Next (Avanti).
4. Nella schermata Driver Setup (Installazione driver), fare clic su Next (Avanti) per testare il
controller.
5. Quando è visualizzata la schermata Saitek Controller (Controller Saitek), testare i controlli
per vericare il funzionamento del dispositivo. Dopo il test, fare clic su OK.
INSTALLAZIONE DEL SOFTWARE
1. Nella schermata Software Setup (Installazione software) fare clic su Next (Avanti) e una
casella pop-up chiederà se si desidera considerare attendibile il software proveniente da
Saitek. Fare clic su yes (sì), quindi su Next (Avanti).
2. Dopo l’installazione, viene visualizzata l’opzione Run Prole Editor (Esegui Editor proli),
che visualizzerà l’ambiente di programmazione. Per saltare l’Editor proli ora, deselezion-
are la casella e fare clic su Finish (Fine) per completare l’installazione.
48
INFORMAZIONI IMPORTANTI
Brevi commenti sugli aggiornamenti dei driver
Periodicamente sono disponibili aggiornamenti dei driver e del software di programmazione
per questo prodotto.
E’ possibile vericare la disponibilità degli aggiornamenti più recenti visitando il sito web
Saitek e facendo clic su Download. Visualizza un menu a discesa. Seleziona Driver e
Software.
CONFIGURAZIONE DELLA CLOCHE FLIGHT YOKE PRO SAITEK E DEL THROTTLE QUADRANT PER
MICROSOFT FLIGHT SIMULATOR 9 E FSX
Pulsanti, controlli e assi della cloche Flight Yoke Pro Saitek corrispondono alle funzioni
usate comunemente in Microsoft FS9 e FSX come descritto nelle tabelle che seguono. Come
per ogni programma, se volete modicare la funzione di un bottone o di un controllo, dovete
modicare le impostazioni del gioco.

ITALIANO
49
PANORAMICA DELLE FUNZIONI

50
CONTROLLI DELLA CLOCHE E FUNZIONI CORRISPONDENTI NEL FLIGHT SIMULATOR MICROSOFT
Funzioni degli assi della cloche Funzioni di default in FS9 e FSX
asse X Alettoni
asse Y Elevator
Bottoni principali Bottone 1 Freni (frena/rilascia)
T1 (bottone 3) Elevator trim giù
T2 (bottone 4) Elevator trim su
T3 (bottone 5) Ritrae i ap in modo incrementale
T4 (bottone 6) Estende i ap in modo incrementale
T5 (bottone 7) Mostra/nascondi la Knee board
T6 (bottone 8) Carrello su/giù
Bottone 2 Viste (ciclico)
POV Vista Panoramica
Altri Controlli Switch di cambio
modalità
Cambia modalità quando si usa il
Software di programmazione Saitek
Smart Technology
Bottoni Clock Funzione Commutazione orologio/cronometro
Start/Stop Start/stop cronometro
Reset Azzera cronometro

ITALIANO
51
PANORAMICA DELLE FUNZIONI

52
CONTROLLI DEL QUADRANT E FUNZIONI CORRISPONDENTI NEL FLIGHT SIMULATOR MICROSOFT
Funzione Funzioni di default in FS9 e FSX
Assi del
Quadrant
asse Z Throttle
asse Rx Flap
asse Ry Spoiler
Bottoni assi bottone Z Assegnabile nel gioco
bottone Rx Assegnabile nel gioco
bottone Ry Assegnabile nel gioco
Toggle Switch T1 (bottone 15) Assegnabile nel gioco
T2 (bottone 16) Assegnabile nel gioco
T3 (bottone 17) Assegnabile nel gioco
T4 (bottone 18) Assegnabile nel gioco
T5 (bottone 19) Assegnabile nel gioco
T6 (bottone 20) Assegnabile nel gioco
COME ASSEGNARE ALLA CLOCHE PRO FLIGHT YOKE I CONTROLLI DELLE FUNZIONI DI FLIGHT SIMULATOR
Se volete modicare i controlli o impostare bottoni addizionali non assegnati automaticamente
da Flight Simulator, dovete usare le nestre Assegnazioni (Flight Simulator 2004) o Controlli
(Flight Simulator X) del gioco, a cui si accede dal menu
Impostazioni nel gioco. Quando accedete alle schermate Assegnazioni/Controlli nel Flight Simu-
lator, assicuratevi che la cloche Saitek Pro Flight Yoke sia selezionata nell’opzione Joystick Type.
Se volete ri-assegnare i bottoni del controller, dovete prima selezionare la linguetta Buttons/Keys
in cima alla nestra.
Se volete ri-assegnare un asse del vostro controller, (sulla cloche o sulle leve del throttle-
quadrant) dovete selezionare Assi del Joystick (Flight Simulator 2004) o Controllo Assi (Flight
Simulator X) in cima alla nestra. Dopo averlo fatto, è sufciente trovare il comando che volete

ITALIANO
53
assegnare al vostro controller nella lista dei comandi, fare click su di esso e poi fare click sul
bottone Change Assignment. Apparirà una nestra che chiede di muovere la parte del vostro
controller che volete assegnare a quel comando - premete/muovete il bottone o l’asse che volete
assegnare a quel comando e poi fate click su OK.
Consiglio: può capitare che quando assegnate le leve del quadrant a un comando, sembra che
non funzionino quando le provate nel gioco. Se questo accade, dovete guardare nello schermo
Sensibilità (Flight Simulator 2004) o la linguetta Calibrazione della schermata Controlli del gioco
(Flight Simulator X), selezionate il comando dell’asse nella lista e assicuratevi che la sensibilità
impostata non sia troppo bassa (posizionare il controllo del cursore della sensibilità orizzontale
al 70% circa).
PROGRAMMAZIONE DELLA PERIFERICA DI GIOCO SAITEK CON IL SOFTWARE DI PROGRAMMAZIONE
SAITEK SMART TECHNOLOGY
Presentazione del software di programmazione Saitek ST
Saitek ST Programming Software è il software fornito da Saitek per congurare la periferica
di gioco Saitek per una migliore funzionalità. L’ST fornisce un potente gruppo di funzionalità
e consente la programmazione della periferica di gioco con la congurazione migliore per la
totale interazione. Nonostante un livello di sosticatezza mai visto prima sul mercato e grazie alla
presenza della Saitek ST all’interno, il software è semplice e intuitivo da usare.
Per una guida completa sulla programmazione della periferica Saitek, visitate il sito web Saitek a
www.saitek.com.
Funzionalità del software di programmazione ST
• Rapida e facile congurazione in qualsiasi gioco
• Personalizzazione delle congurazioni della periferica per i vostri giochi preferiti
• Congurazione della periferica con un modello e un’interfaccia tridimensionale sullo schermo
• Opzione di congurazione multipla per ciascuna periferica - ideale se una periferica è
utilizzata da diverse persone
• Mosse speciali di programmazione con funzionalità sosticate per la determinazione dei
tempi
• Congurazioni speciali di gioco disponibili come ‘Proli’ dal sito web Saitek
• Scaricamento della versione più recente del software Saitek Smart Technology dal sito web
Saitek
54
Denizione di un prolo
Un Prolo è una congurazione personalizzata per un gioco migliore - comprendente un gruppo
di comandi preassegnati ai pulsanti o agli assi della periferica di gioco. Il Product Companion
Disk fornito con questa periferica e il sito Web di Saitek - www.saitek.com contengono oltre 200
proli predeniti. (Visitare il sito Web per avere proli nuovi o migliorati, che vengono aggiunti
regolarmente).
Come programmo la mia periferica di gioco?
Quando conosci tutte le parti della tua periferica di gioco, puoi iniziare a creare i tuoi proli
personalizzati con il software di programmazione Saitek ST. Questo software è dotato di capacità
di programmazione virtualmente illimitate e ti consente di personalizzare la periferica secondo le
tue esigenze di gioco precise. Il Prole Editor ti consente di programmare i pulsanti sul joystick
per eseguire diverse azioni con i tuoi giochi - ciò è particolarmente utile se il tuo gioco non è
dotato di schermata incorporata che ti permette di ricongurare i pulsanti.
Istruzioni iniziali
1. Fate click con il pulsante destro sull’icona del vostro controller vicina all’orologio e poi fate
click con il pulsante sinistro su Prole Editor.
2. In Editor Proli, scegliere il comando a cui si desidera assegnare un comando della
tastiera, facendo clic con il pulsante sinistro sulla cella di controllo nell’elenco di controllo
sulla destra dello schermo.
3. Mentre il cursore lampeggia, battete i comandi sulla tastiera e poi fate click sulla
casella verde. L’editor vi chiede di attribuire un nome al commando; battete un nome ap-
propriate (per es, Sparo arma) e premete il tasto Invio sulla tastiera.
4. Ripetete questa procedura per tutti i bottoni che volete programmare e poi fate click
sull’icona blu con il disco (Save) nella parte superiore della nestra.
5. Assegnare un nome al prolo (consigliamo di chiamarlo con il nome del gioco per cui il
prolo è inteso) e fare poi clic su Salva.
6. Per abilitare il prolo, fare clic sull’icona Prolo Adesso nella parte superiore dell’Editor Proli
(ha l’aspetto di un cursore a croce nero-giallo) o fare clic con il pulsante destro sull’icona
della periferica nella barra degli strumenti e selezionare il nome del prolo dall’elenco a
comparsa delle opzioni.
7. Quando un prolo viene caricato, dietro l’icona della periferica nella barra degli strumenti
c’è un quadrato verde che indica che il caricamento di prolo è attualmente in corso. Per
scaricare un prolo fare semplicemente clic con il pulsante destro sull’icona della periferica e
fare clic su Cancella Prolo dall’elenco a comparsa delle opzioni.

ITALIANO
55
Per ulteriore assistenza dettagliata sull’utilizzo del software di programmazione ST, fare clic
sull’Help (Guida) sopra il Prole Editor, quindi Manual (Manuale).
GARANZIA LIMITATA DI 2 ANNI
Mad Catz garantisce che questo prodotto è privo di difetti di materiale e lavorazione per il
periodo della garanzia. Questa garanzia limitata di due (2) anni, non trasferibile, è concessa
solo al primo acquirente e utente nale. Se si rileva un difetto coperto da questa garanzia E si
fornisce una prova di acquisto, Mad Catz, a sua discrezione, riparerà o sostituirà il prodotto
gratuitamente.
La garanzia limitata di due (2) anni è disponibile per clienti in Nord America ed Europa. Mad
Catz garantisce solo ed esclusivamente la riparazione o la sostituzione del prodotto. In nessun
caso, la responsabilità di Mad Catz sarà superiore al prezzo di acquisto originale del prodotto.
Questa garanzia non viene applicata nei seguenti casi: (a) normale usura o uso non corretto; (b)
uso industriale, professionale o commerciale; (c) se il prodotto è stato manomesso o modicato.
NORD AMERICA ED EUROPA
Per ricevere assistenza in garanzia, occorre:
Ottenere un numero di autorizzazione per la restituzione dal Centro di assistenza tecnica Mad
Catz in UNO dei seguenti modi:
a. Inviando un ticket all’indirizzo http://support.madcatz.com
b. Contattando il Centro di assistenza tecnica di Mad Catz più vicino:
- Regno Unito: 01633 928072
- Europa (eccetto Regno Unito): +44(0) 1633 883110
- Francia: 01 82 88 01 80
- Germania: 089-21094818
- Spagna: 93 181 63 94
- Nord America: 1-800-659-2287 (USA) o 1-619-683-2815 (al di fuori degli USA)
Una volta ottenuto il numero di autorizzazione per la restituzione, effettuare quanto segue:
1. Inviare il prodotto a Mad Catz a proprie spese per l’assistenza.
2. Allegare una copia dello scontrino scale originale indicante la data d’acquisto.
3. Fornire un indirizzo completo per la restituzione indicante il numero di telefono diurno e
serale.

56
ASSISTENZA TECNICA
Assistenza online: http://support.madcatz.com
Numero di telefono Regno Unito, dal lunedì al venerdì (esclusi giorni festivi):
01633 928072.
Numero di telefono Europa (eccetto Regno Unito), dal lunedì al venerdì (esclusi giorni festivi):
+44(0) 1633 883110.
ATTENZIONE
- Non usare per altri scopi se non quelli previsti.
- Non esporre il prodotto a pioggia o umidità, per evitare incendi e scosse elettriche. Tenere a
una distanza minima di 10 m dall’acqua (piscine, vasche e lavelli).
- Non smontare per evitare scosse elettriche. Eventuali riparazioni vanno eseguite da personale
qualicato.
- Non inserire nel prodotto oggetti, se non quelli previsti, per evitare che raggiungano punti
con tensioni pericolose o che causino un cortocircuito con conseguenti scosse elettriche e
incendio.
- In caso di stanchezza, pesantezza o dolore alle mani e/o alle braccia durante l’utilizzo del
videogioco, sospendere immediatamente l’uso. Se tali condizioni persistono, consultare un
medico.
- Far funzionare l’unità esclusivamente con le mani. Non portarla a contatto con altre parti del
corpo (testa, viso o altro).
- Evitare un uso prolungato dell’unità. Fare una pausa ogni 30 minuti.
- Disporre i cavi in modo tale da non calpestarli o inciamparvi. Accertarsi che i cavi siano
disposti in una posizione o in un’area dove non sia possibile pizzicarli o danneggiarli.
- Non avvolgere i cavi attorno ad aree del corpo.
- Tenere i cavi lontani dalla portata dei bambini.
- Questo prodotto contiene pezzi minuscoli che, se ingeriti, possono causare soffocamento.
Non adatto ai bambini sotto i 3 anni.
DICHIARAZIONE DI CONFORMITÀ CE:
Come richiesto, alcuni prodotto sono stati sottoposti a test e resi conformi ai requisiti delle
Direttive dell’Unione Europea 2002/95/EC, 2002/96/EC, e 2004/108/EC. Il rmatario autorizzato
dal produttore è Mad Catz, Inc., 10680 Treena Street, Suite 500, San Diego, CA 92131.

ESPAÑOL
57
PRIMEROS PASOS : YOKE

58
PRIMEROS PASOS : QUADRANT

ESPAÑOL
59
INTRODUCCIÓN
Enhorabuena por comprar el Sistema Yoke Pro Vuelo de Saitek. El Yoke Pro Vuelo se
caracteriza por sus controles realistas congurables para todos los software de simulación de
vuelo importantes lo que le proporcionará experiencias de vuelo más realistas.
CARACTERÍSTICAS:
• Interruptor de control en 8 direcciones sombrero “punto de vista”
• Interruptor de control multifunción bidireccional
• Botones de única función
• Interruptor de modo 3 posiciones
• Cronómetro
COMO INSTALAR EL YUGO DE VUELO Y EL CUADRANTE DE
ACELERACIÓN
Primero je el Yugo de Vuelo a su mesa o escritorio
insertando las clavijas de la abrazadera de jación en los
agujeros de la base del Yugo y después apretando el
mecanismo de atornillado hasta que el yugo esté rmemente
agarrado (tenga cuidado de no apretar demasiado el tornillo ya
que podría dañar la abrazadera.) Después atornille la placa base al Cuadrante de
Aceleración utilizando los cuatro tornillos proporcionados. Puede atornillar la base a uno de
los dos lados del cuadrante dependiendo de como desee montar el Cuadrante - bien enfrente
y debajo de la mesa o encima de ella. Por favor tome nota de que sea cual sea la manera
en la que elija montar el cuadrante, se tiene que asegurar de que al mirar la unidad los
conmutadores basculantes se encuentran abajo.
Ahora apriete el mecanismo de atornillado de la abrazadera de sujeción
de la unidad de aceleración hasta que esté rmemente agarrada a la
mesa. También puede posicionar el cuadrante de aceleración a
la izquierda o a la derecha del yugo de vuelo.
Ahora conecte el Cuadrante de Aceleración a la parte de atrás del yugo
de vuelo utilizando el conector proporcionado de estilo PS/2.
Utilice el concentrador o equipo de redes de USB integrado situado a un lado del Yugo de
60
Pro Vuelo para conectar de formar fácil otros elementos de la gamade productos de Saitek
Pro Flight como el Cuadrante de Aceleración Pro Vuelo, losPedales de Timón de dirección
Pro Vuelo u otros periféricos.
INSTALACIÓN PARA WINDOWS® 8, 8.1, 7, Y VISTA. INCLUYE TANTO LAS VERSIONES DE 32 COMO DE
64 BITS
¡IMPORTANTE! INSTALA LOS DRIVERS ANTES DE INSTALAR EL SOFTWARE
INSTALACIÓN DE DRIVERS
1. Visita Saitek.com para descargar los últimos drivers y el software para tu sistema opera-
tivo.
2. Con el dispositivo desconectado, sigue las instrucciones de la pantalla para completar la
instalación.
3. En la pantalla Instalación de drivers, únicamente cuando te lo solicite, introduce el cable
USB en uno de los puertos USB de tu ordenador y a continuación haz clic en Siguiente.
4. En la pantalla de Instalación de drivers, haz clic en Siguiente para probar el controlador.
5. Cuando aparezca la pantalla del Controlador Saitek, prueba los controles para vericar el
funcionamiento del dispositivo. Tras realizar la prueba, haz clic en OK.
INSTALACIÓN DEL SOFTWARE
1. En la pantalla Instalación del software, haz clic en Siguiente y un cuadro emergente te
preguntará si “deseas conar en el software de Saitek.” Haz clic en sí, y a continuación
en Siguiente.
2. Tras la instalación, puedes Ejecutar el editor de perles, que te mostrará el entorno de
programación. Para saltarte ahora el Editor de perles, desactiva la casilla y haz clic en
Finalizar para completar la instalación.

ESPAÑOL
61
INFORMACÍON IMPORTANTE
Una breve explicacíon sobre las actualizaciones de controladores
De tiempo en tiempo podría haber actualizaciones de controladore s y software de
programación de este producto.
Puede comprobar si hay actualizaciones visitando el sitio web de Saitek y haciendo clic en
Descargas. Aparecerá una ventana desplegable. Seleccione Controladores y software.
COMO CONFIGURAR SU YUGO DE PRO VUELO DE SAITEK Y SU CUADRANTE DE ACELERACIÓN PARA
EL SIMULADOR DE VUELO 9 Y FSX DE MICROSOFT
Los botones, controles y ejes del Sistema de Yugo Pro Vuelo de Saitek se corresponden con
las funciones habitualmente utilizadas en Microsoft FS9 y FSX según los siguientes cuadros.
Como con cualquier software, si desea cambiar la función de un botón o de un control, tendrá
que cambiar las conguraciones del software del juego.

62
VISIÓN GENERAL DE LAS FUNCIONES

ESPAÑOL
63
CONTROLES DE YUGO DE VUELO Y FUNCIONES CORRESPONDIENTES EN EL SIMULADOR DE VUELO DE
MICROSOFT
Función Función por defecto en FS9 y FSX
Eje de Yugo eje X Alerones
eje Y Elevador
Botones
principales
Botón 1 Frenos (emplear / soltar)
T1 (botón 3) Ajustar elevador hacia abajo
T2 (botón 4) Ajustar elevador hacia arriba
T3 (botón 5) Flaperones se repliegan progresivamente
T4 (botón 6) Flaperones se extienden progresivamente
T5 (botón 7) Visualizar / esconder tablero de rodillas
T6 (botón 8) Mecanismo de aterrizaje hacia arriba / abajo
Botón 2 Vistas (ciclo)
POV Vista panorámica
Otros Controles Interruptor modo El Modo cambia cuando se utiliza el Software
de Programación de Saitek, ST (ST)
Botones de Reloj Función Cambio de reloj / cronómetro
Iniciar / Detener Cronómetro inicio / detener
Reiniciación Reiniciar el cronómetro
64
VISIÓN GENERAL DE LAS FUNCIONES

ESPAÑOL
65
CONTROLES DE CUADRANTE Y FUNCIONES CORRESPONDIENTES EN EL SIMULADORDE VUELO DE
MICROSOFT
Función Función por Defecto en FS9 y
FSX
Eje de Cuadrante eje Z Acelerador
eje Rx Flaperones
eje Ry Deector
Botones de eje botón Z Asignable durante el juego
botón Rx Asignable durante el juego
botón Ry Asignable durante el juego
Interruptor de
Palanca
T1 (botón 15) Asignable durante el juego
T2 (botón 16) Asignable durante el juego
T3 (botón 17) Asignable durante el juego
T4 (botón 18) Asignable durante el juego
T5 (botón 19) Asignable durante el juego
T6 (botón 20) Asignable durante el juego
COMO SE PUEDEN ASIGNAR LOS CONTROLES DE YUGO PRO VUELO A LAS FUNCIONES
DELSIMULADOR DE VUELO
Si desea cambiar los controles o congurar los botones adicionales no asignados
automáticamente por el Simulador de Vuelo, entonces tendrá que utilizar la pantalla de
Asignaciones (Simulador de Vuelo 2004) o de Controles (Simulador de Vuelo X) dentro del
juego. Se puede acceder a esta pantalla desde el menú de Conguración dentro del juego.
Cuando acceda a la pantalla de Asignaciones / Controles en el Simulador de Vuelo,
asegúrese que se ha seleccionado el Yugo de Pro Vuelo de Saitek en la opción etiquetada
Tipo de Palanca de Juego.
66
Si desea reasignar cualquiera de los botones de su controlador, debe seleccionar primero el
tabulador Botones / Teclas en la parte de arriba de la ventana.
Si desea reasignar cualquiera de los ejes de su controlador, (el yugo mismo o las palancas
en el cuadrante de aceleración) debe seleccionar Ejes de Palanca de Juego (Simulador de
Vuelo 2004) o Ejes de Control (Simulador de Vuelo X) en la parte de arriba de la ventana.
Una vez que lo haya hecho, simplemente encuentre en la lista de comandos el comando que
desea asignar a su controlador, púlselo y después pulse el botón
Cambiar Asignación. Aparecerá una ventana pidiéndole que mueva la parte de su controlador
que quiere asignar a ese comando- presione / mueva el botón / eje que quiere asignar a ese
comando y después pulse OK.
Sugerencia: Puede que note que al asignar las palancas en el cuadrante a un comando,
no parece que funcionen cuando las prueba durante el juego. Si ocurre eso, entonces
debe mirar en la pantalla de Sensibilidades (Simulador de Vuelo 2004) o en el tabulador de
Calibración de la pantalla de Controles (Simulador de Vuelo X) del juego y seleccionar el co-
mando de eje de la lista que encontrará allí y asegúrese que la Sensibilidad no es demasiado
baja (ajuste el control deslizante horizontal de sensibilidad a aproximadamente el 70%.)
PROGRAMACIÓN DE SU CONTROLADOR SAITEK FORCE CON EL SOFTWARE DE PROGRAMACIÓN
SAITEK ST
Introducción del software de programación Saitek ST
El software de programación Saitek ST (ST) es el software que proporciona Saitek para
congurar su controlador Saitek para una funcionalidad mejorada. ST ofrece un potente
conjunto de prestaciones, permitiéndole programar su dispositivo con la conguración más
avanzada para una interacción total. A pesar del nivel de sosticación, nunca antes visto en
el mercado, gracias a la Saitek ST incorporada el software permanece sencillo de utilizar e
intuitivo. Para una guía completa de cómo programar el controlador de Saitek, visite el sitio
web de Saitek www.saitek.com.
Prestaciones del software de programación ST:
• Conguración rápida y sencilla con cualquier juego

ESPAÑOL
67
• Personalización de los valores del controlador para sus juegos favoritos
• Conguración del controlador con un modelo e interfaz tridimensional en pantalla
• Opción de conguración múltiple para cada controlador: idóneo en los casos en que varias
personas utilicen el mismo controlador
• Conguración de movimientos especiales con prestaciones de sincronización sosticadas
• Disponibles conguraciones de juego especiales en forma de “perles” en el sitio web de
Saitek
• Descarga de la última versión del software Saitek ST desde el sitio web de Saitek
¿Qué es un Perl?
Un Perl es una conguración especíca para un mejor juego, que consiste en un conjunto
de comandos preasignados a los botones o ejes del controlador. El disco que acompaña al
producto o el sitio de web de Saitek (www.saitek.com) incluyen más de doscientos perles
preestablecidos. Si requiere perles nuevos o mejorados, sírvase consultar el sitio de web,
que se actualiza periódicamente.
¿Cómo programo el controlador?
Una vez que se familiarice con su controlador de juegos puede comenzar a crear sus
propios perles personales con el software de programación Saitek ST. Este software
tiene capacidades de programación prácticamente ilimitadas y le permite personalizar el
controlador para ajustarlo a sus necesidades de juego exactas.
El Editor de perles le permite programar los botones de su palanca de mando para
que ejecuten diferentes acciones en sus juegos: esto resulta especialmente útil si el
juego que se está utilizando no tiene pantalla propia que permita recongurar los
botones.
Puesta en marcha
1. Presione con el botón derecho el icono para el controlador al lado de su reloj y después
presione con el botón izquierdo Prole Editor (Editor de Perl).
2. En el Editor de perles elija el control al que desea asignar un comando de teclado. Esto
se hace haciendo clic con el botón izquierdo en la celda del control de la lista de controles
de la parte derecha de la pantalla.
68
3. Con el cursor destellando, teclee los comandos y después haga clic en la marca verde.
Después el editor le pedirá nombrar el comando y, por tanto, escriba el nombre adecuado
(p.ej. Fire Weapon (Arma de Fuego)) y después presione la tecla Volver de su teclado.
4. Repita este procedimiento para todos los botones que desee programar y después haga
clic en el icono del disco azul (Save) (Guardar) en la parte de arriba de la ventana.
5. Dé un nombre al perl (se recomienda llamarlo con el nombre del juego para el que se
hace el perl) y luego haga clic en Guardar.
6. Para activar el perl haga clic en el icono Perl ahora de la parte superior del Editor de
perles (tiene el aspecto de una cruz negra y amarilla) o haga clic con el botón derecho
en el icono del controlador de la barra de tareas y seleccione el nombre del perl en la
lista emergente de opciones.
7. Observará que cuando se carga un perl el icono del controlador de la barra de tareas
tiene un cuadrado verde detrás del mismo, lo que indica que actualmente hay un perl
cargado. Si desea descargar un perl sólo tiene que hacer clic con el botón derecho en el
icono del controlador y hacer clic en Despejar perl en la lista emergente de opciones.
Si requiere una asistencia más detallada sobre cómo usar el software de programación ST,
haga clic en Ayuda en la parte superior del Editor de perles y luego en Manual.
GARANTÍA LIMITADA DE 2 AÑOS
Mad Catz garantiza que este producto estará libre de defectos en materiales y mano de
obra durante la vigencia de la garantía. Se extiende esta garantía limitada de dos (2) años
exclusivamente a usted, el comprador original, y no podrá traspasarse a otra persona. Si se
presenta algún defecto cubierto por esta garantía Y presenta comprobante de compra, Mad
Catz, a su criterio, reparará o repondrá el producto sin cargo alguno.
La garantía limitada de dos (2) años de Mad Catz sólo se aplica a los compradores de
Norteamérica y Europa. El único remedio que se ofrece es la reparación o reposición del
producto de Mad Catz. La responsabilidad de Mad Catz en ningún caso excederá el precio
de compra original del producto. Esta garantía no corresponderá a: (a) desgaste normal o
mal uso del producto; (b) productos empleados para nes industriales, profesionales o
comerciales; (c) productos alterados o modicados.

ESPAÑOL
69
NORTEAMÉRICA Y EUROPA
Para solicitar servicio al amparo de la garantía:
1. Obtén un número de autorización asignado por el Soporte Técnico de Mad Catz
siguiendo UNO de los siguientes métodos:
a. Enviar un ticket de soporte en http://support.madcatz.com
b. Llamar al centro de Soporte Técnico de Mad Catz más cercano:
- Norteamérica: +1-800-659-2287 (EE.UU.) o +1-619-683-2815 (fuera de los EE.UU.)
- Reino Unido: 01633 928072
- Europa (fuera del Reino Unido): +44(0) 1633 883110
- Francia: 01 82 88 01 80
- Alemania: 089-21094818
- España: 93 181 63 94
Una vez se te asigne un número de autorización, haz lo siguiente:
1. Envíe el producto a Mad Catz porte pagado.
2. Adjunte copia del comprobante de compra original en el que gura la fecha de compra.
3. Adjunte la dirección completa a la cual debamos enviarle el producto, así como los
números telefónicos donde podremos comunicarnos con usted durante el día y primeras
horas de la noche.
APOYO TÉCNICO
Apoyo en línea: http://support.madcatz.com
Teléfono Norteamérica: de lunes a viernes (con excepción de los días festivos en EE.UU.),
+1-800-659-2287 (sólo desde EE.UU.) o +1-619-683-2815 (desde otros países).
Teléfono España: de lunes a viernes (con excepción de los días festivos), 93 181 63 94.
Teléfono Reino Unido: de lunes a viernes (con excepción de los días festivos),
01633 928072.
Teléfono Europa (fuera del Reino Unido): de lunes a viernes (con excepción de los días
festivos), +44(0) 1633 883110.

70
PRECAUCIONES
- Use este equipo únicamente del modo previsto.
- Para evitar riesgo de incendio o de descarga eléctrica, no exponga este equipo a la lluvia
ni a la humedad. No lo utilice a menos de 9 metros de depósitos de agua como piscinas,
bañeras o fregaderos.
- Para evitar descargar eléctricas, no desmonte el equipo. Encargue las reparaciones
únicamente a técnicos cualicados.
- Nunca introduzca en el producto objetos de ningún tipo distintos de los elementos
autorizados, ya que pueden entrar en contacto con puntos de tensión peligrosa o
cortocircuitar piezas que podrían provocar incendios o descargas eléctricas.
- Deje inmediatamente de utilizar este equipo si empieza a sentir cansancio o si
experimenta incomodidad o dolor en las manos y/o brazos mientras utiliza el equipo. Si
persistiesen los síntomas citados, consulte a un médico.
- No intente utilizar la unidad de ningún modo salvo con las manos. Evite situar el equipo
en contacto con la cabeza o la cara o próximo a los huesos de cualquier otra parte del
cuerpo.
- Evite usar este equipo durante largos espacios de tiempo. Haga pausas cada 30 minutos.
- Tienda todos los cables de modo que no sea probable que se pisen o que se tropiece
con ellos. Asegúrese de que los cables no se colocan en posiciones o en zonas donde
puedan resultar oprimidos o dañados.
- No enrolle este cable alrededor de ninguna parte del cuerpo de una persona.
- No permita que los niños jueguen con cables.
- Este producto contiene las piezas pequeñas que pueden causar estrangular si están
tragadas. No previsto para el uso por los niños bajo 3 años de la edad.
DECLARACIÓN DE CONFORMIDAD PARA LA U.E.:
Según lo exigido, ciertos productos de éstos han sido probados y están de conformidad
con los requerimientos de las directivas de la Unión Europea 2002/95/EC, 2002/96/EC,
y 2004/108/EC. El signatario autorizado del fabricante es Mad Catz, Inc., 10680 Treena
Street, Suite 500, San Diego, CA 92131.

71

D70-PZ44
©2016 Mad Catz, Inc. 10680 Treena Street, Suite 500, San Diego, CA 92131 U.S.A. Mad Catz, Saitek, the Pro Flight logo, the Saitek logo and the Mad Catz logo are
trademarks or registered trademarks of Mad Catz Interactive, Inc., its subsidiaries and afliates. The shape and design of this product are a trade dress of Mad Catz Inter-
active, Inc., its subsidiaries and afliates. Microsoft, Windows, and the Windows logos are trademarks of the Microsoft group of companies. This product is not sponsored,
endorsed or approved by Microsoft. All other trademarks or registered trademarks are the property of their respective owners. Made in China. All rights reserved. Product
features, appearance and specications may be subject to change without notice. Please retain this information for future reference.
©2016 Mad Catz Europe, Ltd. 1-2 Shenley Pavilions, Chalkdell Drive. Shenley Wood, Milton Keynes, Buckinghamshire MK5 6LB, Royaume-Uni (UK). Mad Catz, Saitek,
le logo Pro Flight, le logo Saitek et le logo Mad Catz sont des marques de commerce ou des marques déposées de Mad Catz Interactive, Inc., de ses liales et sociétés
afliées. La forme et le design de ce produit sont caractéristiques de la marque Mad Catz Interactive, Inc., de ses liales et sociétés afliées. Microsoft, Windows, et les
logos Windows sont des marques de commerce du groupe Microsoft. Ce produit n’est ni garanti, ni homologué, ni approuvé par Microsoft. Toutes les autres marques ou
marques déposées sont la propriété de leurs propriétaires respectifs. Fabriqué en Chine. Tous droits réservés. L’aspect, les fonctionnalités et les spécications du produit
peuvent changer sans préavis. Veuillez conserver cette notice pour référence ultérieure.
©2016 Mad Catz Europe, Ltd. 1-2 Shenley Pavilions, Chalkdell Drive. Shenley Wood, Milton Keynes, Buckinghamshire MK5 6LB, Reino Unido (UK). Mad Catz, Saitek, el
logotipo de Pro Flight, el logotipo de Saitek y el logotipo de Mad Catz son marcas comerciales o marcas comerciales registradas de Mad Catz Interactive, Inc., sus sub-
sidiarias y aliados. La forma y el diseño de este producto son un vestido comercial de Mad Catz Interactive, Inc., sus subsidiarias y aliados. Microsoft, Windows, y los
logotipos de Windows son marcas comerciales del grupo de empresas de Microsoft. Este producto no está patrocinado, recomendado o no se autorizado por Microsoft.
El resto de nombres y de las imágenes del producto son marcas registradas o marcas registradas de sus dueños respectivos. Fabricado en China. Reservados todos
los derechos. Las características, el aspecto y las especicaciones del producto pueden ser objeto de modicación sin previo aviso. Por favor guarde esta información
para su consulta en el futuro.
