
Linux for Biologists – Part 1
http://cbsu.tc.cornell.edu/lab/doc/Linux_workshop_Part1.pdf
Robert Bukowski
Institute of Biotechnology
Bioinformatics Facility
(aka Computational Biology Service Unit - CBSU)

Why Linux?
Logging in to (and out of) a Linux workstation
Terminal window tricks
Linux directory structure
Working with files and directories
Working with text files
Graphics on Linux, running persistent multiple shells
File transfer between Linux computer and the world
Running applications
Note: this will only cover the Linux aspect of running applications; the
functionality and the biological aspect are covered in other workshops (past
and future) –see http://cbsu.tc.cornell.edu/workshops.aspx
Harnessing the power of multiple processors
Basics of (shell) scripting
Topics (color-coded by session)

Why Linux?
Majority of bioinformatics/computational biology software developed only
for Linux
Most programs are command-line (i.e., launched by entering a command in
a terminal window rather than through GUI)
While various graphical and/or web user interfaces exist (e.g., Galaxy,
CyVerse Discovery Environment, BioHPC Web), but often struggle to provide
level of flexibility needed in cutting-edge research
Versatile scripting and system tools readily available on Linux allow
customization of any analysis
Learning Linux is a good investment

Logging in to a Linux machine
You need:
network name of the Linux machine (e.g.,
cbsumm15.tc.cornell.edu)
an account, i.e., user ID and password valid on the Linux
machine
on your laptop: remote access software (typically: ssh
client, VNC client)
ssh: Secure Shell – provides access to alphanumeric terminal
VNC: Virtual Network Connection - provides access to graphical features (Desktop, GUIs,
File Manager, Firefox, …)

Linux is a multi-access, multi-tasking system: multiple users
may be logged in and run multiple tasks on one machine at
the same time, sharing resources (CPUs, memory, disk space)
This is what is happening during this workshop
After workshop: when using our machines for real work,
you reserve it all for yourself. You can chose to allow a
few other users (collaborators) or not
Our reservation system is not a part of Linux – it is an
add-on we created to better manage access of multiple
users to multiple machines

Logging in from Windows PC
Install remote access software (PuTTy). For details, consult
http://cbsu.tc.cornell.edu/lab/doc/Remote_access.pdf
Use PuTTy to open a terminal window on the reserved workstation
using ssh protocol, configure X11 forwarding (if you intend to run
graphical software)
When connecting for the first time, a window will pop out about “caching server
hostkey” – answer “Yes”. The window will not appear next time around
Adjust colors, if desired
Save the configuration (e.g., under the machine’s name)
while you are typing your password, the terminal will appear frozen – this is on
purpose!
You may open several terminal windows, if needed (in PuTTy – can use
“Duplicate Session” function).

Use native ssh client (already there - no need to install anything)
Launch the Mac’s terminal window and type
ssh -Y bukowski@cbsuwrkstX.tc.cornell.edu
(replace the “cbsuwrkstX” with your reserved workstation, and “bukowski” with
your own user ID). Enter the password when prompted.
When connecting for the first time, a message will appear about “caching server hostkey” –
answer “Yes”. The message will not appear next time around
while you are typing your password, the terminal will appear frozen – this is on purpose!
You may open several terminal windows, if needed, and log in to the workstation
from each of them.
Logging in from Mac (or other Linux box)

Logging out of a Linux machine
While in terminal window, type exit or Ctrl-d - this will close
the current terminal window

How to access BioHPC machines in the
future (after workshop)
Slides from workshop “Introduction to BioHPC Lab”
http://cbsu.tc.cornell.edu/lab/userguide.aspx
BioHPC User’s Guide
http://cbsu.tc.cornell.edu/lab/doc/Introduction_to_BioHPC_Lab_v5.pdf

Logging in to a BioHPC Linux machine
from outside of campus
Users with Cornell NetID:
1. Install VPN client from CIT site
(http://www.it.cornell.edu/services/vpn/howto/index.cfm)
2. Establish a VPN connection (see the CIT site for details)
3. ssh from your laptop to your reserved BioHPC machine as if connecting from
campus
All users (those with NetID can use this procedure as well):
1. ssh from your laptop to cbsulogin.tc.cornell.edu or cbsulogin2.tc.cornell.edu
2. While on cbsulogin (or cbsulogin2), ssh to your reserved BioHPC machine
using the Linux/Mac procedure from previous slides

Interacting with Linux in terminal window
User communicates with Linux machine via commands typed
in the terminal window
Commands are interpreted by a program referred to as shell – an
interface between Linux and the user. We will be using the shell called
bash (another popular shell is tcsh).
Typically, each command is typed in one line and “entered” by hitting
the Enter key on the keyboard.
Commands deal with files and processes, e.g.,
request information (e.g., list user’s files)
launch a simple task (e.g., rename a file)
start an application (e.g., Firefox web browser, BWA aligner, IGV viewer, …)
stop an application
In this part of the workshop we’ll learn mostly about file management
commands

Try a few simple commands:
List files and directories (more about it in a minute):
ls
ls –al
What kind of machine am I on (name, operating system, kernel version, etc.)?
uname –a
Where on disk am I now (i.e., Print Working Directory)?
pwd
Who else is logged in? For how long?
w
who
Use Manual Pages to learn more about each command – see all possible command
options
man ls man uname

These files are text files and can be looked at with any text processing tool (more
about it later)
less OUTERR.log page through the file
(use more to page forward)
cat OUTERR.log print the file on screen
nano OUTERR.log open file in text editor
Screen output from a command may be saved to disk
Each command produces two output streams: standard output (STDOUT) and
standard error (STDERR). Normally, they both are displayed on the screen.
But they can be saved on disk (“redirected”)
Save to separate files (file names are arbitrary) …
who > OUT.log 2> ERR.log
… or save to a single file
who >& OUTERR.log

Useful tricks
(may not work on all ssh or VNC clients…)
Helpful tricks to avoid excessive command typing
Use copy/paste. Any text “mouse-selected” while holding the left mouse
button is copied to clipboard. It may then be pasted, e.g., into a command, by
clicking the right mouse button (PuTTy) or the middle button (when working
through the console in 625 Rhodes).
Use Up/Down arrow keys – this will cycle through recently executed
commands.
Use the TAB key – this will often present you with a list of choices after typing
a part of a command – no need to remember everything.

Useful tricks
Helpful tricks to avoid excessive command typing
history command: list all recently used commands – can copy a desired
command and paste it to execute again, or refer to a command by its index
Examples:
history
(list all remembered commands)
history | less
(list all remembered commands page by page)
history | grep workdir
(list all remembered commands containing string “workdir”)

Files and directory tree
Data and programs are stored in files on disk storage
Each file has a name and directory (a.k.a. folder)
directory – a logical location on disk
(directory, name) pair uniquely specifies the file
a directory may hold files and/or other directories
directories form tree structure

books
beach
nut1
nut2
nut1
Direct squirrel to nut1 (on the right) using commands:
/ get on the main trunk (referred to as root)
some_name/ from where you are, turn into branch “some_name”
../ return to the previous branch (closer to root)
./ stay where you are
Using these, direction from the ground to nut1 will be:
/home/him/shack/nut1
This is called absolute path (starting from the trunk)
Linux
directory
tree
Branches =
directories
leaves, nuts
= files

books
beach
nut1
nut2
nut1
Assume squirrel sitting on home rather than on the ground. We could make
him jump to the ground and use the absolute path. Instead, we can simplify:
him/shack/nut1
This is called relative path (starting from where “we are”)

books
beach
nut1
nut2
nut1
Assume squirrel sitting on shack. We could make him jump to the ground and
use the absolute path. Instead, we can simplify:
nut1 or ./nut1
This is called relative path (starting from where “we are”)
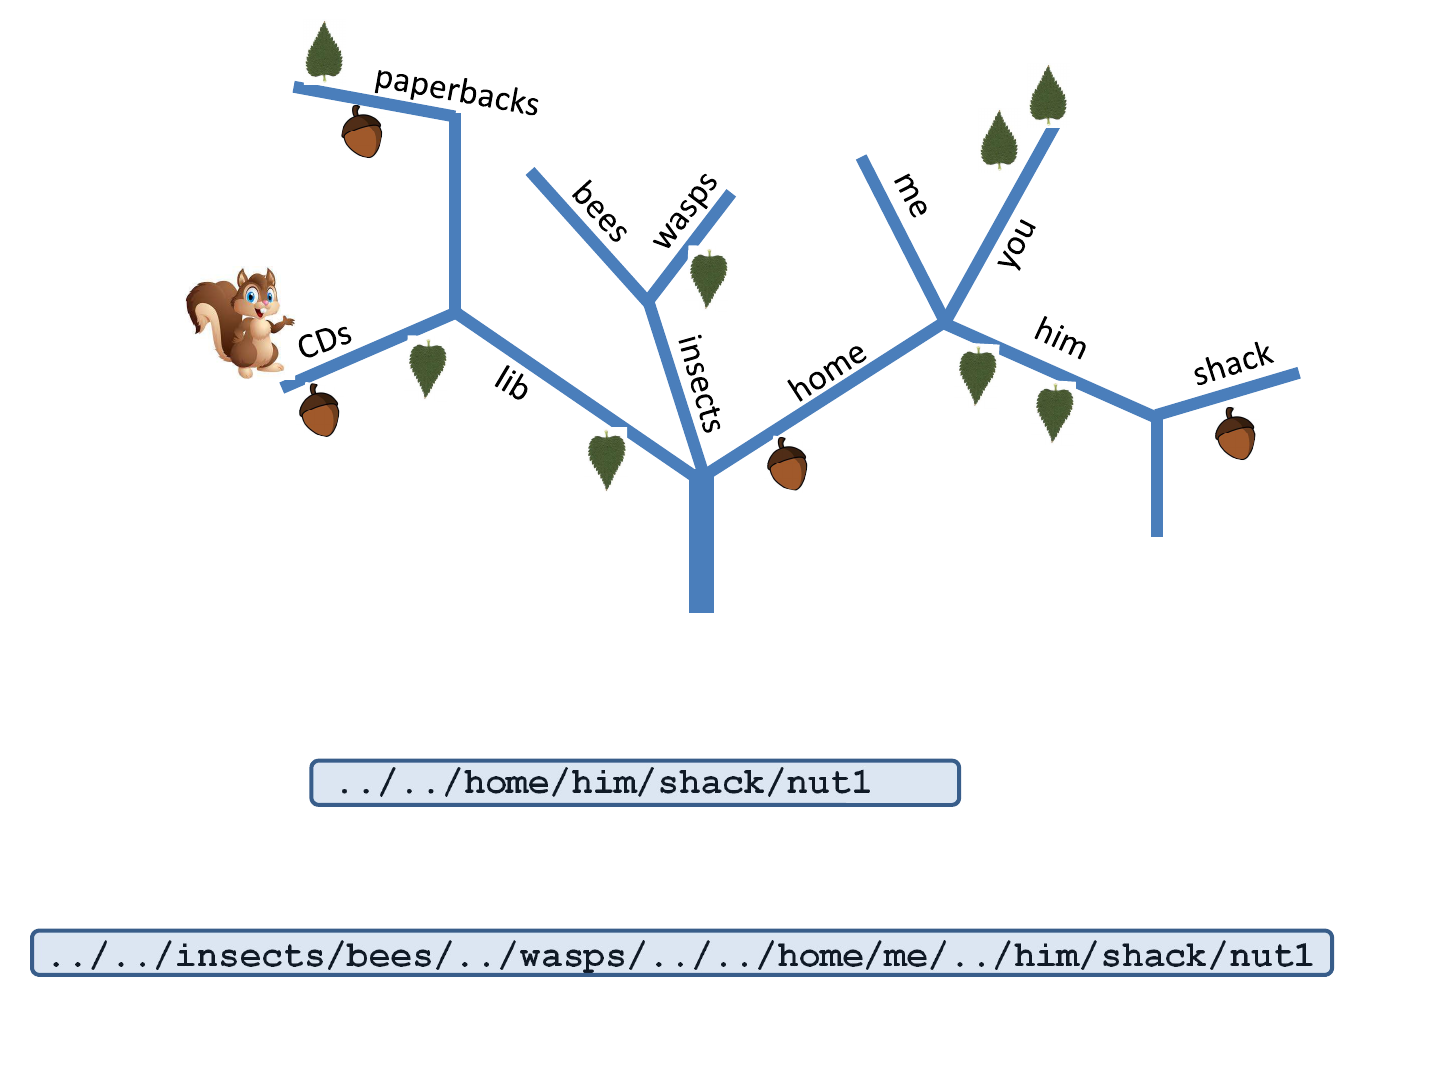
Assume squirrel sitting on CDs. We could make him jump to the ground and use the absolute
path. Instead, we can simplify:
../../home/him/shack/nut1
Another example of relative path. Could also use, for example,
../../insects/bees/../wasps/../../home/me/../him/shack/nut1
Sounds unnecessarily long, but sometimes useful
books
beach
nut1
nut2
nut1

/
bin/
dev/
etc/
home/
bsw27/
bukowski/
454/
Desktop/
GATK_tst/
bin/
ecoli_tst/
igv/
igv.log
perl_test.txt
programs/
schedfile
tst/
tst5/
eee
genes_expr
ooo
test_tophat.bam
test_tophat.sam
transcripts.expr
transcripts.gtf
ttt.pl
tst_toxedo
/
tst_blat/
jarekp/
ponnala/
qisun/
tw337/
yj55/
lib/
media/
opt/
programs/
shared_data
/
tmp/
usr/
var/
workdir/
bukowski/
err
indexes/
ttt.amb
ttt.ann
ttt.bwt
ttt.pac
ttt.rbwt
ttt.Rpac
ttt.rsa
ttt.sa
log
tophat/
ecoli_genome.fa
qisun/
tw337/
directory/
file
Referring to files:
Full path:
/home/bukowski/tst5/transcripts.gtf
Relative path (i.e., relative to
/home/bukowski)
tst5/transcripts.gtf
Relative path (i.e., relative to
/home/bukowski/tst5)
transcripts.gtf
Example of directory tree (more real)
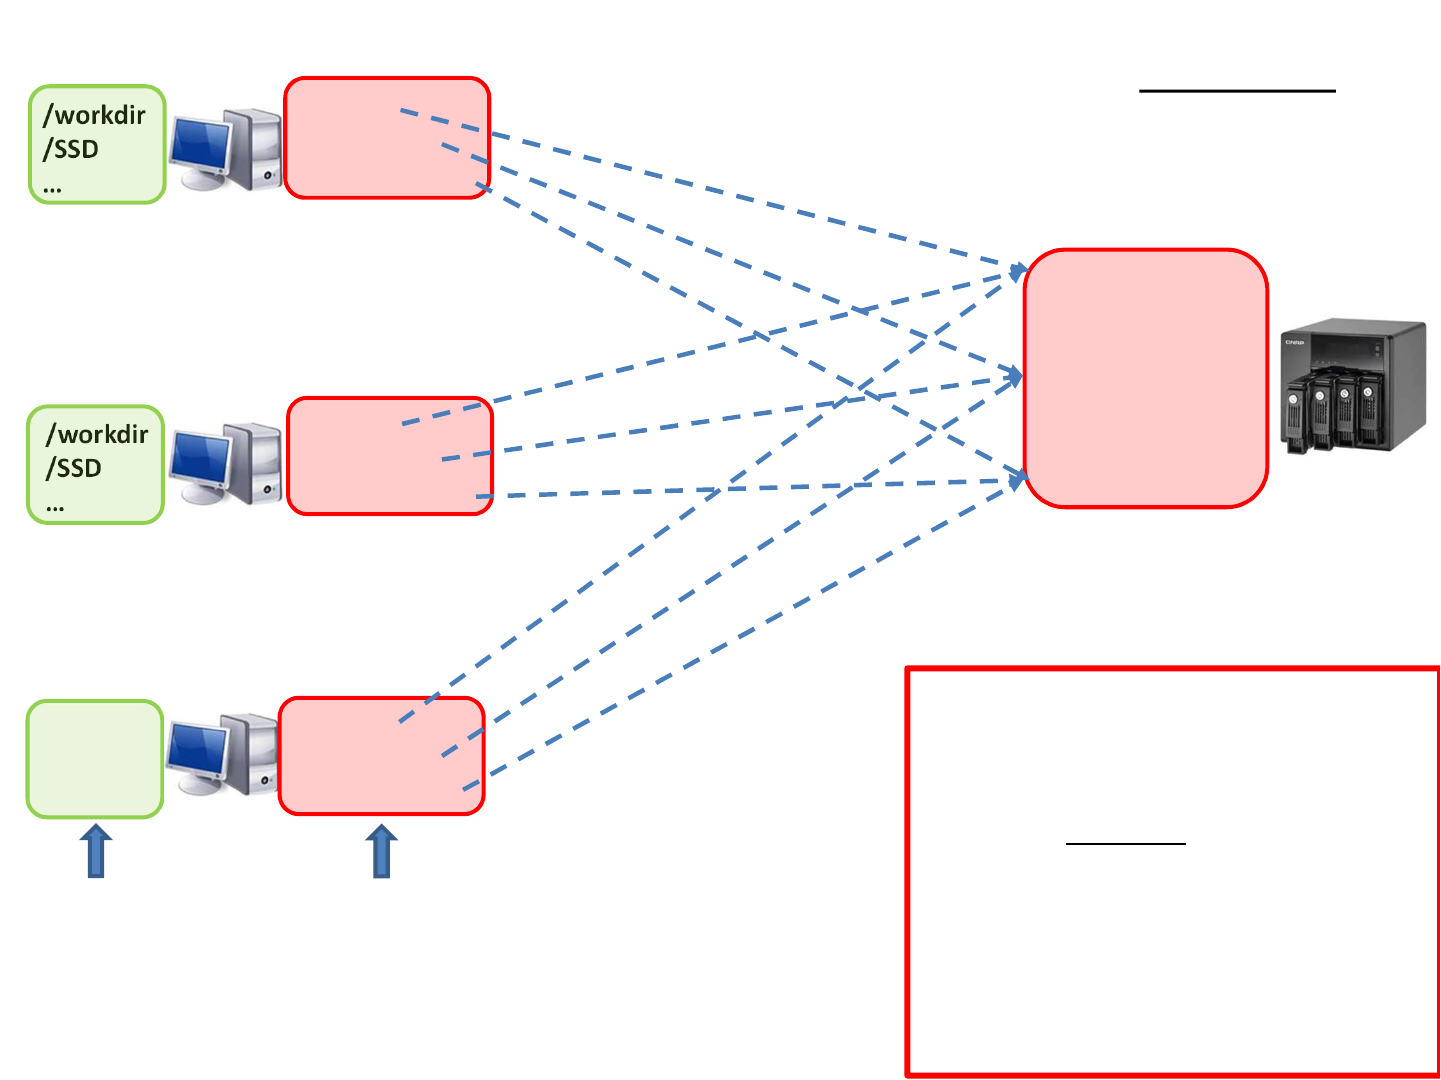
/workdir
/SSD
…
/home
/programs
/shared_data
/home
/programs
/shared_data
/workdir
/SSD
…
/home
/programs
/shared_data
/workdir
/SSD
…
/disk/home
/disk/programs
/disk/shared_data
File server
Network
Local file
systems
(fast, few
users,
temporary)
Storage organization at BioHPC
Network file
systems
(slow, many
users,
permanent)
Never process files located in
network directories!
Instead:
Copy files to /workdir or
/SSD and process them there.
When finished, copy results back
to /home/yourID
1 – 12 TB
700 + 300 TB

Linux directory structure is continuous, i.e. regardless of the
physical location of storage it all seems to be part of one
directory tree starting from root (/).
Not easy to tell which storage is local and which global just by a
name. Remember the setup at BioHPC machines:
Storage
• Networked storage
/home
/shared_data
/programs
• Local storage
/workdir
/SSD
/local_data
Will look different on other machines or centers – always check description!
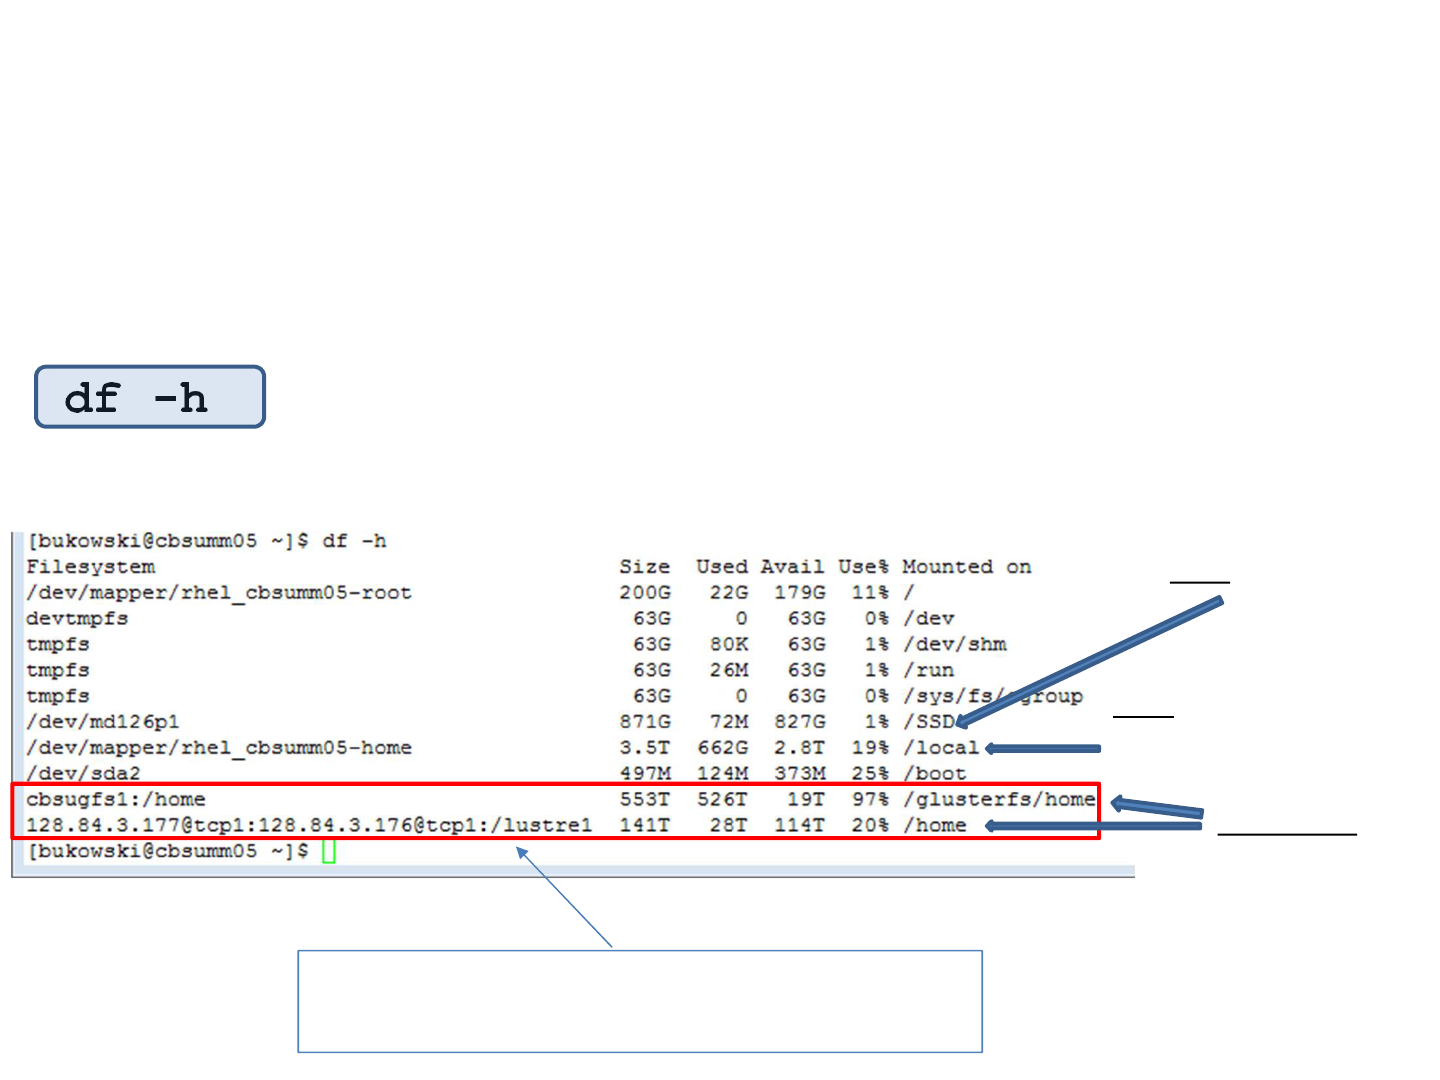
df command provides some insight…
… and also tells how much disk space is available on various file
systems:
df -h
local
/workdir, /local_data
networked
/home
/programs
/shared_data
local
These are network devices – starting with
“computername:/”
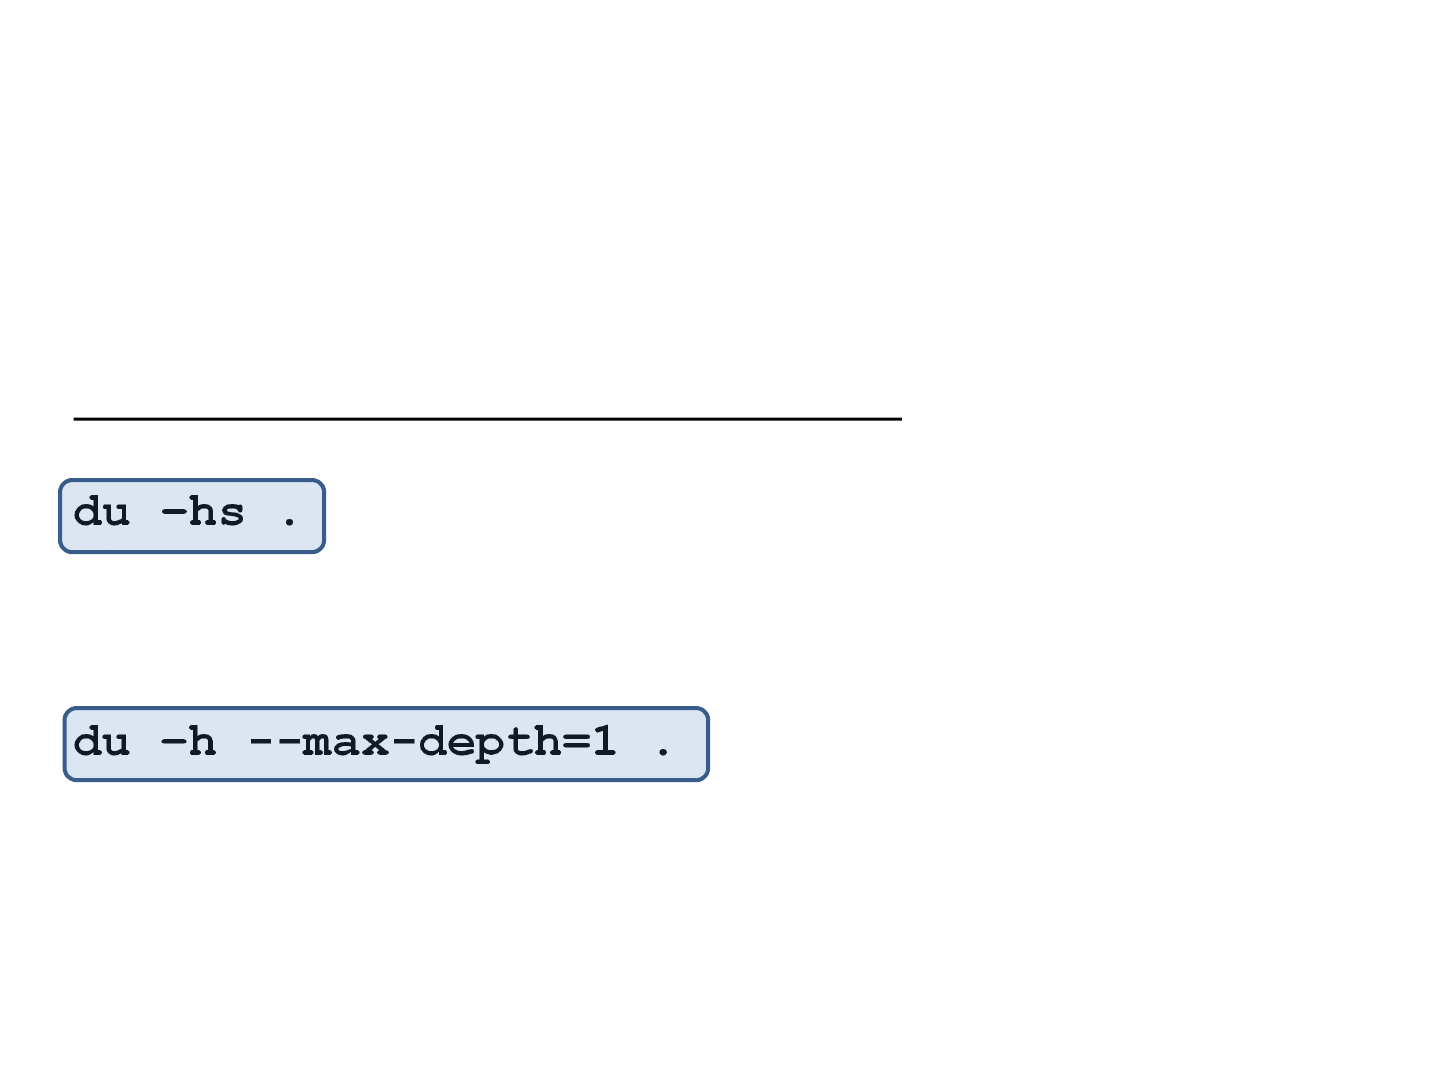
Checking my disk space
How much disk space is taken by my files?
du –hs .
(displays combined size of all files in the current directory (“.”)
and recursively in all its subdirectories)
du –h --max-depth=1 .
(as above, but sizes of each subdirectory are also displayed)
May take some time if you have a lot of small files

Traversing directory tree
Right after logging in or opening a terminal window, “you are” in your home directory (e.g., /home/bukowski).
Where am I?
pwd
(print working directory) – show the current directory; any relative path you specify will be relative to this place
Navigating through directories
cd
Change (current) directory; without additional arguments, this command will take you to your home directory
cd /workdir/bukowski/indexes
Change (current) directory from wherever to /workdir/bukowski/indexes.
cd indexes
Change (current) directory to indexes (will work if the current directory contains “indexes”)
cd ../
Change (current) directory one level back (closer to the root)
cd ../../../
Change (current) directory three levels back (closer to the root)
cd ./
Change (current) directory to the same one (i.e., do nothing). Note: ./ or just . refers to the current directory.

Working with Directories
Creating directories
mkdir /home/bukowski/my_new_dir
Make a new directory called “my_new_dir” in /home/bukowski
mkdir my_new_dir
Make a new directory called “my_new_dir” in the current directory
Removing directories
rmdir /home/bukowski/my_new_dir
Remove directory called “my_new_dir” in /home/bukowski – will fail if the directory is not empty
rm –Rf /home/bukowski/my_new_dir
Remove directory called “my_new_dir” in /home/bukowski with all its content (i.e. all files and
subdirectories will be gone)
rm –Rf my_new_dir
Remove directory called “my_new_dir” in current directory with all its content (i.e. all files and
subdirectories will be gone)

Listing content (files and subdirectories)
of a directory
ls
(list)
ls
List files and directories in current directory (in short) format
ls –al
List all files and directories in current directory in long format
ls –al /home/bukowski/tst
List content of /home/bukowski/tst (which does not have to be the current directory)
ls –alt *.txt
Lists all files and directories with names ending with “.txt” in the current directory, sorted according to
modification time (use ls –altr to sort in reverse)
ls –alS
Lists content of the current directory sorted according to size (use ls –alSr to sort in reverse)
ls –al | less
Lists content of the current directory using pagination – useful if the file list is long (SPACE bar will take you to
the next page, “q” will exit)
LOTS more options for ls – try man ls to see them all (may be intimidating).
pipe
Output from first
command is “piped”
as input to the
second

Listing content of a directory
File
permissions
(“d” means
this is a
directory)
Owner and
group
Size (in bytes) –
meaningful for
files, but not
directories
Last modification time
File name (directories in blue,
executable files in green)
ls -al

Exercise 1
1. Create your temporary directory in the scratch file system /workdir
2. create a subdirectory (of that new directory), called mytmp.
3. Verify the subdirectory mytmp has been created
4. list contents of mytmp
5. remove mytmp

There are many types of files. Here are the most important:
Text files (human-readable; can be viewed and modified using a text
editor)
• Text documents (e.g., README files)
• Data in text format (e.g., FASTA, FASTQ, VCF, …)
• Scripts:
• Shell scripts (usually *.sh or *.csh)
• Perl scripts (usually *.pl)
• Python scripts (usually *.py)
• …
Working with files

Binary files (not human-readable; cannot be viewed using a text editor)
• Executables (e.g., samtools, bwa, bowtie, firefox)
• Data in binary format (e.g, BAM files, index files for BWA or Bowtie,
formatted BLAST databases)
• Compressed files (usually *.gz, *.zip, *.bz2,…, but extensions
not necessary) – often text files re-formatted to save space on disk or
packaged directory trees
Working with files
There are many types of files. Here are the most important:
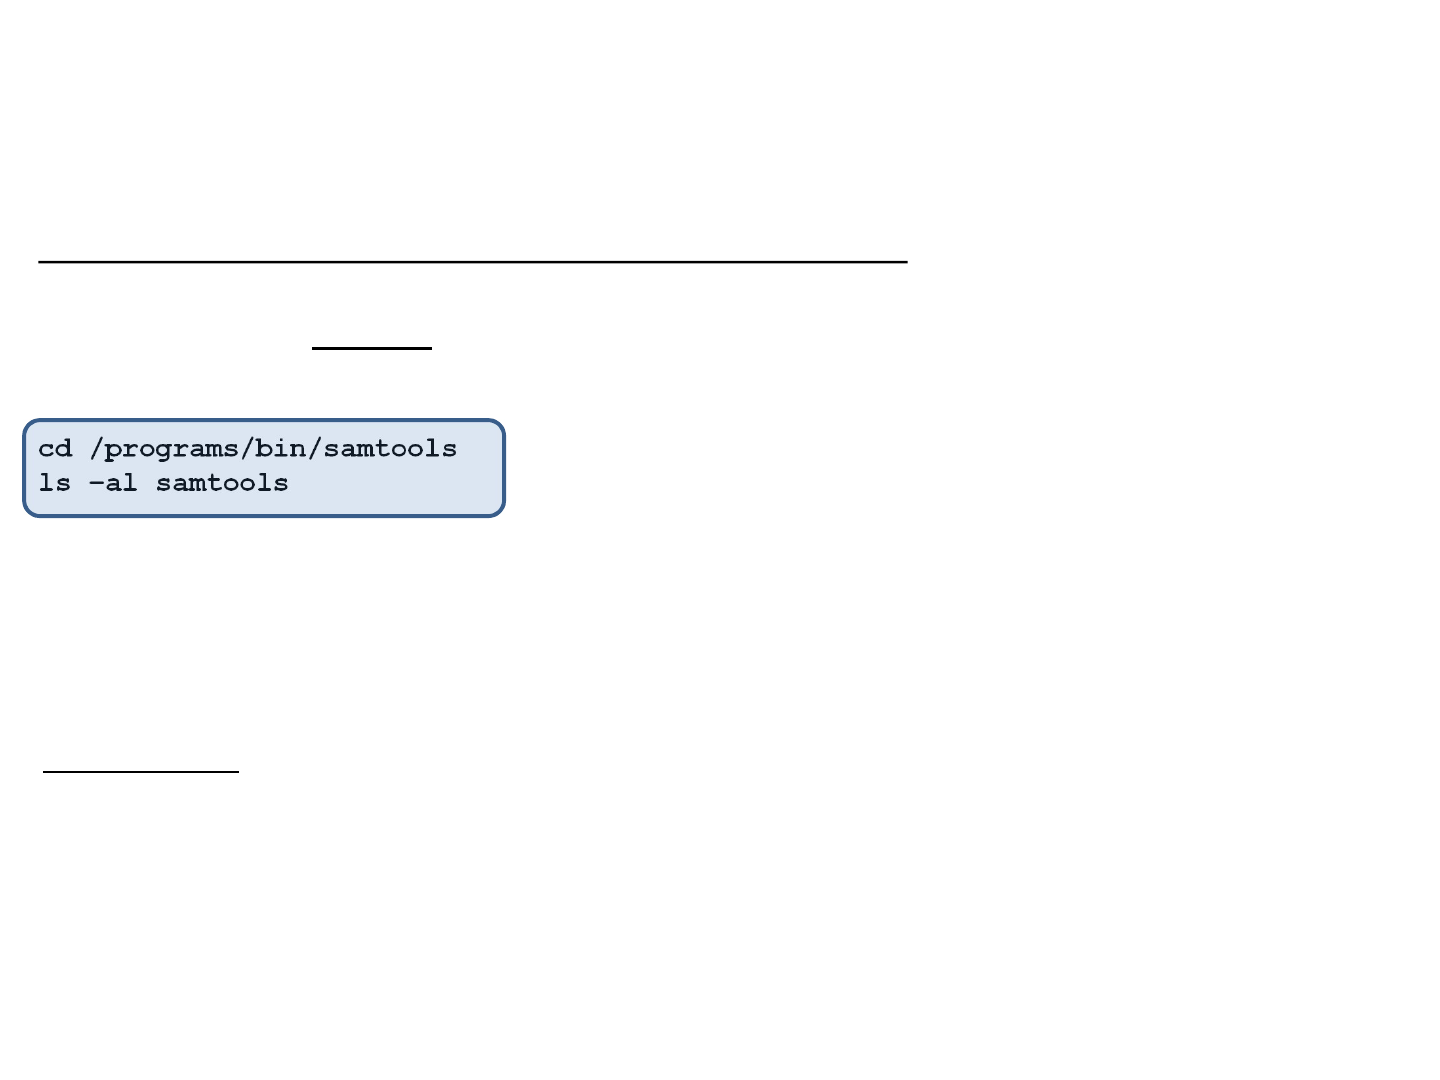
Symbolic links: pointers to other files or directories.
cd /programs/bin/samtools
ls –al samtools
lrwxrwxrwx 1 root root 30 Apr 16 2013 samtools -> ../../samtools-1.2/samtools
Working with files
In the example above, file /programs/bin/samtools/samtools is a
symbolic link to /programs/samtools-1.2/samtools.
Note the “l” character in the first column of output from “ls –al”.

Working with files
Where do files come from?
They are created by various programs, e.g.,
• Text editors
• File compression tools
• Aligners
• Assemblers
• …
• System commands (copy, move, rename, etc.)
• Screen output redirection (>, >&)
• Remote copy tools (scp, sftp, wget, Firefox)
Creating an empty file (zero size):
touch my_file
my_file is empty (so one can’t say if it is a text file or binary file…)

Working with files
File and directory names – best practices
Names are case-sensitive (MyFile, myfile, myFile are all different!)
Use only letters (upper- and lower-case), numbers from 0 to 9, a dot (.),
and an underscore (_) [ good example: This_is_myFile99.abc ]
Avoid other characters, as they may have special meaning to either Linux,
or to the application you are trying to run. Do not use “space” or other
special characters [bad example: This is my&File#^99.abc ]
Use of special characters in file names is possible if absolutely necessary,
but will lead to problems if done incorrectly.
“Extensions” (like .zip, .gz, .ps,…) are commonly used to denote the
type of file, but are typically not necessary to “open” a file. While working
in command line terminal you always explicitly specify a program which is
supposed to work with (open) this file.

Basic operations on files - summary
Listing
ls
ls –al
Copying
cp <path_to_source> <path_to_destination>
Moving and/or renaming
mv <path_to_source> <path_to_destination>
Deleting
rm <path_to_file>
Deleting whole directory with all its content
rm –Rf <path_to_directory>

Working with files
Copying a file
cp <source_file> <destination_file>
Examples:
cp sample_data.fa /workdir/bukowski/sample.fa
(copy file sample_data.fa from the current directory to /workdir/bukowski and give the copy
a name sample.fa; destination directory must exist)
cp /workdir/bukowski/my_script.sh .
(copy file myscript.sh from /workdir/bukowski to the current directory under the same file
name)
cp /home/bukowski/*.fastq /workdir/bukowski
(copy all files with file names ending with “.fastq” from /home/bukowski to
/workdir/bukowski; destination directory must exist)
cp –R /workdir/bukowski/tst5 /home/bukowski
(if tst5 is a directory, it will be copied with all its files and subdirectories to directory
/home/bukowski/tst5; if /home/bukowski/tst5 did not exist, it will be created).
Try man cp for all options to the cp command.

Working with files
Moving and renaming files
mv <source_file> <destination_file>
Examples:
mv my_file_one my_file_two
(change the name of the file my_file_one in the current directory)
mv my_file_one /workdir/bukowski
(move the file my_file_one from the current directory to /workdir/bukowski without changing
file name; the file will be removed from the current directory)
mv /workdir/bukowski/my_file_two ./my_file_three
(move the file my_file_two from /workdir/bukowski to the current directory changing the name
to my_file_three; the file will be removed from /workdir/bukowski)
Try man mv for all options to the mv command….

Working with files
Removing (deleting) files
rm <file_name>
Examples:
rm my_file_one
(delete file my_file_one from the current directory)
rm /workdir/bukowski/my_file_two
(delete file my_file_two from directory /workdir/bukowski)
rm –Rf ./tst5
(if tst5 is a subdirectory in the current directory, it will be removed with all its files and
directories)
Try man rm for all options to the rm command….

Since there are no strict naming conventions for various file types, it is not always
clear what kind of file we deal with. When in doubt, try the file command:
cd /programs/samtools-0.1.11
file samtools
samtools: ELF 64-bit LSB executable, AMD x86-64, version 1
(SYSV), for GNU/Linux 2.6.9, dynamically linked (uses shared
libs), for GNU/Linux 2.6.9, not stripped
Working with files
this is an executable
program….
… which uses “shared”
libraries”, i.e., may not
work if moved to
other machine where
these libraries are
absent
What kind of file is this?

Working with files
Looking for a file
find . –name PHG47_sorted.bam –print
(look for all files called PHG47_sorted.bam in the current directory and recursively
in all its subdirectories)
find /data1 –name “*PHG47*” –print
(look for all files having “PHG47” in the name, located in /data1 or recursively in its
subdirectories)
Try man find for many more options

Working with files: archiving and compression
To save disk space, we can compress large files if we do not intend to use them for a
while. Files downloaded from the web are typically compressed and sometimes need
to be uncompressed before processing can take place.
Common compressed formats and compression/decompression tools:
Format
(extension)
Tool Function
gz gzip Compress a single file
bz2 bzip2 Compress a single file
zip zip Make compressed archive (single file) of a directory
structure; same as on Windows
tar tar Make an archive (single file) of a directory structure
tgz (tar.gz) tar Make a compressed archive (single file) of a directory
structure
Getting help about compression tools:
• gzip -h, bzip2 --help, zip, tar --help
• man gzip, man bzip2, man zip, man tar (may be intimidating…)
Compression works best (i.e., saves most disk space) for text files (e.g., large
FASTQ files).

File compression: examples
• gzip (gz)
gzip my_file
(compresses file my_file, producing its compressed version, my_file.gz)
gzip –d my_file.gz
(decompress my_file.gz, producing its original version my_file)
• bzip2
bzip2 my_file
(compresses file my_file, producing its compressed version, my_file.bz2)
bunzip2 my_file.bz2
(decompress my_file.bz2, producing its original version my_file)

Archiving and compression: examples
• zip
zip my_file.zip my_file1 my_file2 my_file3
(create a compressed archive called my_files.zip, containing three files:
my_file1, my_file2, my_file3)
zip -r my_file.zip my_file1 my_dir
(if my_dir is a directory, create an archive my_file.zip containing the file
my_file1 and the directory my_dir with all its content)
zip –l my_file.zip
(list contents of the zip archive my_file.zip)
unzip my_files.zip
(decompress the archive into the constituent files and directories

Archiving with tar: examples
• tar
tar -cvf my_file.tar my_file1 my_file2 my_dir
(create a compressed archive called my_files.tar, containing files my_file1,
my_file2 and the directory my_dir with all its content)
tar –tvf my_file.tar
(list contents of the tar archive my_file.tar)
tar -xvf my_files.tar
(decompress the archive into the constituent files and directories)

Archiving and compression with tar: examples
• tgz (also, tar.gz – essentially a combo of “tar” and “gzip”)
tar -czvf my_file.tgz my_file1 my_file2 my_dir
(create a compressed archive called my_files.tgz, containing files my_file1,
my_file2 and the directory my_dir with all its content)
tar –tzvf my_file.tgz
(list contents of the tar archive my_file.tar)
tar -xzvf my_files.tgz
(decompress the archive into the constituent files and directories)

Exercise 2
1. If not yet present, create directory /workdir/your_id (replace your_id by your
real userID).
2. Copy the file examples.tgz located in /shared_data/Linux_workshop to
your temporary directory
3. Unpack the file examples.tgz and list the resulting files and directories
4. Check the type of each file (hint use the file command)
5. Create a new directory in /workdir/your_id, called sequences
6. Move the files flygenome.fa and short_reads.fastq to directory sequences
7. Create a new directory in /workdir/your_id, called shellscripts
8. Move all shell scripts (i.e., all files with names ending with “.sh”) from directory
scripts to the newly created directory shellscripts
9. Remove the directory scripts

Function tool
Text editing
vi, nano, gedit, …
Page through the file
less, more
Select lines from top, bottom,
or middle of file
head, tail
Select lines containing a string
grep
Select columns
cut
Append rows to a file
cat
Append columns to a file
paste
Sort a file over column(s)
sort
Count lines, words, characters
wc
Advanced, text-focused
scripting tools
awk, sed
General scripting tools (not
only in Linux)
perl, python
Working with text files
Linux features standard tools for text file processing:

Working with text files: editors
vim
• Available on all UNIX-like systems (Linux included), i.e., also on BioHPC workstations (type vi
or vi file_name)
• Free Windows implementation available (once you learn vi, you can just use one editor
everywhere)
• Runs locally on Linux machine (no network transfers)
• User interface rather peculiar (no nice buttons to click, need to remember quite a few
keyboard commands instead)
• Some love it, some hate it
nano
• Available on most Linux machines (our workstations included; type nano or nano file_name)
• Intuitive user interface. Keyboard commands-driven, but help always displayed on bottom bar
(unlike in vi).
• Runs locally on Linux machine (no network transfers during editing)
gedit
(installed on BioHPC workstations; just type gedit or gedit file_name to invoke)
• X-windows application – need to have X-manager running on client PC.
• May be slow on slow networks…
edit+
(http://www.editplus.com/)
• Commercial product
• Runs on a local machine (laptop) and transfers data to/from Linux workstation as needed
• Can browse Linux directories in a Windows-like file explorer
• May be slow on slow networks
• Some people swear by it

vi basics
Opening a file:
vi my_reads.fastq (open the file my_reads.fastq in the current directory for editing; if the file does not exist, it will be created)
Command mode: typing will issue commands to the editor (rather than change text itself)
Edit mode: typing will enter/change text in the document
<Esc> exit edit mode and enter command mode (this is the most important key – use it whenever you are lost)
The following commands will take you to edit mode:
i enter insert mode
r single replace
R multiple replace
a move one character right and enter insert mode
o start a new line under current line
O start a new line above the current line
The following commands operate in command mode (hit <Esc> before using them)
x delete one character at cursor position
dd delete the current line
G go to end of file
1G go to beginning of file
154G go to line 154
$ go to end of line
1 go to beginning of line
:q! exit without saving
:w save (but not exit)
:wq! save and exit
Arrow keys: move cursor around (in both modes)

Viewing text files
less README.txt
(display the content of the file README.txt in the current directory dividing the file into
pages; press SPACE bar to go to the next page or use up/down arrows)
head -100 my_reads.fastq
(display first 100 lines of the file my_reads.fastq in the current directory)
tail -100 my_reads.fastq
(display last 100 lines of the file my_reads.fastq in the current directory)
tail -1000 my_reads.fastq | less
(extract the last 1000 lines of the file my_reads.fastq and display them page by page)
head -1000 my_reads.fastq | tail -100
(display lines 901 through 1000 of the file my_reads.fastq). Note the “|” character: it pipes
the output from one command as input to another
cat my_reads.fastq cat my_reads.fastq >> reads_all
(print the file on screen) (append a file to the end of another)
wc my_reads.fastq
(display the number of lines, words, and characters in a file)
Working with text files
pipe
Output from first
command is “piped”
as input to the
second

Looking for a string in a text file:
grep “Error: lane” calc.log
(display all lines of the file calc.log in the current directory which contain the
string “Error: lane”)
Looking for a string in a group of text files:
grep “Error: lane” *.out
(display all files *.out in the current directory which contain the string “Error:
lane”; also display the lines containing that string)
Looking for lines which do not contain a string (ignore case)
grep –i –v “some STring” my_file
Look for lines containing “AAA” surrounded by TABs
grep –P “\tAAA\t” my_file
Working with text files

File1
a b c
g h i
d e f
j k l
File2
1 2 3
7 8 9
4 5 6
10 11 12
cut –f 1,3 File1
a c
g i
d f
j l
cut –f 1 –-complement File1
b c
h i
e f
k l
cut –f 1,3 File1 | paste File2 -
paste File1 File2
a b c
g h i
d e f
j k l
1 2 3
7 8 9
4 5 6
10 11 12
a c
g i
d f
j l
1 2 3
7 8 9
4 5 6
10 11 12
TAB-delimited files
“-” means that the second file
is to be read from STDIN
(passed on through pipe “|”)
cut/paste
examples

Let File contain a TAB- or space-delimited table
sort File
(sort File alphabetically over whole rows)
sort –k 2,2 –k 3,3n -k 5,5nr File > new_File
(sort File alphabetically over column 2, then numerically from small to large over
column 3, and then numerically from large to small over column 5; write result to
file new_File)
sort –u File
(sort File keeping only unique rows)
See man sort for lot’s more information
sort command

Files transferred to Linux machine from a Windows or Mac machine often have
line endings incompatible with Linux (depends on transfer software used and its
settings)
To fix line endings, use dos2unix command
dos2unix my_file mac2unix my_file
(the file my_file will have linux line endings)
dos2unix –n my_file my_file_converted
mac2unix –n my_file my_file_converted
(the file my_file_converted will have linux line endings, the original file
my_file will be kept)
Working with text files

NOTE: Text files prepared using advanced text processors (e.g., MS
Word) will cause problems when used as input to Linux applications.
If you have to use such files on Linux – always save as “Plain Text”
Working with text files

File permissions
data:
is a directory (“d” in the first column)
everybody can read and “cd” to it, but not write (“r-x” in the last three columns)
owner (as2847) and everybody in the group (ak735_0001) can also write to it
am2472:
is a file readable by everybody and writable by owner and his group
the file is not executable by anyone
rb565:
is a directory accessible only by owner
d r w x r w x r w x: User (owner), Group, Others
“d”: directory (or “-” if file); “r”: read permission; “w”: write permission; “x”: execute
permission (or permission to “cd” if it is a directory); “-”: no permission
Examples:

Changing file permissions
chmod command – some examples
chmod o-rwx /home/bukowski
make my home directory inaccessible to others (“o”)
chmod ug+x my_script.pl
make the file my_script.pl (in the current directory) executable by the owner (“u”) and the
members of the group (“g”).
chmod a-w /workdir/bukowski/my_file
deny all (“a”), including the owner, the right to write to the file my_file (in
/workdir/bukowski) – will prevent accidental deletion
Try man chmod for more information (may be somewhat intimidating!)
Want to make your files accessible to some (but not all) other users? Contact us!
we would need to make sure that you and those other users are in the
same user groups

Exercise 3
Among the files used in Exercise 2, there is a file ZmB73_5b_FGS.gff, describing gene
annotations in maize. The file is TAB-delimited (check this!) with following columns:
1. Chromosome
2. Source
3. Feature
4. Start position
5. End position
6. Score
7. Strand
8. Frame
9. Attribute
Tasks:
Look into the file to examine its structure (use more,cat or a text editor)
Create a new file, containing only gene features, with columns 9, 1, 4, and 5 (in this order)
Sort this new file over Chromosome and End position
Examine the sorted file in a text editor

Appendix

Exercise 1: solution
cd /workdir
pwd
mkdir my_id (replace my_id with your own userID)
ls –al
mkdir my_id/mytmp
ls –al
ls –al mytmp
rmdir mytmp

Exercise 2: solution
cd /workdir
mkdir bukowski
cd bukowski
cp /shared_data/Linux_workshop/examples.tgz .
tar –xzvf examples.tgz
ls –al
ls –al scripts
file * scripts/*
mkdir sequences
mv flygenome.fa short_reads.fastq sequences
mkdir shellscripts
mv scripts/*.sh shellscripts
ls –al shellscripts
rm –Rf scripts

Exercise 3: solution
Extract the genic lines to a temporary file
grep -P "\tgene\t" ZmB73_5b_FGS.gff > tmp_gene
Extract the last column to another temporary file
cut –f 9 tmp_gene > tmp_gene_attr
Get columns 1,4,5 and paste them to the right or column 9
cut -f 1,4,5 tmp_gene | paste tmp_gene_attr - > final_file
Sort the file obtained above
sort –k 2,2 –k 4,4n final_file > final_file_sorted
Remove the temporary files
rm tmp_gene tmp_gene_attr final_file
Examine the final sorted file
vi final_file_sorted
nano final_file_sorted
…
